SLK/R170: MAFS Cleaning DIY
 05-05-2006, 10:38 AM
#1
Member
Thread Starter
Join Date: Jul 2003
Location: Warwick, RI
Posts: 178
Likes: 0
Received 0 Likes
on
0 Posts
SLK230
MAFS Cleaning DIY
Mass Air Flow Sensor Cleaning
Tools you will need:
Flat blade screwdriver
CRC MAFS Cleaner
Electrical cleaner (Optional)
Some sort of rubber lubricant
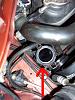
1) Locate the MAFS on the driver’s side of the vehicle.
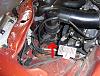
2) Unscrew the bottom hose clamp to loosen clamp, do not unscrew this all the way.
3) Wiggle and slide the rubber off the MAFS.
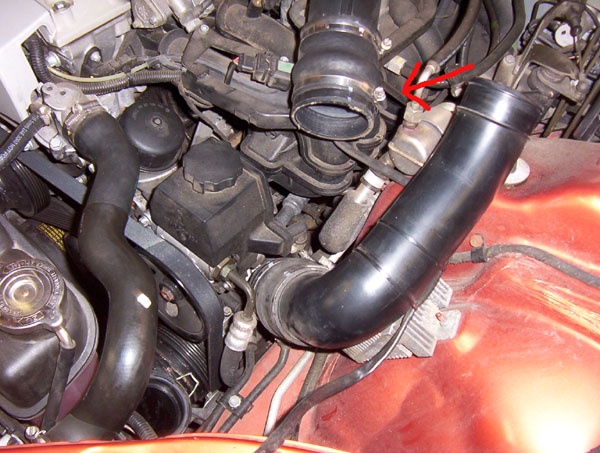
4) Loosen the hose clamp closest to the plastic pipe to remove this pipe for better access to the MAFS.
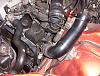
5) Unclamp the two retaining clamps at the bottom of the MAFS.
6) Now gently wiggle and slide the MAFS out of the bottom pipe.
7) Now you need to unplug the electrical connection by gently pulling it off the MAFS
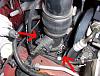
8) Place a rag under the MAFS and follow the directions on the can of CRC MAFS cleaner.
9) While this dries, remove the rubber gasket from the bottom pipe.
10) Lubricate this with the lubricant, a little bit of this stuff goes a long way.
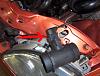
11) I then used the electrical cleaner to clean the connector for the wiring.
12) Installation is the reverse of the removal
Tools you will need:
Flat blade screwdriver
CRC MAFS Cleaner
Electrical cleaner (Optional)
Some sort of rubber lubricant
1) Locate the MAFS on the driver’s side of the vehicle.

2) Unscrew the bottom hose clamp to loosen clamp, do not unscrew this all the way.
3) Wiggle and slide the rubber off the MAFS.
4) Loosen the hose clamp closest to the plastic pipe to remove this pipe for better access to the MAFS.
5) Unclamp the two retaining clamps at the bottom of the MAFS.

6) Now gently wiggle and slide the MAFS out of the bottom pipe.
7) Now you need to unplug the electrical connection by gently pulling it off the MAFS

8) Place a rag under the MAFS and follow the directions on the can of CRC MAFS cleaner.
9) While this dries, remove the rubber gasket from the bottom pipe.

10) Lubricate this with the lubricant, a little bit of this stuff goes a long way.
11) I then used the electrical cleaner to clean the connector for the wiring.
12) Installation is the reverse of the removal
 05-05-2006, 10:41 AM
#2
Member
Thread Starter
Join Date: Jul 2003
Location: Warwick, RI
Posts: 178
Likes: 0
Received 0 Likes
on
0 Posts
SLK230
I was doing this and decided to just snap pictures as I did it.
Hope it helps.
Disclaimer: If you are not comfortable working on cars, do not attempt this. I am not liable for any thing that goes wrong or breaks.
Hope it helps.
Disclaimer: If you are not comfortable working on cars, do not attempt this. I am not liable for any thing that goes wrong or breaks.
 02-09-2012, 07:01 PM
#5
Newbie

Join Date: Jul 2009
Posts: 1
Likes: 0
Received 0 Likes
on
0 Posts
SLK 230
I am a newcomer to this site from Houston, TX and would like to thank you for the info -- I have just bought my 98 SLK from my Mother-in-Law and have inherited some of the problems that I have been reading about -- hydraulic leak in my trunk (fixed) but the top still does not work , Oil Separator, and the MAF (P0170) -- the mech. told me that my Hydraulic pump was bad and that it did not have enough power to raise the top, so the top is in the trunk -- also was told that the oil separator was bad as well as the maf -- so here I am trying to gather info so I can get this car back to where it should be --
I will post pics of the car soon
I will post pics of the car soon


