


Trunk Rattle Solution!
Thread Starter
Member
Joined: Feb 2006
Posts: 199
Likes: 0
From: Irvine, CA
2006 Brabus B55 (Brabus Modified SLK55)
Trunk Rattle Solution!
As many of you, I have experienced a rattle in the trunk area of my SLK. This rattling only occurs when the top is up and on uneven roads at slower speeds (5-45 mph). It sounds like the trunk top is loose. This rattle only eminated from the driver's side of the trunk area. The passenger side made no sound.
This rattle is not the same thing as the typical creaking you hear from the top's rubber seals when it is closed. It is an incredibly annoying rattling sound that was destroying my enjoyment of the car.
I took my SLK to the dealer to have this fixed. They claimed they fixed the noise. But, of course, they didn't. All they did was spray some silicone on the trunk's rubber seals. This did not fix the problem. I was very frustrated. I even considered selling the car because the noise was so bothersome to me. So, on my day off, I decided that I was going to figure out the problem once and for all. I began inspecting all of the moving parts in the trunk and on the top mechanism. Everything was tight and sealing perfectly. I checked the spare tire area and all of the bolts and connectors on the trunk lining. All perfect. I removed all of the tools, first aid kit, etc. a long time ago so it wasn't that. I checked all of the moving parts on the trunk partition but it was opening and closing perfectly without any abnormalities. This took me about an hour. I was stumped.
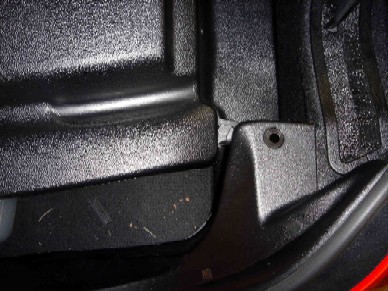
Just as I was about to give up I noticed something. The trunk rests on two pins at the inside upper right and left hand corners. These pins are long srews with flat round rubber heads (see pic below). They are secured in place by nuts on the top and bottom of the steel plate that they are secured to. I noticed that the pin on the driver's side was significantly (about 3 inches!) higher than the passenger side pin. This caused the trunk top to close unevenly creating a much larger gap where the trunk seals when closed. I closed the trunk and pressed down on it hard a few times. I found that the gap on the driver's side had some play in it while the gap on the passenger side did not. I concluded that the rattling was being caused by these pins being uneven. I was right!
I opened the top half way so that the nuts securing the pin were fully exposed. I used two sets of needle nosed pliers and loosened the nuts. I then lowered the driver's side pin so that it was exactly even with the passenger side pin. I lowered the driver's side pin because the passenger side wasn't making any noise. Once I tightened up the nuts again and closed the trunk, I found that there was no longer any disparity between the driver's side gap and the passenger side gap. Also, the play in the driver's side gap was gone.
I got in the car for a test drive and nervously pulled out of my driveway. The trunk would normally start to rattle as soon as I pulled onto the street. But this time, it was completely silent! My fix had worked perfectly. This feels like a new car. All of the rattling is gone.
See the pic below for where the pin is at. I hope that this solution works for those who are experiencing similar rattling from the trunk area.
Take care.
This rattle is not the same thing as the typical creaking you hear from the top's rubber seals when it is closed. It is an incredibly annoying rattling sound that was destroying my enjoyment of the car.
I took my SLK to the dealer to have this fixed. They claimed they fixed the noise. But, of course, they didn't. All they did was spray some silicone on the trunk's rubber seals. This did not fix the problem. I was very frustrated. I even considered selling the car because the noise was so bothersome to me. So, on my day off, I decided that I was going to figure out the problem once and for all. I began inspecting all of the moving parts in the trunk and on the top mechanism. Everything was tight and sealing perfectly. I checked the spare tire area and all of the bolts and connectors on the trunk lining. All perfect. I removed all of the tools, first aid kit, etc. a long time ago so it wasn't that. I checked all of the moving parts on the trunk partition but it was opening and closing perfectly without any abnormalities. This took me about an hour. I was stumped.
Just as I was about to give up I noticed something. The trunk rests on two pins at the inside upper right and left hand corners. These pins are long srews with flat round rubber heads (see pic below). They are secured in place by nuts on the top and bottom of the steel plate that they are secured to. I noticed that the pin on the driver's side was significantly (about 3 inches!) higher than the passenger side pin. This caused the trunk top to close unevenly creating a much larger gap where the trunk seals when closed. I closed the trunk and pressed down on it hard a few times. I found that the gap on the driver's side had some play in it while the gap on the passenger side did not. I concluded that the rattling was being caused by these pins being uneven. I was right!
I opened the top half way so that the nuts securing the pin were fully exposed. I used two sets of needle nosed pliers and loosened the nuts. I then lowered the driver's side pin so that it was exactly even with the passenger side pin. I lowered the driver's side pin because the passenger side wasn't making any noise. Once I tightened up the nuts again and closed the trunk, I found that there was no longer any disparity between the driver's side gap and the passenger side gap. Also, the play in the driver's side gap was gone.
I got in the car for a test drive and nervously pulled out of my driveway. The trunk would normally start to rattle as soon as I pulled onto the street. But this time, it was completely silent! My fix had worked perfectly. This feels like a new car. All of the rattling is gone.
See the pic below for where the pin is at. I hope that this solution works for those who are experiencing similar rattling from the trunk area.
Take care.
Super Member
Joined: Dec 2002
Posts: 761
Likes: 0
From: Lausanne, Switzerland
SLK 55 AMG
I haven't had this problem, and I checked mine too, but all's fine. I think maybe your car just just didn't have these bits tightly screwed in place.
You did get a free lube job for the rubber stuff tho from your dealer
But selling your car because it makes a squeaky noise at low speeds? You just need to drive it quicker
You did get a free lube job for the rubber stuff tho from your dealer
But selling your car because it makes a squeaky noise at low speeds? You just need to drive it quicker
Member
Joined: May 2006
Posts: 83
Likes: 0
From: Suffolk County, Long Island, NY
2010 SLK 350, 2010 Infiniti FX 35, 2007 SLK55 AMG, 1988 CRX SI
Thanks Beleriand! I'll keep this thread handy just in case I hear similar sounds coming from my trunk.
What I have found was some white grease and little plactic pieces on the trunks carpet about 2 weeks after I go my SLK in Oct. Just recently, the right plastic pin of the luggage cover popped out. Doesn't snap into position like the left side's. Even with that not being in place correctly, she's is still quiet. Thankfully.
What I have found was some white grease and little plactic pieces on the trunks carpet about 2 weeks after I go my SLK in Oct. Just recently, the right plastic pin of the luggage cover popped out. Doesn't snap into position like the left side's. Even with that not being in place correctly, she's is still quiet. Thankfully.

Junior Member


Joined: May 2003
Posts: 48
Likes: 9
From: Puerto Rico
2014 C63 Edition 507 / 2010 E550 Sedan / 2006 SLK 55 AMG
Thanks Beleriand! I have the same noise in my trunk. I have felt exactly like you and I have had this noise for quite a long time and is frustrating. At this moment my car is at the dealer for repair of such noise. I will send your post to my service advisor right now, since they are working on it today. Your post came at a very convenient time for me. Thanks again!
SLK 55 AMG 2006 (red)
SLK 55 AMG 2006 (red)

Member
Joined: Jun 2005
Posts: 142
Likes: 0
From: Rancho Palos Verdes, CA
Bel,
Thank you for this post. I did want to clarify one thing, though. Should I minimize the gap between the top of the screw (rubber top) and the nut? I'm only asking because in your picture, there's no gap whatsoever, but when I checked mine, I see about 1 cm for both sides. Please let me know what you think.
Thanks,
JB
Trending Topics
Thread Starter
Member
Joined: Feb 2006
Posts: 199
Likes: 0
From: Irvine, CA
2006 Brabus B55 (Brabus Modified SLK55)
Bel,
Thank you for this post. I did want to clarify one thing, though. Should I minimize the gap between the top of the screw (rubber top) and the nut? I'm only asking because in your picture, there's no gap whatsoever, but when I checked mine, I see about 1 cm for both sides. Please let me know what you think.
Thanks,
JB
Thank you for this post. I did want to clarify one thing, though. Should I minimize the gap between the top of the screw (rubber top) and the nut? I'm only asking because in your picture, there's no gap whatsoever, but when I checked mine, I see about 1 cm for both sides. Please let me know what you think.
Thanks,
JB
Thanks.
MB World Stories
The Best of Mercedes & AMG

7 Craziest Things AMG Gas Ever Built
Verdad Gallardo
New Electric Mercedes-AMG GT 4-Door Coupe Unveiled: 10 Things You Need to Know
Verdad Gallardo
6 Mercedes Models That Did NOT Age Well (But Are Somehow Still Cool)
Verdad Gallardo
Manual Mercedes? 6 Times Sindelfingen Let Drivers Have All The Fun
Verdad Gallardo
Mercedes SLR McLaren 722 S Is Extremely Rare Example Modified by McLaren
Verdad Gallardo
8 Classic Boxy Mercedes Designs That Have Aged Like Fine Wine
Verdad Gallardo
Flawlessly Restored Mercedes 190E Evo II Heads to Auction
Verdad Gallardo
Electric Mercedes C-Class Unveiled: 11 Things You Need to Know
Verdad Gallardo
Mercedes EQS Gets A Major Update: Everything You Need to Know
Verdad GallardoSenior Member
Joined: Jan 2005
Posts: 310
Likes: 0
From: Texas
2005 SLK55 AMG
On one of the other forums, someone went out and measured his and included a pic. Believe it was about 19 to 21 mm from the metal it's screwed into to the top of the rubber.
Bel's were way off and he's correct they SHOULD be similar on both sides. But not necessarly exactly the same (due to tolerances in other parts).
I'm not sure they should be as LOW as possible though.
What these do it give a pressure point for the "front" corners of the rear lid to rest on, along with the rubber seams all the way around.
Too high and the lid would not be fitting all the way down on the rubber seals (you could get water in).
Too low and they won't be doing anything, and the lid edges will be taking all the weight and "crushing" down on the rubber seals around the lip.
For most of these type of adjustments (you typically having them on the rear of the rear lid and also on the front of the front hood), you want them to just touch and then another half turn or so higher. Just enough so that the rubber does compress a little (so it won't vibrate up and down). Also when the lid is closed the lid edges should be at the same "level" as the surrounding body.
If you really want to play with it, then drop it down as low as it will go, then put a little bit of some marker (like baby powder, or a little crushed chalk) on top of the rubber. Shut the lid. Open it up and see if any was transferred to the lid, right where the rubber would touch.
If not, then raise it another turn, repeat, repeat, repeat. Until it just touchs (minimum powder transfer), then another half turn or so.
Member
Joined: Jun 2005
Posts: 142
Likes: 0
From: Rancho Palos Verdes, CA
On one of the other forums, someone went out and measured his and included a pic. Believe it was about 19 to 21 mm from the metal it's screwed into to the top of the rubber.
Bel's were way off and he's correct they SHOULD be similar on both sides. But not necessarly exactly the same (due to tolerances in other parts).
I'm not sure they should be as LOW as possible though.
What these do it give a pressure point for the "front" corners of the rear lid to rest on, along with the rubber seams all the way around.
Too high and the lid would not be fitting all the way down on the rubber seals (you could get water in).
Too low and they won't be doing anything, and the lid edges will be taking all the weight and "crushing" down on the rubber seals around the lip.
For most of these type of adjustments (you typically having them on the rear of the rear lid and also on the front of the front hood), you want them to just touch and then another half turn or so higher. Just enough so that the rubber does compress a little (so it won't vibrate up and down). Also when the lid is closed the lid edges should be at the same "level" as the surrounding body.
If you really want to play with it, then drop it down as low as it will go, then put a little bit of some marker (like baby powder, or a little crushed chalk) on top of the rubber. Shut the lid. Open it up and see if any was transferred to the lid, right where the rubber would touch.
If not, then raise it another turn, repeat, repeat, repeat. Until it just touchs (minimum powder transfer), then another half turn or so.
Bel's were way off and he's correct they SHOULD be similar on both sides. But not necessarly exactly the same (due to tolerances in other parts).
I'm not sure they should be as LOW as possible though.
What these do it give a pressure point for the "front" corners of the rear lid to rest on, along with the rubber seams all the way around.
Too high and the lid would not be fitting all the way down on the rubber seals (you could get water in).
Too low and they won't be doing anything, and the lid edges will be taking all the weight and "crushing" down on the rubber seals around the lip.
For most of these type of adjustments (you typically having them on the rear of the rear lid and also on the front of the front hood), you want them to just touch and then another half turn or so higher. Just enough so that the rubber does compress a little (so it won't vibrate up and down). Also when the lid is closed the lid edges should be at the same "level" as the surrounding body.
If you really want to play with it, then drop it down as low as it will go, then put a little bit of some marker (like baby powder, or a little crushed chalk) on top of the rubber. Shut the lid. Open it up and see if any was transferred to the lid, right where the rubber would touch.
If not, then raise it another turn, repeat, repeat, repeat. Until it just touchs (minimum powder transfer), then another half turn or so.
You sound like a very knowledgeable person, and I appreciate your post very much. I will definitely try what you recommended.
Without straying too much from the original post, do you have any experiences with rattles coming from the front dash area? I just can't pinpoint where the rattle is coming from, and it doesn't exist all the time, which is why the dealer can never find it. I hear it mostly on the freeways and it's been driving me crazy. I took the CD changer out thinking it was that, but it wasn't. I think it's coming from somewhere near the inner most vents for the large front windshield, but i just can't seem to get in there. Any ideas?
Thread Starter
Member
Joined: Feb 2006
Posts: 199
Likes: 0
From: Irvine, CA
2006 Brabus B55 (Brabus Modified SLK55)
I don't know if any of you guys read the Robb Report, but they recently came out with their car of the year edition. They ranked the Bentley Continental GTC (new convertiable Continental GT) as the best car of 2006. The MB SL65 was second and the Porsche 911 Turbo was third. All the Bugatti Veyron could muster was fourth on the list. I guess it gave them some mechanical trouble during their testing. Pretty interesting issue. I would recommend picking it up. It is the current issue so it should be on newstands rignt now. It would make an interesting topic for debate.
Take care.
Senior Member
Joined: Jan 2005
Posts: 310
Likes: 0
From: Texas
2005 SLK55 AMG
Blofin,
Without straying too much from the original post, do you have any experiences with rattles coming from the front dash area? I just can't pinpoint where the rattle is coming from, and it doesn't exist all the time, which is why the dealer can never find it. I hear it mostly on the freeways and it's been driving me crazy. I took the CD changer out thinking it was that, but it wasn't. I think it's coming from somewhere near the inner most vents for the large front windshield, but i just can't seem to get in there. Any ideas?
Without straying too much from the original post, do you have any experiences with rattles coming from the front dash area? I just can't pinpoint where the rattle is coming from, and it doesn't exist all the time, which is why the dealer can never find it. I hear it mostly on the freeways and it's been driving me crazy. I took the CD changer out thinking it was that, but it wasn't. I think it's coming from somewhere near the inner most vents for the large front windshield, but i just can't seem to get in there. Any ideas?
I don't have any rattles up there, so no specifics for you, sorry. Except do check with flashlight and mirror (and maybe a magnet) that something (pen, screw, peanut?) has not dropped into the vents up there.
First step on rattles, is to remove EVERYTHING that is not bolted down. You be suprised at the sheepish grins after someone complains and complains, and they left a bottle cap in the ashtray or a spare key in the glove box and never looked. Just assumed it was something wrong with the build of the car.
So take out ashtray. Take out everything in glovebox, console, upright console, trunk, etc.
Also check under the hood for any obvious cable or fastner that is loose.
Check (or even remove temporarily) windshield wipers (the whole wiper, not just the rubber blade).
Windows (and top up), radio and A/C off. Passenger to help (or he drives and you do the detective work).
Get to speed and surface that causes the noise.
Then start using your (good!) ear (and plugging your opposite ear) by leaning around different places to locate, use your finger to apply pressure in areas. See if sound changes or goes away. If you want to get a little fancy use a short tube to aim your ear (be careful, or use an empty toilet paper or paper towel roll, which is soft). For places that are hard to reach, use a new pencil (eraser end out) to push.
If all else fails, CRANK YOUR MUSIC TO 11 (apologies to Spinal Tap).
Junior Member
Joined: Nov 2005
Posts: 27
Likes: 0
From: Bloomfield Hills, Michigan
2006 SLK55 AMG; 2010 Dodge Challenger SRT8; and 2004 PT Cruiser GT Turbo (Modified)
Had a similar problem except the bumper was missing......
Last edited by matton; Feb 25, 2007 at 09:57 AM. Reason: Problem with attached picture???
Senior Member


Joined: Apr 2004
Posts: 464
Likes: 145
From: Toronto, Canada
2023 GLE63S - Edition 55
Blofin,
You sound like a very knowledgeable person, and I appreciate your post very much. I will definitely try what you recommended.
Without straying too much from the original post, do you have any experiences with rattles coming from the front dash area? I just can't pinpoint where the rattle is coming from, and it doesn't exist all the time, which is why the dealer can never find it. I hear it mostly on the freeways and it's been driving me crazy. I took the CD changer out thinking it was that, but it wasn't. I think it's coming from somewhere near the inner most vents for the large front windshield, but i just can't seem to get in there. Any ideas?


