Koni Shock Pics
#1
Senior Member
Thread Starter
Koni Shock Pics
I'm a new forum member (first post) and purchased my 2002 E55 seven weeks ago today. I learned a lot reading this forum before the purchase and even more since.
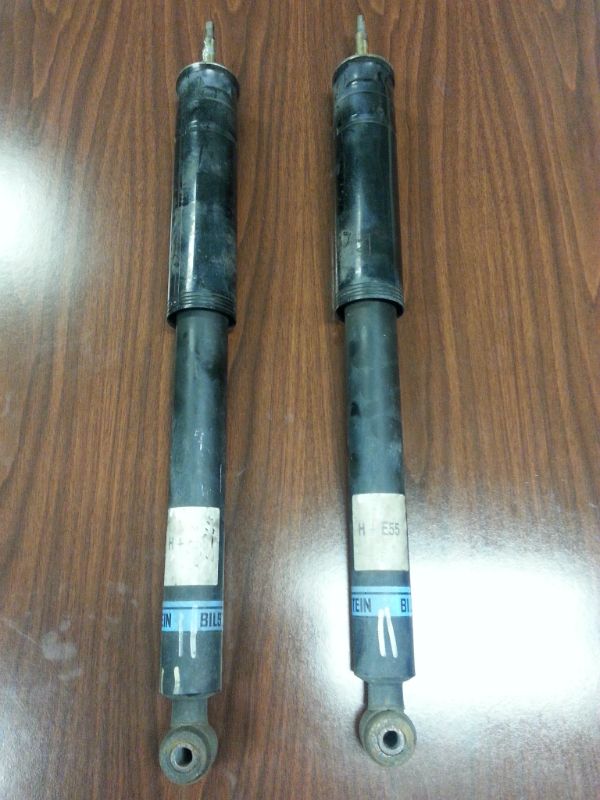
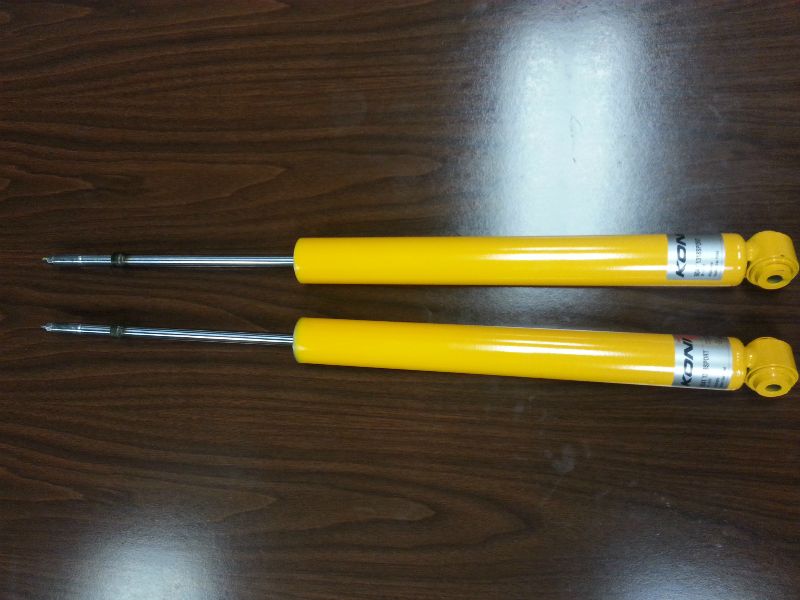
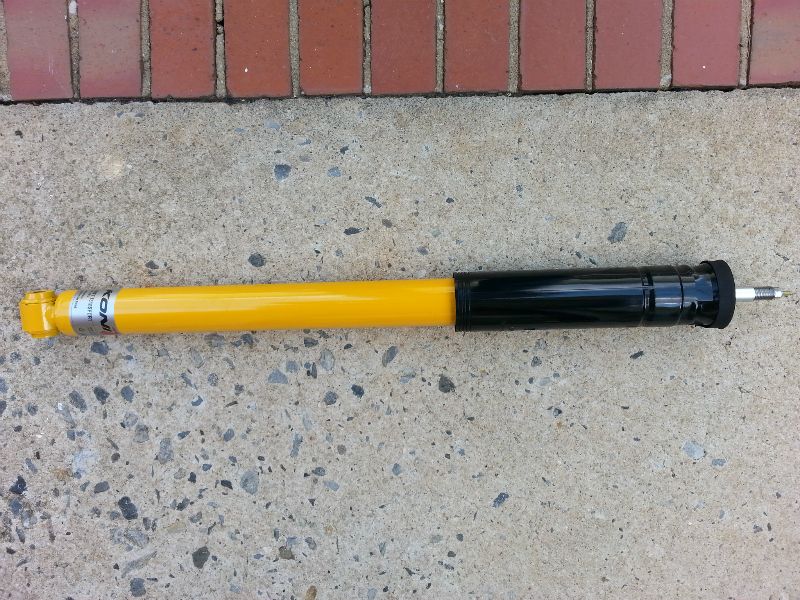
I installed a set of Koni Yellow Sport shocks today and thought I would add some pics for others to see in the future. I read a lot of threads on this forum and others that did a good job describing the process of removing and reusing the dust boots from the original shocks, but I didn't see any pictures. I'm visual and like to see pics so hopefully this will be helpful to others down the road.
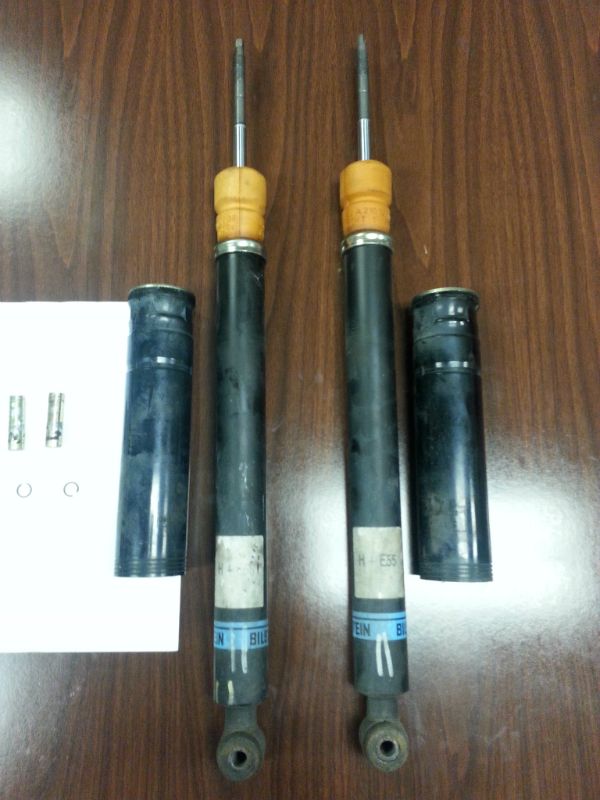
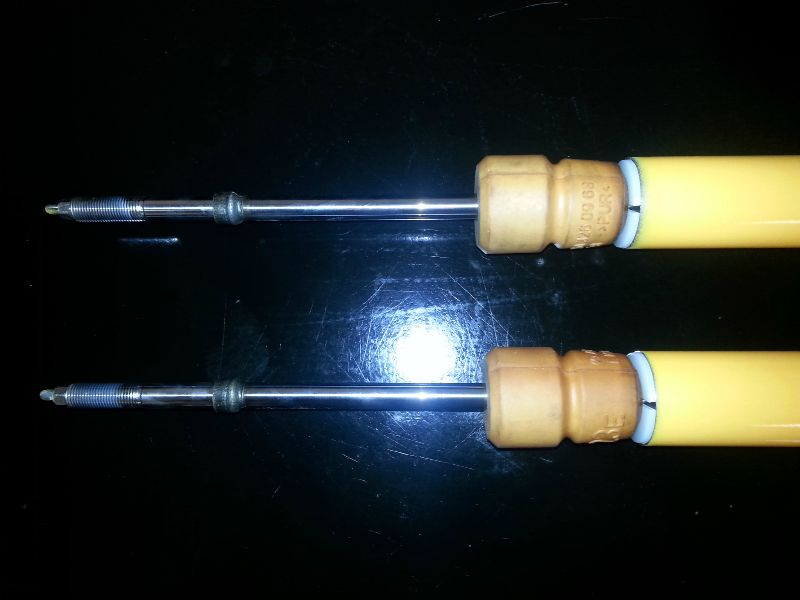
As others have said it is very easy to remove the dust boots from the original shocks. The new Koni shocks come without a dust boot cover so you need to remove and reuse the dust boots from the old shocks as well as the rubber "stop" that slides on the shock piston that is covered by the dust boot.
Many have recommended placing the old shocks in a vise to remove the dust boots. I used this method and it worked well. I placed the bottom shock eye in the vise with the
shock in a horizontal position. With a couple of tugs on the dust boot it popped off
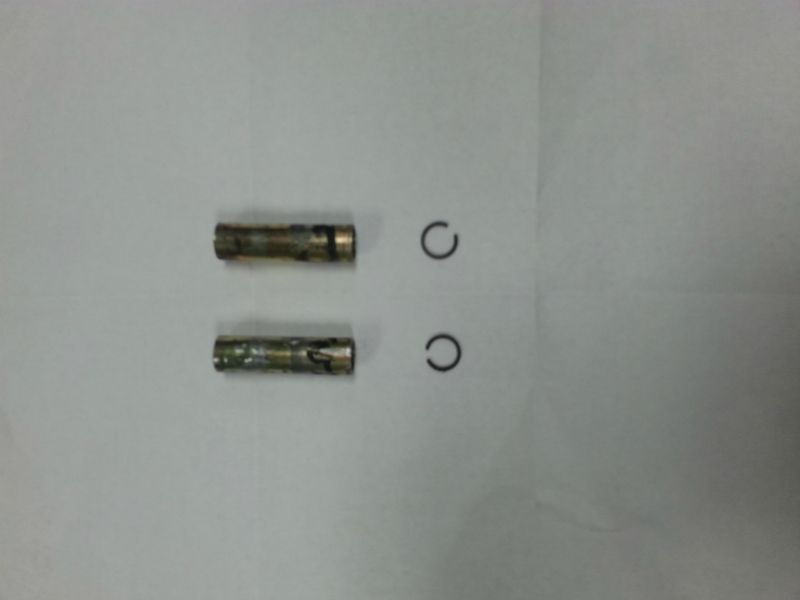
along with the brass-looking cylindrical sleeve that goes over the piston. When I slid the stop off of the piston the small c-clip seen in the pics came off as well. You won't reuse the c-clip or the brass-looking sleeve.
#2
Senior Member
Thread Starter
For the front shocks I didn't use the vise. I simply stuck a screw driver through the bottom shock eye, held the bottom of the shock on the ground in a vertical position with my feet, and pulled the dust boot straight up and off. Very easy to do. If you use this method place a microfiber towel or something on top of the dust boot to catch the brass-looking cylidrical sleeve. If not it is heading straight for your face.
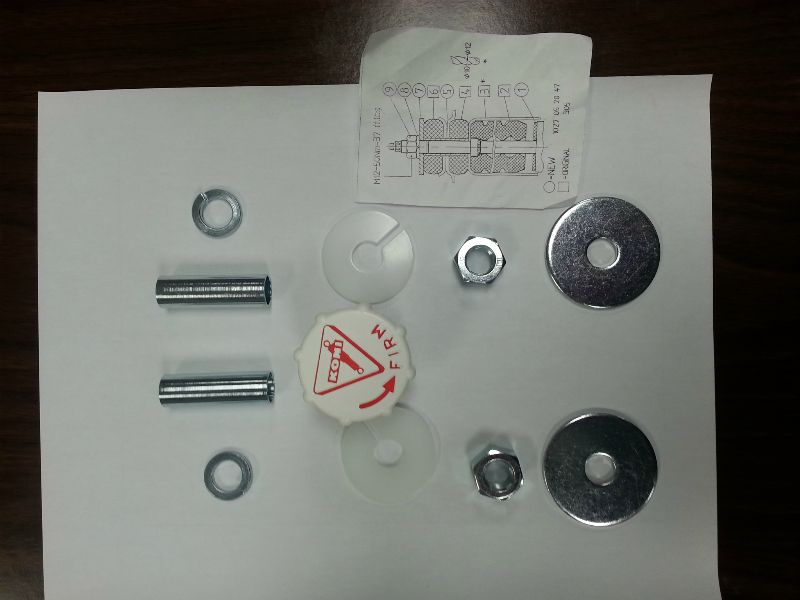
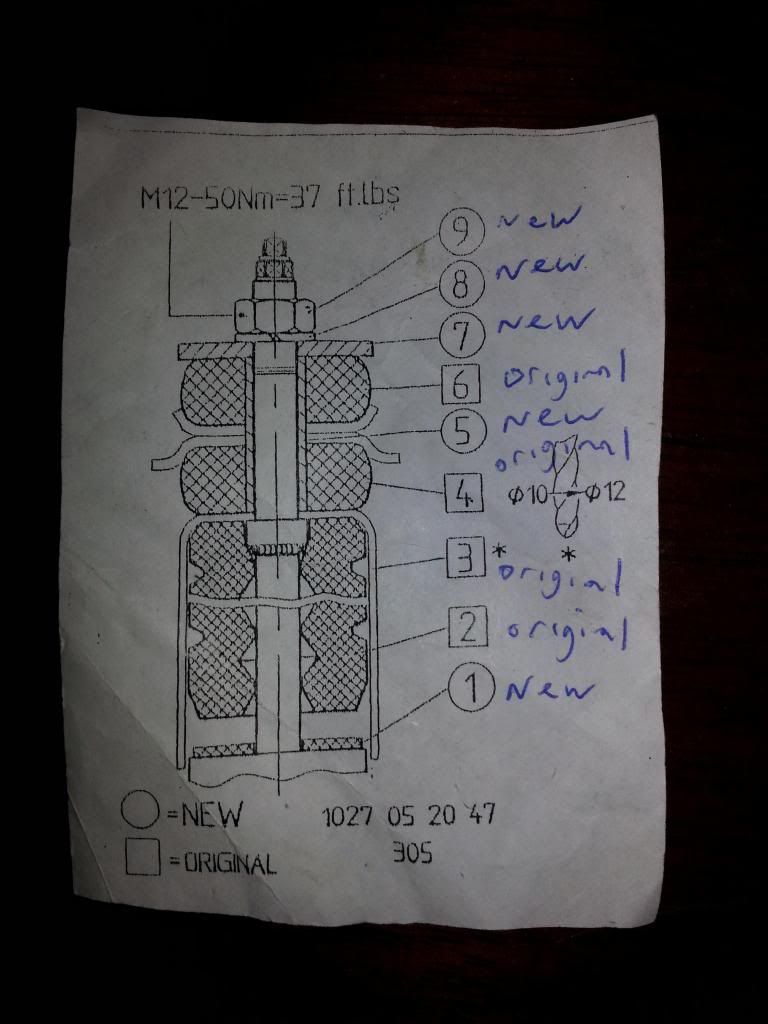
The legend that comes with the hardware with the new shocks lists what needs to be reused and what parts are provided to be used new. You will need to drill out the whole on the top of the dust boot in order to make room for the larger piston on the Koni shocks. The OE size is 10mm and needs to be increased to 12mm. A 31/64 drill bit works well or a step bit will do a nice job as well.
An articulating-head ratcheting wrench makes installing the front shocks a lot easier.
Overall this is a relatively easy and satisfying install. I hope this is helpful to others in the future.
ddb
#3
MBWorld Fanatic!
Welcome to MBworld!
I'm sure new comers & season vets will find this very useful. Any pics of the Beast with the new shocks? Did you stay with the factory stock pads?
Armani
I'm sure new comers & season vets will find this very useful. Any pics of the Beast with the new shocks? Did you stay with the factory stock pads?
Armani

#4
For the front shocks I didn't use the vise. I simply stuck a screw driver through the bottom shock eye, held the bottom of the shock on the ground in a vertical position with my feet, and pulled the dust boot straight up and off. Very easy to do. If you use this method place a microfiber towel or something on top of the dust boot to catch the brass-looking cylidrical sleeve. If not it is heading straight for your face.
The legend that comes with the hardware with the new shocks lists what needs to be reused and what parts are provided to be used new. You will need to drill out the whole on the top of the dust boot in order to make room for the larger piston on the Koni shocks. The OE size is 10mm and needs to be increased to 12mm. A 31/64 drill bit works well or a step bit will do a nice job as well.
An articulating-head ratcheting wrench makes installing the front shocks a lot easier.
Overall this is a relatively easy and satisfying install. I hope this is helpful to others in the future.
ddb
The legend that comes with the hardware with the new shocks lists what needs to be reused and what parts are provided to be used new. You will need to drill out the whole on the top of the dust boot in order to make room for the larger piston on the Koni shocks. The OE size is 10mm and needs to be increased to 12mm. A 31/64 drill bit works well or a step bit will do a nice job as well.
An articulating-head ratcheting wrench makes installing the front shocks a lot easier.
Overall this is a relatively easy and satisfying install. I hope this is helpful to others in the future.
ddb
I have recently bought Koni's for my C43, top adjustable version. I will hopefully get them soon.
The rubber stops you refer to are the yellow ones seen in the picture looking like cork screws?
The dust boots and rubber stops, can they be bought separately from stealership as a replacement part?
Are you finished with your car now?
What's your driving experiance?
Do you like these Koni's?
What's your firm set up front and rear?
Do you have H&R or other lowering springs?
Spring pad thickness front and rear?
Do you have any pictures of your car with Koni's?
Which parts needs to be re-used besides dust boots and rubber stops?
Do I have to remove other parts from my old worn shox?
Last edited by KJI3jflarryfe93; 06-23-2013 at 06:40 AM.
#5
Senior Member
Thread Starter
Armani - Thanks for the welcome!
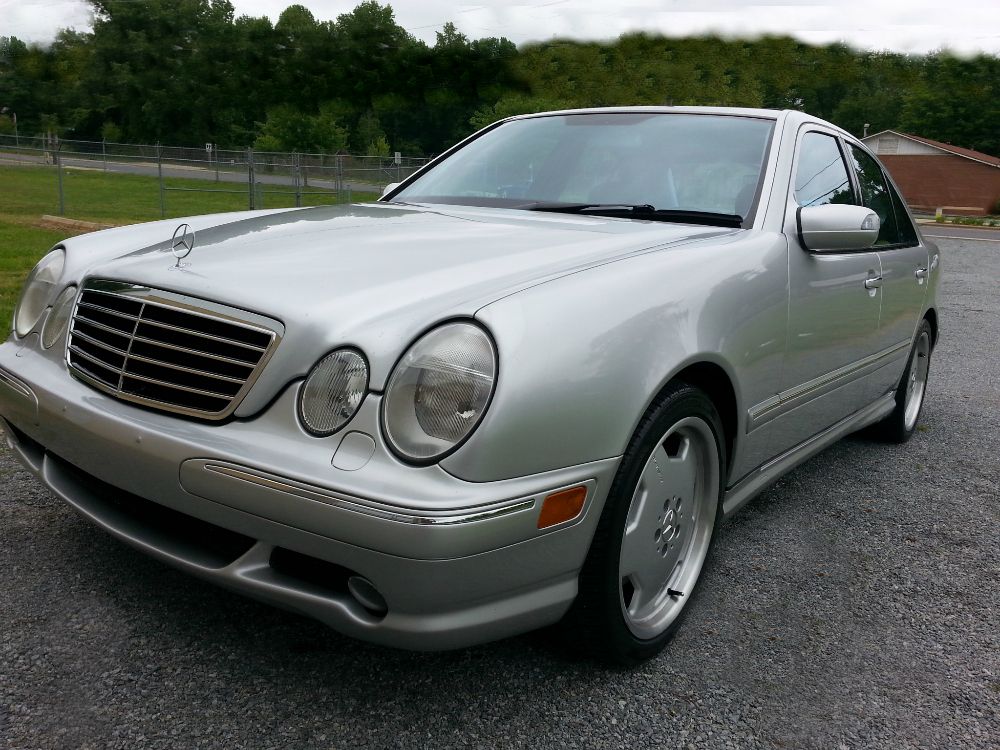
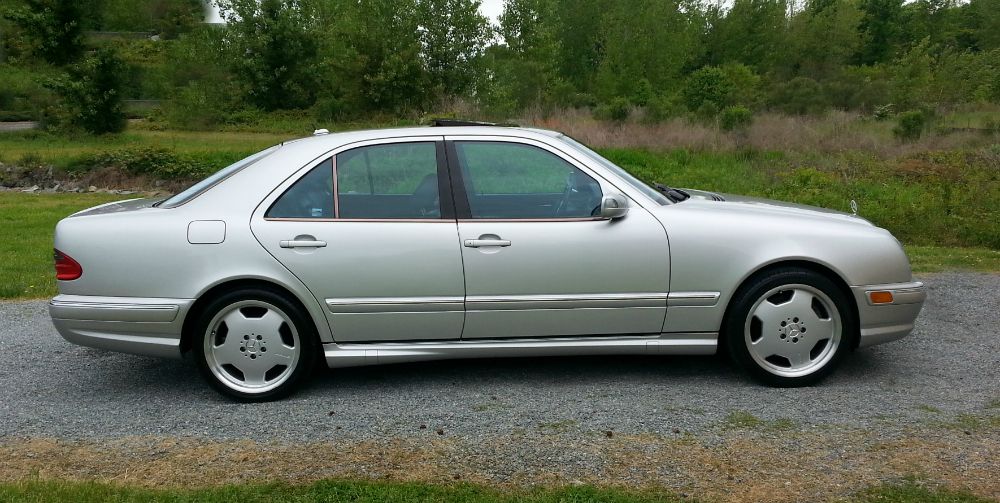
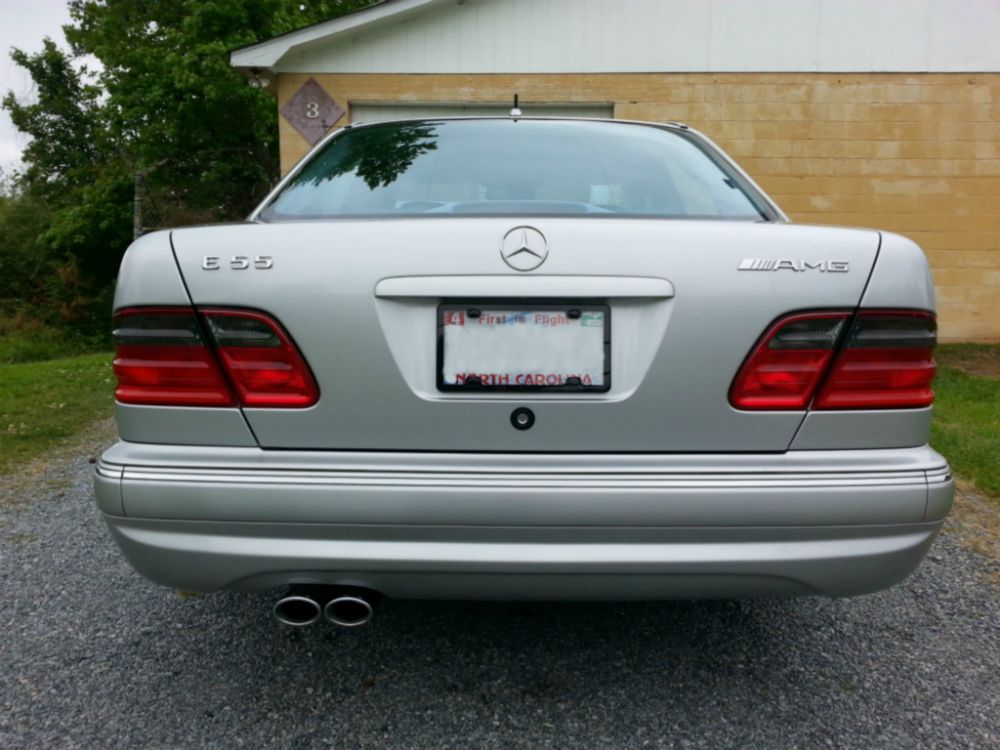
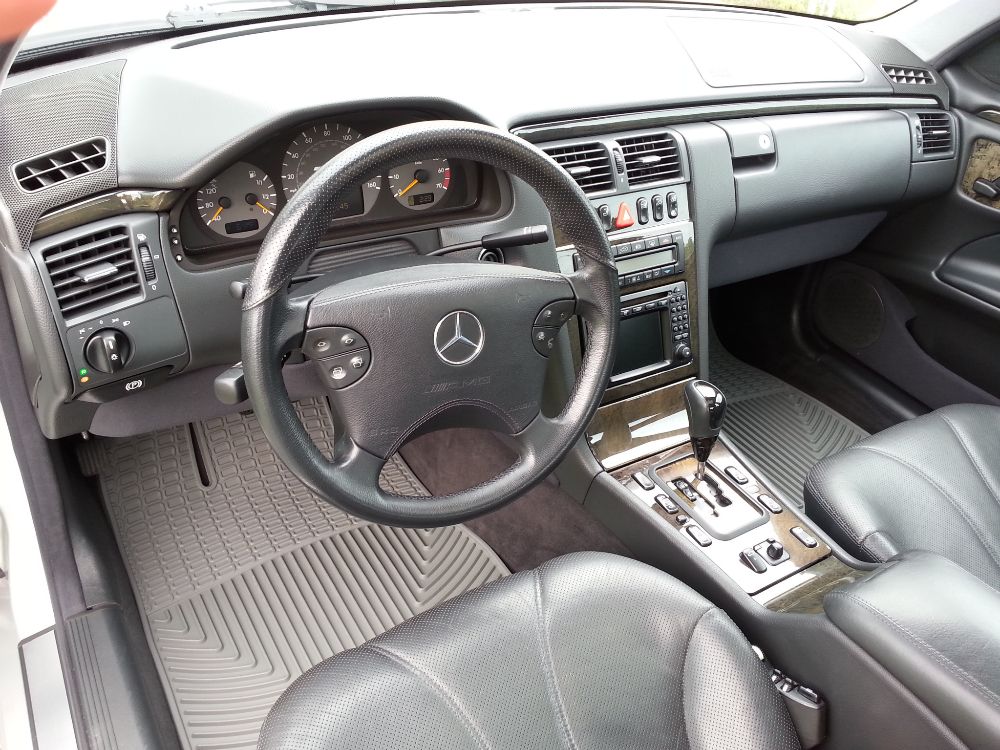
No pics of the car with the new shocks. Here are some pics of the car nonetheless from a month or so ago. Are you referring to spring pads? If so, I haven't changed them or the springs, yet. So the car looks the same with the new shocks. I have some other things I want to work on before changing the springs.
The car is the ubiquitous silver, which is nice. I would've loved to have found a white car, but no such luck. It was difficult enough finding this one. It is a 2002 with ~68,000 miles. It was well taken care of up until the last couple of years when the PO had some issues to deal with. So I'm rehabbing it trying to get it in top shape again.
I've fixed a few common problems: broken NAV antenna; missing visor mirror doors, had the instument cluster gear selector/temperature/clock problem fixed, and some dent wizzardry performed.
The front brake pads and rotors were new and the rears were old. So I replaced the rear rotors and put Akebonos on all four corners. It has newer tires on the rear with the fronts needing to be replaced. The wheels are curb-rashed too much for my liking so I'm going to replace them with some refurbished wheels and replace all four tires.
I've changed the oil and filter, all four cabin filters, and of course the shocks.
I've found a great Indie to tackle anything above my level of comfort. The car had an onging (many years before I purchased it) issue with AC freon leaking. I have the service records where the dealer (and other shops) couldn't identify the location of the leak. Somehow my shop had no issue finding it and replacing a relatively inexpensive hose. I took a risk buying this car with the AC issue but it turned out to be a good move.
I'm itching to do some of the mods in your signature. I think I will start with the resonator delete/x-pipe install. I'm looking forward to a bit more sound. I know from previous cars this can lead to a whole new exhaust system from headers to tips. It is all about having fun with these great cars!
ddb
#6
MBWorld Fanatic!
Clean!!!!! Great find my friend welcome again. Bunch of great guys on this forum with extreme knowledge. So ask away.
Also the headlights look extremely new. Was the car garaged? Looks like it. Either way she's bone stock and ready RUN!
I actually have to tackle the "missing visor mirror doors" mine broke off. How did you overcome this obstacle? Can you help me
Starting withe x-pipe, resonator delete is a great start and it will really open her up and it's not that expensive. You will also see a few gains on MPG as well.
Last question for you. What was the hose for the AC fix? Like to make a mental note-
Also the headlights look extremely new. Was the car garaged? Looks like it. Either way she's bone stock and ready RUN!
I actually have to tackle the "missing visor mirror doors" mine broke off. How did you overcome this obstacle? Can you help me

Starting withe x-pipe, resonator delete is a great start and it will really open her up and it's not that expensive. You will also see a few gains on MPG as well.
Last question for you. What was the hose for the AC fix? Like to make a mental note-
#7
Senior Member
Thread Starter
Hi and welcome to this great forum.
I have recently bought Koni's for my C43, top adjustable version. I will hopefully get them soon.
The rubber stops you refer to are the yellow ones seen in the picture looking like cork screws?
The dust boots and rubber stops, can they be bought separately from stealership as a replacement part?
Are you finished with your car now?
What's your driving experiance?
Do you like these Koni's?
What's your firm set up front and rear?
Do you have H&R or other lowering springs?
Spring pad thickness front and rear?
Do you have any pictures of your car with Koni's?
Which parts needs to be re-used besides dust boots and rubber stops?
Do I have to remove other parts from my old worn shox?
It sounds like you are getting the same shocks as mine - Koni Sport (Yellows) with the adjustment on top. They are probably different part numbers for your C43. My parts numbers are 8041 1317 for the front and 8041 1318 for the rear. I'm not sure how much will be the same, or even similar for your application. Where did you order your shocks? I will answer all of your questions assuming the install is the same.
Yes, the stops are the yellow-looking cork screw shaped pieces. You can see them on the OE Bilsteins once I removed the dust boots. They slide right off and onto the Koni shocks after you install the white plastic "washer" seen in some of the pics.
I don't know if the dust boots or the stops can be purchased from the dealer. I didn't try. I didn't ask Koni about purchasing new ones, but from what I've read on this and other forums they advise folks that ask to reuse the OE parts.
I'm just getting started with the car, and am excited about doing so! You can see some of my plans in the post above. I'm sure the OE shocks were worn, but they weren't total crap. It has only been a day since the install, so I haven't yet driven the car very much. I am going to drive it all this week so I will have a better assessment of the Koni shocks in a week or so. My initial thoughts are the car feels better controlled and quieter. Maybe it is my imagination but the steering feels more direct as well. I have both fronts and rears on the softest setting, and will leave them there for at least a couple of weeks. I will then probably adjust them to the firmest setting just to experience the greatest range of adjustability back to back. I will then back them off to where I like the ride the most. I'm still on the OE springs and pads.
In addition to the dust boots and stops you have to reuse the rubber piece that attached to the top of the dust boot that insulates the shock to the bottom of the shock mount threshold on the car. You also have to reuse the rubber piece that does the same on the upper side of shock mount threshold. You also have to reuse the bolt and nut that secures the bottom of the shock to the car. The shocks come with a new metal washer that goes on top of the upper rubber piece as well as a new lock washer and nut.
I hope this helps. Feel free to ask more questions if you need help.
ddb
Bigger pics...
Trending Topics
#8
Senior Member
Thread Starter
Clean!!!!! Great find my friend welcome again. Bunch of great guys on this forum with extreme knowledge. So ask away.
Also the headlights look extremely new. Was the car garaged? Looks like it. Either way she's bone stock and ready RUN!
I actually have to tackle the "missing visor mirror doors" mine broke off. How did you overcome this obstacle? Can you help me
Starting withe x-pipe, resonator delete is a great start and it will really open her up and it's not that expensive. You will also see a few gains on MPG as well.
Last question for you. What was the hose for the AC fix? Like to make a mental note-
Also the headlights look extremely new. Was the car garaged? Looks like it. Either way she's bone stock and ready RUN!
I actually have to tackle the "missing visor mirror doors" mine broke off. How did you overcome this obstacle? Can you help me

Starting withe x-pipe, resonator delete is a great start and it will really open her up and it's not that expensive. You will also see a few gains on MPG as well.
Last question for you. What was the hose for the AC fix? Like to make a mental note-
Thanks for the YouTube video! Great comparison. That mod is moving up my to do list quickly! Is this mod at all annoying at highway speeds? Any drone? Did you remove your secondary cats as well? Did you use the X-pipe that I see often on eBay?
The car was garaged except for the last couple of years. The headlights were in great shape when I bought the car. I did however polish on them with some rubbing compound and my cordless drill with a Mothers Powerball on it.
I do need to have a fender and the rear bumper center impact strip painted. Also the front bumper cover has a couple of cracks near the mesh area where the PO ran onto a parking curb. They are minor issues and I have a buddy that has a body shop so he will take care of them for me as soon as I'm ready to give up the car for a little while.
I read where you can buy replacement doors for the visor mirrors, but I couldn't find them. I did find some new, complete mirrors with doors installed on eBay, so I bought them. The mirrors are just pressed in so they pry out easily and the new ones just drop in. When I installed them the mirror lights started working perfectly. My visors didn't move very freely so I removed them from the car to install the mirrors and took the time to lube them. Now they work like new. Here is a link to the vendor where I bought the replacement mirrors.
http://stores.ebay.com/murad-motors/..._sid=816633861
After I purchased them I remember seeing somewhere online the same mirrors a little cheaper, so you may want to shop around.
The AC hose was a receiver drier to expansion valve hose. They charged me $67 for the part. The part number is: 210-830-05-15.
ddb
#9
MBWorld Fanatic!
No drone at all and yes I also had the secondary cats removed. THE best thing about this MOD is that it only gets loud when you want it to get loud. If you get on it... the car behind you will hear it and you will definitely make a statement  besides that it pretty not loud at all.
Headlights look really good when your done with a few MODS go with LED on the outside of the car license plate, driving lights. Change the fog lamps to a whiter look and if your up to it retro fit HID. Best MOD to date for sure. I love driving at night. Oh and you can also change the cabin lights (yellow) to LED brighter white. Just a few little things.....
You could also paint the black mesh silver. In link below-
https://mbworld.org/forums/w210-amg/...t-its-way.html
 besides that it pretty not loud at all.
Headlights look really good when your done with a few MODS go with LED on the outside of the car license plate, driving lights. Change the fog lamps to a whiter look and if your up to it retro fit HID. Best MOD to date for sure.
 I love driving at night. Oh and you can also change the cabin lights (yellow) to LED brighter white. Just a few little things.....
You could also paint the black mesh silver. In link below-
https://mbworld.org/forums/w210-amg/...t-its-way.html
Armani,
Thanks for the YouTube video! Great comparison. That mod is moving up my to do list quickly! Is this mod at all annoying at highway speeds? Any drone? Did you remove your secondary cats as well? Did you use the X-pipe that I see often on eBay?
The car was garaged except for the last couple of years. The headlights were in great shape when I bought the car. I did however polish on them with some rubbing compound and my cordless drill with a Mothers Powerball on it.
I do need to have a fender and the rear bumper center impact strip painted. Also the front bumper cover has a couple of cracks near the mesh area where the PO ran onto a parking curb. They are minor issues and I have a buddy that has a body shop so he will take care of them for me as soon as I'm ready to give up the car for a little while.
I read where you can buy replacement doors for the visor mirrors, but I couldn't find them. I did find some new, complete mirrors with doors installed on eBay, so I bought them. The mirrors are just pressed in so they pry out easily and the new ones just drop in. When I installed them the mirror lights started working perfectly. My visors didn't move very freely so I removed them from the car to install the mirrors and took the time to lube them. Now they work like new. Here is a link to the vendor where I bought the replacement mirrors.
http://stores.ebay.com/murad-motors/..._sid=816633861
After I purchased them I remember seeing somewhere online the same mirrors a little cheaper, so you may want to shop around.
The AC hose was a receiver drier to expansion valve hose. They charged me $67 for the part. The part number is: 210-830-05-15.
ddb
#10
hi ddb
thanx for your info
my koni's are
K-8041-1315SPORT
K-8041-1316SPORT
I bought them from a german shop.
Probably will receive them by Wednesday?
Those parts that needs to be scavanged from the old shox are they mentioned in Koni instructions, what needs to be removed from the old shox?
I will pair these Koni's with Vogtland lowering springs and probably thicker pads to avoid rub issues?
This will be an trial n error with spring pads, which ones to use?
I'm planning for 1 - 1½ finger wheel gap
This is how she sits now.
Last edited by KJI3jflarryfe93; 06-25-2013 at 01:12 PM.
#11
Senior Member
Thread Starter
Great looking car! It will look fantastic with your new springs.
Yes, the parts needed from the old shocks are mentioned. They aren't exactly instructions, but I think a legend is a better description.
Everything in the first pic comes in a sealed plastic bag. Included is the small piece of paper that you see in my second pic. It lists what you use new (circle around the number), and what original parts are reused (square around the number).
1) Refers to the white, plastic "washer" seen in the pic that goes around the piston and sits on the shock; 2) Is the corkscrew shaped piece that is reused from the old shock; 3) Is the original dust boot that is reused. Note the asterisk that denotes the hole diameter has to be increased from 10mm to 12mm (since your shocks are a different part number this may be different for your application); 4) Refers to the original "donut" that sits on the top of the shock and insulates it against the bottom of the shock mount on the car; 5) Is the new cylindrical sleeve that goes over the piston and into the donut (part # 4); 6) Is the original upper donut that sits in the upper shock mount where the shock piston enters inside the car; 7) Is the new metal washer that sits on the donut (part # 6); 8) Is the new lock washer that sits on top of the washer (part # 7); and 9) Refers to the nut that locks the whole upper assembly.
I think you are ready for the install! Best of luck and let us know how it goes.
ddb

Last edited by ddb; 06-24-2013 at 07:28 PM. Reason: forgot pics
#12
thanks alot for your help.
UPS screwed up the delivery, I now have to wait till tomorrow Wednesday hopefully getting my shox?
please let us know when you have tried your different settings.
we all need to know what settings are the best for daily sporty driving.
thanks
UPS screwed up the delivery, I now have to wait till tomorrow Wednesday hopefully getting my shox?
please let us know when you have tried your different settings.
we all need to know what settings are the best for daily sporty driving.
thanks
#15
so I receive my Koni's today, can't be more than happy!
although I'm very upset with UPS crappy courier company!
they are useless!
had all my necessary addressinfo on shipping label and courier failed twice to deliver to my address, received my stuff on 3rd day!
UPS = 100% crap!
I received freshly made shox from Koni, they were manufactured in March 2013 - week 11 and week 13.
I hope Koni have solved previous issues with twintube shox if there were any?
checked with stealership, they have dustboots as a spare part in germany, ordered 2 new boots for front shocks.
cost approx $5 dollars each.
turns out there are NO dust boots for rear shox?
why are there NO dust boots for rear shox?
It's time for rock n rolla with new suspension on my car.
on stock AMG euro springs and shox which are 65.000 miles worn, my car had lots of bodyroll when braking hard.
I hope I will reduce that nasty floatation with my new shox and Vogtland suspension
although I'm very upset with UPS crappy courier company!

they are useless!
had all my necessary addressinfo on shipping label and courier failed twice to deliver to my address, received my stuff on 3rd day!

UPS = 100% crap!

I received freshly made shox from Koni, they were manufactured in March 2013 - week 11 and week 13.
I hope Koni have solved previous issues with twintube shox if there were any?
checked with stealership, they have dustboots as a spare part in germany, ordered 2 new boots for front shocks.
cost approx $5 dollars each.
turns out there are NO dust boots for rear shox?
why are there NO dust boots for rear shox?
It's time for rock n rolla with new suspension on my car.
on stock AMG euro springs and shox which are 65.000 miles worn, my car had lots of bodyroll when braking hard.
I hope I will reduce that nasty floatation with my new shox and Vogtland suspension
Last edited by KJI3jflarryfe93; 06-26-2013 at 07:59 AM.
#17
Senior Member
Thread Starter
checked with stealership, they have dustboots as a spare part in germany, ordered 2 new boots for front shocks.
cost approx $5 dollars each.
turns out there are NO dust boots for rear shox?
why are there NO dust boots for rear shox?
It's time for rock n rolla with new suspension on my car.
on stock AMG euro springs and shox which are 65.000 miles worn, my car had lots of bodyroll when braking hard.
I hope I will reduce that nasty floatation with my new shox and Vogtland suspension
Looking forward to hearing how the shocks and springs transform your car. It will be interesting to find out what shock settings you like (although it won't translate to my different model car that is still on OE springs). I'm still running on the softest setting, and enjoying it. I will crank them up in coming weeks for comparison.
Im curious about what type of dust boots you will receive from your dealer. OE Bilstein boots? Is so, you will probably have to enlarge the hole for the larger diameter Koni piston. Are you getting new corkscrew shaped stops that go under the dust boot? If not you will have to remove your existing dust boots to get them out.
Let us know how it works out.
ddb
#19
Glad you have them!
Looking forward to hearing how the shocks and springs transform your car. It will be interesting to find out what shock settings you like (although it won't translate to my different model car that is still on OE springs). I'm still running on the softest setting, and enjoying it. I will crank them up in coming weeks for comparison.
Im curious about what type of dust boots you will receive from your dealer. OE Bilstein boots? Is so, you will probably have to enlarge the hole for the larger diameter Koni piston. Are you getting new corkscrew shaped stops that go under the dust boot? If not you will have to remove your existing dust boots to get them out.
Let us know how it works out.
ddb
Hey buddy.
I'll have the dustboots by the next week, it will take 4 days for my parts to arrive from das muthaland, yes I also ordered new corkscrew bumpstops from stealership for my Koni's.
I figured that I better have new stuff all around.
In these attached pictures which are your parts, do I need to re-use these parts from my old shox, there are similar parts included in Koni parts plastic bag?
Tube and small shims?
Are both pictures the same parts, meaning the short tube?
I will have to make an appointment with my haus-guru mechanic to get my stuff installed.
Wonder if I should buy adjustable toe in arms as I also have adjustable camber arms installed already?
I have bought full suspension rod kit from Lemförder for rear axle, new fresh rods and bushings, I think it would be great having them all installed to get great synergy when driving.
Thanks
Last edited by KJI3jflarryfe93; 07-18-2013 at 06:05 AM.
#20
Senior Member
Thread Starter
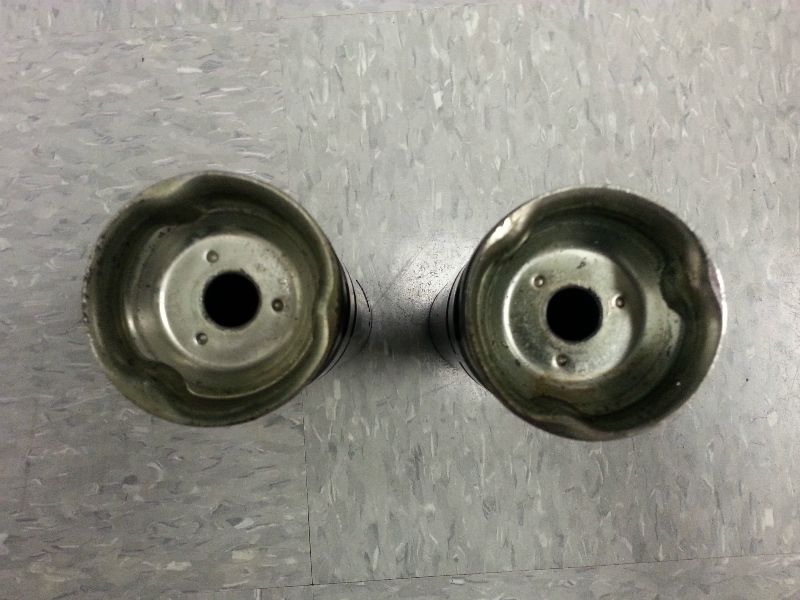
The other pic is a top view of the dust boots. I was attempting to show the holes that need to be enlarged. Of course you won't need to reuse these since you are getting new dust boots. I believe you will have to enlarge the holes on your new dust boots to accommodate the larger diameter Koni pistons.
#21
No, you won't need to reuse those parts. The parts on the left are the sleeves and c-clips from the old shocks. They won't fit on the Koni shocks because the piston has a larger diameter.
The other pic is a top view of the dust boots. I was attempting to show the holes that need to be enlarged. Of course you won't need to reuse these since you are getting new dust boots. I believe you will have to enlarge the holes on your new dust boots to accommodate the larger diameter Koni pistons.
The other pic is a top view of the dust boots. I was attempting to show the holes that need to be enlarged. Of course you won't need to reuse these since you are getting new dust boots. I believe you will have to enlarge the holes on your new dust boots to accommodate the larger diameter Koni pistons.

I will leave my old shox as they are for future use if I get into trouble with my Koni's?
it's great stealership could offer new parts like dustboots and bumpstops, however part no 2 - 4 - 6 in the instruction paper?
Part reffered as Donut is it the same as rubberstop?
There should be 2 rubberstops on each shock if I'm right?
I think I ordered 8 rubberstops from stealership if I'm not mistakin'?
Last edited by KJI3jflarryfe93; 06-27-2013 at 10:09 AM.


