


Self Oil Change ??? Need Help !!!

Thread Starter
Almost a Member!
Joined: Nov 2003
Posts: 32
Likes: 0
From: Rowland Heights, CA
2004 E55
Self Oil Change ??? Need Help !!!
Hi there,
I'm planning to do a self oil change on my E55 and an 2005 C 230. Does anyone know how to reset the service reminder ? I try the owner's manual, it doesn't tell me. Also, approximately how many quarts of oil will I need and will I need any special tools to change the oil filter or taking the drain plug out ?
thanks
MBWorld Fanatic!


Joined: Jul 2005
Posts: 3,176
Likes: 19
From: London, UK
No longer stock '06 E55, A3 3.2 Quattro, GLE 400d, R107 280SL, Golf Polo
Gee thats is a job I never tried - or even attempted! I never had anywhere to put the used oil and it is messy as hell if u dont have the right drip tray etc ...
As for fluid capacity E55 takes ... dont know sorry !
As for fluid capacity E55 takes ... dont know sorry !

Super Member
Joined: Jul 2005
Posts: 577
Likes: 0
From: South Florida
2007 S65, 2005 Nissan Armada
You can find the answer to almost anything on this board it is awesome!
https://mbworld.org/forums/w211-amg/155036-anyone-know-how-reset-service-indicator.html
https://mbworld.org/forums/w211-amg/155036-anyone-know-how-reset-service-indicator.html

Member
Joined: Dec 2004
Posts: 119
Likes: 3
2023 GLE 53
Have always done my own oil. The easiest and cleanest way is to purchase an oil extraction pump/container. Usually easiest to get from Harbor Freight (online) or a local marine shop. I use an "oil boy" by Tempo, Model # OB-5 Part # 170200. About $50 from a marine shop.
Just remove the oil dipstick tube plug, insert the extractor tube, and pump. It will require emptying half way as the extrator will not hold the entire 8.5 quarts in the crankcase. I have measured by the way, and you can extract just about every last drop of the old oil. Buy the new style fleece filter from the stealership or from e-bay, a oil filter cover remover (I use a Hazet #2169) and you're good to go. Use the mercedesshop.com do it yourself section to get instruction on filters etc if you're unclear on procedures.
If you want to drain the oil from the crankcase from below, then it's more work, using car ramps, removal of undercar shields, draining 2 crankcase plugs, replacing the plug washers etc. Definately more work and potentially messy.
Takes me about 15-25 minutes using the extractor pump...and no drips, no runs, no errors.
Here's resetting instructions as well, from the MB training modules (it's really easy to just walk thru these steps):
Hope this helps.
219 Mod 9-1 FSS PLUS Introduction (WFF) 08-16-02
1
Objective:
Vehicle and tools required:
Instructions:
At the conclusion of this module, you will be able to:
� Access the FSS PLUS workshop information display screens.
� W211
Required material:
1. Follow the instructions and answer the questions.
2. Ask your instructor if assistance is needed.
3. Stop at instructor check points for sign-off.
Name ______________________
Skill Module Number: 9-1 X
Subject: FSS PLUS Introduction
219 Mod 9-1 FSS PLUS Introduction (WFF) 08-16-02
2
1. Insert the key and turn to position 2.
2. Using the button on the multi-function steering wheel, scroll to the ambient
temperature screen. Now use the button to scroll to the next service due
display screen (wrench symbol).
3. What is the next service due for this vehicle? ___________________________
4. Press and hold the �reset� button for 5 seconds until the display changes.
5. What is the title of the display that now appears? ________________________
6. Use the button on the multi-function steering wheel to scroll down and
highlight the �ITEMS� option. Select this option using the button.
7. What services are listed?
NOTE: You may have to scroll down to view additional items if a down arrow
appears in the lower left portion of the display.
____________________________ __________________________
___________________________ __________________________
___________________________ __________________________
___________________________ __________________________
NOTE: These service items are listed in the W211 service sheet.
8. Press the button to return to the �SERVICE MENU�.
9. Use the button to scroll down and highlight the �CONFIRMATION� option.
Select this option using the button.
219 Mod 9-1 FSS PLUS Introduction (WFF) 08-16-02
3
10. What are the 3 options under the �CONFIRMATION� menu?
A. __________________________________________________ ________
B. __________________________________________________ ________
C. __________________________________________________ ________
11. Make sure the �CONFIRM� option is highlighted and press the button.
12. What is now displayed on the screen?
__________________________________________________ ______________
NOTE: The �Standard oil� option is for the US market. This is the selection you
should select when servicing the vehicle.
13. Make sure the �Standard oil� option is highlighted and press the button.
14. What is now displayed on the screen?
__________________________________________________ ______________
NOTE: This display indicates that all of the service items have been completed.
15. Press the button to return to the service menu.
16. Highlight and select �CONFIRMATION� using the button.
17. Using the button, scroll down and highlight �CANCEL SING. ITEMS�.
Select it using the button.
18. What is the last service item that appears in the display? __________________
19. Using the button, scroll down and highlight the service item indicated
above and select it using the button.
20. What is displayed in the instrument cluster? ____________________________
NOTE: You have just cancelled a single item from the list. You can cancel
more than one item using the procedure you just performed.
219 Mod 9-1 FSS PLUS Introduction (WFF) 08-16-02
4
21. Press the button to return to the �CONFIRMATION� menu.
22. Using the button, scroll up and highlight the �CANCEL CONFIRM� option
and select it using the button.
23. What is displayed in the instrument cluster? __________________________
NOTE: You�ve just cancelled ALL of the service items that you confirmed
earlier.
24. Press the button repeatedly to exit FSS PLUS.
25. Turn the key off and remove it from the ignition.
If you have noticed any parts that need to be replaced on this vehicle, please inform
your instructor now.
Instructor check point ______________
Trending Topics
MB World Stories
The Best of Mercedes & AMG

7 Craziest Things AMG Gas Ever Built
Verdad Gallardo
New Electric Mercedes-AMG GT 4-Door Coupe Unveiled: 10 Things You Need to Know
Verdad Gallardo
6 Mercedes Models That Did NOT Age Well (But Are Somehow Still Cool)
Verdad Gallardo
Manual Mercedes? 6 Times Sindelfingen Let Drivers Have All The Fun
Verdad Gallardo
Mercedes SLR McLaren 722 S Is Extremely Rare Example Modified by McLaren
Verdad Gallardo
8 Classic Boxy Mercedes Designs That Have Aged Like Fine Wine
Verdad Gallardo
Flawlessly Restored Mercedes 190E Evo II Heads to Auction
Verdad Gallardo
Electric Mercedes C-Class Unveiled: 11 Things You Need to Know
Verdad Gallardo
Mercedes EQS Gets A Major Update: Everything You Need to Know
Verdad GallardoMBWorld Fanatic!
Joined: Dec 2007
Posts: 2,052
Likes: 2
From: PHX/PIE/OMA ---> Yes, all three
E55 then E63, now back to an E55
My FSS was much simpler....
Went into computer menu, then FSS menu, down to last option of "confirm" or "confirmation" - accessed that, top option (full service,) hit PLUS and done deal
Reset to 10k more miles
That appears to be all, why so many other steps?
Went into computer menu, then FSS menu, down to last option of "confirm" or "confirmation" - accessed that, top option (full service,) hit PLUS and done deal
Reset to 10k more miles
That appears to be all, why so many other steps?

MBWorld Fanatic!
Joined: Jan 2007
Posts: 1,359
Likes: 6
ML550
Not true at all. You can get much of the oil using a top extractor, but there is no way a top extractor can reach the old oil in the front section of the pan. If you want to leave about 1/2 a quart of dirty oil when you do your change, use a top extractor. If you want a complete oil change, drain from the two drain plugs as specified in the factory service materials.

MBWorld Fanatic!
Joined: Jul 2006
Posts: 1,947
Likes: 8
From: Oklahoma City
2015 AMG C63 S
I agree. Thanks for the info, Jimmy. I too find it much easier to use an oil extractor like the "Pela" or "MitiVac". I purchased a larger capacity Pela and it holds all the oil coming out. Obviously, this avoids driving up on the Rhino ramps and pulling off the engine covers, etc. Just a cleaner operation, IMO even if there is 1/2 quart left. It's good to see someone else interested in DIY and avoiding the stealer.
It's easier to get the oil extracted out of the E63 as it doesn't have the separate "compartment" like the 55.
It's easier to get the oil extracted out of the E63 as it doesn't have the separate "compartment" like the 55.
Last edited by sack5000; Jun 1, 2008 at 11:42 AM.

Senior Member
Joined: Jan 2006
Posts: 386
Likes: 1
From: Jupiter, Florida
2005 E55, 2004 E55(sold), 2001 Viper GTS, 2006 Viper VOI9, 1994 ZR-1 Corvette 2009 Viper ACR,
Not true at all. You can get much of the oil using a top extractor, but there is no way a top extractor can reach the old oil in the front section of the pan. If you want to leave about 1/2 a quart of dirty oil when you do your change, use a top extractor. If you want a complete oil change, drain from the two drain plugs as specified in the factory service materials.
This is TRUE.... I have done 2 oil changes on my 55. 1 with extractor. One through the 2 drain plugs? The extractor method does leave .5-1.0 quart of old oil in the pan, on E55
only.
You will also need to buy new drain plugs and washers, each time you do the oil change.
I have the extractor. And even the dealer uses this method on 55's. But in reality. Your dumping $50+ worth of oil, into 1 quart of dirty oil.. Not the best method. But probably ok, if you leasing and just need to get through 50-60k miles or so.
MBWorld Fanatic!
Joined: Jul 2006
Posts: 1,947
Likes: 8
From: Oklahoma City
2015 AMG C63 S
This is TRUE.... I have done 2 oil changes on my 55. 1 with extractor. One through the 2 drain plugs? The extractor method does leave .5-1.0 quart of old oil in the pan, on E55
only.
You will also need to buy new drain plugs and washers, each time you do the oil change.
I have the extractor. And even the dealer uses this method on 55's. But in reality. Your dumping $50+ worth of oil, into 1 quart of dirty oil.. Not the best method. But probably ok, if you leasing and just need to get through 50-60k miles or so.

MBWorld Fanatic!


Joined: Jan 2005
Posts: 2,848
Likes: 15
From: Orange County
2005 C Wagon (No snickering please!)
MBWorld Fanatic!
Joined: Jan 2005
Posts: 2,848
Likes: 15
From: Orange County
2005 C Wagon (No snickering please!)
...there is no way a top extractor can reach the old oil in the front section of the pan. If you want to leave about 1/2 a quart of dirty oil when you do your change, use a top extractor. If you want a complete oil change, drain from the two drain plugs as specified in the factory service materials.
Sometimes a complete oil change is desired if an unapproved additive containing chlorine, transmission fluid, antifreeze, or conventional motor oil was introduced to the crankcase. This can be done by using a flushing pump that circulates a heated solvent. This will usualy scavage a liter of oil that would never drain with both plugs out.
Removing the drain plugs is not just a little more work than removing the covers. The machine class used in the thread formation is designed to create an interference fit with the threads on the plug. This means that the fit becomes less tight everytime you remove and replace the plug. This can lead to leaks. The smaller molecule of synthetic oils makes leaks more likely than in the past when conventional oils were used, and extraction equipment was not generally available to automotive workshops.
The bottom line is you will not receive any benifit by using gravity to remove the oil from your car. It will cost an extra buck for a couple of copper washers and can lead to leaks down the road.
MBWorld Fanatic!
Joined: Oct 2006
Posts: 3,642
Likes: 13
From: Caribbean/Florida/Colorado
E-ZGO 53hp., 1999 E 430 sport, 2004 E 55, 2008 Tahoe LTZ on 24"s
[QUOTE=Moviela;2859085]The current WIS specifies use of extraction to change the oil.QUOTE]
Moviela, post up your information source for E55 that >>>" current WIS specifies use of extraction to change the oil"<<<. You may be mistaken the 55K motor should be drained at the pan and plugs replaced, all other Mercedes Benz vehicles can be vacuum extracted.

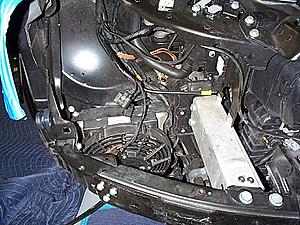
BTW for those that say it is a small amount oil left in the engine after vacuum extraction, and it makes little difference. Think again, your oil cooler and lines hold 2 quarts plus the one you cant get by vacuum. That makes a 25% dilution factor, so you can do it half a$$ or you can do it right.
Here is the cooler with fan.
Moviela, post up your information source for E55 that >>>" current WIS specifies use of extraction to change the oil"<<<. You may be mistaken the 55K motor should be drained at the pan and plugs replaced, all other Mercedes Benz vehicles can be vacuum extracted.
BTW for those that say it is a small amount oil left in the engine after vacuum extraction, and it makes little difference. Think again, your oil cooler and lines hold 2 quarts plus the one you cant get by vacuum. That makes a 25% dilution factor, so you can do it half a$$ or you can do it right.
Here is the cooler with fan.

MBWorld Fanatic!
Joined: Jan 2007
Posts: 1,359
Likes: 6
ML550
I had already planned to change my oil today, and proceeded to do so this afternoon. Thanks to Mr. Rotary Lift in my garage, accessibility is a non-issue.
I also have the luxury of time required to let the engine oil drain completely. Here's the process I follow. First, remove the oil filler cap. Next, unscrew the oil filter cap assembly enough to let the oil drain from the filter housing back down into the block. Then remove the oil filter assembly. Once those steps are done, the car is ready to go up into the air.
Once up, you remove the two rearward engine shields, exposing both the rear and front drain plugs. I drain the rear main pan first, and I let warm oil (always change the oil after it's warmed up) drain until it stops dripping (approximately 10 - 15 minutes). Then I install a new drain plug with copper washer and torque it to the specified torque. Then I remove the front drain plug and watch as easily close to another quart drains out. That's right, it's not just a few ounces, it's alot. Next time, for grins, I might measure it to be precise about the amount, but it's way more than a few ounces. Once the front drain stops dripping, it too gets a new plug and washer torqued to specification. The drain plugs have a sealant coating on the threads; there is no risk of causing leaks by replacing drain plugs - again, bad information. You will get a leak if you strip the threads on the pan, but just changing the drain plug isn't going to cause wear that will result in a leak; that's nonsense.
Then you simply reinstall the engine shields, lower the car, install a new oil filter and replace the 4 rubber Orings on the filter holder shaft and torque oil filter cap assembly to specification. Lastly, fill the engine with 8.75 qts. of the specified Mobil 1 of the proper viscosity. Then start it up and let it idle for a minute or so, and shut it off. Wait about five minutes, and then get out the factory oil dipstick tool and add just enough oil to bring it up to the specified reading on the tool (this step usually uses up most of the remaining .25 qts. remaining out of the called for 9 qts. with a filter replacement), but the dipstick tool is more precise than the dash readout. Replace the dipstick hole cover, close the hood, and you're good to go, knowing you didn't leave nearly a quart of old oil in the forward area of the pan, that the filter, drain plugs, and other fasteners are torqued to the correct specification and that there aren't any other issues underneath the car, because you gave it the once-over while you were allowing the old oil to fully drain.
Senior Member
Joined: Jan 2006
Posts: 386
Likes: 1
From: Jupiter, Florida
2005 E55, 2004 E55(sold), 2001 Viper GTS, 2006 Viper VOI9, 1994 ZR-1 Corvette 2009 Viper ACR,
You really shouldn't be posting this sort of erroneous information.
I had already planned to change my oil today, and proceeded to do so this afternoon. Thanks to Mr. Rotary Lift in my garage, accessibility is a non-issue.
I also have the luxury of time required to let the engine oil drain completely. Here's the process I follow. First, remove the oil filler cap. Next, unscrew the oil filter cap assembly enough to let the oil drain from the filter housing back down into the block. Then remove the oil filter assembly. Once those steps are done, the car is ready to go up into the air.
Once up, you remove the two rearward engine shields, exposing both the rear and front drain plugs. I drain the rear main pan first, and I let warm oil (always change the oil after it's warmed up) drain until it stops dripping (approximately 10 - 15 minutes). Then I install a new drain plug with copper washer and torque it to the specified torque. Then I remove the front drain plug and watch as easily close to another quart drains out. That's right, it's not just a few ounces, it's alot. Next time, for grins, I might measure it to be precise about the amount, but it's way more than a few ounces. Once the front drain stops dripping, it too gets a new plug and washer torqued to specification. The drain plugs have a sealant coating on the threads; there is no risk of causing leaks by replacing drain plugs - again, bad information. You will get a leak if you strip the threads on the pan, but just changing the drain plug isn't going to cause wear that will result in a leak; that's nonsense.
Then you simply reinstall the engine shields, lower the car, install a new oil filter and replace the 4 rubber Orings on the filter holder shaft and torque oil filter cap assembly to specification. Lastly, fill the engine with 8.75 qts. of the specified Mobil 1 of the proper viscosity. Then start it up and let it idle for a minute or so, and shut it off. Wait about five minutes, and then get out the factory oil dipstick tool and add just enough oil to bring it up to the specified reading on the tool (this step usually uses up most of the remaining .25 qts. remaining out of the called for 9 qts. with a filter replacement), but the dipstick tool is more precise than the dash readout. Replace the dipstick hole cover, close the hood, and you're good to go, knowing you didn't leave nearly a quart of old oil in the forward area of the pan, that the filter, drain plugs, and other fasteners are torqued to the correct specification and that there aren't any other issues underneath the car, because you gave it the once-over while you were allowing the old oil to fully drain.
After all 9 quarts are in, and the car has been "run". I usually get a reading on the dipstick tool, around 150-160mm. As high as 170mm if at a slight angle.
You CAN use the vacumn with a 63 (totally different pan), and quite frankly. Im sure my local "stealer" uses the vacumn on the 55's as well.. The old saying remains.. "If you want something done right, you have to do it yourself".
I dont service my car on my own to "save money". I do it, because I "know" the job is done right.
Last edited by Taximan1; Jun 2, 2008 at 04:31 PM.
Super Member
Joined: Mar 2008
Posts: 695
Likes: 0
From: Delran, NJ
05 C55
ot: taximan, im up the street in Delran. pm me if youre out in the streets 
Kompressed and Y. Master, are right on... this is exactly my procedure, since I have a lift as well.. The only "little" thing I do different. Is, once the car is lowered. I just dump all 9 quarts straight in, through the filter housing, THEN re-install the new filter... Its a much bigger hole than the oil fill. Which makes a mess. And I hate funnels (one more thing to clean up) Its all going the same place anyway.
After all 9 quarts are in, and the car has been "run". I usually get a reading on the dipstick tool, around 150-160mm. As high as 170mm if at a slight angle.
You CAN use the vacumn with a 63 (totally different pan), and quite frankly. Im sure my local "stealer" uses the vacumn on the 55's as well.. The old saying remains.. "If you want something done right, you have to do it yourself".
I dont service my car on my own to "save money". I do it, because I "know" the job is done right.

Senior Member
Joined: Jan 2006
Posts: 386
Likes: 1
From: Jupiter, Florida
2005 E55, 2004 E55(sold), 2001 Viper GTS, 2006 Viper VOI9, 1994 ZR-1 Corvette 2009 Viper ACR,
thats funny. I havent changed my avatar in a LONG time(I will now). But I live in Delran as well. "Grande". And I'm pretty sure Ive seen your car at Otts a few times. small world..
I have a white E55, and a white viper. Im sure we'll pass each other sometime.
Super Member
Joined: Mar 2008
Posts: 695
Likes: 0
From: Delran, NJ
05 C55
haha...otts is my after work spot. i have a house off creek road in summer hill. theres a nice black s55 in your development, and my friend duane has a silver e55 in forest hills. stop in otts sometime, ill buy you a beer 
Member
Joined: Dec 2004
Posts: 119
Likes: 3
2023 GLE 53
Just to add to those who use a vacuum pump from the top (like me) to change oil. You can just jack up one side of the front of the car about 6-8 inches while pumping the oil and you'll get most of the 8.5 liters out. I do my own every 5-6 K miles, more frequent than the FSS would suggest, don't have access to a lift for normal maintenance like this, and think the extra effort in from the bottom draining, while entirely valid, won't make a difference in the engine longevity. I have done oil analysis on a couple of changes, and all parameters were well within acceptable tolerences, even with whatever "old" oil might have remained.
Senior Member
Joined: Jan 2006
Posts: 386
Likes: 1
From: Jupiter, Florida
2005 E55, 2004 E55(sold), 2001 Viper GTS, 2006 Viper VOI9, 1994 ZR-1 Corvette 2009 Viper ACR,
Pm sent. Didnt want to hi-jack the thread anymore.. The S55 is my boy Chris's car.. I live a few houses down from him. And now that you mention it. It think Ive seen the silver 55 as well...


