


MBWorld Fanatic!
I read this thread before the morning news every day now.
SO MUCH BETTER!!!!

SO MUCH BETTER!!!!
Yes... Mmmmm what's in here... Being curious I couldn't resist. I actually rebuilt the Tranz a couple of months ago and since some parts for the engine haven't turned up yet and also to keep the thread fresh for thoes who like to watch, I'll post up some shots of the Tranz rebuild.
With the help of my mate looking over my shoulder who just happens to work at a stealership rebuilding these MB boxes for years guided me through the disassembly and identification of all common trouble spots.
Deano, one of my mates, said this box has the same internals as the ones from the SL65 including identical part numbers to all the clutch assemblies as he has rebuilt many of both types. The main problem with these boxes is when the finally assembly is done at the MB assemble line "almost all the clutch pack tolerances are out of wack to factory specifications" where he cannot recall when one was perfect... So what's the big deal about these tolerances? Basically if it's to loose it will slip... simple as that. The tolerances are critical if your throwing a lot of **** as these like we do, probably not as critical for stock applications.
When all the clutch packs are reassembled, their final compressed hight varies due to manufacturing tolerances of the actual clutch media. So... when compressed with a special tool in a press at the correct poundage, a measurement is then taken off all the clutch plates and clutches. The final spacer ring part number depends on the measurement taken which corresponds to the correct part listed as there are a few, -1, 0-1, +1 etc.... The part is then added to the pack and is ready to go.
The E55, SL65, SLR and Maybach all use the same box. Of course some of the internal part numbers are different but not many. Final ratios and programing seem to be very different.
I will be investigating the valve bodie shortly with another one of my mates who owns a large Auto Tranz shop which is equipped with a real time valve bodie tester that shows all the in's and out pressures whilst changing gears There is also a Tranz dyno among other goodies to play with.
My mate Johnny rebuilt and modified the 55 converter by removing the "two paper lock up clutches" and refitting 3 carbon fiber ones. He discovered that they were excessively worn and braking up. It was most likely due to Vmax runs but it's also a common problem which makes the car shake at certain revs.
I have all the spec documentation from MB if any one is interested in a copy. The files are in .jpg & .pdf formats. Where can I post them?
So here are the shots...
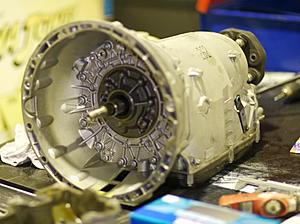
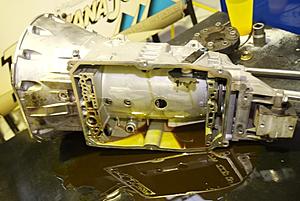
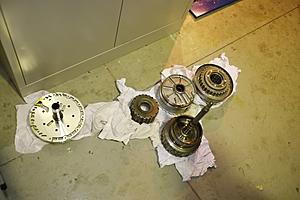
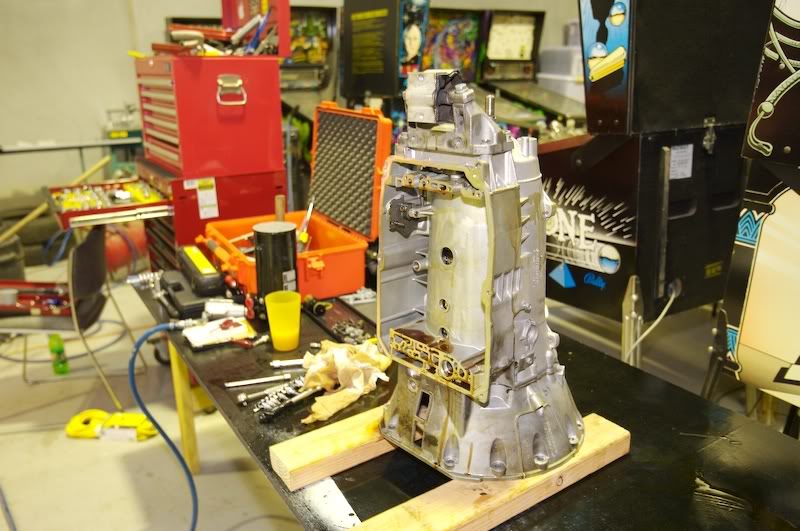
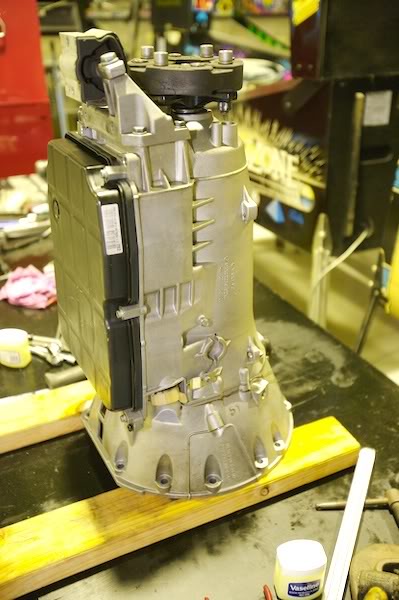
The Victim.
Deano removing the oil pump.
Pan and filter off.
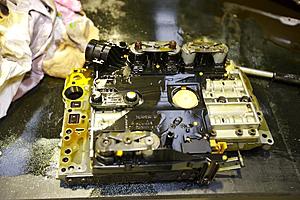
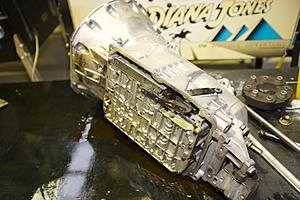
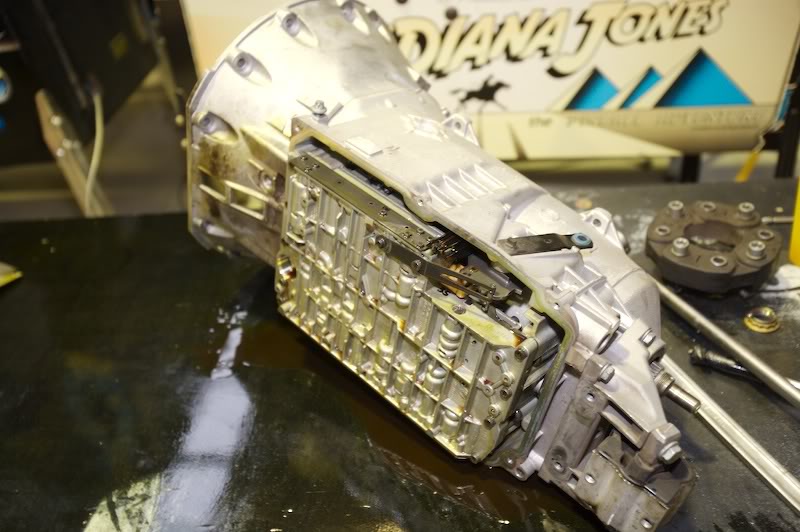
Part of the Tranz brain... Valve Bodie with modulator valves sticking up.
Brainless.
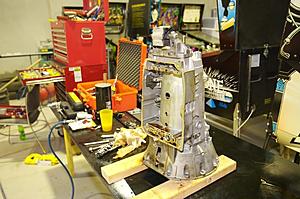
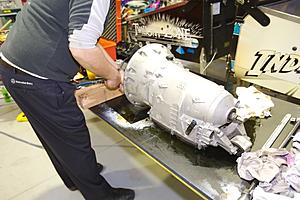
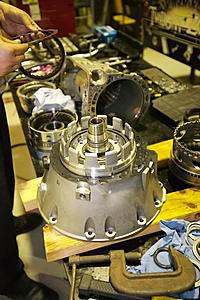
Position for disassembly.
Pop the top off.

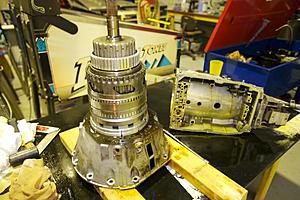
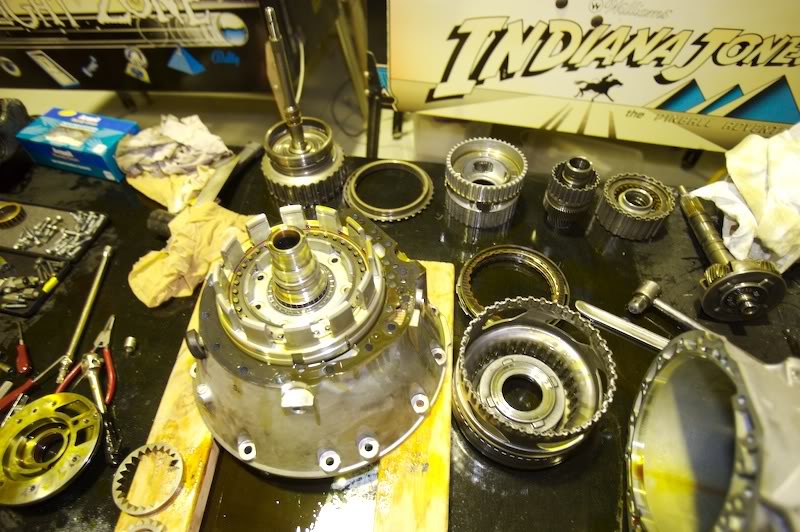
Clutch packs and drive shafts removed.
Notice thrust bearings.
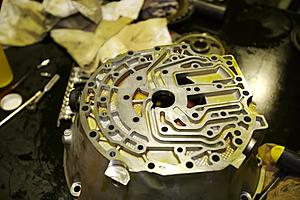
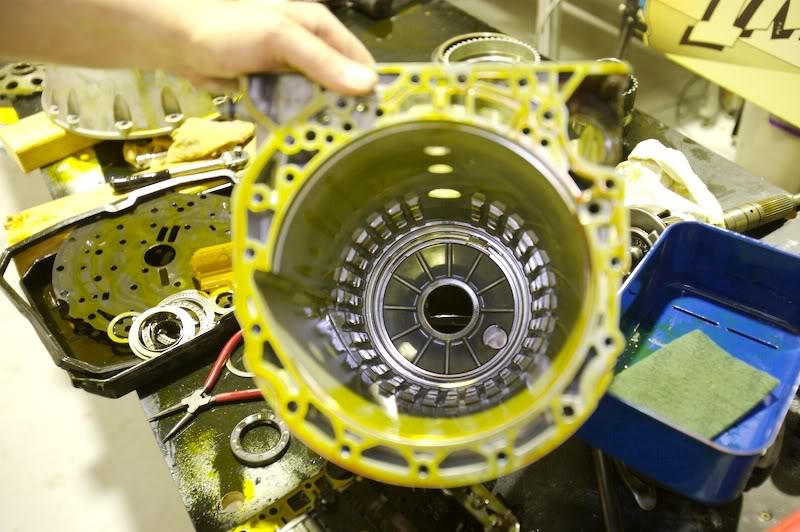
Ant farm network of hydraulics plumbed through here on the back of the bell housing.
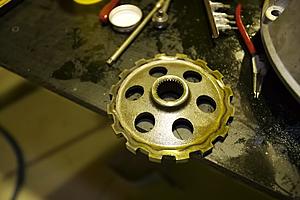
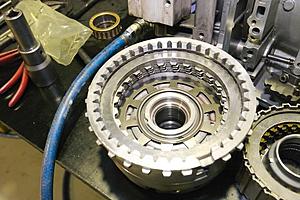
When you put it in park... guess what?... a pin grabs this wheel.
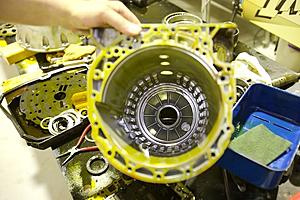
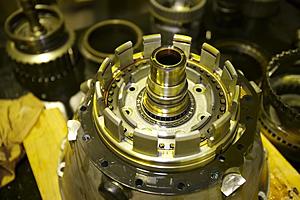
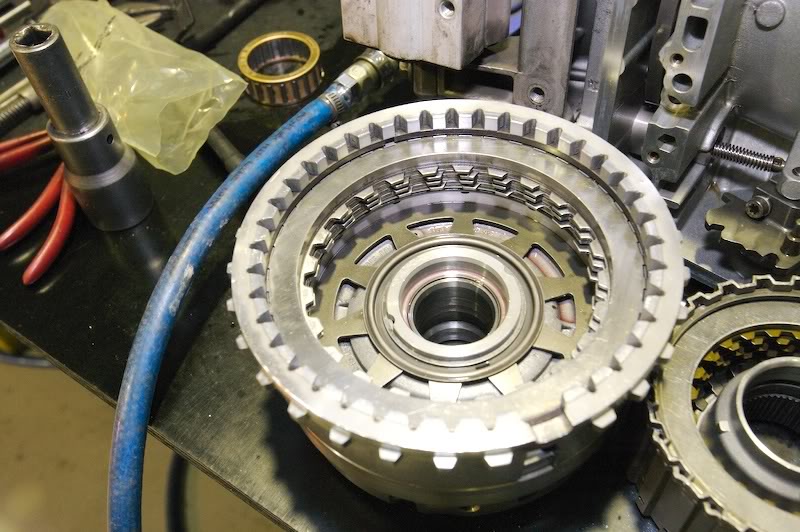
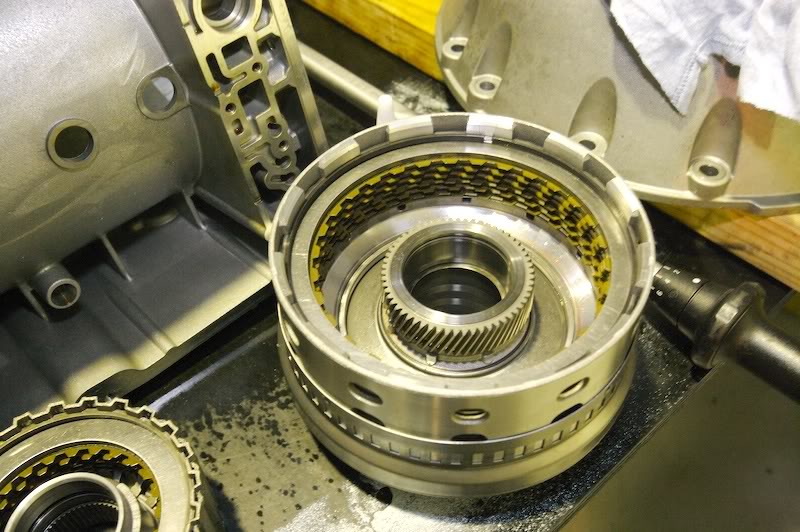
Notice the slots which the first clutch packs slide into.
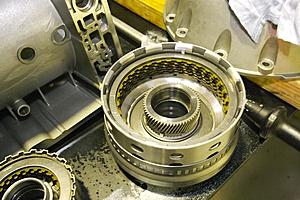
The metal rings here, not the actual clutch media are slightly bowed inwards due to excessive heat build up caused by clutch slippage. You cant notice this without a straight edge. Visually they were a blueish heat stained color. The problem is further perpetuated by causing less contact area as the clutch media stays flat. These were all replaced.
All packs rebuilt properly ready for assembly.
Clutch pack and piston assembly.
Another set.
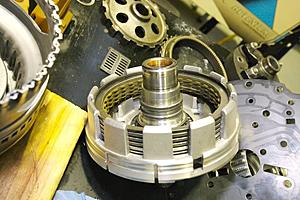
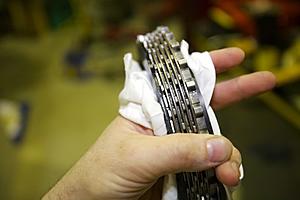
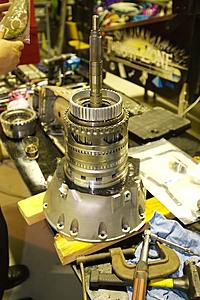
Stacked and ready. All clutch media is soaked in fluid over night before assembly.
Bolted on with oil pump underneath.
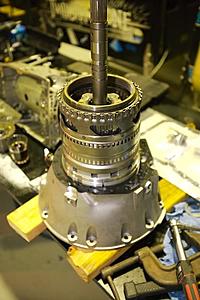
Clutch and final drive shaft added.
Another bit put on???
With the help of my mate looking over my shoulder who just happens to work at a stealership rebuilding these MB boxes for years guided me through the disassembly and identification of all common trouble spots.
Deano, one of my mates, said this box has the same internals as the ones from the SL65 including identical part numbers to all the clutch assemblies as he has rebuilt many of both types. The main problem with these boxes is when the finally assembly is done at the MB assemble line "almost all the clutch pack tolerances are out of wack to factory specifications" where he cannot recall when one was perfect... So what's the big deal about these tolerances? Basically if it's to loose it will slip... simple as that. The tolerances are critical if your throwing a lot of **** as these like we do, probably not as critical for stock applications.
When all the clutch packs are reassembled, their final compressed hight varies due to manufacturing tolerances of the actual clutch media. So... when compressed with a special tool in a press at the correct poundage, a measurement is then taken off all the clutch plates and clutches. The final spacer ring part number depends on the measurement taken which corresponds to the correct part listed as there are a few, -1, 0-1, +1 etc.... The part is then added to the pack and is ready to go.
The E55, SL65, SLR and Maybach all use the same box. Of course some of the internal part numbers are different but not many. Final ratios and programing seem to be very different.
I will be investigating the valve bodie shortly with another one of my mates who owns a large Auto Tranz shop which is equipped with a real time valve bodie tester that shows all the in's and out pressures whilst changing gears There is also a Tranz dyno among other goodies to play with.
My mate Johnny rebuilt and modified the 55 converter by removing the "two paper lock up clutches" and refitting 3 carbon fiber ones. He discovered that they were excessively worn and braking up. It was most likely due to Vmax runs but it's also a common problem which makes the car shake at certain revs.
I have all the spec documentation from MB if any one is interested in a copy. The files are in .jpg & .pdf formats. Where can I post them?
So here are the shots...

The Victim.

Deano removing the oil pump.
Pan and filter off.

Part of the Tranz brain... Valve Bodie with modulator valves sticking up.

Brainless.
Position for disassembly.

Pop the top off.
Clutch packs and drive shafts removed.

Notice thrust bearings.

Ant farm network of hydraulics plumbed through here on the back of the bell housing.

When you put it in park... guess what?... a pin grabs this wheel.
Notice the slots which the first clutch packs slide into.

The metal rings here, not the actual clutch media are slightly bowed inwards due to excessive heat build up caused by clutch slippage. You cant notice this without a straight edge. Visually they were a blueish heat stained color. The problem is further perpetuated by causing less contact area as the clutch media stays flat. These were all replaced.

All packs rebuilt properly ready for assembly.
Clutch pack and piston assembly.
Another set.

Stacked and ready. All clutch media is soaked in fluid over night before assembly.

Bolted on with oil pump underneath.

Clutch and final drive shaft added.

Another bit put on???
All done ready to go in... Have a go, it's fun!

MBWorld Fanatic!
Yacht Master
MBWorld Fanatic!
close
Jun 24, 2023
Again Fantastic pics, Finny this is the transmission that spun your differential out of its mounts? And after its pampered life, all you found to replace was some warped clutches? amazing
Dam that used transmission fluid looks like chocolate.
Thanks,
Dam that used transmission fluid looks like chocolate.
Thanks,
That thing is friggin bullet proof...!
One brave and very knowledgable soul prepared to pull an auto box apart ...
Finny are you trying to qualify as an MB tech or something or complete a degree in Mech Eng ?????!!!!!
One brave and very knowledgable soul prepared to pull an auto box apart ...
Finny are you trying to qualify as an MB tech or something or complete a degree in Mech Eng ?????!!!!!

MBWorld Fanatic!
Scared = pulling engine apart
Scared *****less = pulling transmission apart.
Scared *****less = pulling transmission apart.

Former Vendor of MBWorld
Thanks for more car ****, Finny. 
MB World Stories
The Best of Mercedes & AMG
Explore

Manual Mercedes? 6 Times Sindelfingen Let Drivers Have All The Fun
Verdad Gallardo
Mercedes SLR McLaren 722 S Is Extremely Rare Example Modified by McLaren
Verdad Gallardo
8 Classic Boxy Mercedes Designs That Have Aged Like Fine Wine
Verdad Gallardo
Flawlessly Restored Mercedes 190E Evo II Heads to Auction
Verdad Gallardo
Electric Mercedes C-Class Unveiled: 11 Things You Need to Know
Verdad Gallardo
Mercedes EQS Gets A Major Update: Everything You Need to Know
Verdad Gallardo
5 Underrated Mercedes-Benz Models That Don't Get the Love They Deserve
Verdad Gallardo
Mercedes 300D Has Pushed Well Past 1 Million Miles and It Ain't Stopping
Verdad Gallardo
10 Most Reliable Mercedes-Benz Models You Can Buy Used
Verdad GallardoQuote:
Dam that used transmission fluid looks like chocolate.
Thanks,
Yeah, this is the one that caused a few rear end problems... Ha Ha...Originally Posted by Yacht Master
Again Fantastic pics, Finny this is the transmission that spun your differential out of its mounts? And after its pampered life, all you found to replace was some warped clutches? amazingDam that used transmission fluid looks like chocolate.
Thanks,
Not to mention water also leaked into the box via a faulty radiator which has since been bypassed hence the chocolate colored fluid.
I made up a remote Tranz cooler with an electronic thermostat to activate a fan bolted to the cooler tucked under where the smog pump once lived.
All is now cool...
Out Of Control!!
WOOOOHOOOOOO!!!
Finny, great shots of the tranny!!
Finny, great shots of the tranny!!
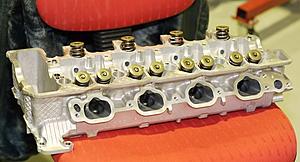
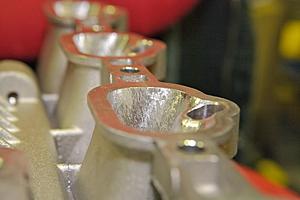
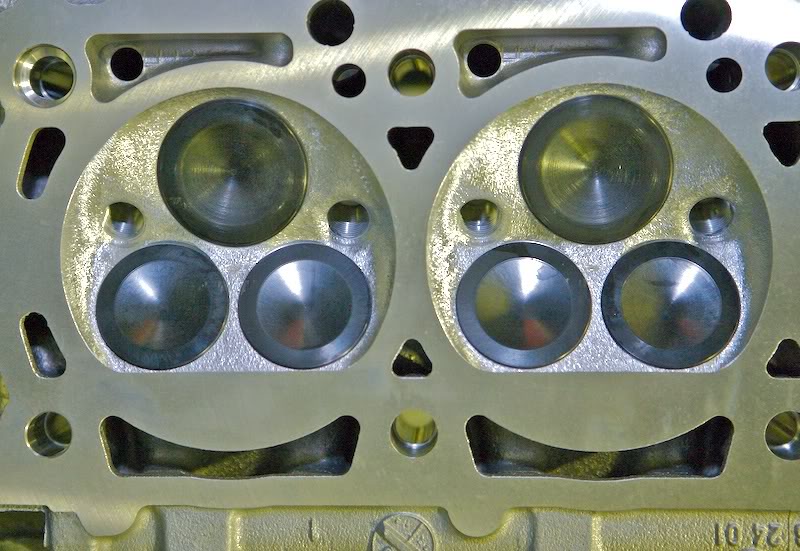
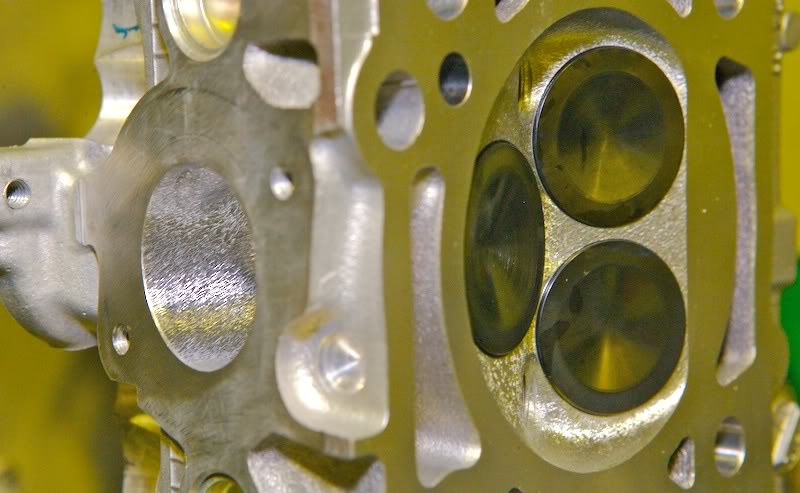
Just got the heads back today from Eddie Woods and these look real cool.
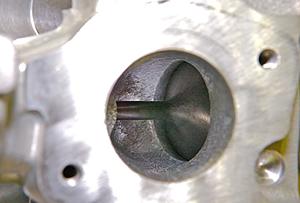
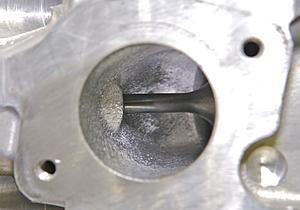
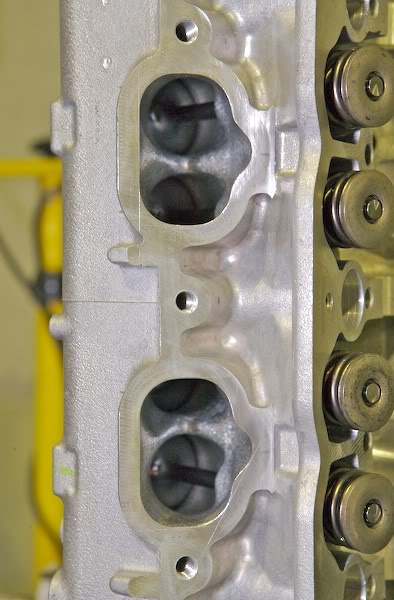
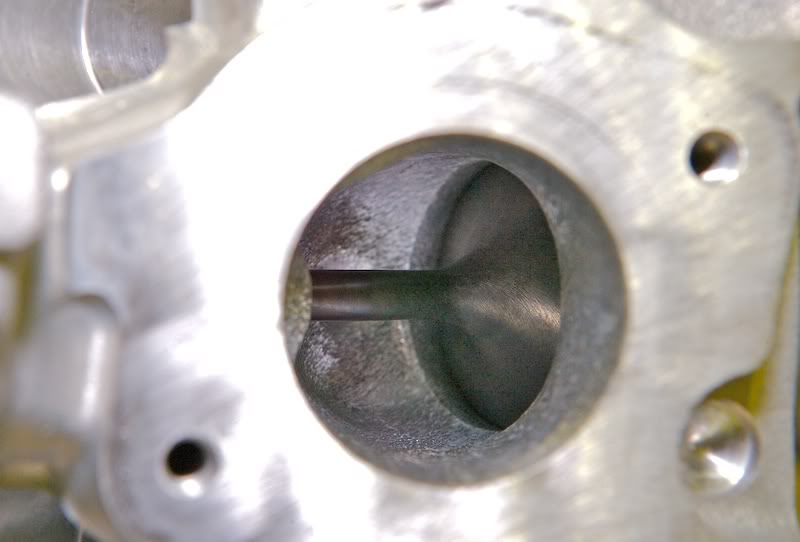
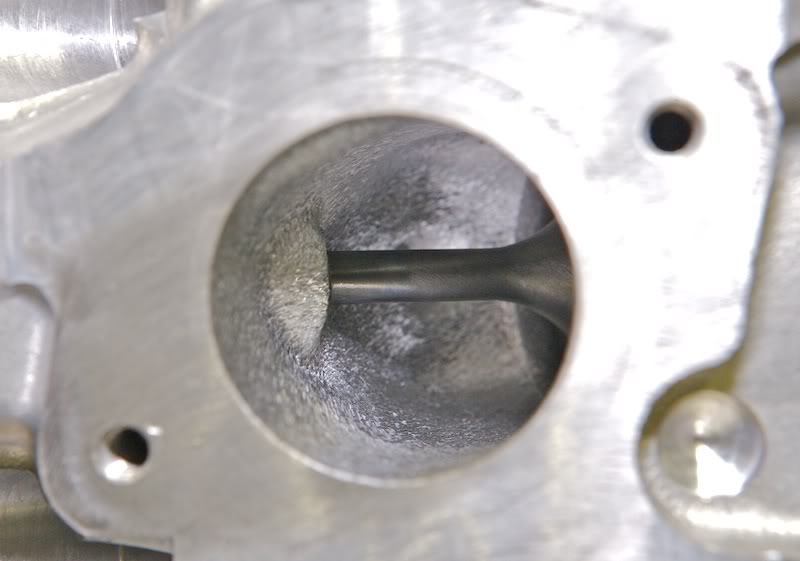
I first noticed the dimpled texture in the tubes and chambers... weird hey? cause I like the shiny polished finish... I asked Eddie what's the story here? He said this is a soft finish which prevents "Laminar adhesion" and enhances mixing... So what's that in english? Laminar adhesion is where fuel or liquid sticks to the inlet walls and accumulates, apparently not good for S/C applications. This soft finish also enhances air & fuel mixing which helps burn propagation. Yeah right... Well good I'm happy if it all works!
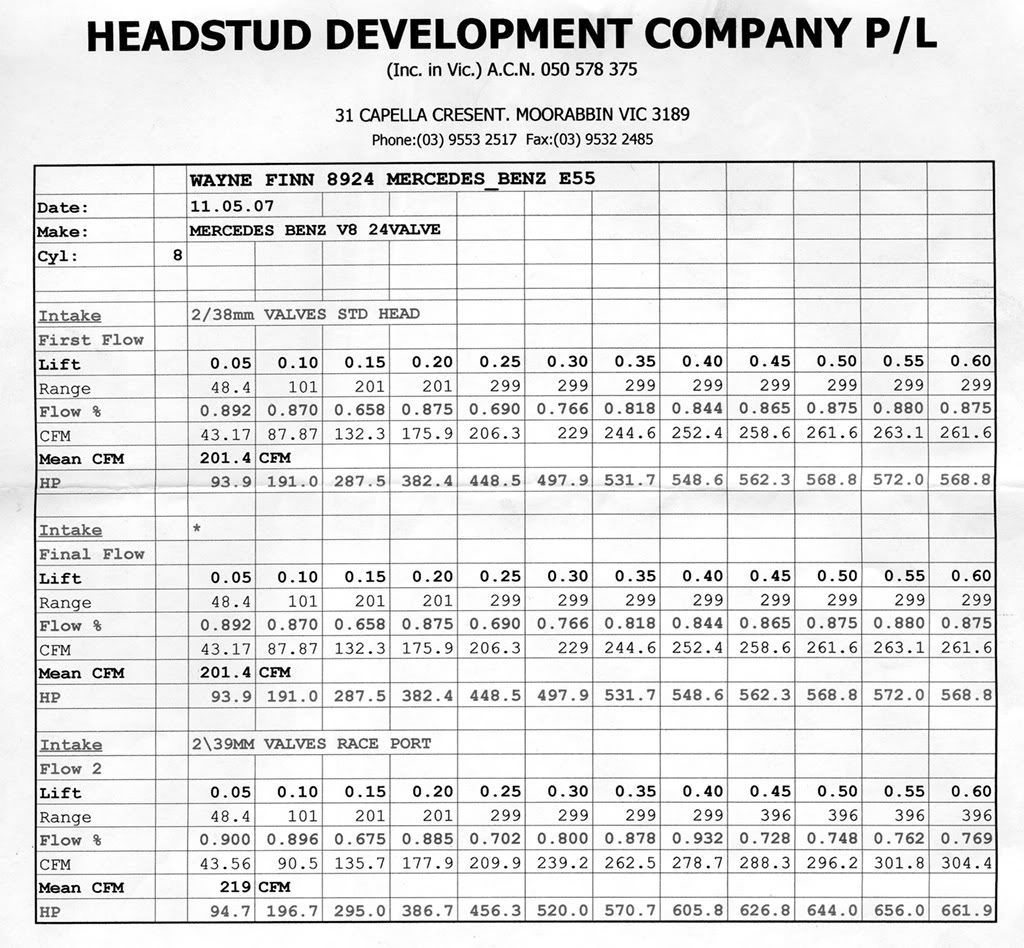
The valve department was interesting too. I wanted the no expense speared whiz bang Titanium jobs! Eddie said these aren't very good in street Turbo or S/C applications because of the extra heat generated can prematurely damage Titanium valves. He said the Titanium jobs were great for N/A high reving apps. So he custom made a valve set from 214n Stainless Steel which was sent off for hardening. An extra 1mm was added to the inlet and 0.5 mm diameter to the exhaust set.
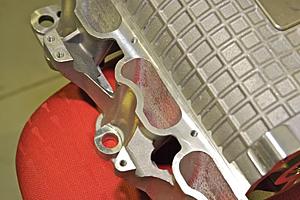
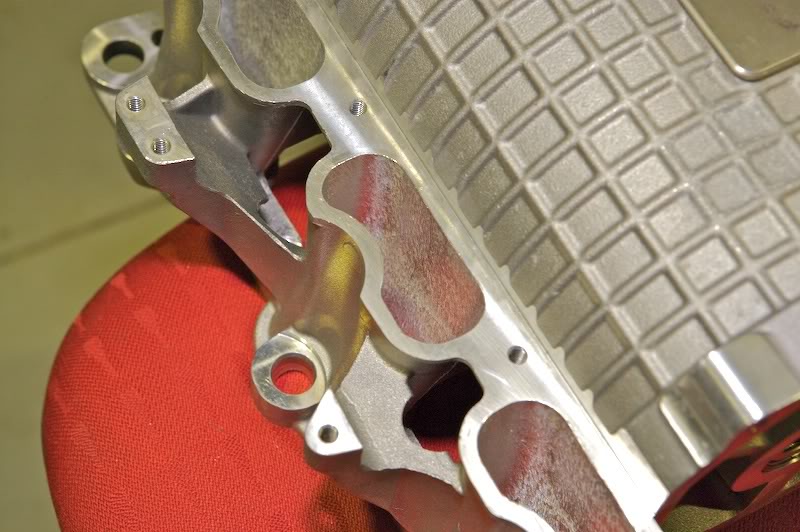
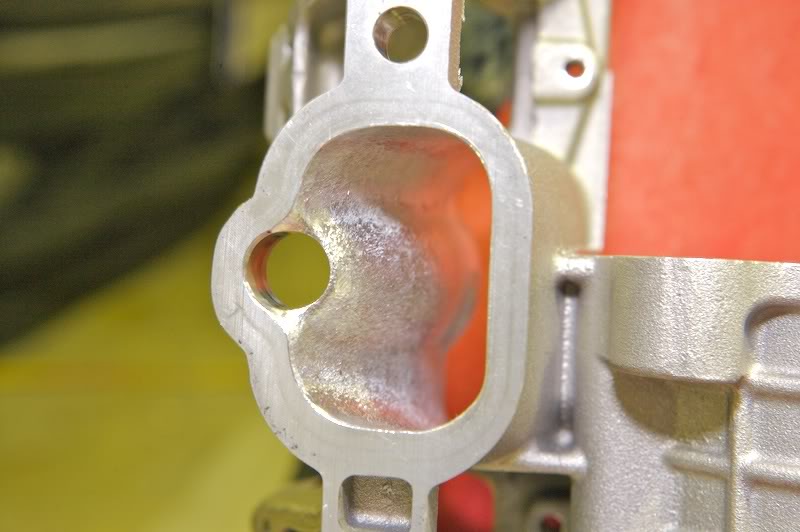
The supercharger manifold was port matched and got the same job as above.
He didn't bother changing the springs as they all tested well and were suitable for the rev range required.
Next post, assembly.
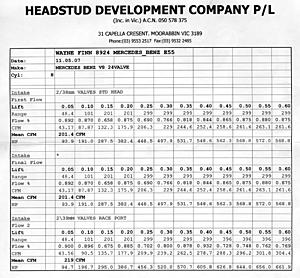
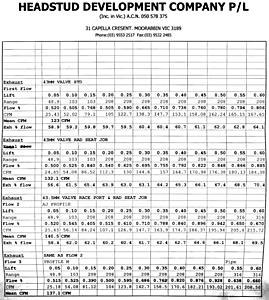
Stat data 1
Stat data 1
Inlet side.
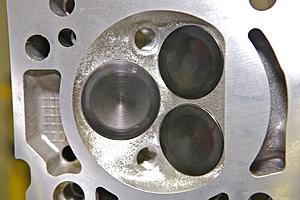
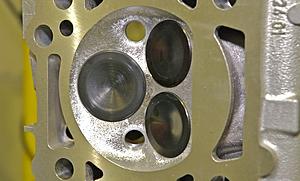
Finished chamber 1.
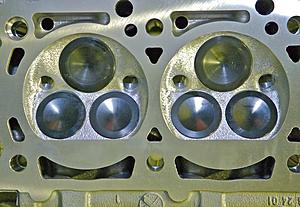
Finished chamber 2.
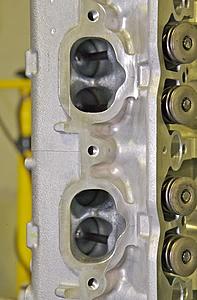
Inlets.
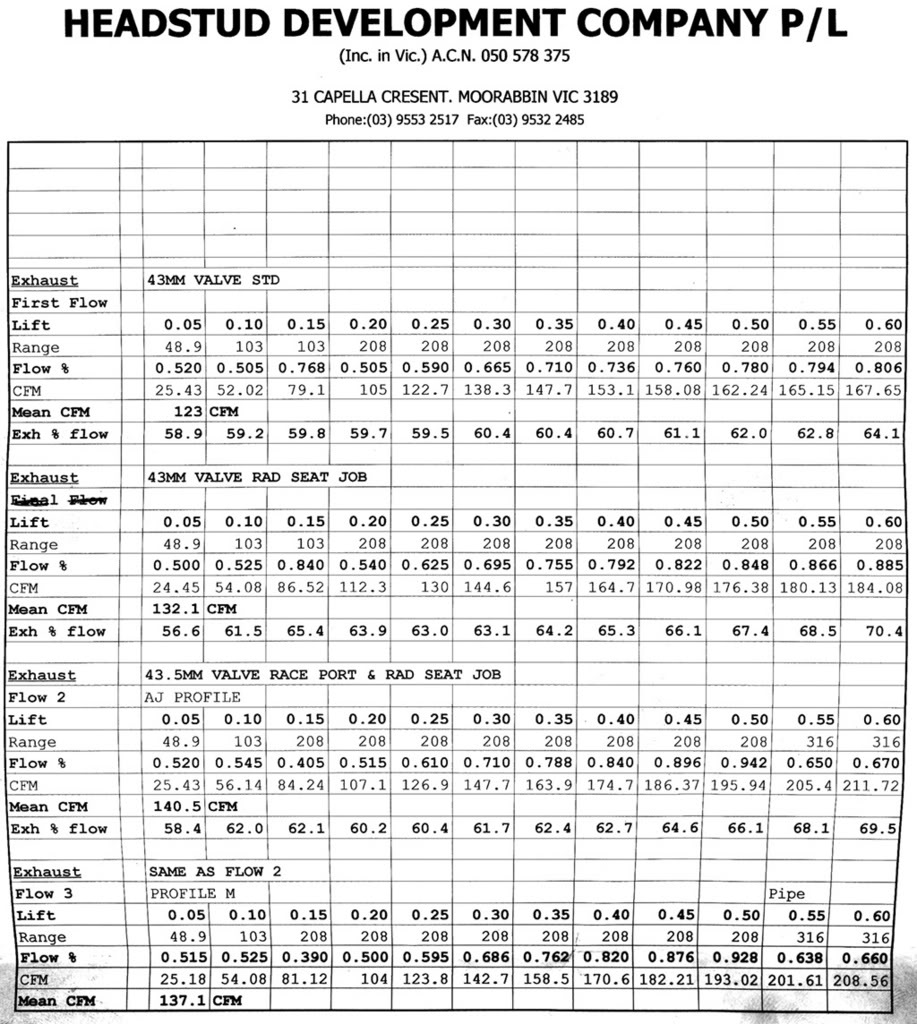
Exhaust 1.
Exhaust 2.

Profile 1.
Profile 2.
S/C 1.

S/C 2.
S/C 3.
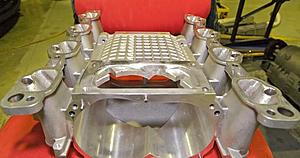
S/C 4.
I first noticed the dimpled texture in the tubes and chambers... weird hey? cause I like the shiny polished finish... I asked Eddie what's the story here? He said this is a soft finish which prevents "Laminar adhesion" and enhances mixing... So what's that in english? Laminar adhesion is where fuel or liquid sticks to the inlet walls and accumulates, apparently not good for S/C applications. This soft finish also enhances air & fuel mixing which helps burn propagation. Yeah right... Well good I'm happy if it all works!
The valve department was interesting too. I wanted the no expense speared whiz bang Titanium jobs! Eddie said these aren't very good in street Turbo or S/C applications because of the extra heat generated can prematurely damage Titanium valves. He said the Titanium jobs were great for N/A high reving apps. So he custom made a valve set from 214n Stainless Steel which was sent off for hardening. An extra 1mm was added to the inlet and 0.5 mm diameter to the exhaust set.
The supercharger manifold was port matched and got the same job as above.
He didn't bother changing the springs as they all tested well and were suitable for the rev range required.
Next post, assembly.
Stat data 1
Stat data 1

Inlet side.

Finished chamber 1.
Finished chamber 2.
Inlets.
Exhaust 1.
Exhaust 2.
Profile 1.

Profile 2.
S/C 1.
S/C 2.

S/C 3.

S/C 4.

Another props to you Finny! Are you sure you're not an ex AMG technician?
How long did it take you to pull that trans apart and put it back together? That's just crazy! But gotta love it! Kudos my friend!
How long did it take you to pull that trans apart and put it back together? That's just crazy! But gotta love it!
Kudos my friend!MBWorld Fanatic!
you're the real deal finny...i can't wait!!!
MBWorld Fanatic!
Yacht Master
MBWorld Fanatic!
close
Jun 24, 2023
Looks great to me, Oh what next SLR cams or a Finny special grind? Man you are ready for your gasket kit
So what's that in english? Laminar adhesion, ya static boundary layer, it works.
I vote this thread should be a sticky how about it Mr. Vanos, Vic55, vraa, drexappeal, RBrenton
So what's that in english? Laminar adhesion, ya static boundary layer, it works.
I vote this thread should be a sticky how about it Mr. Vanos, Vic55, vraa, drexappeal, RBrenton

Banned
Finny.... My buddy from down-under... Simply awesome!!
Can't wait to see the finished product.. Did you book your ticket to Toronto yet???
Can't wait to see the finished product.. Did you book your ticket to Toronto yet???
Quote:
About 4.5 ours total excluding Trans removal, Converter and Clutch mods. Originally Posted by JamE55
How long did it take you to pull that trans apart and put it back together?
Dean dose these things quicker but I slowed him down as I was under instruction... Ha Ha...
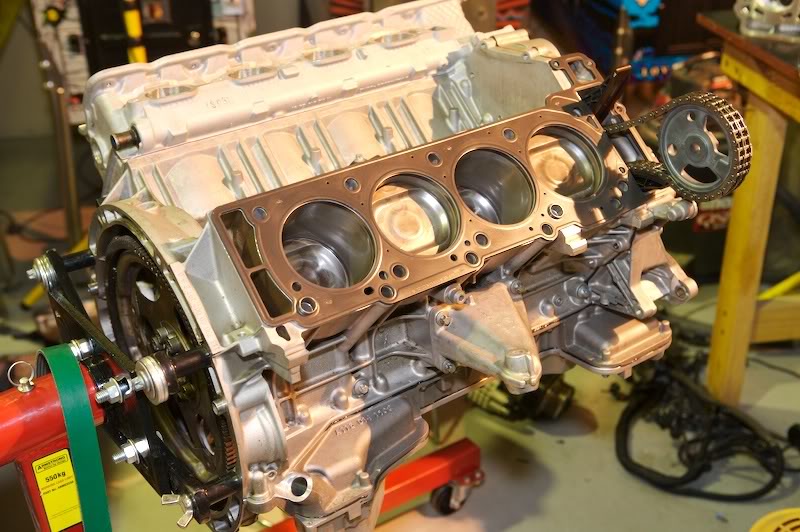
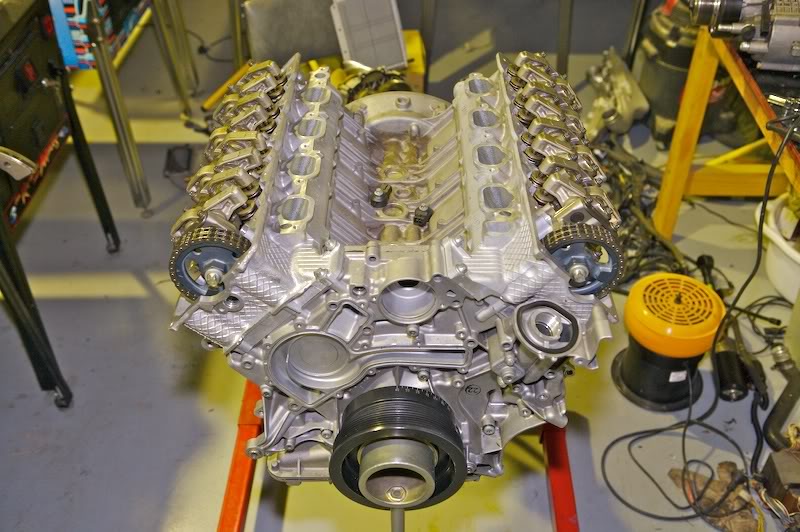
Here's a few shots of the heads & bump sticks being installed.
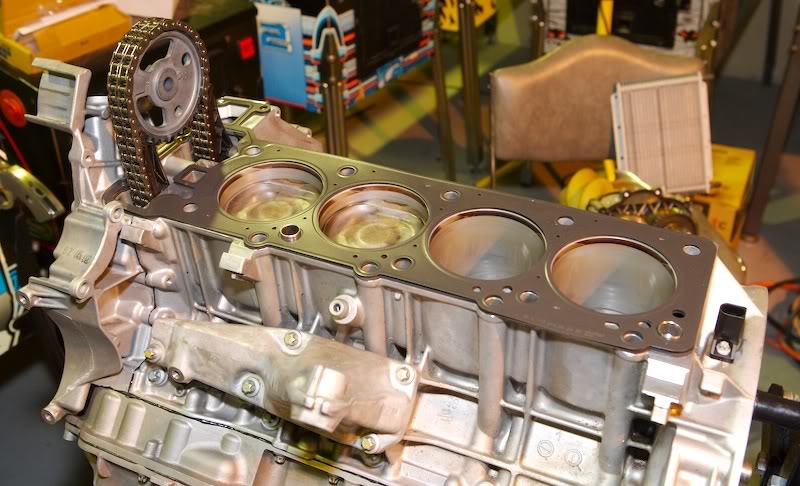
After cleaning the adjoining surfaces the so called OEM Merc gaskets are actually Cometic Multi-Layer Steel (MLS) head gaskets which go on dry because they are coated with a sealant. Each MLS gasket is coated with a .001" thick of viton rubber that is bonded to the outer stainless steel layers. No Re-torque is required with these hi techo gaskets. One of my mates use these on a 32psi turbo car with no worries at all. Apparently these are as good as "O" ringing or better which surprises me.

According to WIS we must put some goo here.

Bolted and torqued to the correct sequence.
Next Victim!
Done.
Now ready for the SLR bump sticks.
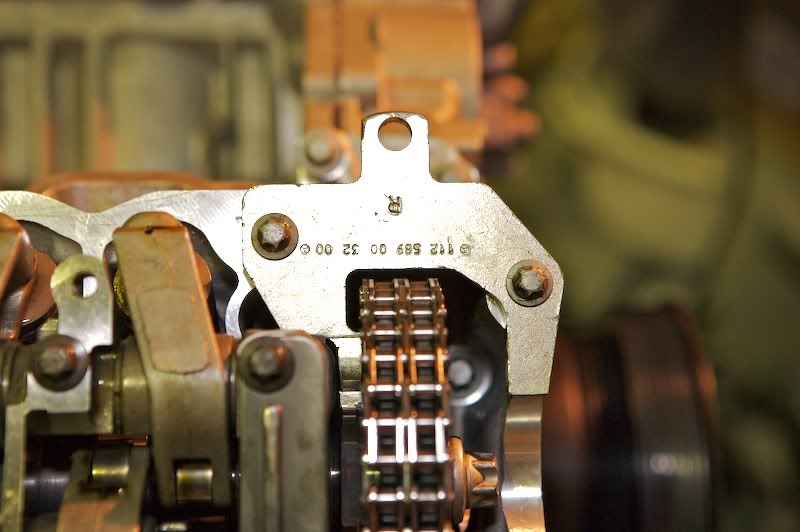
This is a MB cam locking tool which prevents the cam rotating which holds it the correct timing position with cylinder 1 up at 40.ş
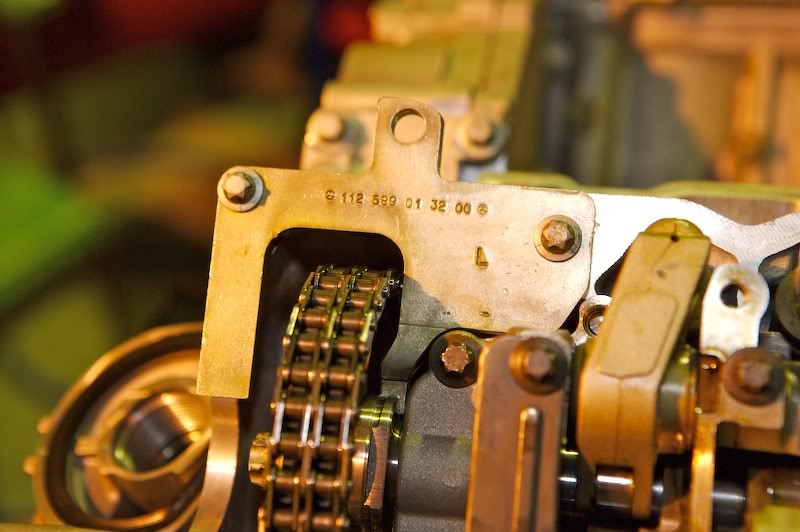
This tool is bolted on with the cam before the over head assembly is installed.
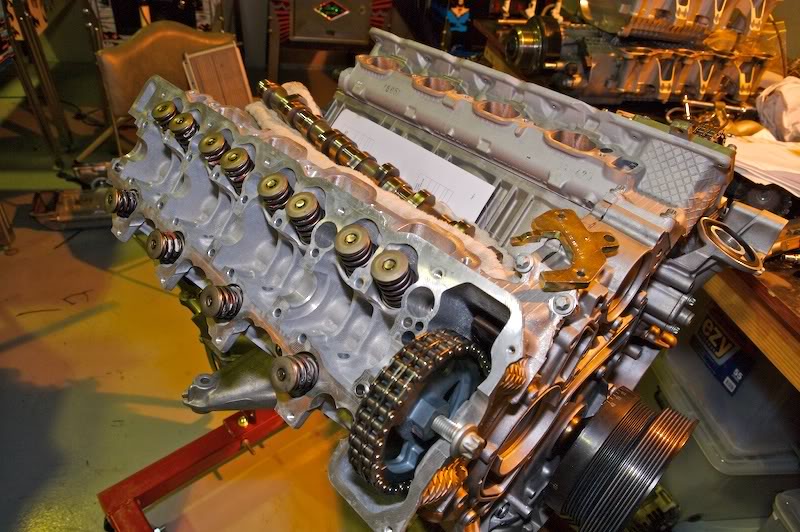
Right bank first.
Ready to rocker... Note cam tools still in place.

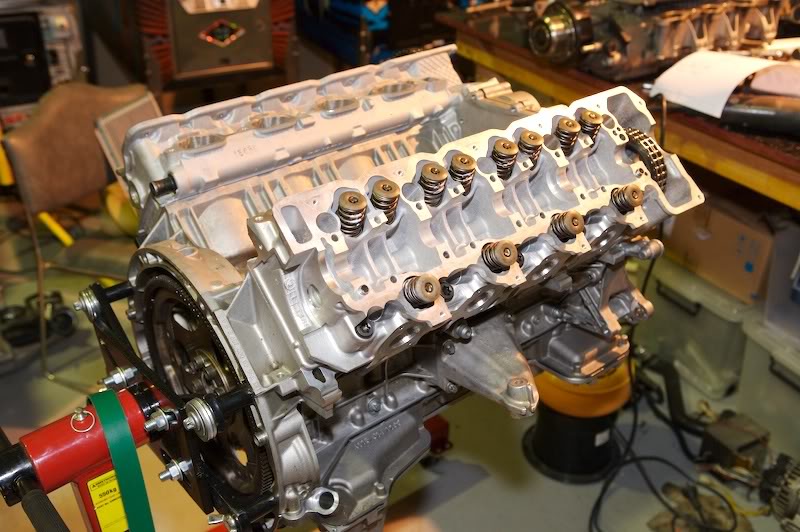
Rocker arms installed.
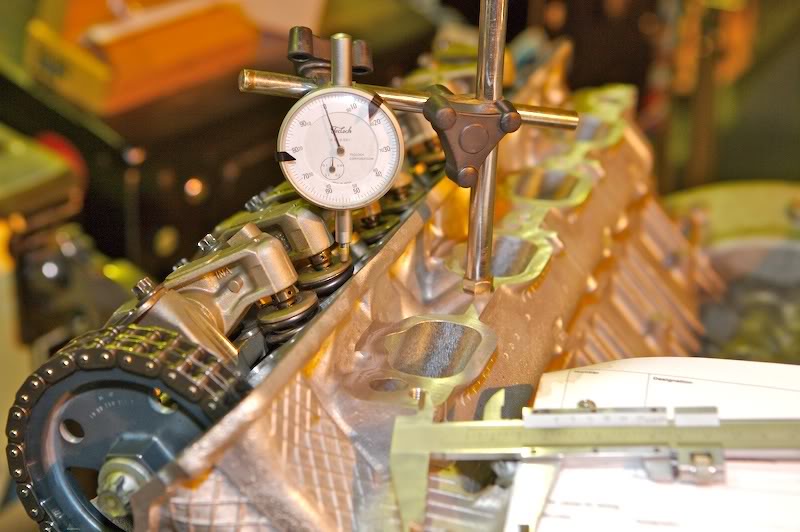
Just being sure to be sure. After an hour or so I couldn't work out why the timing was out of whack??? Duh!!! I was using the E55 timing specs not the SLR's !!! All checked out fine then...Duh????...
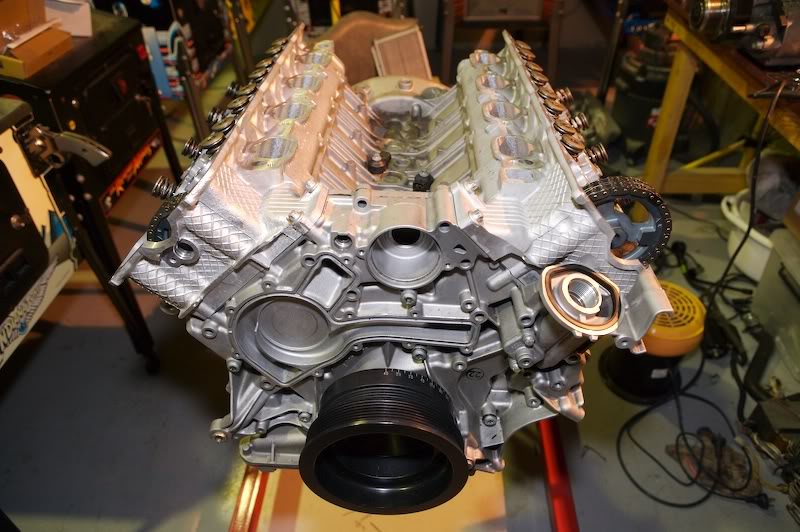
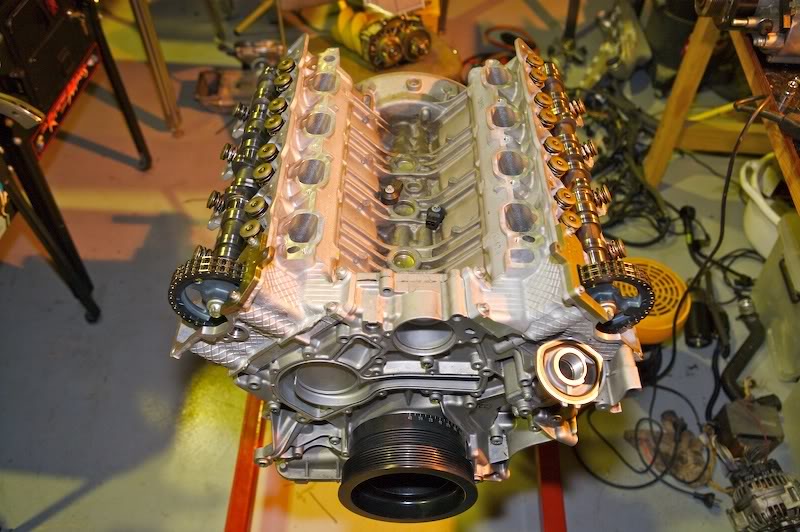
All done and ready for the next stage.
To be continued.....
What is the timing difference Finny on the E55 v SLR?
MBWorld Fanatic!
Finny, those photos are top quality and really help us "youngans" to understand what you're doing.
Thanks.
Thanks.
Quote:
Don't know the exact cam specs but it appears that the lobe separation angle is wider than stock. Originally Posted by stevebez
What is the timing difference Finny on the E55 v SLR?
The power band has been raised up a little more sacrificing a bit of low end torque for upper HP.
MBWorld Fanatic!
I would call it true bonding with the car ...

Senior Member
Please come to my house and do mine....please...I live in Vegas. You can have lots of fun when you're not working on my car!
MBWorld Fanatic!
Quote:
The power band has been raised up a little more sacrificing a bit of low end torque for upper HP.
Originally Posted by Finny
Don't know the exact cam specs but it appears that the lobe separation angle is wider than stock. The power band has been raised up a little more sacrificing a bit of low end torque for upper HP.
What valve springs did you use? Do you happen to have the part number for them??
Quote:
The stock Springs which tested OK can handle the RPM required.Originally Posted by Ghostrider
What valve springs did you use? Do you happen to have the part number for them??
MBWorld Fanatic!
Quote:
I had been looking for the part # on valve springs I need to upgrade my camshafts. Do you know what yours are.... Do they even make aftermarket valve springs for MB's?Originally Posted by Finny
The stock Springs which tested OK can handle the RPM required.


