


Quote:
I used the stock ones which had about 93lbs on the seat. Originally Posted by Ghostrider
I had been looking for the part # on valve springs I need to upgrade my camshafts. Do you know what yours are.... Do they even make after market valve springs for MB's?
If you intend on increasing lift and or RPM range you would most likely need to change the springs.
Depending on lift you will need to find out the crush hight then add 10 thou per coil gap to devise the maximum safe lifting hight.
Cam lift x Rocker ratio = Valve lift. Each manufacture would most likely have their own spring specs.
Just ask who ever you purchase the cams from for their suggested selection.
anybody know of a replacement or custom intercooler for an 03 SL 500 with a Kleeman S/C looking for more HP through cooler IAT's

MBWorld Fanatic!
ProjectC55
MBWorld Fanatic!
close
Oct 26, 2019
Quote:
The upgrade for your car would be Stck E55 valve springs. They are different than the 4.3L valve springs.Originally Posted by Ghostrider
I had been looking for the part # on valve springs I need to upgrade my camshafts. Do you know what yours are.... Do they even make aftermarket valve springs for MB's?
MBWorld Fanatic!
ProjectC55
MBWorld Fanatic!
close
Oct 26, 2019
Quote:
The power band has been raised up a little more sacrificing a bit of low end torque for upper HP.
I experienced this when installing the Kleeman cams on my N/A 5.5L motor. The lobe separation is wider on the "K" cams as well. Had to set the crank to 35 to 38 degrees AFTDC. All I can say is that she runs hard as hell now compared to stck. Completely satisfied.Originally Posted by Finny
Don't know the exact cam specs but it appears that the lobe separation angle is wider than stock. The power band has been raised up a little more sacrificing a bit of low end torque for upper HP.

MBWorld Fanatic!
Quote:
I found them... It was just hard going through all of the lists of valve springs. Pricey little boogers... Originally Posted by ProjectC55
The upgrade for your car would be Stck E55 valve springs. They are different than the 4.3L valve springs.


theboogers
MBWorld Fanatic!
close


May 14, 2026
back to the slr cam timing question. i asked people who have installed the slr cams and they have not reset to a slr timing setup. they are running stock 55 timing setup. is there a slr timing set up that should be used with the slr cams?
Quote:
I'll check it out in WIS.Originally Posted by theboogers
back to the slr cam timing question. i asked people who have installed the slr cams and they have not reset to a slr timing setup. they are running stock 55 timing setup. is there a slr timing set up that should be used with the slr cams?
According to WIS, the 155 engine has the same cam installation procedure as the 113 990 engine.
MB World Stories
The Best of Mercedes & AMG
Explore

Manual Mercedes? 6 Times Sindelfingen Let Drivers Have All The Fun
Verdad Gallardo
Mercedes SLR McLaren 722 S Is Extremely Rare Example Modified by McLaren
Verdad Gallardo
8 Classic Boxy Mercedes Designs That Have Aged Like Fine Wine
Verdad Gallardo
Flawlessly Restored Mercedes 190E Evo II Heads to Auction
Verdad Gallardo
Electric Mercedes C-Class Unveiled: 11 Things You Need to Know
Verdad Gallardo
Mercedes EQS Gets A Major Update: Everything You Need to Know
Verdad Gallardo
5 Underrated Mercedes-Benz Models That Don't Get the Love They Deserve
Verdad Gallardo
Mercedes 300D Has Pushed Well Past 1 Million Miles and It Ain't Stopping
Verdad Gallardo
10 Most Reliable Mercedes-Benz Models You Can Buy Used
Verdad Gallardo
theboogers
MBWorld Fanatic!
close
May 14, 2026
i thought that you had noticed a difference in your statement-
"Just being sure to be sure. After an hour or so I couldn't work out why the timing was out of whack??? Duh!!! I was using the E55 timing specs not the SLR's !!! All checked out fine then...Duh????..."
thanks for all your info and input.
i don't have WIS, what is it?
"Just being sure to be sure. After an hour or so I couldn't work out why the timing was out of whack??? Duh!!! I was using the E55 timing specs not the SLR's !!! All checked out fine then...Duh????..."
thanks for all your info and input.
i don't have WIS, what is it?
I see what your saying... I actually checked the timing from the lobe which is different than stock.
The only difference is where the lobes are positioned.
But the physical cam alignment procedure is identical on both engines.
The only difference is where the lobes are positioned.
But the physical cam alignment procedure is identical on both engines.
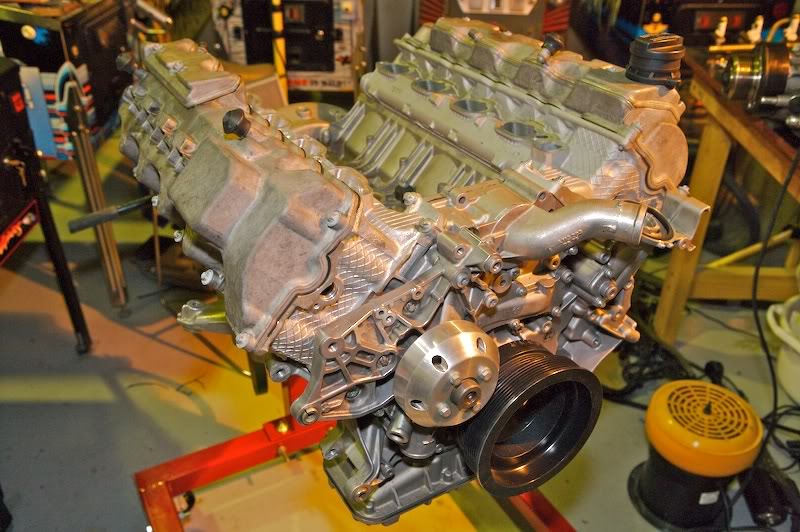
After the timing setting was done the rocker covers finally were installed with the wiring harness and spark coils.
I gave the supercharger case a good clean out to get rid of all the alloy particles from the porting process and topped up the gear oil.
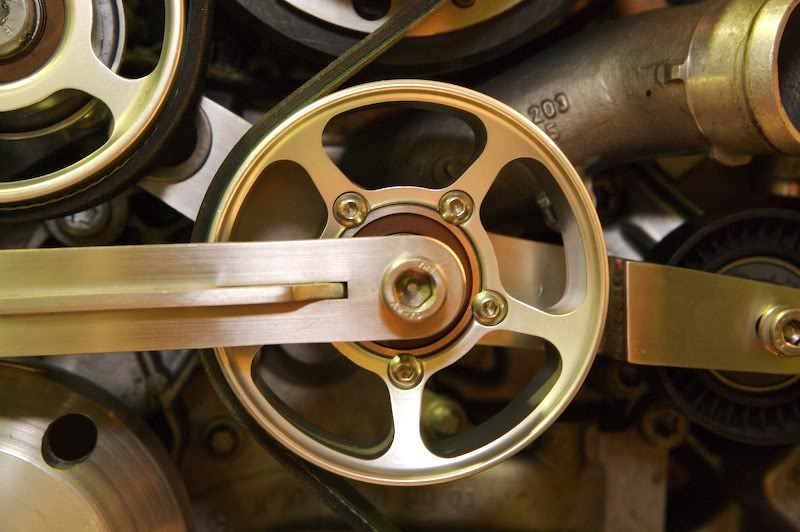
A while ago I mentioned how my supercharger belt was slipping and that there wasn't a solution to fix the problem... well after some R&D I've came up with a two pronged solution to help prevent slip while using larger S/C drive pulleys.
The first item deals with reclaiming pulley foot print area for the belt to claim and the second device deals with adding extra pressure to the stock idler tensioner.
As the S/C pulley size increases so dose slipping which causes a number of problems... Increased fuel consumption, Chewing up of belts, Top end running rich (causing power loss) and erratic or spiky dyno curves all because of slip.
The photos here are of the final prototype which will be identical to the VRP version which will be available shortly. I'm still waiting on these new improved Gates belts and some other small bits which will bring it all together. I'll notify you guys here when the kits are ready to ship to Victor.
I've spared no expense on parts build and quality. Rob black engineering laser cut and Tig welded all the stainless steel components from my plans. The pulleys were sourced from Billetflow where the bearings are mounted by screws instead of cheep cir clips which prevents bearing spinout under higher operating temperatures and loads due to metal expansion. The main fixed idler pulley has a wider bearing to cope with all the extra stress from added tension. The new longer belt which Gates claim to last longer due to new high techo materials used because of higher emissions standards which cause diesel engines to run at higher temperatures. The main wrap pulley has been reinforced further by a brace mounted to the fixed idler which prevents any movement under load. These are just some of the kits features.
Remember theses are original high quality Finny products available exclusively through VRP only. Beware! any others are cheep inferior clones !!!
I did all the R&D myself using my Guinea Pig 55 so I know these kits work perfect!
Anyway check out the mock up photos as I haven't installed the accessories items yet. These are just to show you what it looks like now.
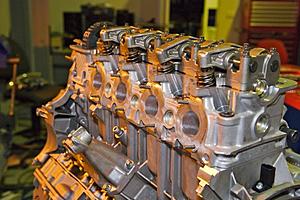
Exhaust studs installed.
Finally rocker covers bolted on!
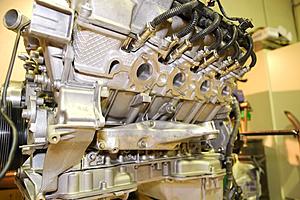
Plugs and coils mounted.

Engine harness added.

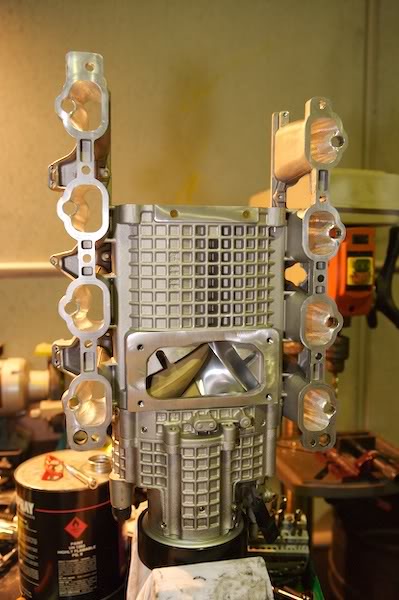
Rotor and Gear assembly slotted into clean ported case.
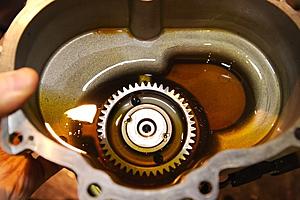
Some fully synthetic gear oil for the helicals.
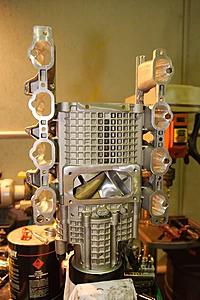
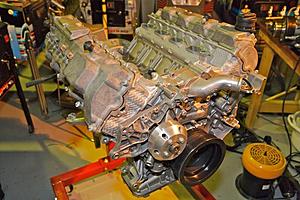
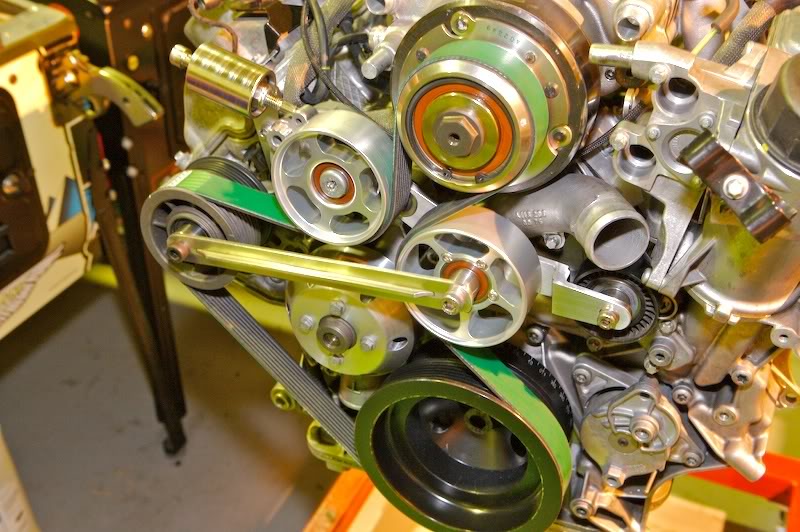
Front section complete.
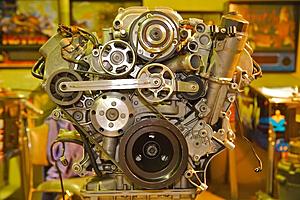
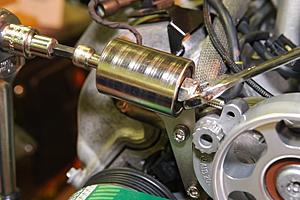
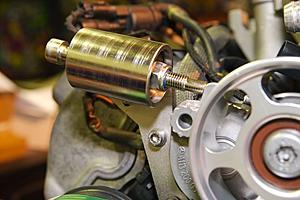
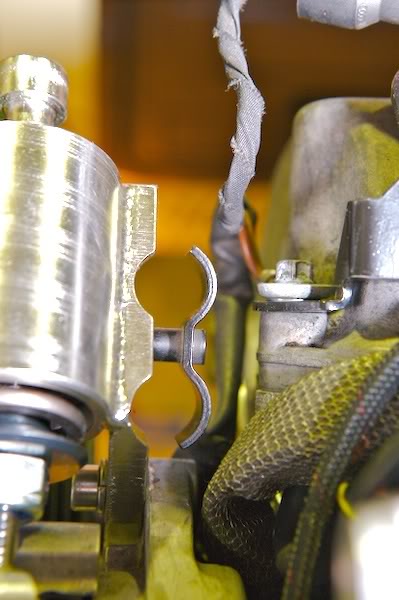
Overview of the pulley wrap kit. Notice the original belt path has been altered by the extra pulley and the larger idler pulley which increases the belt contact area on both the S/C and balancer.

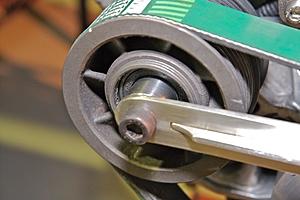
This diverter pulley is mounted firmly by two stainless steel brackets which are pulled to the right under load. The Billetflow pulley is around the wrong way but I wanted to show the small hex screws which mount the high speed bearing which prevents spinning in the wheel case. I'll flip it back later.
I increased the width of the idler bering to cope with the extra pressure added. A high tensile bolt is also used to strengthen the assembly.

Evolution... Yes one of those are wood!

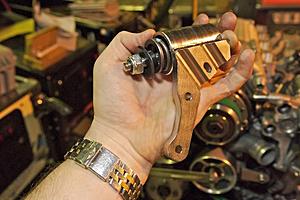
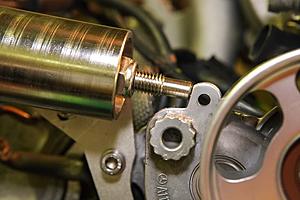
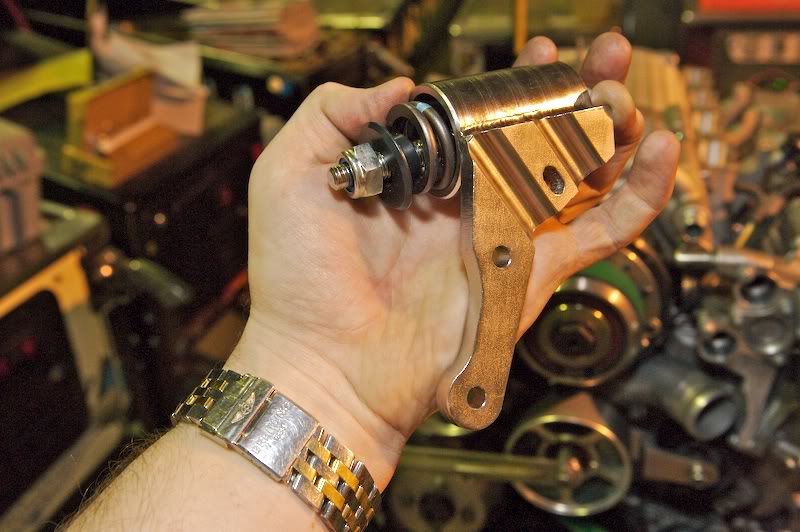
Next up is the Auxiliary tensioner device which uses a valve spring to apply extra tension to the stock idler.
Rear of above. This replaces the stock bracket that is used to secure the hard cooling lines to the intercooler.

I had the rear machined to match the stock bracket and also to use the stock top clamp.
Once bolted in last it's easy to adjust with simple tools.
A little extra pressure added which allows the stock system to move freely.
I ground a flat spot on the cast idler to accommodate contact with tensioner pin.
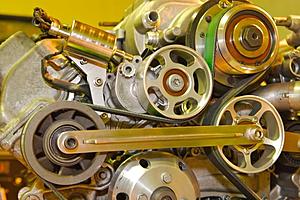
Total solution.

Same.
More soon...
I gave the supercharger case a good clean out to get rid of all the alloy particles from the porting process and topped up the gear oil.
A while ago I mentioned how my supercharger belt was slipping and that there wasn't a solution to fix the problem... well after some R&D I've came up with a two pronged solution to help prevent slip while using larger S/C drive pulleys.
The first item deals with reclaiming pulley foot print area for the belt to claim and the second device deals with adding extra pressure to the stock idler tensioner.
As the S/C pulley size increases so dose slipping which causes a number of problems... Increased fuel consumption, Chewing up of belts, Top end running rich (causing power loss) and erratic or spiky dyno curves all because of slip.
The photos here are of the final prototype which will be identical to the VRP version which will be available shortly. I'm still waiting on these new improved Gates belts and some other small bits which will bring it all together. I'll notify you guys here when the kits are ready to ship to Victor.
I've spared no expense on parts build and quality. Rob black engineering laser cut and Tig welded all the stainless steel components from my plans. The pulleys were sourced from Billetflow where the bearings are mounted by screws instead of cheep cir clips which prevents bearing spinout under higher operating temperatures and loads due to metal expansion. The main fixed idler pulley has a wider bearing to cope with all the extra stress from added tension. The new longer belt which Gates claim to last longer due to new high techo materials used because of higher emissions standards which cause diesel engines to run at higher temperatures. The main wrap pulley has been reinforced further by a brace mounted to the fixed idler which prevents any movement under load. These are just some of the kits features.
Remember theses are original high quality Finny products available exclusively through VRP only. Beware! any others are cheep inferior clones !!!
I did all the R&D myself using my Guinea Pig 55 so I know these kits work perfect!
Anyway check out the mock up photos as I haven't installed the accessories items yet. These are just to show you what it looks like now.

Exhaust studs installed.
Finally rocker covers bolted on!

Plugs and coils mounted.

Engine harness added.

Rotor and Gear assembly slotted into clean ported case.

Some fully synthetic gear oil for the helicals.
Front section complete.

Overview of the pulley wrap kit. Notice the original belt path has been altered by the extra pulley and the larger idler pulley which increases the belt contact area on both the S/C and balancer.
This diverter pulley is mounted firmly by two stainless steel brackets which are pulled to the right under load. The Billetflow pulley is around the wrong way but I wanted to show the small hex screws which mount the high speed bearing which prevents spinning in the wheel case. I'll flip it back later.

I increased the width of the idler bering to cope with the extra pressure added. A high tensile bolt is also used to strengthen the assembly.

Evolution... Yes one of those are wood!
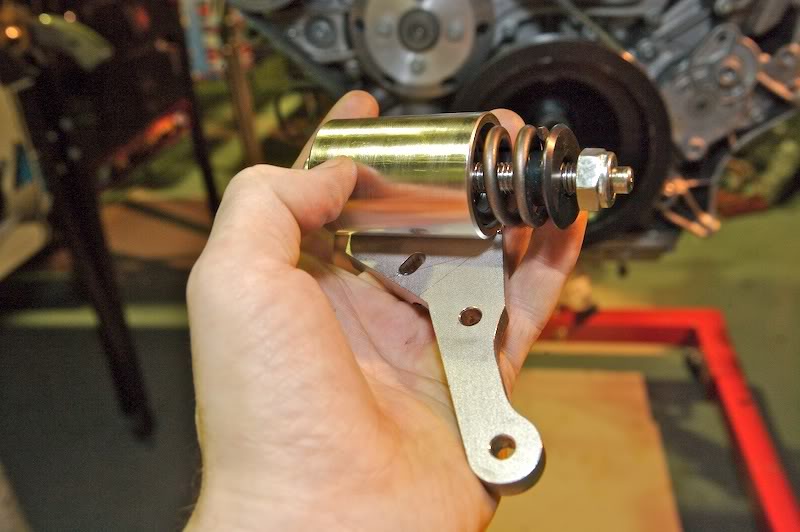
Next up is the Auxiliary tensioner device which uses a valve spring to apply extra tension to the stock idler.
Rear of above. This replaces the stock bracket that is used to secure the hard cooling lines to the intercooler.
I had the rear machined to match the stock bracket and also to use the stock top clamp.

Once bolted in last it's easy to adjust with simple tools.

A little extra pressure added which allows the stock system to move freely.

I ground a flat spot on the cast idler to accommodate contact with tensioner pin.

Total solution.
Same.
More soon...

Some serious development there Finny and indeed some awe!!!
I was wondering how does one know your belt is slipping and how can you tell by how much ... ?
Typically I feel no power loss or no drop in boost ... but I have a sooted exhaust ... what test can one do to detemine if I have a slpping belt?
Also will too much tension not begin to damage / affect the damping characteristics of the crank pulley ?
How much torque should the tensioner put on the belt?

MBWorld Fanatic!
Unbelievable! A work of art. Can't wait for it to be fired up.
Quote:
Slippage is relative to pulley size. A dyno report will help disclose slipping by erratic peeks and troughs in the power curve. The A/F ratio is generally rich as well. Also listen for belt squeal at high RPM.Originally Posted by stevebez
I was wondering how does one know your belt is slipping and how can you tell by how much ... ?
Quote:
Maybe potential power lurking in there?... RS fuel economy and black tips are a dead giveaway. Run a Dyno and check the data.Originally Posted by stevebez
Typically I feel no power loss or no drop in boost ... but I have a sooted exhaust ... what test can one do to determine if I have a slipping belt?
Quote:
No... the actual dampening ring is one pice with the accessories pulley which consumes a small amount of power compared to 100+ hp from the S/C itself. The S/C pulley is solid to the crank which doesn't effect the dampening characteristics. Originally Posted by stevebez
Also will too much tension not begin to damage / affect the damping characteristics of the crank pulley ?
Quote:
Using a dyno I adjusted the tensioner incrementally until the curve smoothed out and the squeal went away. Originally Posted by stevebez
How much torque should the tensioner put on the belt?
I have since upped the pulley size and will post the dyno when the engine is finally put back in the beast.
theboogers
MBWorld Fanatic!
close
May 14, 2026
finny- did you change to the 06 S/C clutch package? How hard is it to remove the S/C clutch and replace for a DIY. thanks
Quote:
I haven't changed to the new version and have no intention to. Not sure on how to do it your self. Looks a little tricky though.Originally Posted by theboogers
finny- did you change to the 06 S/C clutch package? How hard is it to remove the S/C clutch and replace for a DIY. thanks
The new clutch was designed to prevent snap on shock of the S/C pulley which caused the belt to chirp.
I'm not so sure if the new design is suitable for larger pulley setups.
Suppose you can't have it both ways...
")
MBWorld Fanatic!
Quote:
The new clutch was designed to prevent snap on shock of the S/C pulley which caused the belt to chirp.
I'm not so sure if the new design is suitable for larger pulley setups.
Suppose you can't have it both ways...
Firstly great work and looks like your product rocksOriginally Posted by Finny
I haven't changed to the new version and have no intention to. Not sure on how to do it your self. Looks a little tricky though.The new clutch was designed to prevent snap on shock of the S/C pulley which caused the belt to chirp.
I'm not so sure if the new design is suitable for larger pulley setups.
Suppose you can't have it both ways...
.Just was reading a few of the posts and saw a few regarding black tips.
I have black tips, even after I clean them; I get them back in 2-3days. Car is CLS 55 06 and 4100km on it now.
Do the tips have anything to do with low miles, or is it the belt?

Also when I fire her up I hear a 'e eee' sound sometimes (pronounce those as vowels to get the right sound
) like a tugging or pulling sound.Any comments would be greatly appreciated thanks

MBWorld Fanatic!
Yacht Master
MBWorld Fanatic!
close
Jun 24, 2023
Pretty work Finny, I see on your belt tensioner the two reliefs and clamp for the intercooling plumbing, dose this mean that the OEM cooler will be used? I get the feeling we are going to see some wild plumbing going on here soon. As always keep up the good work
 ???
???
???
Banned
Finny my friend... AWESOME... Just AWESOME!!
That engine looks like a piece of art. Can't wait to see the results of all the extra power adders.
Guys: This setup has been in the works for months.. Every detail was covered and Finny spent an incredible amount of R&D time on this to make sure no stone was left unturned. Even the belt that was selected is a specialized belt.
This will be a complete bolt-on package available in 2 stages.. The first will be the auxiliary tensioner.. The second will be the "Extreme Belt wrap kit" + Aux Tensioner system.
We are still working out the pricing details but that should be available shortly.
Banned
Forgot to mention that the 2-piece crank pulley has been ordered and production will be started as soon as our spot comes up.
We've got an initial order of 20 units being made.. That will complete the pulley system for the 55K motors.
Next in line is the SLR 722 Intercooler setup. A set of REAL SLR 722 Intercoolers were purchased and the idea is to make a clone setup which mimics the factory SLR setup.. They made some improvements on the 722 vs the normal SLR units so that is why the newer ones were purchased.
Start saving your pennies guys!! SLR style coolers will be available in the near future at a much lower cost of what is out there now.
Quote:
Do the tips have anything to do with low miles, or is it the belt?
Have you installed a larger pulley? Normal then just some slip. This shouldn't happen being stock if thats the case. Brand new... send it back! get another one... Super rich or oil burn? Have the MB techs check it out. Please advise us what happened.Originally Posted by Zod
I have black tips, even after I clean them; I get them back in 2-3days. Car is CLS 55 06 and 4100km on it now. Do the tips have anything to do with low miles, or is it the belt?
Quote:
) like a tugging or pulling sound.
Emissions smog pump, this is normal on a first start. More like a vacuum cleaner sound... Ha Ha... I chucked mine in the trash and installed a transmission cooler there instead. Ironically I still run cats.Originally Posted by Zod
Also when I fire her up I hear a 'e eee' sound sometimes (pronounce those as vowels to get the right sound ) like a tugging or pulling sound.
Quote:
Thanks man!Originally Posted by Yacht Master
Pretty work Finny, I see on your belt tensioner the two reliefs and clamp for the intercooling plumbing, dose this mean that the OEM cooler will be used?
This is optional for those who wish to use the stock bottle neck intercooler core setup.

The SLR units will cure bottle neck cooler bronchitis.
Quote:
Not to wild, I like the stock neat practical look. The quite achiever method. If the law looks in there, nothing looks radically altered, you know like the 722.Originally Posted by Yacht Master
I get the feeling we are going to see some wild plumbing going on here soon. As always keep up the good work
MBWorld Fanatic!
Yacht Master
MBWorld Fanatic!
close
Jun 24, 2023
Quote:
This is optional for those who wish to use the stock bottle neck intercooler core setup.
The SLR units will cure bottle neck cooler bronchitis.
Not to wild, I like the stock neat practical look. The quite achiever method. If the law looks in there, nothing looks radically altered, you know like the 722.
FinnyOriginally Posted by Finny
Thanks man!This is optional for those who wish to use the stock bottle neck intercooler core setup.
The SLR units will cure bottle neck cooler bronchitis.
Not to wild, I like the stock neat practical look. The quite achiever method. If the law looks in there, nothing looks radically altered, you know like the 722.
Victor posted pics of the
 sacrificial SLR coolers, and a W211 with a SLR engine. The gold W211 looks like only a small mod to the hood was necessary to clear the SLR coolers.
 As I recall you had a dual I/C pump set up will you keep that or will we see an engine driven I/C chiller box pump? I am sure you will once again raise the bar to overkill
Banned
LOL.. Shhhh.. Don't disturb him.. He is hard at work... He is probably preparing himself for the sacrificial carving of the SLR coolers.. I am sure he is getting himself good and drunk so he wont remember what he did the next morning. 
Seriously though.. On the Bin Sulayem car, they cut out the cross-bracing on the hood, removed the liner, and POSSIBLY lowered the motor.. NOT SURE about that last bit.. I've stared and stared at that picture trying to compare against an E55 but I'm just not sure ..
We'll soon know for sure... Hang on to your hats.. Its going to get interesting...
Quote:
Victor posted pics of the sacrificial SLR coolers, and a W211 with a SLR engine. The gold W211 looks like only a small mod to the hood was necessary to clear the SLR coolers. As I recall you had a dual I/C pump set up will you keep that or will we see an engine driven I/C chiller box pump? I am sure you will once again raise the bar to overkill
Originally Posted by Yacht Master
FinnyVictor posted pics of the
sacrificial SLR coolers, and a W211 with a SLR engine. The gold W211 looks like only a small mod to the hood was necessary to clear the SLR coolers. As I recall you had a dual I/C pump set up will you keep that or will we see an engine driven I/C chiller box pump? I am sure you will once again raise the bar to overkill

MBWorld Fanatic!
Does anyone know how fast the Bin Sulayem car is? 1/4 mile times? Has he ever dynoed it?


