
DIY Rear Brake Change

 06-23-2007, 01:07 AM
#1
Senior Member
Thread Starter
DIY Rear Brake Change
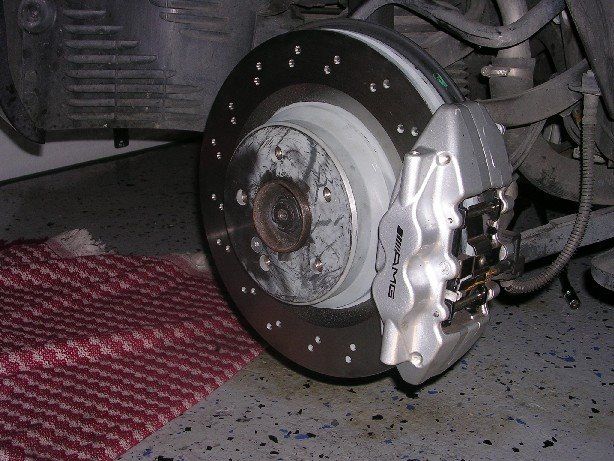
Here are some pics I took during the replacement. Total cost including shipping for both OEM rotors and their respective pads was $274.
The first thing I did was put the car in neutral and disconnect the SBC.

I have a couple of jacks so I slid one under each side jack point and jacked up each side equally. Remove the pins and pad spring from the caliper, unplug the wear sensor, and remove the pads.
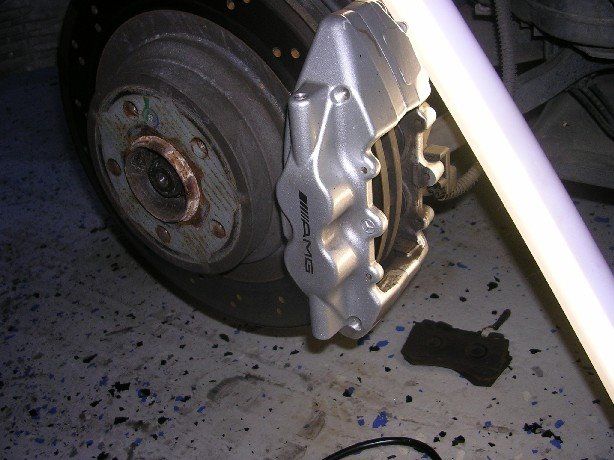
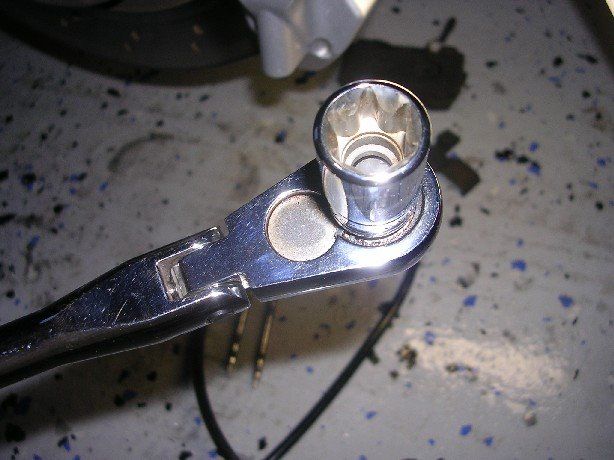
Now remove the caliper using an E18 socket.
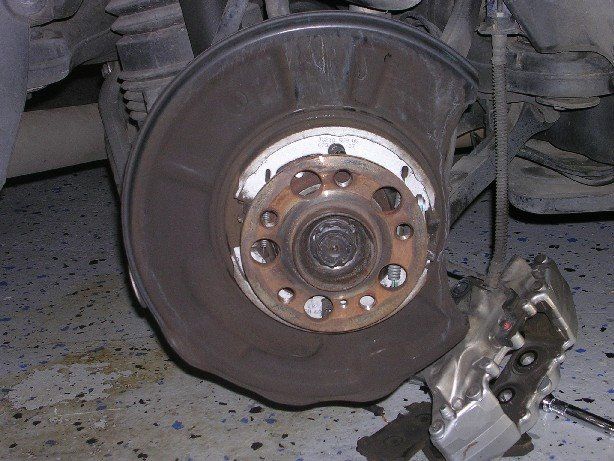
Once the caliper is off, remove the set screw in the rotor and pull the rotor off the hub. This was easier said than done because it was frozen to hub. I soaked it with penetrating oil and heated it with a propane torch. Couple hammer blows later and it came right off. Be sure to clean the hub surface very well and apply a thin layer of high pressure grease prior to installing the new rotor.
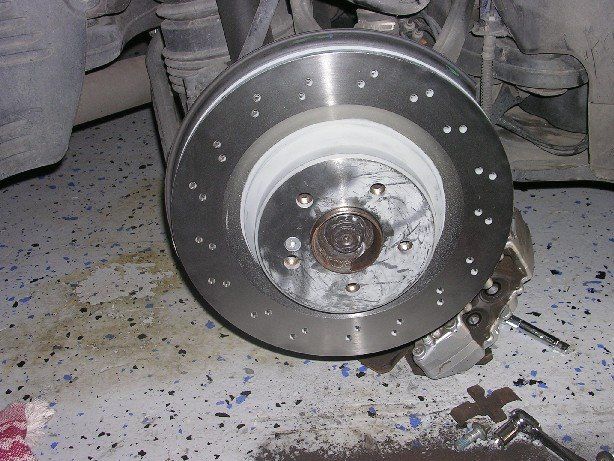
Clean the new rotor VERY well before installation. I used almost and entire can of cleaner for both rotors because of the coating on the rotors. Update to this... you don't need to remove the coating. It comes off after the first few miles with no side effects to the pads. Let the pads do the work.
Clean the caliper and all the components prior to reassembly. Mount caliper, torque bolts to 130ft-lbs, drop in new pads, spring, pins, and plug in wear sensor.
Plug the SBC back in and open one of the doors, and you'll see the caliper pistons close. Put tires back on the car and go for a ride.
Take your time and it's a very straightforward job. It took me longer than it should have because my 4yr-old daughter insisted on "helping" me but it can easily be done on a Saturday morning.
Hope this helped. Next DIY project might be isolating the intercooler coolant circuit while adding a secondary heat exchanger.
The first thing I did was put the car in neutral and disconnect the SBC.
I have a couple of jacks so I slid one under each side jack point and jacked up each side equally. Remove the pins and pad spring from the caliper, unplug the wear sensor, and remove the pads.
Now remove the caliper using an E18 socket.
Once the caliper is off, remove the set screw in the rotor and pull the rotor off the hub. This was easier said than done because it was frozen to hub. I soaked it with penetrating oil and heated it with a propane torch. Couple hammer blows later and it came right off. Be sure to clean the hub surface very well and apply a thin layer of high pressure grease prior to installing the new rotor.
Clean the new rotor VERY well before installation. I used almost and entire can of cleaner for both rotors because of the coating on the rotors. Update to this... you don't need to remove the coating. It comes off after the first few miles with no side effects to the pads. Let the pads do the work.
Clean the caliper and all the components prior to reassembly. Mount caliper, torque bolts to 130ft-lbs, drop in new pads, spring, pins, and plug in wear sensor.
Plug the SBC back in and open one of the doors, and you'll see the caliper pistons close. Put tires back on the car and go for a ride.
Take your time and it's a very straightforward job. It took me longer than it should have because my 4yr-old daughter insisted on "helping" me but it can easily be done on a Saturday morning.
Hope this helped. Next DIY project might be isolating the intercooler coolant circuit while adding a secondary heat exchanger.
Last edited by BrianS; 04-08-2015 at 11:51 AM. Reason: Links to pics.
 06-23-2007, 01:10 PM
#3
Senior Member
Join Date: Feb 2007
Location: East Coast Baby!
Posts: 363
Likes: 0
Received 0 Likes
on
0 Posts
SL55
I was going to do the same thing soon, not because my car needs rear brakes, It only has 5,000mi on it. But because the rear rotors have become discolored and my Wheels display the rotors prominently.
The stock pads are very aggressive, and I was trying to find a less metallic pad... mabye EBC Greens.
Ceramics don't make dust, but every set I've seen discolors the rotors badly.
Anyone have any ideas on kind pads?
Bests,
RoydRage
The stock pads are very aggressive, and I was trying to find a less metallic pad... mabye EBC Greens.
Ceramics don't make dust, but every set I've seen discolors the rotors badly.
Anyone have any ideas on kind pads?
Bests,
RoydRage
06-23-2007, 07:15 PM
#5
MBWorld Fanatic!
Join Date: May 2006
Location: So.Ca.
Posts: 3,042
Likes: 0
Received 0 Likes
on
0 Posts
E55
I was going to do the same thing soon, not because my car needs rear brakes, It only has 5,000mi on it. But because the rear rotors have become discolored and my Wheels display the rotors prominently.
The stock pads are very aggressive, and I was trying to find a less metallic pad... mabye EBC Greens.
Ceramics don't make dust, but every set I've seen discolors the rotors badly.
Anyone have any ideas on kind pads?
Bests,
RoydRage
The stock pads are very aggressive, and I was trying to find a less metallic pad... mabye EBC Greens.
Ceramics don't make dust, but every set I've seen discolors the rotors badly.
Anyone have any ideas on kind pads?
Bests,
RoydRage
06-23-2007, 11:48 PM
#7
Senior Member
Thread Starter
Trending Topics
06-24-2007, 09:31 AM
#8
Member

Join Date: Nov 2006
Location: Stockholm, Sweden
Posts: 180
Likes: 0
Received 0 Likes
on
0 Posts
W211 E55 AMG
brilliant, thanks.
My stealer wants $3000 for new discs and pads all around...
...now to see it the superstore ships to europe...
edit: "WE DO NOT SHIP ORDERS OUTSIDE OF THE U.S.A.", doh...
Last edited by narf; 06-24-2007 at 09:42 AM.
06-24-2007, 09:59 AM
#9
Senior Member
Thread Starter
I hope you can find a way. 3000USD is insane! The paper that came with the pads stated that only MB trained specialists were authorized to work on the brakes.
 Talk about protecting their margins....
12-01-2007, 03:40 PM
Talk about protecting their margins....
12-01-2007, 03:40 PM
#10
Super Member

Join Date: Nov 2005
Location: SoCal
Posts: 673
Likes: 0
Received 0 Likes
on
0 Posts
F10
what did you use to remove the coating on the new rotors? good thing i saw this thread before installing new rotor, I was just gonna let the pads scrape off the coating, yikes.
12-01-2007, 04:22 PM
#11
Out Of Control!!
Join Date: Sep 2004
Location: San Diego
Posts: 13,394
Likes: 0
Received 4 Likes
on
4 Posts
2015 S212
Excellent write up. I did the EXACT thing, getting my EVOSport Rotors on. Getting the rear calipers off was MUCH harder than the fronts. Maybe it is just how the bolts are.
12-01-2007, 10:22 PM
#16
MBWorld Fanatic!

Join Date: Jan 2004
Location: Salt Lake City (but not Morm)
Posts: 7,092
Likes: 0
Received 12 Likes
on
10 Posts
2003 E55 & 2014 GL550
Later that night.
Mrs BrianS, "Honey, have you seen that blanket my mother gave us for Christmas last year??? Can't find it anywhere"

Great job on the brakes BTW. As always, you da man!!!!
Mrs BrianS, "Honey, have you seen that blanket my mother gave us for Christmas last year??? Can't find it anywhere"
Great job on the brakes BTW. As always, you da man!!!!
12-02-2007, 12:21 AM
#17
 12-02-2007, 10:36 PM
#18
MBWorld Fanatic!
Join Date: Oct 2006
Location: Caribbean/Florida/Colorado
Posts: 3,642
Likes: 0
Received 11 Likes
on
11 Posts
E-ZGO 53hp., 1999 E 430 sport, 2004 E 55, 2008 Tahoe LTZ on 24"s
 12-02-2007, 11:57 PM
#19
Senior Member
Thread Starter
You should have heard the conversation when I was installing a Quaife in another car and the ring gear had to be lightly pressed on....so what did I do...put the ring gear in the oven on very low heat and the Quaife in the refrigerator of course! LOL...worked perfect. The ring gear dropped right into place and once both parts were the same temp they were good to go. I was the only one that saw the humor that night for reason.
12-03-2007, 04:10 AM
#20
MBWorld Fanatic!
I would very much like to see a documentation of a Quaife install ... or one where the rear gearing is changed to a 2.82 for example?

Is this possible to DIY or is shimming the diff best left to expert hands?
BTW are you building up a Haynes manual? , great write ups Brian, much appreciated.
Is this possible to DIY or is shimming the diff best left to expert hands?
BTW are you building up a Haynes manual?
, great write ups Brian, much appreciated.
12-03-2007, 08:52 AM
#21
Senior Member
Join Date: Feb 2007
Location: East Coast Baby!
Posts: 363
Likes: 0
Received 0 Likes
on
0 Posts
SL55
Jangy,
In the future, just put a small hose on the bleeder, and open it before pushing the Pistons back, letting the fluid go into a waste can. Pushing Brake Fluid back into the System can damage it...
You don't want the old brake fluid anyway... You should get that outta there. That fluid has been sitting in the caliper getting red hot, and is done. You should flush the system using a air assisted brake bleeder like Snap-On sells.
Best,
RoydRage
12-03-2007, 11:59 AM
#22
Member
Join Date: Aug 2007
Location: philadelphia
Posts: 126
Likes: 0
Received 0 Likes
on
0 Posts
2005 E55 drowned/ 2011 CTS-v coupe gone/ 2012 E63 PP,LSD finally here
[QUOTE=stevebez;2533257]I would very much like to see a documentation of a Quaife install ... or one where the rear gearing is changed to a 2.82 for example?
Is this possible to DIY or is shimming the diff best left to expert hands?
I second this request, I would love to see a write up and some pics of a Quaife install, Brian S we need you to do this for us, I for one love your DIY threads, I find them very helpful, keep up the good work Brian S
Is this possible to DIY or is shimming the diff best left to expert hands?
I second this request, I would love to see a write up and some pics of a Quaife install, Brian S we need you to do this for us, I for one love your DIY threads, I find them very helpful, keep up the good work Brian S
12-03-2007, 12:37 PM
#23
Senior Member
Thread Starter
I was eyeballing it just last week wondering how bad could it possibly be? I'd like to know the factory clearance specs before taking it on because there are several shim options available.
12-03-2007, 12:59 PM
#24
MBWorld Fanatic!
Join Date: Jan 2004
Location: Salt Lake City (but not Morm)
Posts: 7,092
Likes: 0
Received 12 Likes
on
10 Posts
2003 E55 & 2014 GL550
I'd like to know the factory clearance specs before taking it on because there are several shim options available.
11-14-2008, 11:18 PM
#25
Senior Member
Join Date: Apr 2008
Posts: 397
Likes: 0
Received 0 Likes
on
0 Posts
'05 E55 on ADV1s
In addition, I would advise a 1/2" drive E18 torx socket. It also took a 650lb. impact wrench to get them loose. Have a 5lb hammer ready to break the rotors loose too.
The fronts take a 21mm wrench/socket.
My set screws for the rotors came right off, no hassel at all.


