


DIY Pulley Install
Thread Starter
Senior Member
Joined: Apr 2007
Posts: 256
Likes: 9
From: Maryland
2004 E55 AMG
DIY Pulley Install
I just got my pulley today and couldn't wait to install it so I knocked it out tonight. It took all of about 45min total.
I got my ECU back from Adam on Monday which really woke the car up he sent me a 168mm Renntech pulley as well. Can't wait for full testing tomorrow.
Here 'ya go....
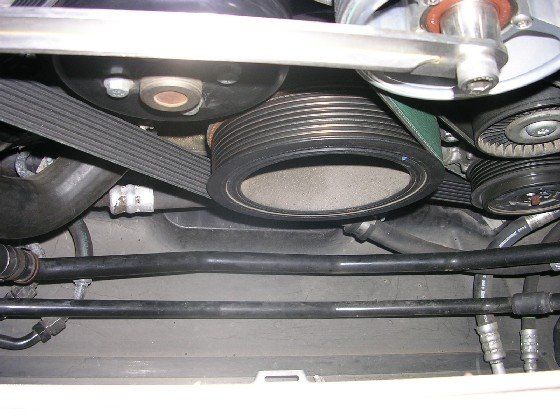
Remove the radiator fan in order to access the dampener's center bolt.
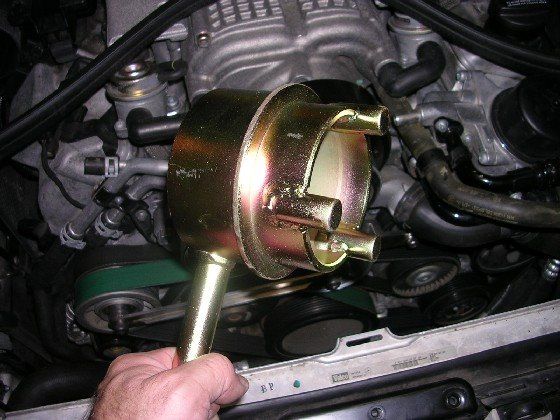
Grab your trusty crank pulley tool to hold the pulley in place while you loosen the center bolt.
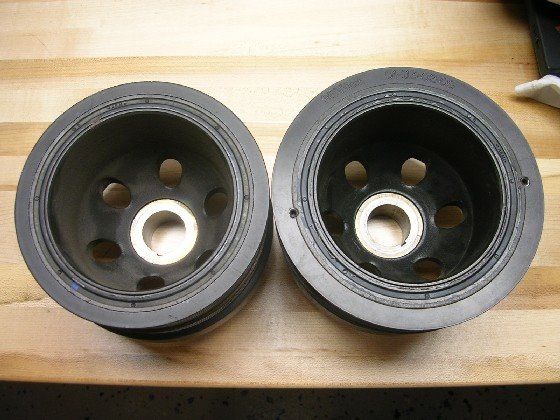
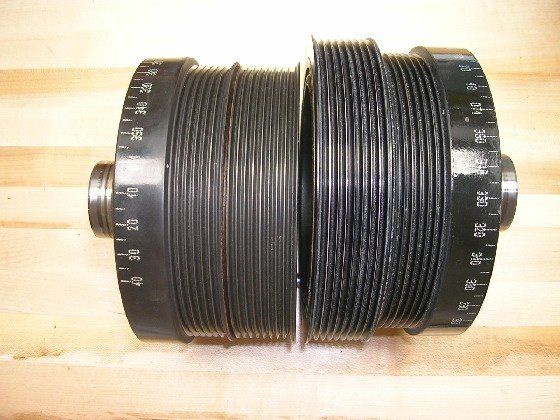
Remove center bolt and crank pulley. Stock one on the left, Renntech on the right.
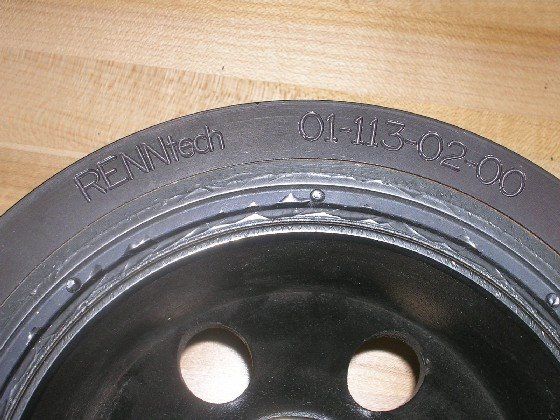
Close up shot of the pulley.
Another comparison of the two.
Install new pulley, new center bolt (torque to 148ft.lbs.+90deg.), make sure both belts are back on properly, install radiator fan, engine cover and you're done.
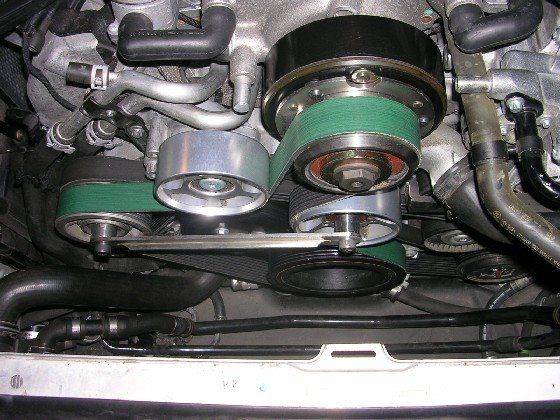
I was able to access everything from above so the car never needed to go up on ramps which made the install very straightforward.
I got my ECU back from Adam on Monday which really woke the car up he sent me a 168mm Renntech pulley as well. Can't wait for full testing tomorrow.
Here 'ya go....
Remove the radiator fan in order to access the dampener's center bolt.
Grab your trusty crank pulley tool to hold the pulley in place while you loosen the center bolt.
Remove center bolt and crank pulley. Stock one on the left, Renntech on the right.
Close up shot of the pulley.
Another comparison of the two.
Install new pulley, new center bolt (torque to 148ft.lbs.+90deg.), make sure both belts are back on properly, install radiator fan, engine cover and you're done.
I was able to access everything from above so the car never needed to go up on ramps which made the install very straightforward.
Last edited by BrianS; Apr 8, 2015 at 11:21 AM. Reason: Link to the pics
MBWorld Fanatic!
Joined: Feb 2004
Posts: 2,566
Likes: 7
'14 ML BT
Good work Brian. 45 minutes! And thanks for the pics.
The MB book says 3 hours for the pulley alone and the tech that did mine took nearly 1.5 hours. Of course, the shop wanted to be paid on 3 hrs.
The MB book says 3 hours for the pulley alone and the tech that did mine took nearly 1.5 hours. Of course, the shop wanted to be paid on 3 hrs.
Thread Starter
Senior Member
Joined: Apr 2007
Posts: 256
Likes: 9
From: Maryland
2004 E55 AMG
Trending Topics
Thread Starter
Senior Member
Joined: Apr 2007
Posts: 256
Likes: 9
From: Maryland
2004 E55 AMG
No, this is the older style pulley.
MB World Stories
The Best of Mercedes & AMG

7 Craziest Things AMG Gas Ever Built
Verdad Gallardo
New Electric Mercedes-AMG GT 4-Door Coupe Unveiled: 10 Things You Need to Know
Verdad Gallardo
6 Mercedes Models That Did NOT Age Well (But Are Somehow Still Cool)
Verdad Gallardo
Manual Mercedes? 6 Times Sindelfingen Let Drivers Have All The Fun
Verdad Gallardo
Mercedes SLR McLaren 722 S Is Extremely Rare Example Modified by McLaren
Verdad Gallardo
8 Classic Boxy Mercedes Designs That Have Aged Like Fine Wine
Verdad Gallardo
Flawlessly Restored Mercedes 190E Evo II Heads to Auction
Verdad Gallardo
Electric Mercedes C-Class Unveiled: 11 Things You Need to Know
Verdad Gallardo
Mercedes EQS Gets A Major Update: Everything You Need to Know
Verdad Gallardo
Thread Starter
Senior Member
Joined: Apr 2007
Posts: 256
Likes: 9
From: Maryland
2004 E55 AMG
3 hours!!?? That had to include lunch and few coffee breaks. Now you know why I DIY as much as possible. Crooks.
Thread Starter
Senior Member
Joined: Apr 2007
Posts: 256
Likes: 9
From: Maryland
2004 E55 AMG
If you have the crank tool, a breaker bar, 27mm socket, and a good torque wrench then yes, definitely a DIY project.

Banned
Joined: May 2004
Posts: 3,797
Likes: 2
From: Richmond Hill, Ontario
2003 E55 AMG
Nice job Brian!!! You weren't kidding when you told me you wrenched on your own car.. I figured, ok, you would do the TB but, I didnt think you'd do the crank pulley.. Good for you!!! 
BTW, do you know how much I paid for that damn crank pulley tool from MB???? $376!!!!!!!!
BTW, do you know how much I paid for that damn crank pulley tool from MB???? $376!!!!!!!!

MBWorld Fanatic!
Joined: Jan 2007
Posts: 1,359
Likes: 6
ML550
 ).
).A case where it didn't pay to go cheap was the calibrated oil dipstick. The aftermarket one was inexpensive, but didn't really fit correctly down the dipstick tube. I ended up getting the factory tool and using it to confirm the fill level after oil changes - more accurate than the onboard display and of course fit with no problems.
Senior Member
Joined: Feb 2007
Posts: 363
Likes: 0
From: East Coast Baby!
SL55
I definately think I can handle that!

Best,
RoydRage

Thread Starter
Senior Member
Joined: Apr 2007
Posts: 256
Likes: 9
From: Maryland
2004 E55 AMG
Thread Starter
Senior Member
Joined: Apr 2007
Posts: 256
Likes: 9
From: Maryland
2004 E55 AMG
 Damn, now I gotta go change my shorts! So you may a few spare sockets laying around...

MBWorld Fanatic!
Joined: Feb 2004
Posts: 1,783
Likes: 21
From: San Diego
2004 E320


Senior Member
Joined: Sep 2006
Posts: 373
Likes: 1
CL65
I'm working on changing a pully. This is not as easy as it sounds, at least not for me. I'm having trouble getting the hoses loose from the back of the fan. It is very tight behind the fan and I don't see how you could do everything from above, but I've never seen it done. I'm working from above and below and can't see how to get them loose, especially on the drivers side. Any suggestions? I guess I could put it back together and take it to a shop. My dealer is not mod friendly.
Thread Starter
Senior Member
Joined: Apr 2007
Posts: 256
Likes: 9
From: Maryland
2004 E55 AMG
Check out the attachment which might help out a bit more. Sorry if I wasn't clear but you should be good to go now.


