
GUIDE: Installing Factory Comand Navigation (with pics)
 12-21-2009, 02:04 AM
#1
Senior Member
Thread Starter
Join Date: Dec 2008
Location: Northern California
Posts: 361
Likes: 0
Received 3 Likes
on
3 Posts
05 e55
Introduction:
So just this past week I installed Harman Becker's OEM Navigation computer in my 2005 w211 AMG... I searched this forum like there was no tomorrow and am thankful to all who attempted this before me. I found a lot of useful information, but I also had questions that were unanswered. Therefore I decided to create my own post to help anyone else who may be interested in doing this.
Parts Needed:
I purchased the following parts to complete this task:
Part # A 220 820 60 85 - OEM Navigation Processor
Part # A 211 540 68 33 - MOST bus extention cable
Part # B 6 7 82 3111 - Logmatic GPS Splitter
I did not have to purchase the bracket as my vehicle already had the bracket installed. If you vehicle has Keyless Go, or Parktronic, then your vehicle will already have the bracket and correct panel in the rear. If not, you will have to purchase the bracket and panel.
Part # A 211 545 63 40 - OEM Bracket
Part # A 211 690 01 53 9C53 - Left Panel
Install Overview:
This is a fairly easy install... I had some issues with my install which I will point out later. However, here are the "basic" instructions if all goes well...
You remove the trunk paneling from the left side...
My vehicle already had the bracket, so I proceeded to extending the Fiber Optics to the navigation drive...
There is an Audio Gateway that has fiber going into it. You remove the yellow Fiber wire from the AGW plug and add the Orange Fiber cable from the MOST connector you purchased from the dealer. Once you do that, you now get the yellow fiber cable you removed and add it to the open port on the most connector you purchased.
Power and antenna wires will already be located behind the bracket ziptied together.
If your teleaid is deactivated, you do not need the GPS Splitter. If it's active, then you must install the splitter otherwise you will get errors in your instrument cluster.
When you find the power and antenna wires zip-tied together, follow the black antenna wire. The end of that cable is unplugged. This is what will either plug into the GPS Splitter, or it will plug directly to the GPS Antenna where the Tele-aid is currently plugged in.
Plug everything in and make sure your Comand recognizes the Navigation Processor. If your Comand powers on for a few seconds and then turns off, there is a break in your MOST ring, and you should double check all fiber optic connectors.
On initial powerup, the processor may take a while to acqire satellite signal. Some forum members have mentioned it took from 10-30 minutes of driving for this to happen...
This is the basic step by step proces of adding factory navigation. If everything is working, close it up and enjoy!
Problems/Troubleshooting:
Unfortunately, everything did not go as smooth as it could have and required more work...
My Comand noticed the Navigation processor right away, and loaded the software. However, it would not display a map, nor would it pick up any satellites. I double checked all connections but was unable to find anything that was improperly plugged in.
About a year back I had the dealer disable the Tele-Aid functionality of my vehicle. I would always get a warning message in my instrument cluster and had always assumed it was due to the service subscription being expired. This led me to search if disabling Tele-Aid would also disable the GPS antenna... Well, it doesn't. The GPS antenna is not software controlled as it is in some vehicles.
At this point I started to wonder if the navigation processor I purchased may have been bad. After all, it would not properly display a map, just show a gray screen with nothing on it.
When I would first get into the car, a map would pop up... But, the second I would begin to drive or move the vehicle, the map would dissappear and turn gray...
I started searching the intenet for aftermarket GPS antenna's i could use for testing purposes. I found forum member GAMBARI who was selling a Navigation Processor with a GPS antenna. I asked Gambari if he would let me use his antenna for testing purposes and he gladly accepted...
The next day I drove out to Gambari (a very polite respectful person) We plugged in his GPS antenna.
Nothing happened initially, but after a few minutes my Comand showed "0" satellites locked in. This confirmed that there was a fault with my factory GPS antenna. After an additional 5-10 minutes my Comand was able to lock in a few satellites. However, I still had no map being displayed.
We tried the map disc from Gambari's vehicle, but no luck... Gambari had the Navi Software upgrade disc, and the Comand software upgrade disc. What a lifesaver! So we updated the software for both devices.
For the Navi drive, just pop the software update to the rear drive and it will automatically update the software.
For the Comand drive, you eject any cd from your single disc slot and power down the comand. Then, Power up the comand, and immediately after powering up hit 1-3-8 together and keep them pressed until your screen prompt changes and asks for the update disc. I recommend having your vehicle started when doing this. The Comand update took a good 5-10 minutes. During this process be extra careful not to hit any buttons on the Comand, or not to start/shutdown the engine as this flashes the device memory; any power loss can render your Comand useless.
Once the update was complete, I had a few extra features I had not noticed before but I still had no map being displayed. By now it had been roughly an hour of tinkering in cold weather, we decided to call it quits.
The GPS antenna was magnetic. I routed the cable to where it would not be crimped and stuck the antenna on the right rear fender. Gambari and I shook hands and I paid him for the GPS antenna. Now, as I drive off, the map appeared!!!
So this is what I was able to gather. When I initially installed the unit it was not picking up any satellites. It did not know where it was so it didn't display anything on the screen. Occasionaly when I would start the car after work or something, a map would appear but it would show be as being somewhere in the midwest. This is most likely the last location the drive was powered down. As soon as I would move the map would turn gray again. This was because the unit was confused and did not know where I was.
When I drove away from Gambari's place, the unit now had GPS signal but was still confused where I was. After a few hundred feet the map appeared and showed me to be in the correct location. After searching the crap out of this forum, I learned that many people had this issue but none of the posts I ran into had a solution. In this case, it was a bad GPS antenna.
I went home and took rest. The next night I finished everything off after work. Below are pictures of the entire process.
Pictures:
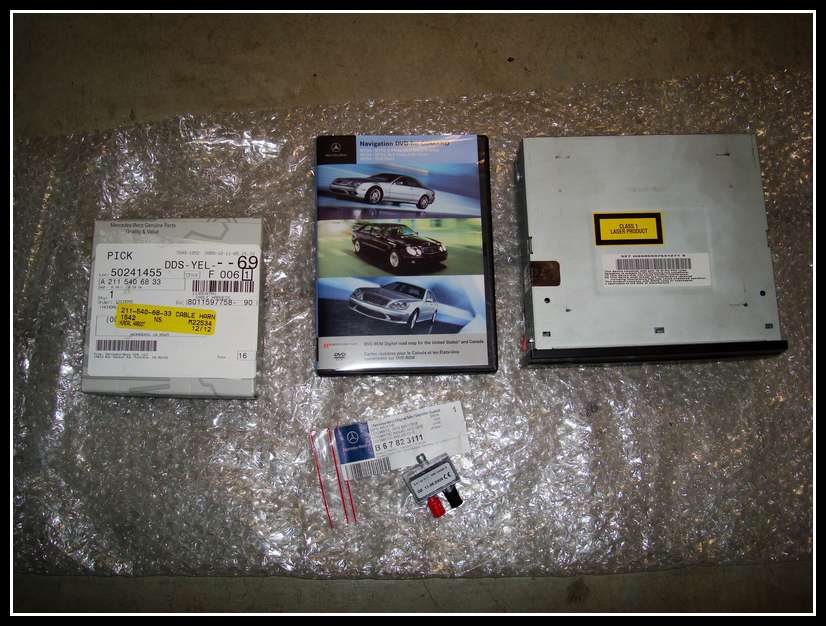
Here are all the parts I initially ordered to complete the job
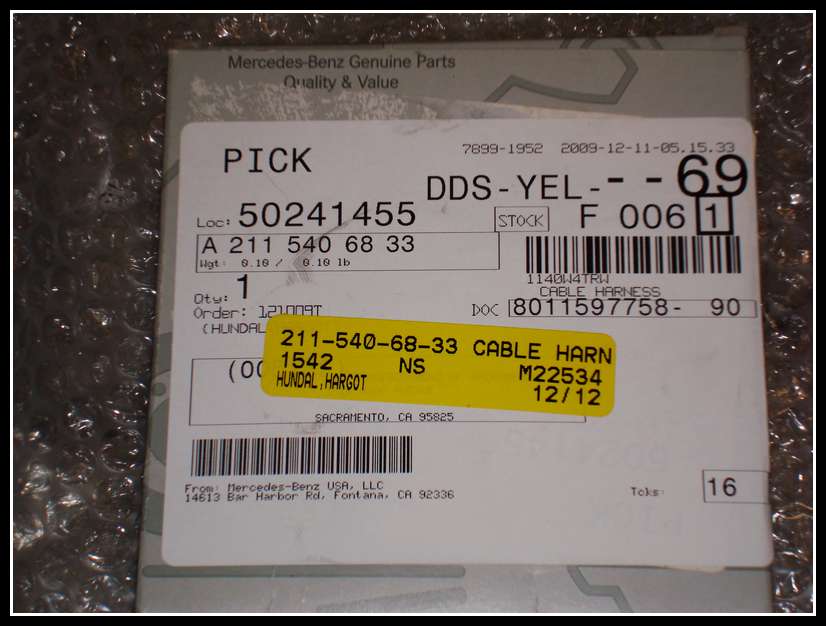
This is the MOST Bus Fiber Extention Cable
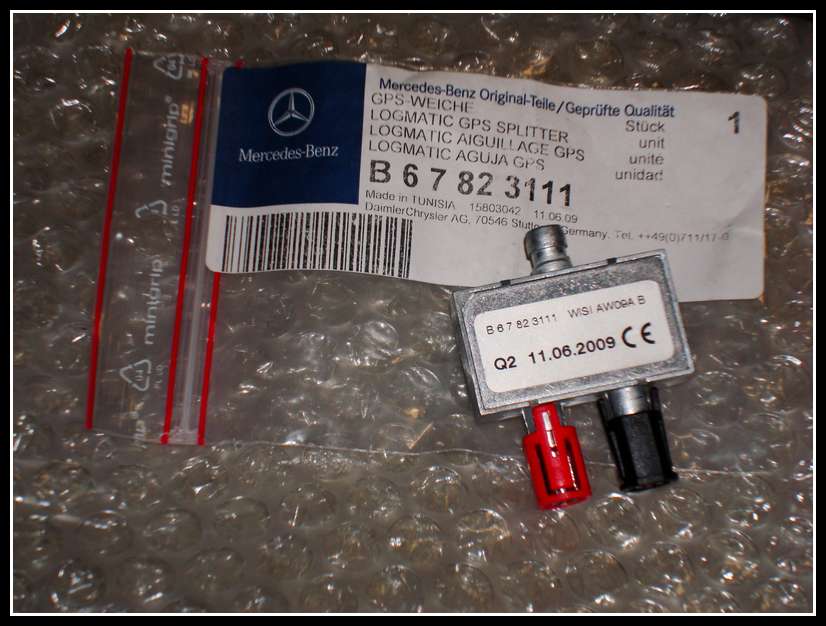
Here is the GPS Splitter
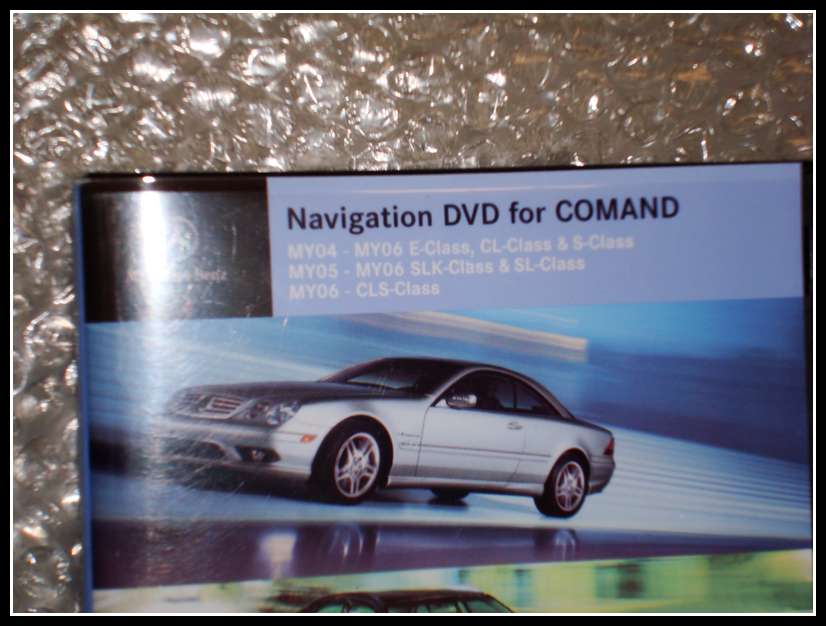
Here is the Map DVD that came with the drive I purchased
Here is the Navigation Processor Drive
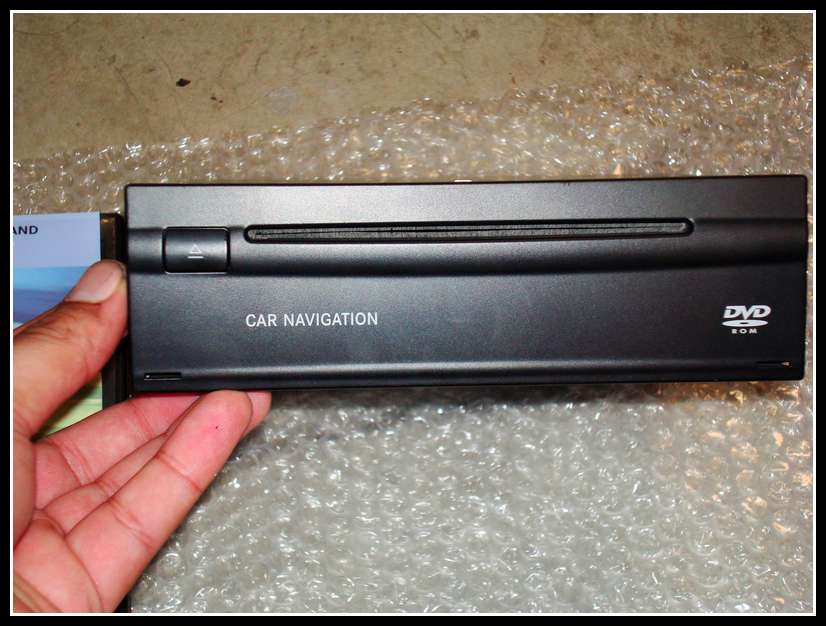
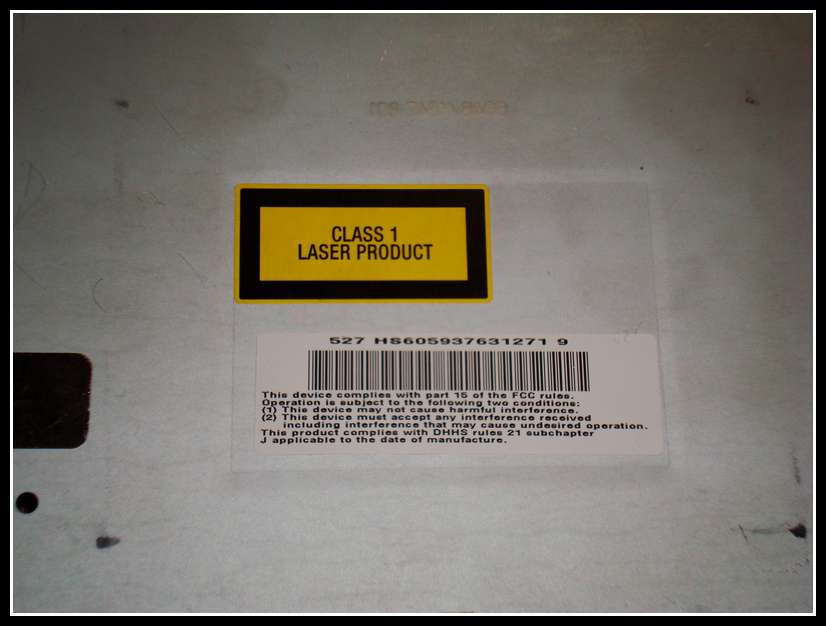
This is the top of the navigation processor
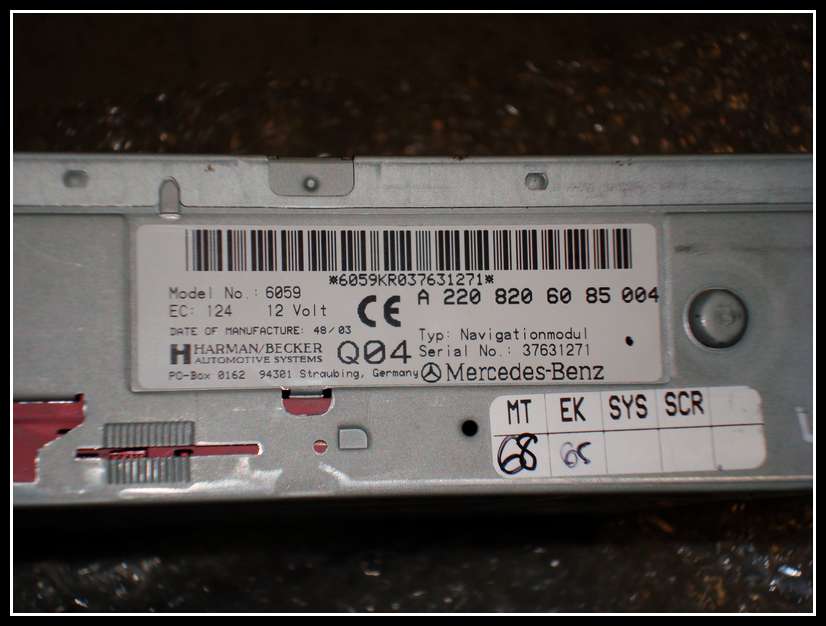
Here is the side of the Navigation Processor
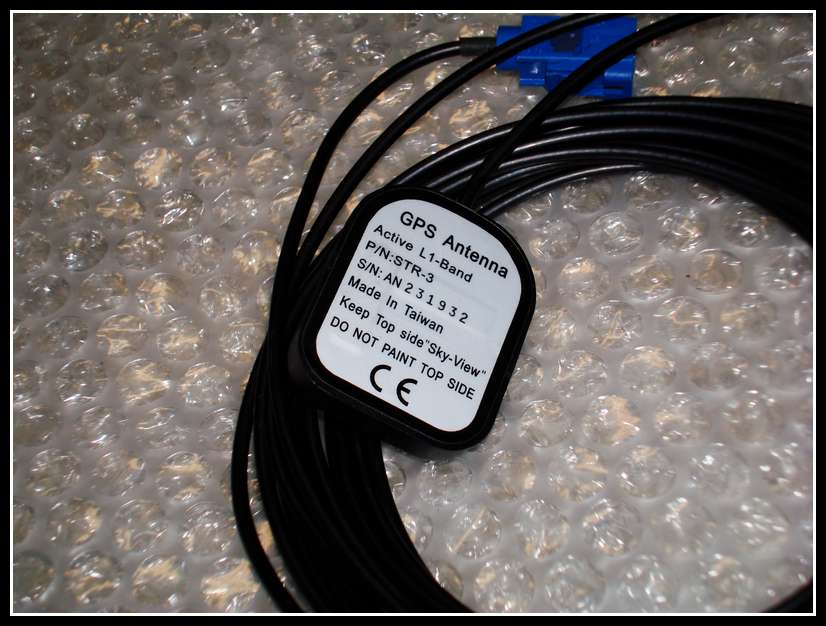
Here is the aftermarket GPS antenna I purchased from forum member Gambari
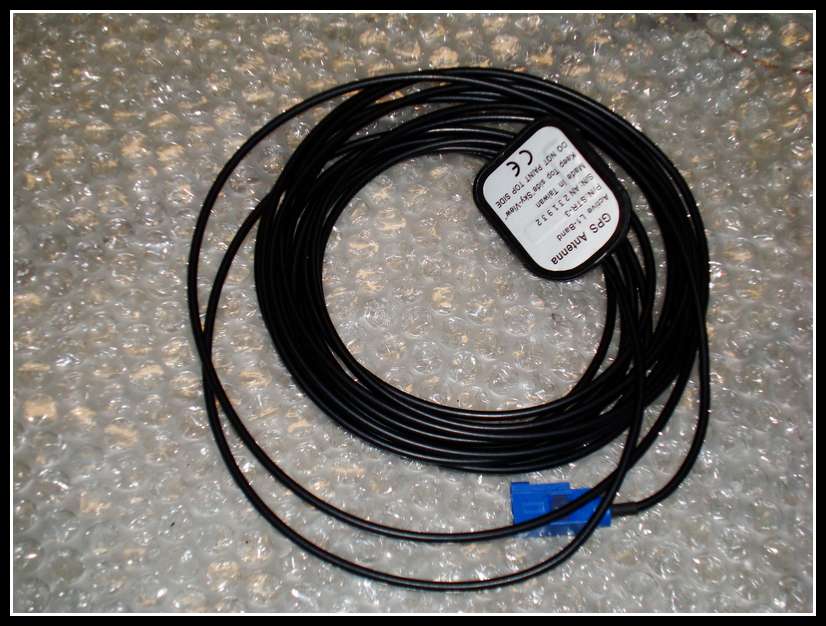
Here is a closeup
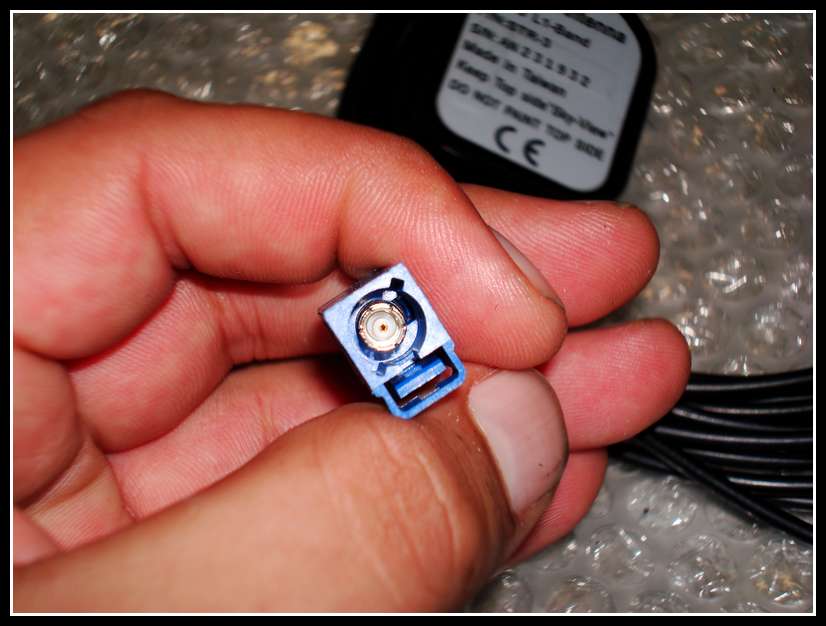
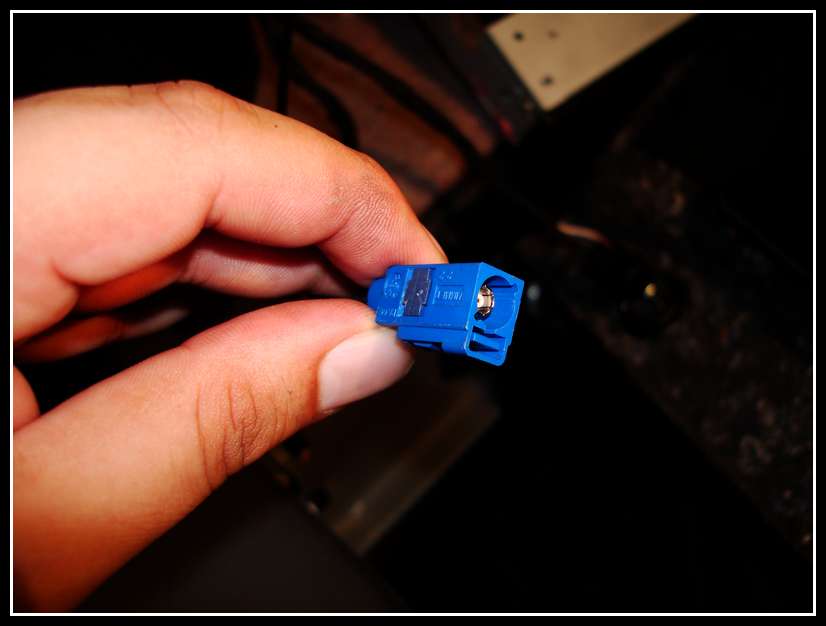
Here is a picture of the Connector. It is a "FAKRA" connector
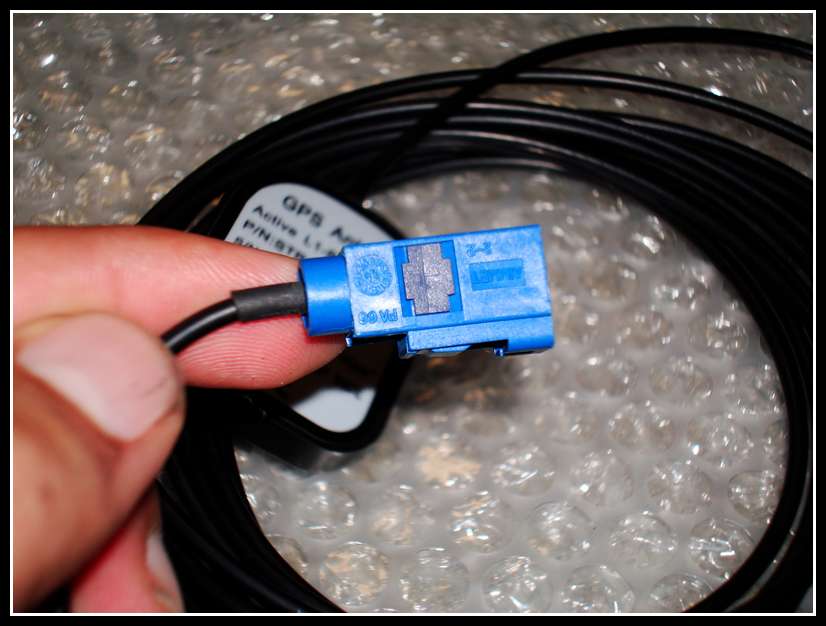
Another shot of the connector
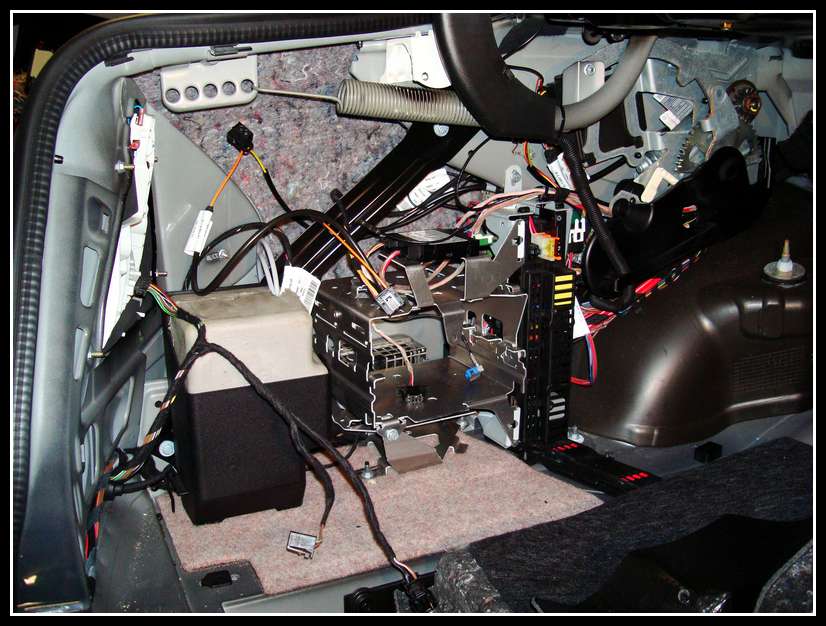
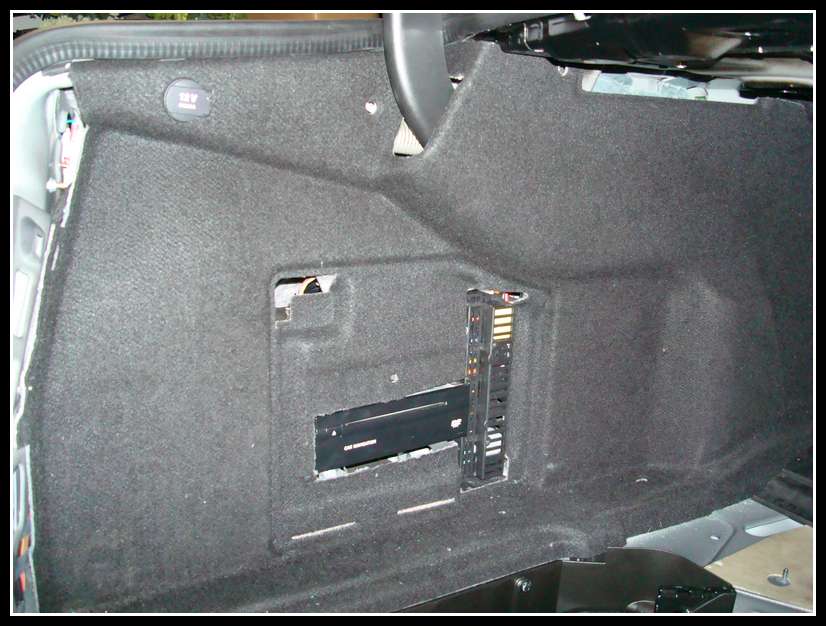
This is what the trunk left panel looks like before the drive is installed
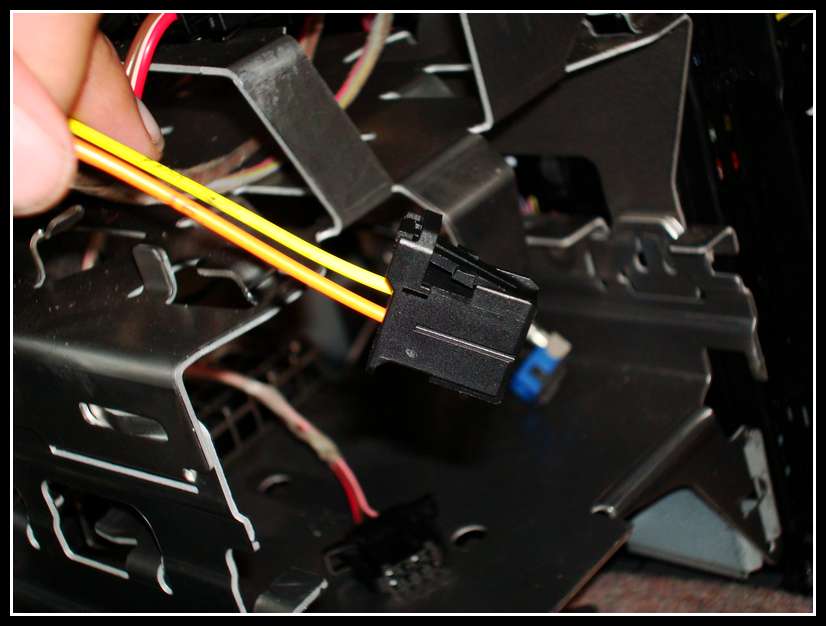
This is a picture of the MOST connection that goes to the AGW. The most plug for the navigation has already been inserted in this picture.
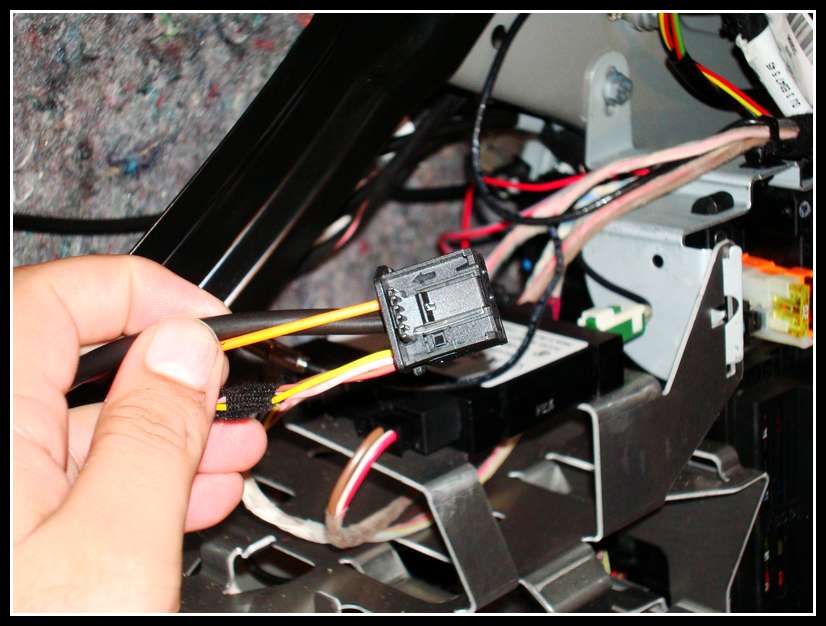
This is the plug you buy from the dealer. The yellow cable is the cable you take from the AGW connector. The orange cable goes back to the AGW connector in the place that the yellow cable was removed from.
Here you get a better idea of how it plugs in. Follow the trail of the orange cable by my thumb. It goes into the AGW connector which is sitting there off to the right. That is normally where the yellow cable would have been plugged in, which is now plugged into the NAVI fiber connector.
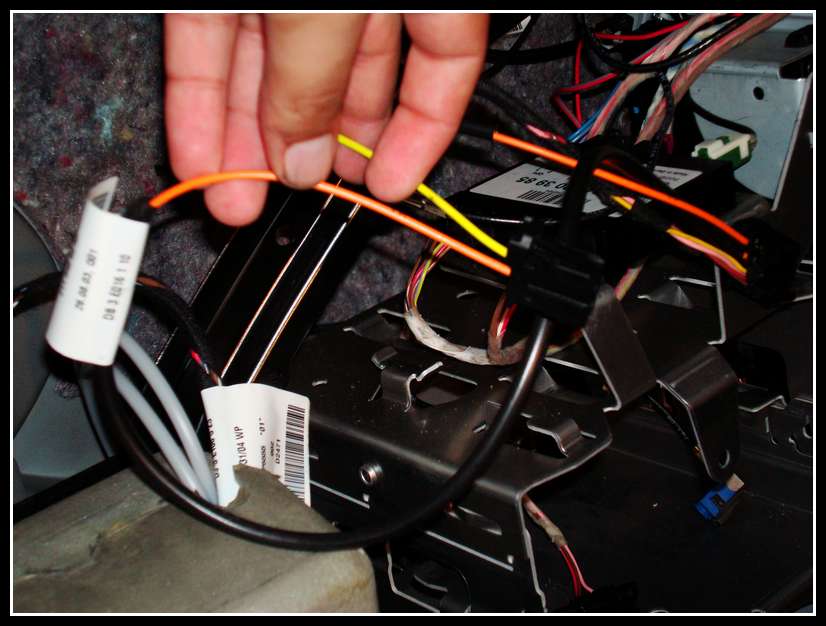
Now, you ask yourself, where is the AGW (Audio Gateway/Amplifier) located? Its located behind this at the top right here, on the other side.
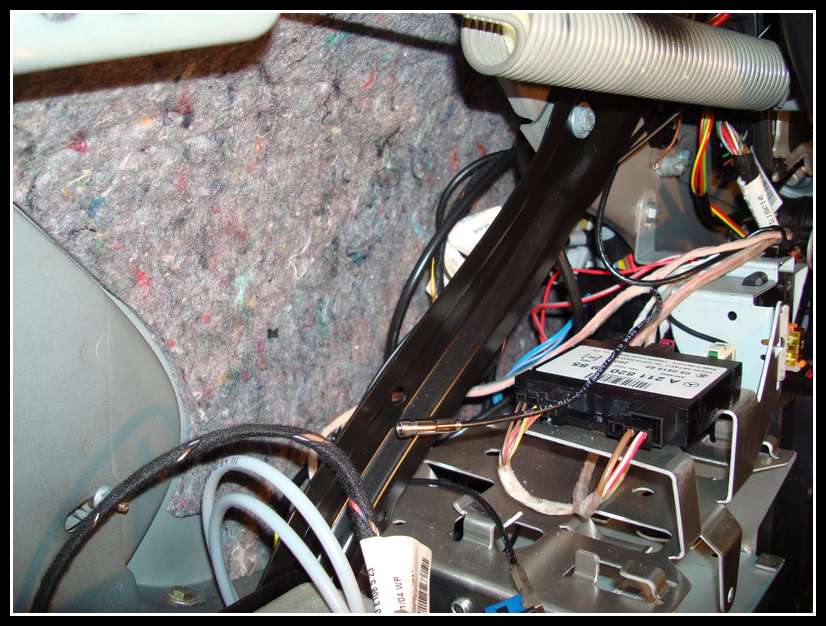
This is the the AGW looks like. In this picture, the AGW MOST plug is reinserted. The plug is the one that is highest up in the picture.
So just this past week I installed Harman Becker's OEM Navigation computer in my 2005 w211 AMG... I searched this forum like there was no tomorrow and am thankful to all who attempted this before me. I found a lot of useful information, but I also had questions that were unanswered. Therefore I decided to create my own post to help anyone else who may be interested in doing this.
Parts Needed:
I purchased the following parts to complete this task:
Part # A 220 820 60 85 - OEM Navigation Processor
Part # A 211 540 68 33 - MOST bus extention cable
Part # B 6 7 82 3111 - Logmatic GPS Splitter
I did not have to purchase the bracket as my vehicle already had the bracket installed. If you vehicle has Keyless Go, or Parktronic, then your vehicle will already have the bracket and correct panel in the rear. If not, you will have to purchase the bracket and panel.
Part # A 211 545 63 40 - OEM Bracket
Part # A 211 690 01 53 9C53 - Left Panel
Install Overview:
This is a fairly easy install... I had some issues with my install which I will point out later. However, here are the "basic" instructions if all goes well...
You remove the trunk paneling from the left side...
My vehicle already had the bracket, so I proceeded to extending the Fiber Optics to the navigation drive...
There is an Audio Gateway that has fiber going into it. You remove the yellow Fiber wire from the AGW plug and add the Orange Fiber cable from the MOST connector you purchased from the dealer. Once you do that, you now get the yellow fiber cable you removed and add it to the open port on the most connector you purchased.
Power and antenna wires will already be located behind the bracket ziptied together.
If your teleaid is deactivated, you do not need the GPS Splitter. If it's active, then you must install the splitter otherwise you will get errors in your instrument cluster.
When you find the power and antenna wires zip-tied together, follow the black antenna wire. The end of that cable is unplugged. This is what will either plug into the GPS Splitter, or it will plug directly to the GPS Antenna where the Tele-aid is currently plugged in.
Plug everything in and make sure your Comand recognizes the Navigation Processor. If your Comand powers on for a few seconds and then turns off, there is a break in your MOST ring, and you should double check all fiber optic connectors.
On initial powerup, the processor may take a while to acqire satellite signal. Some forum members have mentioned it took from 10-30 minutes of driving for this to happen...
This is the basic step by step proces of adding factory navigation. If everything is working, close it up and enjoy!
Problems/Troubleshooting:
Unfortunately, everything did not go as smooth as it could have and required more work...
My Comand noticed the Navigation processor right away, and loaded the software. However, it would not display a map, nor would it pick up any satellites. I double checked all connections but was unable to find anything that was improperly plugged in.
About a year back I had the dealer disable the Tele-Aid functionality of my vehicle. I would always get a warning message in my instrument cluster and had always assumed it was due to the service subscription being expired. This led me to search if disabling Tele-Aid would also disable the GPS antenna... Well, it doesn't. The GPS antenna is not software controlled as it is in some vehicles.
At this point I started to wonder if the navigation processor I purchased may have been bad. After all, it would not properly display a map, just show a gray screen with nothing on it.
When I would first get into the car, a map would pop up... But, the second I would begin to drive or move the vehicle, the map would dissappear and turn gray...
I started searching the intenet for aftermarket GPS antenna's i could use for testing purposes. I found forum member GAMBARI who was selling a Navigation Processor with a GPS antenna. I asked Gambari if he would let me use his antenna for testing purposes and he gladly accepted...
The next day I drove out to Gambari (a very polite respectful person) We plugged in his GPS antenna.
Nothing happened initially, but after a few minutes my Comand showed "0" satellites locked in. This confirmed that there was a fault with my factory GPS antenna. After an additional 5-10 minutes my Comand was able to lock in a few satellites. However, I still had no map being displayed.
We tried the map disc from Gambari's vehicle, but no luck... Gambari had the Navi Software upgrade disc, and the Comand software upgrade disc. What a lifesaver! So we updated the software for both devices.
For the Navi drive, just pop the software update to the rear drive and it will automatically update the software.
For the Comand drive, you eject any cd from your single disc slot and power down the comand. Then, Power up the comand, and immediately after powering up hit 1-3-8 together and keep them pressed until your screen prompt changes and asks for the update disc. I recommend having your vehicle started when doing this. The Comand update took a good 5-10 minutes. During this process be extra careful not to hit any buttons on the Comand, or not to start/shutdown the engine as this flashes the device memory; any power loss can render your Comand useless.
Once the update was complete, I had a few extra features I had not noticed before but I still had no map being displayed. By now it had been roughly an hour of tinkering in cold weather, we decided to call it quits.
The GPS antenna was magnetic. I routed the cable to where it would not be crimped and stuck the antenna on the right rear fender. Gambari and I shook hands and I paid him for the GPS antenna. Now, as I drive off, the map appeared!!!
So this is what I was able to gather. When I initially installed the unit it was not picking up any satellites. It did not know where it was so it didn't display anything on the screen. Occasionaly when I would start the car after work or something, a map would appear but it would show be as being somewhere in the midwest. This is most likely the last location the drive was powered down. As soon as I would move the map would turn gray again. This was because the unit was confused and did not know where I was.
When I drove away from Gambari's place, the unit now had GPS signal but was still confused where I was. After a few hundred feet the map appeared and showed me to be in the correct location. After searching the crap out of this forum, I learned that many people had this issue but none of the posts I ran into had a solution. In this case, it was a bad GPS antenna.
I went home and took rest. The next night I finished everything off after work. Below are pictures of the entire process.
Pictures:
Here are all the parts I initially ordered to complete the job
This is the MOST Bus Fiber Extention Cable
Here is the GPS Splitter
Here is the Map DVD that came with the drive I purchased
Here is the Navigation Processor Drive
This is the top of the navigation processor
Here is the side of the Navigation Processor
Here is the aftermarket GPS antenna I purchased from forum member Gambari
Here is a closeup
Here is a picture of the Connector. It is a "FAKRA" connector
Another shot of the connector
This is what the trunk left panel looks like before the drive is installed
This is a picture of the MOST connection that goes to the AGW. The most plug for the navigation has already been inserted in this picture.
This is the plug you buy from the dealer. The yellow cable is the cable you take from the AGW connector. The orange cable goes back to the AGW connector in the place that the yellow cable was removed from.
Here you get a better idea of how it plugs in. Follow the trail of the orange cable by my thumb. It goes into the AGW connector which is sitting there off to the right. That is normally where the yellow cable would have been plugged in, which is now plugged into the NAVI fiber connector.
Now, you ask yourself, where is the AGW (Audio Gateway/Amplifier) located? Its located behind this at the top right here, on the other side.
This is the the AGW looks like. In this picture, the AGW MOST plug is reinserted. The plug is the one that is highest up in the picture.
 12-21-2009, 02:05 AM
#2
Senior Member
Thread Starter
Join Date: Dec 2008
Location: Northern California
Posts: 361
Likes: 0
Received 3 Likes
on
3 Posts
05 e55
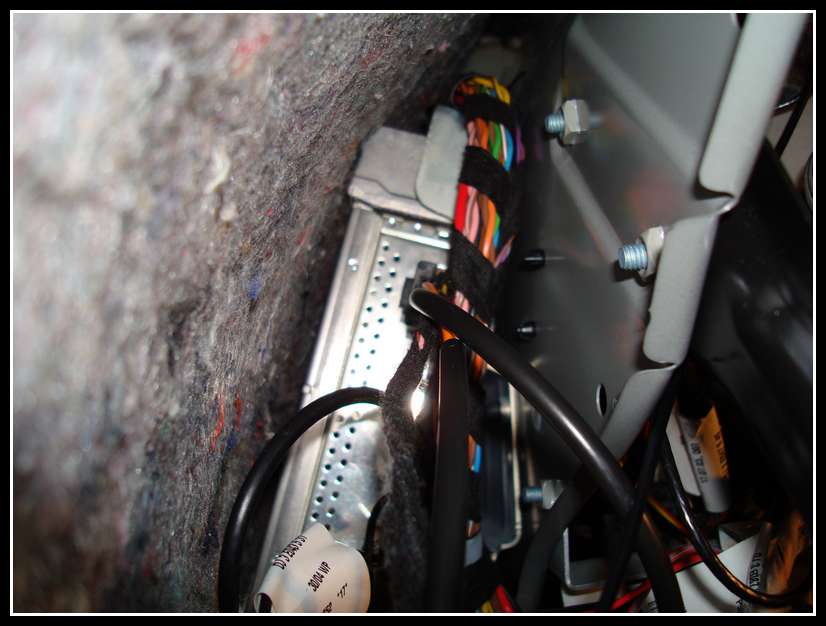
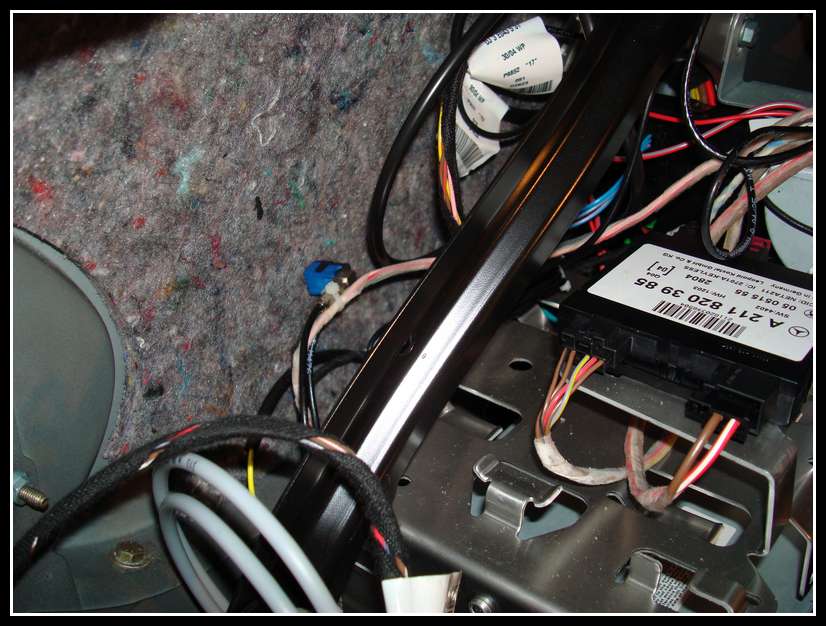
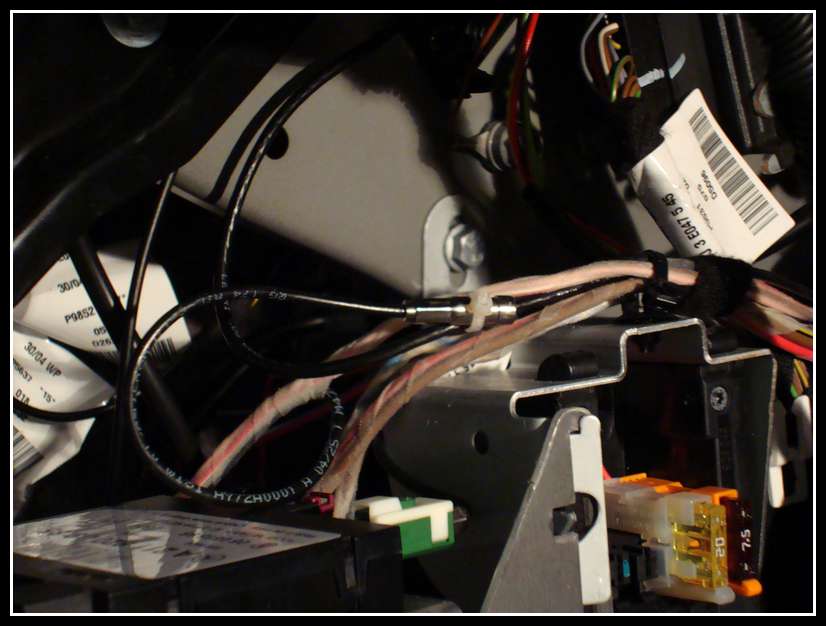
This is the Factory GPS antenna cable/connection (wire coming from top) and the wire towards the bottom is feeding out to the Tele-Aid system
This is a better view to show where it is located. It is on the other side of the wall that the AGW is located on.
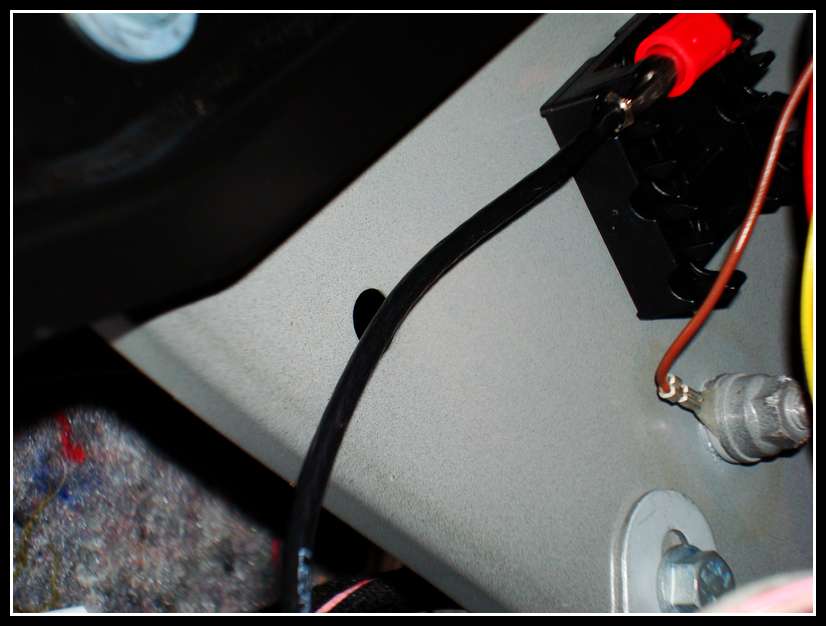
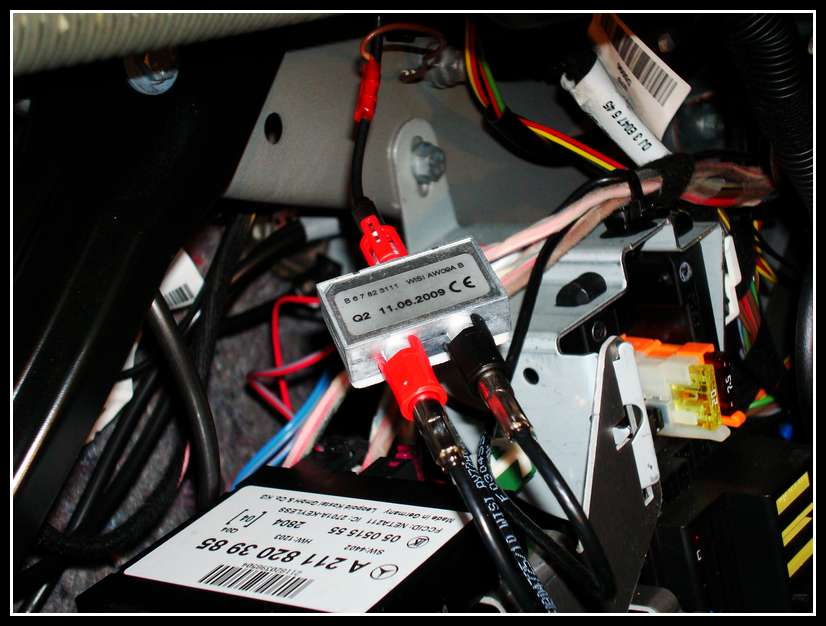
This is what it would look like if you were to use the GPS splitter. The wire on top comes from the GPS antenna. The wire on the left (red) is the current wire that went to Tele-Aid. The wire on the right (black) goes to the navi drive. The Splitter mounts to the same location at the factory location was previously. You break off the black mount and put the splitter in its place.
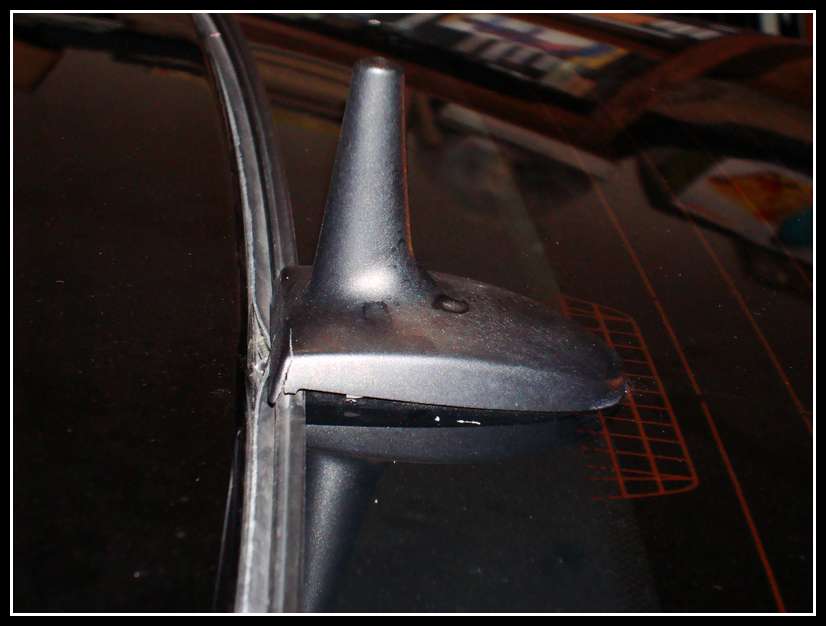
Here is the factory GPS antenna located on the top of the rear window. It's seen better days
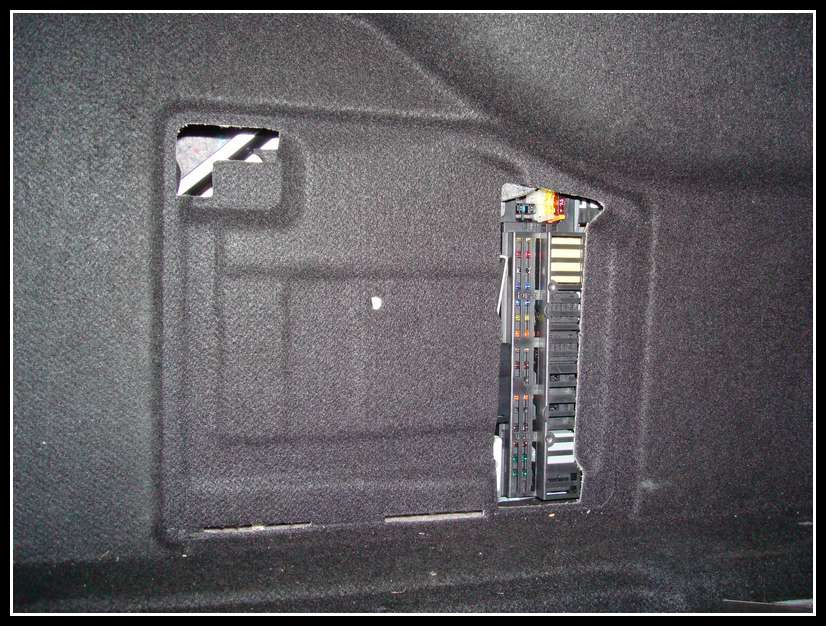
This is how the GPS wire feeds into the trunk. Remove this panel located on the left side of your trunk, under the window.
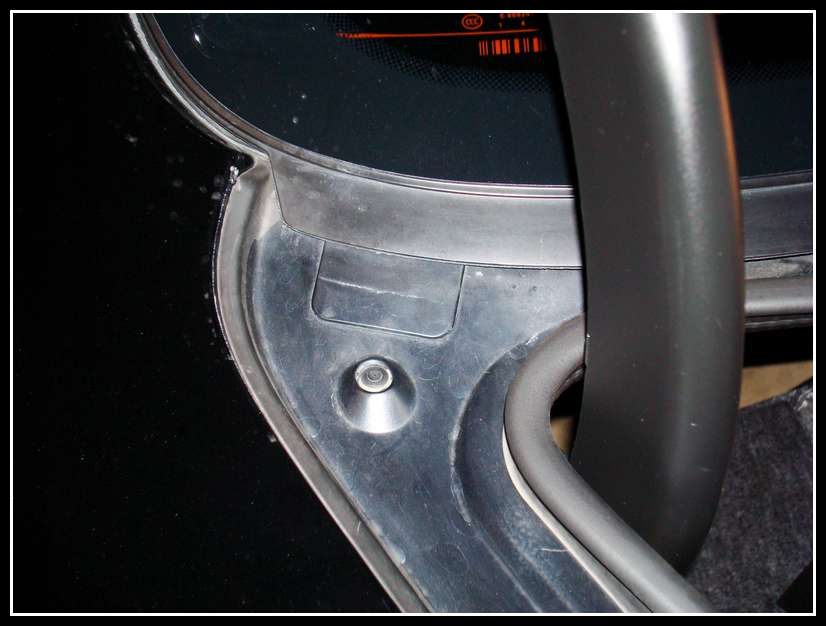
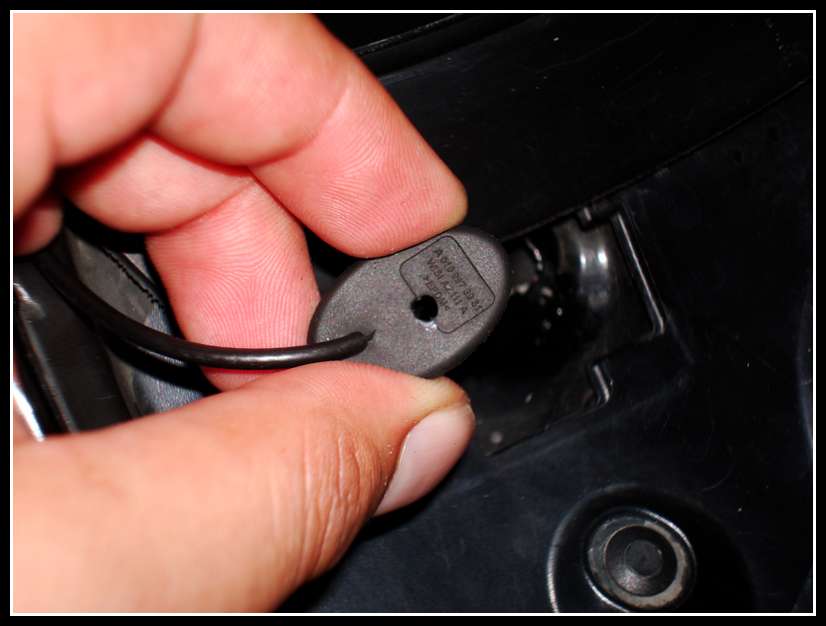
This rubber grommet is where the cable feeds through.
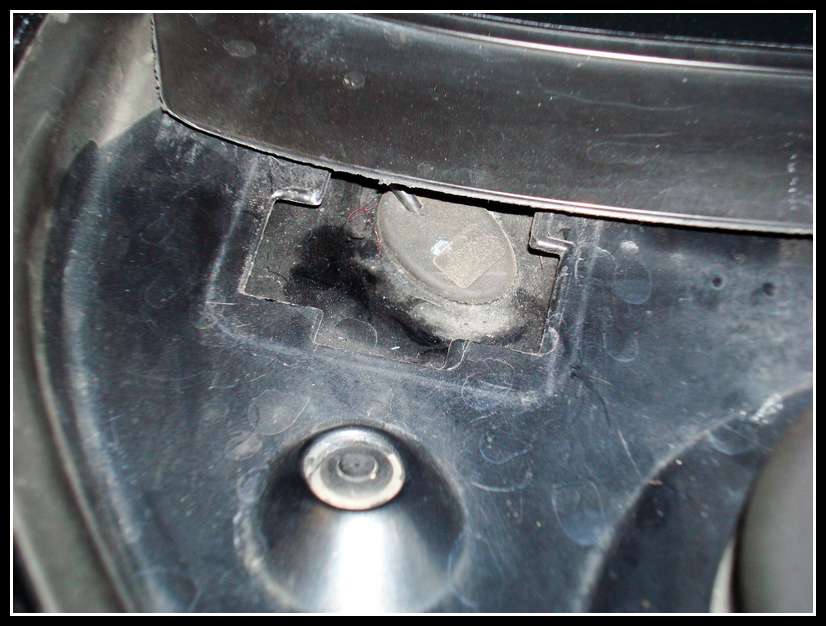
Here is a better view.
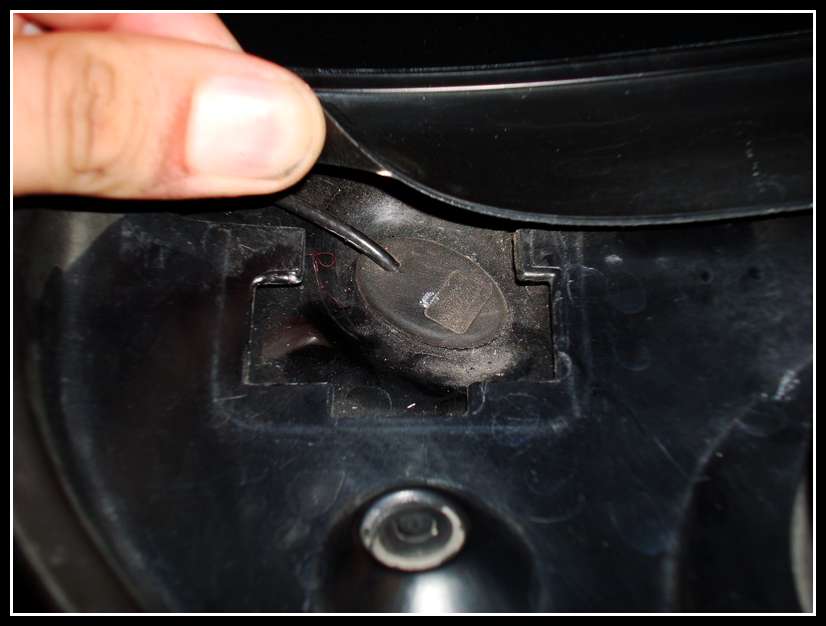
Here the grommet is removed. Be careful not to damage the grommet as I'm certain this is an area that water would travel during rainfall.

I used a Dremel and made a hole in the grommet.
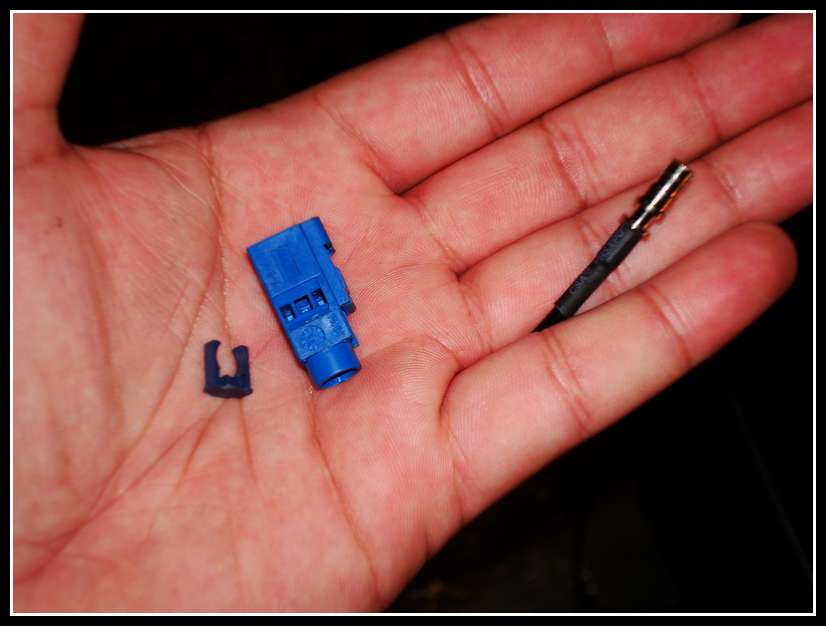
Now, the hole in the trunk is to small to feed the GPS plug with the connector still attached to it. I removed the connector and was able to feed the cable like this, without the blue plug attached.
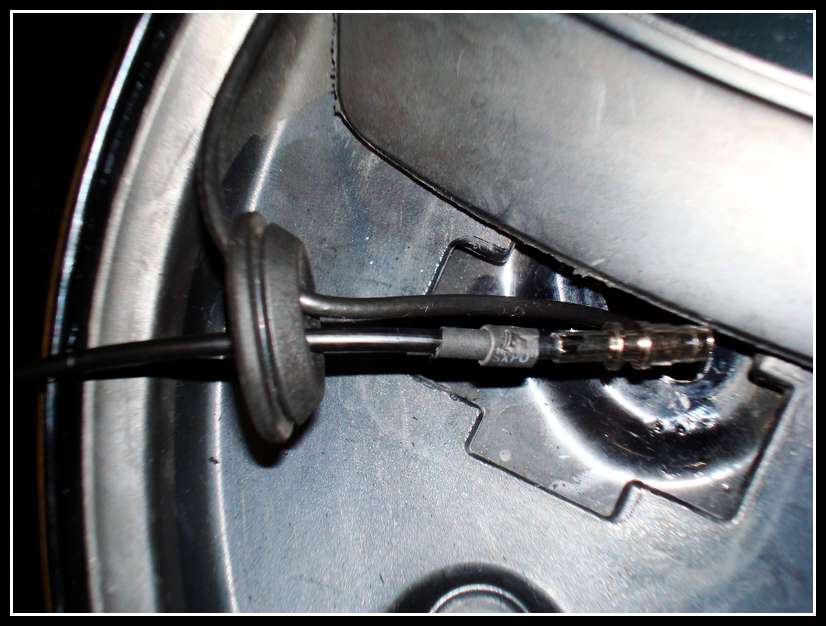
Here it is fed through. I decided to leave the Factory GPS wire in place.
When you feed the wire back into the trunk, simply feed the wire back into the connector. Then when inserted into the blue conncetor, re-insert this purple plug which will prevent it from coming out of the connector.
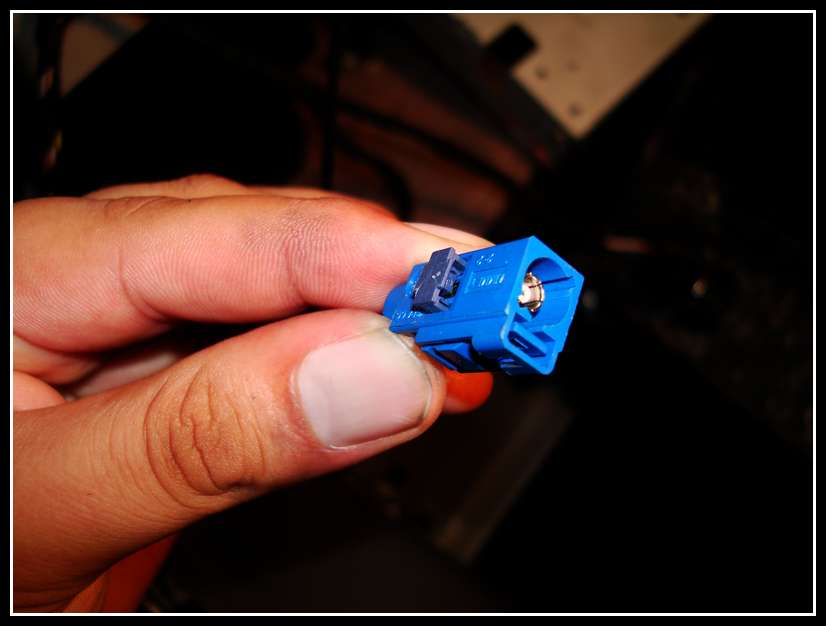
There it is, all re-attached and locked.
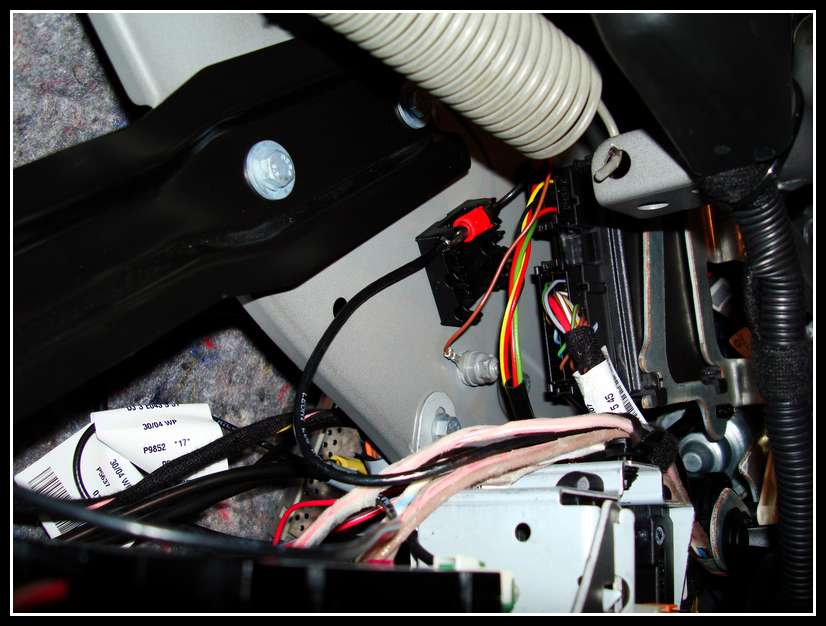
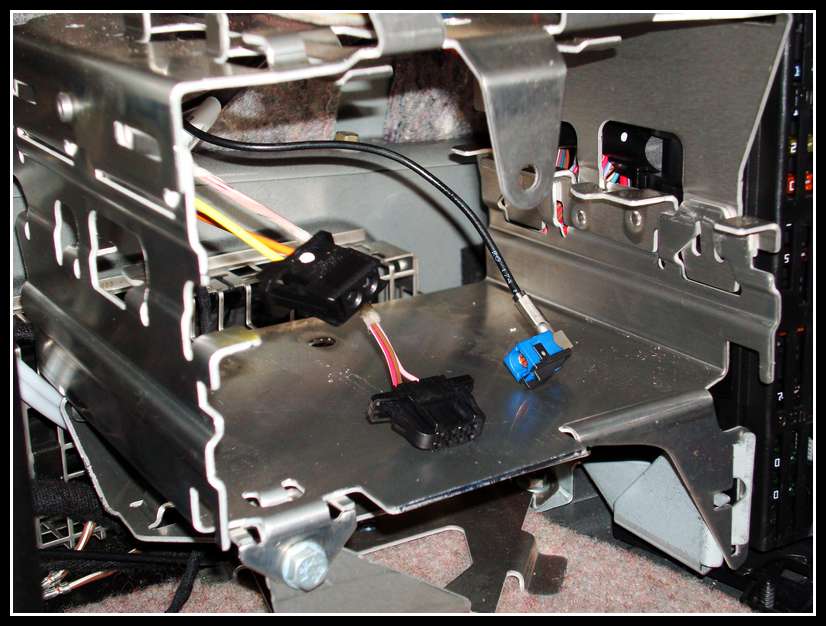
Here we have the MOST connector, the Power connector, and the Factory GPS cable waiting for the nav drive.
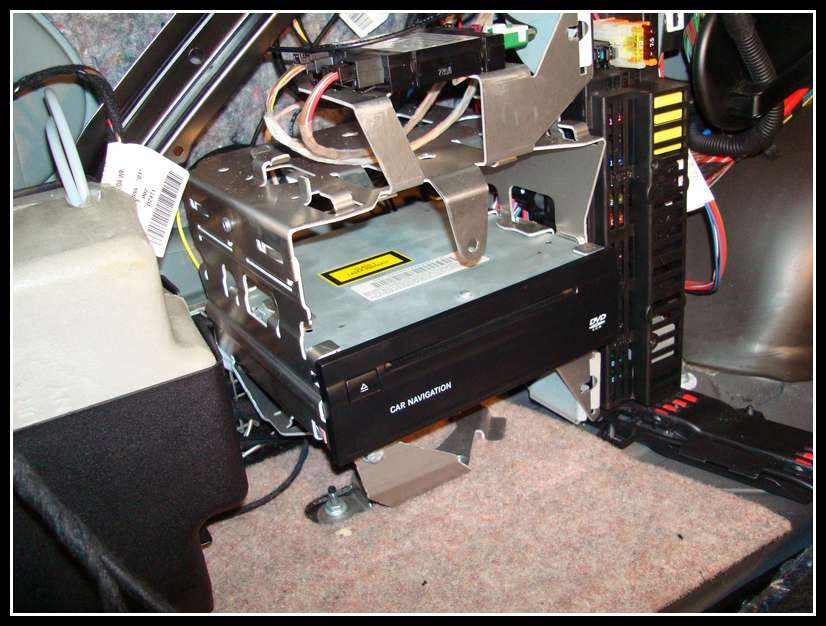
Here is the nav drive plugged in using the aftermarket antenna wire, not the factory GPS cable.
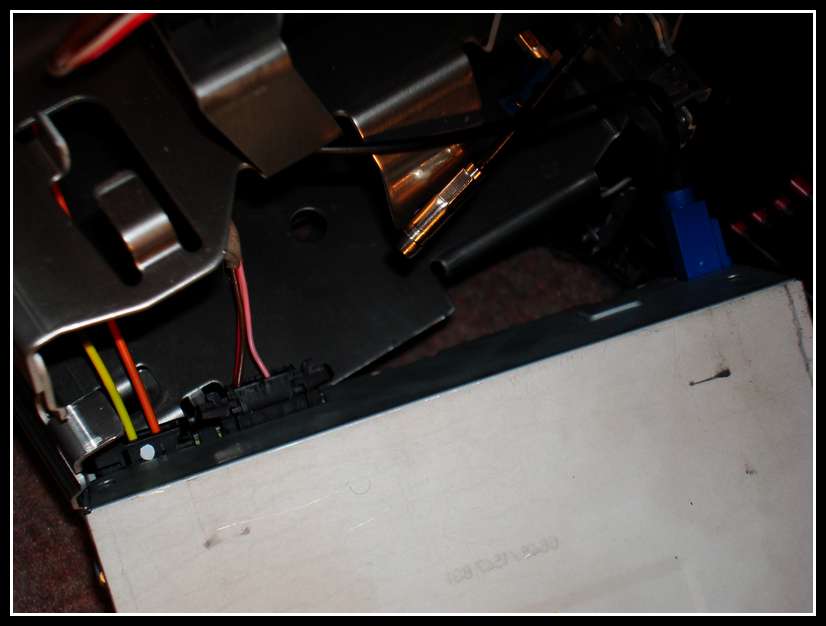
When sliding the Navi Drive back into place, be very cautious. I was glad to catch this. Take a look inside the bracket, the yellow wire. If I were to push the Navi Drive back any furthur, the yellow fiber cable would become damaged due to that metal piece being behind it. Always use extreme caution and care when working with Fiber Optic cables.
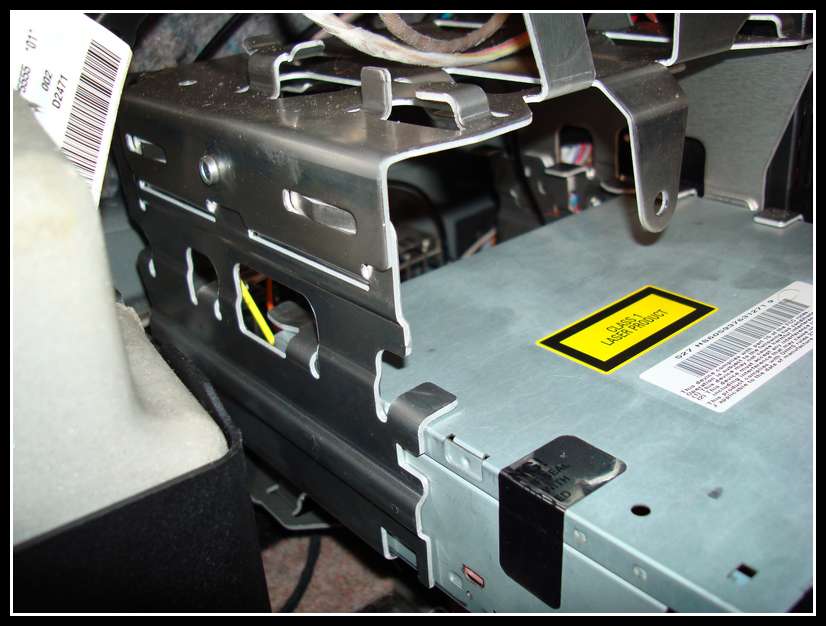
There it is, plugged in and locked in place. The drive will "click" when it's funny inserted and locked.
This is a better view to show where it is located. It is on the other side of the wall that the AGW is located on.
This is what it would look like if you were to use the GPS splitter. The wire on top comes from the GPS antenna. The wire on the left (red) is the current wire that went to Tele-Aid. The wire on the right (black) goes to the navi drive. The Splitter mounts to the same location at the factory location was previously. You break off the black mount and put the splitter in its place.
Here is the factory GPS antenna located on the top of the rear window. It's seen better days
This is how the GPS wire feeds into the trunk. Remove this panel located on the left side of your trunk, under the window.
This rubber grommet is where the cable feeds through.
Here is a better view.
Here the grommet is removed. Be careful not to damage the grommet as I'm certain this is an area that water would travel during rainfall.
I used a Dremel and made a hole in the grommet.
Now, the hole in the trunk is to small to feed the GPS plug with the connector still attached to it. I removed the connector and was able to feed the cable like this, without the blue plug attached.
Here it is fed through. I decided to leave the Factory GPS wire in place.
When you feed the wire back into the trunk, simply feed the wire back into the connector. Then when inserted into the blue conncetor, re-insert this purple plug which will prevent it from coming out of the connector.
There it is, all re-attached and locked.
Here we have the MOST connector, the Power connector, and the Factory GPS cable waiting for the nav drive.
Here is the nav drive plugged in using the aftermarket antenna wire, not the factory GPS cable.
When sliding the Navi Drive back into place, be very cautious. I was glad to catch this. Take a look inside the bracket, the yellow wire. If I were to push the Navi Drive back any furthur, the yellow fiber cable would become damaged due to that metal piece being behind it. Always use extreme caution and care when working with Fiber Optic cables.
There it is, plugged in and locked in place. The drive will "click" when it's funny inserted and locked.
12-21-2009, 02:06 AM
#3
Senior Member
Thread Starter
Join Date: Dec 2008
Location: Northern California
Posts: 361
Likes: 0
Received 3 Likes
on
3 Posts
05 e55
Here is the GPS cable being routed.
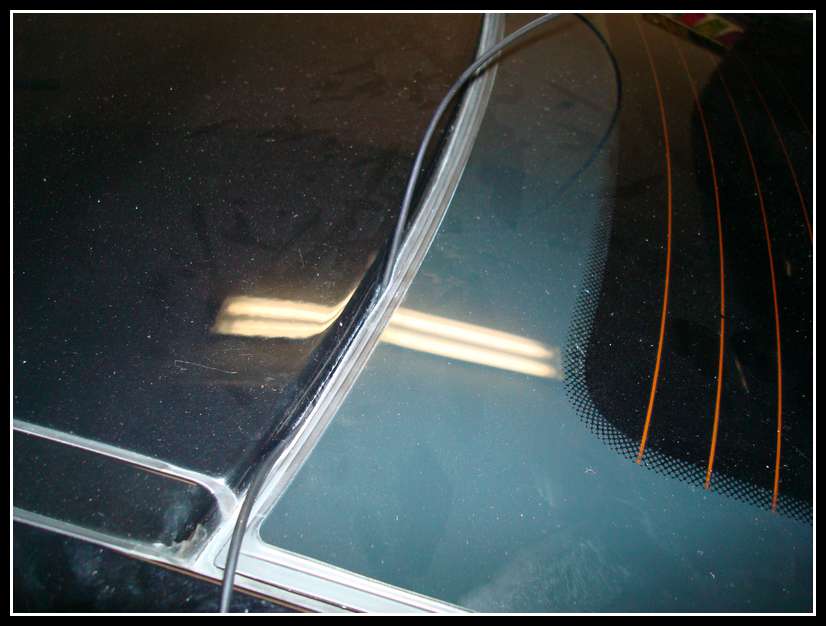
Here is another view.
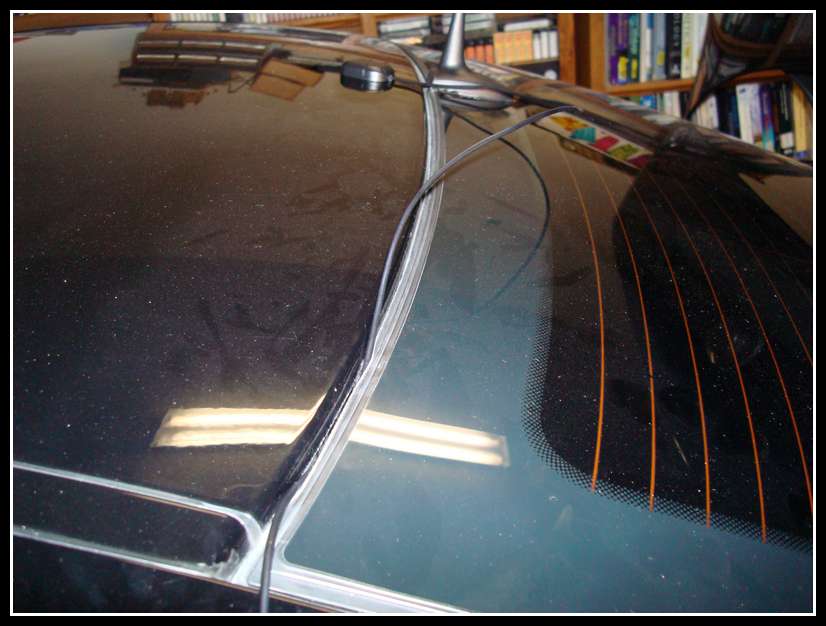
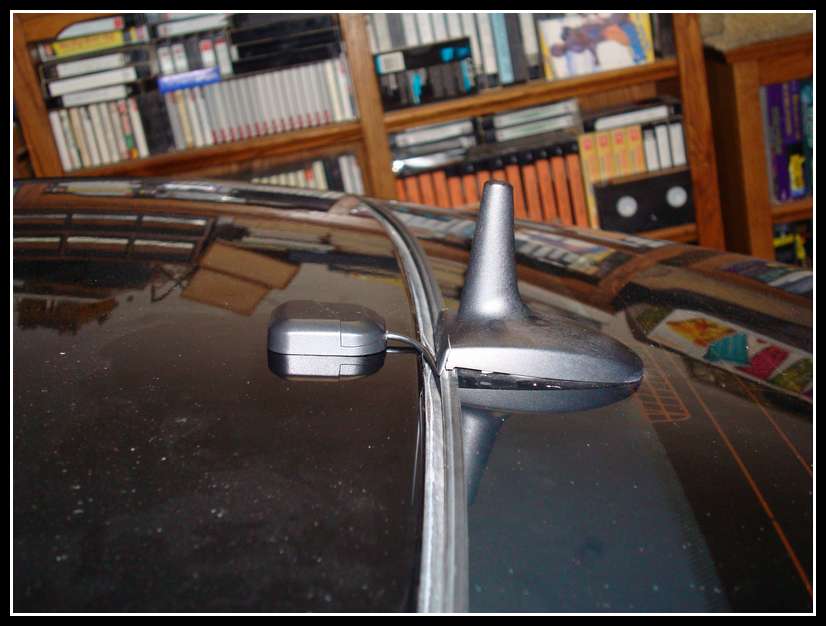
Here it is all done. At first I didn't like how it looked, but I've since tucked the wire in some more and it looks ok. I preferred mounting it outside rather than inside on the rear deck to achieve better coverage/signal.
Here is the factory GPS wire ziptied to the Navi power wire.
Here is the other end ziptied. There are a lot of electronics on the left side of the trunk. The last thing you would want is for loose conncetors to move around and short components out.
This is a cover that was there when I initially took the trunk apart. My best guess would be it's to help absorb/keep water away from the electronics if the rubber grommet for the GPS plug was to ever fail.
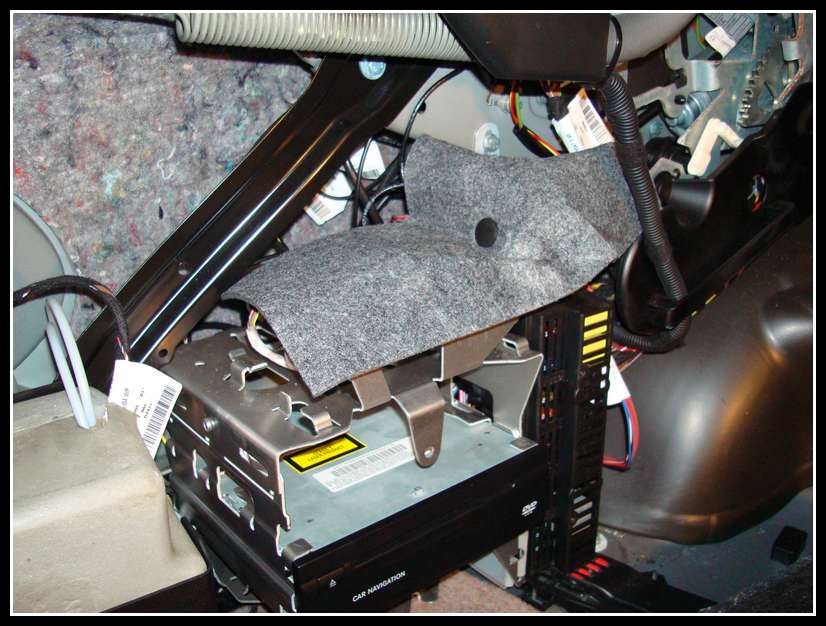
Here is the panel put back in place. You must trim out a piece where the Navi drive is located.
Here it is trimmed and finished. Not the best job, but it's good enough. I used a dremel to cut it out and did it freehand while the panel was still in the trunk.
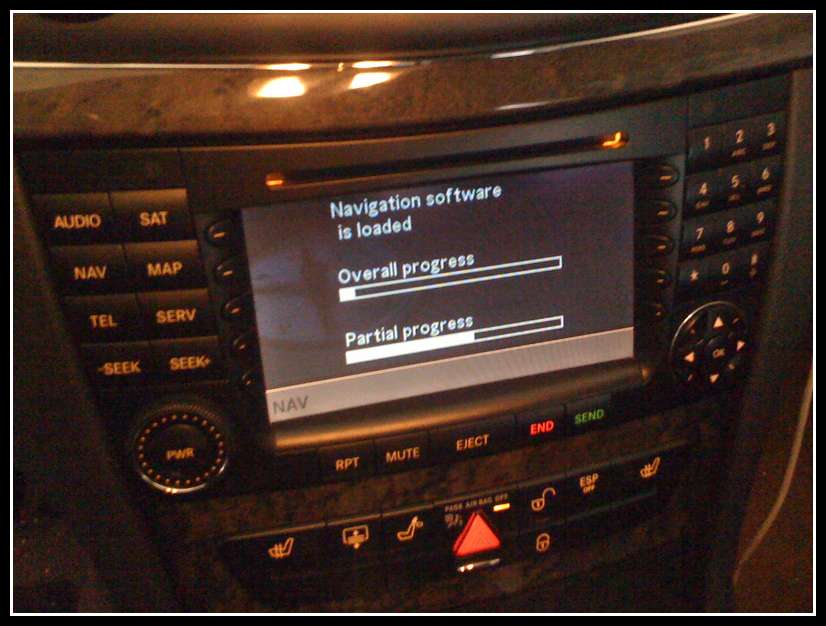
When you first plug the Navigation Processor into the most bus, your Comand will load software. This will also happen if you upgrade the Nav map DVD to a newer version. Takes roughly 2-3 minutes.
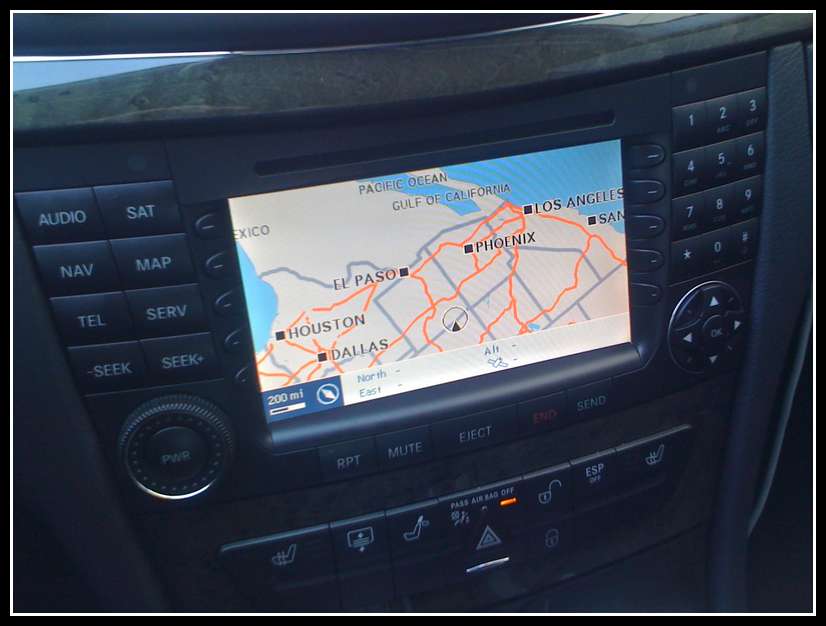
This is what I was getting after installing the unit. It is showing me to be somewhere mid-west. No satellites location, no lattitude/longitude display.
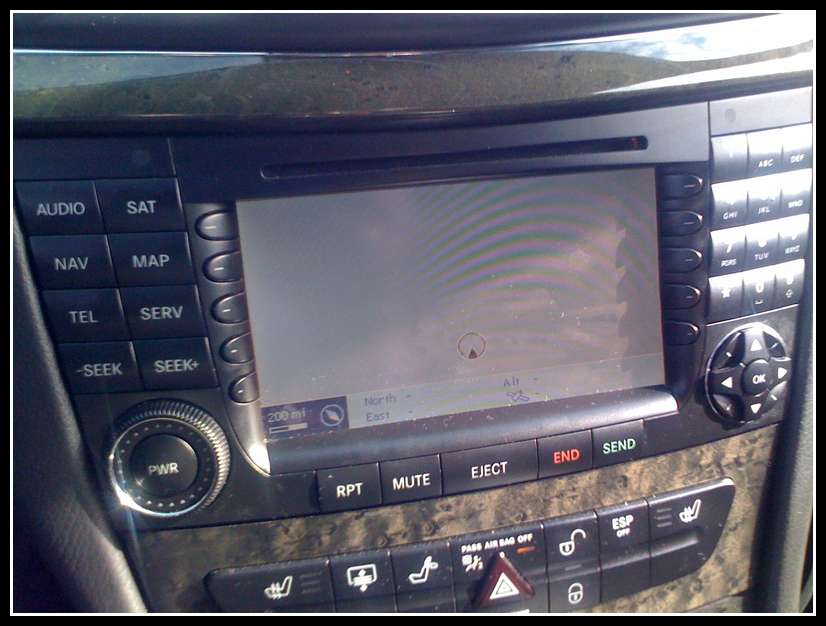
This is what would happen the second the car moved. The Processor would be confused as to where it is, and display a gray blank map.
If you hit the "nav" and "5" button, you will get this hidden menu for the Navi Drive. Scroll down the "GPS" and hit ok.
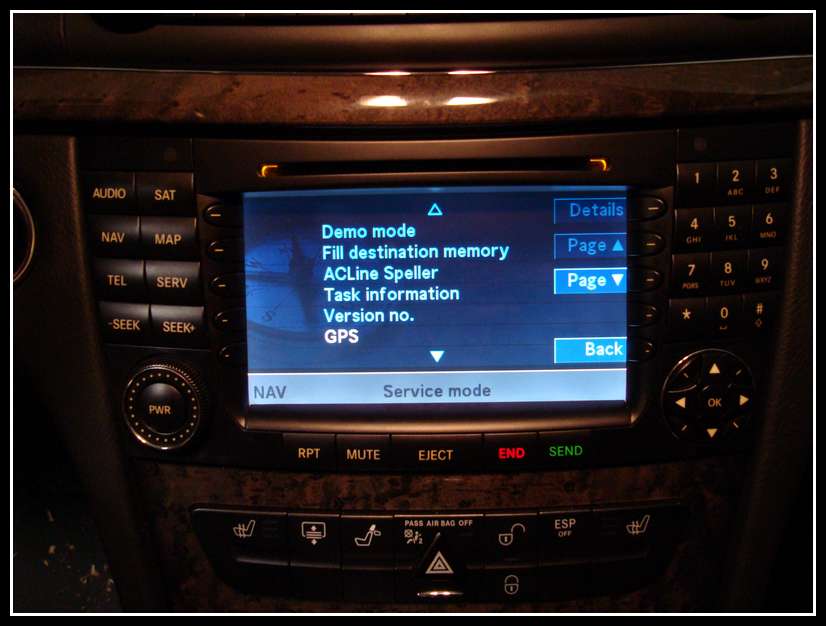
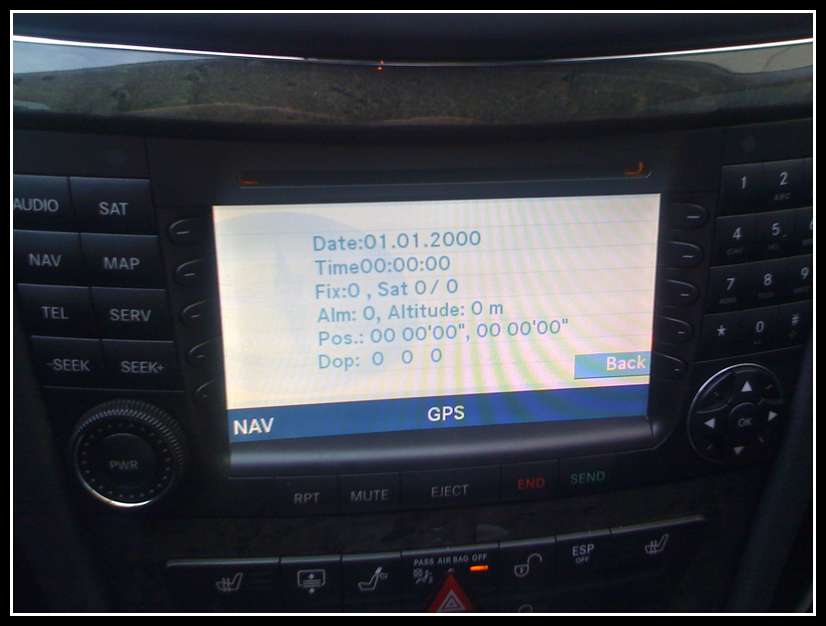
This is what you get when you go to the "GPS" screen. Notice how the date and time is incorrect. This is the date and time that the drive picks up from the GPS satellites. Since there was no GPS signal, its all 0's mostly.
Here is how it looked once I had a good antenna plugged in.
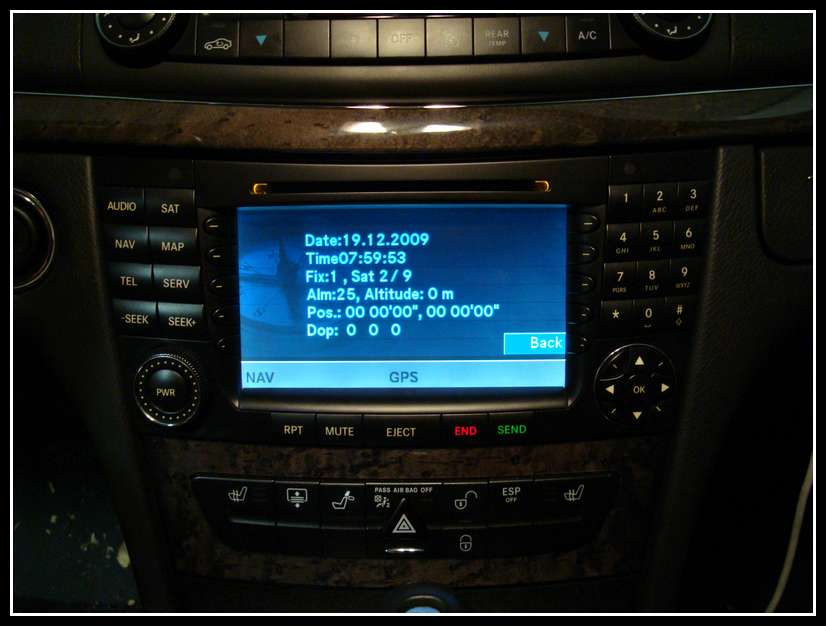
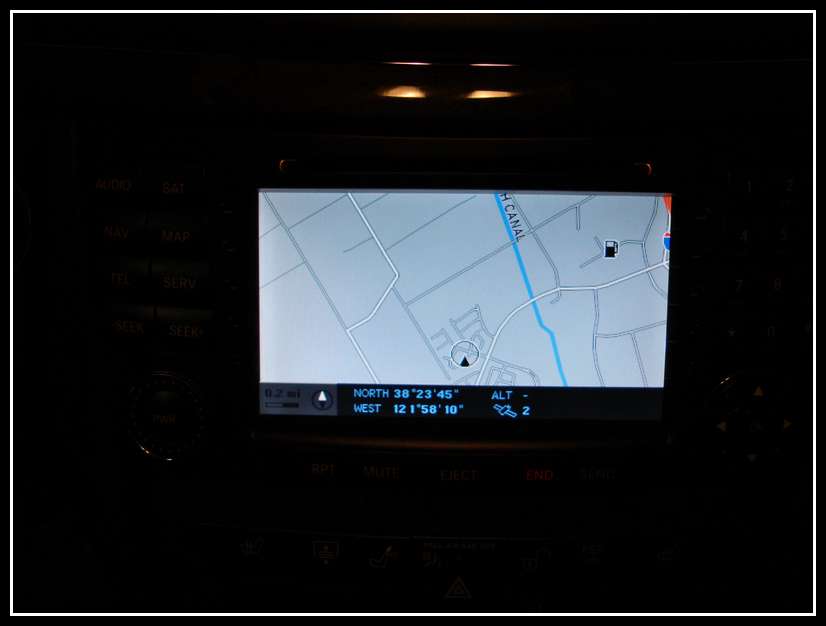
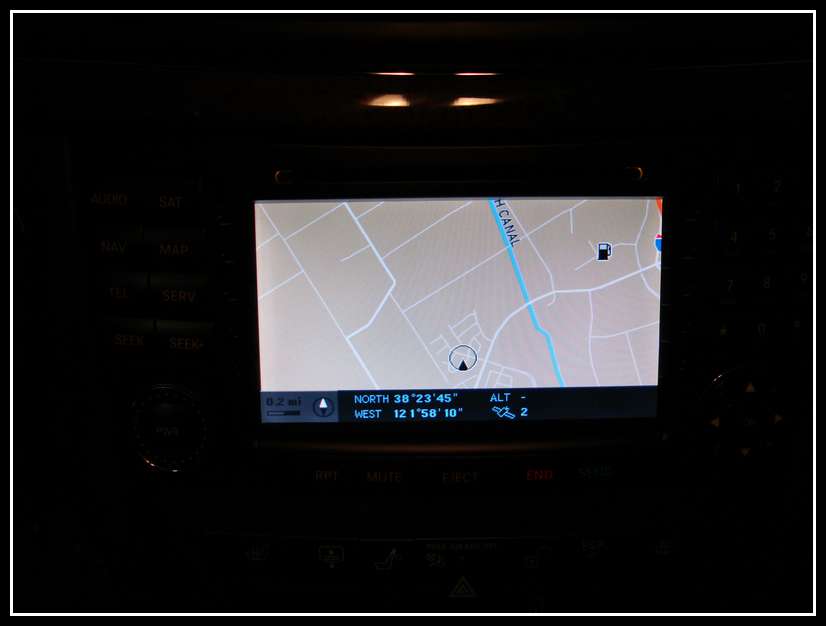
Here is the map while the car was in the garage, still being able to lock in 2 satellites.
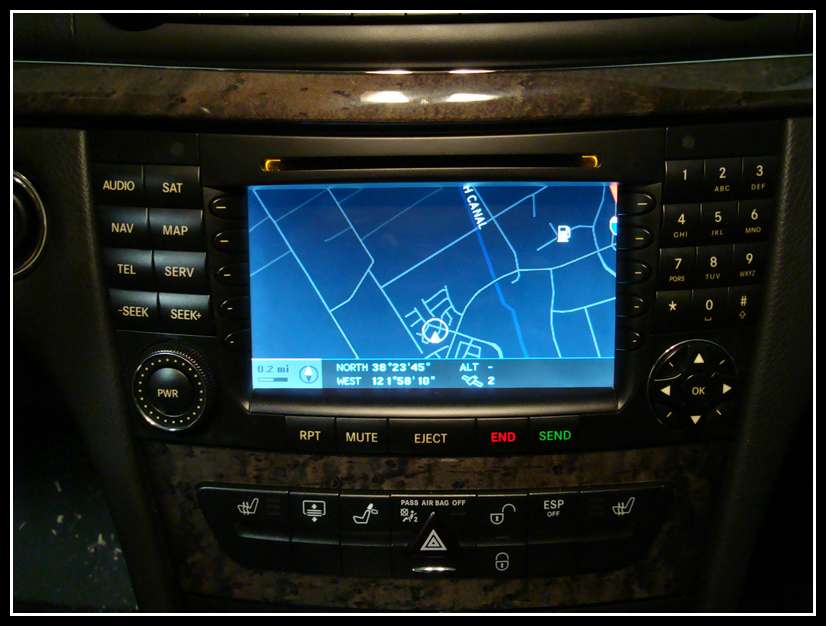
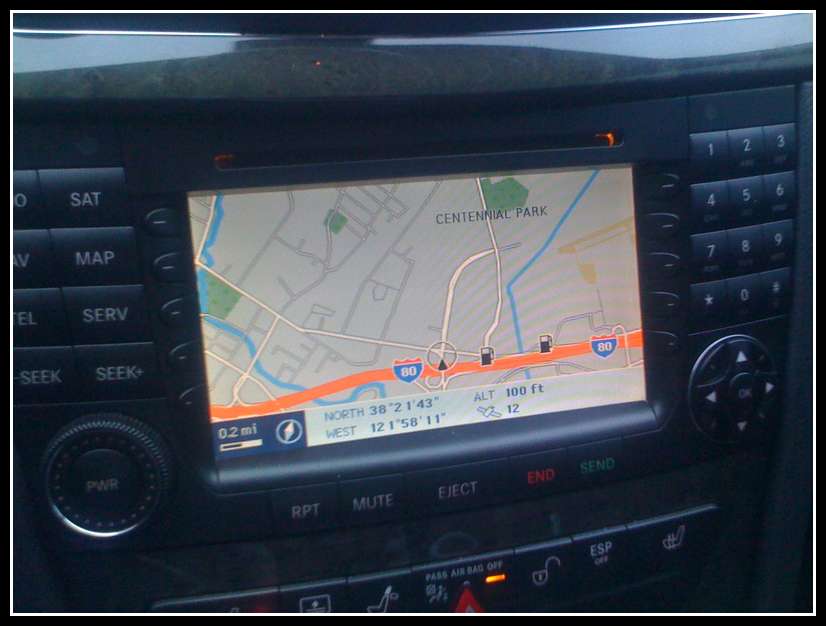
And here we are, the next day. Driving around town with a great signal and 12 satellites locked in.
Here is another view.
Here it is all done. At first I didn't like how it looked, but I've since tucked the wire in some more and it looks ok. I preferred mounting it outside rather than inside on the rear deck to achieve better coverage/signal.
Here is the factory GPS wire ziptied to the Navi power wire.
Here is the other end ziptied. There are a lot of electronics on the left side of the trunk. The last thing you would want is for loose conncetors to move around and short components out.
This is a cover that was there when I initially took the trunk apart. My best guess would be it's to help absorb/keep water away from the electronics if the rubber grommet for the GPS plug was to ever fail.
Here is the panel put back in place. You must trim out a piece where the Navi drive is located.
Here it is trimmed and finished. Not the best job, but it's good enough. I used a dremel to cut it out and did it freehand while the panel was still in the trunk.
When you first plug the Navigation Processor into the most bus, your Comand will load software. This will also happen if you upgrade the Nav map DVD to a newer version. Takes roughly 2-3 minutes.
This is what I was getting after installing the unit. It is showing me to be somewhere mid-west. No satellites location, no lattitude/longitude display.
This is what would happen the second the car moved. The Processor would be confused as to where it is, and display a gray blank map.
If you hit the "nav" and "5" button, you will get this hidden menu for the Navi Drive. Scroll down the "GPS" and hit ok.
This is what you get when you go to the "GPS" screen. Notice how the date and time is incorrect. This is the date and time that the drive picks up from the GPS satellites. Since there was no GPS signal, its all 0's mostly.
Here is how it looked once I had a good antenna plugged in.
Here is the map while the car was in the garage, still being able to lock in 2 satellites.
And here we are, the next day. Driving around town with a great signal and 12 satellites locked in.
12-21-2009, 02:23 AM
#4
Senior Member
Thread Starter
Join Date: Dec 2008
Location: Northern California
Posts: 361
Likes: 0
Received 3 Likes
on
3 Posts
05 e55
This is another option in the GPS Service mode. You can change the map color. The name of this map is w211 Day
The name of this map is w240 Day
If you don't see this option for the "eta" then your Comand drive needs the firmware update.

The name of this map is w240 Day
If you don't see this option for the "eta" then your Comand drive needs the firmware update.
The following users liked this post:
LarryK0502 (12-13-2019)

 12-21-2009, 02:18 PM
#6
Senior Member
Thread Starter
Join Date: Dec 2008
Location: Northern California
Posts: 361
Likes: 0
Received 3 Likes
on
3 Posts
05 e55
Thank You Hooleyboy! Just giving back to a community that has given me so much knowledge 
I also forgot to mention in the above posts that some say that Star programming is required to tell the vehicle there is now another device in the most chain, and to enable the route guidance in the instrument cluster where the speedo is. I have not done this, though I do think I will go and get it done. Just wanted to convey the fact that it's been a few days and all has been working well without any dealer programming at all... From research I figured it will usually take the dealer 1 hour of labor in programming time...
With the exception of the bad GPS antenna, this was pretty much a "plug and play" install

Trending Topics

 04-06-2010, 02:44 AM
#11
MBWorld Fanatic!
Join Date: Dec 2007
Location: PHX/PIE/OMA ---> Yes, all three
Posts: 2,052
Likes: 0
Received 2 Likes
on
2 Posts
E55 then E63, now back to an E55
THANK YOU SO MUCH....
I briefly read it this evening (been up for 19 hours)
but I see you noted it cost less than 1k....
I assume that means buying at least the trunk-mounted DVD drive, can you give me a better estimate if I have all that Hardware (including wiring) ?
But the wiring may be too difficult to remove from current vehicle, so maybe I should just use new wiring/antenna/etc - any thoughts to that ?

 06-08-2010, 02:08 AM
#14
Senior Member
Thread Starter
Join Date: Dec 2008
Location: Northern California
Posts: 361
Likes: 0
Received 3 Likes
on
3 Posts
05 e55
I purchased the processor from ebay, the sellers id was euro-customs... If you search for w211 navigation, you will see them pop up with the drive.


 07-18-2010, 05:55 PM
#20
MBWorld Fanatic!

Join Date: Oct 2005
Location: D.C. METRO AREA
Posts: 1,070
Likes: 0
Received 1 Like
on
1 Post
Nissan GT-R cobb/midpipe/ic piping/wastegate actuators/tials
At the risk of sounding like an idiot, I will ask one more question:
In order to install nav on a 2005 amg e55 that did not come w/nav or keyless go, I need ONLY the below (the antenna you purchased was because your oem antenna was damaged, correct??):
Also- where can I get the rest of the parts besides the Navigation processor online??
Part # A 220 820 60 85 - OEM Navigation Processor
Part # A 211 540 68 33 - MOST bus extention cable
Part # B 6 7 82 3111 - Logmatic GPS Splitter
Part # A 211 545 63 40 - OEM Bracket
Part # A 211 690 01 53 9C53 - Left Panel
07-19-2010, 12:50 AM
#21
Senior Member
Thread Starter
Join Date: Dec 2008
Location: Northern California
Posts: 361
Likes: 0
Received 3 Likes
on
3 Posts
05 e55
That is correct... Does your vehicle have Parktronic? If I remember correctly, the parktronic module also mounts in the same bracket... Best bet is to take your left rear panel off and visually check if you have it or not...
Other than that, you have the right parts listed... You may want to go to your local dealer to see if any of the parts have been superseded with newer revisions, though I used them all and it worked fine... That's also the only place I know of to purchase them... I'm sure there are online parts depots, though I have not used any of them...
Good luck, let me know if you need any more help!
09-05-2010, 04:57 PM
#22
Newbie

Join Date: Jul 2010
Posts: 14
Likes: 0
Received 0 Likes
on
0 Posts
2005 E55
That was easy!
 Another happy installer! Thanks for the detailed information;I completed the install in 1 hour 45 minutes...it was great powering up the system and the Command unit recognized the DVD and GPS antenna immediately. I am a happy man. THANKS for THE POST!!
 10-08-2010, 09:35 PM
#24
Junior Member

Join Date: Oct 2010
Posts: 16
Likes: 0
Received 0 Likes
on
0 Posts
w211
i got a 03 E320 and it not come with a GPS, i was thinking of put one in. anyone know what part do i need? see some on ebay that said just plug and play but i know it more into that then what they say. any info will be helpfull thankx


