
DIY: Folding side mirrors. My favorite mod.


 05-27-2019, 07:24 PM
#27
Member
 05-27-2019, 07:52 PM
#28
Member
Purchased to add folding mirrors to my car but I missed that it did not have the auto dimming feature. It is made by Ven Wezel which is a very good German manufacturer. It is a folding mirror frame that has the memory function (if the car supports it), and heated mirrors. The mirror glass is included and it is the aspherically curved version.
The Mercedes number for the frame is A2038105776 and the Mercedes number for the mirror glass is A2038100121
Selling for $150 shipped
The Mercedes number for the frame is A2038105776 and the Mercedes number for the mirror glass is A2038100121
Selling for $150 shipped
 10-06-2019, 10:29 AM
#30
Member
08-22-2020, 02:33 PM
#31
Member
Here are some photos. It is the aspherically curved glass that is used in Europe. It is what I wanted. That's what I put on my car. It does take a little getting used to from the US mirrors.
All you need to do is to replace the non folding frame with this, add the folding switch and your mirror will fold closed. This is for the drivers left side. If you only add this, only the drivers will fold until you add the right folding mirror.

Top View

Connectors

Front pic

Box

Rear
Last edited by vitop; 08-24-2020 at 08:56 PM. Reason: Add photos
08-06-2021, 08:38 PM
#33
Member
What type of info are you looking for? The mirror part numbers will vary with options. It's a fairly easy option to add though
08-06-2021, 08:55 PM
#34
Senior Member

I want to source the right parts so part numbers of both mirrors and the door switch i have mb parts catalog so if anyone has a VIN example of euro spec E63 amg 2007-2009 that would do nicely.
I have a feeling that US spec glass will transfer over to euro spec housings. Hoping.....
thanks
I have a feeling that US spec glass will transfer over to euro spec housings. Hoping.....
thanks
Last edited by GoodByeHonda; 08-06-2021 at 08:58 PM.
08-10-2021, 02:27 PM
#35
Super Member
I want to source the right parts so part numbers of both mirrors and the door switch i have mb parts catalog so if anyone has a VIN example of euro spec E63 amg 2007-2009 that would do nicely.
I have a feeling that US spec glass will transfer over to euro spec housings. Hoping.....
thanks
I have a feeling that US spec glass will transfer over to euro spec housings. Hoping.....
thanks
I added power folding mirrors to our facelifted w211. Mine's an 09'.
Parts I used 4 years ago.
Mirror Switch 211-821-61-79-7C45 1 $90.48
Mirror Assembly 211-810-16-76 1 $332.88
Mirror Assembly 211-810-15-76 1 $332.88
You need to code certain things in STAR so when you lock/unlock you have the option for the mirrors to open/close.
Thread I used from years ago: Has pictures and part numbers. I believe I posted an update in it as well.
EURO-SPEC Power Folding Mirrors for 07-09 W211 - MBWorld.org Forums
-Nigel
The following users liked this post:
GoodByeHonda (08-10-2021)
08-10-2021, 02:30 PM
#36
Member
Nigel -
Do you have any info on the programming? What you need to turn on and the steps? I never did that and it would be nice to do.
Do you have any info on the programming? What you need to turn on and the steps? I never did that and it would be nice to do.
08-10-2021, 02:33 PM
#37
Super Member
-Nigel
08-11-2021, 09:12 AM
#39
Super Member
Do post up details if you get the w212 working!
-Nigel
08-11-2021, 09:20 AM
#40
Senior Member
Thanks for the part numbers. These parts are available through the dealer but the cost is double than what you listed. So this becomes unobtainnium for me. Really like this mod but waaaay out of my budget. (Got f....d by family court)
I would also want to list a VIN for euro spec E63 amg for reference ( sedan )
WDB2110771B112759
I would also want to list a VIN for euro spec E63 amg for reference ( sedan )
WDB2110771B112759
08-11-2021, 01:42 PM
#41
Super Member
Thanks for the part numbers. These parts are available through the dealer but the cost is double than what you listed. So this becomes unobtainnium for me. Really like this mod but waaaay out of my budget. (Got f....d by family court)
I would also want to list a VIN for euro spec E63 amg for reference ( sedan )
WDB2110771B112759
I would also want to list a VIN for euro spec E63 amg for reference ( sedan )
WDB2110771B112759


-Nigel
08-11-2021, 04:11 PM
#42
Member
Noice, it's really not bad. When I was looking at a 2014 e63s, it didn't have power folding mirrors and of course the 2015's came standard with them. Everything I researched said that people could not get prior w212's to get power folding mirrors working. Something that even with coding didn't make it work.
Do post up details if you get the w212 working!
-Nigel
Do post up details if you get the w212 working!
-Nigel
You can get them to work. Mine are folding fine via the button. I just need to get them integrated into the car system so they fold automatically. I hope to get back to it next month.
08-11-2021, 11:10 PM
#43
Senior Member
Mbonlineparts.com does not ship to Canada. I found few items throughout Europe on their Craigslist equivalent but paying for this from N.America is impossible.Heres a quote from my local dealer
211-821-61-79-7C45 - $212.00
211-810-16-76 $636.92
211-810-15-76 - $636.92
Oh and there is 15% tax on top
211-821-61-79-7C45 - $212.00
211-810-16-76 $636.92
211-810-15-76 - $636.92
Oh and there is 15% tax on top
05-16-2022, 06:50 PM
#44
Junior Member
Thank you
thank you for this well documented tutorial. I was able to complete the install on my E55.
Even with all of my go fast stuff, this is one of my favorite mods on the car. It's just cool, at least to me.
Anyhow, as a DIY did not exist, just wanted to post up a quick one as this is a fairly straight forward and easy mod.
Tools needed:
T20
T30
Panel removal tool
Large sockets-see below
Summary:
1) Remove electrical from the inside
2) Remove mirror held on with 3qty T-20 screws
3) Install new mirror
4) Remove and swap out mirror switch
5) Code new mirror if you would like it to automatically open/close via the ignition switch.
Now on to the details
(1)Electrical
First off, if all you need to do is to remove the standard side mirror, there is no need to remove the interior door panel, just the corner plastic cover to gain access to the two connectors.
OK, so remove the interior plastic cover located near the hing which will allow access to the electrical. It just pops off, don't make it more difficult than it is. Look at the wire loom coming from the mirror, do not confuse with the wire for the tweater wire. There are two connections that are removed by pressing in the little tab. You can also see the picture further down with the panel off for a better look of the electrical.

(2) Remove mirror
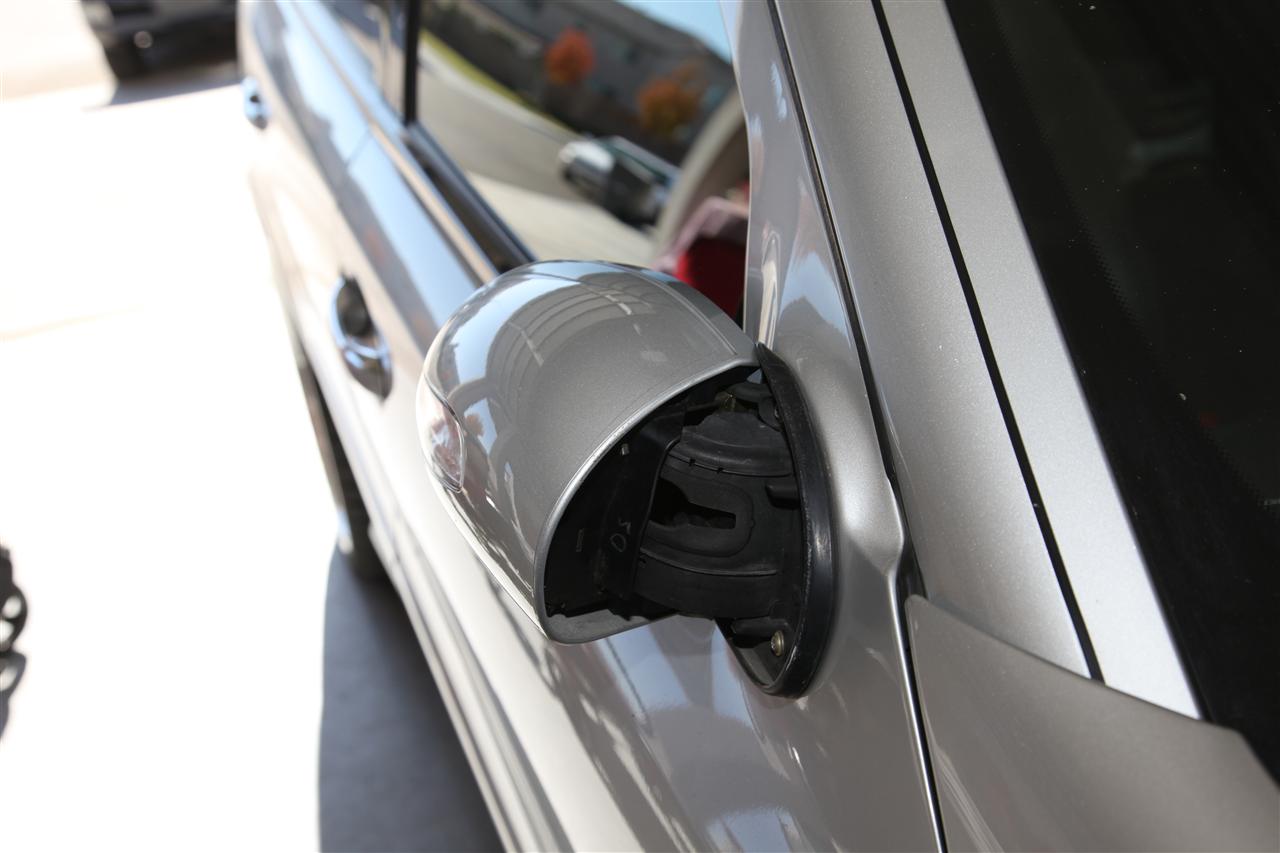
Once you have disconnected the electrical it is time to remove the OEM mirror which is held on via 3qty T-20 screws. The problem here is that in order to gain access to these screws you need to push the mirror back to gain access to two screws and the other way to gain access to one.
The mirror is spring loaded and this is why you cannot just hold it back with your hand and remove the screws as once you remove the last screw the mirror will fly out of your hand-the spring load is pretty stout.
I used a large socket to prop up on the inside of the housing to keep it open. This is much safer vs using your hand.
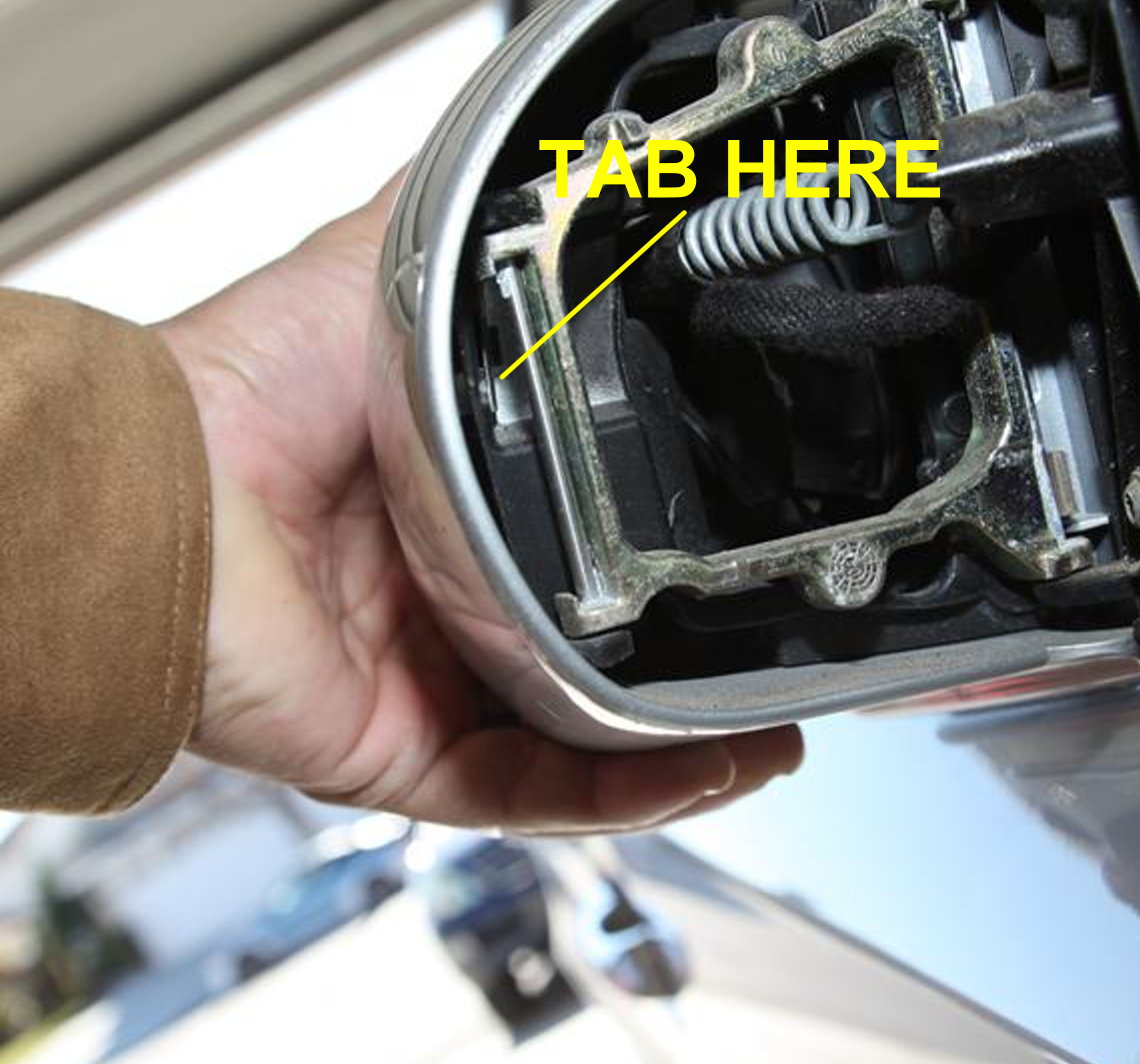
At this time you will need to remove the housing. Shine a flashlight into the back(open) side of the housing and you will see a silver clip approx 3" back that pries up with a flathead screwdriver. Once this is done the mirror just slides right off provide the mirror glass is level. The pics below show where this little tab is. This is the only thing that locks the housing onto the mirror frame. Almost scary.

Once you remove the housing you will have access to the torx screws. Just remove them and remember to use sockets to hold the spring loaded housing open. Be very careful as you do not want the socket to slip out and go flying into the glass or body. Best to lower the window and cover the paint with a towel or other means for protection. Being the rebel I am I just took my time.
Notice the long socket on this one.

Now just feed the mirror and electrical out of the hole.
Remove one connector at a time as both will not feed through at the same time. Duh!

(3) Install new mirror
To install the new folding mirror there is no need for sockets as this mirror just pushes back and forth with a little effort. Feed the connectors and install the new mirror with the 3qty T-20 screws. No socket treatment needed to install the folding mirrors.
(4) Swap mirror switch/remove interior panel
OK, it is now time to remove the interior door panel.
Pop out the plastic cover behind the armrest. You will see a few T-30 screws. Remove them.

Remove the strike lock cover held on with a single T-20 screw.

Take a look at the picture up top where the electrical connections are. There is a single T-30 screw there that needs to be removed also.
OK, with all of the screws removed, use a panel removal tool or similar and pop the panel off the door shell. Oh, don't forget to unscrew the 60s style GM lock located up top.


In order to swap the switch you must remove the other switches on the door first as the tabs overlap-of course!
It is very straight forward and removal of the entire panel is not required provided you are careful not to pull on any of the electrical connections which could cause issues down the line.
Once it is swapped out, put it all back together in reverse order.
Place the housing back on the mirror frame and note there are two alignment 'ears' that slide into provisions in the housing. Just 'bump' it back and you may have to push the silver locking clip back into position. Pull on the housing to ensure it is secure-hate to see your housing fly off while in Famosa
(5) Coding.
The mirror now can be manually folded in and out via the mirror switch. You can have them coded to do this automatically via the ignition switch if you choose.
This is also a cool feature to have when stuck in traffic and those motors get close to your car as they whiz in-between cars.
That's it.
Anyhow, as a DIY did not exist, just wanted to post up a quick one as this is a fairly straight forward and easy mod.
Tools needed:
T20
T30
Panel removal tool
Large sockets-see below
Summary:
1) Remove electrical from the inside
2) Remove mirror held on with 3qty T-20 screws
3) Install new mirror
4) Remove and swap out mirror switch
5) Code new mirror if you would like it to automatically open/close via the ignition switch.
Now on to the details
(1)Electrical
First off, if all you need to do is to remove the standard side mirror, there is no need to remove the interior door panel, just the corner plastic cover to gain access to the two connectors.
OK, so remove the interior plastic cover located near the hing which will allow access to the electrical. It just pops off, don't make it more difficult than it is. Look at the wire loom coming from the mirror, do not confuse with the wire for the tweater wire. There are two connections that are removed by pressing in the little tab. You can also see the picture further down with the panel off for a better look of the electrical.
(2) Remove mirror
Once you have disconnected the electrical it is time to remove the OEM mirror which is held on via 3qty T-20 screws. The problem here is that in order to gain access to these screws you need to push the mirror back to gain access to two screws and the other way to gain access to one.
The mirror is spring loaded and this is why you cannot just hold it back with your hand and remove the screws as once you remove the last screw the mirror will fly out of your hand-the spring load is pretty stout.
I used a large socket to prop up on the inside of the housing to keep it open. This is much safer vs using your hand.
At this time you will need to remove the housing. Shine a flashlight into the back(open) side of the housing and you will see a silver clip approx 3" back that pries up with a flathead screwdriver. Once this is done the mirror just slides right off provide the mirror glass is level. The pics below show where this little tab is. This is the only thing that locks the housing onto the mirror frame. Almost scary.
Once you remove the housing you will have access to the torx screws. Just remove them and remember to use sockets to hold the spring loaded housing open. Be very careful as you do not want the socket to slip out and go flying into the glass or body. Best to lower the window and cover the paint with a towel or other means for protection. Being the rebel I am I just took my time.
Notice the long socket on this one.
Now just feed the mirror and electrical out of the hole.
Remove one connector at a time as both will not feed through at the same time. Duh!
(3) Install new mirror
To install the new folding mirror there is no need for sockets as this mirror just pushes back and forth with a little effort. Feed the connectors and install the new mirror with the 3qty T-20 screws. No socket treatment needed to install the folding mirrors.
(4) Swap mirror switch/remove interior panel
OK, it is now time to remove the interior door panel.
Pop out the plastic cover behind the armrest. You will see a few T-30 screws. Remove them.
Remove the strike lock cover held on with a single T-20 screw.
Take a look at the picture up top where the electrical connections are. There is a single T-30 screw there that needs to be removed also.
OK, with all of the screws removed, use a panel removal tool or similar and pop the panel off the door shell. Oh, don't forget to unscrew the 60s style GM lock located up top.
In order to swap the switch you must remove the other switches on the door first as the tabs overlap-of course!
It is very straight forward and removal of the entire panel is not required provided you are careful not to pull on any of the electrical connections which could cause issues down the line.
Once it is swapped out, put it all back together in reverse order.
Place the housing back on the mirror frame and note there are two alignment 'ears' that slide into provisions in the housing. Just 'bump' it back and you may have to push the silver locking clip back into position. Pull on the housing to ensure it is secure-hate to see your housing fly off while in Famosa
(5) Coding.
The mirror now can be manually folded in and out via the mirror switch. You can have them coded to do this automatically via the ignition switch if you choose.
This is also a cool feature to have when stuck in traffic and those motors get close to your car as they whiz in-between cars.
That's it.


