
Motor Mounts install w/ Pics *first timer, DIY style
 05-10-2011 | 08:07 PM
#1

Thread Starter
Junior Member
Motor Mounts install w/ Pics *first timer, DIY style
Don't mean to repost abundant info, but a few more pics and details would help another first timer, since I had to compile a list of steps from various threads, and still ran into a snag getting the mounts out of the engine bay (disconnecting them was straight forward.
My first attempt I was able to disconnect the old mounts by lifting the engine from below (via wood block, jack, and solid point on engine) but the block prevented the sway bar from moving out of the way, and had no way of getting the old mounts out. I wanted to find a way to get them out the lower front
and without disconnecting the exhaust or any other parts for that matter (besides sway bar end links)
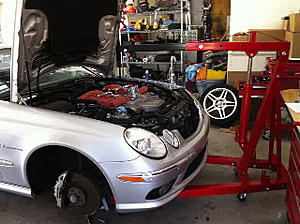
I eventually lifted the engine with an engine hoist, disconnect the sway bar end links, and then placed a jack under the center of the sway bar to move it forward and out of the way enough to pull the old motor mounts out from the front (bottom) This required disconnecting the sway bar end links of course.
1. Removed wheels, place front end on jack stands
2. Removed undercarriage tray (4 8mm bolts)
3. Removed Sway bar end links
4. Placed jack under center of sway bar, carefully check clearance as if want up
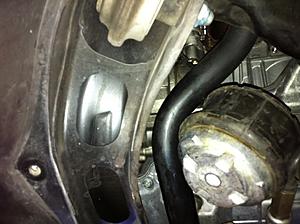
5. Removed lower 13mm bolts on each mount
6. Removed top 16mm nut on mounts (tricky angle, used ratchet wrench)
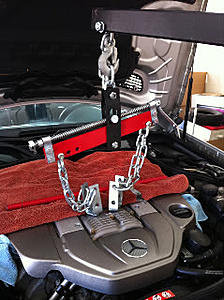
7. Attached engine hoist via leveler and wheel bolts which had same thread
Lifted engine 1.5 inches or so
8. Pulled out old mounts via small space made from moving sway bar out of the way. Inserted new ones, then reversed the process.
(2) New mounts from Mercedes Valencia, CA $237 (using wholesale account)
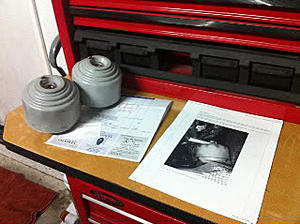
Here is the shot of the driver side are where I removed the mount from the bay. The sway bar was lifted via a jack, and it was just enough space to squeeze out old mount, and insert new one.
Apology of beating dead horse, new e55 owner here! =)
My first attempt I was able to disconnect the old mounts by lifting the engine from below (via wood block, jack, and solid point on engine) but the block prevented the sway bar from moving out of the way, and had no way of getting the old mounts out. I wanted to find a way to get them out the lower front
and without disconnecting the exhaust or any other parts for that matter (besides sway bar end links)
I eventually lifted the engine with an engine hoist, disconnect the sway bar end links, and then placed a jack under the center of the sway bar to move it forward and out of the way enough to pull the old motor mounts out from the front (bottom) This required disconnecting the sway bar end links of course.
1. Removed wheels, place front end on jack stands
2. Removed undercarriage tray (4 8mm bolts)
3. Removed Sway bar end links
4. Placed jack under center of sway bar, carefully check clearance as if want up
5. Removed lower 13mm bolts on each mount
6. Removed top 16mm nut on mounts (tricky angle, used ratchet wrench)
7. Attached engine hoist via leveler and wheel bolts which had same thread
Lifted engine 1.5 inches or so
8. Pulled out old mounts via small space made from moving sway bar out of the way. Inserted new ones, then reversed the process.
(2) New mounts from Mercedes Valencia, CA $237 (using wholesale account)


Here is the shot of the driver side are where I removed the mount from the bay. The sway bar was lifted via a jack, and it was just enough space to squeeze out old mount, and insert new one.

Apology of beating dead horse, new e55 owner here! =)
Last edited by fibercus; 05-11-2011 at 02:41 AM.
The following 2 users liked this post by fibercus:
Overheated (10-05-2022),
testknight (09-13-2020)
 05-10-2011 | 08:43 PM
#3
MBWorld Fanatic!
more pics and more thorough write up would be appreciated, but specifically the sway bar jacking process. Welcome to the forums, as well. Much to be learned from MBWorld! lol
05-11-2011 | 02:39 AM
#7
Thread Starter
Junior Member
They were out of spec (collapsed slightly) and the alternator would sometimes touch the sway bar.
I am cleaning up the steps to add as much detail as possible, including more pics.
Thanks for the warm welcome!
I am cleaning up the steps to add as much detail as possible, including more pics.
Thanks for the warm welcome!
Last edited by fibercus; 05-11-2011 at 02:41 AM.
Trending Topics
 06-09-2012 | 03:01 PM
#9

Super Member
Joined: Apr 2009
Posts: 552
Likes: 0
Received 11 Likes
on
9 Posts
From: Chicago suburbs
2004 E55 AMG
Bringing this back from the dead. Great writeup! I just had to swap out the driver side mount in my driveway. Did it once before but had it in a shop on a lift that time(still wasn't easy).
I tried disconnecting the endlinks, but couldn't get a 10mm Allen in the bolt side(nut was spinning), so I unbolted the steering rack instead. Two 18mm bolts and nuts and it was free. A little wiggling a and little prying between the center of the sway bar and rack, and the mount slid in and out. It took a little force to pull/push it through, but there's just enough clearance.
Thought I'd give an alternative to anyone attempting this with the exhaust in place. Took me about two and a half hours, but I could do it in one and a half now that I know what to do. Saved $400 in the process, well worth it!
If a mod would like, I think this would make a great sticky in the DIY thread!
Edit: The trans mount is 4 bolts and easy as can be. Just jack the trans up an inch or so with a wood block and it slides right out.
06-09-2012 | 03:29 PM
#11

MBWorld Fanatic!
The following users liked this post:
PNW_E63_AMG (10-28-2022)
The following users liked this post:
PNW_E63_AMG (10-30-2022)
06-10-2012 | 01:33 PM
#13
MBWorld Fanatic!
09-09-2013 | 11:45 PM
#14
Senior Member
Joined: Aug 2013
Posts: 252
Likes: 0
Received 1 Like
on
1 Post
From: South Florida
Daily 06 E55, Fun 12 GSXR750, Racing John Deere D110
Can the motor be lifted from the bottom? I got quoted $180 to have two mounts installed or I buy the cherry picker myself for $120 and do it myself.
On another note, there are really only two motor mounts on a 500trq motor? Or only two that go bad.
Thanks!
On another note, there are really only two motor mounts on a 500trq motor? Or only two that go bad.
Thanks!
09-10-2013 | 04:55 AM
#15
MBWorld Fanatic!
Joined: Dec 2006
Posts: 1,123
Likes: 0
Received 30 Likes
on
25 Posts
From: Florida-Germany-New York
2004 E55,1969 300SEL6.3,2011 ML350 BlueTec Diesel,2005 ML400 CDI
Just changed mine last week. While there was no unusual vibration or noise, I felt 9 years and 69,000 miles was long enough. All the mounts showed age and wear related deterioration.
These items should be on everyone's preventative maintenance list.
09-10-2013 | 09:33 AM
#16
Super Member
Joined: Apr 2012
Posts: 840
Likes: 0
Received 0 Likes
on
0 Posts
Blown 208 55 amg, 211 55 amg
09-11-2013 | 03:22 PM
#17
Senior Member
Joined: Aug 2013
Posts: 252
Likes: 0
Received 1 Like
on
1 Post
From: South Florida
Daily 06 E55, Fun 12 GSXR750, Racing John Deere D110
Don't forget the rear transmission mount.
Just changed mine last week. While there was no unusual vibration or noise, I felt 9 years and 69,000 miles was long enough. All the mounts showed age and wear related deterioration.
These items should be on everyone's preventative maintenance list.
Just changed mine last week. While there was no unusual vibration or noise, I felt 9 years and 69,000 miles was long enough. All the mounts showed age and wear related deterioration.
These items should be on everyone's preventative maintenance list.
09-11-2013 | 08:26 PM
#18

MBWorld Fanatic!
Joined: Aug 2006
Posts: 7,034
Likes: 0
Received 385 Likes
on
350 Posts
From: A.D., U.A.E
00 C200 & 00 C55 & 06 SLK55
I believe the E55 Engine Mounts comes with "220 240 27 17",,
i found another #, which is: "211 240 19 17", can anyone confirm if this part # will works.....?!?
ZAYED,,
i found another #, which is: "211 240 19 17", can anyone confirm if this part # will works.....?!?
ZAYED,,
10-02-2013 | 12:32 PM
#19
Newbie
Joined: Sep 2012
Posts: 14
Likes: 0
Received 0 Likes
on
0 Posts
06' E55, 80' 280TE manual
Used the parts from RMEUROPEAN part number 220-240-27-17-98 http://www.rmeuropean.com/Part-Numbe..._8582EF73.aspx
Used your DIY photos last night replacing the mounts on my car, the top bolts are very "special" getting too. In reality it was a bit of work getting leverage on the wrench up in that little valley in between the exhaust manifolds and the engine mounts. In all your DIY was perfect...thank you for providing it! Got it done in a little under 2 hours with a lift and a couple transmission jacks.
The car is MUCH better. Now on to the other projects, plug replacement, gas smell....smh!
Last edited by m54sam; 10-02-2013 at 12:35 PM.
10-02-2013 | 03:43 PM
#21
Senior Member
Joined: Aug 2013
Posts: 252
Likes: 0
Received 1 Like
on
1 Post
From: South Florida
Daily 06 E55, Fun 12 GSXR750, Racing John Deere D110
Used the parts from RMEUROPEAN part number 220-240-27-17-98 http://www.rmeuropean.com/Part-Numbe..._8582EF73.aspx
Used your DIY photos last night replacing the mounts on my car, the top bolts are very "special" getting too. In reality it was a bit of work getting leverage on the wrench up in that little valley in between the exhaust manifolds and the engine mounts. In all your DIY was perfect...thank you for providing it! Got it done in a little under 2 hours with a lift and a couple transmission jacks.
The car is MUCH better. Now on to the other projects, plug replacement, gas smell....smh!
Used your DIY photos last night replacing the mounts on my car, the top bolts are very "special" getting too. In reality it was a bit of work getting leverage on the wrench up in that little valley in between the exhaust manifolds and the engine mounts. In all your DIY was perfect...thank you for providing it! Got it done in a little under 2 hours with a lift and a couple transmission jacks.
The car is MUCH better. Now on to the other projects, plug replacement, gas smell....smh!
Where did you disconnect the endlinks from and any tips? I took off the bolts that connect to the control arm and wasn't able to get the arm off. The connection directly to the end link is tough to get to, but I'm assuming thats what I need to do.
10-02-2013 | 04:06 PM
#22
Newbie
Joined: Sep 2012
Posts: 14
Likes: 0
Received 0 Likes
on
0 Posts
06' E55, 80' 280TE manual
Disconnected the end links from the lower control arm(s) and pryed the ends off with a long HD spade. Note: that swaybar is a monster! Had to use the jack to move the s\bar (even with it disconnected) up and closer to the bottom of the engine to get clearance for the removal of the mounts.
10-02-2013 | 05:20 PM
#23
Senior Member
Joined: Aug 2013
Posts: 252
Likes: 0
Received 1 Like
on
1 Post
From: South Florida
Daily 06 E55, Fun 12 GSXR750, Racing John Deere D110
Forget the sway bar... The steering rack and cover takes 10 minutes to remove then the mounts go in with ZERO struggle. I just need to tighten the top bolts then I'm done!
Last edited by S2K750; 10-02-2013 at 08:37 PM.
10-02-2013 | 05:29 PM
#24
Newbie
Joined: Sep 2012
Posts: 14
Likes: 0
Received 0 Likes
on
0 Posts
06' E55, 80' 280TE manual
Maybe...didn't think to pull that off, but then again they came out easy enough with the swaybar moved out of the way too. Lets hope I don't need to do this again anytime soon :-)
10-02-2013 | 08:37 PM
#25
Senior Member
Joined: Aug 2013
Posts: 252
Likes: 0
Received 1 Like
on
1 Post
From: South Florida
Daily 06 E55, Fun 12 GSXR750, Racing John Deere D110
Thanks to Izzy I looked around and popped off the steering rack and the plate that covers it. That gives you enough room for the mount and another 1" gap all around.
I would also like to add that the bolts to lift the motor from the supercharger are M12 1.5 pitch. My wheel bolts didn't fit, m14 1.5 pitch.


