


Need help finding the inner idler pulley

Thread Starter
Super Member
Joined: Mar 2007
Posts: 946
Likes: 1
From: Bay Area
03 C32 gone, 06 CLS55, 16 Tesla X
Need help finding the inner idler pulley
Hi all,
I need help to find the inner idler pulley for my car. The plastic one that runs the same belt with water pump, power steering pump etc. Not the outer pulley that runs with the supercharger pulley that ASP has.
If you know where to get one, please let me know.
Thanks,
I need help to find the inner idler pulley for my car. The plastic one that runs the same belt with water pump, power steering pump etc. Not the outer pulley that runs with the supercharger pulley that ASP has.
If you know where to get one, please let me know.
Thanks,
MBWorld Fanatic!


Joined: Dec 2007
Posts: 1,461
Likes: 9
From: Treasure Island, FL
GLE 63S
Hi all,
I need help to find the inner idler pulley for my car. The plastic one that runs the same belt with water pump, power steering pump etc. Not the outer pulley that runs with the supercharger pulley that ASP has.
If you know where to get one, please let me know.
Thanks,
I need help to find the inner idler pulley for my car. The plastic one that runs the same belt with water pump, power steering pump etc. Not the outer pulley that runs with the supercharger pulley that ASP has.
If you know where to get one, please let me know.
Thanks,

MBWorld Fanatic!
Joined: Sep 2002
Posts: 1,719
Likes: 12
From: West
2005 E55 Wagon
Joined: Apr 2006
Posts: 560
Likes: 65
From: LHC, Arizona
2024 GLE 63 S Coupe 2020 E 63 S
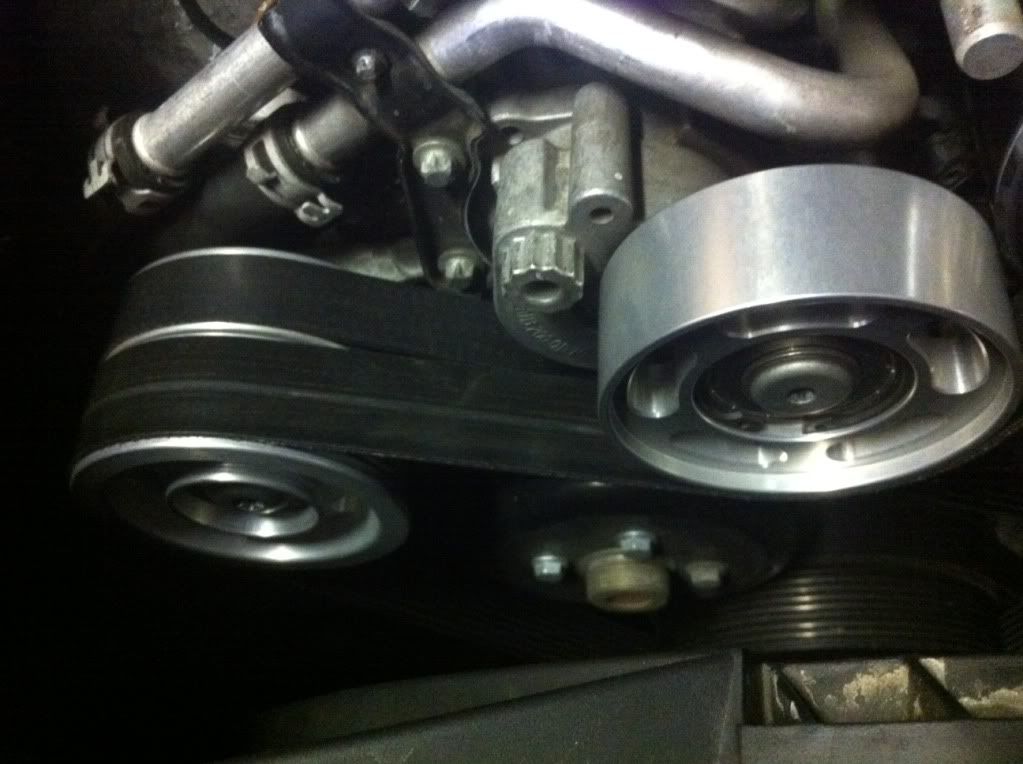
Definitely a DIY. You'll need a 17mm 12 pt combo wrench or socket for the s/c tensioner pulley, and a socket for the other tensioner. I don't remember the torx sizes for the two bolts.
Remove the front plastic engine cover, then start by removing the s/c belt first. Then I removed the s/c tensioner pulley with a torx bit on a 3/8 rachet wrench and then removed the other belt to get access to the other two pulleys. I wasn't able to remove the lower bolt with a rachet because it was too tight so I used a 3/8 drive stubby breaker bar to clear the fan shroud. Once that bolt is out you can remove both lower pulley's. Use the new spacer provided in the ASP kit and install the lower pulley's. You reuse the spacer with a shoulder on it for the new lower pulley's. You will have a slight gap between the two pulleys when installed correctly. It may take a couple of tries to figure out which way the pulleys face, but it will make sense when you do it. I used blue loctite on the bolt and reinstalled the bolt with the two pulleys on it first. I then reinstalled the lower belt. Then moved up and did the s/c tensioner pulley. You do not reuse the dust cover on the upper pulley. I did find that a 3/8 stainless washer with a 1" outside diameter works well in place of the dust cover. Once again use blue loctite. Then reinstall the belt and you're done. I started my car with the cover off and hood open just to check and snap the engine cover back on and close the hood. No more squeaky pulleys.
Remove the front plastic engine cover, then start by removing the s/c belt first. Then I removed the s/c tensioner pulley with a torx bit on a 3/8 rachet wrench and then removed the other belt to get access to the other two pulleys. I wasn't able to remove the lower bolt with a rachet because it was too tight so I used a 3/8 drive stubby breaker bar to clear the fan shroud. Once that bolt is out you can remove both lower pulley's. Use the new spacer provided in the ASP kit and install the lower pulley's. You reuse the spacer with a shoulder on it for the new lower pulley's. You will have a slight gap between the two pulleys when installed correctly. It may take a couple of tries to figure out which way the pulleys face, but it will make sense when you do it. I used blue loctite on the bolt and reinstalled the bolt with the two pulleys on it first. I then reinstalled the lower belt. Then moved up and did the s/c tensioner pulley. You do not reuse the dust cover on the upper pulley. I did find that a 3/8 stainless washer with a 1" outside diameter works well in place of the dust cover. Once again use blue loctite. Then reinstall the belt and you're done. I started my car with the cover off and hood open just to check and snap the engine cover back on and close the hood. No more squeaky pulleys.
Trending Topics
MBWorld Fanatic!
Joined: Sep 2002
Posts: 1,719
Likes: 12
From: West
2005 E55 Wagon
Definitely a DIY. You'll need a 17mm 12 pt combo wrench or socket for the s/c tensioner pulley, and a socket for the other tensioner. I don't remember the torx sizes for the two bolts.
Remove the front plastic engine cover, then start by removing the s/c belt first. Then I removed the s/c tensioner pulley with a torx bit on a 3/8 rachet wrench and then removed the other belt to get access to the other two pulleys. I wasn't able to remove the lower bolt with a rachet because it was too tight so I used a 3/8 drive stubby breaker bar to clear the fan shroud. Once that bolt is out you can remove both lower pulley's. Use the new spacer provided in the ASP kit and install the lower pulley's. You reuse the spacer with a shoulder on it for the new lower pulley's. You will have a slight gap between the two pulleys when installed correctly. It may take a couple of tries to figure out which way the pulleys face, but it will make sense when you do it. I used blue loctite on the bolt and reinstalled the bolt with the two pulleys on it first. I then reinstalled the lower belt. Then moved up and did the s/c tensioner pulley. You do not reuse the dust cover on the upper pulley. I did find that a 3/8 stainless washer with a 1" outside diameter works well in place of the dust cover. Once again use blue loctite. Then reinstall the belt and you're done. I started my car with the cover off and hood open just to check and snap the engine cover back on and close the hood. No more squeaky pulleys.
Remove the front plastic engine cover, then start by removing the s/c belt first. Then I removed the s/c tensioner pulley with a torx bit on a 3/8 rachet wrench and then removed the other belt to get access to the other two pulleys. I wasn't able to remove the lower bolt with a rachet because it was too tight so I used a 3/8 drive stubby breaker bar to clear the fan shroud. Once that bolt is out you can remove both lower pulley's. Use the new spacer provided in the ASP kit and install the lower pulley's. You reuse the spacer with a shoulder on it for the new lower pulley's. You will have a slight gap between the two pulleys when installed correctly. It may take a couple of tries to figure out which way the pulleys face, but it will make sense when you do it. I used blue loctite on the bolt and reinstalled the bolt with the two pulleys on it first. I then reinstalled the lower belt. Then moved up and did the s/c tensioner pulley. You do not reuse the dust cover on the upper pulley. I did find that a 3/8 stainless washer with a 1" outside diameter works well in place of the dust cover. Once again use blue loctite. Then reinstall the belt and you're done. I started my car with the cover off and hood open just to check and snap the engine cover back on and close the hood. No more squeaky pulleys.
MB World Stories
The Best of Mercedes & AMG

6 Mercedes Models That Did NOT Age Well (But Are Somehow Still Cool)
Verdad Gallardo
Manual Mercedes? 6 Times Sindelfingen Let Drivers Have All The Fun
Verdad Gallardo
Mercedes SLR McLaren 722 S Is Extremely Rare Example Modified by McLaren
Verdad Gallardo
8 Classic Boxy Mercedes Designs That Have Aged Like Fine Wine
Verdad Gallardo
Flawlessly Restored Mercedes 190E Evo II Heads to Auction
Verdad Gallardo
Electric Mercedes C-Class Unveiled: 11 Things You Need to Know
Verdad Gallardo
Mercedes EQS Gets A Major Update: Everything You Need to Know
Verdad Gallardo
5 Underrated Mercedes-Benz Models That Don't Get the Love They Deserve
Verdad Gallardo
Mercedes 300D Has Pushed Well Past 1 Million Miles and It Ain't Stopping
Verdad Gallardo
MBWorld Fanatic!
Joined: Jul 2012
Posts: 1,556
Likes: 15
From: Canada
07 E63 + 07 CLK63CAB
299.00 fast delivery


