


DIY W211 Rear Springs/Bellows (Arnott)

MBWorld Fanatic!


Joined: Dec 2009
Posts: 1,046
Likes: 28
From: SOCAL
2004 E55

Member
Joined: Jun 2012
Posts: 100
Likes: 0
From: S Florida
01 audi a4, 06 e55

MBWorld Fanatic!
Joined: Dec 2009
Posts: 1,046
Likes: 28
From: SOCAL
2004 E55

Thread Starter
Member
Joined: Jan 2012
Posts: 229
Likes: 1
From: To your right or left, flying past you
'03 E55 AMG - '06 300C SRT8 - '93 240SX Coupe w/1JZ-GTE
Ever since I have done this I get an airmatic "visit workshop" warning after a few minutes every time I drive the car. Anyone else getting this? Is it because of the reservoirs?
Thread Starter
Member
Joined: Jan 2012
Posts: 229
Likes: 1
From: To your right or left, flying past you
'03 E55 AMG - '06 300C SRT8 - '93 240SX Coupe w/1JZ-GTE
Would it be air in the lines or something? It's definitely something to do with replacing the springs because it only started this right afterward. My suspension works flawlessly in all settings now.. so I have no idea why the error pops up..
Last edited by Jakez; Nov 26, 2012 at 03:41 AM.
Newbie
Joined: Apr 2013
Posts: 1
Likes: 0
2003 E-class - 1989 W124
Thank you for making this write upp. I had good use of it.
You actually dont need to puncture annything to deflate the old airsprings.
All you need to do is to detach the airhose. Either from the airspring or from the coupling under the car. Then you pull the electric contact on the old spring. This is actually just an ordinary 12-vold solenoid and you do not need the mercedes-bens Star diagnoses to do this as instructions from Arnott says. All you actually need is a 12v powersource some copperwire and some elecrichians tape A lot safer then using a knife and you may re-fit your airspring if its not demaged. (Pardon my english). I wil make a short instruction on this if annyone is interested?
You actually dont need to puncture annything to deflate the old airsprings.
All you need to do is to detach the airhose. Either from the airspring or from the coupling under the car. Then you pull the electric contact on the old spring. This is actually just an ordinary 12-vold solenoid and you do not need the mercedes-bens Star diagnoses to do this as instructions from Arnott says. All you actually need is a 12v powersource some copperwire and some elecrichians tape
A lot safer then using a knife and you may re-fit your airspring if its not demaged. (Pardon my english). I wil make a short instruction on this if annyone is interested?
Last edited by jan.arne; Apr 24, 2013 at 05:07 PM.

MBWorld Fanatic!
Joined: Oct 2012
Posts: 1,242
Likes: 7
From: Canada
2004 E55 AMG
Thank you for making this write upp. I had good use of it.
You actually dont need to puncture annything to deflate the old airsprings.
All you need to do is to detach the airhose. Either from the airspring or from the coupling under the car. Then you pull the electric contact on the old spring. This is actually just an ordinary 12-vold solenoid and you do not need the mercedes-bens Star diagnoses to do this as instructions from Arnott says. All you actually need is a 12v powersource some copperwire and some elecrichians tape A lot safer then using a knife and you may re-fit your airspring if its not demaged. (Pardon my english). I wil make a short instruction on this if annyone is interested?
You actually dont need to puncture annything to deflate the old airsprings.
All you need to do is to detach the airhose. Either from the airspring or from the coupling under the car. Then you pull the electric contact on the old spring. This is actually just an ordinary 12-vold solenoid and you do not need the mercedes-bens Star diagnoses to do this as instructions from Arnott says. All you actually need is a 12v powersource some copperwire and some elecrichians tape
A lot safer then using a knife and you may re-fit your airspring if its not demaged. (Pardon my english). I wil make a short instruction on this if annyone is interested?MB World Stories
The Best of Mercedes & AMG

Manual Mercedes? 6 Times Sindelfingen Let Drivers Have All The Fun
Verdad Gallardo
Mercedes SLR McLaren 722 S Is Extremely Rare Example Modified by McLaren
Verdad Gallardo
8 Classic Boxy Mercedes Designs That Have Aged Like Fine Wine
Verdad Gallardo
Flawlessly Restored Mercedes 190E Evo II Heads to Auction
Verdad Gallardo
Electric Mercedes C-Class Unveiled: 11 Things You Need to Know
Verdad Gallardo
Mercedes EQS Gets A Major Update: Everything You Need to Know
Verdad Gallardo
5 Underrated Mercedes-Benz Models That Don't Get the Love They Deserve
Verdad Gallardo
Mercedes 300D Has Pushed Well Past 1 Million Miles and It Ain't Stopping
Verdad Gallardo
10 Most Reliable Mercedes-Benz Models You Can Buy Used
Verdad Gallardo
Thread Starter
Member
Joined: Jan 2012
Posts: 229
Likes: 1
From: To your right or left, flying past you
'03 E55 AMG - '06 300C SRT8 - '93 240SX Coupe w/1JZ-GTE
Thank you for making this write upp. I had good use of it.
You actually dont need to puncture annything to deflate the old airsprings.
All you need to do is to detach the airhose. Either from the airspring or from the coupling under the car. Then you pull the electric contact on the old spring. This is actually just an ordinary 12-vold solenoid and you do not need the mercedes-bens Star diagnoses to do this as instructions from Arnott says. All you actually need is a 12v powersource some copperwire and some elecrichians tape A lot safer then using a knife and you may re-fit your airspring if its not demaged. (Pardon my english). I wil make a short instruction on this if annyone is interested?
You actually dont need to puncture annything to deflate the old airsprings.
All you need to do is to detach the airhose. Either from the airspring or from the coupling under the car. Then you pull the electric contact on the old spring. This is actually just an ordinary 12-vold solenoid and you do not need the mercedes-bens Star diagnoses to do this as instructions from Arnott says. All you actually need is a 12v powersource some copperwire and some elecrichians tape
A lot safer then using a knife and you may re-fit your airspring if its not demaged. (Pardon my english). I wil make a short instruction on this if annyone is interested? I love the fact that we can replace this so easily ourselves and avoid the insane dealer/shop costs.
MBWorld Fanatic!
Joined: Dec 2006
Posts: 1,124
Likes: 32
From: Florida-Germany-New York
2004 E55,1969 300SEL6.3,2011 ML350 BlueTec Diesel,2005 ML400 CDI
The only part I would be afraid of (I was) is leaking the air out of the hose/reservoir to get the stock spring to compress, since there is no going back as far as I know.. that's why I left that step for last (cutting the hose) and only punctured a tiny hole at first to slowly leak air out and if I pulled the knife out it would seal back up enough temporarily if I wasn't able to finish the install.

MBWorld Fanatic!


Joined: May 2010
Posts: 1,027
Likes: 55
05 E55 AMG, E320 CDI, Turbo E46 M3,IS300 2JZGTE,VQ35 Turbo Maxima, Mercedes 300D
Firstly, I wanted to give thanks to OP for documenting this well.
I just completed my install of rear arnott springs. Things didn�t go smoothly on the first side. Some mistakes I made that you should avoid. Not sure how others did not encounter these issues. Possibly because I had my car in the raised airmatic position. Also possibly because mine were not really leaking very badly.
1. Drive onto some planks of wood with the back wheels. This will lower the back suspension as it auto levels.
2. Put jack underneath the car in the correct position.
3. Lower your car (low in airmatic). Mine was set on high since I need it to get up my relatively steep driveway
4. The pressure in the system can be quite high. The WIS advises to release pressure first, so if you have a DAS, I recommend you do the following:
5. Use DAS (if possible) to deflate your springs. If your springs are leaking badly, this will not be an issue anyway.
Here is how to release pressure with DAS.
a. Go to Control Units -> Chassis -> Suspension -> AIRmatic->Actuations
b. Select release pressure in Central Reservoir (This may not be necessary step but I did it anyway.)
c. Press F3 until the pressure reading reduces to 3 bar
d.Go back and select release pressure in suspension strut.
e.select rear struts
f.release pressure in suspension struts. It drops to around 3 bar.
g. Jack up the car
h. Disconnect the 4mm voss fitting (that is the brass fitting that connects the airline to the air spring) It is a 10mm nut. I struggled with this one a little. You need to use a 10mm wrench and use the tips to turn the nut. I tried needle nose at first but that didn�t work
i.release the pressure in the airsprings again (rear only) and it will completely deflate the airspring allowing for easy removal.
j. Disconnect the battery at this point.
I did not do the steps above and the pressure was quite high so I could not get the lower 21mm bolt that holds the airspring in place out. I forced it out. Do NOT do this. It should ease out. If it does not, then there is pressure in the spring. Mine jumped and got stuck. The only way I could get it out was to deflate using the steps above. I fought with this for a while � the key steps being h and i. If you do not release voss fitting.
I know people said they did not replace the fittings, I did replace the fittings as a precaution. Arnott ships with them so why not use them. It is a compression type fitting that is identical to the OEM fitting. It is a 4mm Voss, which (I also found out) is available from Checker Auto
Mine were missing. I called Arnott. I had kind of mixed experience with Arnott customer service both bad and really good. It really depends on who you talk to. They shipped the parts to me after some argument back and forth on whether these are included.
Another issue I had was one connector locking tab broke when I removed it .. be gentle with these connectors. Mine was really stuck though. I recommend spraying some electrical cleaner or brake clean on the connectors to clean them up before you remove them.
Since my tab was broke, I thought I was stuck. I didn�t want to put it back on that way if it pops off while I am driving, then I�d be stuck. So I switched it with the airmatic connector on the front strut. The broken tabbed one I put on the front and zip tied it so it wouldn�t come loose until I gather a big enough order to buy another one on line.
Here are some tightening torques I looked up. I like to go by the book where possible:
Airsping 21mm bolt � 150Nm
Strut bolt (bottom) � 50Nm followed by 90 degree turn
Top strut bolt - 20Nm (I just tightened it with a wrench by hand)
Wheels � 130Nm

MBWorld Fanatic!
Joined: Sep 2002
Posts: 1,719
Likes: 12
From: West
2005 E55 Wagon
Urgh...go figure, I just replaced the front driver airmatic strut 3 weeks ago. Yesterday morning, I see my rear sitting on my rear tires, start the car and I get the red "stop, car too low" warning. I asked my friend a merc mechanic to confirm it was the rear and he did. Luckily I purchased 2 new rear Arnott A-2725 last week as a CYA (and bc the price was too good to pass up..$380 a piece). For the fun of it, I called the dealer for a quote...and they refused to quote me. They just said it would be pricey but they would work with me (I am sure they would work me alright). I called my Indy and they quoted me an out the door price of $1,400.00. Luckily, I got the replacement rear Arnotts and found this thread. Thanks OP! Now, on to the garage.
Update: I ended up having my Indy do the work . Luckily, The reason is because in order to remove my rear shock absorbers (to remove/install the rear arnott), I needed a special tool since my wagon had this funny looking washer type nut (https://mbworld.org/forums/e-class-w...g-problem.html). Yes, I could have purchased that special tool and then do the work myself..but since it is something that I was not familiar with, I wanted to be safe then sorry. The cost to install both Rear Arnotts was $400.
Also, car rides better/firmer with new rear Arnotts. Total cost ended up being $1,200 ($800 both rear Arnotts and $400 install). Not exactly cheap, but I save $200 vs original $1,400 quote. I could have saved more if I did the work myself (by also purchasing that special mercedes tool).
Last edited by jcjmw; Sep 9, 2014 at 08:22 PM. Reason: Update

Newbie
Joined: Oct 2014
Posts: 1
Likes: 0
From: Spring Texas
2007 E63 AMG, 2010 Range Rover Sport HSE, 2011 Ford F-250
Urgh...go figure, I just replaced the front driver airmatic strut 3 weeks ago. Yesterday morning, I see my rear sitting on my rear tires, start the car and I get the red "stop, car too low" warning. I asked my friend a merc mechanic to confirm it was the rear and he did. Luckily I purchased 2 new rear Arnott A-2725 last week as a CYA (and bc the price was too good to pass up..$380 a piece). For the fun of it, I called the dealer for a quote...and they refused to quote me. They just said it would be pricey but they would work with me (I am sure they would work me alright). I called my Indy and they quoted me an out the door price of $1,400.00. Luckily, I got the replacement rear Arnotts and found this thread. Thanks OP! Now, on to the garage.
Update: I ended up having my Indy do the work . Luckily, The reason is because in order to remove my rear shock absorbers (to remove/install the rear arnott), I needed a special tool since my wagon had this funny looking washer type nut (https://mbworld.org/forums/e-class-w...g-problem.html). Yes, I could have purchased that special tool and then do the work myself..but since it is something that I was not familiar with, I wanted to be safe then sorry. The cost to install both Rear Arnotts was $400.
Also, car rides better/firmer with new rear Arnotts. Total cost ended up being $1,200 ($800 both rear Arnotts and $400 install). Not exactly cheap, but I save $200 vs original $1,400 quote. I could have saved more if I did the work myself (by also purchasing that special mercedes tool).
Update: I ended up having my Indy do the work . Luckily, The reason is because in order to remove my rear shock absorbers (to remove/install the rear arnott), I needed a special tool since my wagon had this funny looking washer type nut (https://mbworld.org/forums/e-class-w...g-problem.html). Yes, I could have purchased that special tool and then do the work myself..but since it is something that I was not familiar with, I wanted to be safe then sorry. The cost to install both Rear Arnotts was $400.
Also, car rides better/firmer with new rear Arnotts. Total cost ended up being $1,200 ($800 both rear Arnotts and $400 install). Not exactly cheap, but I save $200 vs original $1,400 quote. I could have saved more if I did the work myself (by also purchasing that special mercedes tool).
MBWorld Fanatic!
Joined: Sep 2002
Posts: 1,719
Likes: 12
From: West
2005 E55 Wagon


Newbie
Joined: May 2015
Posts: 1
Likes: 0
4
Arnott Springs
well here is one for the books - i removed the bellows ( rear springs ) from my w211 wagon after various ride struggles and finding the car literally sitting on the tires
I replaced them with the engineered mounts and springs from Arnott - the fit was excellent and the work straight forward
However, the rear end now sits about an inch and half lower than MB meant it to
Of course I went back to Arnott and asked what gives ? they sent me new springs which I of course installed and found the same effect - no change
After all of the work they told me I should have installed the Airsprings !
Too crazy for me given they make springs for that purpose and what a bunch of idiots or maybe it is just me in that category for listening to them
Special thanks goes out to the Arnott tech team

Senior Member


Joined: Sep 2011
Posts: 384
Likes: 13
From: Sweden
E55 AMG V8 Kompressor 2004 E 55 AMG Type: 5,439 cc (5.439 L; 331.9 cu in) Supercharged V8 Powe
Super geatefull just 1 quistion
Got these pretty Arnott springs / bellows in the mail a while ago and couldn't wait to get them in, lets just say my car liked to sit everwhere it went LOL. I did one side the first night and the other the 2nd night. After the first night I went for a drive and could easily notice the stiffness of the Arnott spring. I'm not sure if it's because the old ones were so worn but the handling feels like it went from comfy to sporty, but still kept the straight line comfort. It really is a vast improvement as the car doesn't really feel like it's leaning so sloppily into a turn now. It kind of reminds me of the feeling you get when you install sway bars on a car honestly... ok enough of that lets get into this..
Short version:
Remove trunk liner to get to top shock bolt. Remove bottom shock bolt and spring bolt, unbolt rear arm to move down and make room. Cut (carefully) large air hose from spring and near reservoir (no longer used). Unhook small airline and sensor from spring. Pry top of spring down with a screwdriver and remove spring. Replace white plastic clip with Arnott replacement and install Arnott spring up into new clip, make sure rear arm is out of the way to push the bottom of the spring up into the control arm. Put her back together.
Extended cut:
Some of the full size images may be rotated sideways or something because of imgur. Sorry I'm not sure why it did that, but the attached images (bottom of this post) are right side up!
First remove these clips and tabs from the trunk liner and then take it off and set aside. The screws are a 7/64 allen key and the tabs you just use a flathead screw driver to slide the middle part out and then it comes out easy. There might be one more tab that isn't in the picture I can't remember:


Now you'll want to put the car on a jack stand or two using your favorite method. And remove the wheel.
Then remove the cover from the control arm, there are 2 little parts of it hanging onto the arm, just use a flathead to pop them open and take it off:

Remove this 17mm nut, use something to hang onto the top and keep it from spinning while you take the nut off. Might also want to support the control arm with a small jack or something while you take this nut off because it's all going to suddenly drop an inch or two once the nut comes off:

Next is to remove these 3 bolts. The bolt for the spring (13/16 I think) is going to be a pain to take out if the bag/spring still has pressure against it so just remove the nut for now and leave that bolt in. Remove the bottom shock bolt I think it's 16mm, then you can pull the shock out, carefully set it aside without disconnecting or messing up the wires, I just flipped it upside down and set it on the ground leaning against the outside edge of the rotor. Then remove the bolt from the long skinny arm to make room for removing/installing the spring, it's a 10mm allen key and I think 18mm nut on the other side:

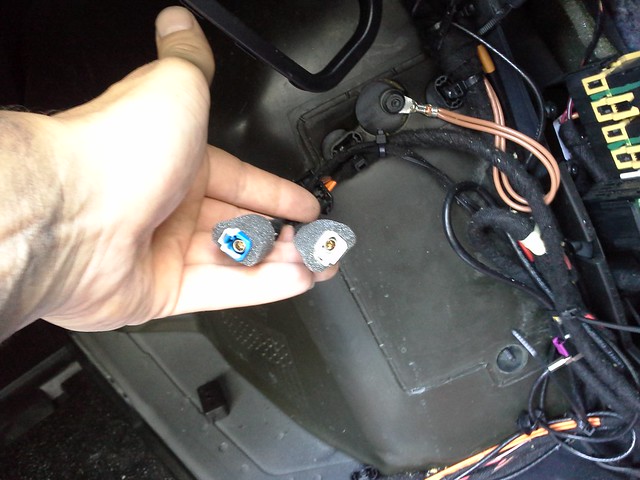
Now disconnect the small white airline hose from the spring (10mm nut I believe, if you can't get to the nut then just follow the line to the middle of the car where the diff is and 3 lines are connected to a block and unbolt (10mm) it there). Then disconnect the sensor from the spring, let the airline and sensor hang aside to be ready for going into the new spring:

Next is to get rid of that hose going to the reservoir you aren't going to be using anymore. Use a knife or something to puncture a small hole in it and let the air leak out, basically just poke the knife in a tiny bit to where it only leaks air if you twist it sideways, in case you have second thoughts like me haha. After it's done airing out cut the hose in the same spot. The bottom bolt of the spring should also be loose enough now that you can take it out with your hand. Then (3rd pic) get under the car and cut the hose again closest to the reservoir tank, if you can't find it just tug on the other end near the spring until you figure it out, careful not to cut anything else near it:


Now the spring should be almost ready to fall out except there is a little plastic clip hanging onto the top (Arnott provides a replacement clip). Use a screwdriver or something to pry the spring down and it will fall. Then use a flathead on the bottom of the white plastic clip to unscrew it from the threading and install the fresh one from Arnott:


Next is probably the hardest (but last!) part, getting the new spring in. What I did was pushed the middle/top of the spring into place on the new white plastic piece and then used an allen key to hold that long skinny arm down and out of the way while I layed on the ground and shoved the bottom of the spring up and into the control arm. Be careful not to jam a finger or something in the process!:

Now just put everything back together in reverse order basically. I didn't use the replacement fitting Arnott supplied for the white airline, just bolted the stock one back up to the new spring.
The shock will probably be extended too much to go back in but it should easily compress if you mount it into the control arm and pull down on the top with your hands to get it back up into the trunk area. Make sure you follow the instructions Arnott gives when you go to put the car back on the ground. Basically you just don't want to put the full load of the car onto the new spring before it has time to fill up and make sure it works correctly.
Hope this helps some people! It's actually a very very easy job but I just tried to make the DIY as long and detailed as I could for the novices like me.
I'm attaching all the images again below in case they disappear from imgur in the future.
Short version:
Remove trunk liner to get to top shock bolt. Remove bottom shock bolt and spring bolt, unbolt rear arm to move down and make room. Cut (carefully) large air hose from spring and near reservoir (no longer used). Unhook small airline and sensor from spring. Pry top of spring down with a screwdriver and remove spring. Replace white plastic clip with Arnott replacement and install Arnott spring up into new clip, make sure rear arm is out of the way to push the bottom of the spring up into the control arm. Put her back together.
Extended cut:
Some of the full size images may be rotated sideways or something because of imgur. Sorry I'm not sure why it did that, but the attached images (bottom of this post) are right side up!
First remove these clips and tabs from the trunk liner and then take it off and set aside. The screws are a 7/64 allen key and the tabs you just use a flathead screw driver to slide the middle part out and then it comes out easy. There might be one more tab that isn't in the picture I can't remember:
Now you'll want to put the car on a jack stand or two using your favorite method. And remove the wheel.
Then remove the cover from the control arm, there are 2 little parts of it hanging onto the arm, just use a flathead to pop them open and take it off:
Remove this 17mm nut, use something to hang onto the top and keep it from spinning while you take the nut off. Might also want to support the control arm with a small jack or something while you take this nut off because it's all going to suddenly drop an inch or two once the nut comes off:
Next is to remove these 3 bolts. The bolt for the spring (13/16 I think) is going to be a pain to take out if the bag/spring still has pressure against it so just remove the nut for now and leave that bolt in. Remove the bottom shock bolt I think it's 16mm, then you can pull the shock out, carefully set it aside without disconnecting or messing up the wires, I just flipped it upside down and set it on the ground leaning against the outside edge of the rotor. Then remove the bolt from the long skinny arm to make room for removing/installing the spring, it's a 10mm allen key and I think 18mm nut on the other side:
Now disconnect the small white airline hose from the spring (10mm nut I believe, if you can't get to the nut then just follow the line to the middle of the car where the diff is and 3 lines are connected to a block and unbolt (10mm) it there). Then disconnect the sensor from the spring, let the airline and sensor hang aside to be ready for going into the new spring:
Next is to get rid of that hose going to the reservoir you aren't going to be using anymore. Use a knife or something to puncture a small hole in it and let the air leak out, basically just poke the knife in a tiny bit to where it only leaks air if you twist it sideways, in case you have second thoughts like me haha. After it's done airing out cut the hose in the same spot. The bottom bolt of the spring should also be loose enough now that you can take it out with your hand. Then (3rd pic) get under the car and cut the hose again closest to the reservoir tank, if you can't find it just tug on the other end near the spring until you figure it out, careful not to cut anything else near it:
Now the spring should be almost ready to fall out except there is a little plastic clip hanging onto the top (Arnott provides a replacement clip). Use a screwdriver or something to pry the spring down and it will fall. Then use a flathead on the bottom of the white plastic clip to unscrew it from the threading and install the fresh one from Arnott:
Next is probably the hardest (but last!) part, getting the new spring in. What I did was pushed the middle/top of the spring into place on the new white plastic piece and then used an allen key to hold that long skinny arm down and out of the way while I layed on the ground and shoved the bottom of the spring up and into the control arm. Be careful not to jam a finger or something in the process!:
Now just put everything back together in reverse order basically. I didn't use the replacement fitting Arnott supplied for the white airline, just bolted the stock one back up to the new spring.
The shock will probably be extended too much to go back in but it should easily compress if you mount it into the control arm and pull down on the top with your hands to get it back up into the trunk area. Make sure you follow the instructions Arnott gives when you go to put the car back on the ground. Basically you just don't want to put the full load of the car onto the new spring before it has time to fill up and make sure it works correctly.
Hope this helps some people! It's actually a very very easy job but I just tried to make the DIY as long and detailed as I could for the novices like me.
I'm attaching all the images again below in case they disappear from imgur in the future.
Arnott Air spring(s) contain a solenoid valve.
Only the “Mercedes-Benz DAS Star” diagnostic computer software can (inflate the air spring)
Why do they add this if nobody use it a bit confusing
Last edited by SuperChargerE55; Jan 11, 2016 at 01:59 PM.

Newbie
Joined: Jan 2017
Posts: 4
Likes: 0
E55 AMG
Sorry to dig up an old post, but I felt this information is vital.
I too installed the new rear Arnott springs, and tried to let the car fill the bags while at ride height on the jacks (as Arnott and others have said). Bags would not inflate, and I was about to give up and have the car towed to an independent mechanic.
I called Arnott, and their tech support said, "yes, 97% of the vehicles need either an Autel or MB DAS star system to reset the system." I couldn't really believe it, but I actually called my local Indy to make an appointment to the tune of "a couple hundred, since we didn't do the work". :facepalm:
Anyways - I was thinking back to the reason I replaced the bags in the first place - I would walk out after the car being parked for hours, and the right rear would be slammed. However - without fail - the car would pump itself back up and I'd be on my merry way. Realizing this, and the fact the car doesn't know the bags have been changed, I removed the jacks completely and started the car. **Warning do this at your own risk, as this may damage the bags** The "STOP! car too low" warning immediately popped up on the dash, but then the car started re-inflating the bags, being back to ride height in under a minute. I then raised the suspension to the tallest mode, and waited another minute. VIOLA! everything works.
As a side note, I saw a number of people mention that this is bad for the bags/airmatic system. While I agree that it is not ideal, there shouldn't be a concern of over-pressurization while it is lifting the car. The first bump you hit after the install is gonna spike the bag pressure to 1.5 to 2x what they will see raising the car, so I think this concern is mostly bunk.
Cliff notes: Remove the jacks completely, car will pump the bags up, bags can fold over and overpressurize, don't be a wussy
Last edited by Budget_e55; Jan 17, 2017 at 11:11 AM. Reason: Rocman8 gave a reasonable explanation of why this shouldn't be done

MBWorld Fanatic!
Joined: Nov 2014
Posts: 1,139
Likes: 77
E55
Sorry to dig up an old post, but I felt this information is vital.
I too installed the new rear Arnott springs, and tried to let the car fill the bags while at ride height on the jacks (as Arnott and others have said). Bags would not inflate, and I was about to give up and have the car towed to an independent mechanic.
I called Arnott, and their tech support said, "yes, 97% of the vehicles need either an Autel or MB DAS star system to reset the system." I couldn't really believe it, but I actually called my local Indy to make an appointment to the tune of "a couple hundred, since we didn't do the work". :facepalm:
Anyways - I was thinking back to the reason I replaced the bags in the first place - I would walk out after the car being parked for hours, and the right rear would be slammed. However - without fail - the car would pump itself back up and I'd be on my merry way. Realizing this, and the fact the car doesn't know the bags have been changed, I removed the jacks completely and started the car. The "STOP! car too low" warning immediately popped up on the dash, but then the car started re-inflating the bags, being back to ride height in under a minute. I then raised the suspension to the tallest mode, and waited another minute. VIOLA! everything works.
As a side note, I saw a number of people mention that this is bad for the bags/airmatic system. While I agree that it is not ideal, there shouldn't be a concern of over-pressurization while it is lifting the car. The first bump you hit after the install is gonna spike the bag pressure to 1.5 to 2x what they will see raising the car, so I think this concern is mostly bunk.
Cliff notes: Remove the jacks completely, car will pump the bags up, don't be a wussy.


Super Member
Joined: Nov 2001
Posts: 565
Likes: 0
From: the OC, So Cal
2000 CLK 320

Hello all. Informative post, thank you for the guide.
Didn't see it listed but does anyone know the torque specs for the above items circled in GREEN. Does suspension have to be under load when torqued? Its for the upper control arm and the sway bar link. Thanks.
Senior Member
Joined: Aug 2015
Posts: 453
Likes: 50
From: East Coast, USA
Mercedes CLS 55 AMG
Sorry to dig up an old post, but I felt this information is vital.
I too installed the new rear Arnott springs, and tried to let the car fill the bags while at ride height on the jacks (as Arnott and others have said). Bags would not inflate, and I was about to give up and have the car towed to an independent mechanic.
I called Arnott, and their tech support said, "yes, 97% of the vehicles need either an Autel or MB DAS star system to reset the system." I couldn't really believe it, but I actually called my local Indy to make an appointment to the tune of "a couple hundred, since we didn't do the work". :facepalm:
Anyways - I was thinking back to the reason I replaced the bags in the first place - I would walk out after the car being parked for hours, and the right rear would be slammed. However - without fail - the car would pump itself back up and I'd be on my merry way. Realizing this, and the fact the car doesn't know the bags have been changed, I removed the jacks completely and started the car. **Warning do this at your own risk, as this may damage the bags** The "STOP! car too low" warning immediately popped up on the dash, but then the car started re-inflating the bags, being back to ride height in under a minute. I then raised the suspension to the tallest mode, and waited another minute. VIOLA! everything works.
As a side note, I saw a number of people mention that this is bad for the bags/airmatic system. While I agree that it is not ideal, there shouldn't be a concern of over-pressurization while it is lifting the car. The first bump you hit after the install is gonna spike the bag pressure to 1.5 to 2x what they will see raising the car, so I think this concern is mostly bunk.
Cliff notes: Remove the jacks completely, car will pump the bags up, bags can fold over and overpressurize, don't be a wussy
Highly recommend having STAR if you own this car.
Member

Joined: Oct 2018
Posts: 228
Likes: 41
2005 E320, 2008 E320 Bluetec
Quick question for everyone who has changed rear air springs. Is it logical for a bad air spring to cause BOTH sides of the rear suspension to suddenly drop while the car is driving? This happened to me the other day and I'm trying to figure out why. Car has relatively new valve block and air pump, as well as Arnott rebuilt front struts (recent) and the rear springs are also Arnott units but they were on the car when I got it so they're at least 3 years and about 40k miles old.
Junior Member
Joined: Sep 2014
Posts: 45
Likes: 3
From: San Antonio, TX
2008 E550
Quick question for everyone who has changed rear air springs. Is it logical for a bad air spring to cause BOTH sides of the rear suspension to suddenly drop while the car is driving? This happened to me the other day and I'm trying to figure out why. Car has relatively new valve block and air pump, as well as Arnott rebuilt front struts (recent) and the rear springs are also Arnott units but they were on the car when I got it so they're at least 3 years and about 40k miles old.


