
DIY W211 Rear Springs/Bellows (Arnott)


Thread Starter
Member
Joined: Jan 2012
Posts: 229
Likes: 1
From: To your right or left, flying past you
'03 E55 AMG - '06 300C SRT8 - '93 240SX Coupe w/1JZ-GTE
DIY W211 Rear Springs/Bellows (Arnott)
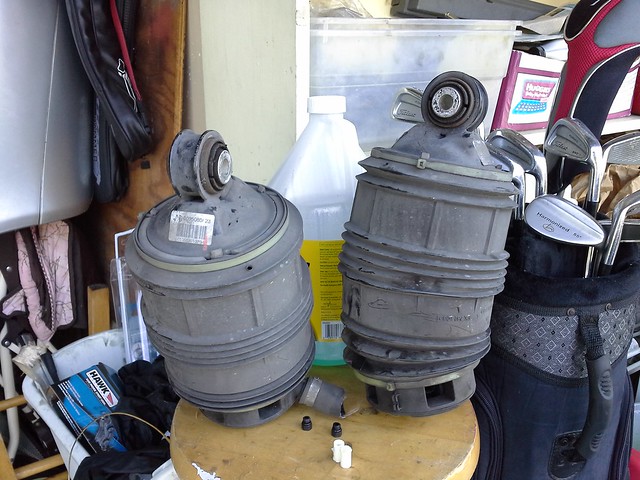
Got these pretty Arnott springs / bellows in the mail a while ago and couldn't wait to get them in, lets just say my car liked to sit everwhere it went LOL. I did one side the first night and the other the 2nd night. After the first night I went for a drive and could easily notice the stiffness of the Arnott spring. I'm not sure if it's because the old ones were so worn but the handling feels like it went from comfy to sporty, but still kept the straight line comfort. It really is a vast improvement as the car doesn't really feel like it's leaning so sloppily into a turn now. It kind of reminds me of the feeling you get when you install sway bars on a car honestly... ok enough of that lets get into this..
Short version:
Remove trunk liner to get to top shock bolt. Remove bottom shock bolt and spring bolt, unbolt rear arm to move down and make room. Cut (carefully) large air hose from spring and near reservoir (no longer used). Unhook small airline and sensor from spring. Pry top of spring down with a screwdriver and remove spring. Replace white plastic clip with Arnott replacement and install Arnott spring up into new clip, make sure rear arm is out of the way to push the bottom of the spring up into the control arm. Put her back together.
Extended cut:
Some of the full size images may be rotated sideways or something because of imgur. Sorry I'm not sure why it did that, but the attached images (bottom of this post) are right side up!
First remove these clips and tabs from the trunk liner and then take it off and set aside. The screws are a 7/64 allen key and the tabs you just use a flathead screw driver to slide the middle part out and then it comes out easy. There might be one more tab that isn't in the picture I can't remember:


Now you'll want to put the car on a jack stand or two using your favorite method. And remove the wheel.
Then remove the cover from the control arm, there are 2 little parts of it hanging onto the arm, just use a flathead to pop them open and take it off:

Remove this 17mm nut, use something to hang onto the top and keep it from spinning while you take the nut off. Might also want to support the control arm with a small jack or something while you take this nut off because it's all going to suddenly drop an inch or two once the nut comes off:

Next is to remove these 3 bolts. The bolt for the spring (13/16 I think) is going to be a pain to take out if the bag/spring still has pressure against it so just remove the nut for now and leave that bolt in. Remove the bottom shock bolt I think it's 16mm, then you can pull the shock out, carefully set it aside without disconnecting or messing up the wires, I just flipped it upside down and set it on the ground leaning against the outside edge of the rotor. Then remove the bolt from the long skinny arm to make room for removing/installing the spring, it's a 10mm allen key and I think 18mm nut on the other side:

Now disconnect the small white airline hose from the spring (10mm nut I believe, if you can't get to the nut then just follow the line to the middle of the car where the diff is and 3 lines are connected to a block and unbolt (10mm) it there). Then disconnect the sensor from the spring, let the airline and sensor hang aside to be ready for going into the new spring:

Next is to get rid of that hose going to the reservoir you aren't going to be using anymore. Use a knife or something to puncture a small hole in it and let the air leak out, basically just poke the knife in a tiny bit to where it only leaks air if you twist it sideways, in case you have second thoughts like me haha. After it's done airing out cut the hose in the same spot. The bottom bolt of the spring should also be loose enough now that you can take it out with your hand. Then (3rd pic) get under the car and cut the hose again closest to the reservoir tank, if you can't find it just tug on the other end near the spring until you figure it out, careful not to cut anything else near it:


Now the spring should be almost ready to fall out except there is a little plastic clip hanging onto the top (Arnott provides a replacement clip). Use a screwdriver or something to pry the spring down and it will fall. Then use a flathead on the bottom of the white plastic clip to unscrew it from the threading and install the fresh one from Arnott:


Next is probably the hardest (but last!) part, getting the new spring in. What I did was pushed the middle/top of the spring into place on the new white plastic piece and then used an allen key to hold that long skinny arm down and out of the way while I layed on the ground and shoved the bottom of the spring up and into the control arm. Be careful not to jam a finger or something in the process!:

Now just put everything back together in reverse order basically. I didn't use the replacement fitting Arnott supplied for the white airline, just bolted the stock one back up to the new spring.
The shock will probably be extended too much to go back in but it should easily compress if you mount it into the control arm and pull down on the top with your hands to get it back up into the trunk area. Make sure you follow the instructions Arnott gives when you go to put the car back on the ground. Basically you just don't want to put the full load of the car onto the new spring before it has time to fill up and make sure it works correctly.
Hope this helps some people! It's actually a very very easy job but I just tried to make the DIY as long and detailed as I could for the novices like me.
I'm attaching all the images again below in case they disappear from imgur in the future.
Short version:
Remove trunk liner to get to top shock bolt. Remove bottom shock bolt and spring bolt, unbolt rear arm to move down and make room. Cut (carefully) large air hose from spring and near reservoir (no longer used). Unhook small airline and sensor from spring. Pry top of spring down with a screwdriver and remove spring. Replace white plastic clip with Arnott replacement and install Arnott spring up into new clip, make sure rear arm is out of the way to push the bottom of the spring up into the control arm. Put her back together.
Extended cut:
Some of the full size images may be rotated sideways or something because of imgur. Sorry I'm not sure why it did that, but the attached images (bottom of this post) are right side up!
First remove these clips and tabs from the trunk liner and then take it off and set aside. The screws are a 7/64 allen key and the tabs you just use a flathead screw driver to slide the middle part out and then it comes out easy. There might be one more tab that isn't in the picture I can't remember:
Now you'll want to put the car on a jack stand or two using your favorite method. And remove the wheel.
Then remove the cover from the control arm, there are 2 little parts of it hanging onto the arm, just use a flathead to pop them open and take it off:
Remove this 17mm nut, use something to hang onto the top and keep it from spinning while you take the nut off. Might also want to support the control arm with a small jack or something while you take this nut off because it's all going to suddenly drop an inch or two once the nut comes off:
Next is to remove these 3 bolts. The bolt for the spring (13/16 I think) is going to be a pain to take out if the bag/spring still has pressure against it so just remove the nut for now and leave that bolt in. Remove the bottom shock bolt I think it's 16mm, then you can pull the shock out, carefully set it aside without disconnecting or messing up the wires, I just flipped it upside down and set it on the ground leaning against the outside edge of the rotor. Then remove the bolt from the long skinny arm to make room for removing/installing the spring, it's a 10mm allen key and I think 18mm nut on the other side:
Now disconnect the small white airline hose from the spring (10mm nut I believe, if you can't get to the nut then just follow the line to the middle of the car where the diff is and 3 lines are connected to a block and unbolt (10mm) it there). Then disconnect the sensor from the spring, let the airline and sensor hang aside to be ready for going into the new spring:
Next is to get rid of that hose going to the reservoir you aren't going to be using anymore. Use a knife or something to puncture a small hole in it and let the air leak out, basically just poke the knife in a tiny bit to where it only leaks air if you twist it sideways, in case you have second thoughts like me haha. After it's done airing out cut the hose in the same spot. The bottom bolt of the spring should also be loose enough now that you can take it out with your hand. Then (3rd pic) get under the car and cut the hose again closest to the reservoir tank, if you can't find it just tug on the other end near the spring until you figure it out, careful not to cut anything else near it:
Now the spring should be almost ready to fall out except there is a little plastic clip hanging onto the top (Arnott provides a replacement clip). Use a screwdriver or something to pry the spring down and it will fall. Then use a flathead on the bottom of the white plastic clip to unscrew it from the threading and install the fresh one from Arnott:
Next is probably the hardest (but last!) part, getting the new spring in. What I did was pushed the middle/top of the spring into place on the new white plastic piece and then used an allen key to hold that long skinny arm down and out of the way while I layed on the ground and shoved the bottom of the spring up and into the control arm. Be careful not to jam a finger or something in the process!:
Now just put everything back together in reverse order basically. I didn't use the replacement fitting Arnott supplied for the white airline, just bolted the stock one back up to the new spring.
The shock will probably be extended too much to go back in but it should easily compress if you mount it into the control arm and pull down on the top with your hands to get it back up into the trunk area. Make sure you follow the instructions Arnott gives when you go to put the car back on the ground. Basically you just don't want to put the full load of the car onto the new spring before it has time to fill up and make sure it works correctly.
Hope this helps some people! It's actually a very very easy job but I just tried to make the DIY as long and detailed as I could for the novices like me.
I'm attaching all the images again below in case they disappear from imgur in the future.
Last edited by Jakez; Oct 19, 2012 at 03:34 AM.

MBWorld Fanatic!
Joined: Oct 2011
Posts: 1,212
Likes: 5
From: Chicago
03 E55 AMG, 06 Harley Road King Custom 06 Ram 2500 Cummins, 97 Firebird Race Car, 88 Cutlass Supreme
FANTASTIC write up! I feel like I could dive right in there and not be intimidated at all at this point. Thank you for this. 

Thread Starter
Member
Joined: Jan 2012
Posts: 229
Likes: 1
From: To your right or left, flying past you
'03 E55 AMG - '06 300C SRT8 - '93 240SX Coupe w/1JZ-GTE
The only part I would be afraid of (I was) is leaking the air out of the hose/reservoir to get the stock spring to compress, since there is no going back as far as I know.. that's why I left that step for last (cutting the hose) and only punctured a tiny hole at first to slowly leak air out and if I pulled the knife out it would seal back up enough temporarily if I wasn't able to finish the install.
Last edited by Jakez; Oct 18, 2012 at 10:09 PM.
Trending Topics
MBWorld Fanatic!


Joined: Jan 2007
Posts: 2,004
Likes: 241
From: Usa
mgLipGD
Just completed mine early tonight. 1st side was ***** once I got some tips from Jakez i got the new bellow in place and was good to go. 2nd side was done in about 30min with a friend helping.
It is only like 3 bolts and the plastic clips holding the trunk liner.
It is only like 3 bolts and the plastic clips holding the trunk liner.
MBWorld Fanatic!
Joined: Jan 2007
Posts: 2,004
Likes: 241
From: Usa
mgLipGD
BTW I ordered my set from carid.com (http://www.carid.com/arnott/item-1234492.html) for $672 shipped. I got them in 4 business days, looked to be drop shipped from Arnott directly. Felt it was a good deal since Arnott charges $835 shipped. They may have come quicker but for saving $163 and not my daily it was well worth a little extra wait.
note- the org order email from carid said they wouldn't ship until 10-17 but they arrived before that date, so if you order don't worry you should get them pretty quickly.
note- the org order email from carid said they wouldn't ship until 10-17 but they arrived before that date, so if you order don't worry you should get them pretty quickly.

MBWorld Fanatic!
Joined: Jun 2010
Posts: 4,173
Likes: 7
From: Puerto Rico
2005 E55 AMG
BTW I ordered my set from carid.com (http://www.carid.com/arnott/item-1234492.html) for $672 shipped. I got them in 4 business days, looked to be drop shipped from Arnott directly. Felt it was a good deal since Arnott charges $835 shipped. They may have come quicker but for saving $163 and not my daily it was well worth a little extra wait.
note- the org order email from carid said they wouldn't ship until 10-17 but they arrived before that date, so if you order don't worry you should get them pretty quickly.
note- the org order email from carid said they wouldn't ship until 10-17 but they arrived before that date, so if you order don't worry you should get them pretty quickly.

Member
Joined: Feb 2010
Posts: 77
Likes: 0
From: New Zealand
2012 E63 Bi Turbo
Rear air springs
Great writeup easy to follow.
I contacted CARID and they didnt know what I was asking about. They say they have never stocked Arnott rear air springs.
Can you shed any light BLACK06c230....?
I contacted CARID and they didnt know what I was asking about. They say they have never stocked Arnott rear air springs.
Can you shed any light BLACK06c230....?

Thread Starter
Member
Joined: Jan 2012
Posts: 229
Likes: 1
From: To your right or left, flying past you
'03 E55 AMG - '06 300C SRT8 - '93 240SX Coupe w/1JZ-GTE
I remember clicking his link and they were there (no 404 error). My guess is that his post caused a backup of orders for the springs lol.
MBWorld Fanatic!
Joined: Jan 2007
Posts: 2,004
Likes: 241
From: Usa
mgLipGD
not sure why it doesn't work now. Maybe they realized they had the pricing wrong and removed it. I will check my order for a part number they may have used. Nope nothing there, my order # was 4042039 if that helps them pull it up so you can check pricing and order. Order placed 10-10-12.

Member
Joined: Jun 2012
Posts: 100
Likes: 0
From: S Florida
01 audi a4, 06 e55
Thanks for the DIY!
swapped mine out last night and this morning. write up was spot on, only difference on mine was the shock nut in the trunk was a 16 or 5/8 on my car. I swear no wrench set comes with a 16.Thanks again for sharing it made the job a breeze. Out with the old.
On a side note are these the sirius connections bundled in my trunk?

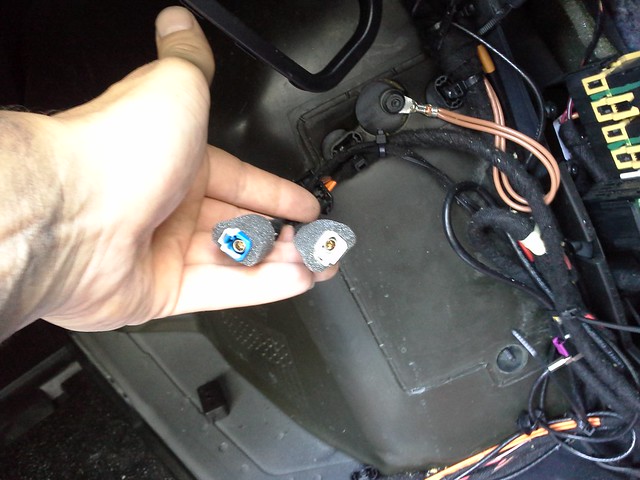
On a side note are these the sirius connections bundled in my trunk?
Thread Starter
Member
Joined: Jan 2012
Posts: 229
Likes: 1
From: To your right or left, flying past you
'03 E55 AMG - '06 300C SRT8 - '93 240SX Coupe w/1JZ-GTE
Edit: my stock springs were also old and worn obviously so of course a new set are going to be stiffer, but I've read on here more than a few times that the Arnott's are more stiff than a set of new oem springs. Maybe because there is no longer a reservoir? IDK..
Last edited by Jakez; Nov 3, 2012 at 05:19 AM.

Former Vendor of MBWorld
Joined: Jan 2012
Posts: 302
Likes: 29
From: Merritt Island, Florida
MERCEDES-BENZ CL-CLASS
Thanks for the great write up. Remember, Arnott will buy those used E-Class rear parts (cores) for $25 each and will send you shipping labels - just call 800-251-8993 for more information click here.


