


Macht schnell E55 project
Super Member
Joined: Nov 2012
Posts: 698
Likes: 16
From: Germany
C215 CL55 AMG, W124 500E, W210 E430, W124 300E
Excellent write up! WOW!
And im sooooo glad you found the origin of the ticking/clacking sound - the oil pumps chain, just like that Tech from the German AMGs Owners club once stated, like i posted here: https://mbworld.org/forums/w211-amg/...ml#post5609630
This is a SERIOUS Design Flaw IMHO. Was the tensioner Spring so weak that it could Jump a tooth ? Was the slack bad?

MBWorld Fanatic!
Joined: May 2011
Posts: 1,109
Likes: 20
From: Las Vegas, NV
1000Hp Diesel Trucks, 2019 E63s
Excellent write up! WOW!
And im sooooo glad you found the origin of the ticking/clacking sound - the oil pumps chain, just like that Tech from the German AMGs Owners club once stated, like i posted here: https://mbworld.org/forums/w211-amg/...ml#post5609630
This is a SERIOUS Design Flaw IMHO. Was the tensioner Spring so weak that it could Jump a tooth ? Was the slack bad?
And im sooooo glad you found the origin of the ticking/clacking sound - the oil pumps chain, just like that Tech from the German AMGs Owners club once stated, like i posted here: https://mbworld.org/forums/w211-amg/...ml#post5609630
This is a SERIOUS Design Flaw IMHO. Was the tensioner Spring so weak that it could Jump a tooth ? Was the slack bad?

Thread Starter
MBWorld Fanatic!
iTrader: (1)
Joined: Jan 2012
Posts: 2,092
Likes: 29
From: Orlando
1967 Pro Touring turbo LSX Camaro
Cougar You're exactly right. Even the contaminants of ground up aluminum off the cover are being trapped by the filter because my bearings looked awesome after nearly 80k miles.
Crissus- the chain had no slack, but had practically no tension on it if that makes sense. The guide was so easy to push away from the chain you could probably do it with a soda straw and not break the straw. I don't think it's possible for the chain to jump a tooth ,and even if it did there's nothing being held in time by the chain, only turning the oil pump gear.
Crissus- the chain had no slack, but had practically no tension on it if that makes sense. The guide was so easy to push away from the chain you could probably do it with a soda straw and not break the straw. I don't think it's possible for the chain to jump a tooth ,and even if it did there's nothing being held in time by the chain, only turning the oil pump gear.

Senior Member
Joined: Nov 2012
Posts: 381
Likes: 0
From: Houston, TX
2006 E55
I'm really not too worried about the oil pump chain tension. Its not slack enough to jump teeth and even if it did it would have zero effect on timing events. like mentioned before, if the aluminum debris from the case were a big issue, there would be way more motor failures out there.
Super Member
Joined: May 2009
Posts: 511
Likes: 2
From: Orlando, FL
04 E55 AMG, 03 350z Track Built/Single Turbo
That's some good **** right there. When you gonna run it over at OSW once you're done? Would love to see that beast run. I can smell Bithlo from my back yard.
MB World Stories
The Best of Mercedes & AMG

New Electric Mercedes-AMG GT 4-Door Coupe Unveiled: 10 Things You Need to Know
Verdad Gallardo
6 Mercedes Models That Did NOT Age Well (But Are Somehow Still Cool)
Verdad Gallardo
Manual Mercedes? 6 Times Sindelfingen Let Drivers Have All The Fun
Verdad Gallardo
Mercedes SLR McLaren 722 S Is Extremely Rare Example Modified by McLaren
Verdad Gallardo
8 Classic Boxy Mercedes Designs That Have Aged Like Fine Wine
Verdad Gallardo
Flawlessly Restored Mercedes 190E Evo II Heads to Auction
Verdad Gallardo
Electric Mercedes C-Class Unveiled: 11 Things You Need to Know
Verdad Gallardo
Mercedes EQS Gets A Major Update: Everything You Need to Know
Verdad Gallardo
5 Underrated Mercedes-Benz Models That Don't Get the Love They Deserve
Verdad Gallardo
Thread Starter
MBWorld Fanatic!
iTrader: (1)
Joined: Jan 2012
Posts: 2,092
Likes: 29
From: Orlando
1967 Pro Touring turbo LSX Camaro
It's been a minute since I updated the progress on this, my free time comes and goes in waves thus so does progress on my fun stuff like this.
I had to wait over a week for main caps hardware to come in from Germany. Most were in stock but there are a few specific ones that have threads tapped into the heads to hold the oil pump bracket, there was not one to be found in Yankeeland. These are TTY (torque-to-yield) style fasteners made from an elastomeric steel that are a one time use only.
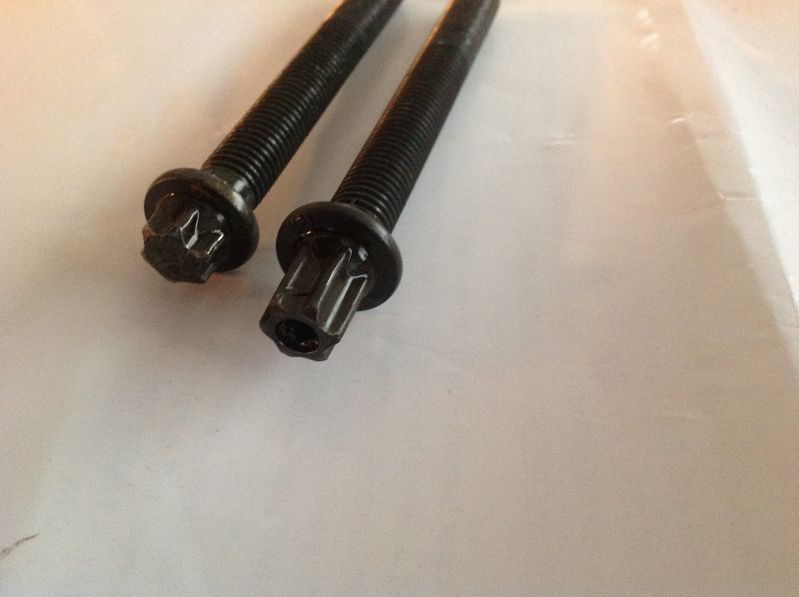
Here you can see the difference in length between the used originals and the virgin replacements. They're consistently .013 longer after use
8mm outer
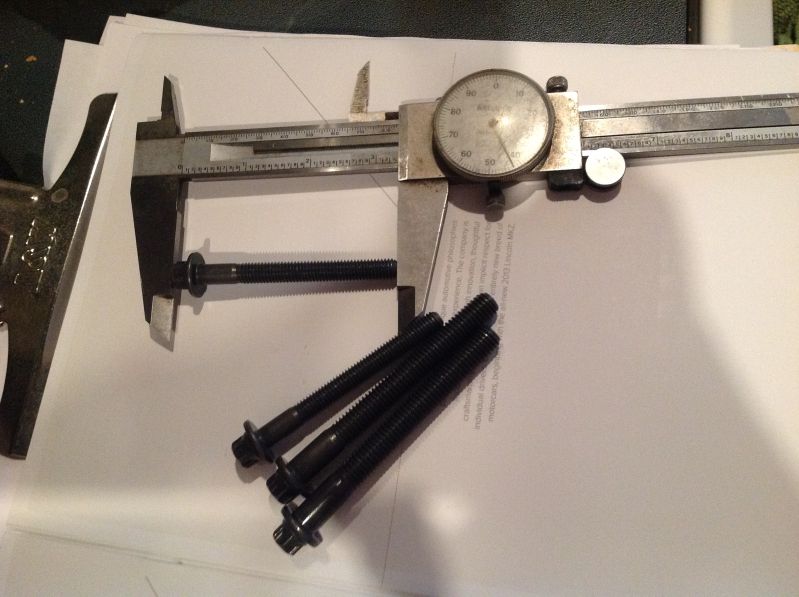
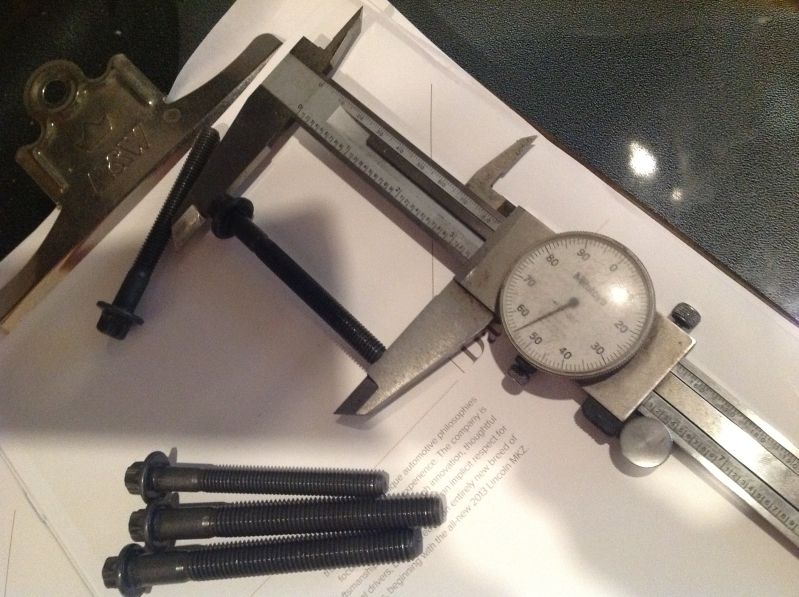
10mm inner
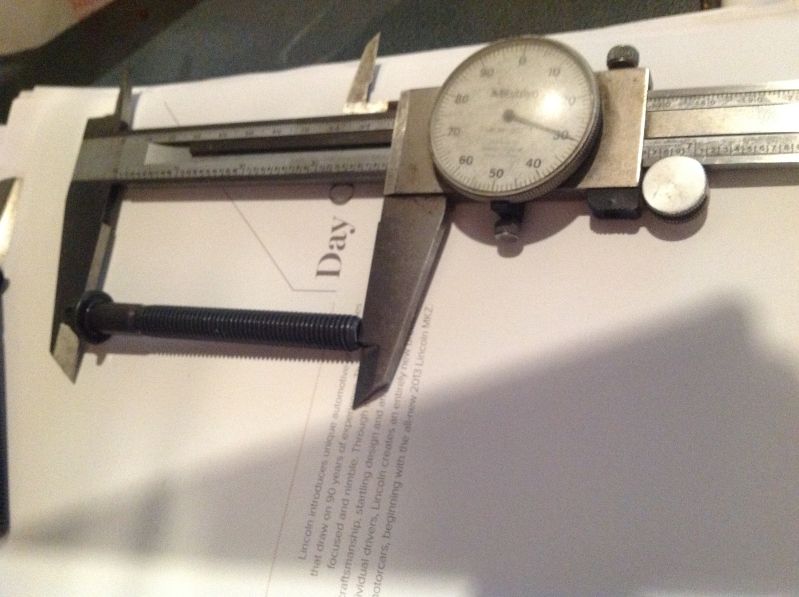
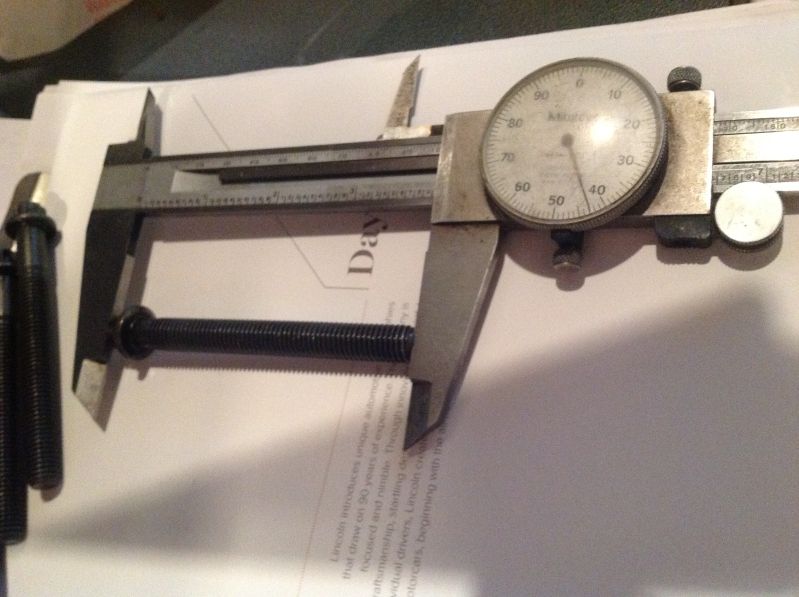
So while I was waiting on these to come in, I got busy with other things and just got back in gear on this project this weekend.
I had to wait over a week for main caps hardware to come in from Germany. Most were in stock but there are a few specific ones that have threads tapped into the heads to hold the oil pump bracket, there was not one to be found in Yankeeland. These are TTY (torque-to-yield) style fasteners made from an elastomeric steel that are a one time use only.
Here you can see the difference in length between the used originals and the virgin replacements. They're consistently .013 longer after use
8mm outer
10mm inner
So while I was waiting on these to come in, I got busy with other things and just got back in gear on this project this weekend.
Thread Starter
MBWorld Fanatic!
iTrader: (1)
Joined: Jan 2012
Posts: 2,092
Likes: 29
From: Orlando
1967 Pro Touring turbo LSX Camaro
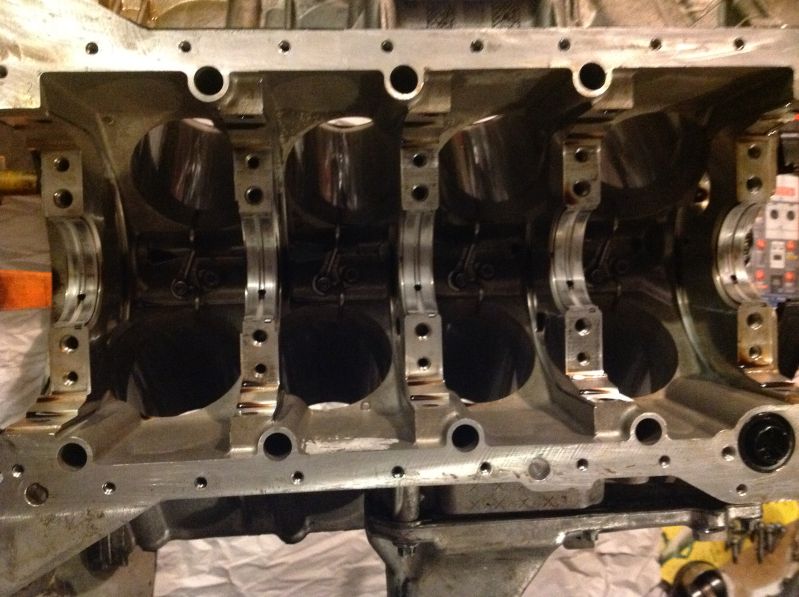
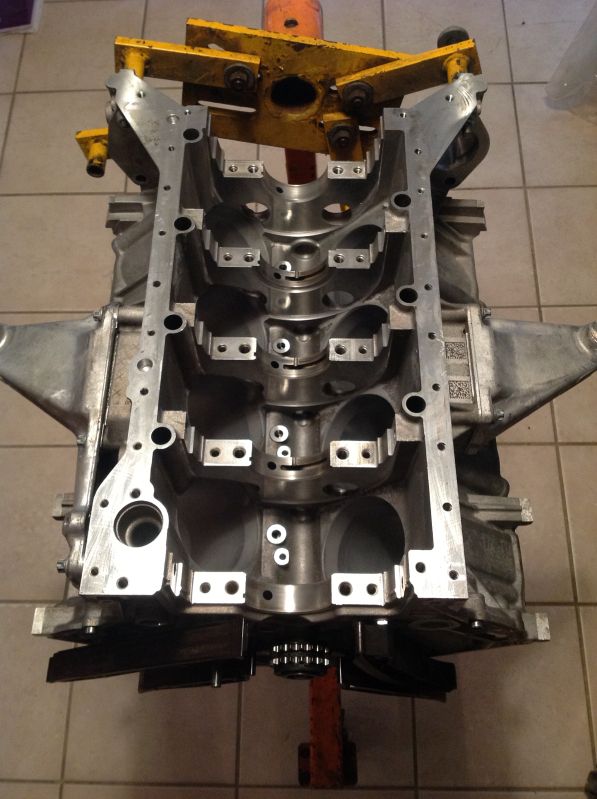
I stripped the block down to pretty much nothing and gave to a few hours worth of love via lacquer thinner , brakekleen. And good old simple green.

Thread Starter
MBWorld Fanatic!
iTrader: (1)
Joined: Jan 2012
Posts: 2,092
Likes: 29
From: Orlando
1967 Pro Touring turbo LSX Camaro
Here's my felt cylinder hone rig for the Sunnen honing paste
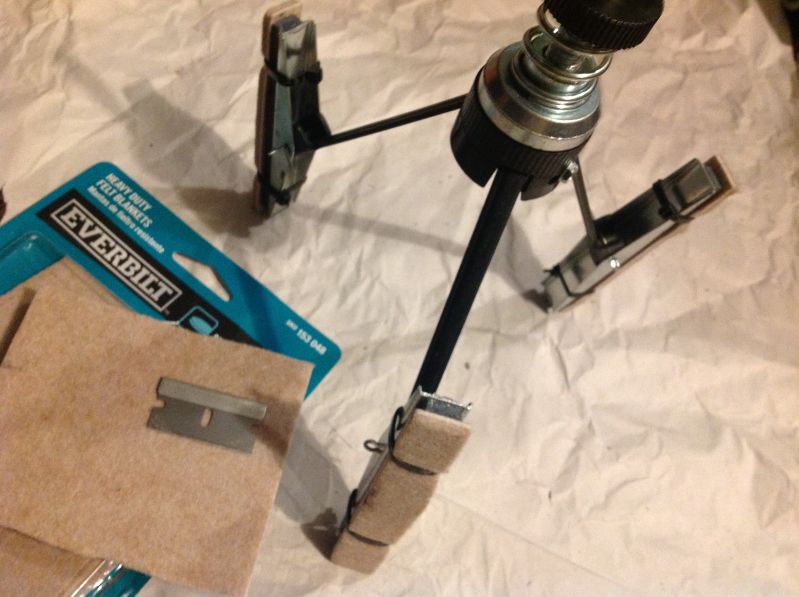
I originally rigged up a plastic lid to some gelato wrapped in masking tape to slide down to the bottom of the bore, and keep the paste out of the crankcase. However this was only important because I was going to leave the crank in the block and just swap pistons. After the crank was determined to need its counterweights lightened for the new lighter pistons, there wasn't much point since the block was naked now anyways. I tried it on the first hole just for future reference , it worked.

Taping the decks up makes for easier cleanup later.
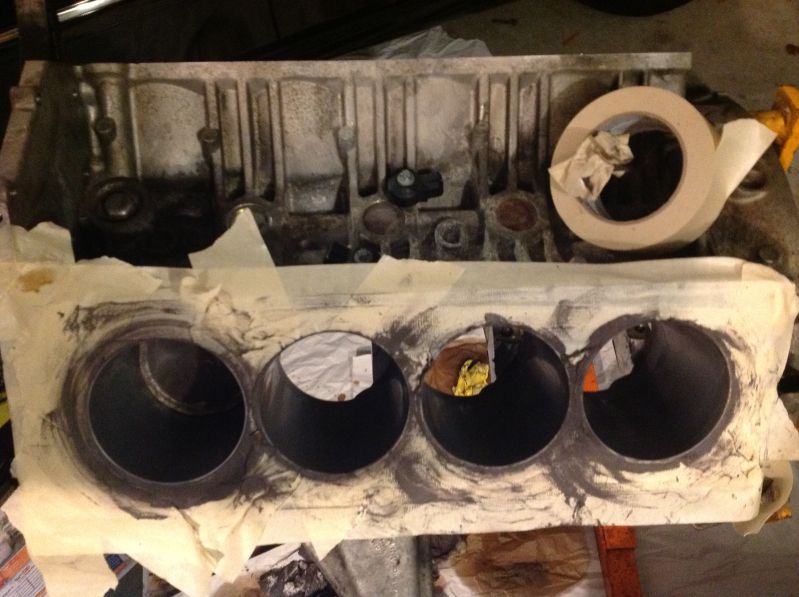
When crap falls into places you don't want it like an oil galley, here's a cheap tip to retrieve it (from my painting days) roll a small section of tape backwards around a screwdriver and it makes a sort of "magnet on a stick" for things nonferrous.
I originally rigged up a plastic lid to some gelato wrapped in masking tape to slide down to the bottom of the bore, and keep the paste out of the crankcase. However this was only important because I was going to leave the crank in the block and just swap pistons. After the crank was determined to need its counterweights lightened for the new lighter pistons, there wasn't much point since the block was naked now anyways. I tried it on the first hole just for future reference , it worked.
Taping the decks up makes for easier cleanup later.
When crap falls into places you don't want it like an oil galley, here's a cheap tip to retrieve it (from my painting days) roll a small section of tape backwards around a screwdriver and it makes a sort of "magnet on a stick" for things nonferrous.
Thread Starter
MBWorld Fanatic!
iTrader: (1)
Joined: Jan 2012
Posts: 2,092
Likes: 29
From: Orlando
1967 Pro Touring turbo LSX Camaro
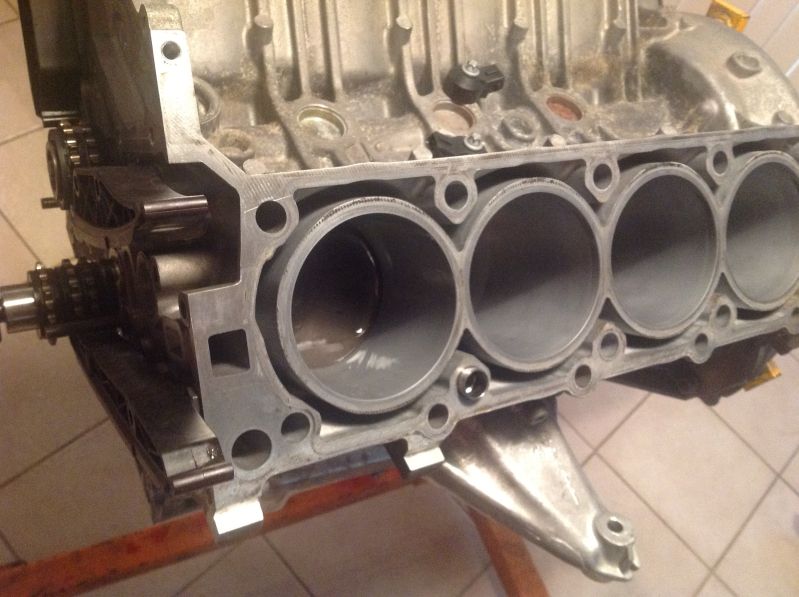
Here you can see the difference in an alusil bore that has been used, note the shine
And one that has been surface prepped by Sunnen AN-30 on a felt hone.
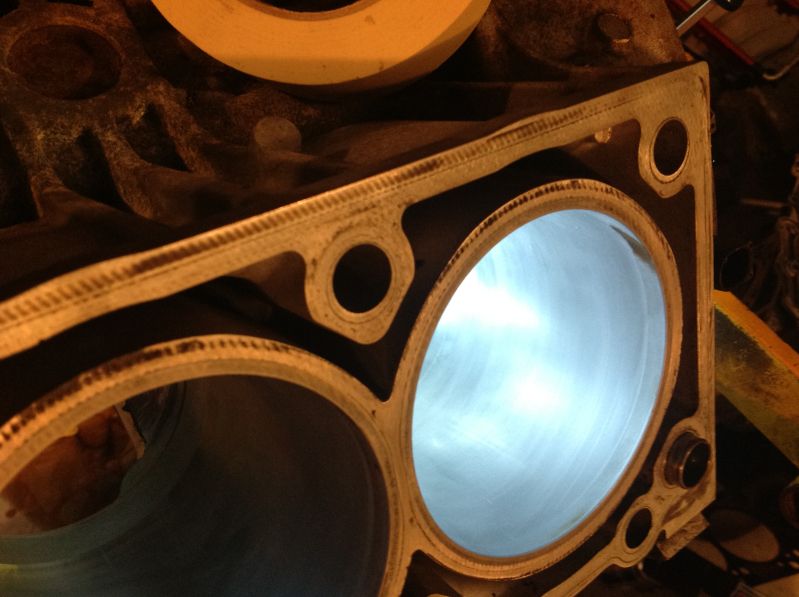
There's practically no material removed, it didn't register even one ten thousandth of an inch difference on my bore gauge before and after honing.
And one that has been surface prepped by Sunnen AN-30 on a felt hone.
There's practically no material removed, it didn't register even one ten thousandth of an inch difference on my bore gauge before and after honing.

Thread Starter
MBWorld Fanatic!
iTrader: (1)
Joined: Jan 2012
Posts: 2,092
Likes: 29
From: Orlando
1967 Pro Touring turbo LSX Camaro
Here's a quick mockup to check port alignment with the Weistec manifold. It's not perfect but it's acceptable. I've seen waaaaaayyyy worse
All this stuff has already been measured twice and now this is just all about maintaining a super clean environment, and super clean hands so theres no contaminants getting trapped in the assembly oil to scratch up nicely machined parts with tolerances set to +/- .0002ish
Everything gets soaked in oil on assembly and should move smoothly with no hesitation when articulated
Here's what I do with crap that comes in the mail that I never asked for it makes for a clean work surface that is disposable like the paper sheet the doctor rolls out for each patient for a checkup
All this stuff has already been measured twice and now this is just all about maintaining a super clean environment, and super clean hands so theres no contaminants getting trapped in the assembly oil to scratch up nicely machined parts with tolerances set to +/- .0002ish
Everything gets soaked in oil on assembly and should move smoothly with no hesitation when articulated
Here's what I do with crap that comes in the mail that I never asked for
it makes for a clean work surface that is disposable like the paper sheet the doctor rolls out for each patient for a checkup
Thread Starter
MBWorld Fanatic!
iTrader: (1)
Joined: Jan 2012
Posts: 2,092
Likes: 29
From: Orlando
1967 Pro Touring turbo LSX Camaro
Here she is in heels ready for action
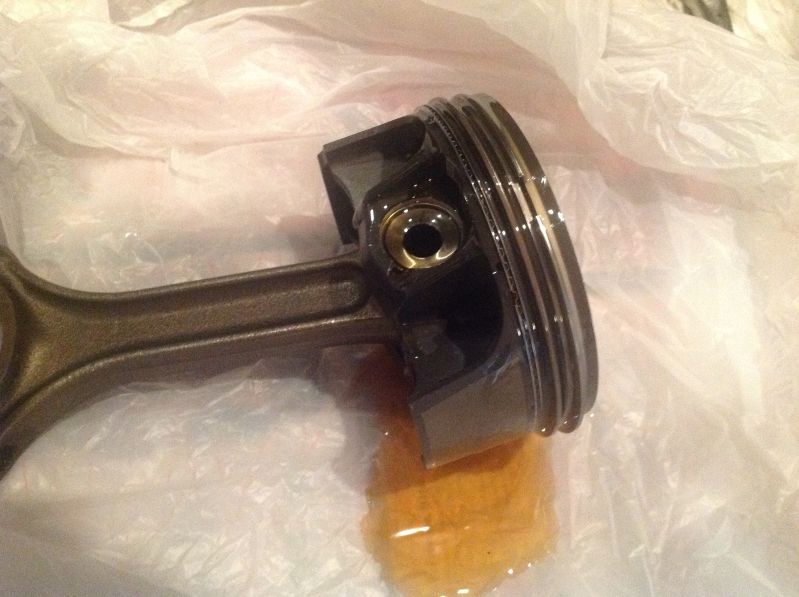
I'm putting this straight into the car, so the assembly lube could be replaced by motor oil. However just in case there's some odd unforseen computer glitch that needs attention , the red stuff will allow for extended cranking with no oil pressure , and save the bearings from damage. I always change the oil within the first ten minutes of break in anyways to flush contaminants to, so this stuff is no biggie.

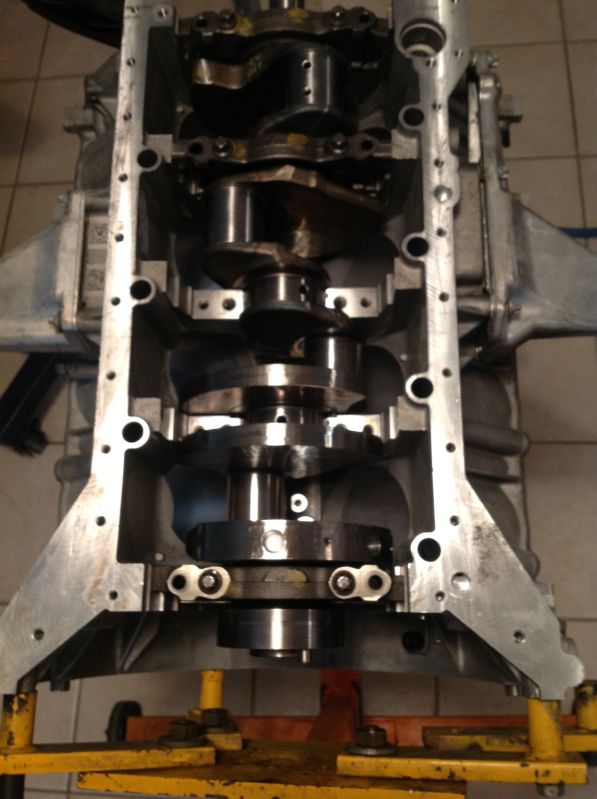
Here's the crank
I'm putting this straight into the car, so the assembly lube could be replaced by motor oil. However just in case there's some odd unforseen computer glitch that needs attention , the red stuff will allow for extended cranking with no oil pressure , and save the bearings from damage. I always change the oil within the first ten minutes of break in anyways to flush contaminants to, so this stuff is no biggie.
Here's the crank
Thread Starter
MBWorld Fanatic!
iTrader: (1)
Joined: Jan 2012
Posts: 2,092
Likes: 29
From: Orlando
1967 Pro Touring turbo LSX Camaro
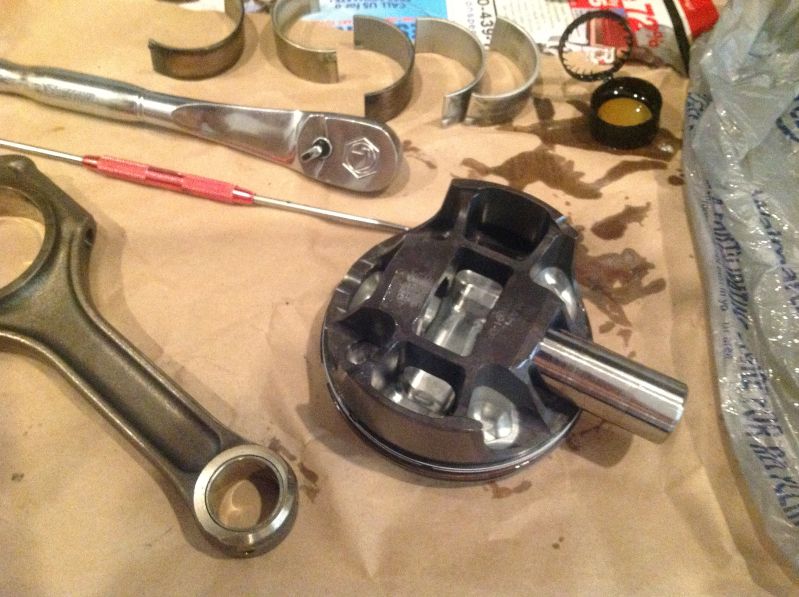
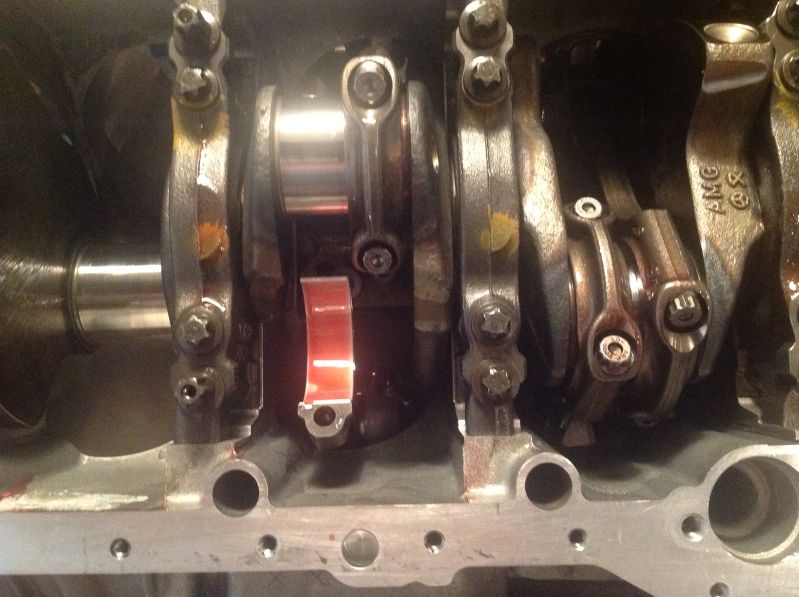
Always want to make sure youve got the right amount of crank thrust play. These multi piece thrust bearings dont require seating like the saddle types, but you still need to know if there's a potential problem lurking
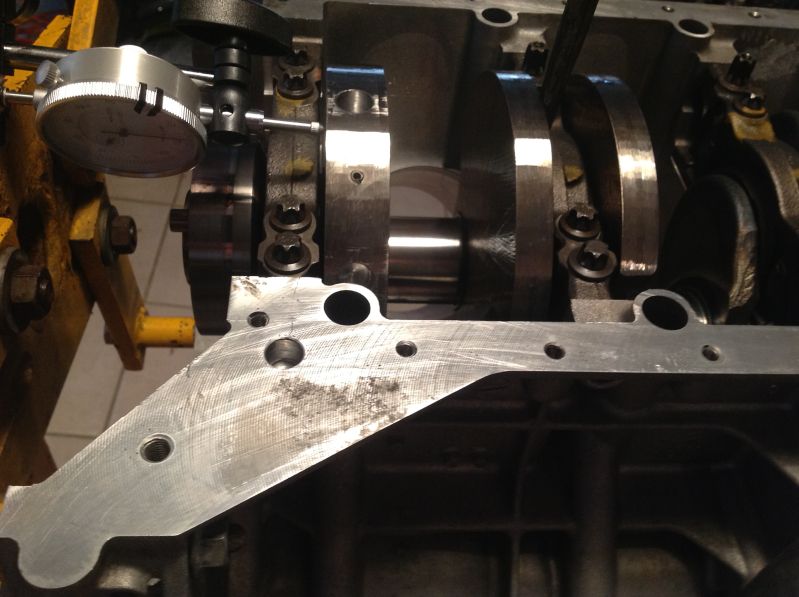
As per Exotic's thread, here's how to tell what bearings the factory wants on this crank. You can still tailor the shells to suit a different usage, but I just went with the same ones as stock on this one.
As per Exotic's thread, here's how to tell what bearings the factory wants on this crank. You can still tailor the shells to suit a different usage, but I just went with the same ones as stock on this one.
Thread Starter
MBWorld Fanatic!
iTrader: (1)
Joined: Jan 2012
Posts: 2,092
Likes: 29
From: Orlando
1967 Pro Touring turbo LSX Camaro
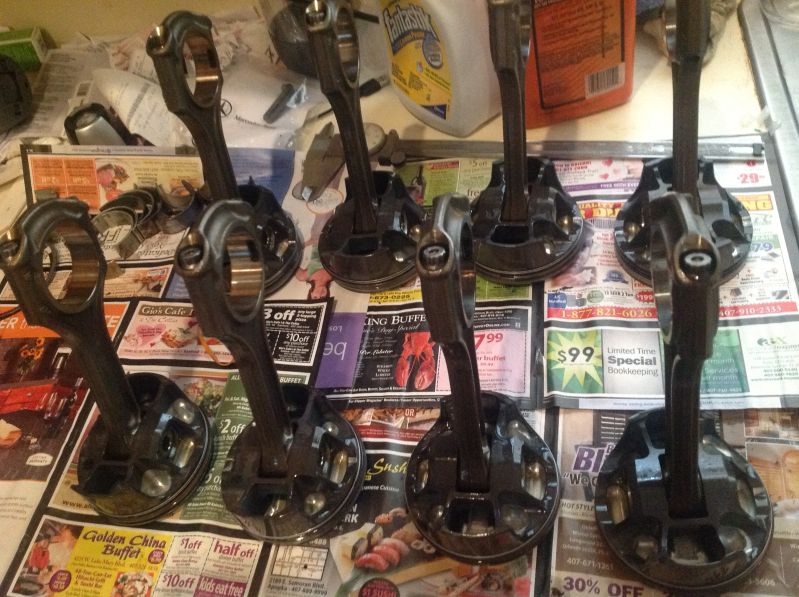
Once again, the oil bath before assembly
Finally !
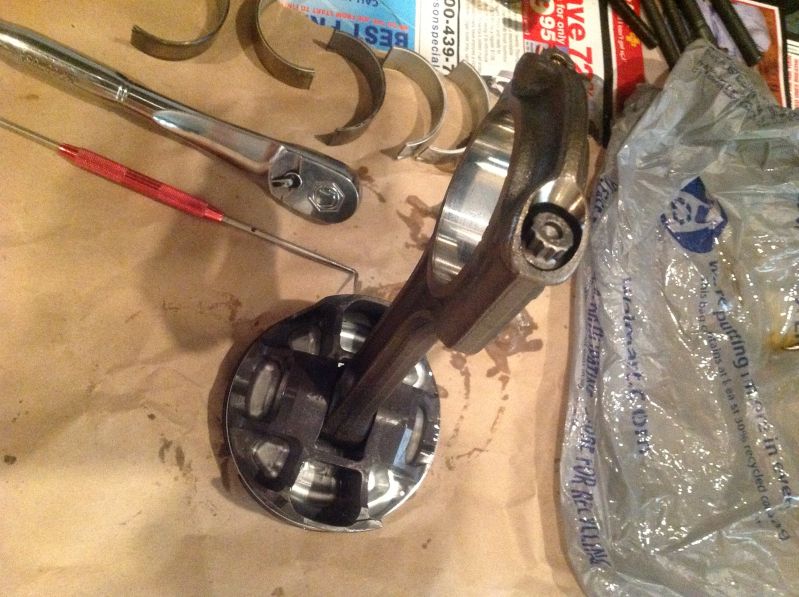
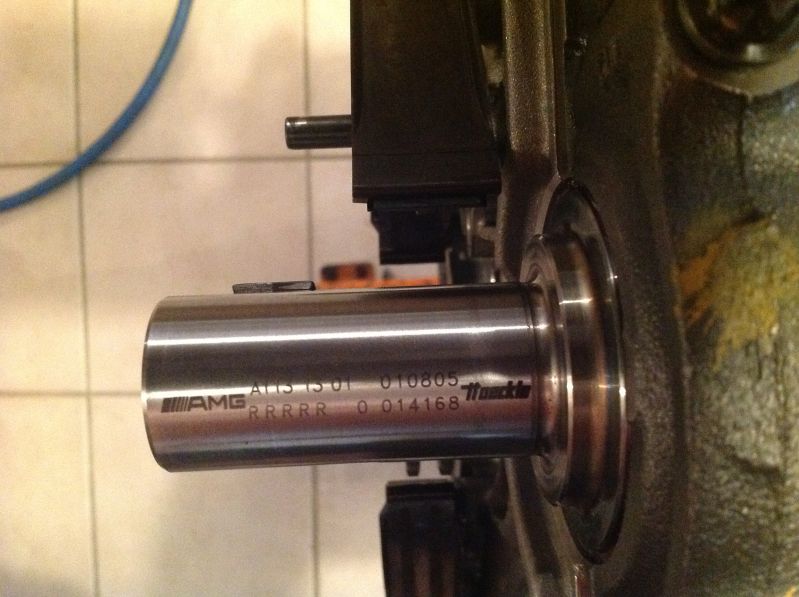
More of the red permeatex goop, note the upgraded ARP rod bolts Exotic/Shardul supplied
And now it's ready for the rest of the goodies. Everything came out very nice,this should do the trick for the next month or two till the MID engine is ready
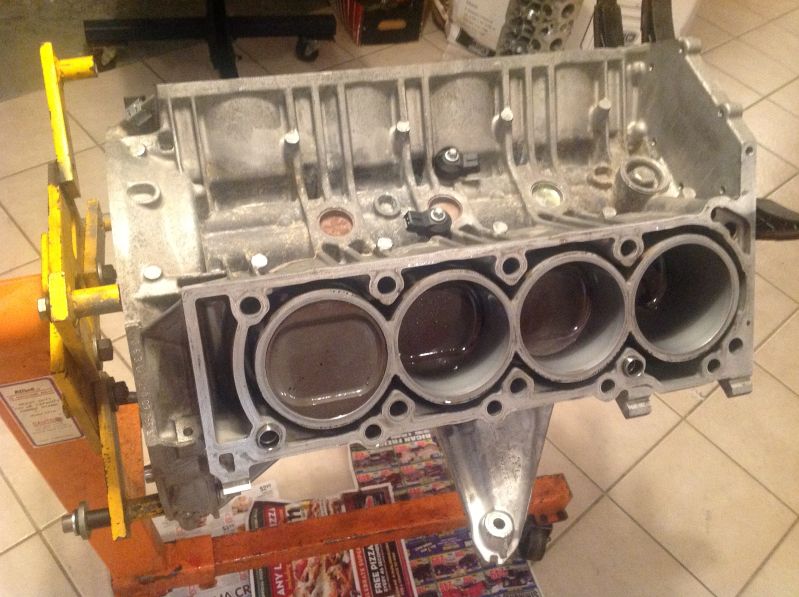
This was last night, tonight I'm going to measure the heads for piston/valve clearance since we now have more duration and the dish on the pistons is 12cc instead of 30cc. 9.15 SCR vs 7.75 SCR. The dynamic numbers however will be a little closer due to the increased duration. This should still be a lot of fun and very responsive on the street.
Finally !
More of the red permeatex goop, note the upgraded ARP rod bolts Exotic/Shardul supplied
And now it's ready for the rest of the goodies. Everything came out very nice,this should do the trick for the next month or two till the MID engine is ready
This was last night, tonight I'm going to measure the heads for piston/valve clearance since we now have more duration and the dish on the pistons is 12cc instead of 30cc. 9.15 SCR vs 7.75 SCR. The dynamic numbers however will be a little closer due to the increased duration. This should still be a lot of fun and very responsive on the street.


 Outstanding.. Can't wait to see the final product..


PLATINUM SPONSOR

Joined: Jun 2008
Posts: 3,834
Likes: 65
From: Texas
2003 CL55
Here you can see the difference in an alusil bore that has been used, note the shine
And one that has been surface prepped by Sunnen AN-30 on a felt hone.
There's practically no material removed, it didn't register even one ten thousandth of an inch difference on my bore gauge before and after honing.
And one that has been surface prepped by Sunnen AN-30 on a felt hone.
There's practically no material removed, it didn't register even one ten thousandth of an inch difference on my bore gauge before and after honing.
Those glowing hole pictures look Nuclear!
__________________

E63 Biturbo, UPD Cold Air induction kit, UPD performance crank pulley and UPD adjustable rear suspension with ride height adjustment.
CL55 UPD Cold Air Boost kit, UPD 3000 stall converter, UPD 77mm SC clutched pulley and beltwrap kit, Custom long tubes, UPD crank pulley , UPD suspension kit, UPD SC pulley, Aux. HE, Trunk tank w/rule 2000 pump, Mezeire pump, UPD 5pc idler set, Aluminum rotor hats.
www.ultimatepd.com
instagram @ultimate_pd
facebook.com/ultimatepd
Thread Starter
MBWorld Fanatic!
iTrader: (1)
Joined: Jan 2012
Posts: 2,092
Likes: 29
From: Orlando
1967 Pro Touring turbo LSX Camaro
Thanks for the kind words gentlemen! Next up checking PTV clearance. This is a real pain in the *** compared to an LSX . Well, everything is a pain compared to an LSX, there's a reason those things are so popular.
You can't just pop one cylinder worth of valvetrain on each bank to do a clay test, since The cams are in each head and the rockers are all one of assembly with the caps. No biggie, it's just time consuming but mandatory when using new hardware regardless of how much calculating you do ahead of time.
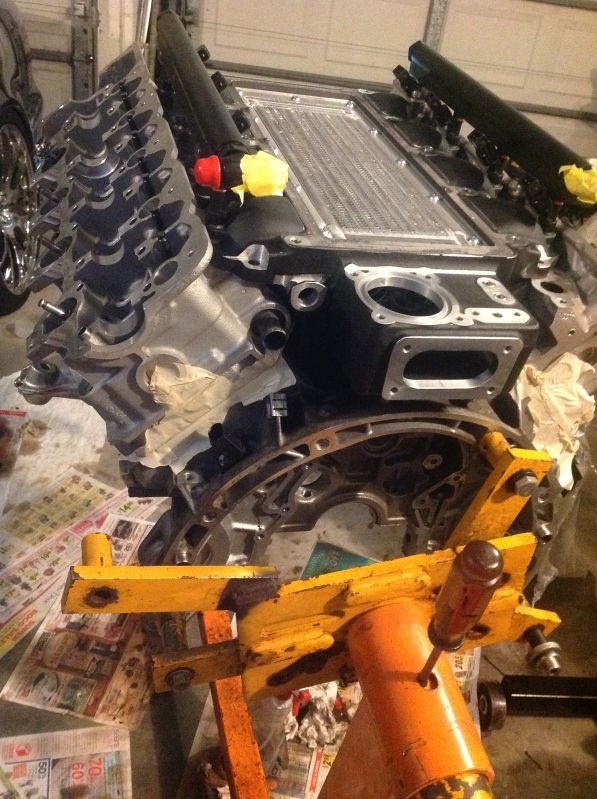
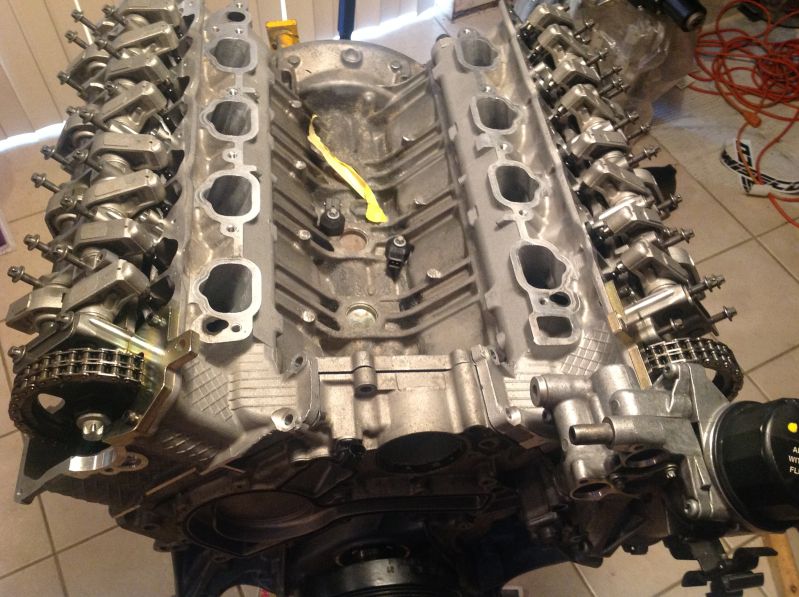
Heads cams and chains mocked up using the old gaskets ( cleaned up) and two bolts in each head.
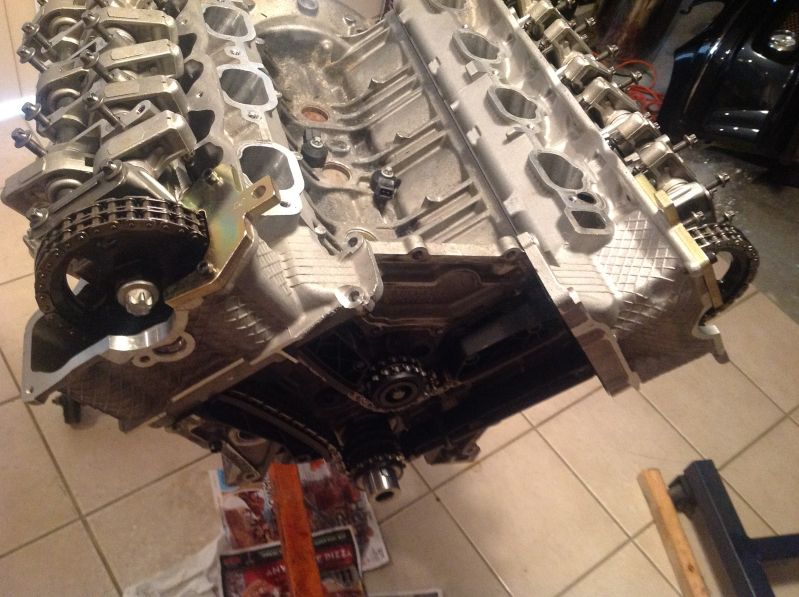
You need the front cover on also to provide a reference for the 40' crank mark on the balancer, to match the alignment plates bolted to the heads. The huge chain tensioner bolt also is in the cover , and that's a must to ensure the timing is spot on. There's no point in doing the exercise otherwise as the crank rotates a few degrees when the tension is put on the chain.
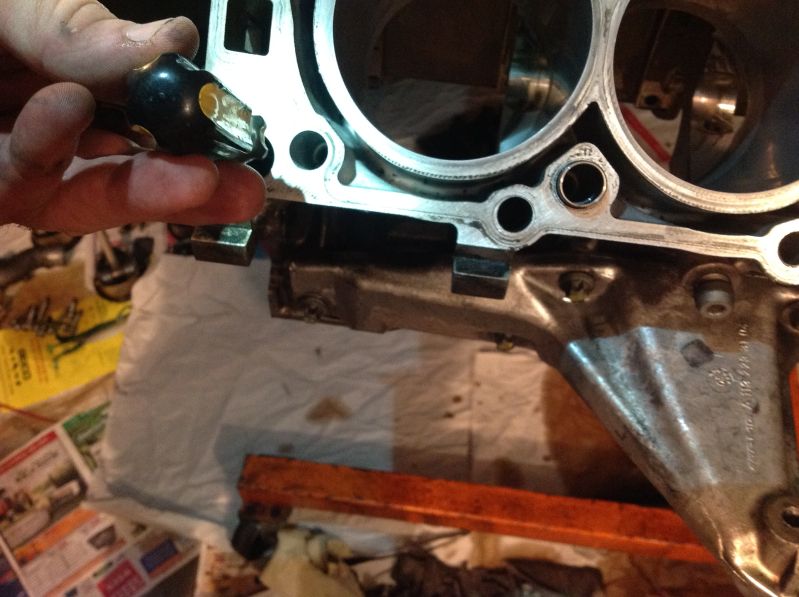
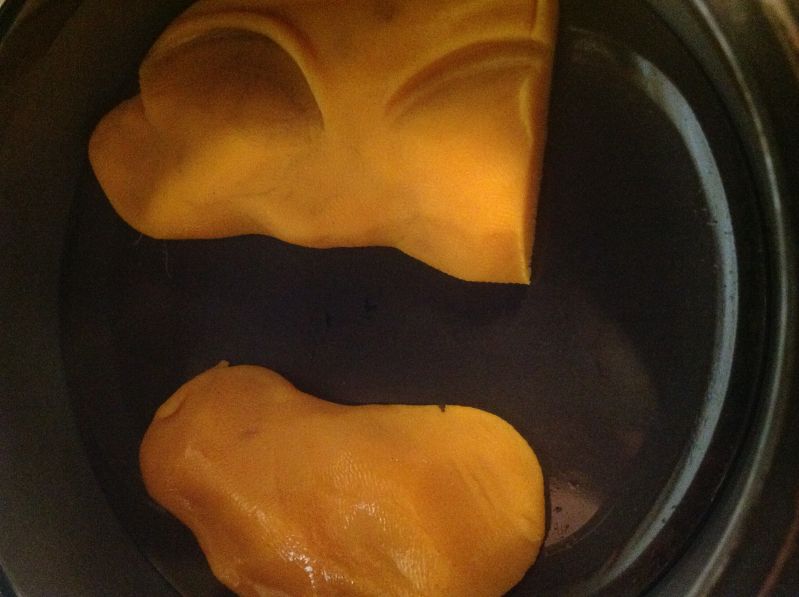
You've also got to install puss springs in place of the real valve springs on the cylinders you want to check. Otherwise the valvesprings tension will compress the hydraulic lifter on the tip of the rocker since there is no oil pressure present to hold its place.this will cause you to believe you have considerably more PTV clearance then actual.

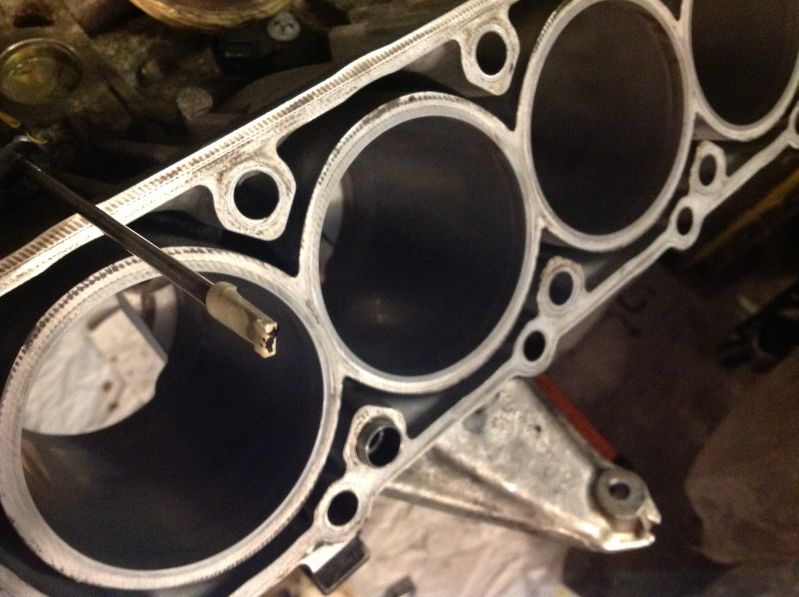
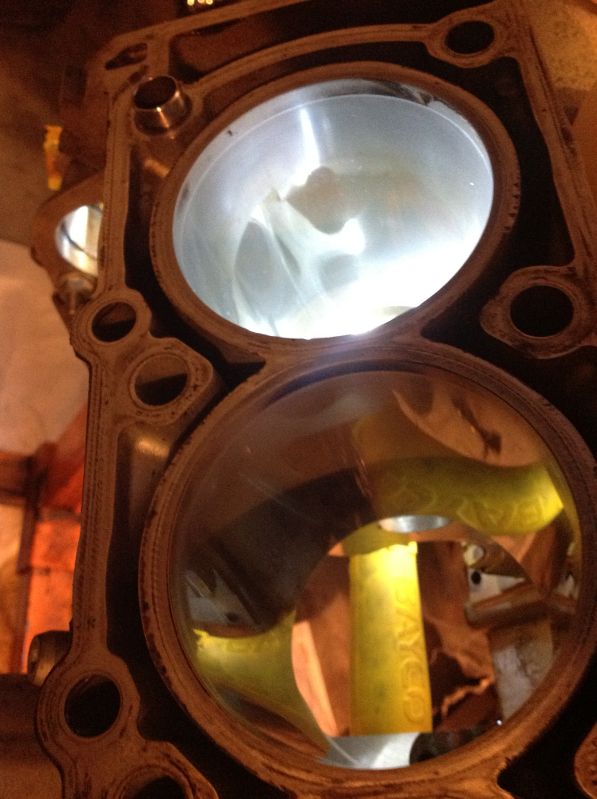
I wipe a light oat of oil to the surface of the valve and to the clay itself so that it doesn't stick to the valve when testing. Make a few revolutions to be safe.
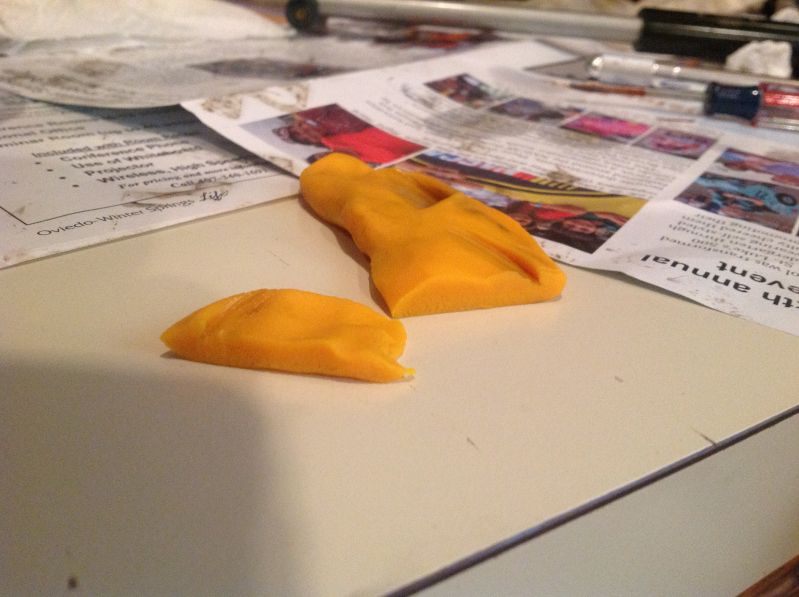
The exhaust wasn't even close, and the intakes are at .130. We're golden! Especially with the upgraded valve springs which have some more seat pressure, and way less weight. No floaters for this scallywag.
A super light wipe of an oily rag to the piston top before clay makes it easy to remove and measure after the exercise. Finally , the heads can get loaded with the springs and put on the engine tonight!
You can't just pop one cylinder worth of valvetrain on each bank to do a clay test, since The cams are in each head and the rockers are all one of assembly with the caps. No biggie, it's just time consuming but mandatory when using new hardware regardless of how much calculating you do ahead of time.
Heads cams and chains mocked up using the old gaskets ( cleaned up) and two bolts in each head.
You need the front cover on also to provide a reference for the 40' crank mark on the balancer, to match the alignment plates bolted to the heads. The huge chain tensioner bolt also is in the cover , and that's a must to ensure the timing is spot on. There's no point in doing the exercise otherwise as the crank rotates a few degrees when the tension is put on the chain.
You've also got to install puss springs in place of the real valve springs on the cylinders you want to check. Otherwise the valvesprings tension will compress the hydraulic lifter on the tip of the rocker since there is no oil pressure present to hold its place.this will cause you to believe you have considerably more PTV clearance then actual.
I wipe a light oat of oil to the surface of the valve and to the clay itself so that it doesn't stick to the valve when testing. Make a few revolutions to be safe.
The exhaust wasn't even close, and the intakes are at .130. We're golden! Especially with the upgraded valve springs which have some more seat pressure, and way less weight. No floaters for this scallywag.
A super light wipe of an oily rag to the piston top before clay makes it easy to remove and measure after the exercise. Finally , the heads can get loaded with the springs and put on the engine tonight!
Last edited by Sir-Boost-a-Lot; Jun 5, 2013 at 12:36 PM.


