
Arnott rear suspension install on a wagon COMPLETE
 10-29-2015, 06:17 PM
#1
Member
Thread Starter

Arnott rear suspension install on a wagon COMPLETE
I finally got around to installing two Arnott rear air springs on my wagon. I purchased them in July, but other things kept taking up any free time. The driver side would sometimes drop down a 1/2" or so after a few days and other times it would go a week of sitting with no issues at all. I never got the feeling it was critical that I got it done immediately but I figured it would only get worse with time if it wasn't addressed.
I called Arnott directly in July to try to get them to match a price I found on CarID.com. They wouldn't match the price and then went on to say that CarID was actually selling them lower then their agreed upon contract with Arnott. I quickly hung up the phone and ordered them from CarID before any pricing changed. Whoever I spoke with at Arnott said thats what she would do as well. They get drop shipped directly from Arnott anyways, so I chose pricing over who I ordered from. In the end, this maybe wasn't my smartest move.
While there are a few DIY's for swapping over to Arnott rears, I have not seen one from start to finish on an E55 wagon.
Here are some helpful thread I found in case any searches pull up this thread:
E55 Wagon thread addressing the top shock nut:
https://mbworld.org/forums/e-class-w...g-problem.html
E350 Wagon (helpfull thread):
http://www.benzworld.org/forums/w211...ic-spring.html
E55 Install:
https://mbworld.org/forums/w211-amg/...ws-arnott.html
The most important tool for the project. I would not want to tackle this job without it:
http://www.motorsport-tools.com/bgs-...edes-8307.html
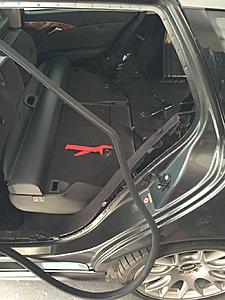
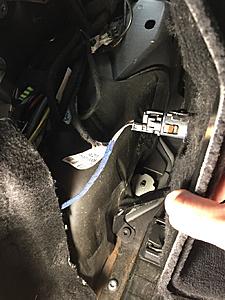
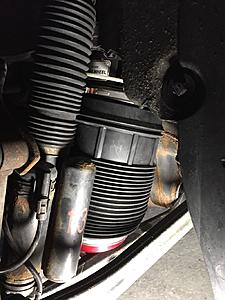
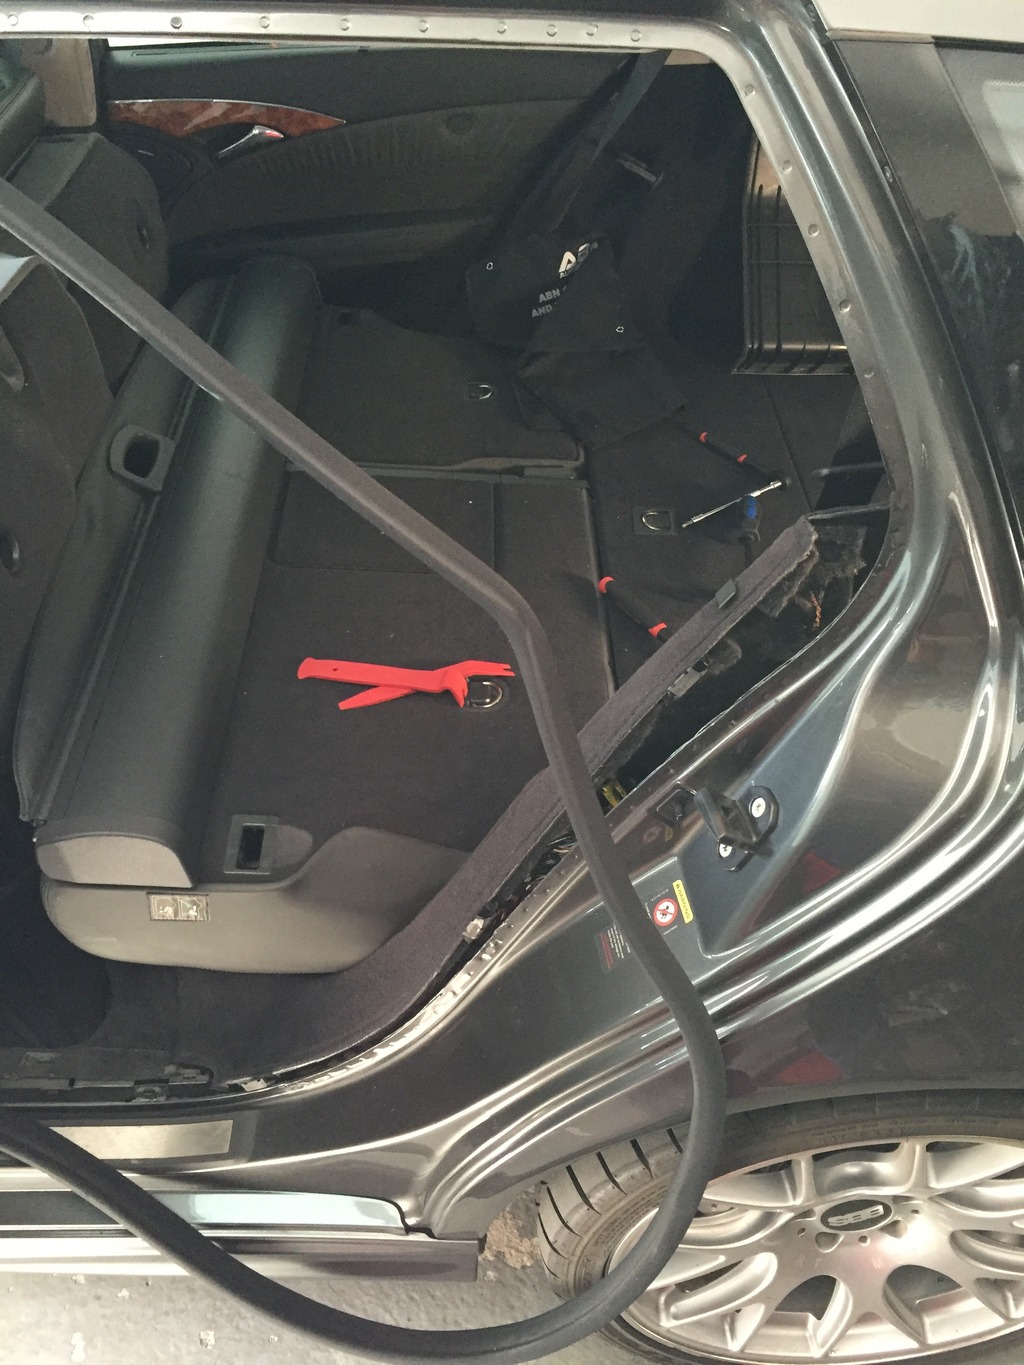
I tore apart both side of the interior on Tuesday morning. Using those threads referenced above and WIS on my STAR laptop, it was still tricky pulling the interior apart. I got both interior sides done in about an hour taking my time. Once I figured how things really went together, it was fairly easy. I know people have released the pressure from the springs not using STAR, but it was incredibly easy having that as a tool and I would not want to do it without that system. I got the driver side suspension all taken apart and got the new spring in place in about an hour. I pressurized it back up and it held pressure just fine. I was thrilled. I went to take the passenger side apart and I took everything out in about 20 minutes. I put the new Arnott in on that side and when I went to add pressure, I could hear it leaking air at the fitting. It would not hold pressure. I changed a few of the VOSS fittings that Arnott provides and I still couldn't get it to hold. At this point I assumed that I stripped the female threads slightly in the housing. I called Arnott right away and they would not handle the warranty since I bought it from CarID. I called CarID and got a solid 45 minutes of being put on hold between the representative going back and forth about what they would do to handle it. Their final answer was that I would need to take it to a licensed mechanic, so they could determine what was wrong with it. I emphatically told her exactly what was wrong with it, but my word would not be good enough. I decided to place a new order and have it overnighted while they sorted out my warranty. I knew they were going to drag their feet and I didn't feel like having my car up on jack stands for a week. I missed the shipping cutoff from Arnott via CarID, so I had to wait until today for the new one.
The new one arrived today and I had it in place and pressurized in about 30 minutes. I got the interior back together and the car seems to have been done properly. It raises and lowers like it is supposed to.
A couple important things to note:
1. Arnott's customer service was really great to deal with over the phone even though they couldn't help me directly. I wish I paid a bit more and just ordered it through them directly.
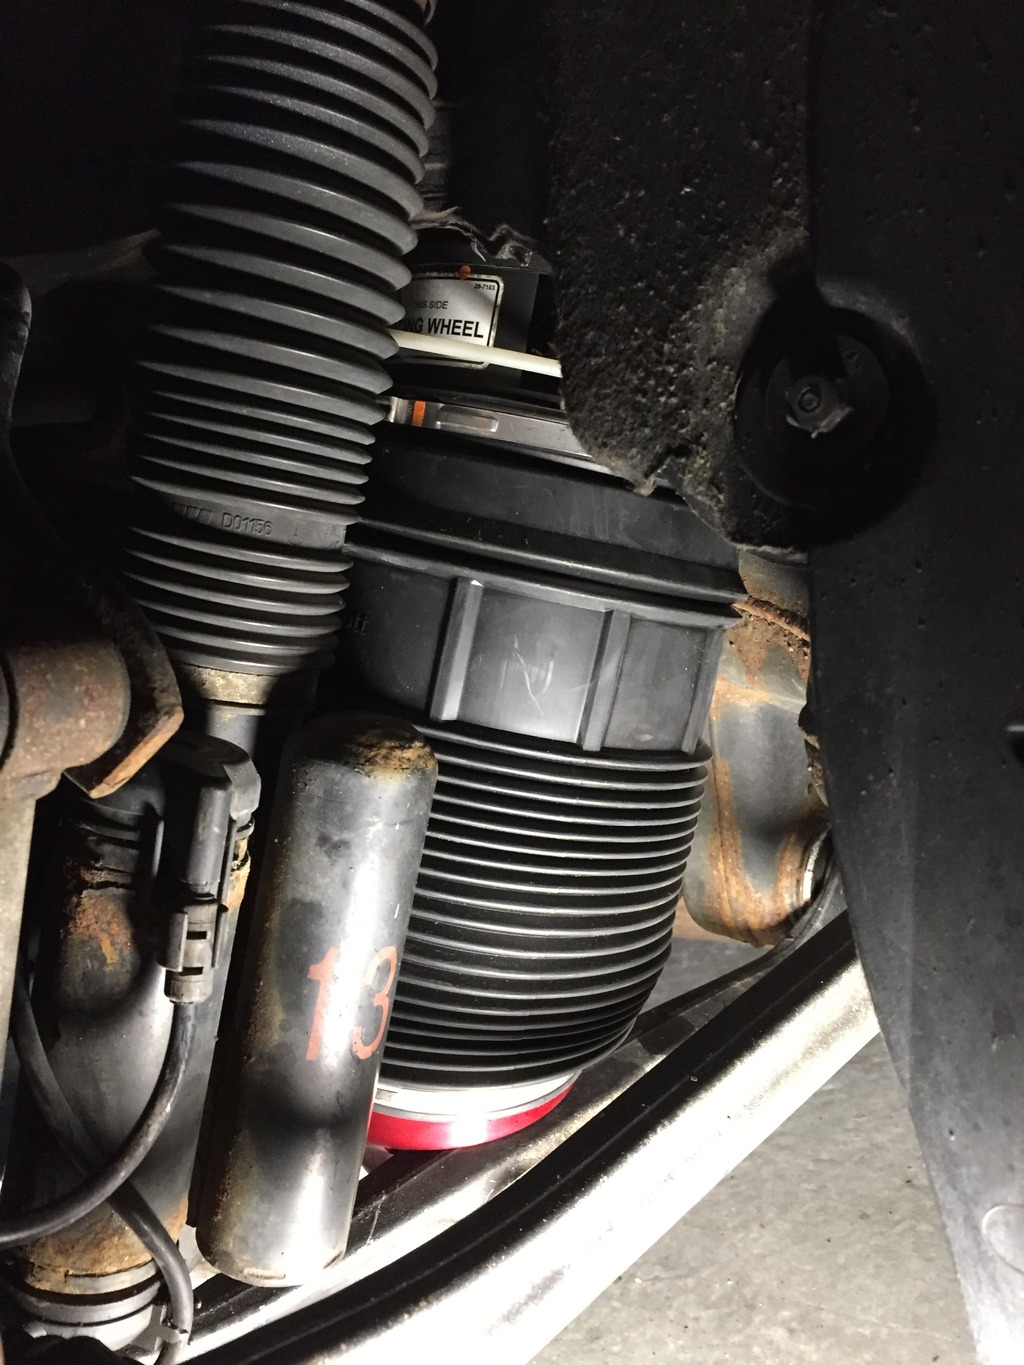
2. Arnott shipped my springs with directions from 12/2013. They have since updated their install manual to 4/2015, but it did not ship with my springs and did not ship with my replacement that I received today. One of the technicians at Arnott referenced it in our phone call and he had no clue that their springs were still shipping with the old version. What I found funny was that the old version is the way where you basically take apart everything in the rear end just so you can remove the OEM expansion tanks hooked to the original air springs rather than cutting their line and leaving them in place. The new version of the directions looks like they read some online DIY's and realized this could be done in a much simpler way.
3. DO NOT OVERTIGHTEN THE AIRLINE! I wish this was mentioned somewhere in Arnott's literature or on a forum, but maybe its common sense for most. The tech at Arnott told me it only needs to be hand-tightened to hold pressure properly. After I stripped the threads on the first one and had time to kill I did some searching to see if this had happened to others. It has been an issue across a bunch of auto brands. I still think it was more user error on my end than a design flaw.
I think thats about it. Please feel free to reach out with any questions about this that may be wagon/estate specific. I think I fully understand what I did now
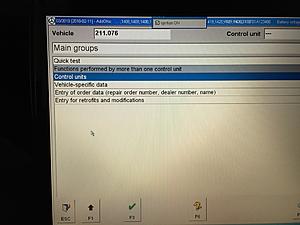
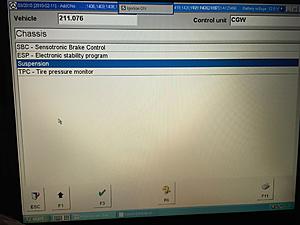
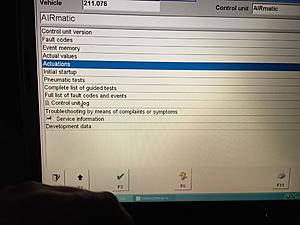
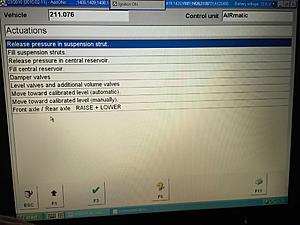
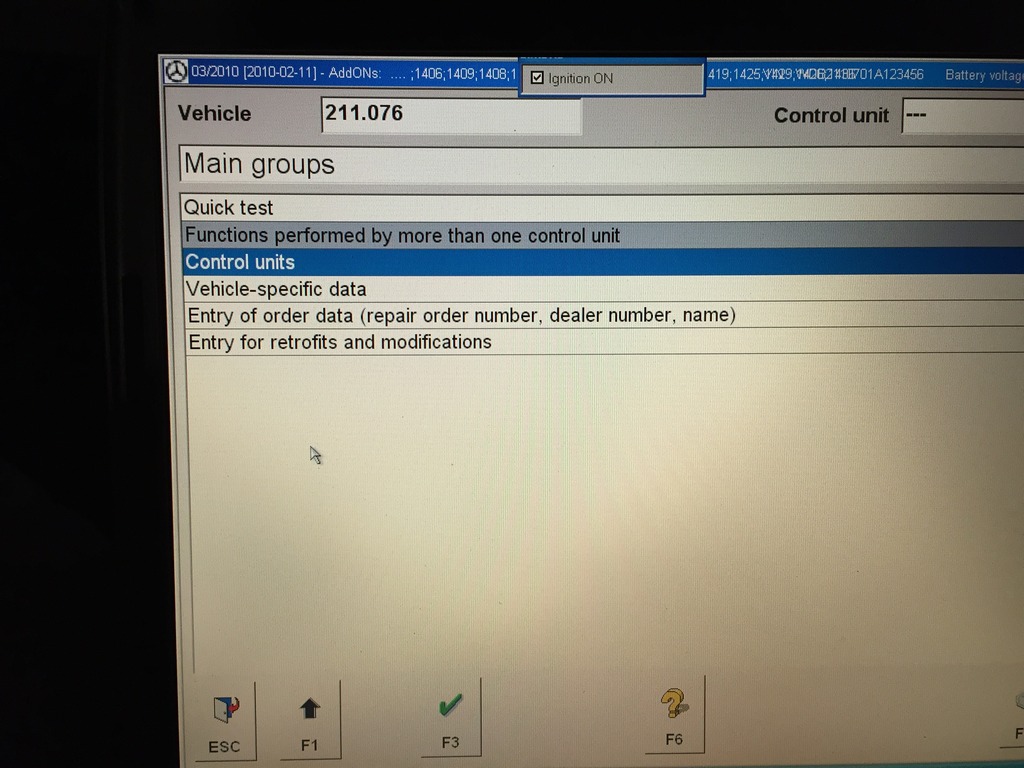
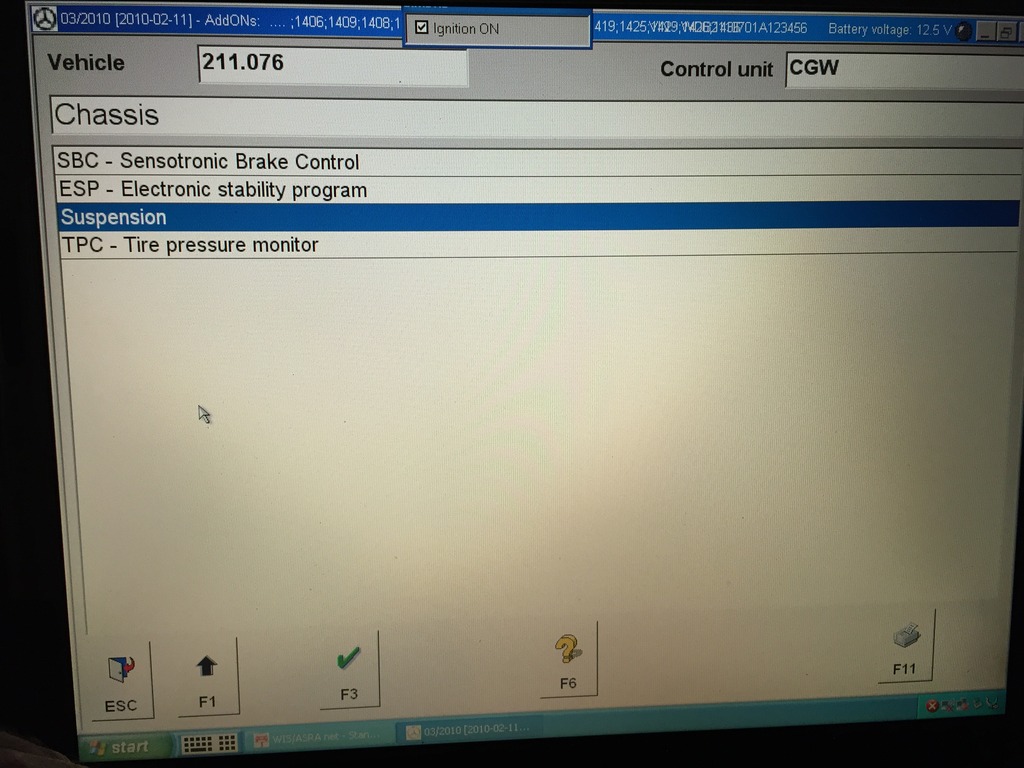
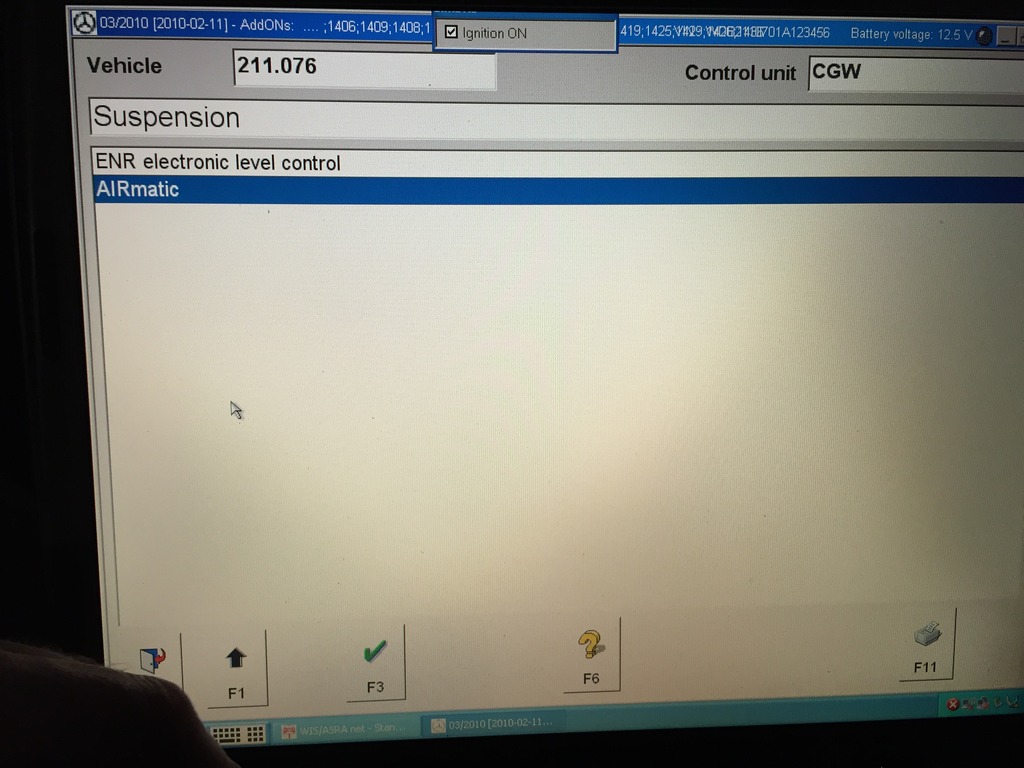
I realized after the fact that I didn't take all that many pictures of the job. Here are a few I did take and the steps in STAR to deal with filling or releasing air pressure.


I called Arnott directly in July to try to get them to match a price I found on CarID.com. They wouldn't match the price and then went on to say that CarID was actually selling them lower then their agreed upon contract with Arnott. I quickly hung up the phone and ordered them from CarID before any pricing changed. Whoever I spoke with at Arnott said thats what she would do as well. They get drop shipped directly from Arnott anyways, so I chose pricing over who I ordered from. In the end, this maybe wasn't my smartest move.
While there are a few DIY's for swapping over to Arnott rears, I have not seen one from start to finish on an E55 wagon.
Here are some helpful thread I found in case any searches pull up this thread:
E55 Wagon thread addressing the top shock nut:
https://mbworld.org/forums/e-class-w...g-problem.html
E350 Wagon (helpfull thread):
http://www.benzworld.org/forums/w211...ic-spring.html
E55 Install:
https://mbworld.org/forums/w211-amg/...ws-arnott.html
The most important tool for the project. I would not want to tackle this job without it:
http://www.motorsport-tools.com/bgs-...edes-8307.html
I tore apart both side of the interior on Tuesday morning. Using those threads referenced above and WIS on my STAR laptop, it was still tricky pulling the interior apart. I got both interior sides done in about an hour taking my time. Once I figured how things really went together, it was fairly easy. I know people have released the pressure from the springs not using STAR, but it was incredibly easy having that as a tool and I would not want to do it without that system. I got the driver side suspension all taken apart and got the new spring in place in about an hour. I pressurized it back up and it held pressure just fine. I was thrilled. I went to take the passenger side apart and I took everything out in about 20 minutes. I put the new Arnott in on that side and when I went to add pressure, I could hear it leaking air at the fitting. It would not hold pressure. I changed a few of the VOSS fittings that Arnott provides and I still couldn't get it to hold. At this point I assumed that I stripped the female threads slightly in the housing. I called Arnott right away and they would not handle the warranty since I bought it from CarID. I called CarID and got a solid 45 minutes of being put on hold between the representative going back and forth about what they would do to handle it. Their final answer was that I would need to take it to a licensed mechanic, so they could determine what was wrong with it. I emphatically told her exactly what was wrong with it, but my word would not be good enough. I decided to place a new order and have it overnighted while they sorted out my warranty. I knew they were going to drag their feet and I didn't feel like having my car up on jack stands for a week. I missed the shipping cutoff from Arnott via CarID, so I had to wait until today for the new one.
The new one arrived today and I had it in place and pressurized in about 30 minutes. I got the interior back together and the car seems to have been done properly. It raises and lowers like it is supposed to.
A couple important things to note:
1. Arnott's customer service was really great to deal with over the phone even though they couldn't help me directly. I wish I paid a bit more and just ordered it through them directly.
2. Arnott shipped my springs with directions from 12/2013. They have since updated their install manual to 4/2015, but it did not ship with my springs and did not ship with my replacement that I received today. One of the technicians at Arnott referenced it in our phone call and he had no clue that their springs were still shipping with the old version. What I found funny was that the old version is the way where you basically take apart everything in the rear end just so you can remove the OEM expansion tanks hooked to the original air springs rather than cutting their line and leaving them in place. The new version of the directions looks like they read some online DIY's and realized this could be done in a much simpler way.
3. DO NOT OVERTIGHTEN THE AIRLINE! I wish this was mentioned somewhere in Arnott's literature or on a forum, but maybe its common sense for most. The tech at Arnott told me it only needs to be hand-tightened to hold pressure properly. After I stripped the threads on the first one and had time to kill I did some searching to see if this had happened to others. It has been an issue across a bunch of auto brands. I still think it was more user error on my end than a design flaw.
I think thats about it. Please feel free to reach out with any questions about this that may be wagon/estate specific. I think I fully understand what I did now
I realized after the fact that I didn't take all that many pictures of the job. Here are a few I did take and the steps in STAR to deal with filling or releasing air pressure.


Last edited by ekalb; 10-29-2015 at 07:51 PM. Reason: add link


 11-01-2015, 06:48 AM
#5
Member
Thread Starter
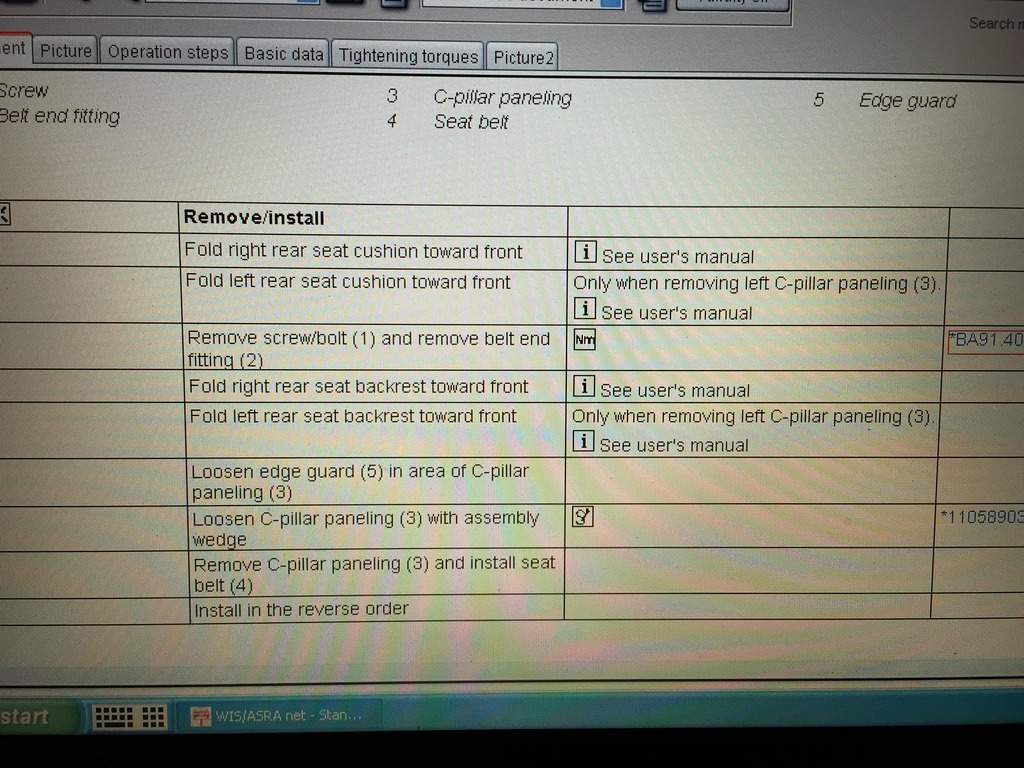
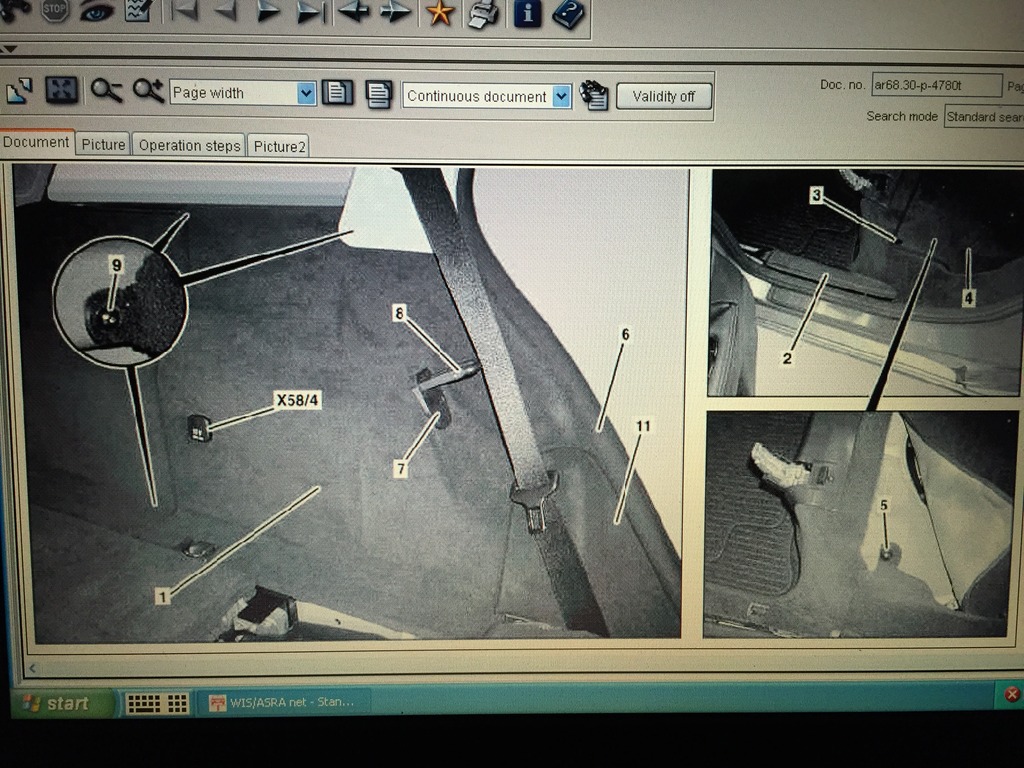
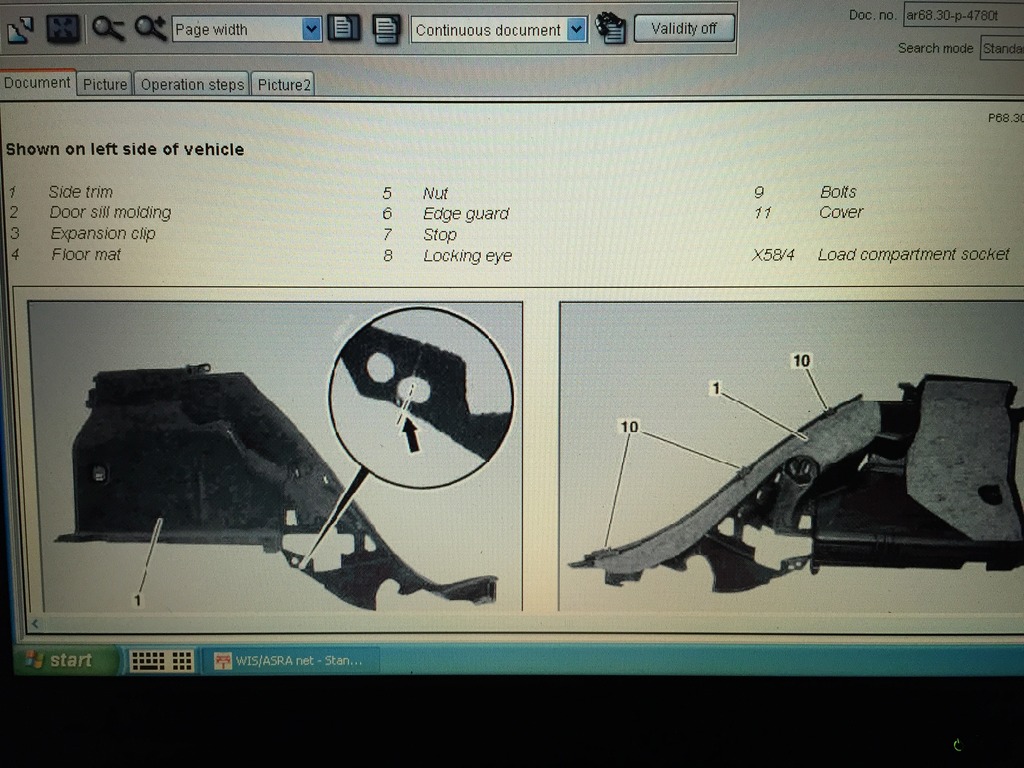
How would I access the top strut nut without taking the interior apart?
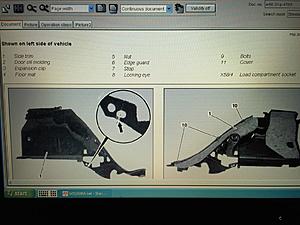
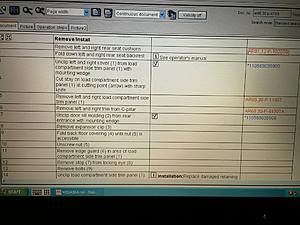
As I mentioned in the original post, even Arnott now recommends just leaving the tank in place rather than disassembling basically everything in the rear end just to get that tank out. If there is a way to remove that tank using the method of getting the airspring out that I used, I didn't see it. I agree though, I would much rather have that tank and hose removed as far as aesthetics go. It came down to either removing 3 bolts and one strut tower nut and leaving the tank in place, or getting in over my head removing way more than I am comfortable removing (without a lift) just to say I got that now useless tank out.
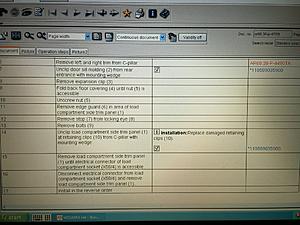
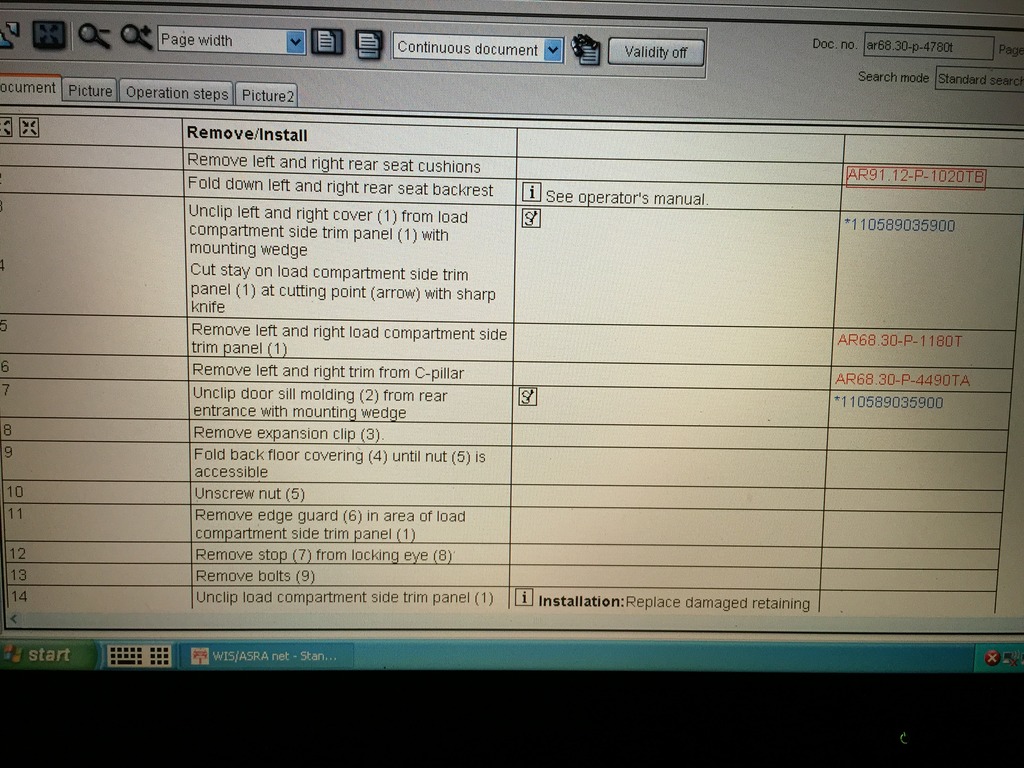
A. The old provided Arnott instructions have you completing the job in 29 steps.
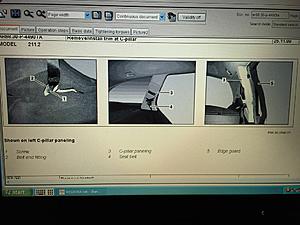
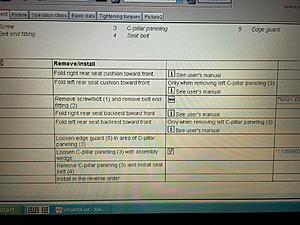
B. The new Arnott Instructions have you completing it in 10 (not including removing the interior C-Pillar upper and lower trim).
Option B was the lessor of two evils for me.
Here are the new Arnott instructions for future reference:
http://arnottinfo.com/manuals/A-2725.pdf
Their video link still shows the "old" way:
Last edited by ekalb; 11-01-2015 at 07:59 AM. Reason: adding a link
11-02-2015, 12:27 AM
#6
How would I access the top strut nut without taking the interior apart?
As I mentioned in the original post, even Arnott now recommends just leaving the tank in place rather than disassembling basically everything in the rear end just to get that tank out. If there is a way to remove that tank using the method of getting the airspring out that I used, I didn't see it. I agree though, I would much rather have that tank and hose removed as far as aesthetics go. It came down to either removing 3 bolts and one strut tower nut and leaving the tank in place, or getting in over my head removing way more than I am comfortable removing (without a lift) just to say I got that now useless tank out.
A. The old provided Arnott instructions have you completing the job in 29 steps.
B. The new Arnott Instructions have you completing it in 10 (not including removing the interior C-Pillar upper and lower trim).
Option B was the lessor of two evils for me.
Here are the new Arnott instructions for future reference:
http://arnottinfo.com/manuals/A-2725.pdf
Their video link still shows the "old" way:
Replacing the Mercedes-Benz® E & CLS-Class Rear Air Spring with a New Arnott-Designed Air Spring - YouTube
Also, the spot welds that hold the bracket to the tank are very weak. One tap with the air hammer on each weld and you can now remove the bracket and tank separately.
11-02-2015, 01:36 AM
#7
MBWorld Fanatic!

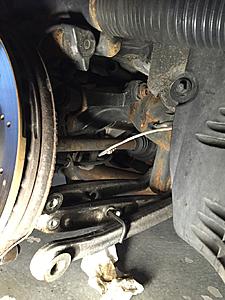
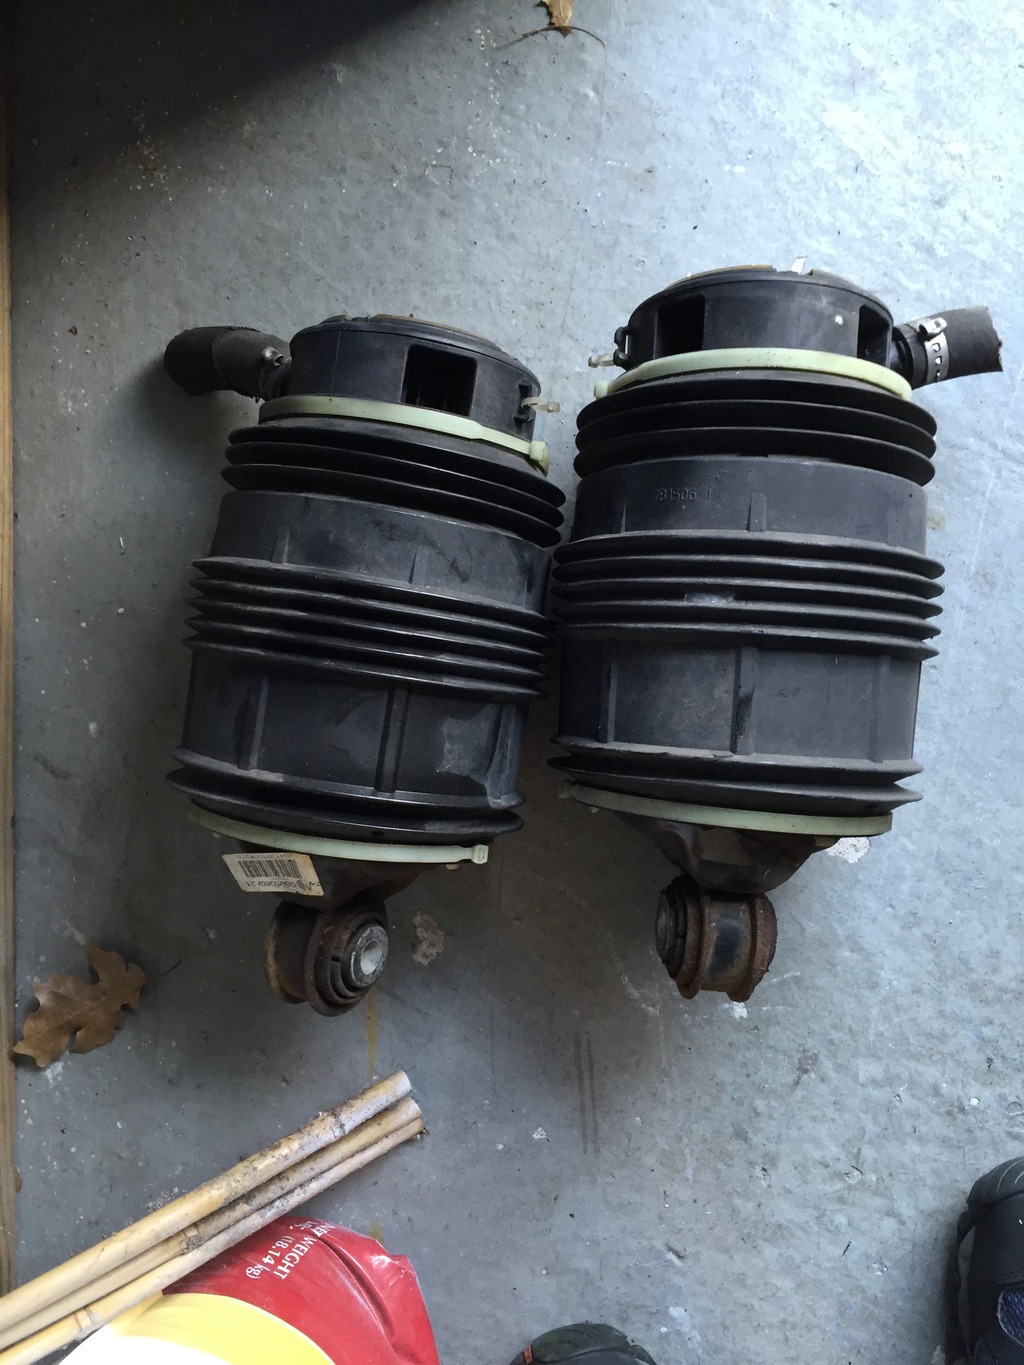
Dunno if the subframe is similar on a wagon to a sedan or not but I got those aluminium chambers out of mine (its a very tight like they kinda get jammed) but with some gentlish persuasion they do come out without removing anything other than cutting the rubber hose which you've likely already done.
Trending Topics
11-02-2015, 07:59 AM
#8
Member
Thread Starter
Interesting. I felt like I absolutely needed to have the shock out of the way to gain enough clearance to remove/install the spring. I never even considered leaving it in place. I also thought I needed that extra bit of travel that comes with having the shock completely unhooked.
Next time I am under there I will take a look again and try to remove them.
Thanks!


