When you click on links to various merchants on this site and make a purchase, this can result in this site earning a commission. Affiliate programs and affiliations include, but are not limited to, the eBay Partner Network.
EDIT:
I have purchased the Splitter, I have my eyes set on a Bootlid Spoiler, but not 100% sold on it yet so I am still in the market for that. I wasn't entertaining much more than these items at this time, but may be interested in a CF Roof Spoiler (if someone is selling at a reasonable price). I am however now on the market for a NON CF Grill. I am looking for a gloss black, single fin, pre-facelift (fitment) grill in mint condition. I prefer it to come with the star. I am also still looking for 12mm and 15mm spacers. I may be Plasti-Dipping my badges, but if a member is selling blacked out badges, let me know.
EDIT: No longer in need of a bootlid spoiler either, purchase has been made.
Let me know on the other stuff fellas.
Last edited by Autosport7; 04-30-2014 at 08:01 PM.
Are you referring to the covers that go over the OEM mirrors with double sided tape?
If so, I wish you hadn't. I have those on my car right now and to be honest they look terrible from close when you look at them. From far away they are alright, but from close by it is a different story.
I had them sitting for like 6 months before I finally decided to install them cause I figured I might as well. At first, they wouldn't stick with the tape right away so I had to double the tape on the mirrors so the parts actually make contact and now they sit high up and not properly fit at all. Perhaps I shouldn't have doubled the tape on the covers who knows.
Oy Vey!
Well I had them on my BMW and they fit and looked great hence my recent purchase for the C.
Thanks for the heads up. I will let you know how it turns out as they make it to my house tomorrow.
I would ask Nicholas from Mode Carbon for a quote. Their products are manufactured with the best quality and their customer service is outstanding. Got all my parts from them.
Are you referring to the covers that go over the OEM mirrors with double sided tape?
If so, I wish you hadn't. I have those on my car right now and to be honest they look terrible from close when you look at them. From far away they are alright, but from close by it is a different story.
I had them sitting for like 6 months before I finally decided to install them cause I figured I might as well. At first, they wouldn't stick with the tape right away so I had to double the tape on the mirrors so the parts actually make contact and now they sit high up and not properly fit at all. Perhaps I shouldn't have doubled the tape on the covers who knows.
In not sure who your vendor was, but my quality and fitment is spot on! I had to remove the paint from the back of cf caps before installation as the double sides tape pulled it off an I used thicker double sides sticky tape than what was provided and the install went flawlessly!
Very happy with what they are!
Thanks Suvneer!
Sorry for the sideways pic. I also didn't do a real good job with the angle of the pic as you can see inside the piece to the mirror, but at normal angles you can not see that.
Last edited by Autosport7; 04-30-2014 at 09:51 AM.
Those side mirrors deff look different than what I have. Mine has three separate slits or whatever you want to call them for the shape of our pre facelift side mirrors. It would be perfect had I not doubled the tape, cause it just sits a little high on the mirror and to my add personality looks terrible. I tried with single tape before and it wouldn't stick but at the time the tape I used wasn't as strong as the one I got now. So perhaps I will rip them apart and install a single layer of this new stronger tape and reinstall them, I am not sure. They are stuck so good now that I am worried that if I try to rip them off, they will take off the 3M under it.
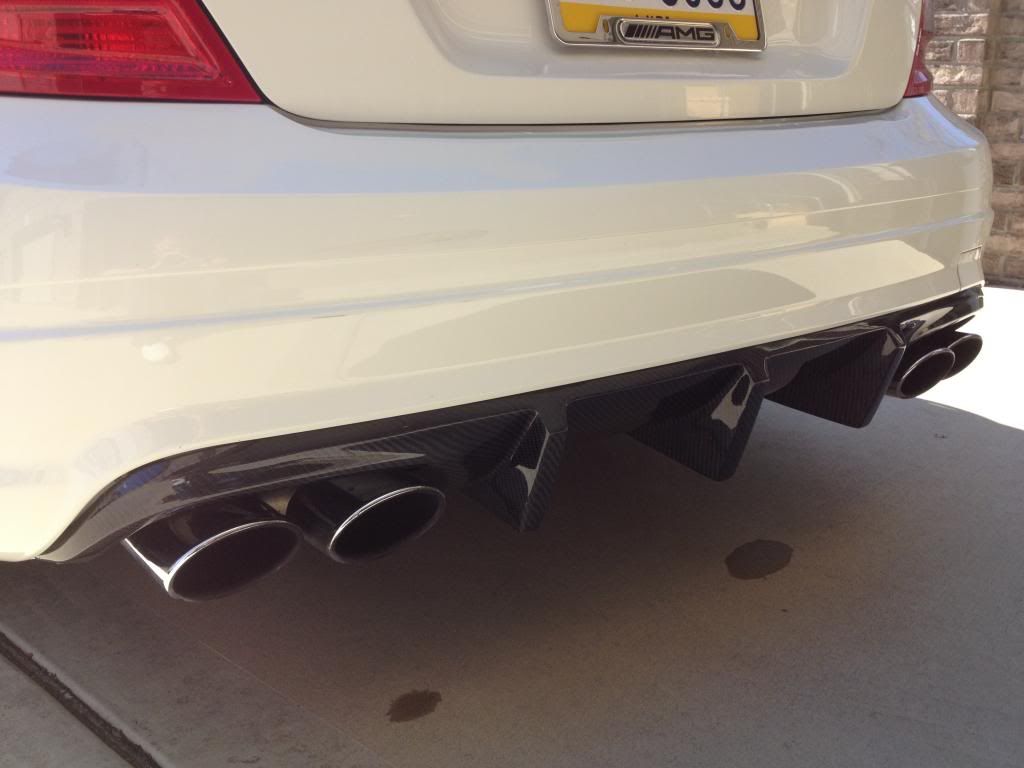
Also wondering about the cf diffuser you bought from another member; how is the fitment? How did you install it? The original seller mentioned he bought it off ebay and I am just trying to determine which one exactly. Does it look anything like this one;
Those side mirrors deff look different than what I have. Mine has three separate slits or whatever you want to call them for the shape of our pre facelift side mirrors. It would be perfect had I not doubled the tape, cause it just sits a little high on the mirror and to my add personality looks terrible. I tried with single tape before and it wouldn't stick but at the time the tape I used wasn't as strong as the one I got now. So perhaps I will rip them apart and install a single layer of this new stronger tape and reinstall them, I am not sure. They are stuck so good now that I am worried that if I try to rip them off, they will take off the 3M under it.
I would still redo it, what is the problem with ripping off the 3M under it, you would want to replace that with new 3M anyway. Better to have a product you love, than to have something on there you feel is half assed.
Originally Posted by papashango
Also wondering about the cf diffuser you bought from another member; how is the fitment? How did you install it? The original seller mentioned he bought it off ebay and I am just trying to determine which one exactly. Does it look anything like this one;
Why are you still messing around on EBay when this is available for $300.00 + shipping!? If this was available when I bout mine, I would have bought this no questions asked. https://mbworld.org/forums/c63-amg-w...n-h-r-etc.html - EDIT: I see that it has been sold... A while ago actually. I suppose that one you posted from Ebay may very well be it. If I were buying from Ebay, I would buy from AutoFans or 4A Motorsports (same company actually) Bought lots of stuff from them in the past and all was great quality and good fitment. If you do and yours is bad, don't hate on me. lol
As for the fitment, I had to adjust it a bit here and there, took a heat gun to one of the tabs and bent it down where it needed to be and from then on, it really fit like a glove. The quality of the piece isn't what I would consider the best in the world, but it looks beautiful and fitment is now really pretty good.
As for the installation, I followed the diy that you can find on MBWorld, but made some modifications to it. I did not, and DO NOT FEEL grease of any kind is necessary, it will just make a big mess that you then have to clean up. When installing tabs of hard plastic into plastic slots provided for the tabs, I don't understand what grease is going to do.
Anyway, I used my oem brackets from the oem diffuser to make the install as factory as it could be.
Once the oem diffuser was removed, I drilled out all the rivets that attached the brackets, I then drilled new holes in the new diffuser and went to Lowes and bought a multi sized bolt and nut kit. I also purchased washers to install on both the nut side and the bolt side. This will allow for a larger area instead of point loading such a small area with the bolt head, this will allow for a tighter fit without cracking the diffuser.
I then bolted the brackets to the diffuser and placed the diffuser on the car. I loosely bolted everything up and made adjustments until I thought it was as good as it could get. I then torqued those bolts and screws down and then drilled new Torx T20 holes into the diffuser and into the bumper where it was least identifiable and screwed them in.
End result is as good as factory I suppose. Just take your time and make proper adjustments. The total removal of oem and install of new probably took me 45 mins.
Last edited by Autosport7; 05-01-2014 at 07:34 AM.
I would still redo it, what is the problem with ripping off the 3M under it, you would want to replace that with new 3M anyway. Better to have a product you love, than to have something on there you feel is half assed.
Why are you still messing around on EBay when this is available for $300.00 + shipping!? If this was available when I bout mine, I would have bought this no questions asked. https://mbworld.org/forums/c63-amg-w...n-h-r-etc.html - EDIT: I see that it has been sold... A while ago actually. I suppose that one you posted from Ebay may very well be it. If I were buying from Ebay, I would buy from AutoFans or 4A Motorsports (same company actually) Bought lots of stuff from them in the past and all was great quality and good fitment. If you do and yours is bad, don't hate on me. lol
As for the fitment, I had to adjust it a bit here and there, took a heat gun to one of the tabs and bent it down where it needed to be and from then on, it really fit like a glove. The quality of the piece isn't what I would consider the best in the world, but it looks beautiful and fitment is now really pretty good.
As for the installation, I followed the diy that you can find on MBWorld, but made some modifications to it. I did not, and DO NOT FEEL grease of any kind is necessary, it will just make a big mess that you then have to clean up. When installing tabs of hard plastic into plastic slots provided for the tabs, I don't understand what grease is going to do.
Anyway, I used my oem brackets from the oem diffuser to make the install as factory as it could be.
Once the oem diffuser was removed, I drilled out all the rivets that attached the brackets, I then drilled new holes in the new diffuser and went to Lowes and bought a multi sized bolt and nut kit. I also purchased washers to install on both the nut side and the bolt side. This will allow for a larger area instead of point loading such a small area with the bolt head, this will allow for a tighter fit without cracking the diffuser.
I then bolted the brackets to the diffuser and placed the diffuser on the car. I loosely bolted everything up and made adjustments until I thought it was as good as it could get. I then torqued those bolts and screws down and then drilled new Torx T20 holes into the diffuser and into the bumper where it was least identifiable and screwed them in.
End result is as good as factory I suppose. Just take your time and make proper adjustments. The total removal of oem and install of new probably took me 45 mins.
Awesome stuff Kris!
I would say a better quality product could be had as mine (the diffuser that is...) just seemed a little thinner than other cf products I have seen in the past, but would be shocked if better fitment could be had.
All in all I feel I got what I paid for and am satisfied.


 04-27-2014, 08:54 PM


 still have the Vossens too