

MBWorld Fanatic!
Quote:
nope, euro strips are easy to install. you do not need to remove the bumper for that or the side markers. it's really easy to pop out. a little too easy if you ask me. just get a flat head and wrap a cloth around it and dig in and pop out. less than 1 min. the euro strips are a bit harder - but not much. take off the side markers, unplug the bumb then proceed to pop the entire strip off. if i can do it anyone can.
I guess I'll be asking my parts department to provide me with an impact strip for my W210. I hope they come painted. They can't be cheap unfortunately...Originally Posted by 14cue
patrick,nope, euro strips are easy to install. you do not need to remove the bumper for that or the side markers. it's really easy to pop out. a little too easy if you ask me. just get a flat head and wrap a cloth around it and dig in and pop out. less than 1 min. the euro strips are a bit harder - but not much. take off the side markers, unplug the bumb then proceed to pop the entire strip off. if i can do it anyone can.
Thanks for the information. I hope the E's is the same. I'll ask more about it with my dealer.
patrick,
they do come painted as far as i know. and nope, they're not cheap at all.
let me know how much they charge. you should ask Steve if he has them.
they do come painted as far as i know. and nope, they're not cheap at all.
let me know how much they charge. you should ask Steve if he has them.
MJ50
Super Moderator
close


Mar 30, 2026
- Join DateJul 2003
- LocationMBworld
- Posts:22,003
-
iTrader Positive Feedback0
-
iTrader Feedback Score(0)
- Vehicle(s) I drivebone stock E55 AMG
-
Likes:569
-
Liked:962 Times in 933 Posts
looks great! 1st time seeing CF lip on black car... not bad at all 
MBWorld Fanatic!
Quote:
Mod - the last 2 months
- New rims (thanks Blake)
- $400 detail (I know - expensive)
- Euroteck front lip
Now, aren't you glad I told you that Blake's rims were up for sale? Originally Posted by 14cue
Finally posting pics of my car in full. Sorry, there isnt a fancy backdrop. I was too lazy to drive it anywhere. Pictures are not the best quality either. I didnt bother messing with the camera settings.Mod - the last 2 months
- New rims (thanks Blake)
- $400 detail (I know - expensive)
- Euroteck front lip
 Looking good bro!!!
 MBWorld Fanatic!
Quote:
Thanks for the information. I hope the E's is the same. I'll ask more about it with my dealer.
Patrick, i could be wrong, but I'll be surprised if your dealer will order the euro impact strips as they technically don't meet the US DOT requirements which will eliminate the lighted amber side markers.Originally Posted by patrick_y
I guess I'll be asking my parts department to provide me with an impact strip for my W210. I hope they come painted. They can't be cheap unfortunately...Thanks for the information. I hope the E's is the same. I'll ask more about it with my dealer.
MBWorld Fanatic!
Very nice looking car!! The front looks so smooth and perfect.

Super Member
Hey 14..take a close up of the corner new the wheel well. Looks like its not pull flush enough with the bumper which is why it may be slanted.
Quote:
thanks bro Originally Posted by GPI-AMG
Very nice looking car!! The front looks so smooth and perfect.

i love it too!
Quote:
hey,Originally Posted by jan ken po
Hey 14..take a close up of the corner new the wheel well. Looks like its not pull flush enough with the bumper which is why it may be slanted.
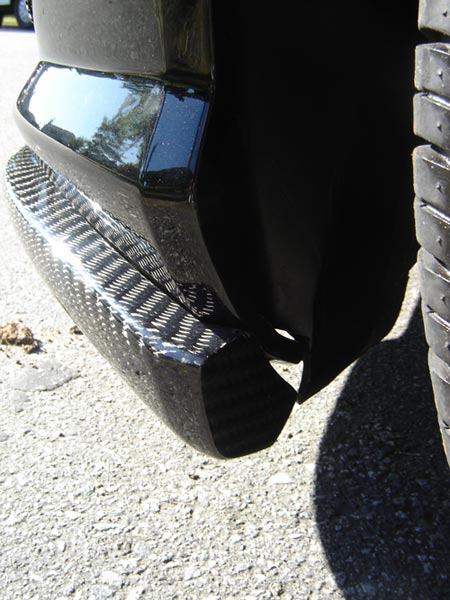
yeah it isnt flush, the driver side isnt molded the same as the passenger. the passenger is perfect. but this is as close as i can get. maybe i did do it wrong but would it be a bad idea to reinstall it with 8 holes already on there?

Quote:
Looking good bro!!!
thanks bro for the comments and for telling me about blake Originally Posted by NO_WUR_E
Now, aren't you glad I told you that Blake's rims were up for sale? Looking good bro!!!
Quote:
yeha i like it. not as good as it would on a white or silver car but it's a close second. Originally Posted by mj50
looks great! 1st time seeing CF lip on black car... not bad at all
MBWorld Fanatic!
hey, is that an AMG flat badge on your hood???? you didn't like the typical mercedes symbol kind.
Quote:
yep, it's an amg one, looks funky. i dont like original b.c you would have 2 stars, one of the hood and one on the grille...i prefer it this way. Originally Posted by NO_WUR_E
hey, is that an AMG flat badge on your hood???? you didn't like the typical mercedes symbol kind.
Super Member
14..see, I'm sure its supposed to fit like so...just may need to do a little more pulling on it. It looks like you did the middle 1st? you didn't did you?


jan ken po,
nope, i installed the sides first. yours looks perfect. but mine is def not flush, maybe i did need to pull more, it should be higher up on the bumper like yours i suppose. do you think it's wise to take it off and re install? with the holes there and all?
nope, i installed the sides first. yours looks perfect. but mine is def not flush, maybe i did need to pull more, it should be higher up on the bumper like yours i suppose. do you think it's wise to take it off and re install? with the holes there and all?
jan ken po,
can you take a shot of it from the side and front (angled)?
i want to compare it, b/c i was petty sure i couldnt pull it anymore, that and i didnt want to scratch the bumper, how hard did you pull?
can you take a shot of it from the side and front (angled)?
i want to compare it, b/c i was petty sure i couldnt pull it anymore, that and i didnt want to scratch the bumper, how hard did you pull?
Super Member
Best pics I got right now, is like been raining like crazy the last few days down here. I had to good grip on the driver's side (I did it first). That is the second pic (in the set of pics above)...and you'll notice it covers slightly more of the bumper than the other. The passenger side took a lot more "elbow grease" because the driver side was already 80% tightened. The did the middle holes.
I think you'll be ok in the front if you take it off. The onyl thing you would have to watch out far is how close the original holes you made are to your new location. Because if it is too close, the screws with simply slip right back into those holes. In that case, I might be a slight bigger size screw so it forms a new size hole. However, I think you'll be ok becuase I'm betting they'll probably be in the same spot. It really looks like you just need "tuck" some. Your passenger side looks d--n near close, but don't have a good close up of the driver's side.


I think you'll be ok in the front if you take it off. The onyl thing you would have to watch out far is how close the original holes you made are to your new location. Because if it is too close, the screws with simply slip right back into those holes. In that case, I might be a slight bigger size screw so it forms a new size hole. However, I think you'll be ok becuase I'm betting they'll probably be in the same spot. It really looks like you just need "tuck" some. Your passenger side looks d--n near close, but don't have a good close up of the driver's side.
Quote:
I think you'll be ok in the front if you take it off. The onyl thing you would have to watch out far is how close the original holes you made are to your new location. Because if it is too close, the screws with simply slip right back into those holes. In that case, I might be a slight bigger size screw so it forms a new size hole. However, I think you'll be ok becuase I'm betting they'll probably be in the same spot. It really looks like you just need "tuck" some. Your passenger side looks d--n near close, but don't have a good close up of the driver's side.
thanks buddy.Originally Posted by jan ken po
Best pics I got right now, is like been raining like crazy the last few days down here. I had to good grip on the driver's side (I did it first). That is the second pic (in the set of pics above)...and you'll notice it covers slightly more of the bumper than the other. The passenger side took a lot more "elbow grease" because the driver side was already 80% tightened. The did the middle holes. I think you'll be ok in the front if you take it off. The onyl thing you would have to watch out far is how close the original holes you made are to your new location. Because if it is too close, the screws with simply slip right back into those holes. In that case, I might be a slight bigger size screw so it forms a new size hole. However, I think you'll be ok becuase I'm betting they'll probably be in the same spot. It really looks like you just need "tuck" some. Your passenger side looks d--n near close, but don't have a good close up of the driver's side.
maybe i will re do it...
here are some close ups, the driver side is really bad up close...but it doesnt look off at all from a far... check it out and let me know what you think. i swear the mold from the driver side is different than the passenger - isnt yours? even tho that isnt my problem right now...


I had to put on my shades to look at those photos. You car looks better than the new bodies just out of the paint shop. Looks very sweet with the wheels and the front lip. Two thumbs up.
Quote:
lol - thanks man.Originally Posted by Moviela
I had to put on my shades to look at those photos. You car looks better than the new bodies just out of the paint shop. Looks very sweet with the wheels and the front lip. Two thumbs up.
i treat her better than all the gf's i have ever had combined - maybe thats a bit of a stretch but she's def. worth it
too bad i messed up the install, still looks great tho. i'll fix her on the weekend
Super Member
Mo is right...man you gotta put ya stunna shades on to look at them pics..LMAO. On the mold itself, its been too long since I put it on, so I don't have a clear cut memeory on the exact shape it was...honestly thought it was even on both sides.
Well 1st, lemme back up and say I just thought it was off. Bottomline, if it is no big deal to you, then don't mess with it. 'Cuz if you luck is anything like mine in the past situations like this, I ended up making it worse than it originally was.
But, in looking at these last pics, it is definitely not right, especially the driver's side. You got too much upward tilt at the front. Looks like it needs to tilt down slightly and slide back toward the rear of the car a good 1/4". Maye tilting it down will compensate for the 1/4" movement, dunno...I'd try loosening the midle screws maybe to 50% out, give you a lil downward tilt (if that doesn't allow for enough tilt, they may have to come all the way out).. loosen pass side all the way and "tuck" it..Get your screw in about 50% and have someone hold like hell. The do the driver's side to 90%, back to the pass to 100%, finish driver side...and then tighten the middle 8 screws back. Again, if its worth all that to you...if not, just forget it and ride out!
jan_ken_po,
thanks for the sound advice. i appreacite it bro.
it does bother me to look at it close up
i might play with it this weekend and see how it goes. if it's an easy fix or if i dont have to take all the screws off then i will try your methods. if not, then i'll just leave it. no biggy.
thanks again mang!
MBWorld Fanatic!
Quote:
I'll be going after the US Impact strips. Not the Euro ones. Originally Posted by NO_WUR_E
Patrick, i could be wrong, but I'll be surprised if your dealer will order the euro impact strips as they technically don't meet the US DOT requirements which will eliminate the lighted amber side markers.
I'll hopefully give the dealership a call later this week and then post the estimate on this website. If they come painted, the cheapest it could possibly be is already $200. Which is liveable.
Former Vendor of MBWorld
Quote:
maybe i will re do it...
here are some close ups, the driver side is really bad up close...but it doesnt look off at all from a far... check it out and let me know what you think. i swear the mold from the driver side is different than the passenger - isnt yours? even tho that isnt my problem right now...
Originally Posted by 14cue
thanks buddy.maybe i will re do it...
here are some close ups, the driver side is really bad up close...but it doesnt look off at all from a far... check it out and let me know what you think. i swear the mold from the driver side is different than the passenger - isnt yours? even tho that isnt my problem right now...
I am glad you took these. It is slanted because of this, you did not pull it correctly and hard enough to the edge of the bumper. Take out all the screws, every one in the middle and the one side where it is not flush. Leave the one screw in where it is flush on the driver side. Now PULL the lip and push no matter how you do it to fit flush with the bumper. Don't be afraid to pull, the lip will not break, just dont pull to hard and rip the other side out. You will also need to be pulling a lot on the side of the front bumper and pull ir to the lip and then insert the side screw. Then reinstall the front screws. You will probably need to drill new holes. Then you will be good to go! Simple mistake, these can be tricky to install.


