DIY: M112 Spark Plug R&R

 11-04-2007, 11:02 PM
#1
Super Moderator
Thread Starter
DIY: M112 Spark Plug R&R
The C240/320 are fitted with twelve (two per cylinder) of either:
Bosch F 8 DPER,
Beru 14 FGH 8 DPUR X 2, or
NGK IFR 5 D 10
MB part number is 004 159 94 03
The C32 has NGK IFR 6 D 10 as original equipment.
MB part number is 003 159 97 03
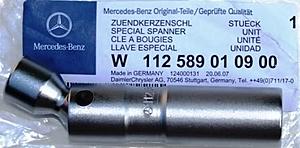
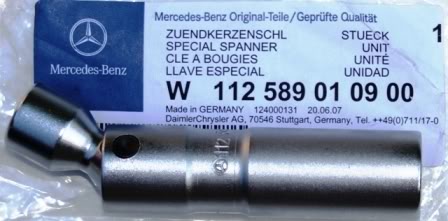
MB’s spark plug socket, 112 589 01 09 00, helps to make the task easier.
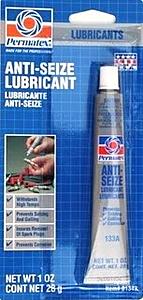
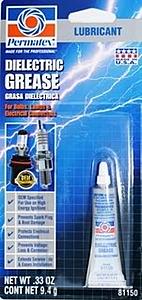
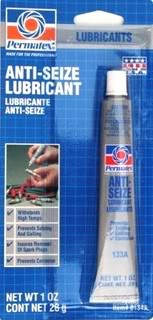
Have available some anti-seize lubricant and dielectric grease.
Raise the hood to its full vertical position. Remove the engine cover and air filter assembly...https://mbworld.org/forums/c-class-w203/116104-d-i-y-v6-air-filter-replacement.html#post1227088
Remove the coil packs. Each is secured with a single #27 TORX fastener.
[
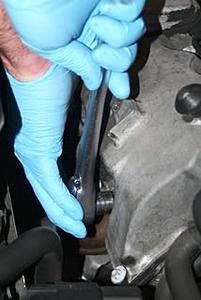
Use an 18mm open-end wrench on the spark plug wire connector, leveraged against the cam cover, to pull it free of the plug. It helps to reduce the force required by slightly rotating the connector before removing it. Do not place any undue stress on either the sparkplug wires, or the coil pack wires themselves.
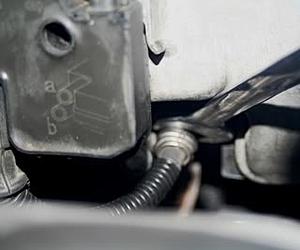
Lay them on the intake manifold.

The plugs are now as accessible as they will ever be. To get them in and out is done mostly by feel, rather than sight.

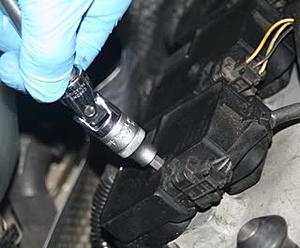
Here's the ratchet, extension, and socket combination used to reach all twelve plugs. YMMV. The plugs nearest the firewall necessitated fitting the socket to the plug first, and then connecting the ratchet.
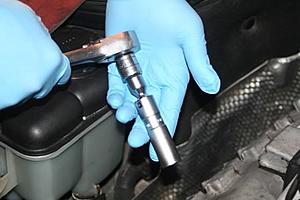
Use compressed air to blow any residual debris from each plug recess. Remove the old plugs.
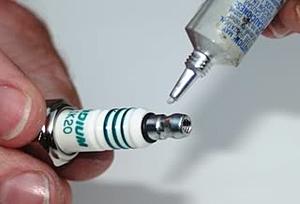
Prepare your new plugs for installation by first verifying their gap. Specification is 1.0 mm/.039 inch. While some may argue with the anti-seize step, I’ve used it successfully for three decades. The rationale is merely to lubricate the respective threads. Because the steel plug is threading into aluminum, it’s obvious which is the stronger of the two. No reason to turn a pleasant plug swap into a Heli-coil repair job.
Rub a very modest portion into the threads. Keep it well away from the firing tip so as not to cause misfires. The washer area of the plug should remain uncoated as well, so that it can properly conduct away its heat, thereby helping to avoid pre-ignition.
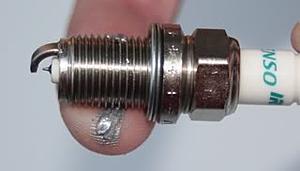
Nevermind about the 'nail!
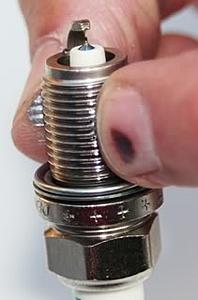
Place a dollop of dielectric grease on the tip to improve conductivity, and help inhibit corrosion.
Thread the new plugs initially by hand to avoid any chance of cross-threading. Because you’ll be compressing a new washer, just get them fully seated on the first attempt. Torque them to 15-22 ft.lbs./20-30 Nm. It will require ~Ľ to ˝ additional turn to yield the proper reading.
I like to get them snug, then go back to gently sneak up on the correct torque. Go around on all twelve again to establish their final torque and verify your work.
Bosch F 8 DPER,
Beru 14 FGH 8 DPUR X 2, or
NGK IFR 5 D 10
MB part number is 004 159 94 03
The C32 has NGK IFR 6 D 10 as original equipment.
MB part number is 003 159 97 03
MB’s spark plug socket, 112 589 01 09 00, helps to make the task easier.
Have available some anti-seize lubricant and dielectric grease.

Raise the hood to its full vertical position. Remove the engine cover and air filter assembly...https://mbworld.org/forums/c-class-w203/116104-d-i-y-v6-air-filter-replacement.html#post1227088
Remove the coil packs. Each is secured with a single #27 TORX fastener.
[

Use an 18mm open-end wrench on the spark plug wire connector, leveraged against the cam cover, to pull it free of the plug. It helps to reduce the force required by slightly rotating the connector before removing it. Do not place any undue stress on either the sparkplug wires, or the coil pack wires themselves.

Lay them on the intake manifold.

The plugs are now as accessible as they will ever be. To get them in and out is done mostly by feel, rather than sight.

Here's the ratchet, extension, and socket combination used to reach all twelve plugs. YMMV. The plugs nearest the firewall necessitated fitting the socket to the plug first, and then connecting the ratchet.

Use compressed air to blow any residual debris from each plug recess. Remove the old plugs.
Prepare your new plugs for installation by first verifying their gap. Specification is 1.0 mm/.039 inch. While some may argue with the anti-seize step, I’ve used it successfully for three decades. The rationale is merely to lubricate the respective threads. Because the steel plug is threading into aluminum, it’s obvious which is the stronger of the two. No reason to turn a pleasant plug swap into a Heli-coil repair job.
Rub a very modest portion into the threads. Keep it well away from the firing tip so as not to cause misfires. The washer area of the plug should remain uncoated as well, so that it can properly conduct away its heat, thereby helping to avoid pre-ignition.


Nevermind about the 'nail!
Place a dollop of dielectric grease on the tip to improve conductivity, and help inhibit corrosion.

Thread the new plugs initially by hand to avoid any chance of cross-threading. Because you’ll be compressing a new washer, just get them fully seated on the first attempt. Torque them to 15-22 ft.lbs./20-30 Nm. It will require ~Ľ to ˝ additional turn to yield the proper reading.

I like to get them snug, then go back to gently sneak up on the correct torque. Go around on all twelve again to establish their final torque and verify your work.
Last edited by splinter; 11-05-2007 at 01:07 PM. Reason: repair link

The following users liked this post:
pda1971 (06-09-2018)
11-04-2007, 11:23 PM
#2
MBWorld Fanatic!

Excellent write up. These pliers make the plug boot removal easier/less traumatic. Getting the boots off the old and on the new plugs solidly was the hardest part for me.
https://mbworld.org/forums/c-class-w203/216797-help-request-spark-plug-replacement.html
https://mbworld.org/forums/c-class-w203/216797-help-request-spark-plug-replacement.html
Last edited by mleskovar; 11-04-2007 at 11:28 PM.
11-05-2007, 02:06 AM
#4
Super Moderator

awesome DIY John! thanks man! 
having you, Ed, John and Jose around really make me feel good about keeping my car past warranty!
BTW, this is going on the DIY sticky.
having you, Ed, John and Jose around really make me feel good about keeping my car past warranty!
BTW, this is going on the DIY sticky.
Trending Topics
11-05-2007, 11:46 PM
#8
MBWorld Fanatic!
I"m glad I don't have 12 plugs....
Well it'd be ok if it was C32
Well it'd be ok if it was C32
11-19-2007, 01:57 PM
#10
Super Member
Join Date: Mar 2006
Location: Northeast
Posts: 545
Likes: 0
Received 0 Likes
on
0 Posts
e300d
I've got to deal with this job soon. SNAP ON offers this tool:
http://buy1.snapon.com/catalog/item....re&dir=catalog
http://buy1.snapon.com/catalog/item....re&dir=catalog
11-19-2007, 02:00 PM
#11
Super Member
Join Date: Mar 2006
Location: Northeast
Posts: 545
Likes: 0
Received 0 Likes
on
0 Posts
e300d
Can anyone offer insight on where to buy one of the OE (Bosch or Beru) plugs? They're not exactly easy to find and appear to be quite expensive when compared to the traditional $1 spark plug.
Thanks.
Thanks.
11-19-2007, 02:04 PM
#12
Newbie

Join Date: Jul 2007
Location: Glencoe, Illinois
Posts: 16
Likes: 0
Received 0 Likes
on
0 Posts
2002 C320 Sedan
Changed the plugs just yesterday....took 2 hours start to finish with the MB spark plug socket. I purchased plugs from www.autohausaz.com. They were $5.43 each.
Thanks for the great write up.
Gary
Thanks for the great write up.
Gary
11-19-2007, 03:01 PM
#13
MBWorld Fanatic!
I've got to deal with this job soon. SNAP ON offers this tool:
http://buy1.snapon.com/catalog/item....re&dir=catalog
http://buy1.snapon.com/catalog/item....re&dir=catalog
11-19-2007, 03:22 PM
#14
Super Member
Join Date: Mar 2006
Location: Northeast
Posts: 545
Likes: 0
Received 0 Likes
on
0 Posts
e300d
Description:
Vinyl coated offset jaw tips will pull most domestic and import spark plug boots, including the back plugs on new-model Porsche and Mercedes Benz. Vinyl covered handles are cushioned for comfort.
Vinyl coated offset jaw tips will pull most domestic and import spark plug boots, including the back plugs on new-model Porsche and Mercedes Benz. Vinyl covered handles are cushioned for comfort.
it's specfically designed for the job. I can't comment directly, but others have used it.
11-19-2007, 03:23 PM
#15
Super Member
Join Date: Mar 2006
Location: Northeast
Posts: 545
Likes: 0
Received 0 Likes
on
0 Posts
e300d
Changed the plugs just yesterday....took 2 hours start to finish with the MB spark plug socket. I purchased plugs from www.autohausaz.com. They were $5.43 each.
Thanks for the great write up.
Gary
Thanks for the great write up.
Gary
Thanks.
11-19-2007, 04:26 PM
#16
MBWorld Fanatic!
http://ww2.harborfreight.com/cpi/cta...emnumber=37909
they are also long and provide excellent reach and leverage. I used this plier type and it worked very well.
Last edited by mleskovar; 11-19-2007 at 08:37 PM.
11-19-2007, 08:19 PM
#17
Newbie
Join Date: Jul 2007
Location: Glencoe, Illinois
Posts: 16
Likes: 0
Received 0 Likes
on
0 Posts
2002 C320 Sedan
Used Bosch plugs #4418. They have 4 electrodes each. I understand the original plugs are no longer made and these are replacements. Car runs just fine....have over 100 miles on the plugs since yesterday.
Gary
Gary
11-19-2007, 08:47 PM
#18
MBWorld Fanatic!
The standard plugs are still available at about $5.25. I saw no wear on mine after 100K miles, great color. They have the needle/small electrode. The four electrode plug is a gimmick IMHO, or someone please explain the advantage.
Last edited by mleskovar; 11-19-2007 at 08:51 PM.
11-24-2007, 08:11 AM
#20
Super Member
Join Date: Mar 2006
Location: Northeast
Posts: 545
Likes: 0
Received 0 Likes
on
0 Posts
e300d
The original plugs (listed in OM) are still available and that's what's going back in our car since they've provided 100k miles of fault-free motoring.
These guys have the BERU plug:
http://www.kingsborne.com/
These guys have the BERU plug:
http://www.kingsborne.com/
11-24-2007, 08:21 AM
#21
Super Member
Join Date: Mar 2006
Location: Northeast
Posts: 545
Likes: 0
Received 0 Likes
on
0 Posts
e300d
This guy bought the Snap On tool and suggests it worked for him:
https://mbworld.org/forums/e-class-w210/81360-successful-spark-plug-change-98-e320.html
Perhaps the E Class car, which is what I'll be working on, has more clearance than the C Class permitting use of the tool. I guess I'd like to end up with whatever tools make the job easiest and don't result in any damage.
Thx.
11-24-2007, 10:55 AM
#22
MBWorld Fanatic!
[QUOTE=uberwgn;2518505]This guy bought the Snap On tool and suggests it worked for him:QUOTE]
I definitely won't argue with success....but I don't see how it worked easily. When you actually do the job you'll see what I mean. You'll notice that he also ended up using long handled needle nose pliers to make it work. And I agree with him, removing the boots is the hardest part. It's the same engine in the E so clearance between the boot and valve cover is the same. Trust me, the hose pliers from harbor freight make the job easier. Please let us know how it goes.
I definitely won't argue with success....but I don't see how it worked easily. When you actually do the job you'll see what I mean. You'll notice that he also ended up using long handled needle nose pliers to make it work. And I agree with him, removing the boots is the hardest part. It's the same engine in the E so clearance between the boot and valve cover is the same. Trust me, the hose pliers from harbor freight make the job easier. Please let us know how it goes.
11-24-2007, 11:07 AM
#23
Super Member
Join Date: Mar 2006
Location: Northeast
Posts: 545
Likes: 0
Received 0 Likes
on
0 Posts
e300d
m, thanks for your comments. I don't want to invest in a bunch of tools I'll never use again..that's my main concern prior to ordering stuff. If you feel getting those curved jaw pliers is the best option, that works for me. I'm sure I can hit Sears tool store and get those pliers. Would a large version be better than small or vice versa?
Thx.
Thx.
11-24-2007, 12:35 PM
#24
MBWorld Fanatic!
I agree. The first set of "made for Mercedes" boot pullers I bought wouldn't fit around the boot and I never used them. Somebody on this forum recommended these pliers and they worked very well. The tip is about 1/2" ID and serrated on the inside for grip. You want them long so you can use the valve cover as a pivot point for leverage and it's easier to reach the back boots. They're made by Pittsburgh and you can order them on line from Harbor Freight Tools.


