
Steering Wheel Controls

 02-15-2008, 04:08 PM
#1

Steering Wheel Controls
I am making this thread because I tried searching about my steering wheel controls not working, and I didn't find much, Basically the controls on the left side of my steering wheel slowly began "not working", I read about other people having the same issue but the only "fix" was to call the dealership find out it costs alot to get fixed and that was about it.
Basically I found a thread that explained to me how to get that Steeringwheel torn apart enough that I could do some investigating, I'll write up a "how-to" in this thread when I get home where I have pictures.
Big key, the connector attached to the PCB (printed circuit board) had broken away from the solder, with no solid connection in place the button malfunctioned altogether.
If you are having problems with this in your car I think this is one place to check, I just soldered mine back in and it works like a charm.
Tools needed:
1. A brain.
2. Torx T30, one that will fit between your dash and the steeringwheel and can reach in and unscrew the unit that holds the airbag to the steeringwheel.
3. Torx T06 (let me double check on that when I get home) to take the control unit apart to get at the connector.
4. Soldering Iron with a fine point and some solder.
More to come...

The following users liked this post:
Sanjay Gordhan (08-07-2017)

 +1 bump it up. good potential for being great DIY thread!
 02-18-2008, 08:44 PM
#4
Super Member
Join Date: Aug 2006
Location: Vancouver, BC
Posts: 574
Likes: 0
Received 1 Like
on
1 Post
2005 Mercedes C230 Sport Sedan (W203)
Its nice to see more contribution to the forum. Pics would be great. You should change the title of your post to "Possible Solution to Malfunctioning Steering Wheel Buttons" or something along those lines, so that its easier to find it when people are using the search.
04-01-2008, 12:58 AM
#5
* NOTE: I disconnected my battery just to be safe, I recommend the same for anyone else doing this "mod"
1. Remove the airbag unit. Follow the directions located here:
https://mbworld.org/forums/c-class-w203/139782-w203-steering-wheel-swap-how.html
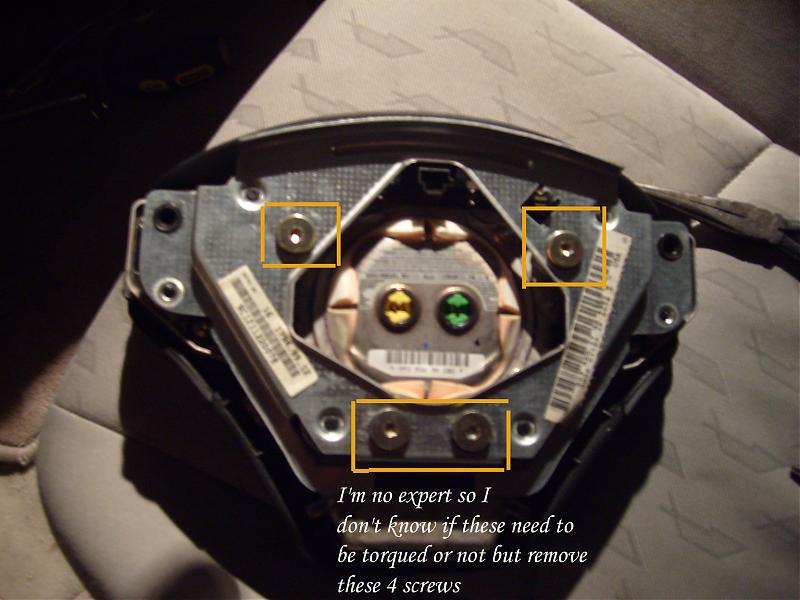
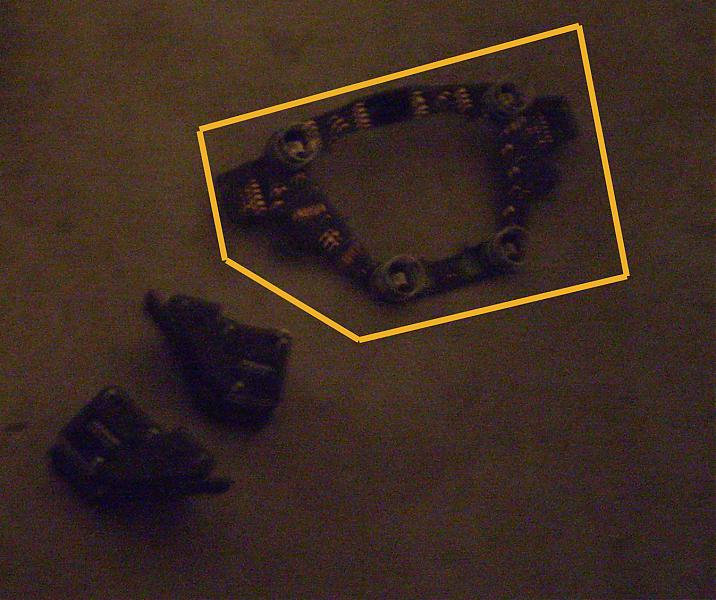
2. Once you have the Airbag/Steering wheel controls unit separated, place the unit facedown on a soft rag (dont want scuffs of course)!
remove the 4 screws (see attached)
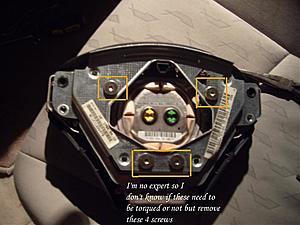
3. Between the metal plate in step 2 and the rest of the unit is this piece, remember how you took it out, here it is:

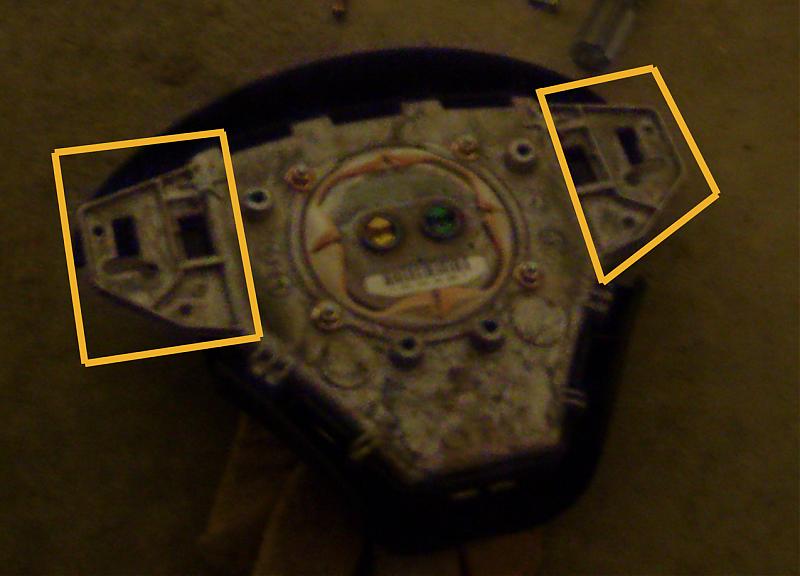
4. Next remove the appropriate steering wheel control from the unit see they are attached by a couple screws in the locations highlighted.
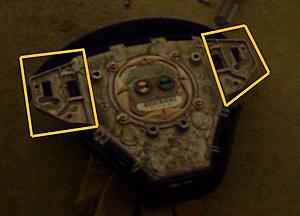
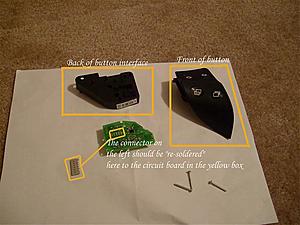
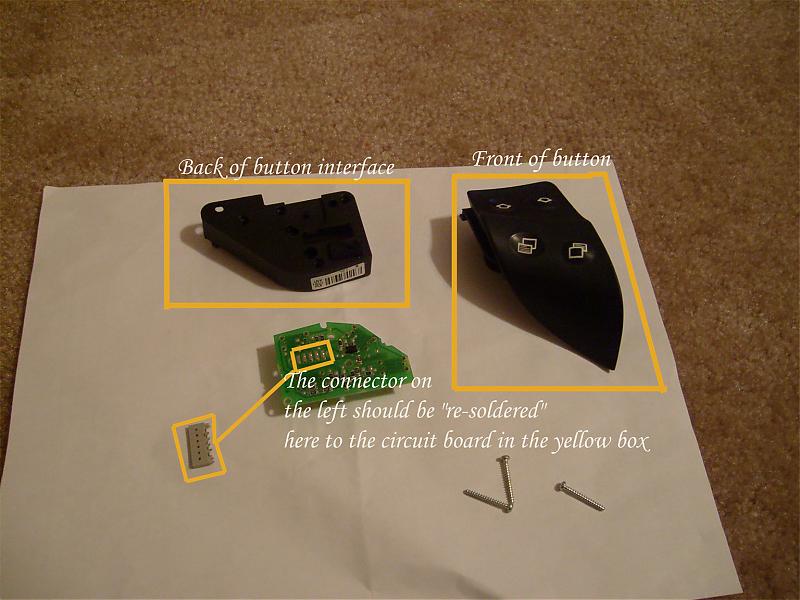
5. The rest of things are detailed in the next picture, but the long and short of it is this,
a. remove the screws holding the unit together
b. pull the circuit board out
c. if you can't tell if it is connected good or not, if you can wiggle it that's
not a good sign
d. I decided to hold the connector on (after I accidentally finished it off)
then heat up the solder on each end and let it cool so it stays on it's
own make sure you do a good job soldering it in, I'm not teaching
soldering in this tutorial. Plus you don't want to have to take it apart
and do it all again.
6. Once it's all finished and you've ohm checked it (checked for continuity a.k.a. no shorts, opens etc) put everything back together in the reverse order you took it apart.
7. Good luck and have fun,
If anyone needs more details or better explanations please let me know, this is really one of the first tutorials i have written and hope it's understandable.
Thank you to Bif Powell for the info on how to get the stuff apart.
*Note sorry at least one pic is not very clear, I had poor lighting.
1. Remove the airbag unit. Follow the directions located here:
https://mbworld.org/forums/c-class-w203/139782-w203-steering-wheel-swap-how.html
2. Once you have the Airbag/Steering wheel controls unit separated, place the unit facedown on a soft rag (dont want scuffs of course)!
remove the 4 screws (see attached)
3. Between the metal plate in step 2 and the rest of the unit is this piece, remember how you took it out, here it is:
4. Next remove the appropriate steering wheel control from the unit see they are attached by a couple screws in the locations highlighted.
5. The rest of things are detailed in the next picture, but the long and short of it is this,
a. remove the screws holding the unit together
b. pull the circuit board out
c. if you can't tell if it is connected good or not, if you can wiggle it that's
not a good sign
d. I decided to hold the connector on (after I accidentally finished it off)
then heat up the solder on each end and let it cool so it stays on it's
own make sure you do a good job soldering it in, I'm not teaching
soldering in this tutorial. Plus you don't want to have to take it apart
and do it all again.
6. Once it's all finished and you've ohm checked it (checked for continuity a.k.a. no shorts, opens etc) put everything back together in the reverse order you took it apart.
7. Good luck and have fun,
If anyone needs more details or better explanations please let me know, this is really one of the first tutorials i have written and hope it's understandable.
Thank you to Bif Powell for the info on how to get the stuff apart.
*Note sorry at least one pic is not very clear, I had poor lighting.
The following users liked this post:
Neddye (07-01-2021)
04-01-2008, 01:01 AM
#6
If any mod's think this is something worthwhile to make a sticky go for it, if they need more clarity or updates before doing so let me know,
Sorry it took so long.
Thank you
Tyson
Sorry it took so long.
Thank you
Tyson

Trending Topics
04-01-2008, 12:56 PM
#8
Super Moderator Alumni
Join Date: Mar 2004
Location: West Los Angeles
Posts: 7,684
Likes: 0
Received 10 Likes
on
5 Posts
Midnight Blue 2004.5 C230 Kompressor Sport Sedan. 2002 w210 E320, 2009 w211 E350 Sport
Excellent DIY. I'm gonna add this, but put a stipulation that it's not recommended for those that aren't handy.
 04-09-2008, 11:06 PM
#10
Senior Member

Thank you sooooo much godsquad. My left side just went out one day... many... many days ago. Didn't want to spend the $250.00 for the part. Directions were very simple.
Performed in under an hour, its back in car and working!

Performed in under an hour, its back in car and working!
 05-08-2008, 03:20 PM
#12
I think that "cheapness" is the necessity of some inventions, I simply was too cheap to spend $250 on something, I worked on 20million dollar Flight Simulators and thought, "well heck I know how electronics work, I'm sure its just a simple connection or something"
Turns out I was right. Thankfully,
If I come up with anything else I'll definitely post it.
Onaclov (my other name... )
)
Turns out I was right. Thankfully,
If I come up with anything else I'll definitely post it.
Onaclov (my other name...
)
 08-07-2010, 12:41 AM
#14
Newbie

Join Date: Jul 2010
Posts: 5
Likes: 0
Received 0 Likes
on
0 Posts
2002 C230
Gentlemen.... I think I finally found my peace.! I just bought my first Benz (2002 C230). I Truly appreciate the time put into these DIYs. The car is in excellent condition but it has a few electrical glitches that as godsquad said, " I know electronics.." so I wanna do it myself. I've been looking cluelessly for the past 3 weeks for a good service manual and I ended up buying a $180 dollar CD from star that I found terrible, so I'm returning it. Thank to these efforts, I've found 2 of my repairs/ modifications on here so far with step by step instructions and pictures. I might have a few questions in the near future but I just wanted to say thanks as I'm excited about doing this work correctly.!
04-24-2011, 08:57 PM
#15
Newbie

Join Date: Apr 2011
Posts: 2
Likes: 0
Received 0 Likes
on
0 Posts
This is an old post, but just recently experienced this with my car, where mashing/almost punching the buttons was the only way to get any results. I did this quick fix and am happy to say that my buttons are working like new. The only problem is that now I have a ESP error on the console, which wasn't present before. What could this be from, and is there a fix?
Thanks!
Thanks!
04-25-2011, 07:11 AM
#16
Senior Member
I don't think there is any way the buttons on your wheel chould have caused that. What happens if you turn ESP on/off using the button on your dash? Is it only the ESP or is there also an ABS error? ESP could be caused by a number of things.
04-25-2011, 10:10 PM
#17
Newbie
Join Date: Apr 2011
Posts: 2
Likes: 0
Received 0 Likes
on
0 Posts
I guess it was just a fluke, because when I put it in gear and began to drive, it immediately went away.
Thanks for this amazing fix!
Edit: I have very little soldering experience or electrical expertise, but this fix was SIMPLE!
Thanks for this amazing fix!
Edit: I have very little soldering experience or electrical expertise, but this fix was SIMPLE!
Last edited by UnoDosTrey; 04-25-2011 at 10:14 PM.
04-25-2011, 10:54 PM
#18
MBWorld Fanatic!

Join Date: Jan 2005
Location: Orange County
Posts: 2,848
Likes: 0
Received 15 Likes
on
15 Posts
2005 C Wagon (No snickering please!)
Sometimes the assembly with the stalks becomes loose and rotates slightly causing errors. Simply tighten it so it does not move.
06-07-2011, 12:49 PM
#19
Newbie

Join Date: May 2011
Posts: 1
Likes: 0
Received 0 Likes
on
0 Posts
c200 cdi coupe
Thanks: Worked for me
Thanks once more.
Excellent post.
Merc recommends insulating battery negative so no accidental contact and 15 mins wait for any capacitance in circuit to discharge, so i completely removed negative battery cable and waited 15 mins before starting repair.
Have just used the above method but without removing the sprung backing plate.
Instead totally removed screw boxed in yellow first (image below) and then used a 4.0 mm ballpoint torx (or in my case hex, think torx may be better) wrench to remove screw boxed in red.
Suggest using needle (or snipe) nosed pliers if screw boxed in red does'nt start easily.
Hope you dont mind me using your image (godsquad c230)
screw_removal.jpg
Last edited by saddlejib; 06-07-2011 at 08:37 PM.
 10-03-2013, 07:40 PM
#21
MBWorld Fanatic!
Well, just discovered I have the same problem.
Off to Harbor freight for a T6 bit, and a new soldering iron.
Off to Harbor freight for a T6 bit, and a new soldering iron.
10-04-2013, 01:09 AM
#22
MBWorld Fanatic!
Success!!!!!
It also resolved the issue of the horn switch issue. My horn would only honk it pushed from the top or bottom but not the right side, same side as the broken switch. That was actually the scary thing, you go to hit the horn in an emergency situation, and nada.
Really easy fix, you just need a long T30, which you can buy as a seperate bit but this style works. Also got a set of tool with a T6 bit from Harbor Freight for $5, a soldering iron for 3 and a pair pliers for 2. Anyway, it's working now, and I'll be able to set the correct time, and reset the service indicator. I'm happy.
09-23-2014, 11:19 PM
#25
Junior Member

Join Date: Sep 2014
Location: Hobart Tasmania Australia 7008
Posts: 16
Likes: 0
Received 0 Likes
on
0 Posts
2002 CL203 C200 Kompressor
Same Airbag, Different Controls
This is a great write up, and I just found the answer to a question posted elsewhere on this forum!
So, I now know that you can remove the controls, I am replacing a deployed airbag out of a 10/2002 CL203 C180 into my 05/2002 CL203 C200. The C200 had a cassette deck and CD changer, hence had an extra wire, so the connector is different on both airbags.
Since the donor airbag is from the same car, same year, although a C180, can I assume that the fourth wire in the original car was for the CD changer? BUT, now I can just change over the steering wheel controls and use the donor airbag unit.
Am I correct? This does NOT affect the AIRBAG functionality, and when the controls are switched over, it should just click back into the original squibb on the repairer car?
BTW does anyone know the torque settings for the horn bolts holding the steel frame to the rear of the airbag unit?
Regards,
James


