
W203: Removing Rear Deck
 02-26-2009 | 07:08 AM
#1
Thread Starter
Member
Joined: Sep 2008
Posts: 91
Likes: 0
From: Sacramento/Orange County/Inland Empire
2006 Mercedes-Benz C230
W203: Removing Rear Deck
I've done a quick search for this, but:
Does anyone have a guide to removing the rear deck on the w203? (behind the back seats enclosing the sunshade) Rather, does anyone know how to remove the subwoofer?
I think I've read somewhere that we need to remove the seats, pillar, deck...
Does anyone have a guide to removing the rear deck on the w203? (behind the back seats enclosing the sunshade) Rather, does anyone know how to remove the subwoofer?
I think I've read somewhere that we need to remove the seats, pillar, deck...

 when the bass hits.
02-26-2009 | 11:37 AM
when the bass hits.
02-26-2009 | 11:37 AM
#3

Member
Joined: May 2007
Posts: 93
Likes: 3
From: Chicago
08 E350 4MATIC
Flip the rear seat bases up and fold the backs foward (can't help if your car
doesn't have this option but remember seeing instructions somewhere here...)
The rear side seat bolsters just pop out of their clips.
Carefully use a precision flat blade screwdriver or thin plastic wedge to pull outthe SRS covers in the C pillar to reveal a bolt.
Remove the bolts in the C pillar.
Carefully pull the C pillar trim out of the clips, paying close attention to the
wiring and other items behind. Lay them on the seat backs.
From inside the trunk, remove 2 oval covers from the front wall of the trunk
and disengage the plastic connection behind them. Right under each red
pop-up indicator that the fold down seat backs have been released.
Again if your car doesn't have fold down rear seats, this may be slightly different...
There are several nuts that also have to be removed from inside the trunk
to free up the sunshade. I also remember several 2-piece plastic compression
pins holding the vertical lip of the rear deck (behind the seat backs).
This should completely release the rear deck - be gentle while removing it.
The subwoofer (if it can be called that, don't want to know what I really
think of BOSE) is under it on the driver's side. I seem to remember a tab
that had to be released from the trunk side to get it out.
I don't know your skill levels, however I removed this panel in mine several times with no major difficulty. Unfortunately I can't find a source for just
the sunshade motor box... everybody wants to sell the whole unit.
At least my SA chuckled somewhat when I asked if I had to buy a complete
door if one of my DCMs ever failed...
Hope this can help ya.
Trending Topics
02-26-2009 | 05:06 PM
#8
Member
Joined: Mar 2008
Posts: 219
Likes: 1
From: Kansas City, MO
'05 C230K SS
I, unfortunately, do not. It still amazes me that rear fold-down seats are (or were at the time...2005 for my car) not a standard option on every Mercedes...considering they are basically standard equipment on cars like Hyundai's, Mazda's, etc.
02-27-2009 | 06:34 AM
#9
Member
Joined: Feb 2009
Posts: 102
Likes: 0
From: Ireland, co. louth
c200k
Well everyone,
I had the same problem with the sub rattling, I just lifted the speaker grille and I got a strip of foam and built it up until it was thick enough to be in contact with the sub and the grille worked perfect no rattles at all so I'm a happy camper now
I had the same problem with the sub rattling, I just lifted the speaker grille and I got a strip of foam and built it up until it was thick enough to be in contact with the sub and the grille worked perfect no rattles at all so I'm a happy camper now
03-16-2009 | 09:59 PM
#10

Member
Joined: May 2008
Posts: 125
Likes: 1
From: Chicago
2007 GL450 2005 C55 2002 C32 sold 2001 ML320 sold
I just yanked the rear shelf using the instructions from DarthBudice, and it worked very well. I have destroyed both rear seat side bolster clips though as i could not figure out how to remove them without breaking them. If anyone knows if 2039230025 is the correct part number for this, please let me know. The issue i have is that one of the arms that support the sunshade had broken at the hinged part. I am only guessing, but when i go to the dealer tomorrow he is going to tell me to get a whole new sunshade assembly rather than just the hinge piece!
Thanks for the great instructions - i have been holding off trying to fix this for 18 months since my son broke it.
Thanks for the great instructions - i have been holding off trying to fix this for 18 months since my son broke it.

 06-07-2011 | 07:57 PM
#14
Super Moderator

Joined: Jun 2008
Posts: 19,942
Likes: 183
From: Llandudno, Cape Town, South Africa
late 2009 CLK 350 Coupe Elegance, '65 Jaguar S Type wires
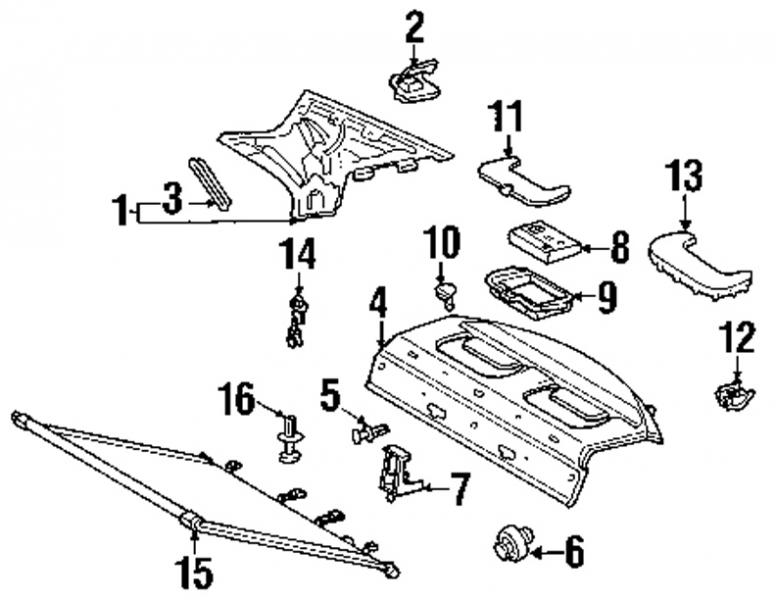
10 A 203 690 20 49 PANELING
HAT TRAY [113], [042], [043], [045], [951]
001
10 A 203 690 41 49 PANELING
HAT TRAY [114], [115], [116], [117], [118]
001
10 A 203 690 12 49 PANELING
HAT TRAY [113], [042], [043], [045], [951]
Code: 287
001
10 A 203 690 42 49 PANELING
HAT TRAY [114], [115], [116], [117], [118]
Code: 287
001
10 A 203 690 39 49 PANELING
HAT TRAY [113], [042], [043], [045], [951]
Code: 287+540
001
10 A 203 690 47 49 PANELING
HAT TRAY [114], [115], [116], [117], [118]
Code: 287+540
001
10 A 203 690 40 49 PANELING
HAT TRAY [113], [042], [043], [045], [951]
Code: 540
001
10 A 203 690 44 49 PANELING
HAT TRAY [114], [115], [116], [117], [118]
Code: 540
001
10 A 203 690 43 49 PANELING
HAT TRAY
Replaced_By: A 203 690 41 49
+001 A 210 817 08 20 [115], [116], [117], [951]
Code: 810
001
10 A 203 690 41 49 PANELING
HAT TRAY [115], [116], [117], [002], [003]
10 A 203 690 45 49 PANELING
HAT TRAY
Replaced_By: A 203 690 42 49
+001 A 210 817 08 20 [951]
Code: 287+810
001
10 A 203 690 42 49 PANELING
HAT TRAY [002], [003], [010], [951]
Code: 287+810
001
30 A 203 690 05 30 .COVER
LOUDSPEAKER [113], [042], [043], [045], [952]
001
30 A 203 690 23 30 .COVER
LOUDSPEAKER [114], [115], [116], [117], [952]
001
10 A 203 690 46 49 PANELING
HAT TRAY
Replaced_By: A 203 690 44 49
+001 A 210 817 08 20 [951]
Code: 540+810
001
10 A 203 690 44 49 PANELING
HAT TRAY [002], [003], [010], [951]
Code: 540+810
001
40 A 203 690 02 27 .COVER
FIRST AID BAG [113], [042], [043], [045], [952]
001
45 A 203 840 00 74 .SHELL
FIRST AID BAG [113], [042], [043], [045]
001
10 A 203 690 48 49 PANELING
HAT TRAY
Replaced_By: A 203 690 47 49
+001 A 210 817 08 20 [951]
Code: 287+540+810
001
10 A 203 690 47 49 PANELING
HAT TRAY [002], [003], [010], [951]
Code: 287+540+810
001
50 A 203 690 00 60 .CATCH
FIRST AID BAG [113], [042], [043], [045], [952]
001
110 A 124 990 05 92 .RIVET
BLIND MOUNTING TO PARCEL SHELF [953]
Code: 540
002
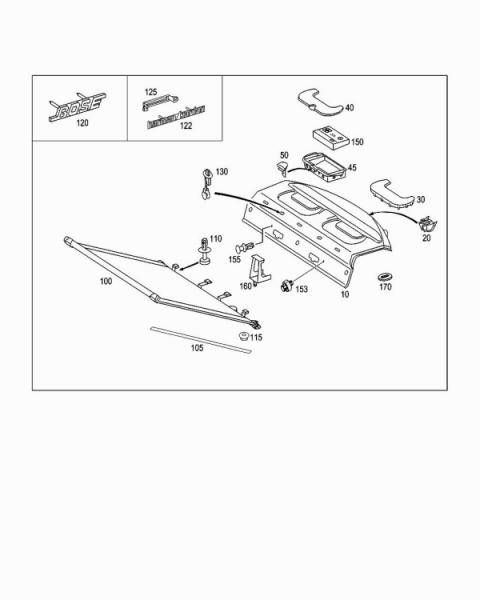
130 A 203 690 00 19 INDICATOR
REAR BACKREST RELEASE [954]
Code: 287
002
170 A 203 694 00 94 ESCUTCHEON
AT HAT TRAY [409], [955]
Code: 494/625
003
20 A 210 988 17 78 .CLIP
PANELLING TO REAR PANEL 001
100 A 203 810 04 20 .ROLLER BLIND
REAR WINDOW Code: 540
001
105 A 203 983 00 10 ..STRIP
ROLLER BLIND REAR WINDOW PANE Code: 540
001
115 N 910112 2006003 .NUT
BLIND MOUNTING TO PARCEL SHELF
M6 Code: 540
004
120 A 210 817 08 20 .GUIDE SIGN
BOSE [002], [003], [010]
Code: 810
001
122 A 211 817 52 20 .PLATE
HARMAN/KARDON [004], [005], [011]
Code: 810
001
125 A 012 988 55 78 .CLIP
HARMAN/KARDON SIGN FASTENING [004], [005], [011]
Code: 810
001
150 A 203 860 00 50 FIRST AID BOX
SANITARY EQUIPMENT
Replaced_By: A 169 860 01 50 001
150 A 169 860 01 50 FIRST AID BOX
SANITARY EQUIPMENT 001
153 A 203 987 00 39 RUBBER BUFFER
TO COVERING 002
100 A 203 810 03 20 .ROLLER BLIND
REAR WINDOW
Replaced_By: A 203 810 04 20 Code: 540
001
155 A 123 990 00 92 RIVET
LINING FASTENING TO REAR WALL 002
160 A 203 694 00 38 STAY
UNTER HAT TRAY Code: -540
001
11-29-2011 | 01:55 PM
#15

Member
Joined: May 2011
Posts: 208
Likes: 1
From: Newport Beach, CA
E55 AMG, Porsche 911 SC
bumping this up because I'm trying to fix a rattle in the rear deck.
i can't remove the clip that everyone is breaking no matter what technique i use. where can i get spare clips? it does not seem like the part is available anywhere online like it was in 2009.
i can't remove the clip that everyone is breaking no matter what technique i use. where can i get spare clips? it does not seem like the part is available anywhere online like it was in 2009.
05-21-2012 | 04:23 AM
#17

Newbie
Joined: Aug 2011
Posts: 8
Likes: 1
2003 c180 Kompressor Sport
just a small screw driver and the grilles just pop out?
I want to stuff something in there to control the rattle a bit...
 03-21-2013 | 08:06 PM
#20
Super Member
Joined: Mar 2012
Posts: 960
Likes: 57
From: San Francisco, CA
2005 c230SS
Does anyone have pics of the fasteners that are holding the hat tray onto the rear deck?
I have the non-folding rear seat:
Thanks. John
I have the non-folding rear seat:
- I removed the seat back, which revealed two "bumper" fasteners behind where the upper seat back rests against the deck.
- I removed the two bumper fasteners.
- From inside the trunk I removed the nuts holding the sunshade to the deck.
- I removed the two grilles and child safety bracket covers and oval trim pieces from on top of the hat tray.
- But after that I could not lift up the front of the hat tray enough to get it over the child safety brackets to slide forward.
Thanks. John
05-31-2013 | 12:35 AM
#21
Newbie
Joined: May 2013
Posts: 3
Likes: 0
2004 c230
how do I remove the back speaker for w203? I need help. Im installing a sub in my car and I need to know how to get the back to open?? Imma get a rca converter but to do that I need to get to the back speaker. Anyone Piz help. sorry for bad english
Imma get a rca converter but to do that I need to get to the back speaker. Anyone Piz help. sorry for bad english
05-31-2013 | 12:36 AM
#22
Newbie
Joined: May 2013
Posts: 3
Likes: 0
2004 c230
how do I remove the back speaker for w203? I need help. Im installing a sub in my car and I need to know how to get the back to open?? Imma get a rca converter but to do that I need to get to the back speaker. Anyone Piz help. sorry for bad english.. W203 2004
Imma get a rca converter but to do that I need to get to the back speaker. Anyone Piz help. sorry for bad english.. W203 2004
05-31-2013 | 08:50 AM
#23
Super Moderator
Joined: Jun 2008
Posts: 19,942
Likes: 183
From: Llandudno, Cape Town, South Africa
late 2009 CLK 350 Coupe Elegance, '65 Jaguar S Type wires
09-19-2013 | 04:46 PM
#24
Junior Member
Joined: Sep 2013
Posts: 15
Likes: 0
2006 C230 SS
Long-time lurker; new member.
First, I want to thank you guys for the great tips and detailed instructions. You've saved me hundreds of dollars in maintenance/repair/upgrade labor costs.
I've tried the Search function - to no avail.
Any instructions for removal of the rear deck WITHOUT folding seatback option?
And replacement parts for the tabs which are ever so likely to break or disappear?
It's a 2006 C230 Sport (sedan). Pretty sure that falls under W203.
Thanks!
09-19-2013 | 06:45 PM
#25
Super Member
Joined: Mar 2012
Posts: 960
Likes: 57
From: San Francisco, CA
2005 c230SS
I didn't fully remove the rear deck (because I didn't know to remove the C pillar panels at the time) but I did fully separate the back seat:
* remove the seat bottom by removing four screws in front, that are under plastic caps. The plastic caps are held on via squeeze-barbs ... I more-or-less broke the plastic when I removed mine. You might need to push up or down on these firmly to dislodge the barbs without breaking the plastic. Pull one off an take a good look at how it works to give you an idea on how to remove the others more carefully.
* once the seat bottom is out, remove the child safety tab bars under the bottom of the seat rear. Each bar has a bolt and a torx screw.
* then remove two bolts holding the bottom of the seat in. Confirm that the bottom of the seat back is now loose from the frame.
* To unfasten the top of the seat, go into the trunk and look for the large black oval plastic covers facing the seat back, they are up at the top. Remove these covers by prying out gently with a screwdriver or door panel pry tool, and you will see the latch mechanism.
* These are spring latches, and on some cars may come with a release cable and lever. If not (mine did not) then take a screwdriver and manually release the locking mechanism. It doesn't take much force, maybe 5 lbs? When you release these the top of the seat will pop out just a tad.
* then go back into the car and pull the top of the seat back away from the frame.
* I think the seat belts can just me moved out of the way.
* The last thing is to disconnect the pneumatic tube that operates the pop down the headrests ... there is a coupler towards the bottom of the seat back on the left side. I did not disconnect mine -- I left my seat propped up in the car. So I'm not 100% sure how to separate this coupler. It looks like simple barbs, but be careful as you probably don't want to break this part.
To put back:
- make sure the pneumatic coupler sits nicely in the cavity down on the bottom left corner of the seat back, and the cable is not pinched anywhere.
- pop the top of the seat back into those latches by setting it in place and then giving it a good firm whack with your fist over each latch area to close the latch. Before you do this check back inside from the trunk to make sure the latches are still open and didn't close when you were working on the car.
Last edited by jkowtko; 09-19-2013 at 06:50 PM.


