


Squeek/chirp sound from fan under glove box
Super Member
Joined: May 2006
Posts: 546
Likes: 10
From: Cumberland, RI U.S.A.
2005 C230WZ SS Capri Blue/Ash
Hey everyone,
So for quite some time, I've been having problems with my blower motor squeeking and chirping during the cold weather months. Started out only when slowing down or making a turn with the car, but lately since the weather's been getting cooler here in New England, it's been getting worse, to the point where a few days ago, the blower motor completely stopped working.
I did bring this issue up to my dealership when it was under warranty. Post #13 details what they did, which, as myself and some of you questioned, didn't really work to resolve the problem. The warmer months came, and the squeeking kind of went away, until now.
Being that the car is now out of warranty, I decided to take the whole thing apart and see if I could get some grease in the blower and hopefully get it quiet again.
As I always do, I like to document everything I do on my car, with pictures and notes. And being that this is a common problem on our cars, I wanted to post some pictures and my observations of what I did to attempt to fix my problem. Hopefully this can help a lot of people...
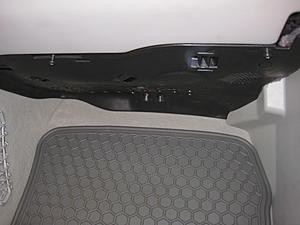
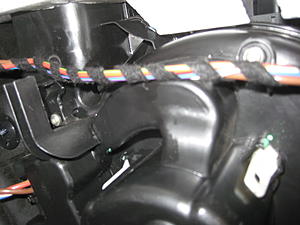
OK. First of is the underside plastic cover below the glove box on the passenger side of the car. This is held by 2 torx screws, which I have partially removed for ease of locating them. As a side note, when putting this back, a portion of the black plastic back edge actually goes behind the carpeting, something that took me forever to figure out when putting this back on:
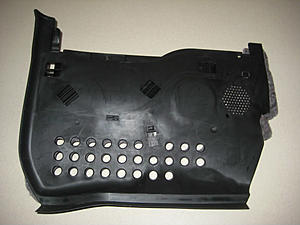
Outside view of the plastic covering removed:
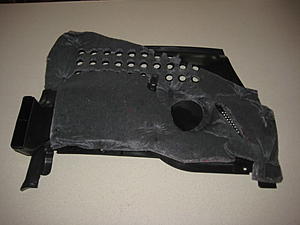
Inside of the plastic covering:
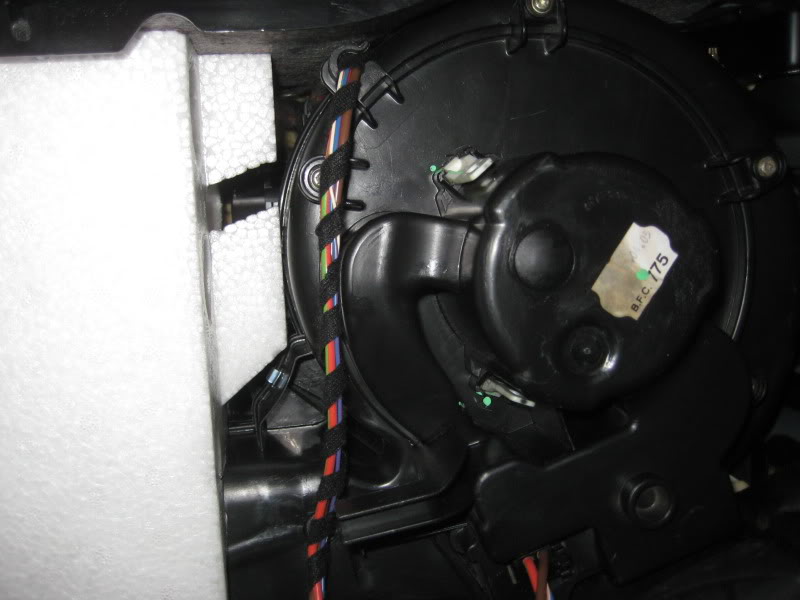
Looking up at the blower motor. The motor is held by 5 torx screws. Only 4 are visible here. The other one is behind the wiring towards the bottom of the picture:
The last screw that was hidden in the previous picture, behind that plastic L-shaped piece:
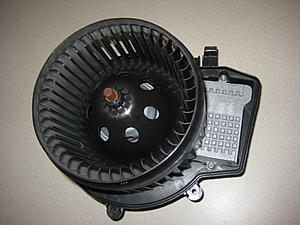
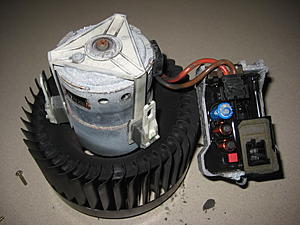
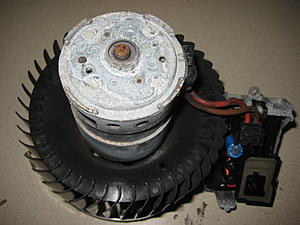
Blower motor removed:
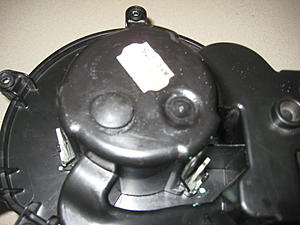
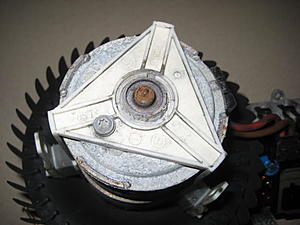
Underside of the blower motor. Note the little rubber cap:
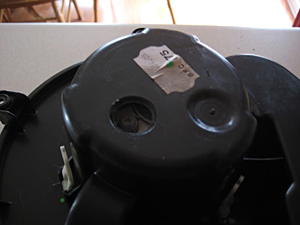
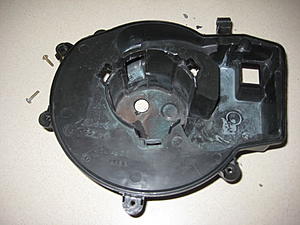
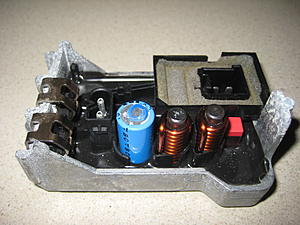
Rubber cap removed. Another torx screw inside. ALso note two of the three white plastic tabs shown. To remove this plastic housing, you have to squeeze these tabs towards the center. PIA. One of those deals where they're easy to snap in, but a pain to remove:
After I removed the rubber cap and flipped the motor right side up again, a bunch of thick grey grease fell out of the hole. You can see it on my counter as well as on the paper towel. I think this is what's used to lubricate the bearings:
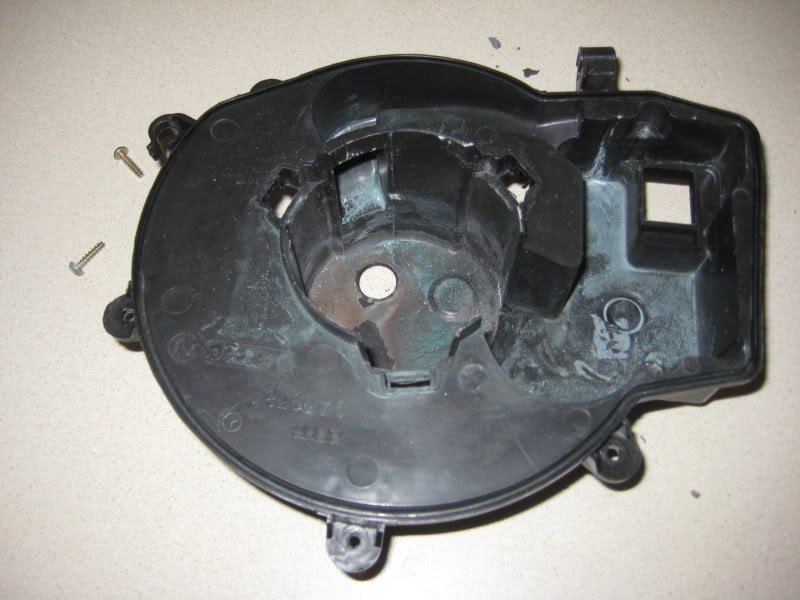
Plastic housing removed. Jabbed my finger with a small screwdriver pretty good trying to get this thing out:
Underside of blower motor with the blower regulator underside shown too:
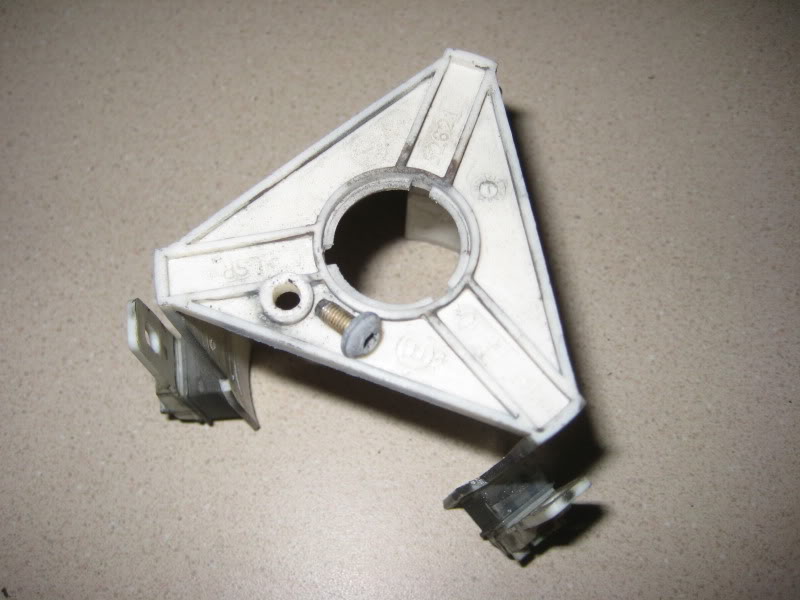
Here is the torx screw that was seen after removing the little rubber cap. This screw holds the white plastic triangular snaps that hold the bottom plastic housing to the blower motor:
White plastic snap/holder removed:

Blower motor underside with the white plastic holder removed:

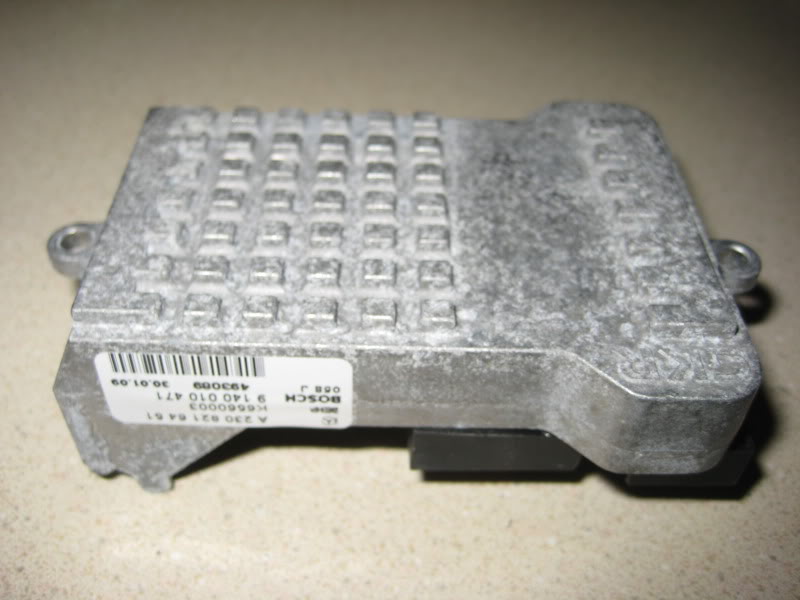
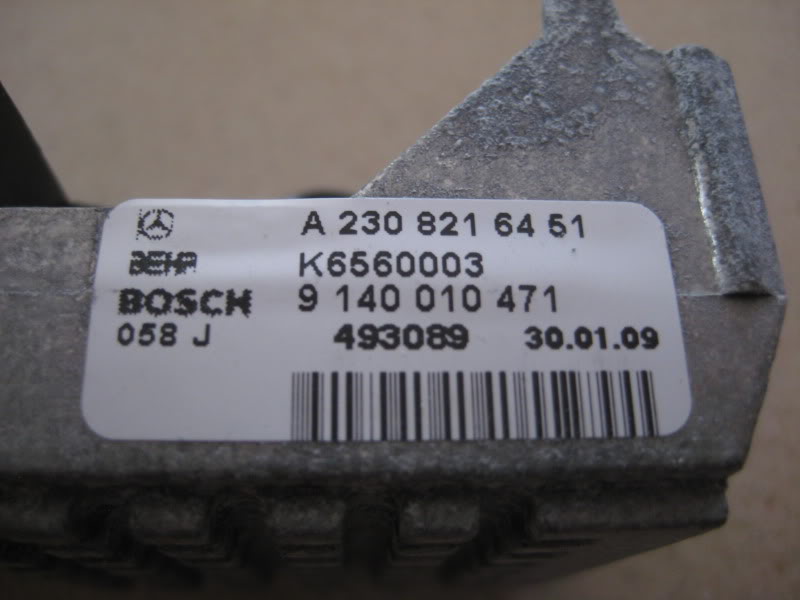
Blower motor regulator:
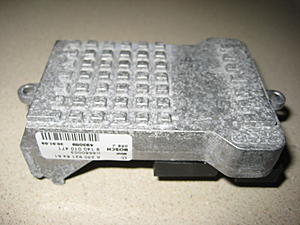
Underside of the blower motor regulator:
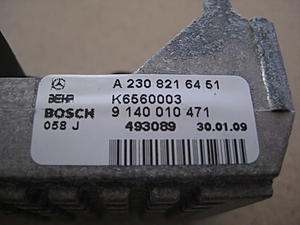
Note the part # and date stamp for this regulator. It was installed in back around February 2010 as noted in my post #13, about a year after manufacture:
Engraving on the side of the blower motor. It states:
Bosch
DPL 12V B2723
0 130 101 118
Made in Germany

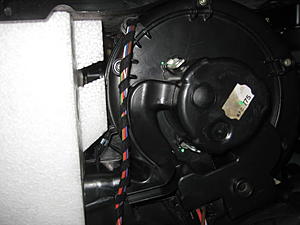
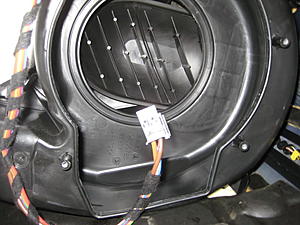
Looking up at the open area where the blower motor resides:
So for quite some time, I've been having problems with my blower motor squeeking and chirping during the cold weather months. Started out only when slowing down or making a turn with the car, but lately since the weather's been getting cooler here in New England, it's been getting worse, to the point where a few days ago, the blower motor completely stopped working.
I did bring this issue up to my dealership when it was under warranty. Post #13 details what they did, which, as myself and some of you questioned, didn't really work to resolve the problem. The warmer months came, and the squeeking kind of went away, until now.
Being that the car is now out of warranty, I decided to take the whole thing apart and see if I could get some grease in the blower and hopefully get it quiet again.
As I always do, I like to document everything I do on my car, with pictures and notes. And being that this is a common problem on our cars, I wanted to post some pictures and my observations of what I did to attempt to fix my problem. Hopefully this can help a lot of people...
OK. First of is the underside plastic cover below the glove box on the passenger side of the car. This is held by 2 torx screws, which I have partially removed for ease of locating them. As a side note, when putting this back, a portion of the black plastic back edge actually goes behind the carpeting, something that took me forever to figure out when putting this back on:

Outside view of the plastic covering removed:

Inside of the plastic covering:

Looking up at the blower motor. The motor is held by 5 torx screws. Only 4 are visible here. The other one is behind the wiring towards the bottom of the picture:
The last screw that was hidden in the previous picture, behind that plastic L-shaped piece:

Blower motor removed:

Underside of the blower motor. Note the little rubber cap:

Rubber cap removed. Another torx screw inside. ALso note two of the three white plastic tabs shown. To remove this plastic housing, you have to squeeze these tabs towards the center. PIA. One of those deals where they're easy to snap in, but a pain to remove:

After I removed the rubber cap and flipped the motor right side up again, a bunch of thick grey grease fell out of the hole. You can see it on my counter as well as on the paper towel. I think this is what's used to lubricate the bearings:

Plastic housing removed. Jabbed my finger with a small screwdriver pretty good trying to get this thing out:
Underside of blower motor with the blower regulator underside shown too:

Here is the torx screw that was seen after removing the little rubber cap. This screw holds the white plastic triangular snaps that hold the bottom plastic housing to the blower motor:

White plastic snap/holder removed:
Blower motor underside with the white plastic holder removed:

Blower motor regulator:
Underside of the blower motor regulator:

Note the part # and date stamp for this regulator. It was installed in back around February 2010 as noted in my post #13, about a year after manufacture:
Engraving on the side of the blower motor. It states:
Bosch
DPL 12V B2723
0 130 101 118
Made in Germany

Looking up at the open area where the blower motor resides:

Super Member
Joined: May 2006
Posts: 546
Likes: 10
From: Cumberland, RI U.S.A.
2005 C230WZ SS Capri Blue/Ash
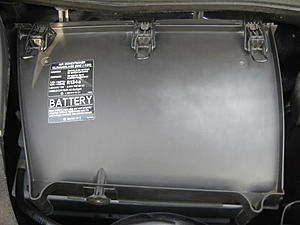
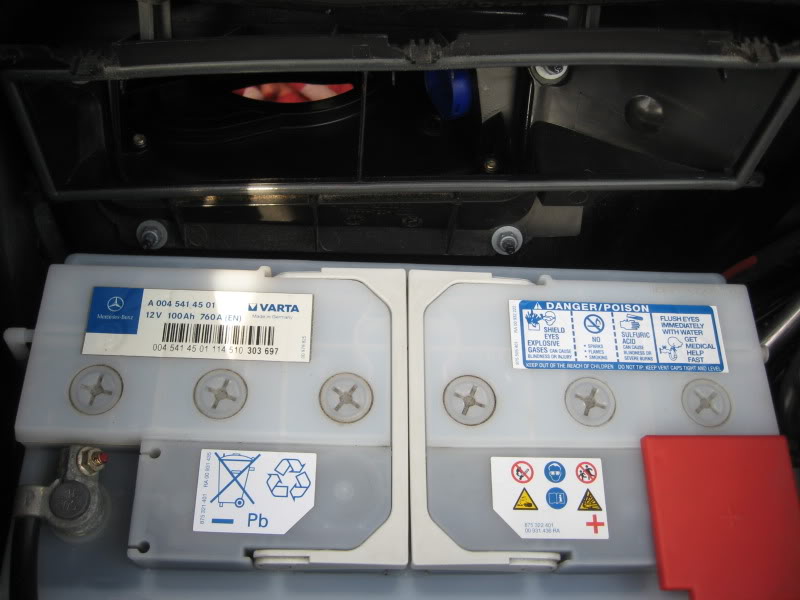
Now we're hitting the engine area. I wanted to put into perspective where this blower motor is located by taking a peek at the engine view of it. Mine is a left-hand drive model. Here's the air filter holder we all have above our battery:
Air filter removed, and now you can see the open area with the blower motor removed, which shows the red square blanket I have on the footwell of the passenger side floor:

I'm including a picture I previously shown above to show you where I lubricated. The rusted center shaft is what spins around. Because I had no way of spraying anywhere on the upperside of the squirrel cage, I focused my attention here, spraying this shaft, then spinning it, then spraying some more. Unfortunately, it doesn't seem like much would get inside, as it would puddle up around the shaft, where the purple-colored area is. There is some side access openings into the motor, however looking inside, all I really saw was a lot of copper wiring. So I didn't want to spray in there:
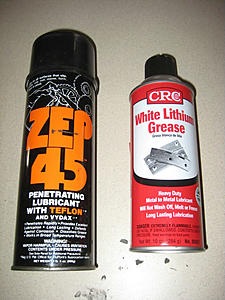
I originally bought the can on the right side from my local Wal-Mart. It has the thin red straw to focus the liquid. However, my neighbor let me borrow the can on the left, which is some sort of industrial lubricant. Truthfully, I used both:
As always, reinstalling is the opposite of the disassembly.
Looking back, most of this disassembly may not be necessary. It appears that by removing the little black rubber cap to access the torx screw also allows you access to the spinning shaft, which if you're careful, you can spray some lubricant right inside.
I hooked up the electrical connection, started my car, and tried the motor prior to installing. Sounded nice and quiet. But my true test will be over the next few mornings when the car is cold.
I will update everyone on how it turns out.
Thanks everyone,
Cintoman

Air filter removed, and now you can see the open area with the blower motor removed, which shows the red square blanket I have on the footwell of the passenger side floor:
I'm including a picture I previously shown above to show you where I lubricated. The rusted center shaft is what spins around. Because I had no way of spraying anywhere on the upperside of the squirrel cage, I focused my attention here, spraying this shaft, then spinning it, then spraying some more. Unfortunately, it doesn't seem like much would get inside, as it would puddle up around the shaft, where the purple-colored area is. There is some side access openings into the motor, however looking inside, all I really saw was a lot of copper wiring. So I didn't want to spray in there:

I originally bought the can on the right side from my local Wal-Mart. It has the thin red straw to focus the liquid. However, my neighbor let me borrow the can on the left, which is some sort of industrial lubricant. Truthfully, I used both:

As always, reinstalling is the opposite of the disassembly.
Looking back, most of this disassembly may not be necessary. It appears that by removing the little black rubber cap to access the torx screw also allows you access to the spinning shaft, which if you're careful, you can spray some lubricant right inside.
I hooked up the electrical connection, started my car, and tried the motor prior to installing. Sounded nice and quiet. But my true test will be over the next few mornings when the car is cold.
I will update everyone on how it turns out.
Thanks everyone,
Cintoman

MBWorld Fanatic!
Joined: Jul 2008
Posts: 8,384
Likes: 800
2019 G70 6MT & 2022 Ford Maverick XL
Mine does this.. started last winter and is back again this one. A little bit of squeaking and chirping when cold only when stopping or turning.
There's no way I'm capable of doing your DIY post. I'll definitely have to have it professionally fixed.
There's no way I'm capable of doing your DIY post. I'll definitely have to have it professionally fixed.
MBWorld Fanatic!
Joined: Jul 2008
Posts: 8,384
Likes: 800
2019 G70 6MT & 2022 Ford Maverick XL
Doing anything with a car that requires taking things apart makes me highly uncomfortable. Plus, standing on my head under a dash?!
With an extender thing are we sure it can't be lubed from the intake under the hood near the battery?
With an extender thing are we sure it can't be lubed from the intake under the hood near the battery?
Super Member
Joined: May 2006
Posts: 546
Likes: 10
From: Cumberland, RI U.S.A.
2005 C230WZ SS Capri Blue/Ash
Actually, it's really not bad at all. In fact, you could honestly skip the majority of these steps and get to the shaft area really easily. Here's all you'd have to do:
Remove the black plastic cover above the passenger side footwell.
Once that's removed, you can easily see the blower motor black housing as I outline in the pics.
If you notice in the pics, on the bottom side of the housing, there's a little black round rubber cap, about the size of a U.S. dime. If you pop that rubber cap off, it'll give you nearly direct access to the shaft that spins.
My 4th picture shows this rubber cap clearly. It's right above the white sticker that's on the housing.
My 7th pic shows another clear view of the cap. And the very next pic shows it removed. Once it's removed, get a can of lubricating grease, preferebly one that has a little straw so you can direct the grease.
Look inside where the cap was removed. You'll see a small torx screw. Well, spray towards the center, as that's where the shaft is.
You definitely don't have to remove the whole blower assembly to get to this; I just like taking things apart, and truthfully, I thought you'd have to in order to lubricate it.
It's really not bad at all.
Cintoman
MB World Stories
The Best of Mercedes & AMG

6 Mercedes Models That Did NOT Age Well (But Are Somehow Still Cool)
Verdad Gallardo
Manual Mercedes? 6 Times Sindelfingen Let Drivers Have All The Fun
Verdad Gallardo
Mercedes SLR McLaren 722 S Is Extremely Rare Example Modified by McLaren
Verdad Gallardo
8 Classic Boxy Mercedes Designs That Have Aged Like Fine Wine
Verdad Gallardo
Flawlessly Restored Mercedes 190E Evo II Heads to Auction
Verdad Gallardo
Electric Mercedes C-Class Unveiled: 11 Things You Need to Know
Verdad Gallardo
Mercedes EQS Gets A Major Update: Everything You Need to Know
Verdad Gallardo
5 Underrated Mercedes-Benz Models That Don't Get the Love They Deserve
Verdad Gallardo
Mercedes 300D Has Pushed Well Past 1 Million Miles and It Ain't Stopping
Verdad GallardoSuper Member
Joined: May 2006
Posts: 546
Likes: 10
From: Cumberland, RI U.S.A.
2005 C230WZ SS Capri Blue/Ash
On a positive note, it's been about 1 week of cool mornings (32F/0C), and not a single squeak whatsoever from my blower motor. Never realized how quiet this thing runs.
Definitely a all the way, and well worth doing!!
Cintoman
Definitely a
all the way, and well worth doing!!Cintoman

Banned
Joined: Oct 2010
Posts: 391
Likes: 0
From: USA
a Tank
I did some research and found a person that described the exact same ticking as I'm hearing and said that the insulation in the driveshaft tunnel was the culprit. Glyn can you please take a look at his post and let me know if the solution that C320_User posted in post #8 on the 1st page makes sense? Spring break is in 1 week, so I'll wait until then to look under the car.
http://www.benzworld.org/forums/w203...d-bicycle.html
Found another exact same description and exact same answer to what the problem is. Page 2 post 18 and 20. http://www.benzworld.org/forums/w203...ticking-2.html
Found another one https://mbworld.org/forums/c32-amg-c...nsole-c32.html
Looks like the easiest thing to do is to cut the insulation right?
Last edited by Ribo89; Mar 10, 2012 at 11:06 PM.
Super Member
Joined: May 2006
Posts: 546
Likes: 10
From: Cumberland, RI U.S.A.
2005 C230WZ SS Capri Blue/Ash
Cintoman


Super Moderator

Joined: Jun 2008
Posts: 19,942
Likes: 192
From: Llandudno, Cape Town, South Africa
late 2009 CLK 350 Coupe Elegance, '65 Jaguar S Type wires
It has been 4 months after lubricating the bearings and the problem is still there. I firmly believe that my problem has nothing to do with the blower motor and that the blower motor is fine.
I did some research and found a person that described the exact same ticking as I'm hearing and said that the insulation in the driveshaft tunnel was the culprit. Glyn can you please take a look at his post and let me know if the solution that C320_User posted in post #8 on the 1st page makes sense? Spring break is in 1 week, so I'll wait until then to look under the car.
http://www.benzworld.org/forums/w203...d-bicycle.html
Found another exact same description and exact same answer to what the problem is. Page 2 post 18 and 20. http://www.benzworld.org/forums/w203...ticking-2.html
Found another one https://mbworld.org/forums/c32-amg-c...nsole-c32.html
Looks like the easiest thing to do is to cut the insulation right?
Also check flex discs on the propshaft for cracks. They can tick/click at low speed if cracked.
Last edited by Glyn M Ruck; Mar 18, 2012 at 01:03 PM.
Super Member
Joined: Apr 2010
Posts: 858
Likes: 0
From: New Joisey
13 Jeep JKU Sahara w/4" lift Kit & the works,2015 Toyota Sienna XLE,2013 Hyundai Sonata Hybrid

Member
Joined: Mar 2005
Posts: 172
Likes: 3
From: Portland, OR
2005 C230 Kompressor Sport Sedan
My blower motor doesn't work after doing this :0
Matt,
Actually, it's really not bad at all. In fact, you could honestly skip the majority of these steps and get to the shaft area really easily. Here's all you'd have to do:
Remove the black plastic cover above the passenger side footwell.
Once that's removed, you can easily see the blower motor black housing as I outline in the pics.
If you notice in the pics, on the bottom side of the housing, there's a little black round rubber cap, about the size of a U.S. dime. If you pop that rubber cap off, it'll give you nearly direct access to the shaft that spins.
My 4th picture shows this rubber cap clearly. It's right above the white sticker that's on the housing.
My 7th pic shows another clear view of the cap. And the very next pic shows it removed. Once it's removed, get a can of lubricating grease, preferebly one that has a little straw so you can direct the grease.
Look inside where the cap was removed. You'll see a small torx screw. Well, spray towards the center, as that's where the shaft is.
You definitely don't have to remove the whole blower assembly to get to this; I just like taking things apart, and truthfully, I thought you'd have to in order to lubricate it.
It's really not bad at all.
Cintoman
Super Moderator
Joined: Jun 2008
Posts: 19,942
Likes: 192
From: Llandudno, Cape Town, South Africa
late 2009 CLK 350 Coupe Elegance, '65 Jaguar S Type wires
Check Fuses 41 & 51 in the front SAM.
Also. If refrigerant pressure is too low the HVAC system will shut down to protect the compressor.
Also. If refrigerant pressure is too low the HVAC system will shut down to protect the compressor.
 I'll report back what they find.
Member
Joined: Mar 2005
Posts: 172
Likes: 3
From: Portland, OR
2005 C230 Kompressor Sport Sedan
My blower motor and regulator were shot, ouch $$$. All working now after replacement by the dealer. I highly recommend taking it out so this doesn't happen to you, maybe mine was on its way out. Good luck.
Last edited by SteveAustin; Oct 30, 2012 at 12:33 PM.
Super Member


Joined: Mar 2012
Posts: 968
Likes: 62
From: San Francisco, CA
2005 c230SS
It was surprisingly easy to remove the cover panel and the fan considering the contortions I had to do to get my head and hands in there to see what was where.
I took the motor housing apart so I had clear access to the bottom bearing for lubrication. The top bearing was pretty well hidden under the plastic hub of the fan blade itself, but I managed to get some lubricant up there by bending the spray tube gently inside through the fan blades and one of the holes in the hub until it butted up against the motor shaft.
I used Liquid Wrench dry lubricant, the stuff you put on garage doors that doesn't attract dust.
Fyi, with the fan plugged back into the car I could still run it on the passenger floor. Before I put everything back together I ran the motor at various speeds for a minute or so upside down to give the lubricant an opportunity to work itself into that bottom bearing before I reinstalled the motor.
All seems okay now ... fingers crossed.
Super Member
Joined: Mar 2012
Posts: 968
Likes: 62
From: San Francisco, CA
2005 c230SS
Okay, after six months the blower is chirping again. I took it out and tried oiling it up again, but this time it didn't last long and the noise is back. I think after eight years it might be time to get a fresh unit with new bearings. Part #203-820-25-14.
I found the TYC for around $80 (shipping included), and Behr in the $140-150 range.
Has anyone installed in the TYC unit? Comments?
Has anyone found a better price on a Behr unit?
Thanks. John
I found the TYC for around $80 (shipping included), and Behr in the $140-150 range.
Has anyone installed in the TYC unit? Comments?
Has anyone found a better price on a Behr unit?
Thanks. John
MBWorld Fanatic!
Joined: Sep 2011
Posts: 1,657
Likes: 35
From: Austin, TX
2005 C230K(sold), Mk7 Jetta
Car-part.com? I see blowers from a 2006 C-class starting at $35. Not sure how much is shipping though.
On the other hand, is it possible to completely disassemble this thing and properly lube it inside out?
Mine is chirping, but only when it's below ~ 70F outside.
On the other hand, is it possible to completely disassemble this thing and properly lube it inside out?
Mine is chirping, but only when it's below ~ 70F outside.
Super Member
Joined: Mar 2012
Posts: 968
Likes: 62
From: San Francisco, CA
2005 c230SS
It takes 5 minutes to pull it out of the car ... and I've taken it apart as far as the DIY in this thread, but I did not figure out how to remove the fan cage so I could get to the bearing underneath. My fear is that if I disturb the fan cage I will throw off the balance, and essential ruin the blower assembly.
Does anyone know how to pull the fan cage off the motor shaft?
Does anyone know how to pull the fan cage off the motor shaft?
Super Member
Joined: Apr 2010
Posts: 858
Likes: 0
From: New Joisey
13 Jeep JKU Sahara w/4" lift Kit & the works,2015 Toyota Sienna XLE,2013 Hyundai Sonata Hybrid
I have installed a TCY, no issues perfect swap and works like a charm......the RPM minght be a litle different them the OEM, but what the heck just crank the dial up ....
Better then the OE design as it has mounting screws and not the tabs as the oe's ....
you have to resue a part of the OE fixture...
But superb value for money....I got mine from Amazone.
javvy
Better then the OE design as it has mounting screws and not the tabs as the oe's ....
you have to resue a part of the OE fixture...
But superb value for money....I got mine from Amazone.
javvy
Super Member
Joined: Mar 2012
Posts: 968
Likes: 62
From: San Francisco, CA
2005 c230SS
when you say "... the RPM might be a litle different ..." that makes me leary. Do you have an example of what settings you have to use vs before to get moderate airflow?
Can you tell if motor just turns slower for the same voltage? Or is the fan less efficient so it needs to operate at a higher rpm to produce the same airflow? (If the latter, I would think that would contribute to more fan noise).
Thanks. John
Can you tell if motor just turns slower for the same voltage? Or is the fan less efficient so it needs to operate at a higher rpm to produce the same airflow? (If the latter, I would think that would contribute to more fan noise).
Thanks. John
Last edited by jkowtko; May 22, 2013 at 02:11 PM.
Super Member
Joined: Apr 2010
Posts: 858
Likes: 0
From: New Joisey
13 Jeep JKU Sahara w/4" lift Kit & the works,2015 Toyota Sienna XLE,2013 Hyundai Sonata Hybrid
lets say that if you want air from setting 3, with the tcy you will have to trun the dial to setting 4.5......may be I am being too finicky cause I dont even remember if the OEM one did the same or not.........
your call ...old car to spend so much for an OEM which we know fails after a while cause the one that you are trying to replace has.......I would rather take the risk with tcy and be happy that i saved a bunch of dinaerosss....$$$...
Thats just me being a cheap ***.........heheheh
javvy
your call ...old car to spend so much for an OEM which we know fails after a while cause the one that you are trying to replace has.......I would rather take the risk with tcy and be happy that i saved a bunch of dinaerosss....$$$...
Thats just me being a cheap ***.........heheheh
javvy


