


")

Is there a way to check timing chain with tearing engine apart?
Super Member
Joined: Jul 2010
Posts: 605
Likes: 0
From: Cali
2006 C230 Sedan

Senior Member


Joined: Feb 2010
Posts: 250
Likes: 15
From: Miami, FL
2009 E63
That mysterious noise on the M111 is the famous cam adjuster noise on these engines. I was shown by my indy that it was the cam adjuster by unplugging it and starting the car . Sure enough the noise vanished. You can also hear it click on/off or make an adjustment while leaving the car in park and revving it between 2500 rpm's and 3500 rpm's. Mom's car does this every now and then depending on the ambient temperature. Colder calls for higher ralenti warmer calls for lower hence not making the noise as much. Also this is on a 1999 C230K with 150k miles on the clock.
Last edited by jpman; Jun 6, 2012 at 06:15 PM.
MBWorld Fanatic!

Joined: May 2009
Posts: 1,101
Likes: 5
From: Toronto, NYC
2002 Mercedes Benz C230 Coupe
That mysterious noise on the M111 is the famous cam adjuster noise on these engines. I was proved that it was by my indy unplugging it and starting the car . Sure enough the noise disappeared. You can also here it click on/off or make an adjustment while leaving the car in park and revving it between 2500 rpm's and 3500 rpm's. Mom's car does this every now and then depending on the ambient temperature. Colder calls for higher ralenti warmer calls for lower hence not making the noise as much. Also this is on a 1999 C230K with 150k miles on the clock.
Thanks.
Senior Member
Joined: Feb 2010
Posts: 250
Likes: 15
From: Miami, FL
2009 E63
It's been running with this noise since we bought it, it then had 126k miles. I do not plan on replacing it. I have a document from Mercedes somewhere where it states it is within the norm of operation to produce this sound. Apparently people would raise this concern when the cars were new and they released this memorandum to the service department.
MBWorld Fanatic!
Joined: May 2009
Posts: 1,101
Likes: 5
From: Toronto, NYC
2002 Mercedes Benz C230 Coupe
It's been running with this noise since we bought it, it then had 126k miles. I do not plan on replacing it. I have a document from Mercedes somewhere where it states it is within the norm of operation to produce this sound. Apparently people would raise this concern when the cars were new and they released this memorandum to the service department.
Hi jpman,
If its not too much trouble, could you scan and send me that doc from Mercedes?
Really appreciate the information..its such a huge relief that that noise isnt coming from the timing chain being loose.

Member
Joined: Apr 2011
Posts: 100
Likes: 1
2001 w203 C180
That mysterious noise on the M111 is the famous cam adjuster noise on these engines. I was shown by my indy that it was the cam adjuster by unplugging it and starting the car . Sure enough the noise vanished. You can also hear it click on/off or make an adjustment while leaving the car in park and revving it between 2500 rpm's and 3500 rpm's. Mom's car does this every now and then depending on the ambient temperature. Colder calls for higher ralenti warmer calls for lower hence not making the noise as much. Also this is on a 1999 C230K with 150k miles on the clock.
My question is, if the cam adjuster/gear is causing the noise will unplugging the cam magnet be guaranteed to take the noise away? I need to work on process of elimination here
 Cause my mechanic refuses to change the timing chain and tensioner because he says its the cam adjuster/gear.
Also, the rattle loudness i experience is the opposite to what jpman experiences. I only get the noise if the ambient temp is warm to hot. If its cold i do not get any noise
Last edited by selwyng; Jun 11, 2012 at 02:32 AM.
MB World Stories
The Best of Mercedes & AMG

Manual Mercedes? 6 Times Sindelfingen Let Drivers Have All The Fun
Verdad Gallardo
Mercedes SLR McLaren 722 S Is Extremely Rare Example Modified by McLaren
Verdad Gallardo
8 Classic Boxy Mercedes Designs That Have Aged Like Fine Wine
Verdad Gallardo
Flawlessly Restored Mercedes 190E Evo II Heads to Auction
Verdad Gallardo
Electric Mercedes C-Class Unveiled: 11 Things You Need to Know
Verdad Gallardo
Mercedes EQS Gets A Major Update: Everything You Need to Know
Verdad Gallardo
5 Underrated Mercedes-Benz Models That Don't Get the Love They Deserve
Verdad Gallardo
Mercedes 300D Has Pushed Well Past 1 Million Miles and It Ain't Stopping
Verdad Gallardo
10 Most Reliable Mercedes-Benz Models You Can Buy Used
Verdad Gallardo
Member
Joined: Apr 2011
Posts: 100
Likes: 1
2001 w203 C180
MBWorld Fanatic!
Joined: May 2009
Posts: 1,101
Likes: 5
From: Toronto, NYC
2002 Mercedes Benz C230 Coupe
Thanks...would definitely appreciate some pics...Ive removed the covers a bunch of times to do oil changes etc....but dont know which connector to disconnect.

Junior Member
Joined: Aug 2008
Posts: 58
Likes: 1
From: Ont, Canada
2005 C230K coupe
I decided to add my experience to this thread to add to the good search material for timing chain info... I got a ton of great info here for my own project.
After reading about Hogger's problems, as well as the plight of a few others, I decided it was time to take care of the pronounced timing chain "death rattle" I was hearing at start up and do a pre-emptive replacement.
The car is a 2005 coupe and had about 185K km on the M271 at the time. I did the job about three months ago and all's been well since.
Parts used:

Essential items are the timing chain, tensioner and valve cover gasket set. I decided that while I had things apart I'd replace some wear items including the serpentine belt, idler and tensioner pulleys, spark plugs and the famous Valeo voltage regulator.
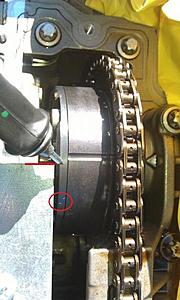
I basically followed the instructions in WIS, making changes as needed due to not having the listed special tools. Super condensed summary of first steps: Disconnect battery, remove t-stat housing, belts and alternator, remove spark plugs, move/remove hoses and wires from valve cover, remove valve cover and here we are:

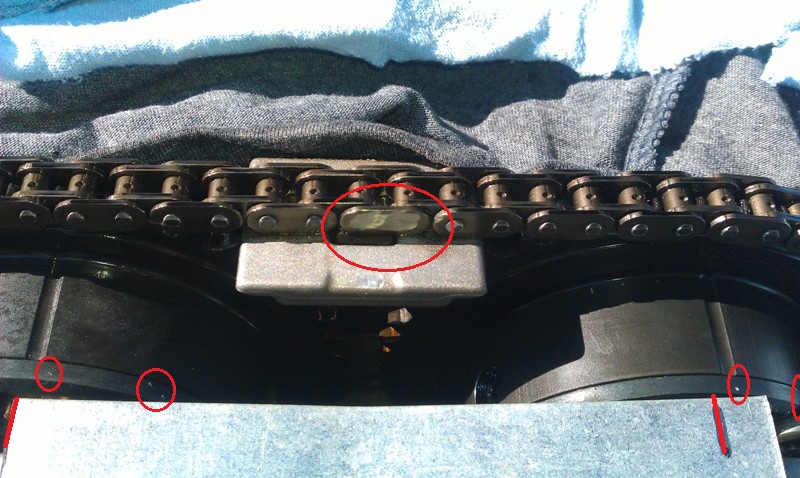
Note that the chain does not appear stretched here. Other's photos look as though there is a bunch of slack in the upper part of the chain. On an engine that's skipped a tooth what you are actually seeing there is the chain jumped over the exhaust cam by a link or two! Any stretch would only really be visible over the longer portion of the chain taken up by the tensioner, if at all. Difficult to see from the top.
Now's a good time to get the engine to TDC to make lining things up later easier. I removed the cam magnets and the upper timing cover at this point also. It would probably be possible to get away without removing this cover if you have the right tools - more on this later. Next, remove the timing chain tensioner, which in my case was behind a friction-fit expansion plug, sealed over with a factory applied rubber-like gloop. Here, Hogger mentions he found a red reusable plug which is a much nicer arrangement than the use-it-once affair that I found and needed to come up with a way of replacing afterwards.
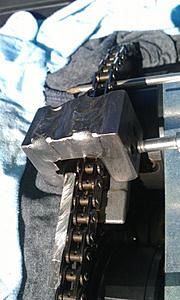
After removing the tensioner, the time comes to build up some courage and break the old chain. To break and rivet the chain I had a tool designed for a larger type of chain. I was able to make it work with a significant amount of MacGyvering, but I would HIGHLY recommend having a proper tool for the type/size of chain here. I then very loosely/temporarily riveted the new chain on to the end of the old one and loosely fished it through. Do NOT just pull the old chain out - you definitely want to use it to fish the new chain through, otherwise the lower timing chain cover would likely also have to come off to install the new chain around the crank.
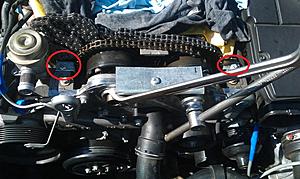
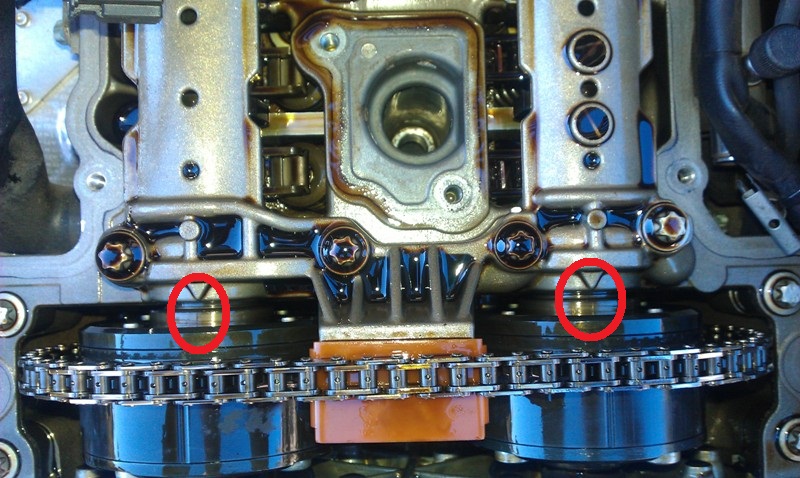
Due to the valve springs, the cams will naturally move away from TDC. They need to be held in place at TDC in order to rivet the new chain together. Far from Benz approved, I rigged up a couple of wrenches and tied them together to hold the cams in place, which worked out great. Best to have an assistant help you here to hold the cams in place while securing the wrenches:

Cams are nicely lined up. At this point I still had the old and new chains connected - this is why its so long. The nuts on the cams that the wrenches are holding are 24mm. I think that with a pair of 24mm DEEP sockets, you could rig up a cam alignment tool using ratchets while only removing the cam magnets and leaving the upper cover installed.
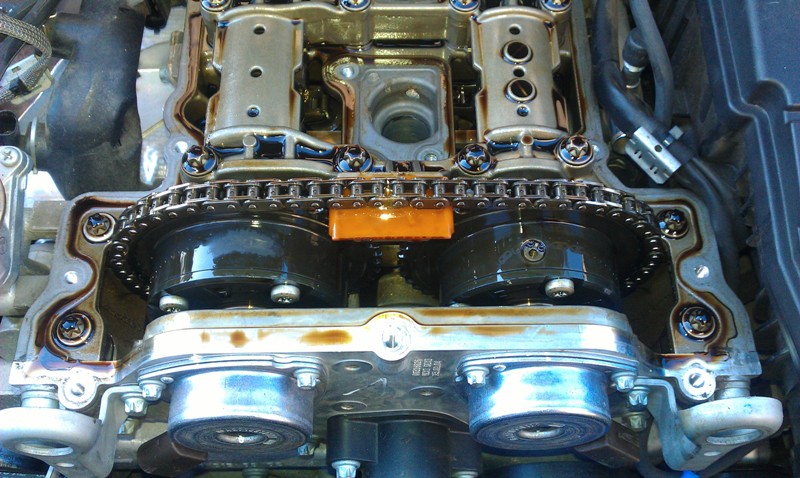
Prior to riveting the new chain, double, triple and quadruple check that the cams and crank are still aligned, then rivet away. Carefully install the new tensioner to tighten up the chain. Give the engine a few revolutions by hand to make sure things remain aligned. Here we are, new chain on and ready to go:

Since the chain was dry, I poured some oil on it to lube it and the guides up for the initial start. For the tensioner cover, I got a hold of a rubber expansion plug and cut the bolt off after installing so that it would fit behind the alternator.
Here's a shot of the old voltage regulator that was on the car since new, which I decided to replace while the alternator was off. Not sure what the length of those brushes was to start out with, but I'm thinking they didn't have much life left in them at this point:

I'd recommend keeping one of those little coolant fittings on hand also. I have no idea when I broke mine but I did at some point. It was so brittle it just broke without me even noticing.
To avoid leaks, when installing the valve cover, I followed the torque recommendations and tightening sequence from WIS.
Otherwise, re-assembly was the reverse of disassembly. Put it together, pray hard then start it up. All turned out well for me!
KP
After reading about Hogger's problems, as well as the plight of a few others, I decided it was time to take care of the pronounced timing chain "death rattle" I was hearing at start up and do a pre-emptive replacement.
The car is a 2005 coupe and had about 185K km on the M271 at the time. I did the job about three months ago and all's been well since.
Parts used:
Essential items are the timing chain, tensioner and valve cover gasket set. I decided that while I had things apart I'd replace some wear items including the serpentine belt, idler and tensioner pulleys, spark plugs and the famous Valeo voltage regulator.
I basically followed the instructions in WIS, making changes as needed due to not having the listed special tools. Super condensed summary of first steps: Disconnect battery, remove t-stat housing, belts and alternator, remove spark plugs, move/remove hoses and wires from valve cover, remove valve cover and here we are:
Note that the chain does not appear stretched here. Other's photos look as though there is a bunch of slack in the upper part of the chain. On an engine that's skipped a tooth what you are actually seeing there is the chain jumped over the exhaust cam by a link or two!
Any stretch would only really be visible over the longer portion of the chain taken up by the tensioner, if at all. Difficult to see from the top.Now's a good time to get the engine to TDC to make lining things up later easier. I removed the cam magnets and the upper timing cover at this point also. It would probably be possible to get away without removing this cover if you have the right tools - more on this later. Next, remove the timing chain tensioner, which in my case was behind a friction-fit expansion plug, sealed over with a factory applied rubber-like gloop. Here, Hogger mentions he found a red reusable plug which is a much nicer arrangement than the use-it-once affair that I found and needed to come up with a way of replacing afterwards.
After removing the tensioner, the time comes to build up some courage and break the old chain. To break and rivet the chain I had a tool designed for a larger type of chain. I was able to make it work with a significant amount of MacGyvering, but I would HIGHLY recommend having a proper tool for the type/size of chain here. I then very loosely/temporarily riveted the new chain on to the end of the old one and loosely fished it through. Do NOT just pull the old chain out - you definitely want to use it to fish the new chain through, otherwise the lower timing chain cover would likely also have to come off to install the new chain around the crank.
Due to the valve springs, the cams will naturally move away from TDC. They need to be held in place at TDC in order to rivet the new chain together. Far from Benz approved, I rigged up a couple of wrenches and tied them together to hold the cams in place, which worked out great. Best to have an assistant help you here to hold the cams in place while securing the wrenches:
Cams are nicely lined up. At this point I still had the old and new chains connected - this is why its so long. The nuts on the cams that the wrenches are holding are 24mm. I think that with a pair of 24mm DEEP sockets, you could rig up a cam alignment tool using ratchets while only removing the cam magnets and leaving the upper cover installed.
Prior to riveting the new chain, double, triple and quadruple check that the cams and crank are still aligned, then rivet away. Carefully install the new tensioner to tighten up the chain. Give the engine a few revolutions by hand to make sure things remain aligned. Here we are, new chain on and ready to go:
Since the chain was dry, I poured some oil on it to lube it and the guides up for the initial start. For the tensioner cover, I got a hold of a rubber expansion plug and cut the bolt off after installing so that it would fit behind the alternator.
Here's a shot of the old voltage regulator that was on the car since new, which I decided to replace while the alternator was off. Not sure what the length of those brushes was to start out with, but I'm thinking they didn't have much life left in them at this point:
I'd recommend keeping one of those little coolant fittings on hand also. I have no idea when I broke mine but I did at some point. It was so brittle it just broke without me even noticing.
To avoid leaks, when installing the valve cover, I followed the torque recommendations and tightening sequence from WIS.
Otherwise, re-assembly was the reverse of disassembly. Put it together, pray hard then start it up. All turned out well for me!
KP

Newbie
Joined: Jun 2010
Posts: 1
Likes: 0
From: Eshowe, South Africa
2004 C180K W203
W203 C180 Kompressor Timing chain replacement
W203 C180 Kompressor Timing chain replacement
After reading a couple of threads with regards to timing chain problems and all the helpfull advive on this thread, I decided to replace mine a.s.a.p.
I purchased an aftermarket chain (JWIS was the make and this was the same make I removed from the vehicle) that came with a master link for around 80% less than the MB agents. (R1900.00 vs R1100.00) By the time I was ready to start the job, the car had covered 120450 km.
I was prepared for a big job and maybe a couple of days to order spares where needed as the nearest MB dealer is 100km from me.
1. First make sure the engine is clean and free from any sand, grime etc. as this will be hard to keep out of the engine after the tappet cover is removed. It makes working on the engine a pleasure.
2. Remove all plastic covers on the engine.
3. Remove Air intake to air box.
4. Remove super charger pipe below intake pipe.
5. Remove fan belt.
6. If you tend on replacing the tensioner and seal then remove bolts from power steering pump (takes no time at all and make it easy to replace the oil seal at the timing tensioner) as well as alternator without removing the units.
7. Remove the coils, spark plugs, loosen all plugs, pipes and cables as well as the two on the can sensors (see earth cable as well)
8. Remove tappet cover carefully not to damage the rubber seal, as well as the cam sensors.
9. Inspect all the exposed parts to asses any other parts to be replaced.
10. Bring engine to TDC and make sure all marks line up.
11. Make a small plate or card board for a reference as you would now turn the engine slowly and mark the cams at intervals of let’s say 2cm. This is to prevent the cams from going out of sync as the engine is turned)
12. Cover the engine with something to prevent any dirt from getting in.
13. Make two plates in the shape of an “L” and bolt in onto the head to prevent the chain from slipping and jumping teeth.
14. I raised the chain with screwdrivers to have space to work and to remove the chain guide.
15. I shoved rags into all the cavities before I cut one link with a small grinder (just cut the ends off the chain pins)
16. Attach two tube sockets to the cams and secure tools with a tie down/ cable tie before removing the link. (I used a tool I made to press the link out)
17. Now attach the new chain to the old one (I made a link with a fence nail, soft enough to manipulate to the size I needed and used the old link plate on the side and then flared the ends just enough to prevent the link from coming off)
18. Remove rags where necessary.
19. Slowly turn the engine at the crank and keep the cams in sync. As you get to the point there you need to move the sockets back, make sure the cams are not in the place where anyone will jump. Be careful not to be in a hurry and keep the chains (both) on the sprockets and lined up.
20. When you have the new chain through, remove the link and attach the new link with the tool. Flair the ends with a small chisel (place a 4 pound hammer behind the link and)
21. Turn engine at the crank until you reach TDC once again and check all the timing marks.
22. My marks on the cams have moved slightly closer to the marks on the engine as the chain is obviously a little shorter.
23. Assemble engine, check all plugs are connected and job is done.
This job only took 3-4 hours and I’m not a mac. Anyone can do this if you take it step by step. I did not buy any other parts so the job cost came to just over R1100.00. There are no leaks thus far as I did not replace the tappet cover seal.
I measured the new chain before fitting and found the old one had stretched by 3mm. The sprockets were still good as well as the guides. I believe the weakness is the chain and not any other part.
If you intend to wash the engine check the coils after the wash as they tend to collect water at the sparkplugs with the engine cover on and this will give you a problem later. I have twice washed the engine just with normal running water (no high pressure) and the car started jerking after a long trip of 150km (I found water at the sparkplugs)
After a 500km trip yesterday, all went well. I'm very happy with the way all turned out.
Also see my home made isolating harnesses to prevent oil from the cam sensors getting into the main harness.
I hope this will be helpful as most of the work I take on will follow a search on the forum.
Thanks. More pics can be seen on my profile.


Last edited by Gannand; Jul 5, 2012 at 09:13 AM.

Thread Starter
Senior Member
Joined: Jun 2011
Posts: 264
Likes: 2
From: Lumberton, TX
2009 ML350, 2007 GL450, 1963 GMC, BMW 325i

Got almost 3000 miles on mine now. Still going strong.
Last edited by Hogger; Jul 5, 2012 at 11:05 AM.


MBWorld Fanatic!
Joined: Sep 2011
Posts: 1,657
Likes: 35
From: Austin, TX
2005 C230K(sold), Mk7 Jetta
Hey Hogger,
Which valve cover gasket did you use?
https://mbworld.org/forums/mercedes-...they-leak.html
Is yours leaking? Or does gasket maker do its job to seal the thing?
Which valve cover gasket did you use?
https://mbworld.org/forums/mercedes-...they-leak.html
Is yours leaking? Or does gasket maker do its job to seal the thing?
Last edited by VVF; Sep 29, 2012 at 10:48 AM.
Thread Starter
Senior Member
Joined: Jun 2011
Posts: 264
Likes: 2
From: Lumberton, TX
2009 ML350, 2007 GL450, 1963 GMC, BMW 325i
Not sure what brand the gaskets are. I got them from a dealer, and I can't see in my parts picture what it says.
But no leaks so far.
But no leaks so far.

Member
Joined: Nov 2008
Posts: 142
Likes: 6
From: New Orleans, LA
C230K Sedan
Super Moderator

Joined: Jun 2008
Posts: 19,942
Likes: 192
From: Llandudno, Cape Town, South Africa
late 2009 CLK 350 Coupe Elegance, '65 Jaguar S Type wires
W203 C180 Kompressor Timing chain replacement
After reading a couple of threads with regards to timing chain problems and all the helpfull advive on this thread, I decided to replace mine a.s.a.p.
I purchased an aftermarket chain (JWIS was the make and this was the same make I removed from the vehicle) that came with a master link for around 80% less than the MB agents. (R1900.00 vs R1100.00) By the time I was ready to start the job, the car had covered 120450 km.
I was prepared for a big job and maybe a couple of days to order spares where needed as the nearest MB dealer is 100km from me.
1. First make sure the engine is clean and free from any sand, grime etc. as this will be hard to keep out of the engine after the tappet cover is removed. It makes working on the engine a pleasure.
2. Remove all plastic covers on the engine.
3. Remove Air intake to air box.
4. Remove super charger pipe below intake pipe.
5. Remove fan belt.
6. If you tend on replacing the tensioner and seal then remove bolts from power steering pump (takes no time at all and make it easy to replace the oil seal at the timing tensioner) as well as alternator without removing the units.
7. Remove the coils, spark plugs, loosen all plugs, pipes and cables as well as the two on the can sensors (see earth cable as well)
8. Remove tappet cover carefully not to damage the rubber seal, as well as the cam sensors.
9. Inspect all the exposed parts to asses any other parts to be replaced.
10. Bring engine to TDC and make sure all marks line up.
11. Make a small plate or card board for a reference as you would now turn the engine slowly and mark the cams at intervals of let�s say 2cm. This is to prevent the cams from going out of sync as the engine is turned)
12. Cover the engine with something to prevent any dirt from getting in.
13. Make two plates in the shape of an �L� and bolt in onto the head to prevent the chain from slipping and jumping teeth.
14. I raised the chain with screwdrivers to have space to work and to remove the chain guide.
15. I shoved rags into all the cavities before I cut one link with a small grinder (just cut the ends off the chain pins)
16. Attach two tube sockets to the cams and secure tools with a tie down/ cable tie before removing the link. (I used a tool I made to press the link out)
17. Now attach the new chain to the old one (I made a link with a fence nail, soft enough to manipulate to the size I needed and used the old link plate on the side and then flared the ends just enough to prevent the link from coming off)
18. Remove rags where necessary.
19. Slowly turn the engine at the crank and keep the cams in sync. As you get to the point there you need to move the sockets back, make sure the cams are not in the place where anyone will jump. Be careful not to be in a hurry and keep the chains (both) on the sprockets and lined up.
20. When you have the new chain through, remove the link and attach the new link with the tool. Flair the ends with a small chisel (place a 4 pound hammer behind the link and)
21. Turn engine at the crank until you reach TDC once again and check all the timing marks.
22. My marks on the cams have moved slightly closer to the marks on the engine as the chain is obviously a little shorter.
23. Assemble engine, check all plugs are connected and job is done.
This job only took 3-4 hours and I�m not a mac. Anyone can do this if you take it step by step. I did not buy any other parts so the job cost came to just over R1100.00. There are no leaks thus far as I did not replace the tappet cover seal.
I measured the new chain before fitting and found the old one had stretched by 3mm. The sprockets were still good as well as the guides. I believe the weakness is the chain and not any other part.
If you intend to wash the engine check the coils after the wash as they tend to collect water at the sparkplugs with the engine cover on and this will give you a problem later. I have twice washed the engine just with normal running water (no high pressure) and the car started jerking after a long trip of 150km (I found water at the sparkplugs)
After a 500km trip yesterday, all went well. I'm very happy with the way all turned out.
Also see my home made isolating harnesses to prevent oil from the cam sensors getting into the main harness.
I hope this will be helpful as most of the work I take on will follow a search on the forum.
Thanks. More pics can be seen on my profile.
Attachment 239258
Attachment 239259
Attachment 239260
Attachment 239261
Attachment 239262
Attachment 239263
Member
Joined: Nov 2008
Posts: 142
Likes: 6
From: New Orleans, LA
C230K Sedan
Nevermind I got the pin out of the guide rails.
For anyone who is going to attempt it get you a long 10mm bolt and couple 10mm nuts and a washer to go with it and screw it in with the two bolts. Its About 170lb pressed in. Turn and it should push out. Just like brake drums.
For anyone who is going to attempt it get you a long 10mm bolt and couple 10mm nuts and a washer to go with it and screw it in with the two bolts. Its About 170lb pressed in. Turn and it should push out. Just like brake drums.
Member
Joined: Nov 2008
Posts: 142
Likes: 6
From: New Orleans, LA
C230K Sedan
Update on my work.. One of the pieces on the cam came off.. Wondering if it was pressed on or do I need to order a new one for it. New Rails installed and waiting on some seals and water pump to come in. Been turning it by hand to do a compression test to check for valve damages. It is jumping still when I crank it by hand.
Last edited by hahaitzmickey; Oct 12, 2012 at 08:17 PM. Reason: More Info Update.
Member
Joined: Nov 2008
Posts: 142
Likes: 6
From: New Orleans, LA
C230K Sedan
For anyone taking the cam cover off, becareful when you slide it off. You will be in risk of break a weak cam bolt that gets stuck to the magnets. If you do break one the part number is A 271 050 01 71 Camshaft Ajduster to Camshaft. A 006 990 44 40 washer and N 000472018000 Retaining Ring.
Stealership - $130 bucks for the cam bolt plus retainer and washer.
You can find it only for around $70 to $90 bucks.
So right now I'm waiting on parts to come in to start work on the timing.
Comes out my timing chain did not stetched. It jumped the tooth due to bad chain tensioner.
Stealership - $130 bucks for the cam bolt plus retainer and washer.
You can find it only for around $70 to $90 bucks.
So right now I'm waiting on parts to come in to start work on the timing.
Comes out my timing chain did not stetched. It jumped the tooth due to bad chain tensioner.


