


How would you clean this?
Thread Starter
Senior Member
Joined: Nov 2013
Posts: 323
Likes: 4
From: Los Angeles, CA. USA
2013 c250
How would you clean this?
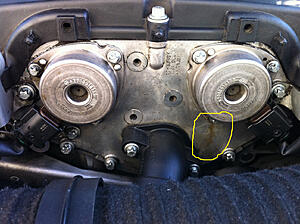
It's THICK and I don't want it all over my pulley and everywhere, so I was thinking some kind of vacuum to take off initial layer, then lay a rag below and spray w/ some de-greaser and wipe off. Then figure out where the leak's coming from.
Cam magnet, front cylinder head gasket leak, timing cover gasket leak, cam sensor leak????
Or since the camshaft solenoid was replaced (previous owner according to giving my VIN to dealership) is there no leak, just clean?
Attachment 447394
Cam magnet, front cylinder head gasket leak, timing cover gasket leak, cam sensor leak????
Or since the camshaft solenoid was replaced (previous owner according to giving my VIN to dealership) is there no leak, just clean?
Attachment 447394
Last edited by scottonfire; Dec 9, 2013 at 12:42 AM.
MBWorld Fanatic!
Joined: Mar 2008
Posts: 3,714
Likes: 56
From: 1 hours drive north of Sydney Australia
2007 W204 220CDI Classic Sedan
I would use a small nozzle with compressed air . Most should come off then blow the remnants from the belt & pulleys & out the bottom.
Then do as you say, place a thick rag underneath & use a brush dipped in an oil solvent to clean the rest off.
Blow dry with compressed air.
$100 Chinese compressors are available in this country . A very handy workshop tool. I use mine for keeping my engine clean, cleaning mechanical parts, blowing up tyres & also changing my brake fluid.
Last edited by Carsy; Dec 9, 2013 at 01:24 AM.

MBWorld Fanatic!


Joined: Jan 2005
Posts: 2,848
Likes: 15
From: Orange County
2005 C Wagon (No snickering please!)
We call 'em air compressors. How do you compress Chinese anyhow?
I would use Perchloroethylene (found in some brake cleaners) and a Chinese pony belly hair brush to remove the greasy dirt. Wipe dry with cotton cloth.
I would use Perchloroethylene (found in some brake cleaners) and a Chinese pony belly hair brush to remove the greasy dirt. Wipe dry with cotton cloth.
MBWorld Fanatic!
Joined: Mar 2008
Posts: 3,714
Likes: 56
From: 1 hours drive north of Sydney Australia
2007 W204 220CDI Classic Sedan
[QUOTE=Moviela;5869087]We call 'em air compressors. How do you compress Chinese anyhow?
QUOTE]
1,361,500,000 people in 9,327,480 sq Km is compression
QUOTE]
1,361,500,000 people in 9,327,480 sq Km is compression
Thread Starter
Senior Member
Joined: Nov 2013
Posts: 323
Likes: 4
From: Los Angeles, CA. USA
2013 c250
[QUOTE=Carsy;5869112]

Any guesses as to what kind of leak this is? I've heard front cylinder head gasket leak, cam magnet leak, cam sensor leak, timing cover gasket leak, maybe just coat the whole engine in crazy glue to be safe.
Any guesses as to what kind of leak this is? I've heard front cylinder head gasket leak, cam magnet leak, cam sensor leak, timing cover gasket leak, maybe just coat the whole engine in crazy glue to be safe.
Last edited by scottonfire; Dec 9, 2013 at 12:51 PM.
Senior Member
Joined: Aug 2013
Posts: 283
Likes: 2
From: Toronto, ON
2012 C300 Sport 4MATIC (current) 2006 C280 Elegance 4MATIC (sold)
Looks like oil but many clean the engine and engine bay out first so they can go about diagnosing a leak. Just spray some Gunk engine degreaser and scrub it with one of those dish washing scrubbers. Wipe off with a damp cloth. Using compressed air is good but it might blow it all over the place.
Trending Topics
Super Moderator

Joined: Jun 2008
Posts: 19,942
Likes: 192
From: Llandudno, Cape Town, South Africa
late 2009 CLK 350 Coupe Elegance, '65 Jaguar S Type wires
MB World Stories
The Best of Mercedes & AMG

8 Oddball Mercedes Ideas That Actually Made it to Production
Verdad Gallardo
Dubai Tuner Gives the Mercedes G-Class An Entirely New Look
Verdad Gallardo
Six Gift Ideas Your AMG Loving Dad or Grad Will Cherish

7 Craziest Things AMG Gas Ever Built
Verdad Gallardo
New Electric Mercedes-AMG GT 4-Door Coupe Unveiled: 10 Things You Need to Know
Verdad Gallardo
6 Mercedes Models That Did NOT Age Well (But Are Somehow Still Cool)
Verdad Gallardo
Manual Mercedes? 6 Times Sindelfingen Let Drivers Have All The Fun
Verdad Gallardo
Mercedes SLR McLaren 722 S Is Extremely Rare Example Modified by McLaren
Verdad Gallardo
8 Classic Boxy Mercedes Designs That Have Aged Like Fine Wine
Verdad Gallardo
Thread Starter
Senior Member
Joined: Nov 2013
Posts: 323
Likes: 4
From: Los Angeles, CA. USA
2013 c250
Thx for the input guys! After I hear from MB USA I'll see if I or they will do the cleaning- probably me since I'm not willing to pay them a cent to fix a recall that was already fixed.
Question: Those two black plastic connectors with the MB logo on it- do you disconnect b4 or after cleaning? I'm planning to spray the area with Gunk degreaser, take off residue with a brush and have a rag underneath to catch the debris as Khan suggested.
Question: Those two black plastic connectors with the MB logo on it- do you disconnect b4 or after cleaning? I'm planning to spray the area with Gunk degreaser, take off residue with a brush and have a rag underneath to catch the debris as Khan suggested.
Super Moderator
Joined: Jun 2008
Posts: 19,942
Likes: 192
From: Llandudno, Cape Town, South Africa
late 2009 CLK 350 Coupe Elegance, '65 Jaguar S Type wires
Leave them connected while cleaning off the major oil & dirt. Then clean them properly with switch cleaner.


MBWorld Fanatic!
Joined: Jan 2005
Posts: 2,848
Likes: 15
From: Orange County
2005 C Wagon (No snickering please!)
Not in California for much longer. The paper work burden to use Perch has caused most dry cleaners to switch to hydrocarbon or brominated solvents like Chevron EcoSolv or DrySolv respectively. Of course both alternatives are not as "powerful" as Perch, and require longer processing times. A shirt that used to cost a buck to dry clean now costs five. I suppose that is better than cancer.
MBWorld Fanatic!
Joined: Jul 2008
Posts: 1,005
Likes: 0
2013 UFO
Not in California for much longer. The paper work burden to use Perch has caused most dry cleaners to switch to hydrocarbon or brominated solvents like Chevron EcoSolv or DrySolv respectively. Of course both alternatives are not as "powerful" as Perch, and require longer processing times. A shirt that used to cost a buck to dry clean now costs five. I suppose that is better than cancer.
Junior Member
Joined: Dec 2013
Posts: 17
Likes: 0
From: Melbourne Australia
03 C180 Kompressor
It's THICK and I don't want it all over my pulley and everywhere, so I was thinking some kind of vacuum to take off initial layer, then lay a rag below and spray w/ some de-greaser and wipe off. Then figure out where the leak's coming from.
Cam magnet, front cylinder head gasket leak, timing cover gasket leak, cam sensor leak????
Or since the camshaft solenoid was replaced (previous owner according to giving my VIN to dealership) is there no leak, just clean?

Cam magnet, front cylinder head gasket leak, timing cover gasket leak, cam sensor leak????
Or since the camshaft solenoid was replaced (previous owner according to giving my VIN to dealership) is there no leak, just clean?
Use some engine degreaser followed by a shot of water to clean it up with and then note how long it takes to reappear before determining if it is a leak or not.
Thread Starter
Senior Member
Joined: Nov 2013
Posts: 323
Likes: 4
From: Los Angeles, CA. USA
2013 c250
haha! Okay, so I got the degreaser and the wire connector cleaner and a few rags. I laid one rag down under and began taking off the oil residue with another rag. After 20 minutes I had pretty much taken all the oil off. I sprayed maybe one time with the connector cleaner and sprayed the degreaser on a rag and wiped it one time.
Indy mechanic originally diagnosed this as a front, upper, valve gasket leak. I've done soooo much research on fixing, ordered the valve gasket kit, was looking at all the parts for camshaft magnets, looks like after all this, the driver side cam magnet has a tiny stream (see pic below). When I disconnected the black plastic pieces, there was oil in them. Is this bad? Are these the camshaft position sensors, and now I need to check the oxygen sensors for oil? How would I even do that?
Hopefully this helps someone. Just clean it first, wait and see where the leak really is, or if there even is a leak before proceeding. I would've felt like a jacka$$ if I popped off the cylinder head and replaced the gasket when there's no leak.
NOW, MB at Encino, CA said they replaced the cam mags in July, 2011 under an open campaign b/c they were DEFECTIVE (even leaked on the wiring harness which was also replaced under the campaign). So did they replace the cam mags or are they full of shlT? Based on the part number written on the cam mags, can anyone tell if this this an updated part number or one of the original defective Cam Mags??

Last edited by scottonfire; Dec 12, 2013 at 05:17 PM.
Super Member


Joined: Mar 2012
Posts: 968
Likes: 62
From: San Francisco, CA
2005 c230SS
Here's a link to another thread where I posted photos of my recall work:
https://mbworld.org/forums/5436912-post254.html
You may be able to read the part number of my cam solenoids.
I agree with the philosophy of "clean first, replace later". A couple years ago the dealership quoted me $1400 to fix a leaking parking pawl in my transmission. Last year I did a transmission flush, and when I cleaned the area of concern, turns out it was leftover gunk from the transmission switch receptacle problem that had been fixed a few years back. To top it off, my tranny doesn't even have an external parking pawl -- the service manager misnamed the shift linkage. So yes, unless oil is pouring out or you are about to embark on a cross-country trip, clean it, and wait a while to see what happens
Thread Starter
Senior Member
Joined: Nov 2013
Posts: 323
Likes: 4
From: Los Angeles, CA. USA
2013 c250
Here's a link to another thread where I posted photos of my recall work:
https://mbworld.org/forums/5436912-post254.html
You may be able to read the part number of my cam solenoids.
I agree with the philosophy of "clean first, replace later". A couple years ago the dealership quoted me $1400 to fix a leaking parking pawl in my transmission. Last year I did a transmission flush, and when I cleaned the area of concern, turns out it was leftover gunk from the transmission switch receptacle problem that had been fixed a few years back. To top it off, my tranny doesn't even have an external parking pawl -- the service manager misnamed the shift linkage. So yes, unless oil is pouring out or you are about to embark on a cross-country trip, clean it, and wait a while to see what happens
https://mbworld.org/forums/5436912-post254.html
You may be able to read the part number of my cam solenoids.
I agree with the philosophy of "clean first, replace later". A couple years ago the dealership quoted me $1400 to fix a leaking parking pawl in my transmission. Last year I did a transmission flush, and when I cleaned the area of concern, turns out it was leftover gunk from the transmission switch receptacle problem that had been fixed a few years back. To top it off, my tranny doesn't even have an external parking pawl -- the service manager misnamed the shift linkage. So yes, unless oil is pouring out or you are about to embark on a cross-country trip, clean it, and wait a while to see what happens
Super Moderator
Joined: Jun 2008
Posts: 19,942
Likes: 192
From: Llandudno, Cape Town, South Africa
late 2009 CLK 350 Coupe Elegance, '65 Jaguar S Type wires
haha! Okay, so I got the degreaser and the wire connector cleaner and a few rags. I laid one rag down under and began taking off the oil residue with another rag. After 20 minutes I had pretty much taken all the oil off. I sprayed maybe one time with the connector cleaner and sprayed the degreaser on a rag and wiped it one time.
Indy mechanic originally diagnosed this as a front, upper, valve gasket leak. I've done soooo much research on fixing, ordered the valve gasket kit, was looking at all the parts for camshaft magnets, looks like after all this, the driver side cam magnet has a tiny stream (see pic below). When I disconnected the black plastic pieces, there was oil in them. Is this bad? Are these the camshaft position sensors, and now I need to check the oxygen sensors for oil? How would I even do that?
Hopefully this helps someone. Just clean it first, wait and see where the leak really is, or if there even is a leak before proceeding. I would've felt like a jacka$$ if I popped off the cylinder head and replaced the gasket when there's no leak.
NOW, MB at Encino, CA said they replaced the cam mags in July, 2011 under an open campaign b/c they were DEFECTIVE (even leaked on the wiring harness which was also replaced under the campaign). So did they replace the cam mags or are they full of shlT? Based on the part number written on the cam mags, can anyone tell if this this an updated part number or one of the original defective Cam Mags??
The pigtales should have stopped oil from getting into the main harness. To check if this is so go to the O2 sensors. Each one has a fly lead. Trace the flylead back & you will find an inline plug. If the inline plugs are full of oil you know that the harness is saturated.
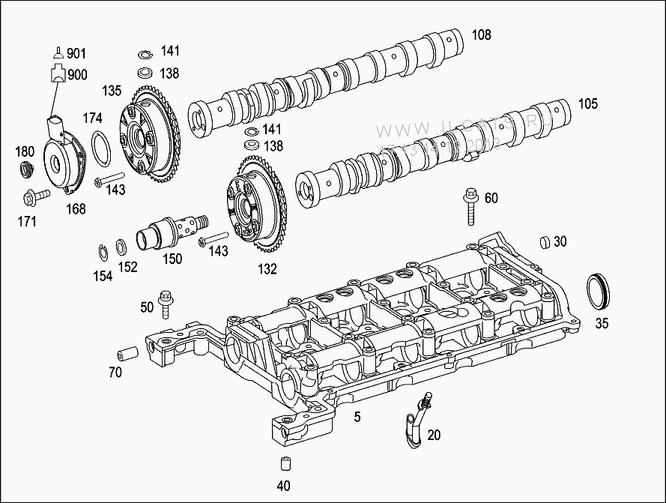
Original Part numbers from the EPC.
168 A 2710510177 MAGNET, Camshaft adjuster 002
Super Moderator
Joined: Jun 2008
Posts: 19,942
Likes: 192
From: Llandudno, Cape Town, South Africa
late 2009 CLK 350 Coupe Elegance, '65 Jaguar S Type wires
Not in California for much longer. The paper work burden to use Perch has caused most dry cleaners to switch to hydrocarbon or brominated solvents like Chevron EcoSolv or DrySolv respectively. Of course both alternatives are not as "powerful" as Perch, and require longer processing times. A shirt that used to cost a buck to dry clean now costs five. I suppose that is better than cancer.
Of course the Benzines are not all that healthy either.
Thread Starter
Senior Member
Joined: Nov 2013
Posts: 323
Likes: 4
From: Los Angeles, CA. USA
2013 c250
Because the part number for the cam mags are not updated, I'm going to only replace the O ring and the stop plug. I have the WIS for the camshaft solenoid but it does not say the torque spec for the three screws. Does anyone know what size to use to get off the screws so I don't accidentally strip em?

Junior Member
Joined: May 2012
Posts: 17
Likes: 0
From: Riverside Ca
c230 Kompressor
The leak is coming from the two gaskets inside the adjuster magnets. They are actually very easy to repair. I just did this on my 05 c230k. You need to take a small drill bit and drill out he lead sodder points holding the magnet housing together. there are three. Once you drill these out you will be able to pry them apart. You will find the doughnut shaped magnet with a silicone gasket on either side. You need to clean all the oil and completely degrease all the pieces. Then take sensor safe gasket maker and coat both sides of the gaskets put back together in reverse order. (top part of housing, gasket maker, silcone gasket, more gasket maker then magnet, then more gasket maker then silicone gasket then bottom portion of housing) then use a clamp to hold it all together untill dry. This will take a few hours to set up. you dont need to worry about putting rivets back in.. the three bolts will press it together against the engine housing.
I did mine last week and it it dry as bone......cost $7 for sensor safe gasket maker.
I did mine last week and it it dry as bone......cost $7 for sensor safe gasket maker.


