


 Jun 16, 2015, 03:34 PM
Last edit by: IB Advertising
See related guides and technical advice from our community experts:
Browse all: Lighting Guides
- Mercedes-Benz C-Class and AMG: How to Install HID Headlights
Step by step instructions for do-it-yourself repairs
Browse all: Lighting Guides

2013 C250 HID Install
MBWorld Fanatic!
Joined: Nov 2008
Posts: 1,091
Likes: 4
From: Bandar Seri Begawan, Brunei
15 E200CGI SPORT
Member
Joined: Dec 2012
Posts: 223
Likes: 1
From: USA
C Coupe
1.) Adapter cables?
2.) HID harness?
3.) Mounting brackets?
Do i need to purchase any of the 3 as well for my 2013 C250?
Thanks

Edit: Also, since we need to drill the dust cap, would it be possible to put the stock halogens back on later? My car's a lease.
Last edited by AllEyesOnMe; Jan 8, 2013 at 10:20 PM.
MBWorld Fanatic!
Joined: Mar 2006
Posts: 1,375
Likes: 16
From: Hong Kong
2010 C200 CGI
So i need to purchase the error eliminator. What about:
1.) Adapter cables?
2.) HID harness?
3.) Mounting brackets?
Do i need to purchase any of the 3 as well for my 2013 C250?
Thanks
Edit: Also, since we need to drill the dust cap, would it be possible to put the stock halogens back on later? My car's a lease.
1.) Adapter cables?
2.) HID harness?
3.) Mounting brackets?
Do i need to purchase any of the 3 as well for my 2013 C250?
Thanks
Edit: Also, since we need to drill the dust cap, would it be possible to put the stock halogens back on later? My car's a lease.
Also, if you click on the little "i" next to the harness and adapter option it will explain to you what those parts are for therefore answering your questions.
Last edited by Knightmare69; Jan 9, 2013 at 12:42 AM.
Member
Joined: Dec 2012
Posts: 223
Likes: 1
From: USA
C Coupe
Has anyone installed their HIDs without removing the wheels?
Also, the hole to drill on the dust cap is 3/4", correct?
Thanks !
Thanks, will read it. Reason i ask is because forum member "undone" asked kkd the price of his HID kit, and he said said it was $30. However, that's without adding all the added options. I guess the entire "kit" would total to ~$70 instead on DDM website?
Also, the hole to drill on the dust cap is 3/4", correct?
Thanks !
HID KIT consists of ballasts and bulbs, I'm assuming when you say adapter harness you're referring to the connection from the ballast to the OEM plug? If that's the case then that is included with the kit, HID harness would be the same thing. Most kits also provide mounting brackets.
Also, if you click on the little "i" next to the harness and adapter option it will explain to you what those parts are for therefore answering your questions.
Also, if you click on the little "i" next to the harness and adapter option it will explain to you what those parts are for therefore answering your questions.

Member
Joined: May 2013
Posts: 225
Likes: 0
C250 2012
Just installed HIDs in my 2012 W204. I used morimoto 5000k H7 kit from the retrofit source with the canbus harness.
I just had a question, the ballasts were small enough to actually put inside of the headlight housing with harness and all. I put the harness and ballasts INside the housing, i'm just wondering if there's any repercussions to this? It makes for a super clean install.
I just had a question, the ballasts were small enough to actually put inside of the headlight housing with harness and all. I put the harness and ballasts INside the housing, i'm just wondering if there's any repercussions to this? It makes for a super clean install.

Member
Joined: May 2012
Posts: 89
Likes: 0
From: Dallas-Ft.Worth, TX
C43
Great job.
I have been trying to swap my stock bulbs for Phillips CV Ultras, but for the life of me can't get the stock bulbs out. Can someone please clarify do you pull the bulb straight out or is it a twist and pull? I'm scared I'm going to crush the bulb.
I have been trying to swap my stock bulbs for Phillips CV Ultras, but for the life of me can't get the stock bulbs out. Can someone please clarify do you pull the bulb straight out or is it a twist and pull? I'm scared I'm going to crush the bulb.
Member
Joined: May 2013
Posts: 225
Likes: 0
C250 2012
Twist counter clockwise then pull straight out.
MB World Stories
The Best of Mercedes & AMG

7 Craziest Things AMG Gas Ever Built
Verdad Gallardo
New Electric Mercedes-AMG GT 4-Door Coupe Unveiled: 10 Things You Need to Know
Verdad Gallardo
6 Mercedes Models That Did NOT Age Well (But Are Somehow Still Cool)
Verdad Gallardo
Manual Mercedes? 6 Times Sindelfingen Let Drivers Have All The Fun
Verdad Gallardo
Mercedes SLR McLaren 722 S Is Extremely Rare Example Modified by McLaren
Verdad Gallardo
8 Classic Boxy Mercedes Designs That Have Aged Like Fine Wine
Verdad Gallardo
Flawlessly Restored Mercedes 190E Evo II Heads to Auction
Verdad Gallardo
Electric Mercedes C-Class Unveiled: 11 Things You Need to Know
Verdad Gallardo
Mercedes EQS Gets A Major Update: Everything You Need to Know
Verdad Gallardo
Newbie
Joined: Jan 2014
Posts: 2
Likes: 0
2012 c250
HID's on with DRL's
How did you get your DRL's to stay on while having your HID's on? As far as I have heard/learned you need to have the lighting package for them to still be on (reduced to 10% output) at night time with the headlights. I have the stock halogens on my 2012 c250 and want to get HID's but also want my DRL's on with my HID's.


Newbie
Joined: Aug 2014
Posts: 1
Likes: 0
cla 250
Hi I order the hid kit form ddm tuning and I'm having some problem with it. When I went to install it on my cla I can't seem to get it to stay on for any longer then 2 sec before it turn off. anyone else came across this issues before and if so how did you went about fixing it.
Thanks
Juno
Thanks
Juno


Newbie
Joined: Mar 2015
Posts: 4
Likes: 0
C300
Junior Member
Joined: Mar 2015
Posts: 34
Likes: 0
From: Brooklyn NY
2012 c300 Sport
i have a 2012 c300 sport 4matic i just ordered 6000k 55wats hid from ddm im hoping for the best
i see u guys had to drill the cap where can i get the filler to put the wire through?
ALSO WHAT bulb size are the inner small yellow bulbs in the headlights would like to swap those as well for led/ white lights
i see u guys had to drill the cap where can i get the filler to put the wire through?
ALSO WHAT bulb size are the inner small yellow bulbs in the headlights would like to swap those as well for led/ white lights
Last edited by SpraggaBenz06; Mar 20, 2015 at 12:51 PM.

Newbie
Joined: Apr 2015
Posts: 7
Likes: 0
From: Los Angeles
2013 c250 sports coupe
Mucho Thanks to kkd79 for her informative post. It would have been a much more of a search and rescue mission.
Couple of things to add to my experience converting to a Maxlux H7 5000k 35wt. ac ballast with a cancellator. 35 wt. ballast is plenty bright. Also, AC ballast produces better light than cheaper DC ballast. Maxlux has a built in cancellator. So, no need to buy another.
1. With a Maxlux system, I had to cut and splice couple of wires to get the bulb through the metal mounting clip. Wrap electrical tape individually and together so it does not come off inside the housing.
2. The passenger side ballast was mounted with an optional mounting bracket on top of the fender well, in the engine compartment.
3. The driver side on the firewall, next to the air filter in the engine compartment. use 1/2" long metal self-tapping screw with a washer.
4. You must flatten (2) nibs on the metal bulb mounting clip so the plastic bulb base seats flat prior to mounting the bulb.
5. A bulb mounting tip: 1/8 turn clock wise turn and the white metal rod is at a 6' O clock position when completed. The 2 metal tips on the clip mounts inside of 2 hex screws on the housing at 9 and 3'o clock position.
6. 5000k color matches the DRL lamp. If you live in a rainy place like Seattle or roads paved with asphalt, I would recommend a 4300k. for more reflectivity off the road. Otw, darker pavement and wet surface will absorb the light instead of reflecting of the pavement. I live in LA and 5000k with ideal with no rain and conc. pavement. Higher the temperature, less lumen and less longevity. Thus the reason why car makers use 4300k.
7. After the install, use a long hex screw driver to adjust the light beam lower by about 1" from stock setting. It's clearly visible behind the housing- Easy access.
HID conversion is about 3 time brighter than the oem halogen. The cut off is there but not as pronounced as before the conversion. The higher intensity produces some glare. So, not to blind people, lowering the beam is considerate and safe for everyone.
8. Oh... no need to change the fuse if using the 35wt. system. No adaptor cables needed, just plug and play.
9. Bytheway, my DRLs stays on with the low beam.
Last edited by Bigtime!; Apr 15, 2015 at 01:21 PM.
Newbie
Joined: Apr 2015
Posts: 7
Likes: 0
From: Los Angeles
2013 c250 sports coupe
i have a 2012 c300 sport 4matic i just ordered 6000k 55wats hid from ddm im hoping for the best
i see u guys had to drill the cap where can i get the filler to put the wire through?
ALSO WHAT bulb size are the inner small yellow bulbs in the headlights would like to swap those as well for led/ white lights
i see u guys had to drill the cap where can i get the filler to put the wire through?
ALSO WHAT bulb size are the inner small yellow bulbs in the headlights would like to swap those as well for led/ white lights
The rubber cap comes with the conversion system. the front parking light bulb is 194. However, LED 194s are not reliable.
Newbie
Joined: Apr 2015
Posts: 7
Likes: 0
From: Los Angeles
2013 c250 sports coupe
I ended up cut and splicing 2 wires. It's better not bending the metal mounting clip. Otw, you may have some difficulty mounting the bulb later.
Newbie
Joined: Apr 2015
Posts: 7
Likes: 0
From: Los Angeles
2013 c250 sports coupe
If you look at the metal mounting clip, it's tapered. smaller on one side. the tapered side is on top at 12' o clock position when it's mounted. Insert it at 11'o clock position with white bulb rod in a low position. turn clockwise a 1/8 turn to mount. The 2 wings on the clip mounts inside of the 2 hex screws on the housing at 3 and 9'o clock position. Good luck.


Junior Member
Joined: Dec 2015
Posts: 60
Likes: 0
From: Tampa, FL
c250 Coupe Sport
great write-up. I got the Kensun HID Xenon Conversion Kit "All Bulb Sizes and Colors" with "Slim" Digital Ballasts - H7 - 6000k kit off Amazon which was listed as compatible with 2012 c250 coupe but it was not. the connector is too wide to fit in the bracket. I will be purchasing the DDM version!
Now, how do you remove the yellow parking lights?
they seem to have a different clamp than the 2011's that are detailed on youtube. thanks!
Now, how do you remove the yellow parking lights?
they seem to have a different clamp than the 2011's that are detailed on youtube. thanks!
Junior Member
Joined: Dec 2015
Posts: 60
Likes: 0
From: Tampa, FL
c250 Coupe Sport
Depending on what type of HID kit you have, you will need to manipulate the wiring harness to fit through the opening of the stock metal clip and the dust cap. I had to pull apart the wiring harness wire by wire to get each wire to go through the metal clip and dust cover.
If you can get the base of the hid bulb and wires through the opening of the stock metal clip, the reinstall is the same as the factory setup no need to modify anything
If you can get the base of the hid bulb and wires through the opening of the stock metal clip, the reinstall is the same as the factory setup no need to modify anything
All the wires will not detach

Junior Member
Joined: Oct 2016
Posts: 16
Likes: 0
From: PDX
2016 W205 C300 4MATIC Sport, 2006 Lancer Evo 9 - 550 whp
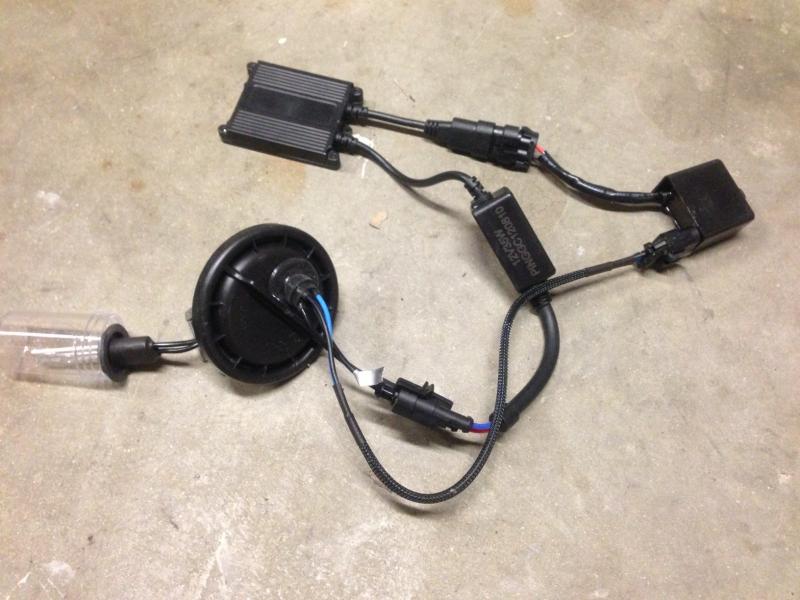
I finally had time this weekend to install an HID kit on my wife's 2016 C300. I definitely wouldn't call this a trivial first-time job because it took some time to determine the best way to install the kit. I spent at least 5 hours experimenting with different installation options. However, now that I've done it once, I could probably install the kit on another C300 in an hour or less. Below are the details of my install that are not covered by the original post. If anyone is interested, this is the XenonDepot Xtreme HID kit wth their standard bulb and with the optional lamp-out fix module. The optional Philips bulbs are too long and hit the the low beam hood. The lamp out module is not capacitor-based, so there is no concern about explosion if not installed at the correct polarity. This same kit (minus the lamp-out module) installed in my Honda Civic 4-5 years ago has been trouble-free and a huge improvement over the stock halogens.
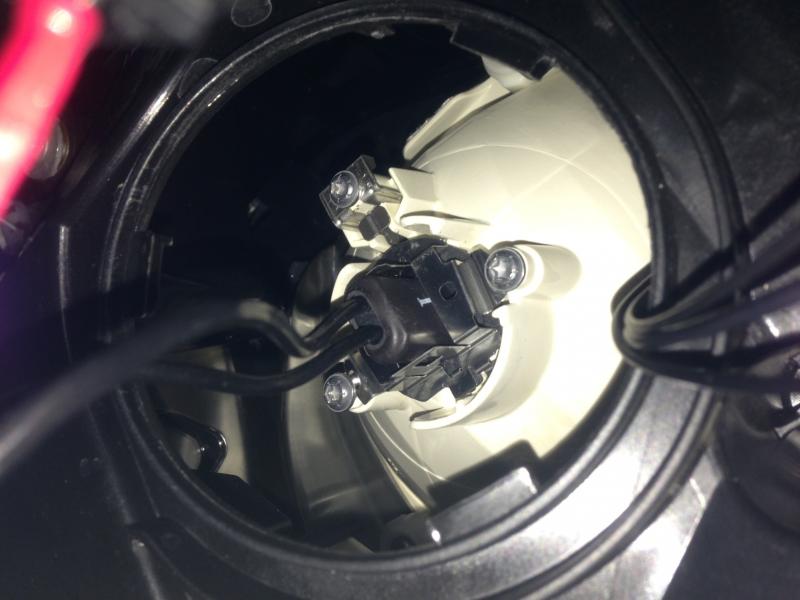
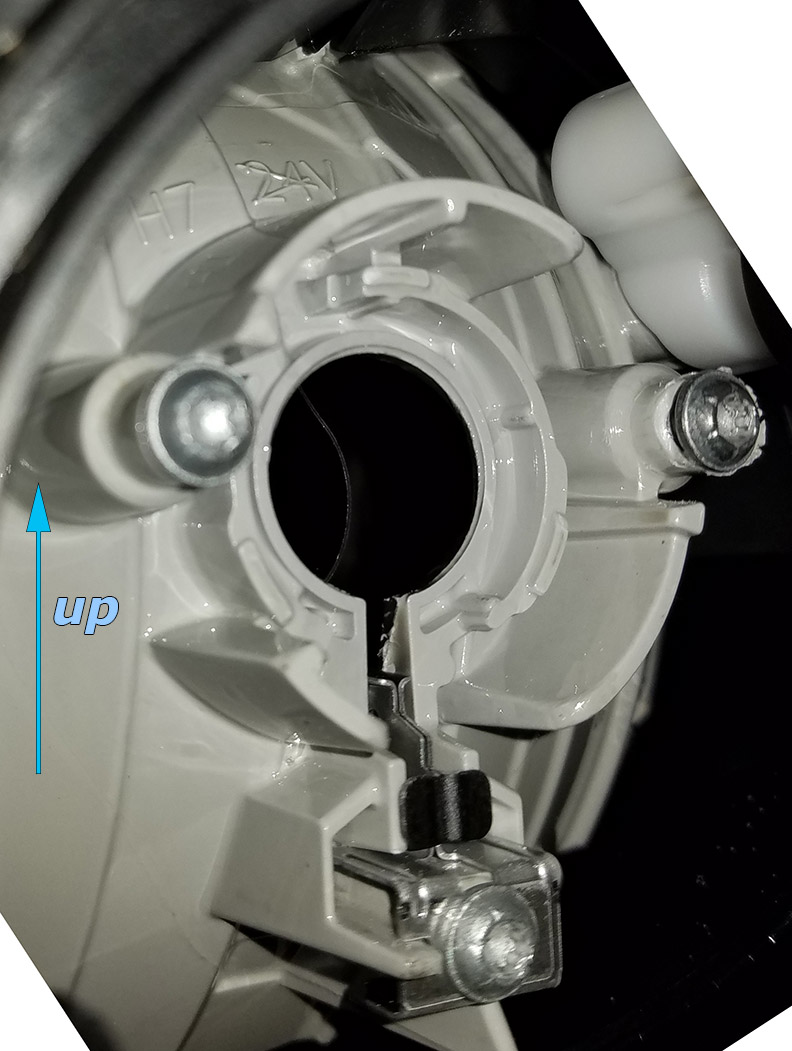
Since its virtually impossible to see what's happening inside the light fixture housing, everything has to be done by feel. And its in a pretty tight working space on the C300, so before starting the job, I suggest looking at the locking adapter for the bulb and practicing removing and installing the factory bulb a few times. The two tangs on the bulb locking adapter slide under the two screws to the left and right on the reflector housing exterior. The bulb and tangs rotate clockwise under the screws.

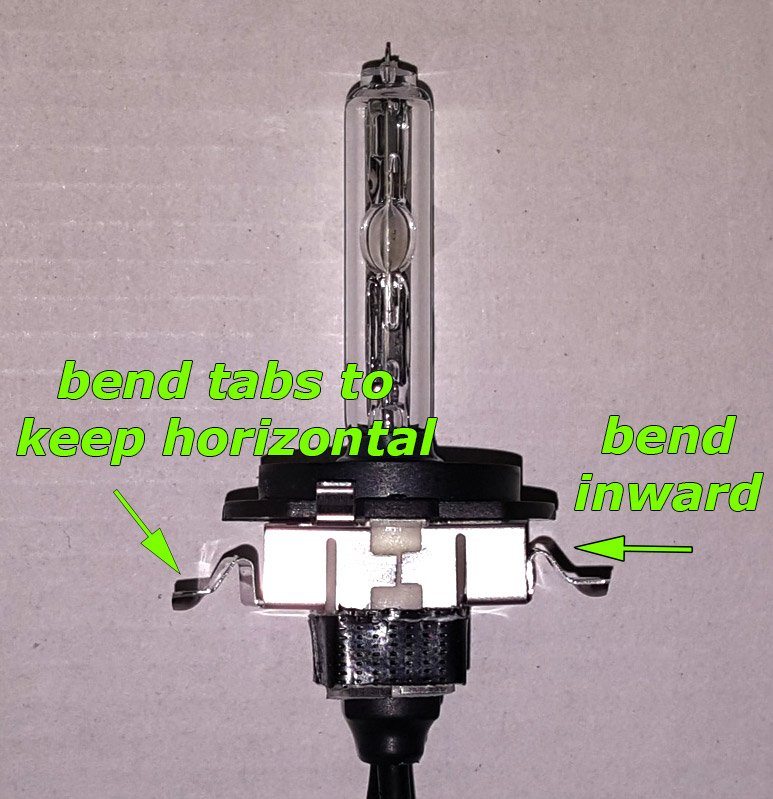
One of the aspects of the install that requires consideration is mating the locking adapter to the HID bulb. The OP suggested that it could be possible to slip the locking adapter over the HID wiring, but I think its impossible for any HID kit I've seen. The two options for getting the locking adapter on the bulb are 1) Cut the HID bulb wiring and then reattach, or 2) Cut the locking adapter. I obviously choose to cut the adapter. The cut points were selected so that when I wrap tape around the locking adpater as shown, the tangs will be held securely (and not be able to flop around). As can be seen, I used foam double-stick tape to more securely hold the HID bulb to the locking adapter. This worked out really well for holding the bulb. As another poster said, flattening two little tangs on the base of the adapter (these are not shown in any of my photos) is helpful for snugging the bulb against the locking adapter.
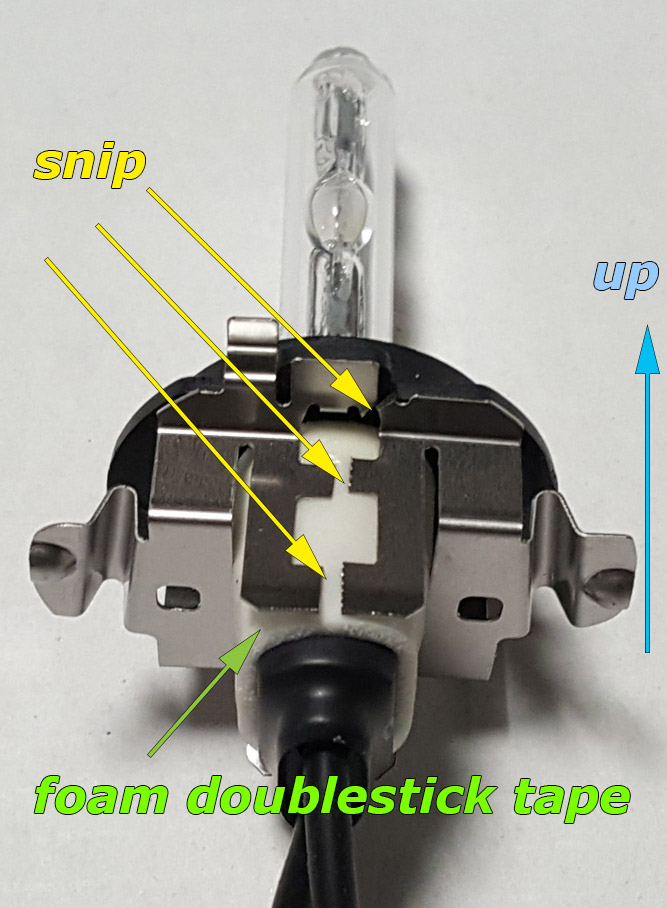

As mentioned by the OP, the locking tangs need to be bent to accommodate the thick plastic base of the HID bulb (compared to the metal base of the halogen bulb). Bend the entire tang inward, and then straighten the wings to be horizontal. A few test fits may be required to get the right level of snuggness. Prior practice installing the factory bulb is very helpful for determining the required snugness.
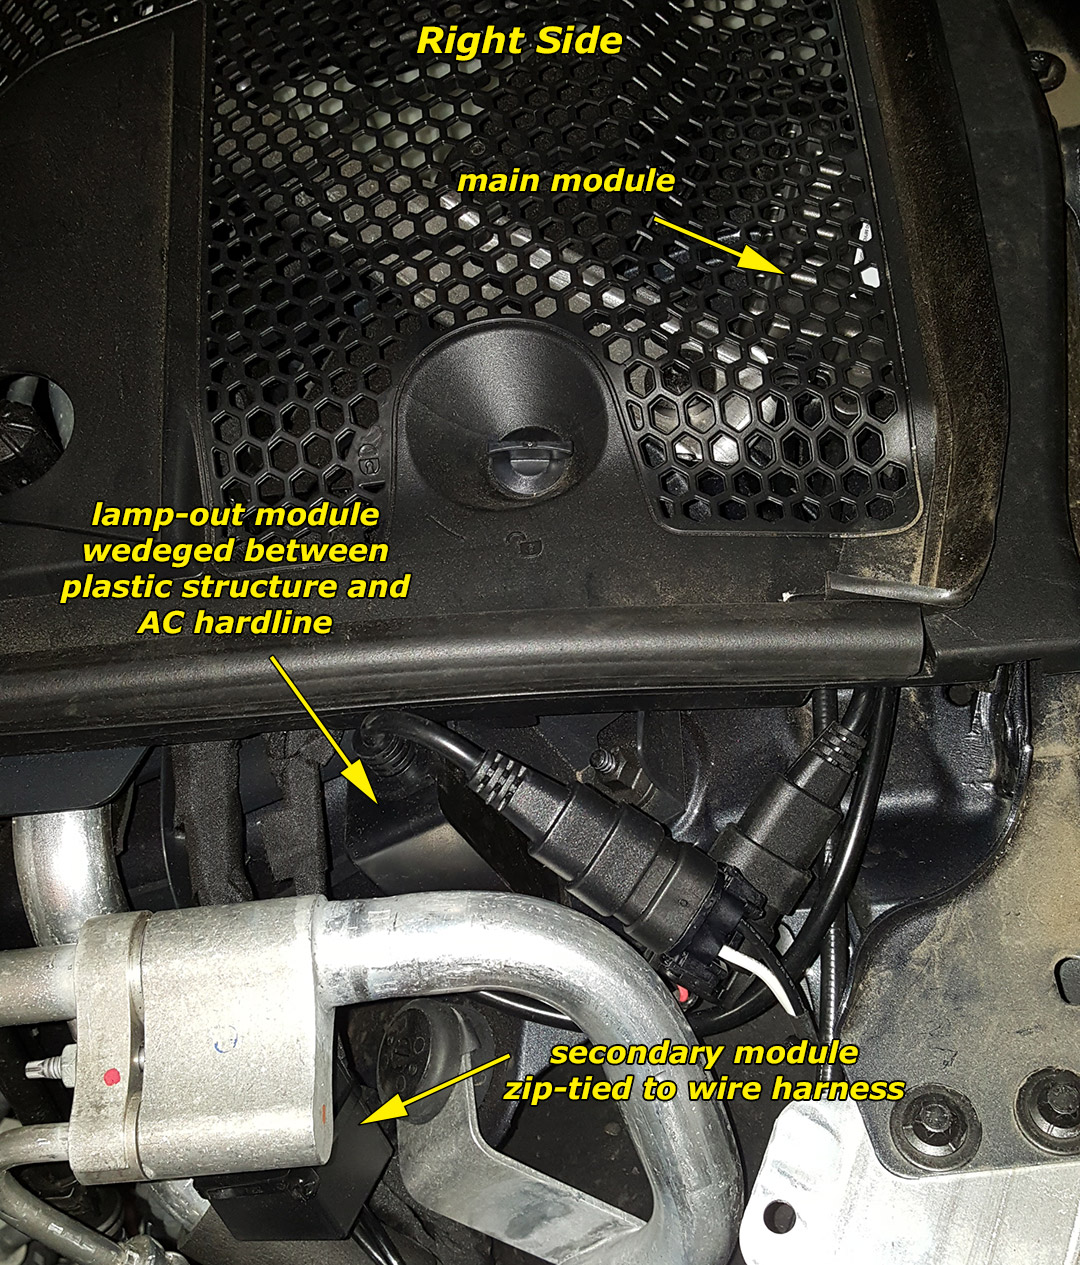
Here is where I installed the HID components. The main module is held in place by the force of the weather cover. For the left side, I had to cut off a small piece of plastic that was blocking the desired location for the bulb-out module. I also had to drill a hole in the remaining plastic for the zip tie.

Since its virtually impossible to see what's happening inside the light fixture housing, everything has to be done by feel. And its in a pretty tight working space on the C300, so before starting the job, I suggest looking at the locking adapter for the bulb and practicing removing and installing the factory bulb a few times. The two tangs on the bulb locking adapter slide under the two screws to the left and right on the reflector housing exterior. The bulb and tangs rotate clockwise under the screws.
One of the aspects of the install that requires consideration is mating the locking adapter to the HID bulb. The OP suggested that it could be possible to slip the locking adapter over the HID wiring, but I think its impossible for any HID kit I've seen. The two options for getting the locking adapter on the bulb are 1) Cut the HID bulb wiring and then reattach, or 2) Cut the locking adapter. I obviously choose to cut the adapter. The cut points were selected so that when I wrap tape around the locking adpater as shown, the tangs will be held securely (and not be able to flop around). As can be seen, I used foam double-stick tape to more securely hold the HID bulb to the locking adapter. This worked out really well for holding the bulb. As another poster said, flattening two little tangs on the base of the adapter (these are not shown in any of my photos) is helpful for snugging the bulb against the locking adapter.
As mentioned by the OP, the locking tangs need to be bent to accommodate the thick plastic base of the HID bulb (compared to the metal base of the halogen bulb). Bend the entire tang inward, and then straighten the wings to be horizontal. A few test fits may be required to get the right level of snuggness. Prior practice installing the factory bulb is very helpful for determining the required snugness.
Here is where I installed the HID components. The main module is held in place by the force of the weather cover. For the left side, I had to cut off a small piece of plastic that was blocking the desired location for the bulb-out module. I also had to drill a hole in the remaining plastic for the zip tie.
Last edited by maxbraketorque; Nov 8, 2016 at 09:56 AM.
Junior Member
Joined: Sep 2016
Posts: 57
Likes: 2
From: Boston, MA
C300 4-Matic Sport
If the housing is a stock halogen housing, and reflective, then is this not illegal? Really want to install a DDMTunning or OPT7 Kit for my '10 C300 but get pulled over enough already with the exhaust. Do not wanna get pulled over for this too... 


