


 Jun 16, 2015, 03:34 PM
Last edit by: IB Advertising
See related guides and technical advice from our community experts:
Browse all: Lighting Guides
- Mercedes-Benz C-Class and AMG: How to Install HID Headlights
Step by step instructions for do-it-yourself repairs
Browse all: Lighting Guides

2013 C250 HID Install

Thread Starter
Member
Joined: Nov 2012
Posts: 99
Likes: 0
213 C250 Coupe
2013 C250 HID Install
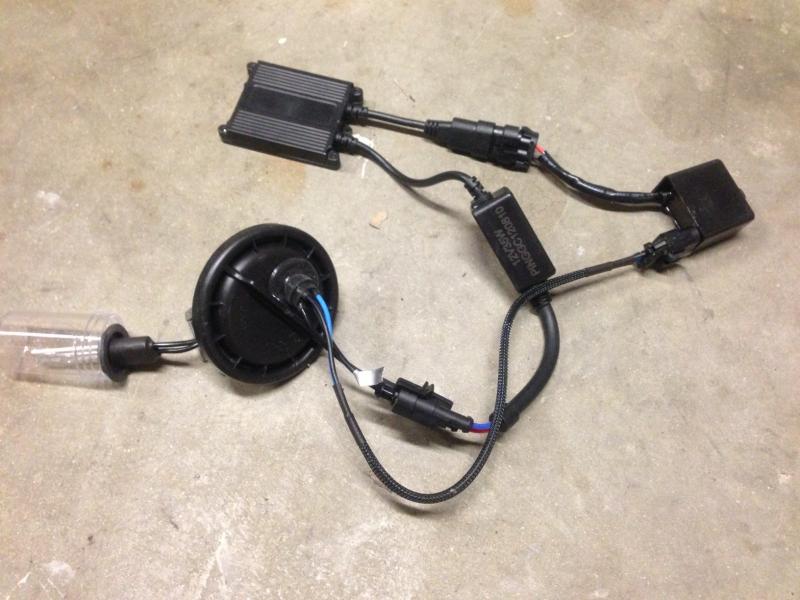
I couldn't find a HID DIY on the 2013 so I documented my install, hopefully someone might find this useful. This is a DDM Tuning H7 6000K HID slim ballast kit with Error Code Eliminator.
Stock halogens
Stock connector turn to remove
Stock connector removed
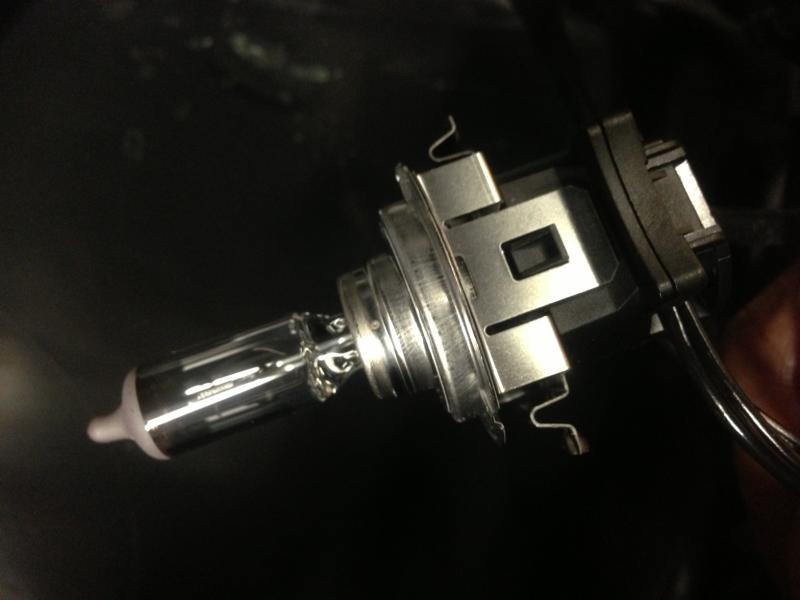
Stock halogen bulb attached to connector
Pull bulb straight up and out
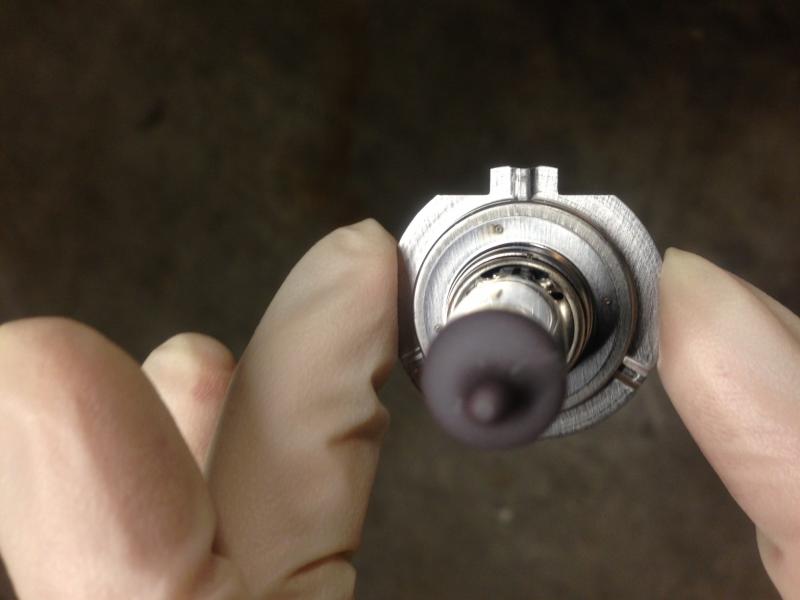
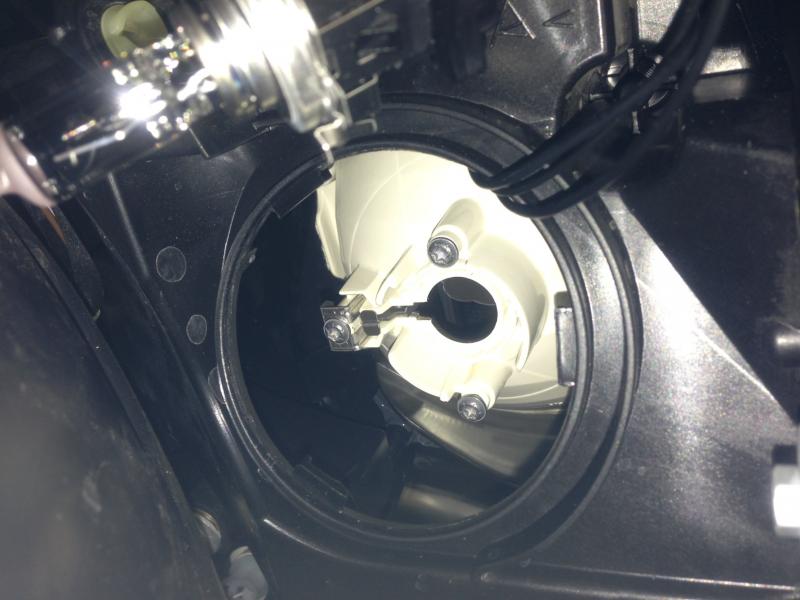
Once bulb is removed
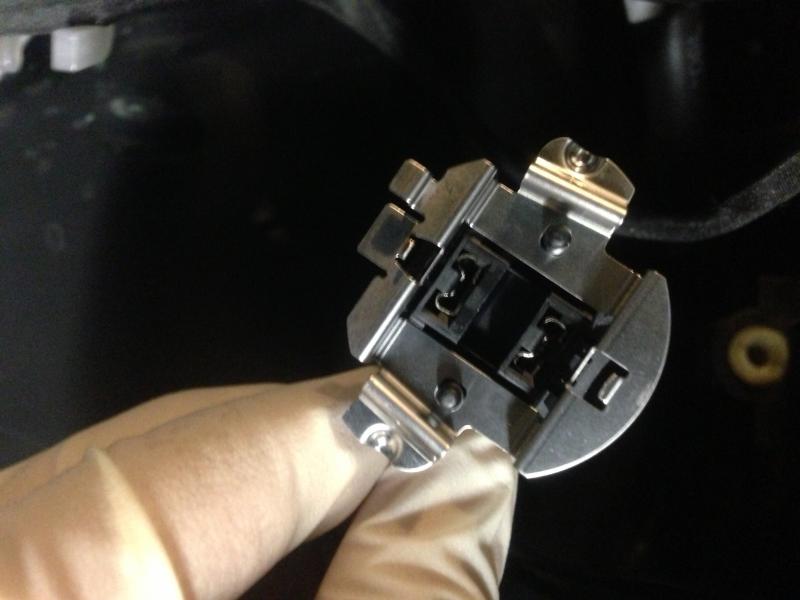
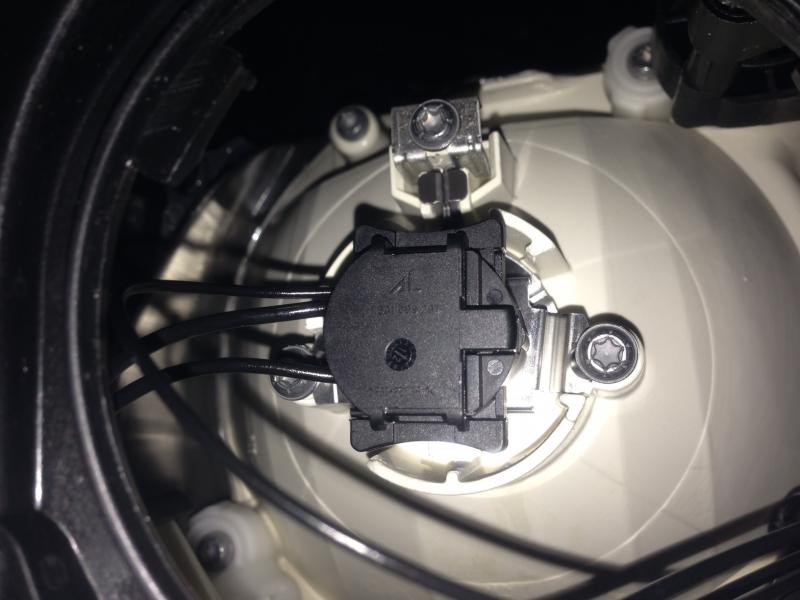
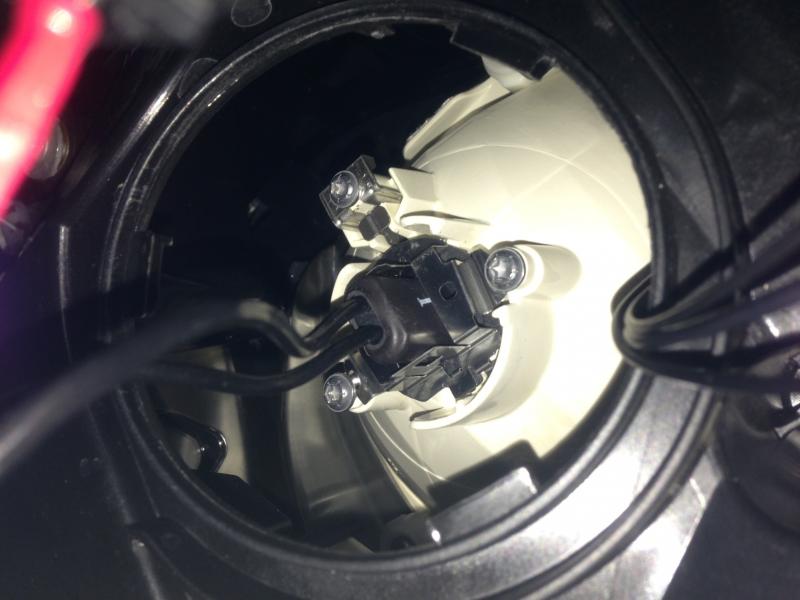
Use flat head screw driver to remove metal clip from plastic connector with wiring

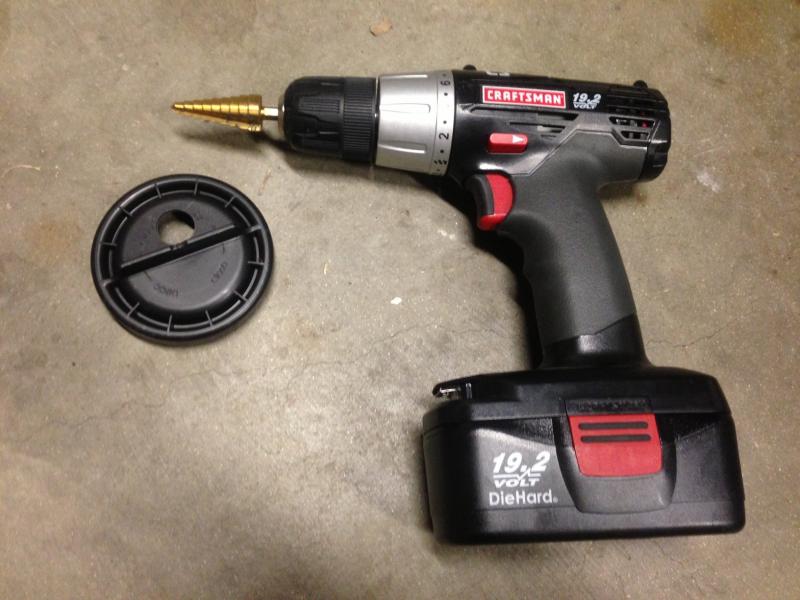
Drill a whole into stock dust cap for wiring to fit through
Depending on what type of HID kit you have, you will need to manipulate the wiring harness to fit through the opening of the stock metal clip and the dust cap. I had to pull apart the wiring harness wire by wire to get each wire to go through the metal clip and dust cover.
If you can get the base of the hid bulb and wires through the opening of the stock metal clip, the reinstall is the same as the factory setup no need to modify anything
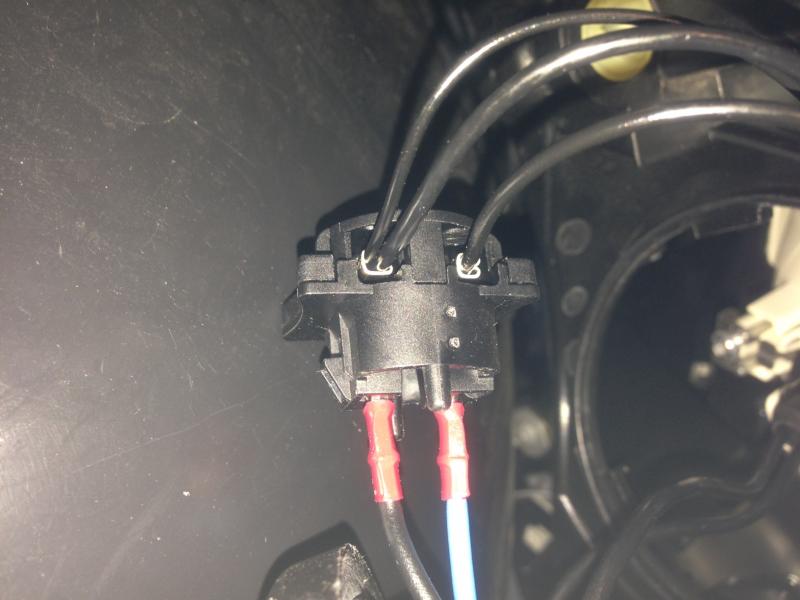
RED (+) into slot with one wire, BLACK (-) into slot with two wires. After this pic was taken, I used electrical tape to secure the wires onto the connector so they don't come off.
Plenty of space inside the housing for all the wiring. Air tight seal with dust cap back on

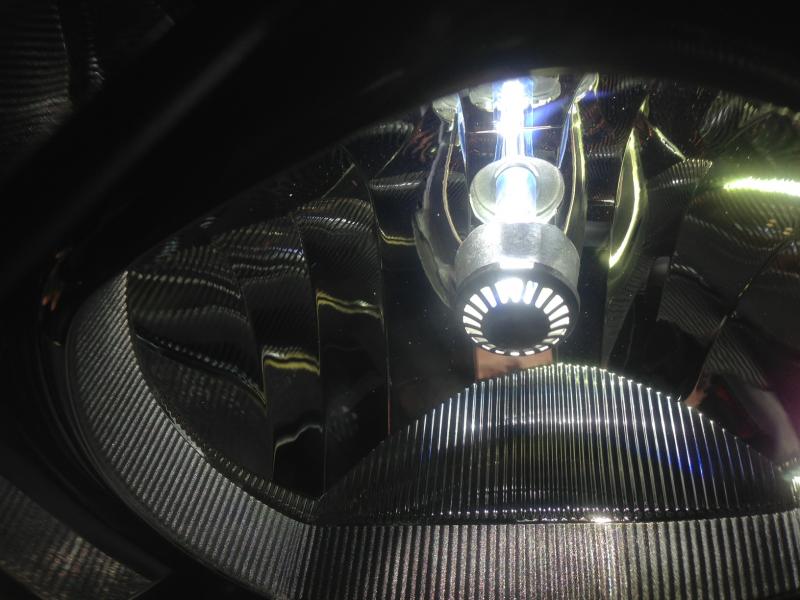
HID H7 bulb flushed with housing inlet. Location and ways to mount the ballast is a personal preference so I'll leave that up to you.
Done!
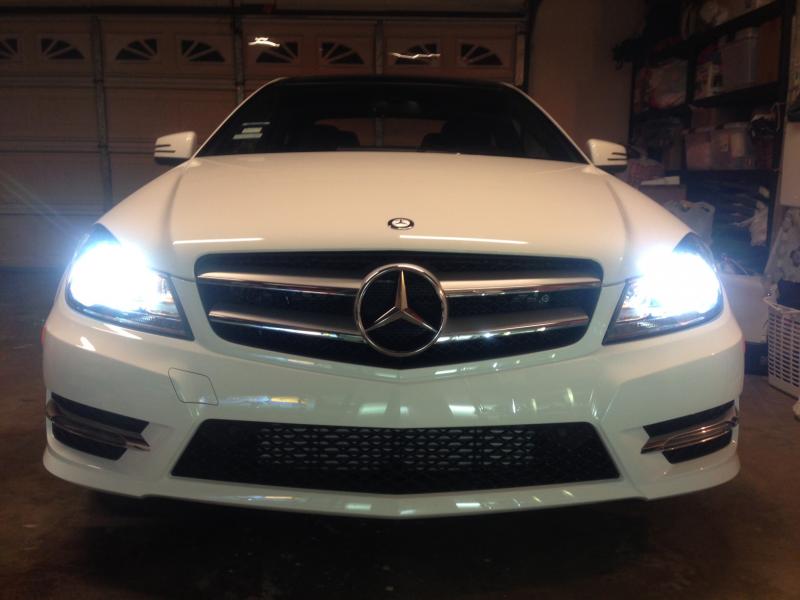

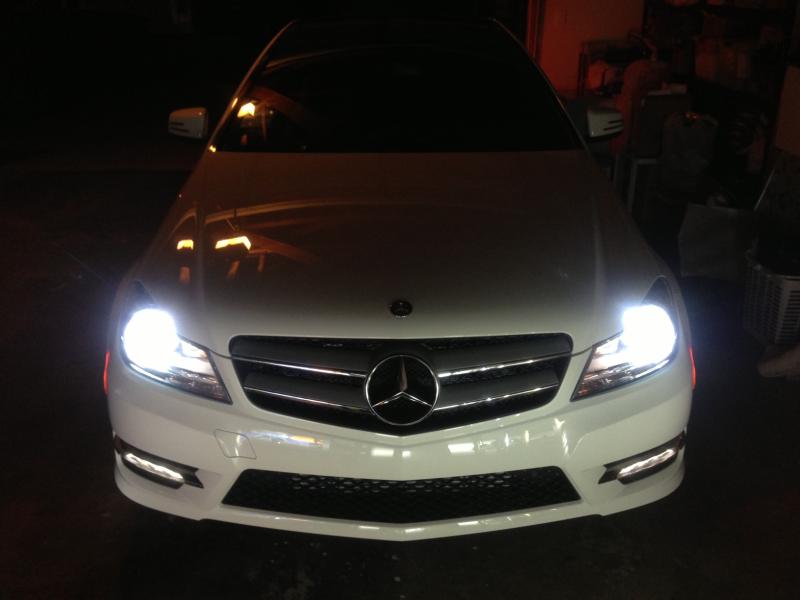
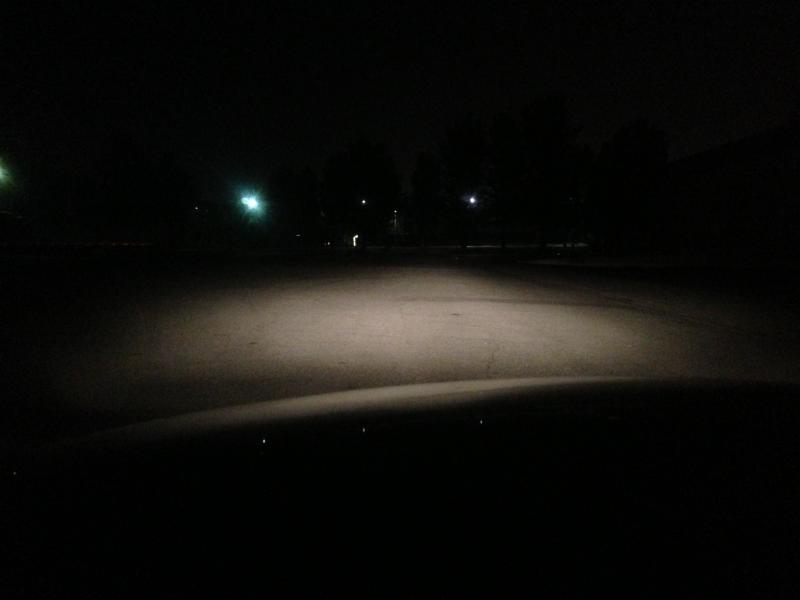
HID much brighter than stock halogen
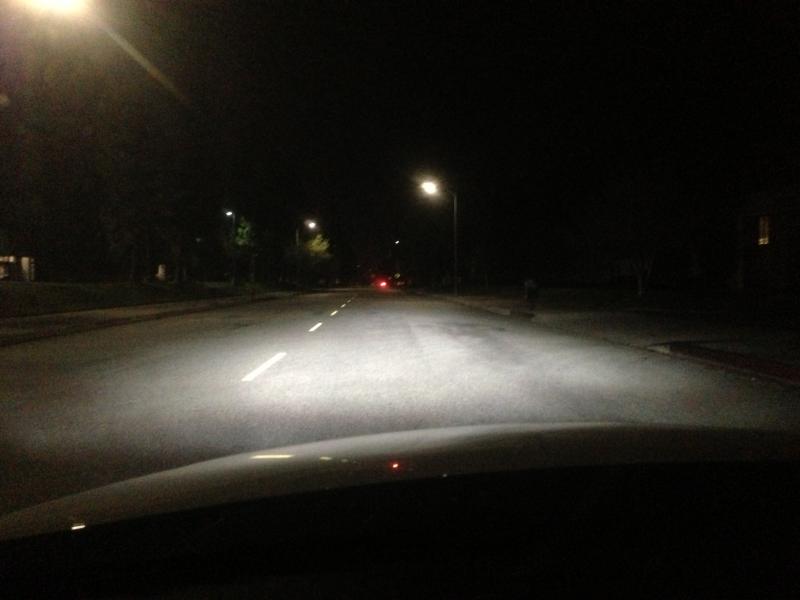
Halogen cut offs
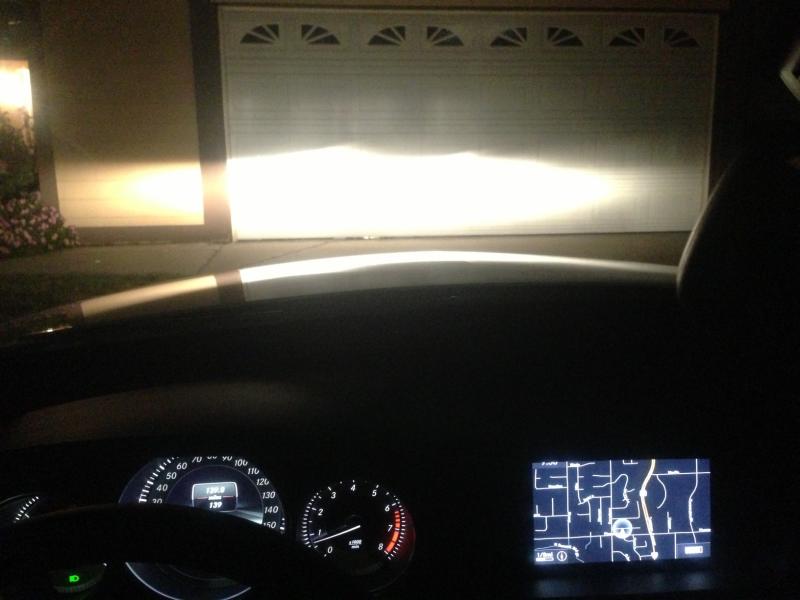
HID cut offs, not too much glare

Stock halogens
Stock connector turn to remove
Stock connector removed
Stock halogen bulb attached to connector
Pull bulb straight up and out
Once bulb is removed
Use flat head screw driver to remove metal clip from plastic connector with wiring
Drill a whole into stock dust cap for wiring to fit through
Depending on what type of HID kit you have, you will need to manipulate the wiring harness to fit through the opening of the stock metal clip and the dust cap. I had to pull apart the wiring harness wire by wire to get each wire to go through the metal clip and dust cover.
If you can get the base of the hid bulb and wires through the opening of the stock metal clip, the reinstall is the same as the factory setup no need to modify anything
RED (+) into slot with one wire, BLACK (-) into slot with two wires. After this pic was taken, I used electrical tape to secure the wires onto the connector so they don't come off.
Plenty of space inside the housing for all the wiring. Air tight seal with dust cap back on
HID H7 bulb flushed with housing inlet. Location and ways to mount the ballast is a personal preference so I'll leave that up to you.
Done!
HID much brighter than stock halogen
Halogen cut offs
HID cut offs, not too much glare
Last edited by kkd79; Dec 5, 2012 at 10:49 AM.
MBWorld Fanatic!
Joined: Mar 2006
Posts: 1,375
Likes: 16
From: Hong Kong
2010 C200 CGI
Can the mods sticky this in the DIY thread? We can hopefully avoid all the threads asking about HID's in the face lift model now. Thanks for this post KKD79, honestly it really doesn't seem that difficult, I dunno why more ppl don't take the time to look the parts over and figure these things out.
Thread Starter
Member
Joined: Nov 2012
Posts: 99
Likes: 0
213 C250 Coupe
 I wanted to get a car with lighting package but couldn't find one at the time.

Member
Joined: Nov 2012
Posts: 86
Likes: 0
From: SoCal
2013 W204
SoCal here and I have a 2 week old 2013 C250 @40k with Bi-xenon adaptive headlight, keyless go, rear spoiler, 18" AMG wheels, etc. 30 mins ago was the first time for me to drive the car in the dark...gotta love adaptive headlight technology.
If the oncoming traffic flashed their high beam at night on you, then I assumed you prolly know what it means. Cars fitted with HID on a non-projector beam always get the blame for head on collision at night.
Just my 2 cents.
Btw, did it throw error code after the mod? Can't do just that on a Bimmer!
Last edited by katuga; Dec 5, 2012 at 11:31 PM.
Thread Starter
Member
Joined: Nov 2012
Posts: 99
Likes: 0
213 C250 Coupe
SoCal here and I have a 2 week old 2013 C250 @40k with Bi-xenon adaptive headlight, keyless go, rear spoiler, 18" AMG wheels, etc. 30 mins ago was the first time for me to drive the car in the dark...gotta love adaptive headlight technology.
If the oncoming traffic flashed their high beam at night on you, then I assumed you prolly know what it means. Cars fitted with HID on a non-projector beam always get the blame for head on collision at night.
Just my 2 cents.
Btw, did it throw error code after the mod? Can't do just that on a Bimmer!
If the oncoming traffic flashed their high beam at night on you, then I assumed you prolly know what it means. Cars fitted with HID on a non-projector beam always get the blame for head on collision at night.
Just my 2 cents.
Btw, did it throw error code after the mod? Can't do just that on a Bimmer!

Blamed for head on collision at night because of aftermarket non projector hid?

No error code with the error code eliminator

Trending Topics

Junior Member
Joined: Nov 2012
Posts: 21
Likes: 0
2012 C250
GREAT post bro! I have been waiting for something like this. I will be doing the same now. 2 questions. Did you do the 35 or 55 watt kit? I know it said the 55 watt bulbs are longer? Did you purchase the mounting brackets?
MB World Stories
The Best of Mercedes & AMG

7 Craziest Things AMG Gas Ever Built
Verdad Gallardo
New Electric Mercedes-AMG GT 4-Door Coupe Unveiled: 10 Things You Need to Know
Verdad Gallardo
6 Mercedes Models That Did NOT Age Well (But Are Somehow Still Cool)
Verdad Gallardo
Manual Mercedes? 6 Times Sindelfingen Let Drivers Have All The Fun
Verdad Gallardo
Mercedes SLR McLaren 722 S Is Extremely Rare Example Modified by McLaren
Verdad Gallardo
8 Classic Boxy Mercedes Designs That Have Aged Like Fine Wine
Verdad Gallardo
Flawlessly Restored Mercedes 190E Evo II Heads to Auction
Verdad Gallardo
Electric Mercedes C-Class Unveiled: 11 Things You Need to Know
Verdad Gallardo
Mercedes EQS Gets A Major Update: Everything You Need to Know
Verdad GallardoMBWorld Fanatic!
Joined: Mar 2006
Posts: 1,375
Likes: 16
From: Hong Kong
2010 C200 CGI
There is cutoff glare and head on glare, while I agree your cutoff is much better than older reflectors, head on your car still produces some glare which can bother other drivers.

Senior Member
Joined: Dec 2011
Posts: 252
Likes: 1
2012 c250
I've sat right across an intersection to a 2012 c250 with HID kit and it did not blind me at all. Of course you can see the usual glare that you see in any reflector headlights but it wasn't the: "wtf! Are his high beams on?!?" Kind of glare.
Thread Starter
Member
Joined: Nov 2012
Posts: 99
Likes: 0
213 C250 Coupe
. I have the 35W kit and the hid bulbs are similar length to the stock halogen bulbs. I don't know about 55w kit. I did not purchase the mounting brackets, I used zip tie.I have the error code eliminator, I don't have any extra wiring harness.
Thread Starter
Member
Joined: Nov 2012
Posts: 99
Likes: 0
213 C250 Coupe

Super Member

Joined: Aug 2008
Posts: 975
Likes: 52
From: Metro Detroit
2014 C63 AMG 507 sedan
IMHO, if you want to do it correctly, you should retrofit an HID projector. Installing an HID bulb in a halogen bowl looks cheap, with an uncontrolled glare for approaching traffic. HID bulbs only work with HID projectors.
Check out this site: www.hidplanet.com. You have a $40k car, do it right.
Check out this site: www.hidplanet.com. You have a $40k car, do it right.
Member
Joined: Dec 2012
Posts: 223
Likes: 1
From: USA
C Coupe
IMHO, if you want to do it correctly, you should retrofit an HID projector. Installing an HID bulb in a halogen bowl looks cheap, with an uncontrolled glare for approaching traffic. HID bulbs only work with HID projectors.
Check out this site: www.hidplanet.com. You have a $40k car, do it right.
Check out this site: www.hidplanet.com. You have a $40k car, do it right.
Do you have pics of retrofitted HID bulb + projector so i can see what the difference is?
Super Member
Joined: Aug 2008
Posts: 975
Likes: 52
From: Metro Detroit
2014 C63 AMG 507 sedan
link
http://www.hidplanet.com/forums/show...highlight=w204
Here's an example of mine.
https://mbworld.org/forums/c63-amg-w...-retrofit.html

Junior Member
Joined: Dec 2012
Posts: 46
Likes: 1
C300
Could have used this video. the 2013+ will have the same layout as previous W204's as far as installing HID kits go.
http://www.youtube.com/watch?v=fVw1X...lqVT3Q&index=5
http://www.youtube.com/watch?v=fVw1X...lqVT3Q&index=5
Thanks for this, just fitted 6k's on the mrs w204 projectors,they light up great and controlled but I like things tidy so the ballasts on the inside is far more secure and out of sight.
I understand why you centrally mounted them as to me it's just a ..looks right kinda thing but not every one will be that fussy
I nearly screwed up on the drilling as I just took 1 inch is the whole size but then checked and the inner ring on the grommet was 3/4
but all done and the guide was a great help thanks
Member
Joined: Nov 2011
Posts: 99
Likes: 4
From: Ann Arbor, MI
2008 c300 sport 4matic
Thanks for this, just fitted 6k's on the mrs w204 projectors,they light up great and controlled but I like things tidy so the ballasts on the inside is far more secure and out of sight.
I understand why you centrally mounted them as to me it's just a ..looks right kinda thing but not every one will be that fussy
I nearly screwed up on the drilling as I just took 1 inch is the whole size but then checked and the inner ring on the grommet was 3/4
but all done and the guide was a great help thanks
MBWorld Fanatic!
Joined: Mar 2006
Posts: 1,375
Likes: 16
From: Hong Kong
2010 C200 CGI


