


DIY: 2012-13 Bi-Xenon headlights fitted into 2009 C300
Thread Starter
Senior Member


Joined: Mar 2013
Posts: 420
Likes: 38
From: NC
W204
DIY: 2012-13 Bi-Xenon headlights fitted into 2009 C300
Putting this headlight onto my 2009 C300:

Okay, so I got the 2012-13 Bi-Xenon headlights used for a really good deal and I am going to put together a DIY on how I wired it up to my 2009 C300. Currently, I have the Spyder headlights on right now. I am doing a whole front end conversion with C63 style hood, bi-xenon headlights, sport front bumper and DRL. Here's what I have so far, I need some help to figure out the rest.
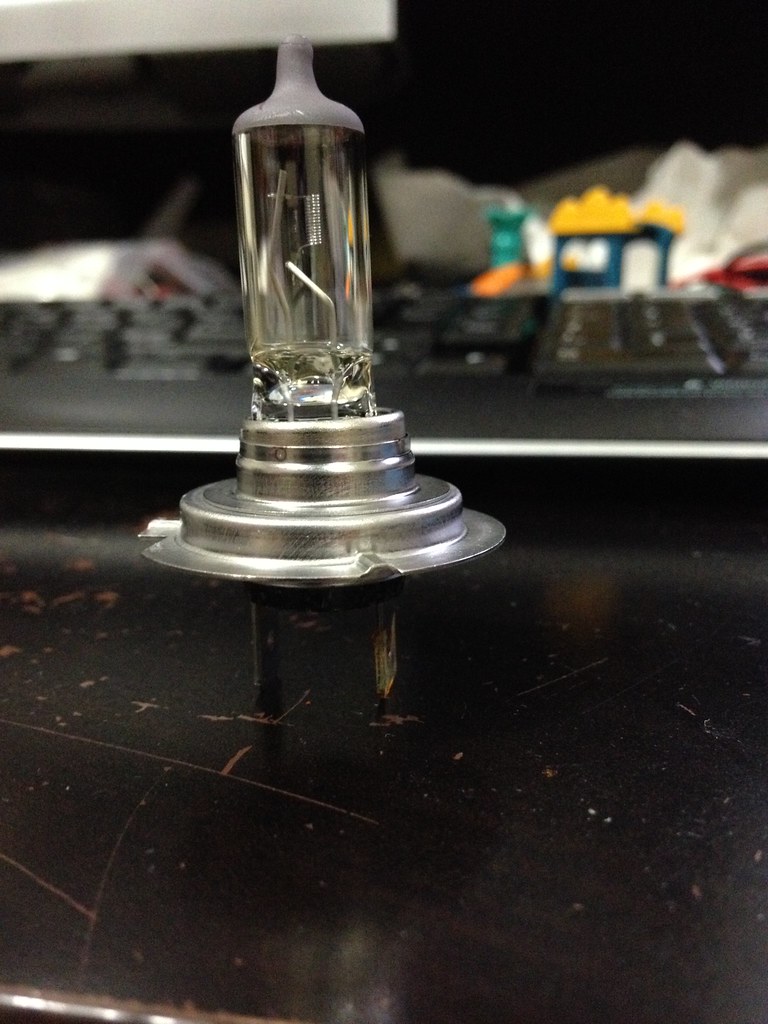
*For the Low Beam HID part, the bulb is a D1S type. I am going to ditch the OEM stuff and just run an aftermarket D1S HID Kit. This way, it's cheaper and the wiring is easier. I can just tap the power off the low beam plug I already have in the car.
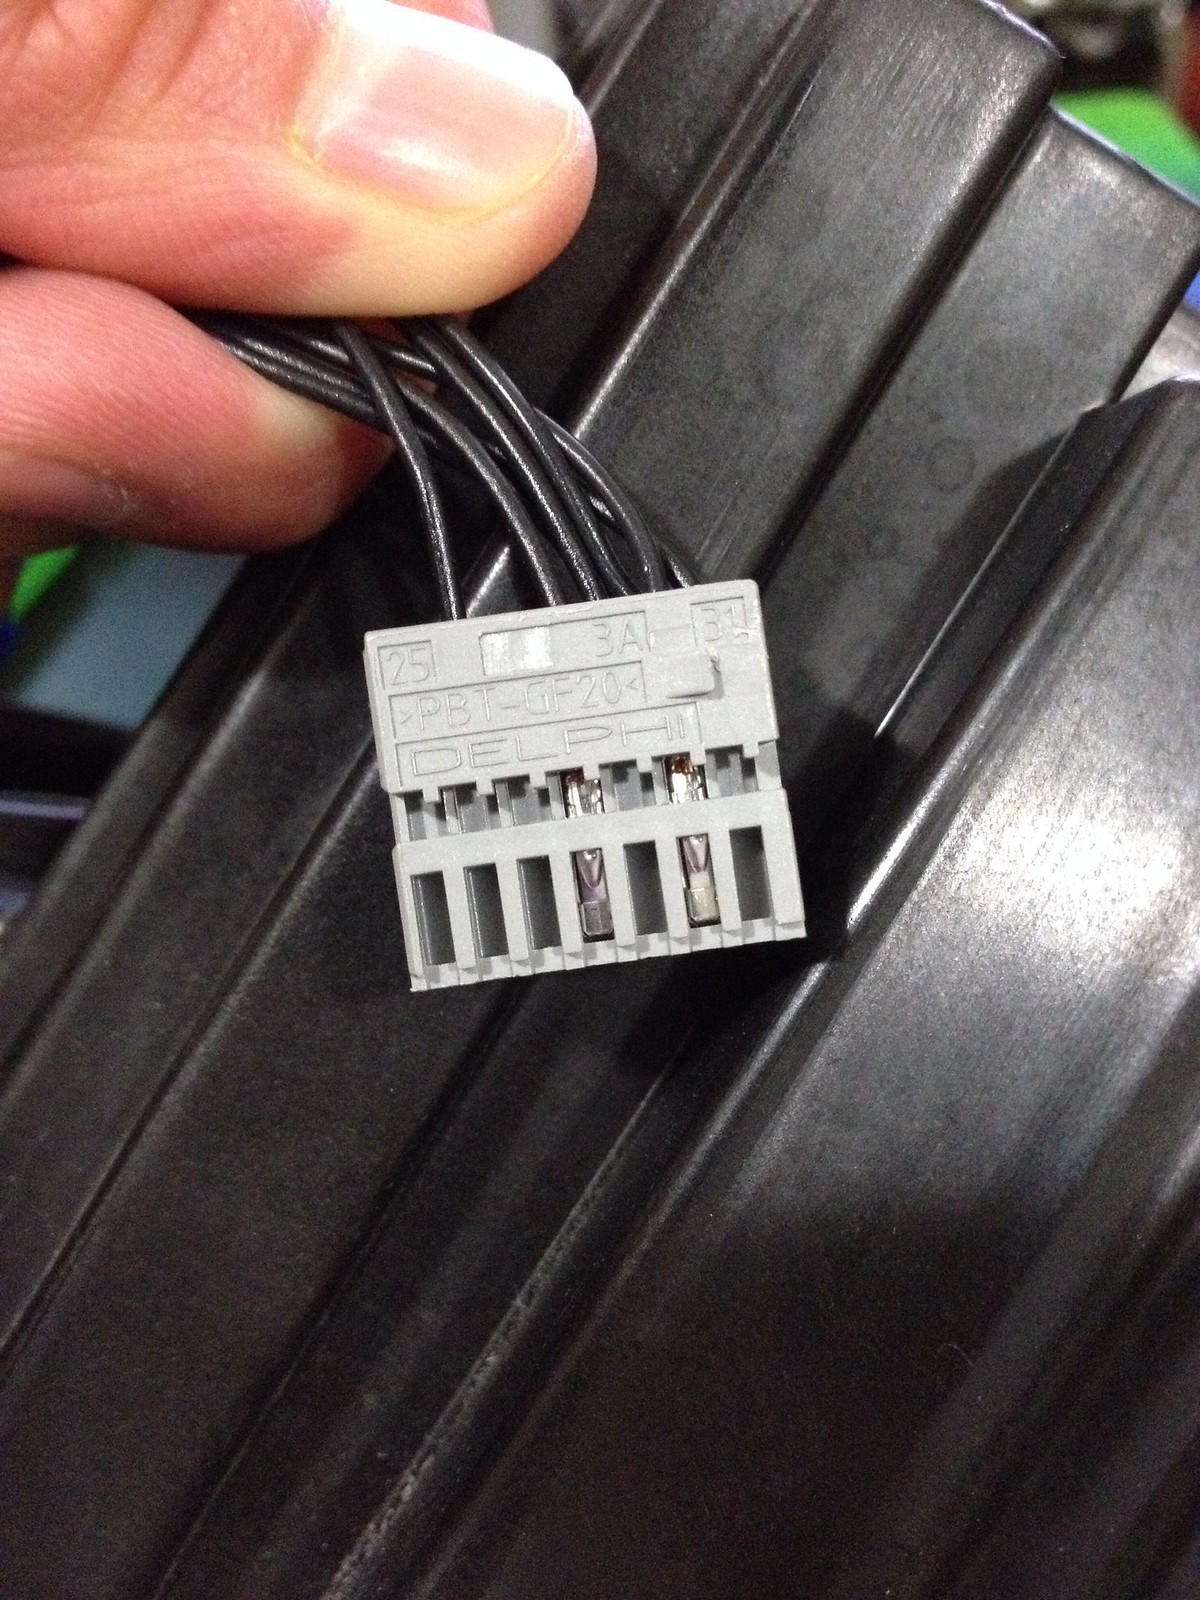
*On the Bi-Xenon headlight, there are two main plugs:
Black Female plug:
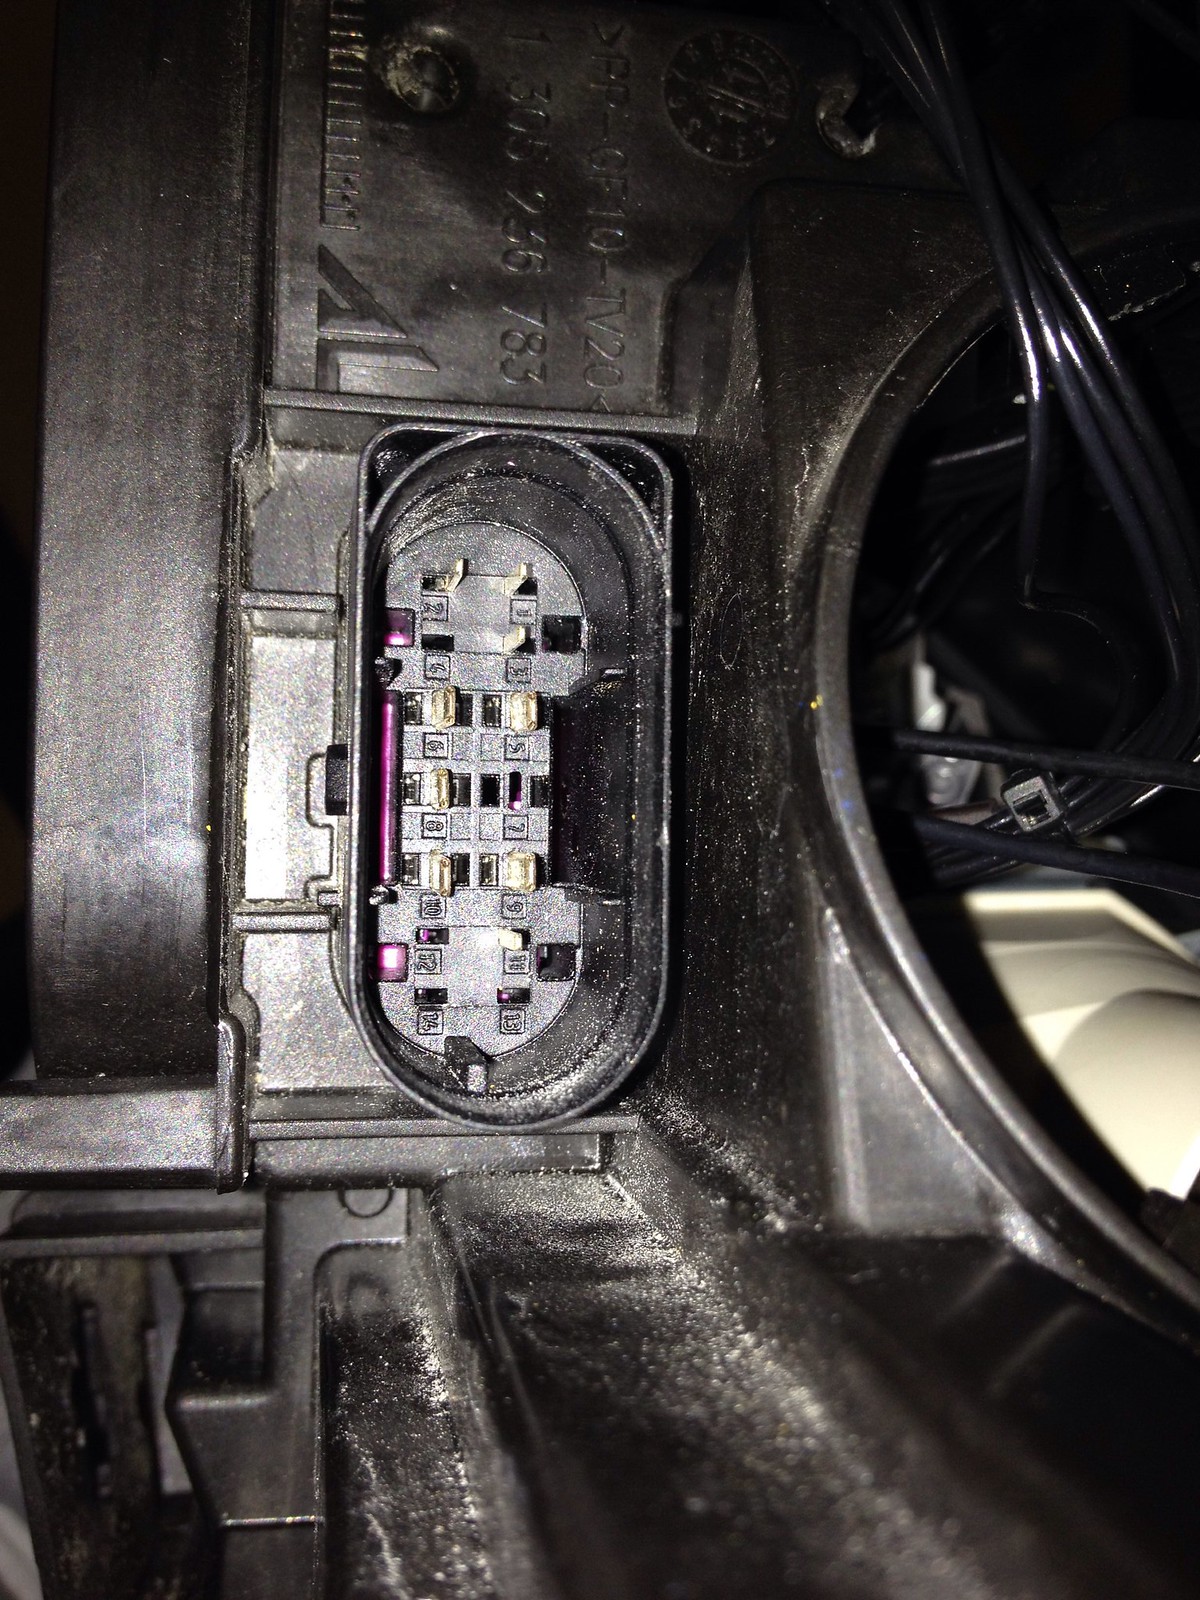
*Please note the numbering:
-top row is numbered 1, 3, 5, 7, 9, 11, 13.
-bottom row is numbered 2, 4, 6, 8, 10, 12, 14
-small prongs on 1, 2, 3, and 11
-large prongs on 5, 6, 8, 9, 10
-everything else is empty
*I found that on the black female plug, this is what happens when you put a 12V power source to the plugs:
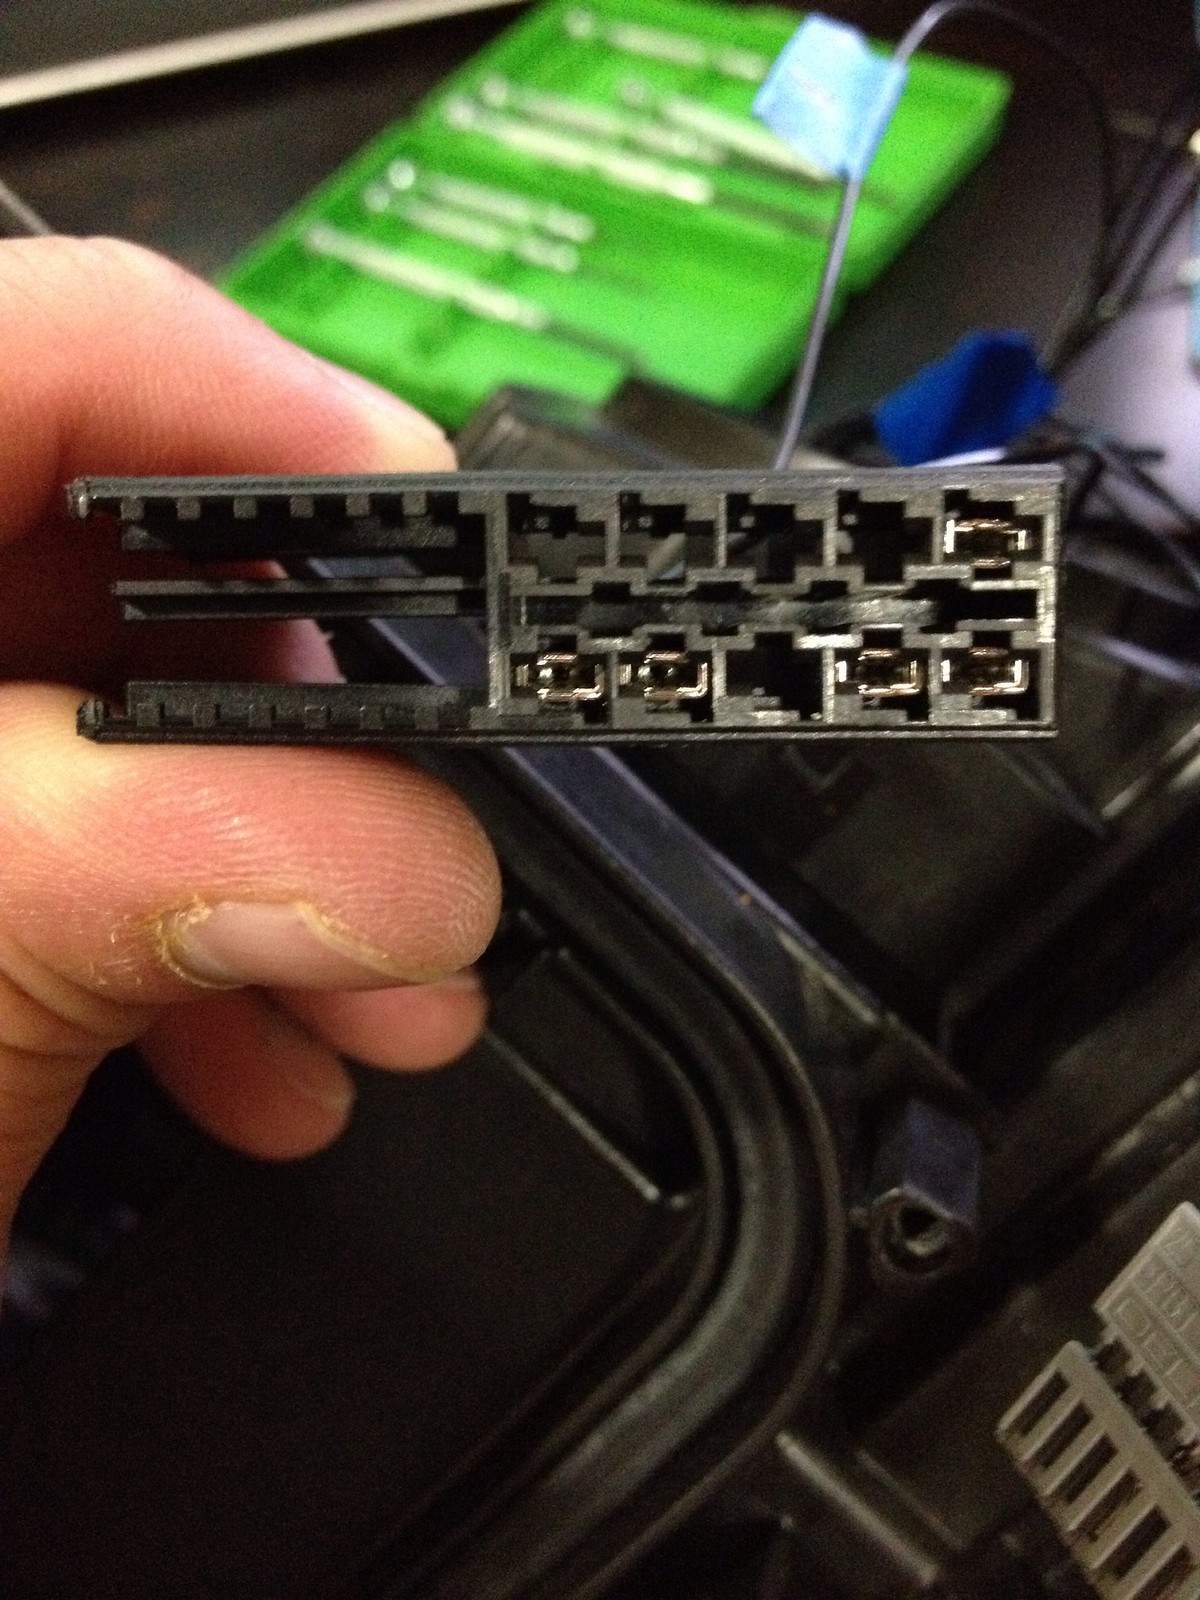
Purple Male plug:
There's actually two separate plugs in this one purple plug, they're held together with a puruple outer shell.
This is the outer purple shell:
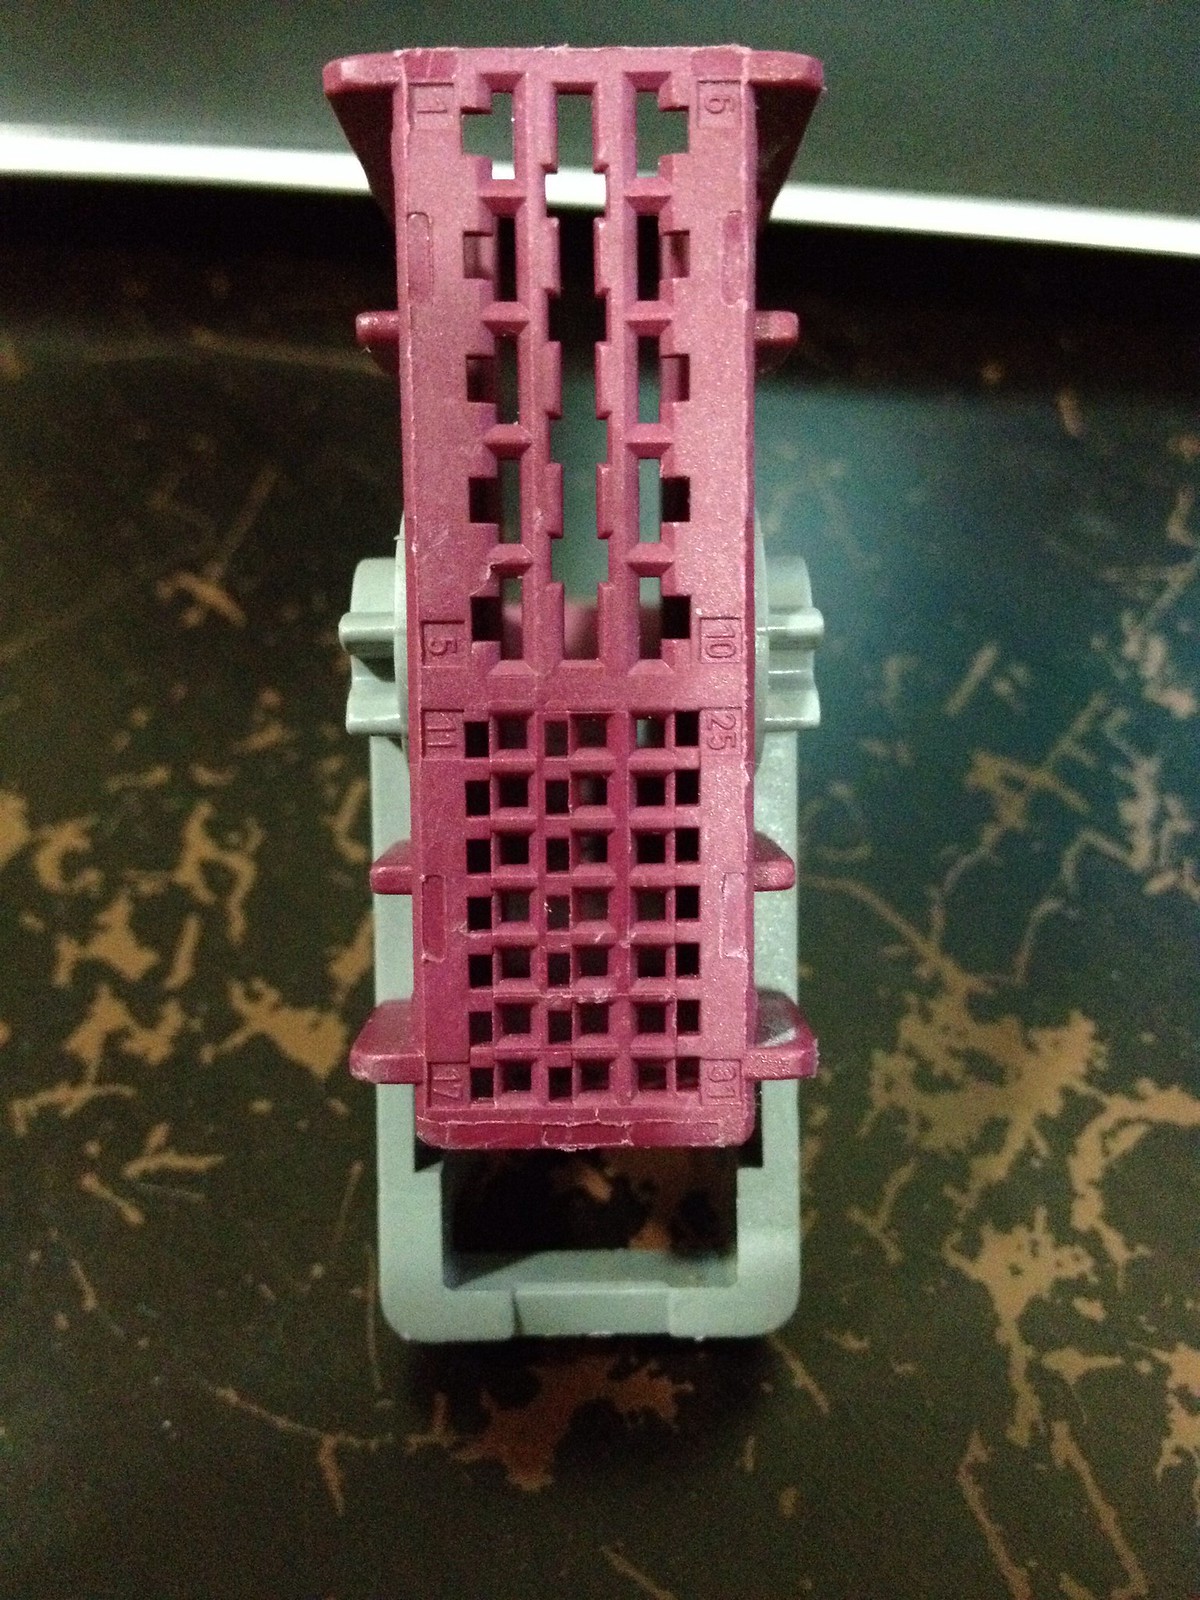
*Note the numbering:
-top row: 6 through 10 for left plug, then 25 through 31 for right plug
-middle row: nothing for left plug, 18 through 24 for right plug (no numbers shown)
-bottom row: 1 through 5 for left plug, 11 through 17 for right plug
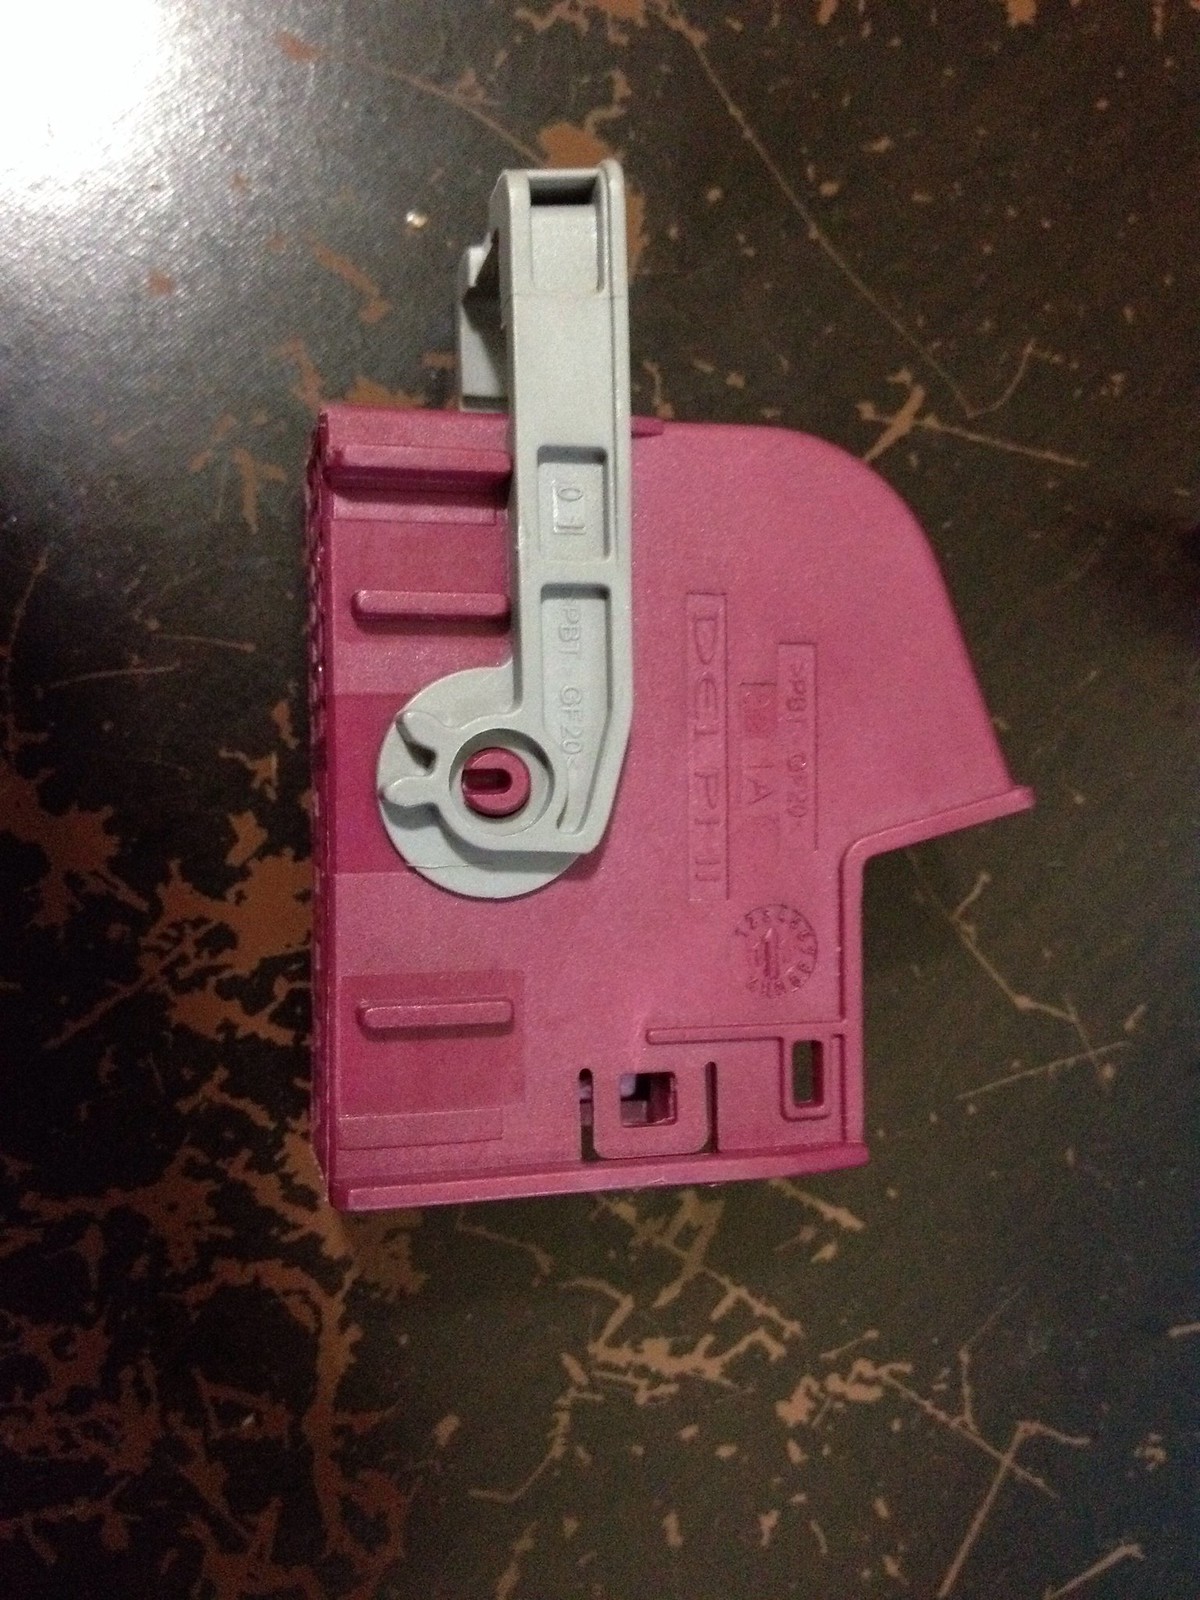
So this is what the plug looks like once I pulled it from the Outer purple shell:
Then I split the plug into two pieces as shown in order to figure out where the wires were going:
Gray Plug:
Black Plug:
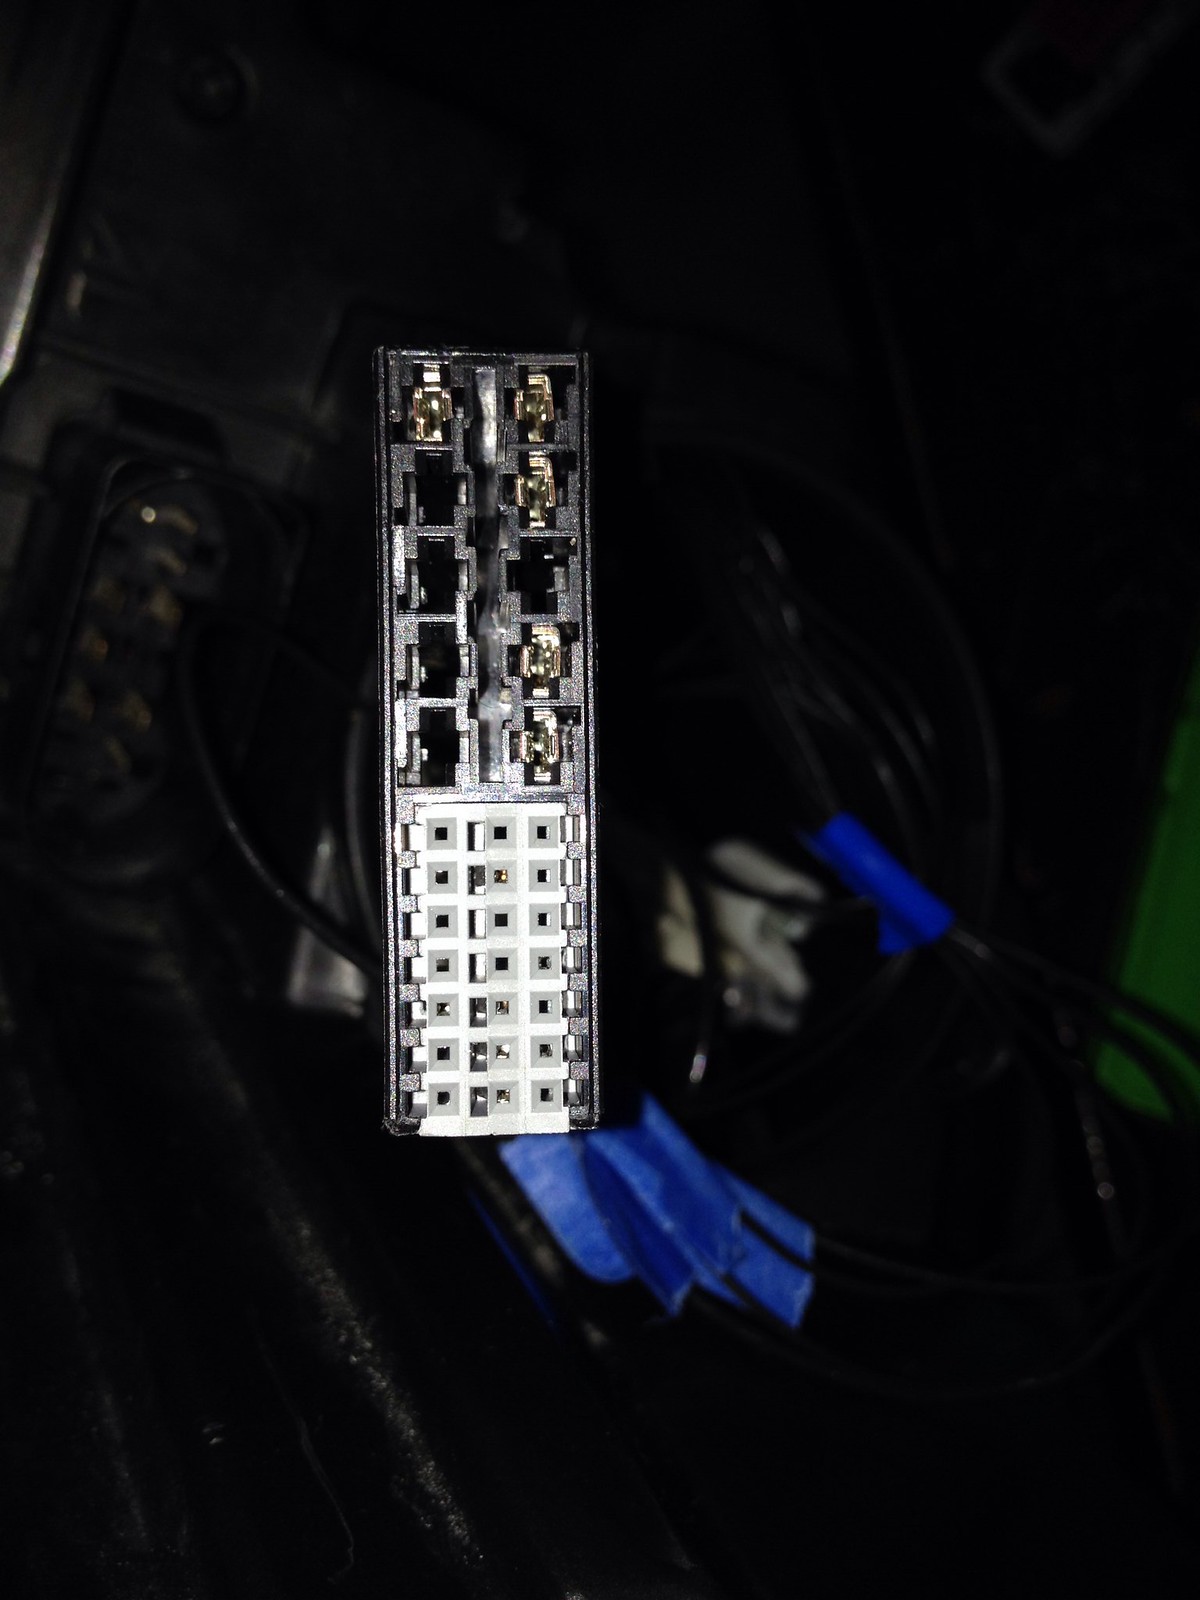
Here's what I was able to map:
This is the plug for the "C" LED. I numbered the wires from left to right as 1, 2, 3, 4:
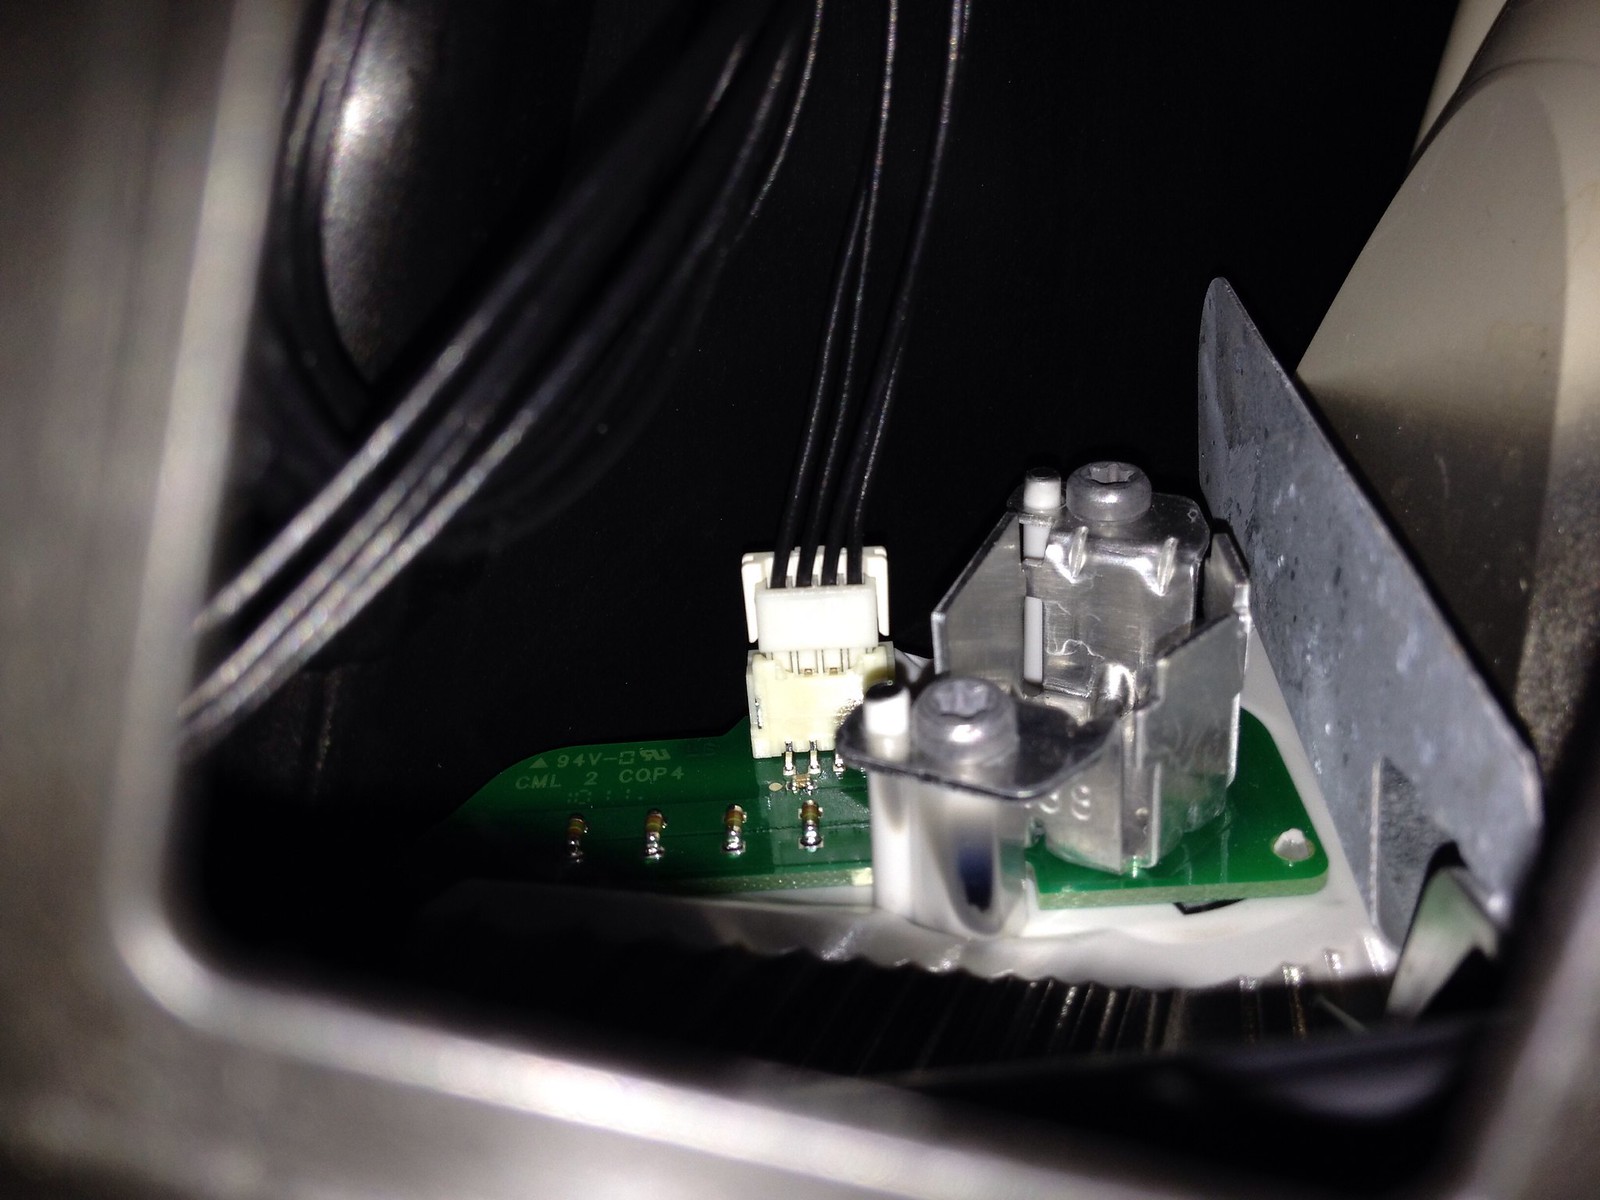
All the wires from this plug goes into the Purple plug, here's where they traced to:
*On the purple plug, If I put a 12V power source: Positive to #9, Negative to #19 ==> "C" LED turns on
Okay, so I got the 2012-13 Bi-Xenon headlights used for a really good deal and I am going to put together a DIY on how I wired it up to my 2009 C300. Currently, I have the Spyder headlights on right now. I am doing a whole front end conversion with C63 style hood, bi-xenon headlights, sport front bumper and DRL. Here's what I have so far, I need some help to figure out the rest.
*For the Low Beam HID part, the bulb is a D1S type. I am going to ditch the OEM stuff and just run an aftermarket D1S HID Kit. This way, it's cheaper and the wiring is easier. I can just tap the power off the low beam plug I already have in the car.
*On the Bi-Xenon headlight, there are two main plugs:
Black Female plug:
*Please note the numbering:
-top row is numbered 1, 3, 5, 7, 9, 11, 13.
-bottom row is numbered 2, 4, 6, 8, 10, 12, 14
-small prongs on 1, 2, 3, and 11
-large prongs on 5, 6, 8, 9, 10
-everything else is empty
*I found that on the black female plug, this is what happens when you put a 12V power source to the plugs:
- Positive on prong #8, Negative on prong #5 ==> Park Light comes on
- Positive on prong #9, Negative on prong #10 ==> Solenoid on bi-xenons activates
Purple Male plug:
There's actually two separate plugs in this one purple plug, they're held together with a puruple outer shell.
This is the outer purple shell:
*Note the numbering:
-top row: 6 through 10 for left plug, then 25 through 31 for right plug
-middle row: nothing for left plug, 18 through 24 for right plug (no numbers shown)
-bottom row: 1 through 5 for left plug, 11 through 17 for right plug
So this is what the plug looks like once I pulled it from the Outer purple shell:
Then I split the plug into two pieces as shown in order to figure out where the wires were going:
Gray Plug:
Black Plug:
Here's what I was able to map:
This is the plug for the "C" LED. I numbered the wires from left to right as 1, 2, 3, 4:
All the wires from this plug goes into the Purple plug, here's where they traced to:
- #1 ==> Purple plug #9
- #2 ==> Purple plug #19
- #3 ==> Purple plug #23
- #4 ==> Purple plug #22
*On the purple plug, If I put a 12V power source: Positive to #9, Negative to #19 ==> "C" LED turns on
Last edited by romeo291; Oct 9, 2013 at 09:49 AM.
Thread Starter
Senior Member
Joined: Mar 2013
Posts: 420
Likes: 38
From: NC
W204
The part I am stuck on right now is figuring out how to power up the LED Turn Signal strip. Here's what I know.
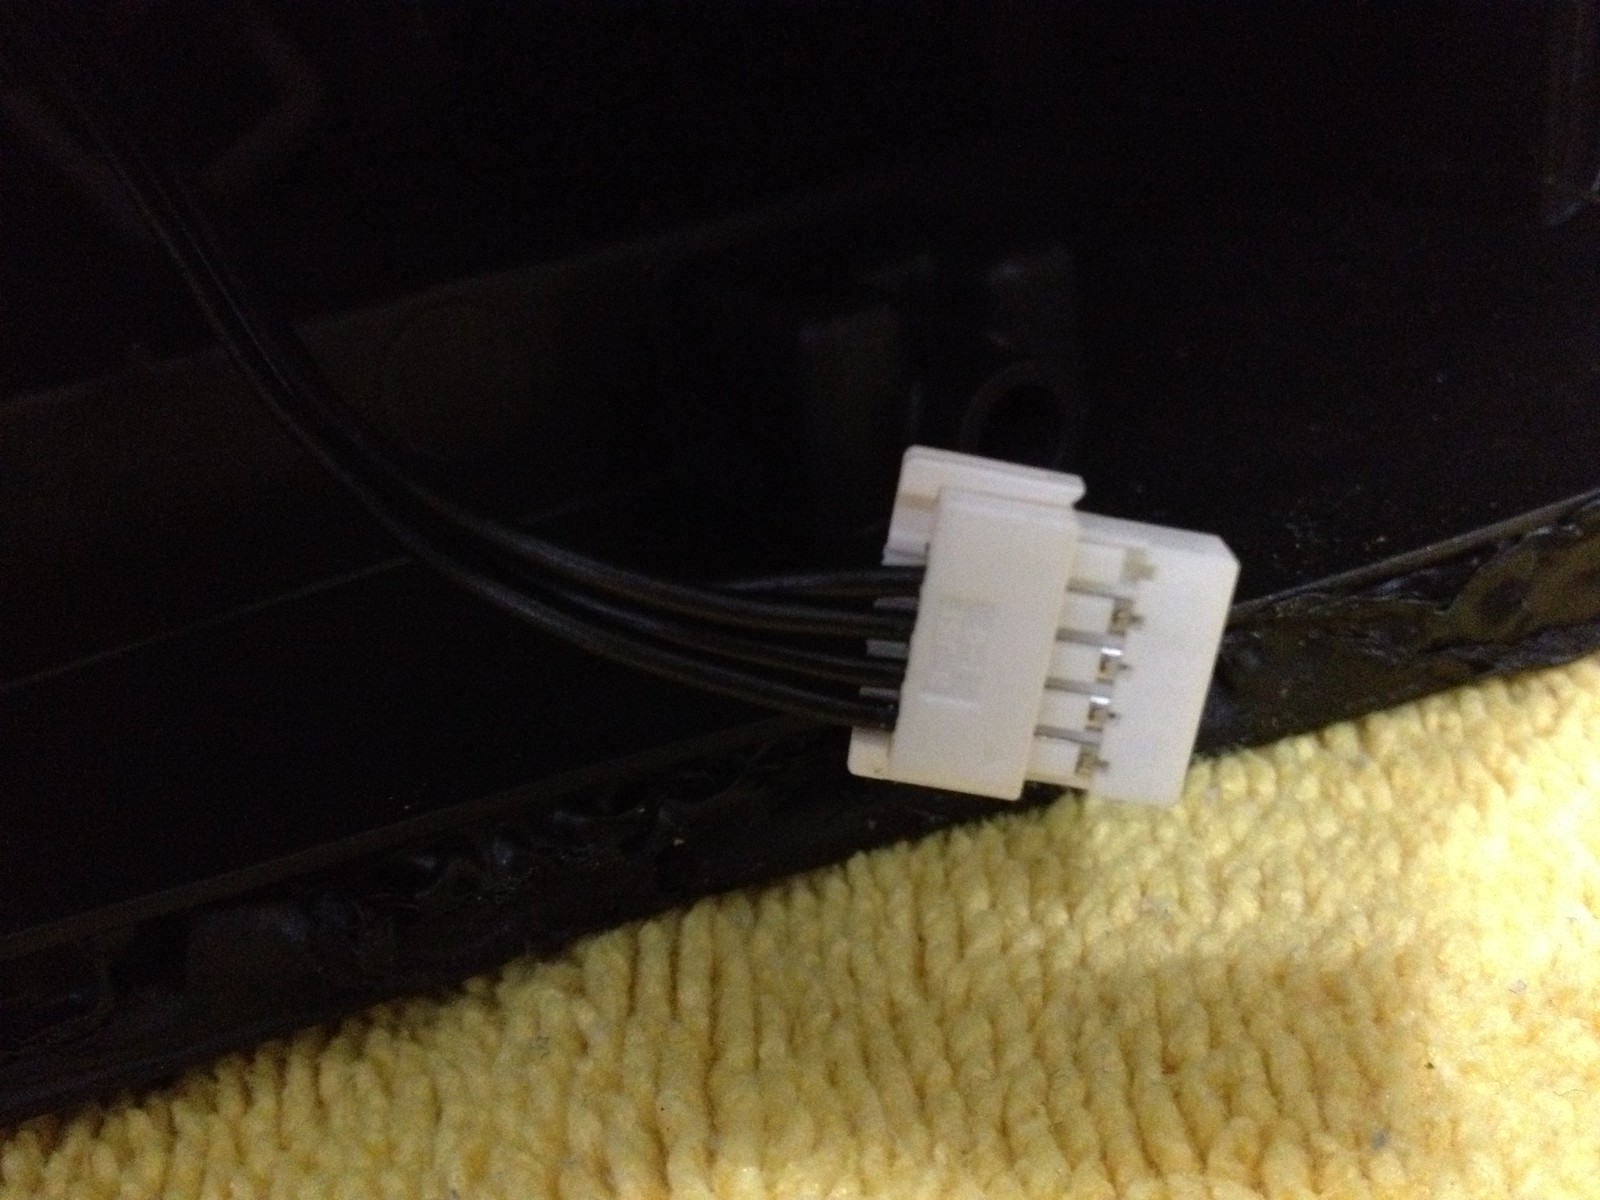
At the corner of the headlight, there's a plug that goes to the circuit board for the LED turn signal strip, as shown (it's kind of hard to see, but there are 5 wires coming out from it):
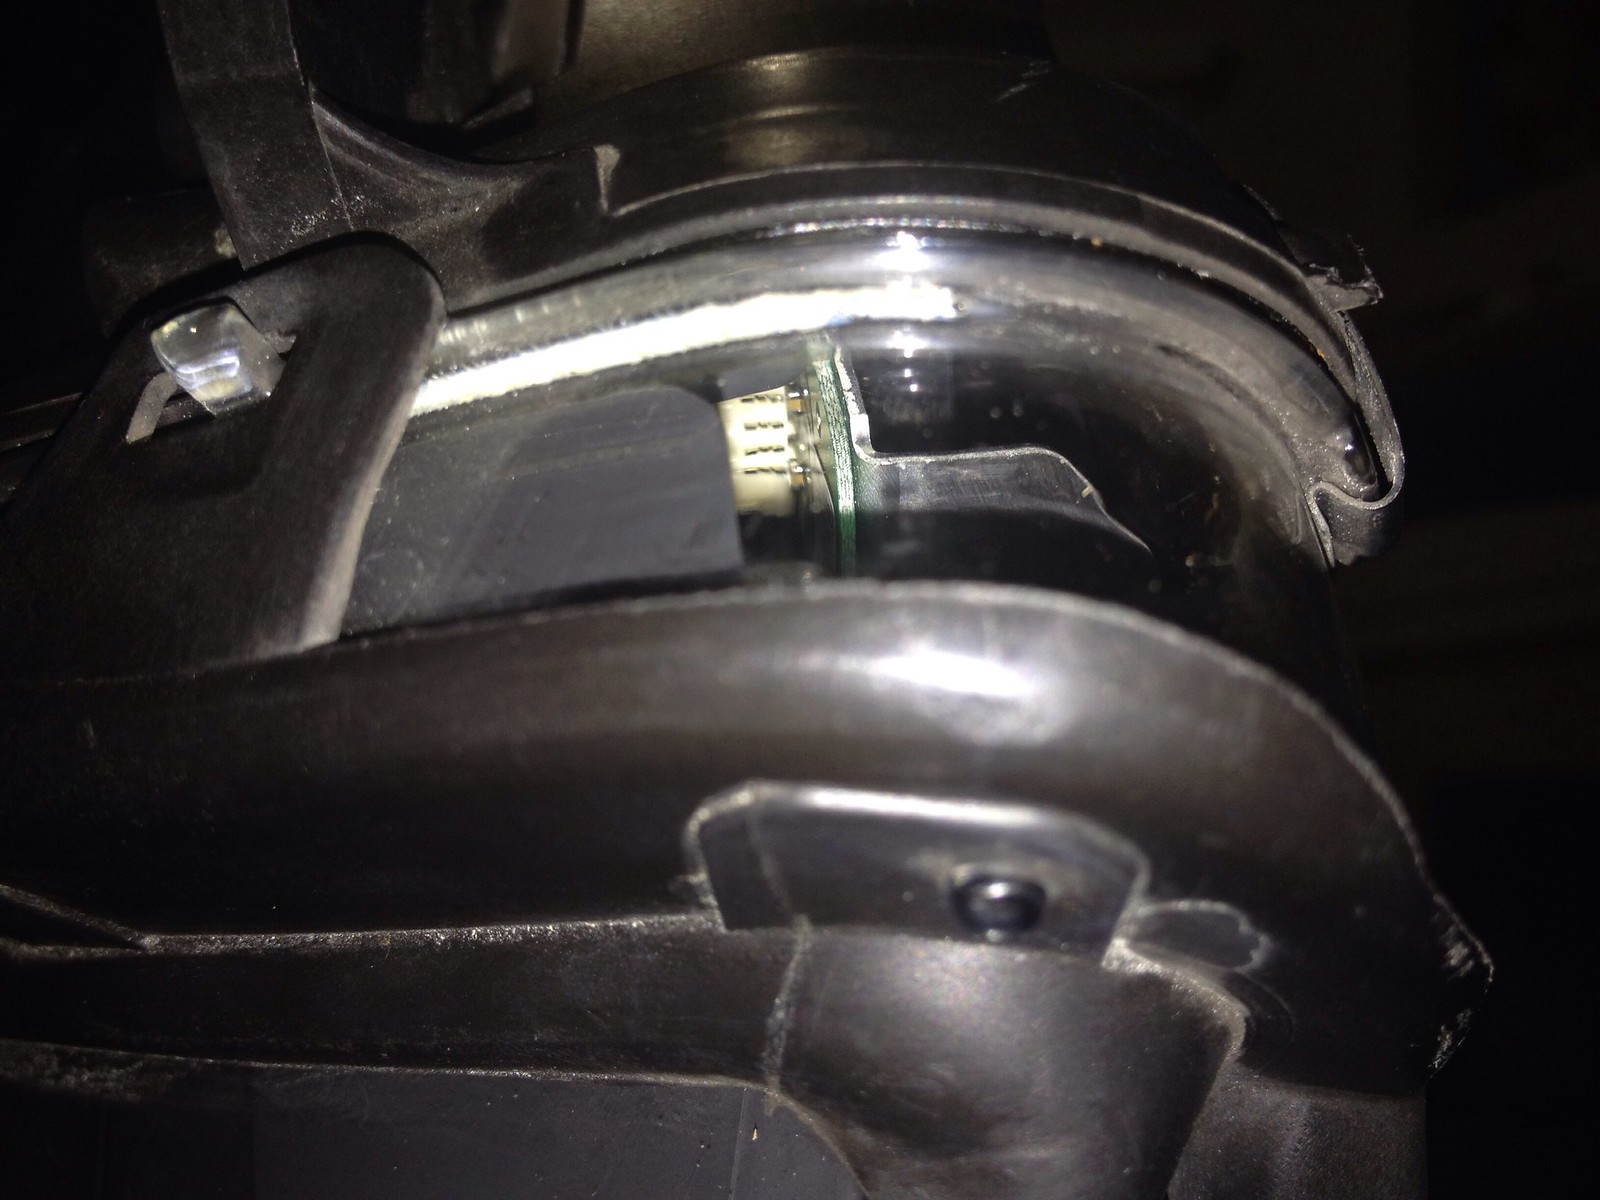
These 5 wires from the LED strip goes to the following locations on the Purple plug:
*#6 on left black plug
*#15 on right gray plug
*#24 on right gray plug
*#28 on right gray plug
*#30 on right gray plug
So far, I've tried all the combinations of 12V positive and negative combos to those 5 wires and I can't get the LED strip to light up. Any help would be appreciated.
At the corner of the headlight, there's a plug that goes to the circuit board for the LED turn signal strip, as shown (it's kind of hard to see, but there are 5 wires coming out from it):
These 5 wires from the LED strip goes to the following locations on the Purple plug:
*#6 on left black plug
*#15 on right gray plug
*#24 on right gray plug
*#28 on right gray plug
*#30 on right gray plug
So far, I've tried all the combinations of 12V positive and negative combos to those 5 wires and I can't get the LED strip to light up. Any help would be appreciated.
Last edited by romeo291; Oct 9, 2013 at 01:11 AM.
Thread Starter
Senior Member
Joined: Mar 2013
Posts: 420
Likes: 38
From: NC
W204
I also found out that on the Black Female Plug, the prongs actually maps back to the Purple Plug. They are mapped as such:
*#6 on Purple ==> #5 on Black
*#7 on Purple ==> #3 on Black
*#1 on Purple ==> #11 on Black
*#6 on Purple ==> #5 on Black
*#7 on Purple ==> #3 on Black
*#1 on Purple ==> #11 on Black
Thread Starter
Senior Member
Joined: Mar 2013
Posts: 420
Likes: 38
From: NC
W204
So I need help figuring out what combinations I can do with 5 wires to get the turn-signal LED strip to turn on. Maybe I need a resistor or something? Maybe I need multiple wires on positive or negative at the same time. I am not sure. I've tried all the 1 to 1 combos, and the 2 to 1 combos, but no luck so far. Anybody got any ideas?

Super Member
Joined: Nov 2003
Posts: 527
Likes: 5
From: TN
2002 c240
This is going to take more time than I have right now to read everything on the diagrams and figure it out. All I know is that the systems don't give you a +12v signal to some of the lights with the switch on because the relay has to see load to close. Therefore it can be tricky to troubleshoot the correct wire. This means all wires must be tested while under load, not open, so the relay closes and sends voltage. Otherwise the wire is dead. That is the best advice I can offer until I look at it deeper. If I come up with any ideas I'll put them here or in PM on CL.
~ O.L.T.

~ O.L.T.
Thread Starter
Senior Member
Joined: Mar 2013
Posts: 420
Likes: 38
From: NC
W204
This is going to take more time than I have right now to read everything on the diagrams and figure it out. All I know is that the systems don't give you a +12v signal to some of the lights with the switch on because the relay has to see load to close. Therefore it can be tricky to troubleshoot the correct wire. This means all wires must be tested while under load, not open, so the relay closes and sends voltage. Otherwise the wire is dead. That is the best advice I can offer until I look at it deeper. If I come up with any ideas I'll put them here or in PM on CL.
~ O.L.T.
~ O.L.T.

Trending Topics
MB World Stories
The Best of Mercedes & AMG

Manual Mercedes? 6 Times Sindelfingen Let Drivers Have All The Fun
Verdad Gallardo
Mercedes SLR McLaren 722 S Is Extremely Rare Example Modified by McLaren
Verdad Gallardo
8 Classic Boxy Mercedes Designs That Have Aged Like Fine Wine
Verdad Gallardo
Flawlessly Restored Mercedes 190E Evo II Heads to Auction
Verdad Gallardo
Electric Mercedes C-Class Unveiled: 11 Things You Need to Know
Verdad Gallardo
Mercedes EQS Gets A Major Update: Everything You Need to Know
Verdad Gallardo
5 Underrated Mercedes-Benz Models That Don't Get the Love They Deserve
Verdad Gallardo
Mercedes 300D Has Pushed Well Past 1 Million Miles and It Ain't Stopping
Verdad Gallardo
10 Most Reliable Mercedes-Benz Models You Can Buy Used
Verdad Gallardo
Thread Starter
Senior Member
Joined: Mar 2013
Posts: 420
Likes: 38
From: NC
W204
Thanx man, still stuck on figuring out how to power up the turn signals. If I can figure that out, then I'll have all the core functionality panned out. So sad that nobody in this freaking world have the info I need. Do you know any member? on this forum that works at Mercedes? Maybe they can pull the wiring schematic on the Bi-xenon headlights for me.

Thread Starter
Senior Member
Joined: Mar 2013
Posts: 420
Likes: 38
From: NC
W204
So, I got some more information......which I pretty much already knew, but Wanda from MBenzNL was able to provide it to me for added clarification. She said that the correct way to get these headlights to work is by having the following components:
*2 Headlight with D1S HID and Ballast
*2 Headlight Control Modules attached to the Headlights (The purple plug goes into this module)
*1 Control Unit in the car (SG SW) to connect the lights to the car
*1 SAM to connect the Control Unit (SG SW)
*2 Headlight with D1S HID and Ballast
*2 Headlight Control Modules attached to the Headlights (The purple plug goes into this module)
*1 Control Unit in the car (SG SW) to connect the lights to the car
*1 SAM to connect the Control Unit (SG SW)
Thread Starter
Senior Member
Joined: Mar 2013
Posts: 420
Likes: 38
From: NC
W204
Anyways, I am not buying control units and SAM and HID ballasts. My plan is to bypass all that. I already know how to power up the "C" LED, the parking lights, the Solenoid, and I am doing a standalone D1S HID kit......so imma just make my own turn signal LEDs.
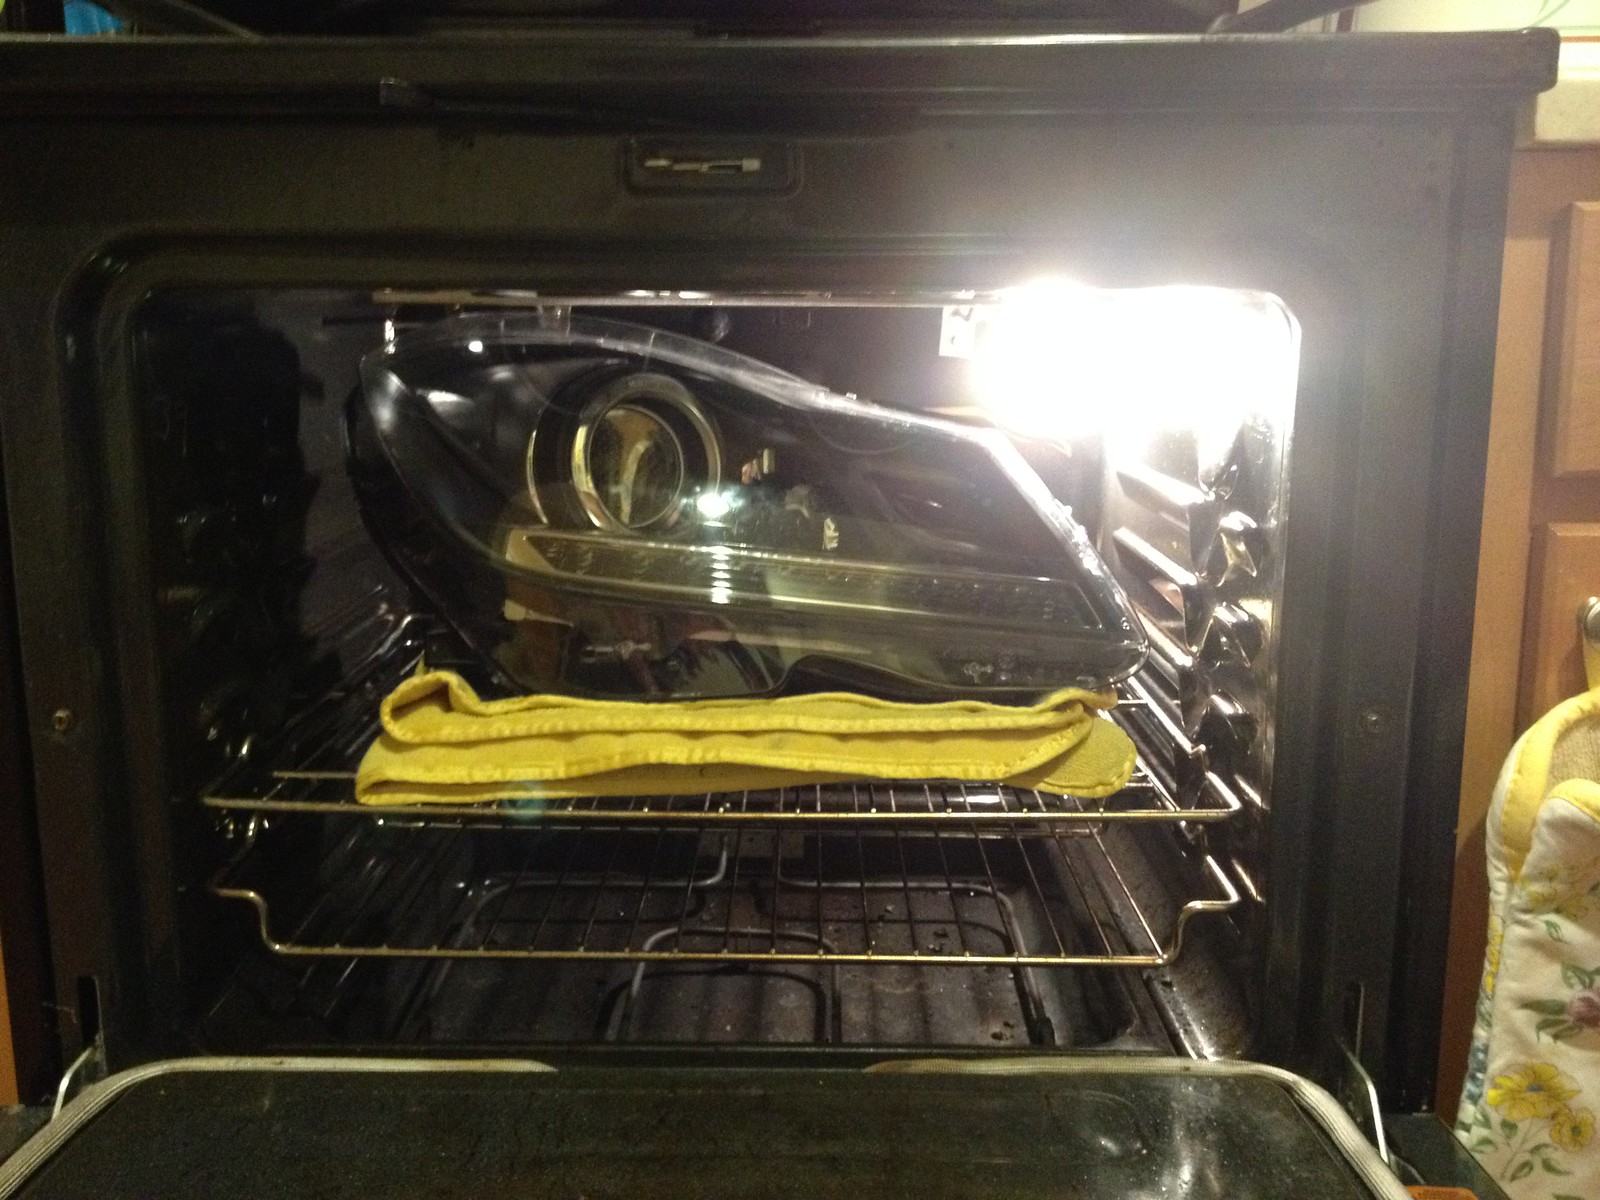
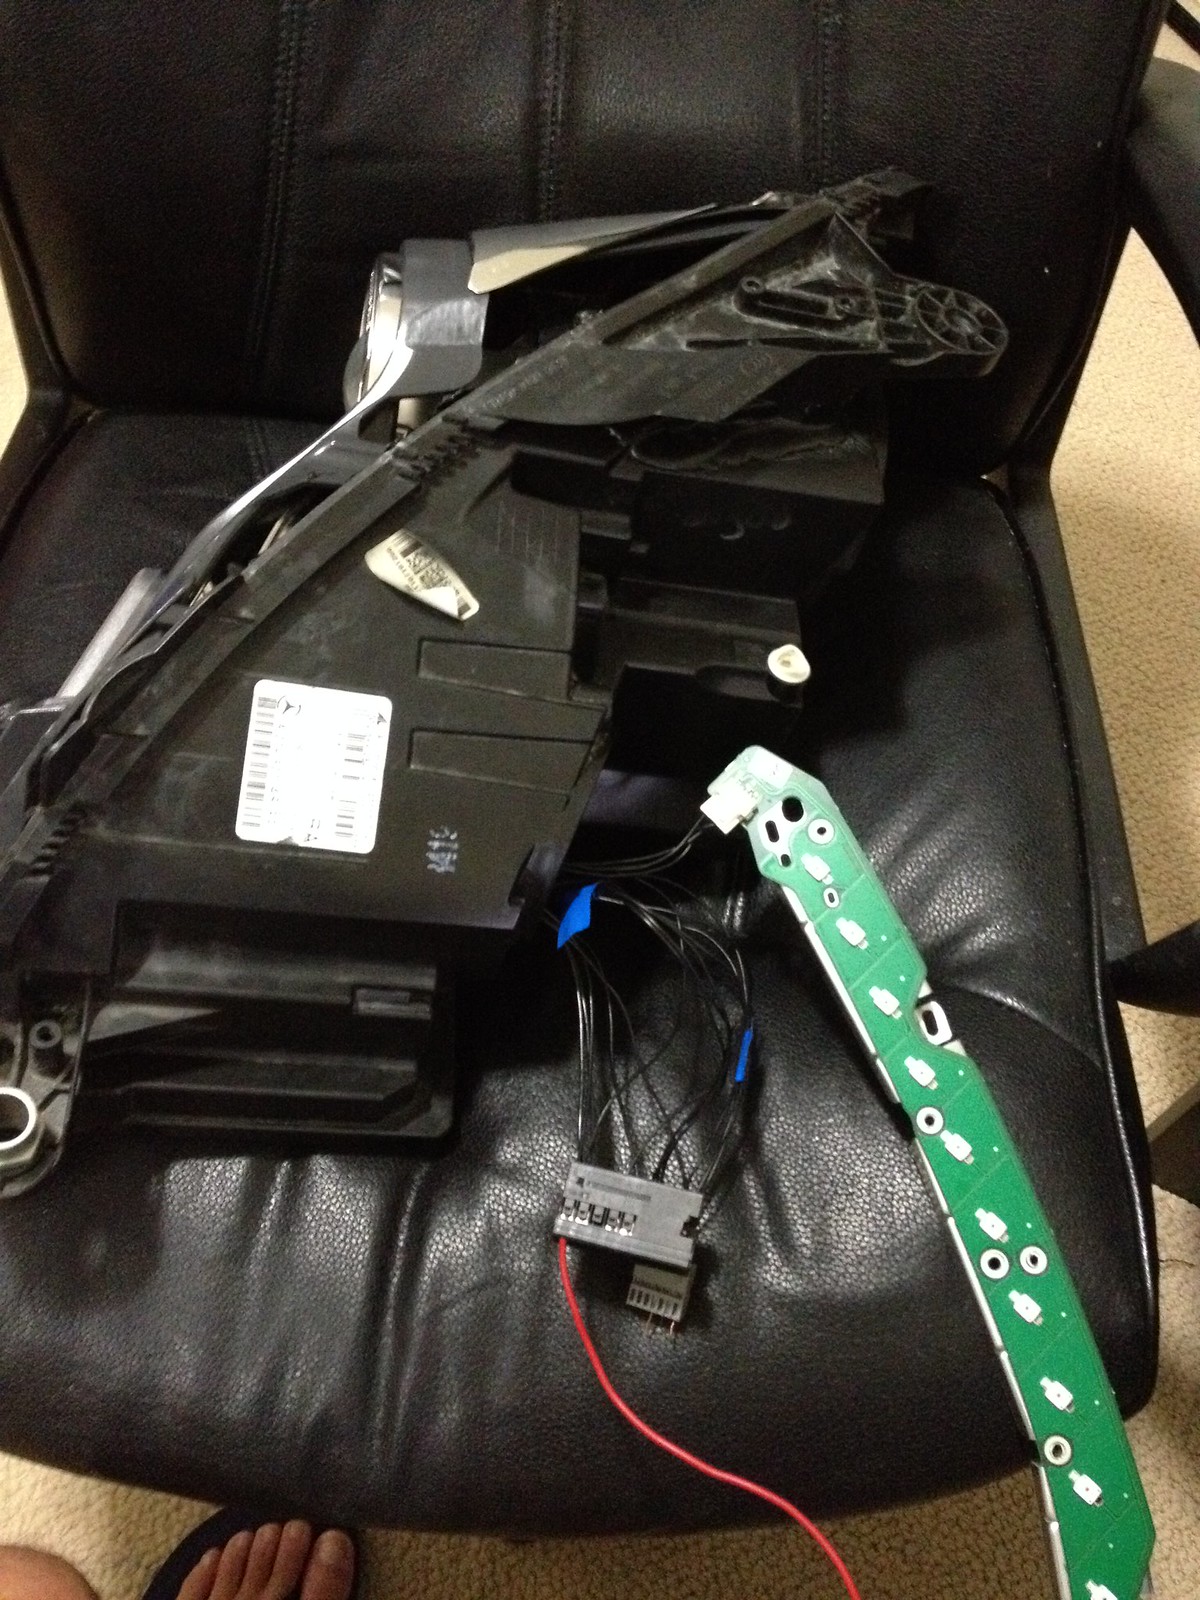
Last night, decided to bake the headlights to see what the LED circuit board looks like:
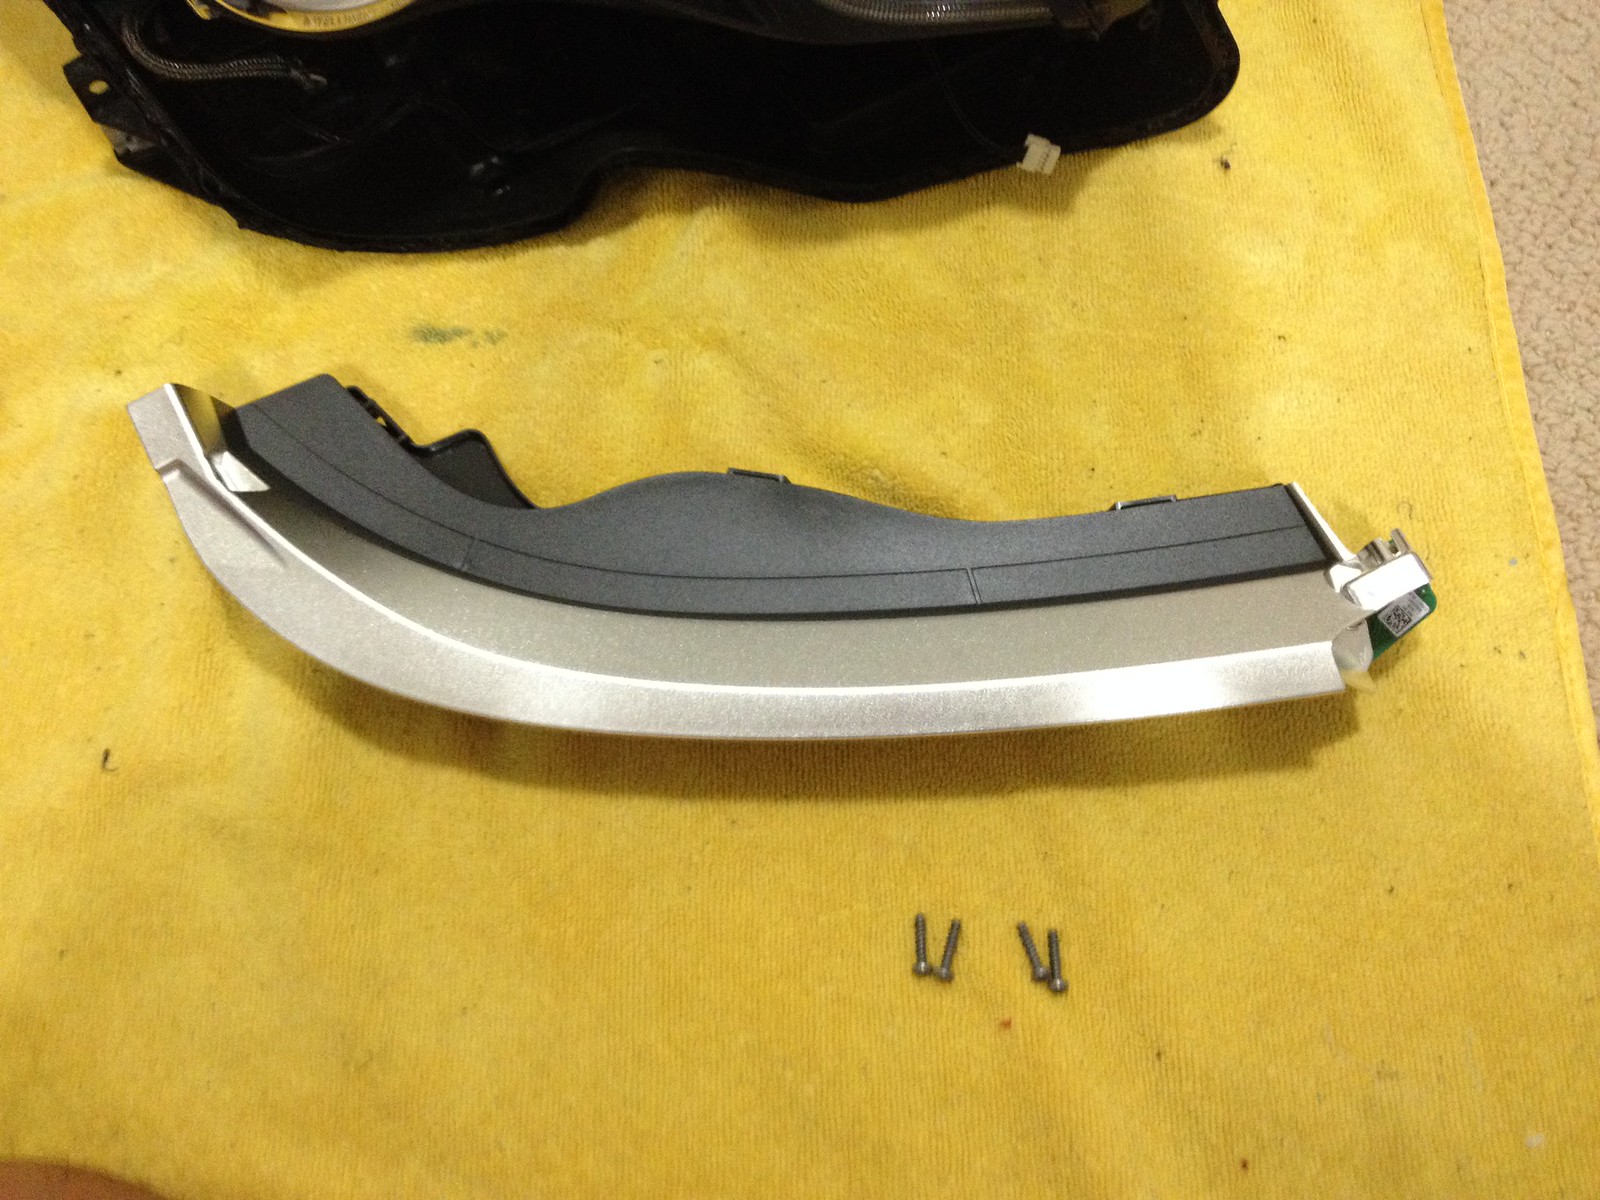
250 Degrees for 10 minutes got the glue soft enough to pry the lens off:

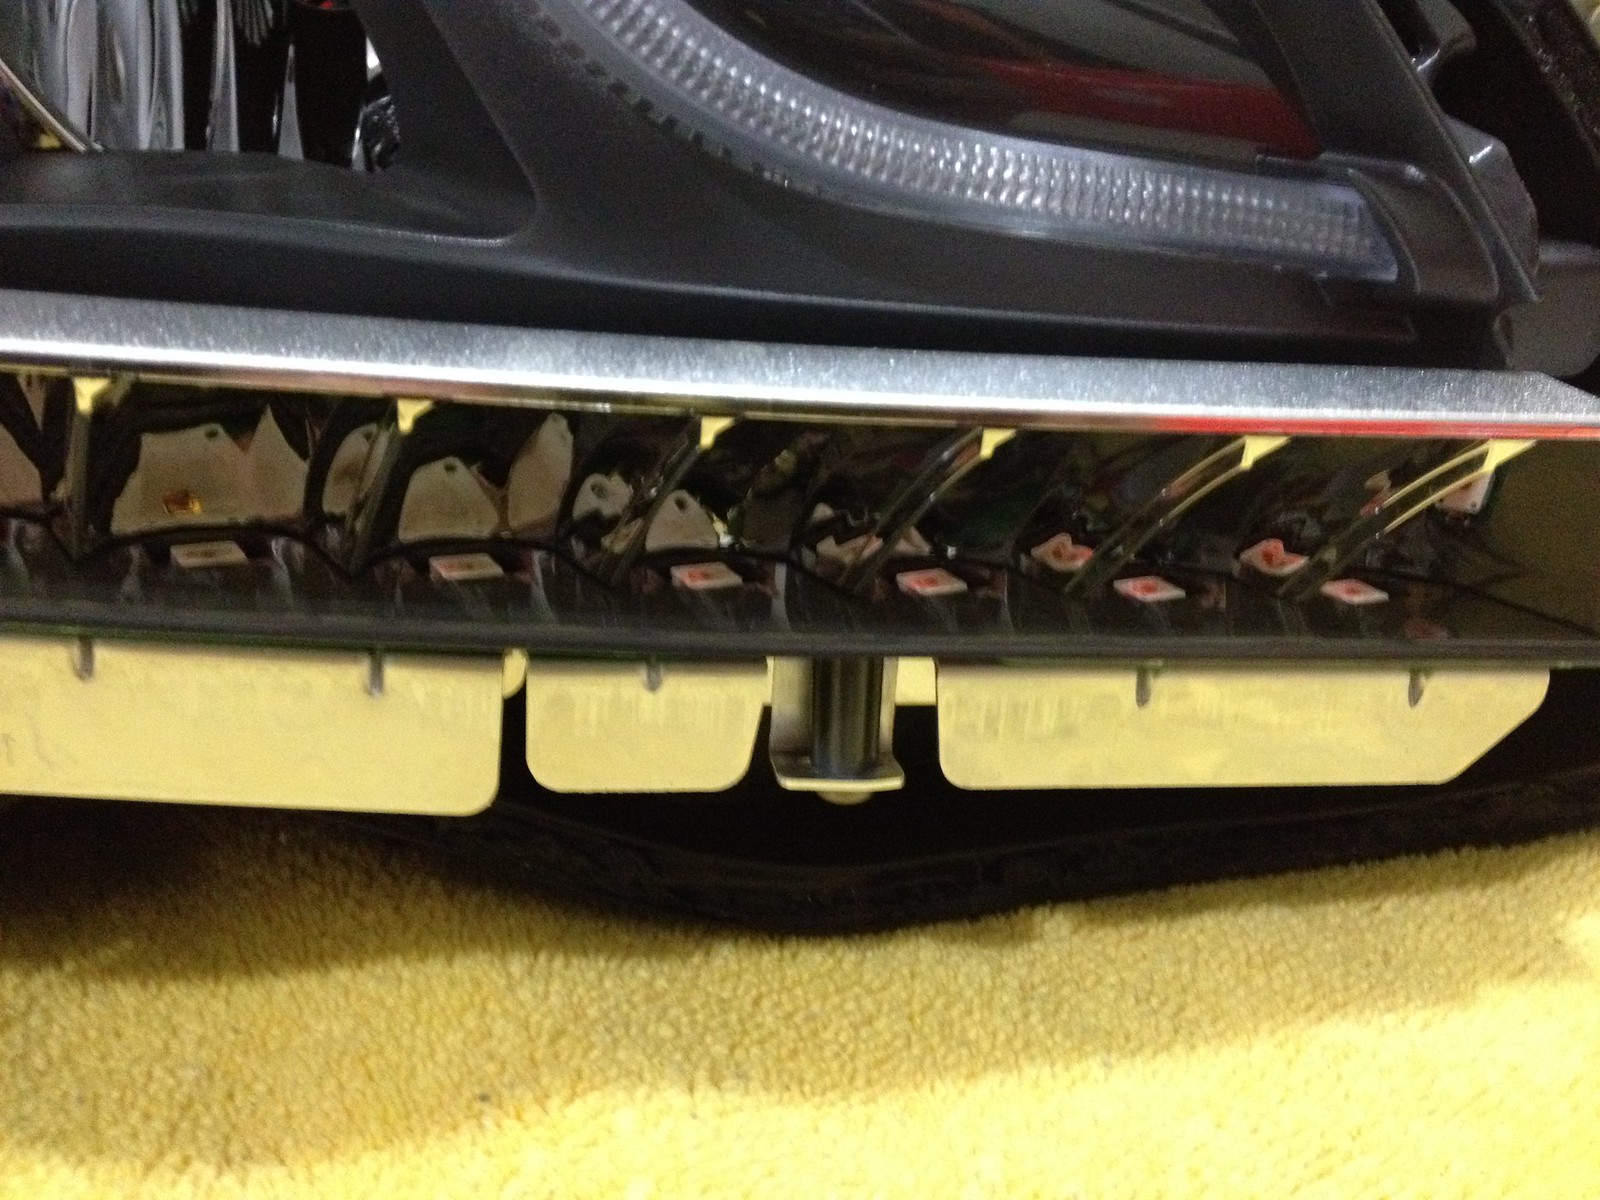
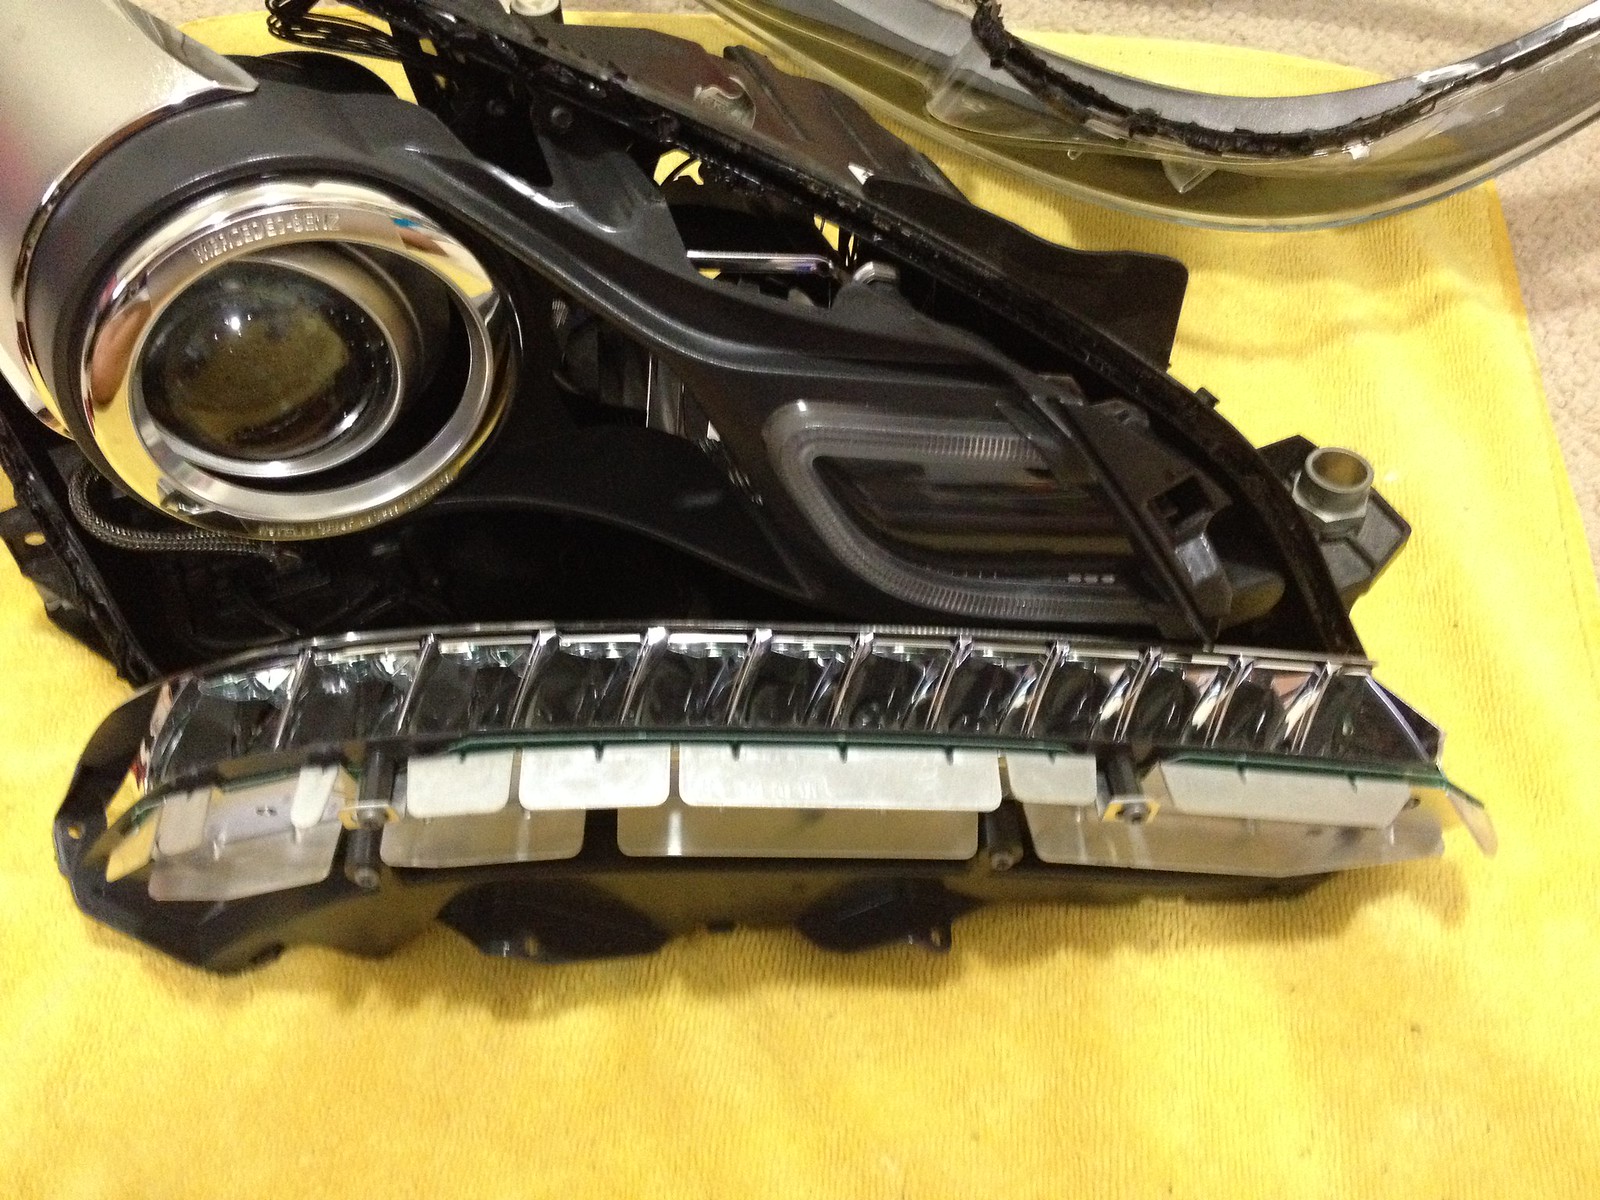
Here, you can see the individual High Output SMDs below the reflectors:
This is the plug that goes into the circuit board of the turn signal SMD strip:
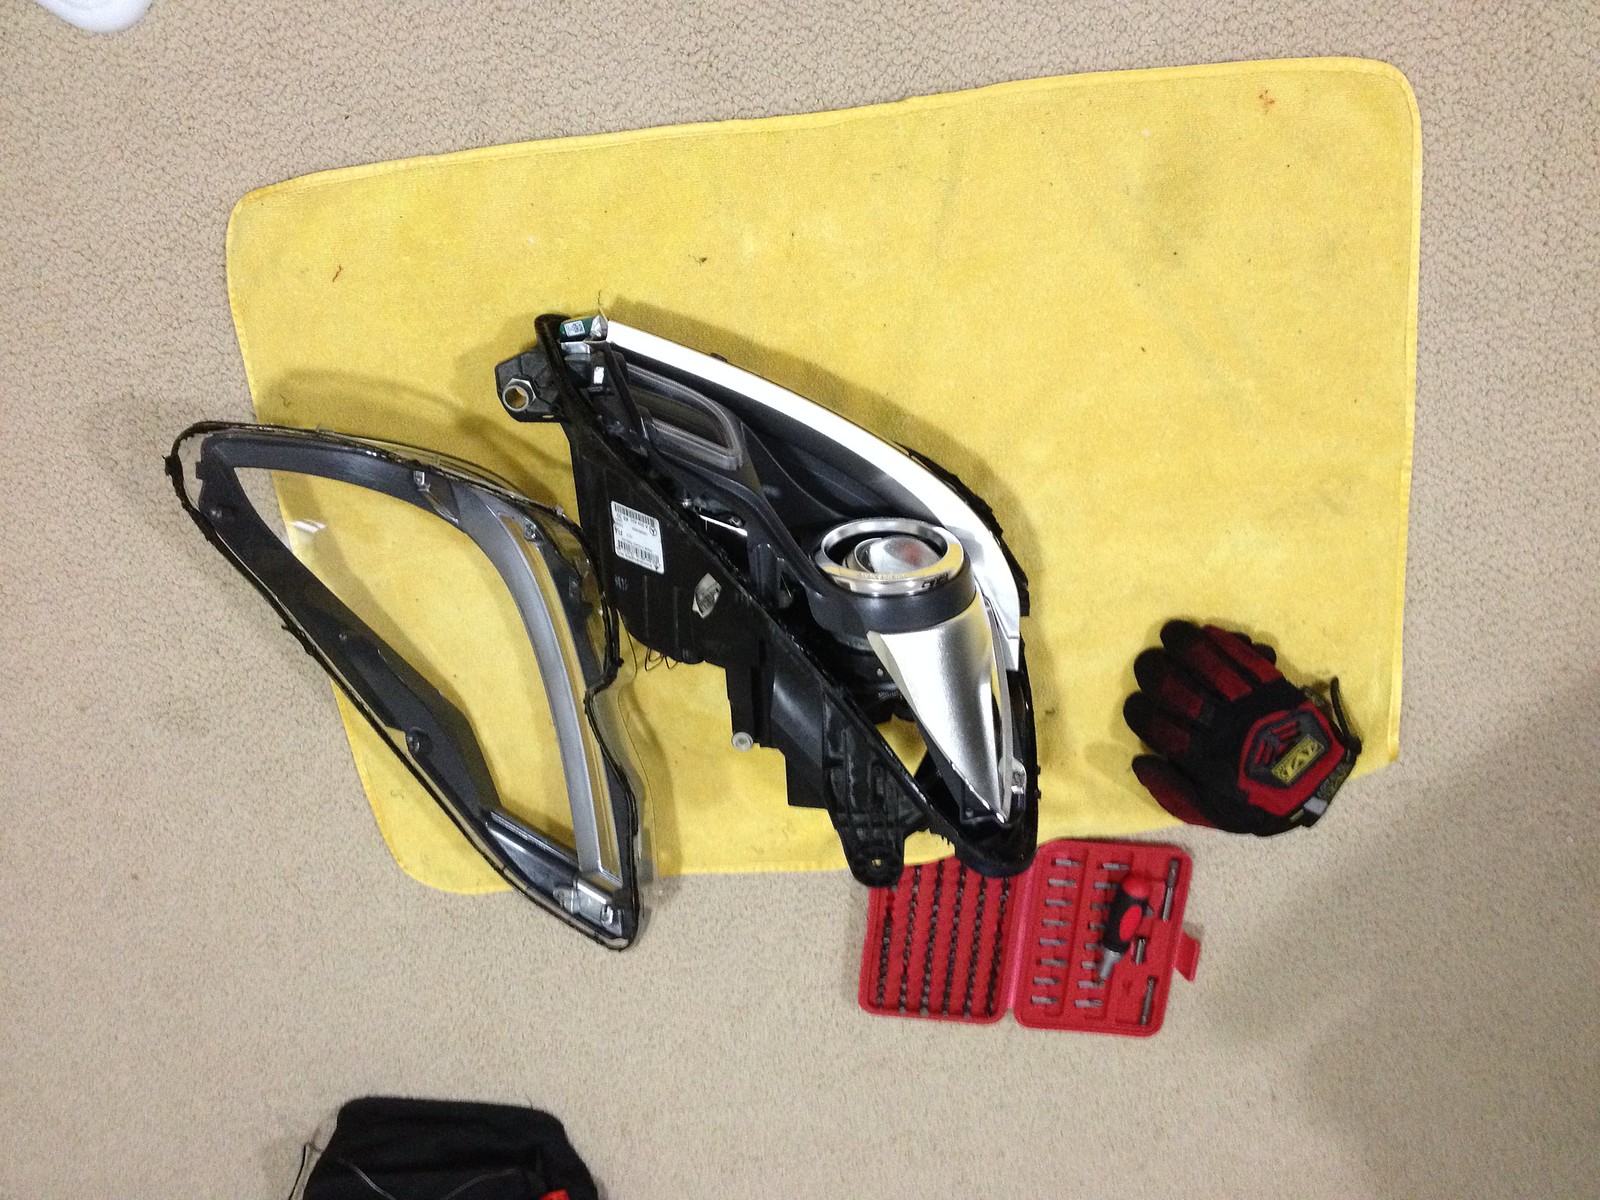
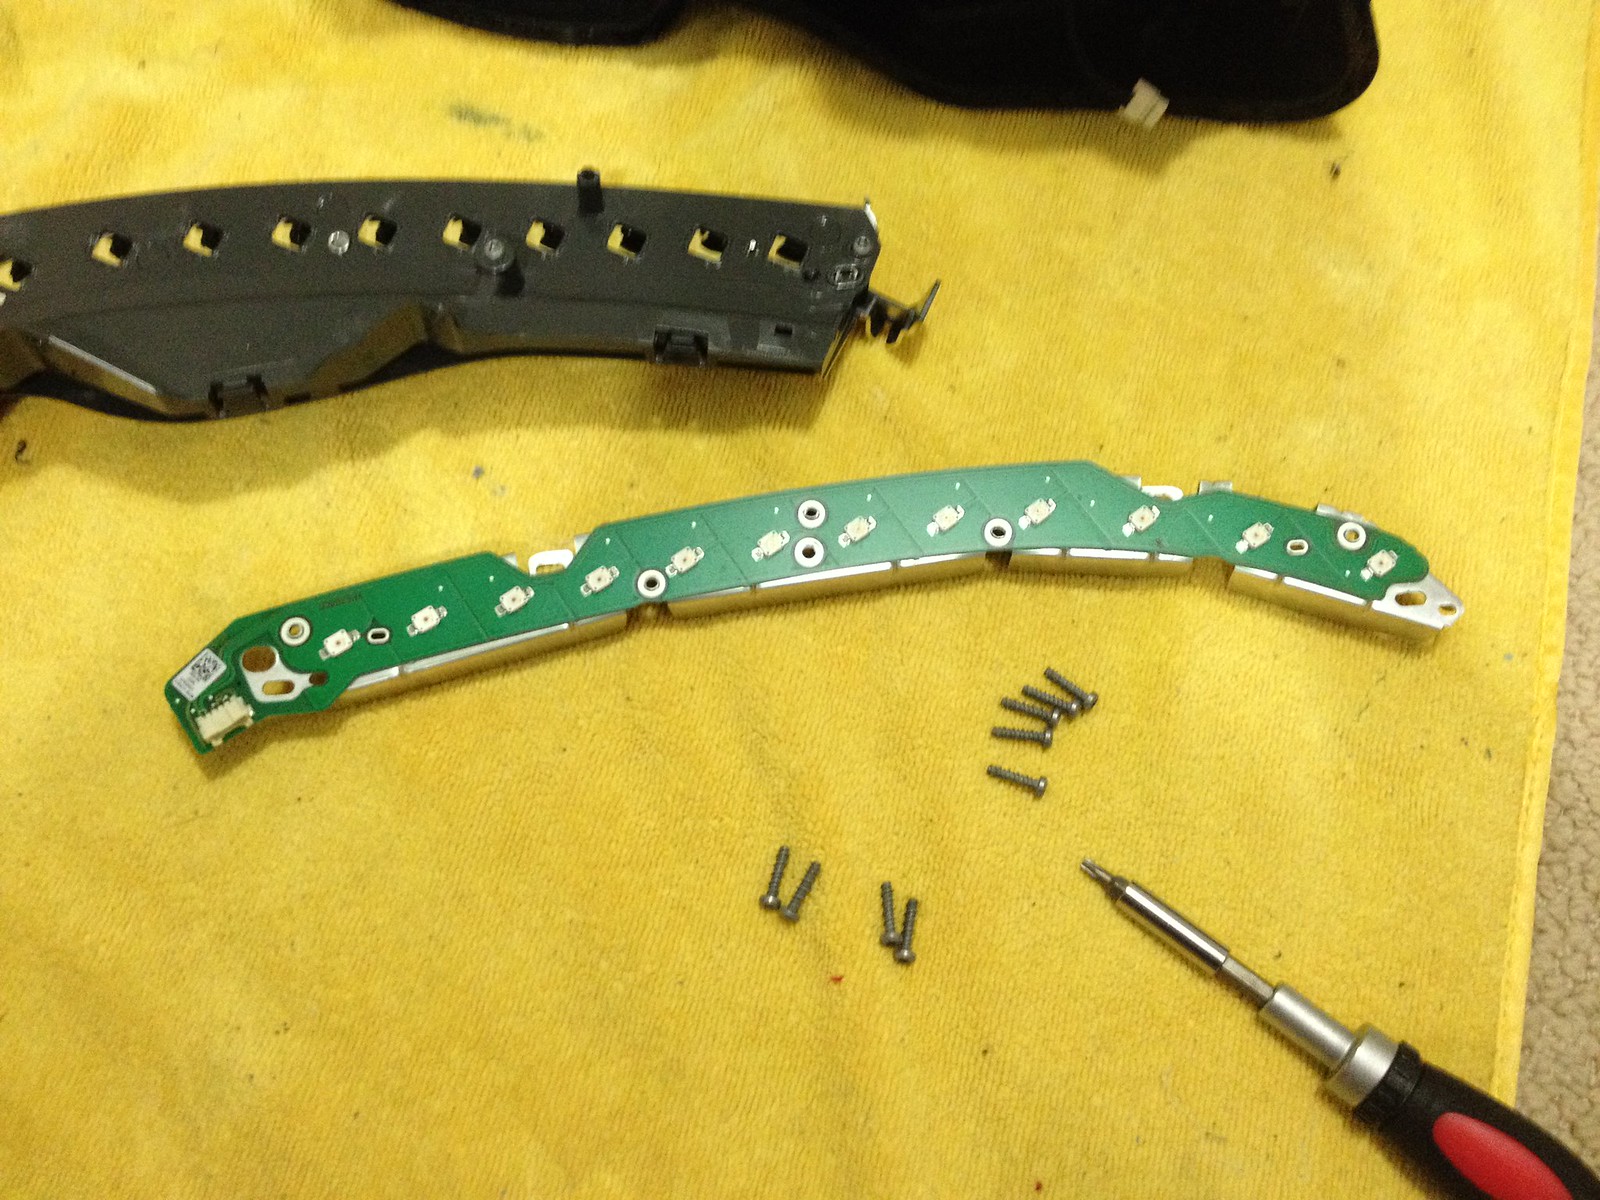
Removed these 4 bolts, and the whole SMD unit comes out:
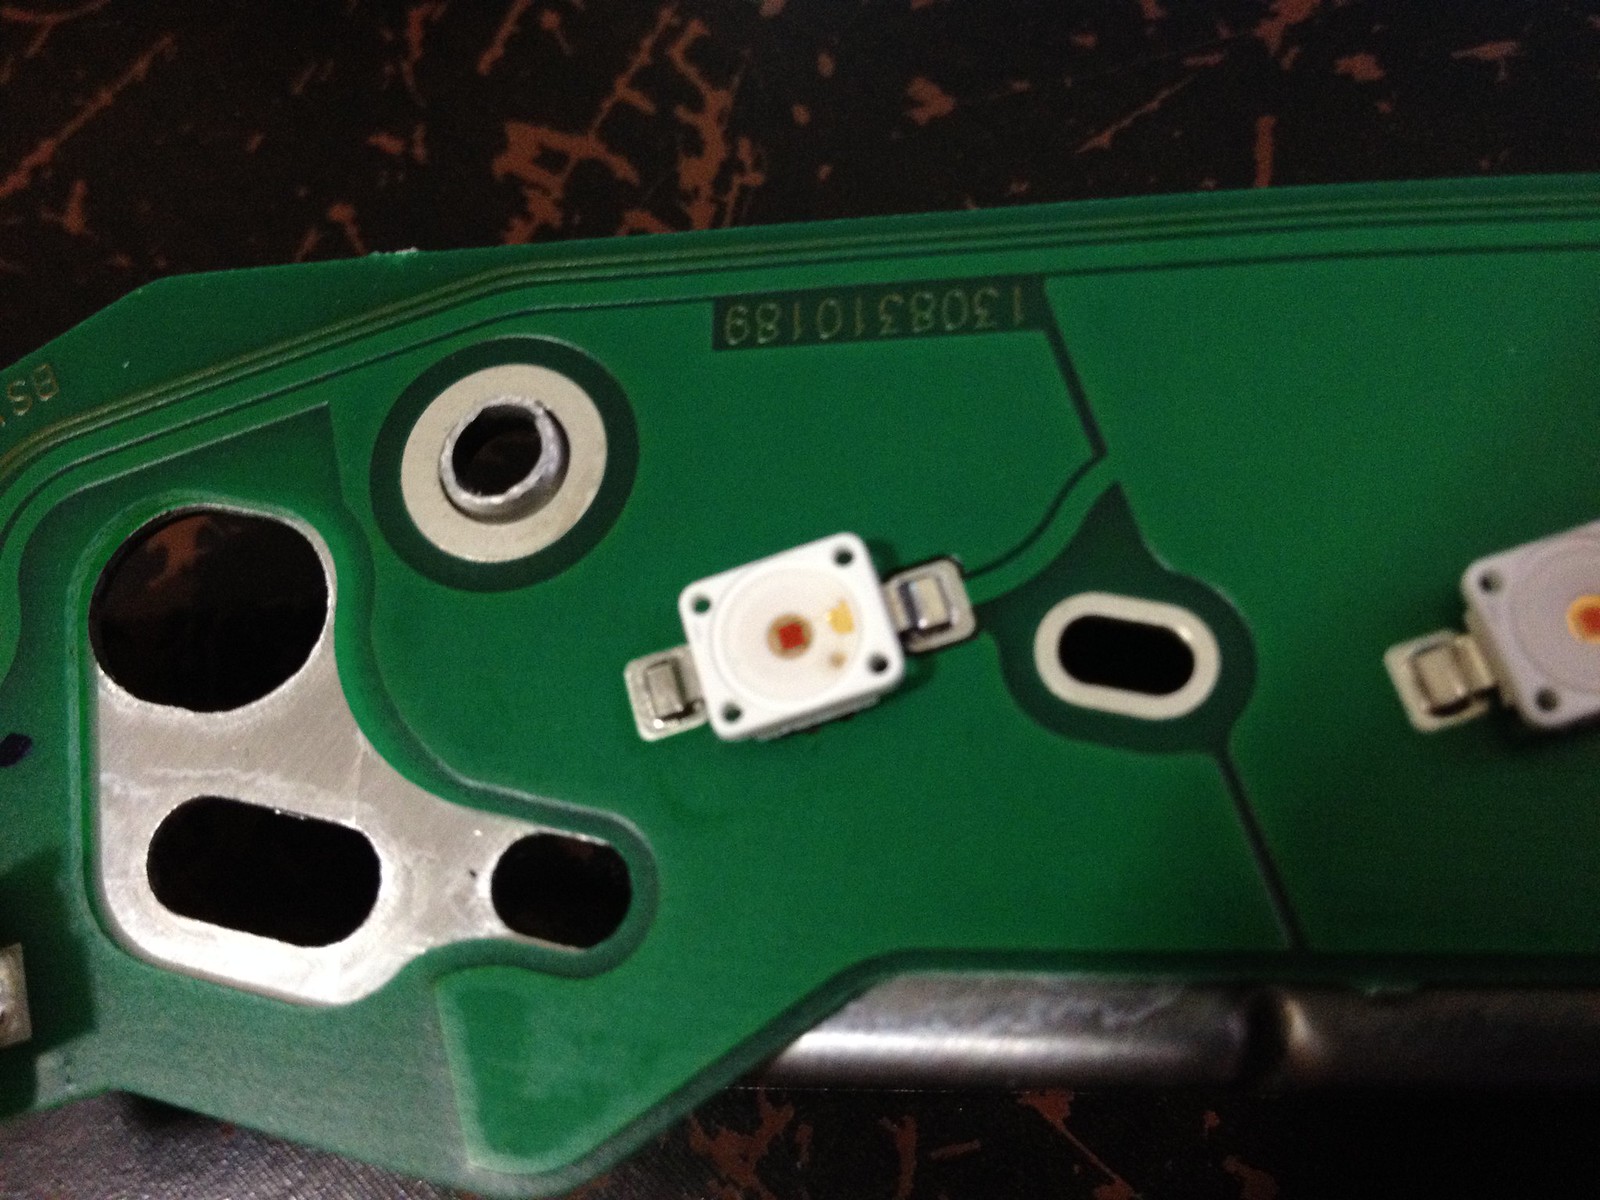
Removed a few more screws, and voila, here's that dang Circuit Board:
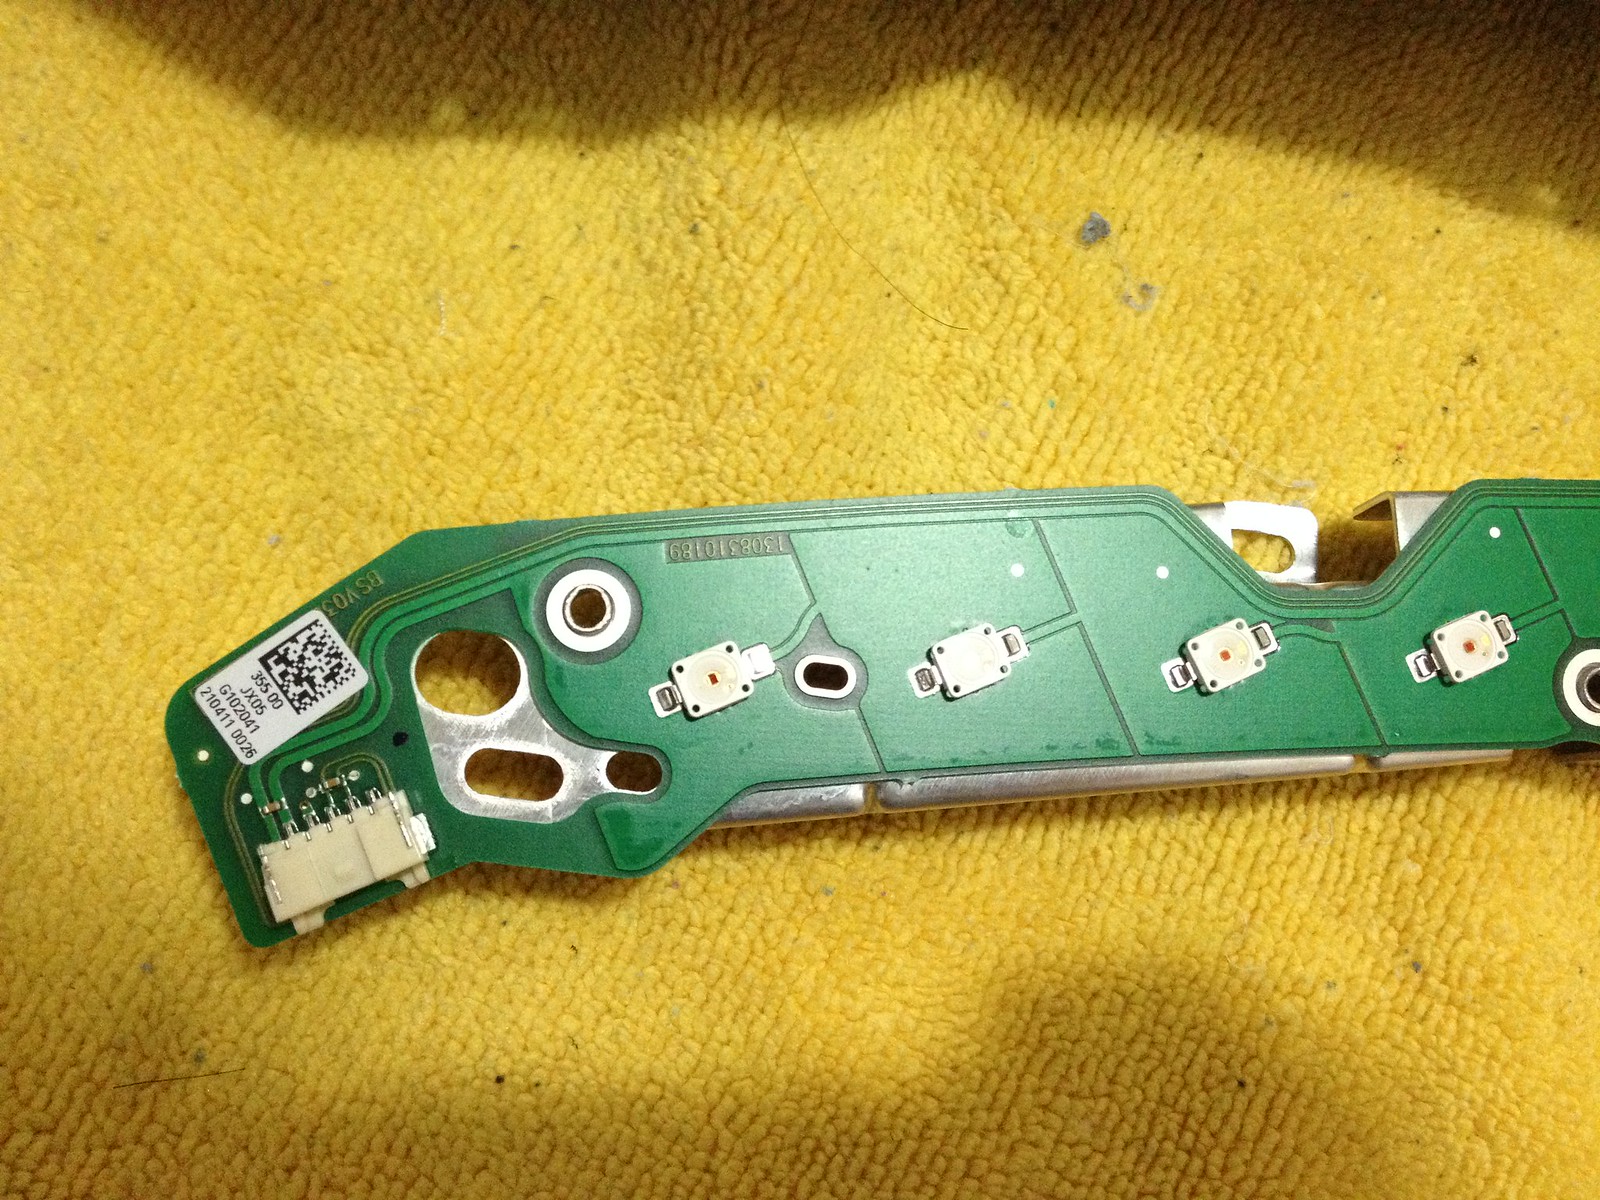
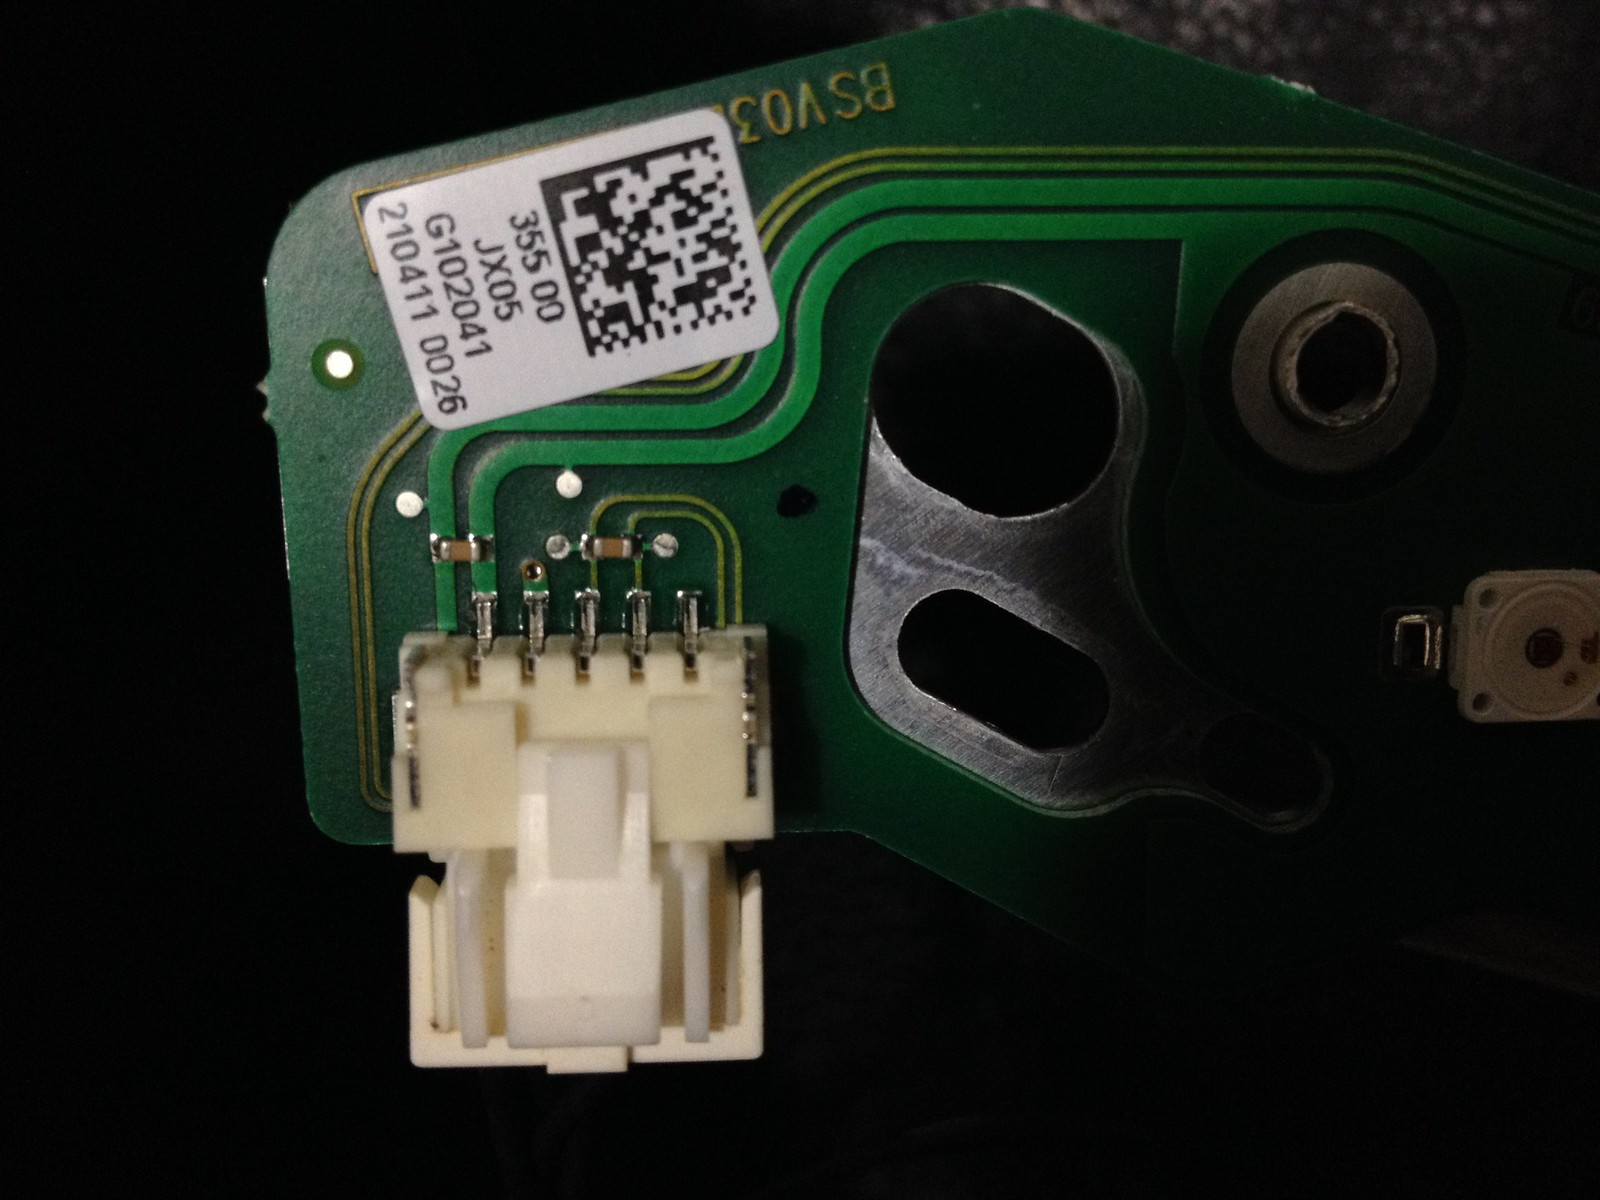
Here's a picture of it connected:
Closeup of the connector:

Closeup of the SMDs:
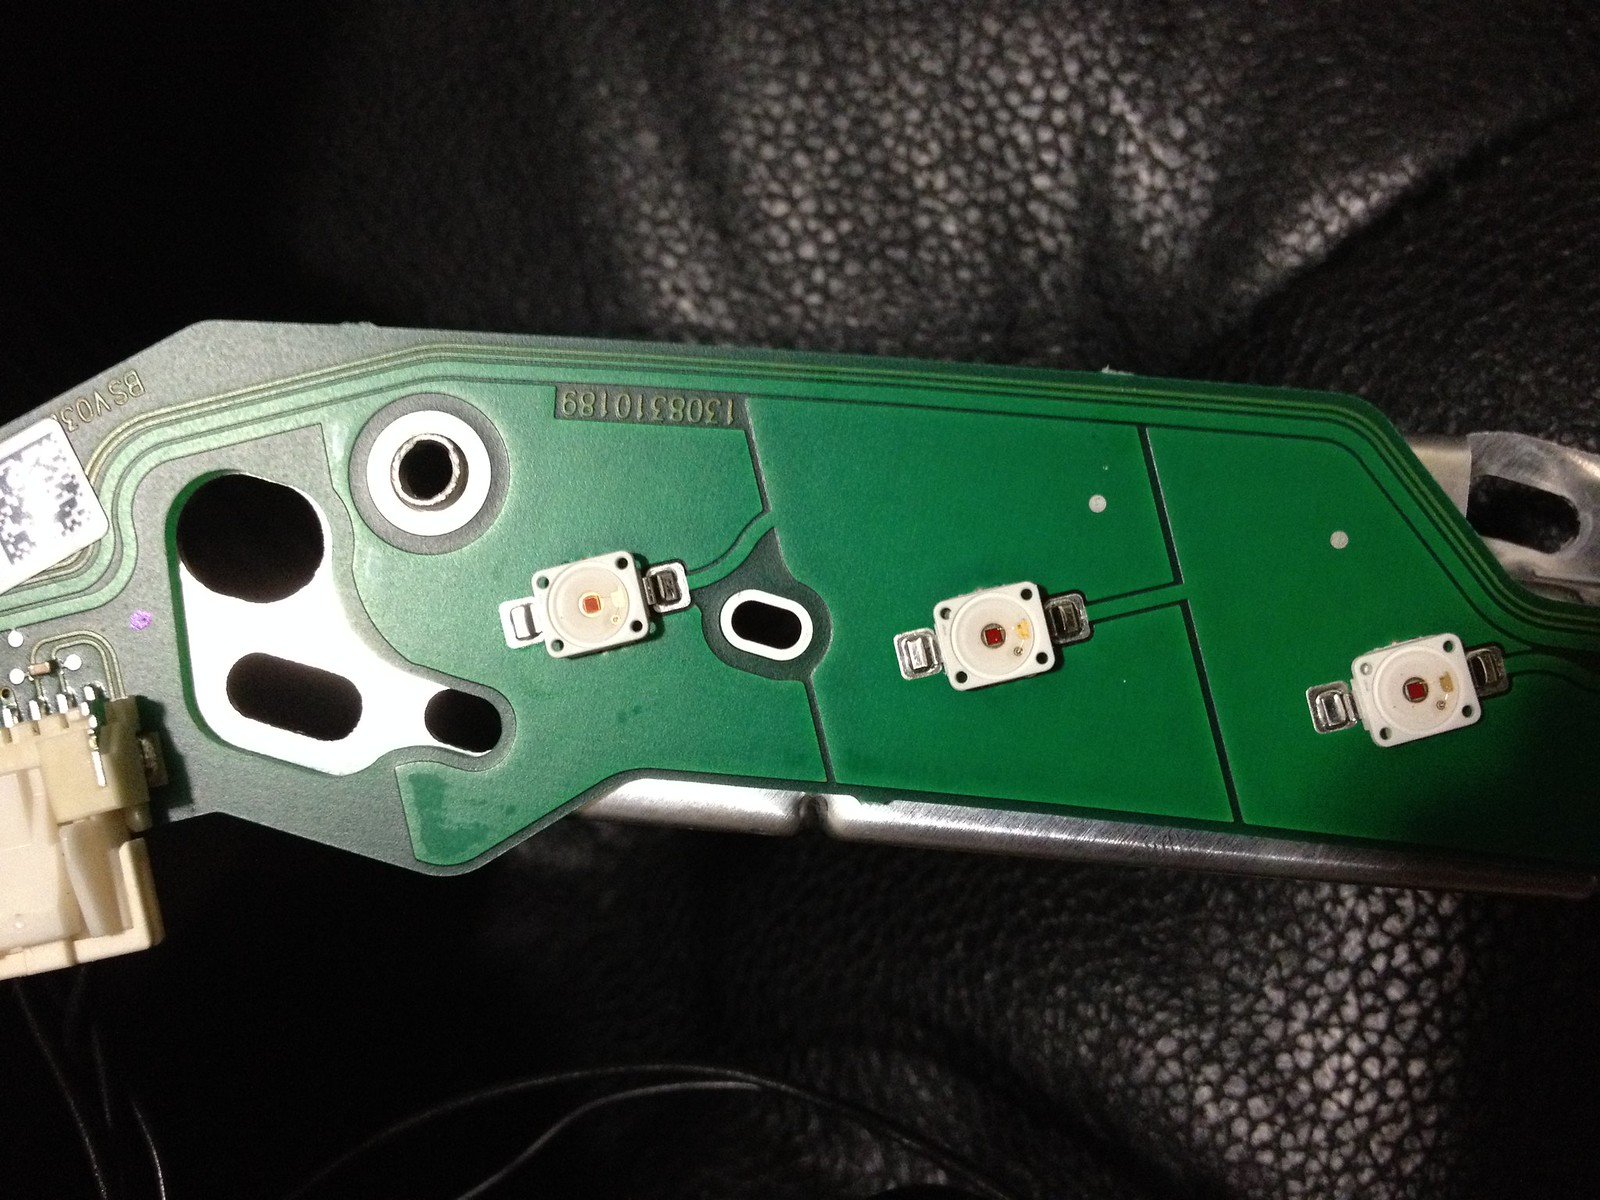
It looks so simple, I don't understand why I can't get it to come on:
I think I might have burnt this SMD, I place positive and negative from my 12V onto each side of the SMD and it came on for like a second and went out. Thinking that was a bad idea, but I was planning on putting my own SMD over these and wire them up separately anyways.
Last night, decided to bake the headlights to see what the LED circuit board looks like:
250 Degrees for 10 minutes got the glue soft enough to pry the lens off:
Here, you can see the individual High Output SMDs below the reflectors:
This is the plug that goes into the circuit board of the turn signal SMD strip:
Removed these 4 bolts, and the whole SMD unit comes out:
Removed a few more screws, and voila, here's that dang Circuit Board:
Here's a picture of it connected:
Closeup of the connector:
Closeup of the SMDs:
It looks so simple, I don't understand why I can't get it to come on:
I think I might have burnt this SMD, I place positive and negative from my 12V onto each side of the SMD and it came on for like a second and went out. Thinking that was a bad idea, but I was planning on putting my own SMD over these and wire them up separately anyways.
Member
Joined: Nov 2008
Posts: 203
Likes: 2
SLK 55, CLS 550, C63
Please refer to my thread:
https://mbworld.org/forums/c63-amg-w...t-diagram.html
The yellow wire is for the signal, You have 10 pins total ?like my connector ?
I don't know if Non C63 connect the same with C63 or not.
https://mbworld.org/forums/c63-amg-w...t-diagram.html
The yellow wire is for the signal, You have 10 pins total ?like my connector ?
I don't know if Non C63 connect the same with C63 or not.
Thread Starter
Senior Member
Joined: Mar 2013
Posts: 420
Likes: 38
From: NC
W204
Member
Joined: Nov 2008
Posts: 203
Likes: 2
SLK 55, CLS 550, C63
They have a new style that look exactly oem one, but does not have ILS and many wires like oem ILS
I look and ILS oem have diff wires and weird and so confusing.
You better off get oem look just the picture you post earlier then wires them like a normal.
I got quoted from headlights 750$ a pair
They have only 7 pins need to connect to our connector
Turn signal, low, high, parking, ground and some other...
You will never be able get the ILS oem working without the new Sam. I have tried and would save you alot of time...put back and sell them
Similar connect diagram betweren our headlight vs non ILS non bixeon version 12
But a huge diff to ILS bixeon
Look at my diagram and other 2 diagrams
You will see all wires and color are diff
Thread Starter
Senior Member
Joined: Mar 2013
Posts: 420
Likes: 38
From: NC
W204
They have a new style that look exactly oem one, but does not have ILS and many wires like oem ILS
I look and ILS oem have diff wires and weird and so confusing.
You better off get oem look just the picture you post earlier then wires them like a normal.
I got quoted from headlights 750$ a pair
They have only 7 pins need to connect to our connector
Turn signal, low, high, parking, ground and some other...
You will never be able get the ILS oem working without the new Sam. I have tried and would save you alot of time...put back and sell them
Similar connect diagram betweren our headlight vs non ILS non bixeon version 12
But a huge diff to ILS bixeon
Look at my diagram and other 2 diagrams
You will see all wires and color are diff
I look and ILS oem have diff wires and weird and so confusing.
You better off get oem look just the picture you post earlier then wires them like a normal.
I got quoted from headlights 750$ a pair
They have only 7 pins need to connect to our connector
Turn signal, low, high, parking, ground and some other...
You will never be able get the ILS oem working without the new Sam. I have tried and would save you alot of time...put back and sell them
Similar connect diagram betweren our headlight vs non ILS non bixeon version 12
But a huge diff to ILS bixeon
Look at my diagram and other 2 diagrams
You will see all wires and color are diff

Member
Joined: Nov 2008
Posts: 203
Likes: 2
SLK 55, CLS 550, C63
http://smrke.en.alibaba.com/product/..._fog_lamp.html
I also have couple sources from Taiwan which they are willing show you how to plug in pre facelift
The headlight you found plus the one here are using same connector for facelift non ILS bixeon
Trying sell the oem headlights and order one of these and see..I'm still waiting on my hood, so can't really test, but I'm trying find more informatio when I'm ready.
Let me knownif you want to order, I can get him ship around 800$ I think plus instruction which wire to which.
What is your email?
Forum post is not efficiency
Thread Starter
Senior Member
Joined: Mar 2013
Posts: 420
Likes: 38
From: NC
W204
Oh wow, that is nice! Kinda wished I saw those before I bought my headlights but I am thinking maybe I'll just keep mine for now and see if I can get it to work, pretty much got everything figured out, just need to test it on the car. Instead of trying to get the orange LED turns to work, I am going to replace it with a high output white LED flex strip, so I can have white turn signals. If things doesn't work out, I'll definitely hit you up for those haha.


Newbie
Joined: Oct 2012
Posts: 4
Likes: 0
2012 C63
They have a new style that look exactly oem one, but does not have ILS and many wires like oem ILS
I look and ILS oem have diff wires and weird and so confusing.
You better off get oem look just the picture you post earlier then wires them like a normal.
I got quoted from headlights 750$ a pair
They have only 7 pins need to connect to our connector
Turn signal, low, high, parking, ground and some other...
You will never be able get the ILS oem working without the new Sam. I have tried and would save you alot of time...put back and sell them
Similar connect diagram betweren our headlight vs non ILS non bixeon version 12
But a huge diff to ILS bixeon
Look at my diagram and other 2 diagrams
You will see all wires and color are diff
I look and ILS oem have diff wires and weird and so confusing.
You better off get oem look just the picture you post earlier then wires them like a normal.
I got quoted from headlights 750$ a pair
They have only 7 pins need to connect to our connector
Turn signal, low, high, parking, ground and some other...
You will never be able get the ILS oem working without the new Sam. I have tried and would save you alot of time...put back and sell them
Similar connect diagram betweren our headlight vs non ILS non bixeon version 12
But a huge diff to ILS bixeon
Look at my diagram and other 2 diagrams
You will see all wires and color are diff
I am wondering will this work on the non bixeon w204, which mean without the lighting package.


