


ND-Photo.nl's 2005 CLS55 Build thread
Thread Starter
MBWorld Fanatic!


Joined: May 2022
Posts: 1,917
Likes: 499
From: The Netherlands
2005 CLS55 AMG W219 C219
Disconnect the battery when using that wrench on the motor mounts. The extension from the ratchet will get very close to the hot lead on the back of the alternator. One touch to the hot lead and your life will get very exciting.
")
On my car I went with Arnott rear air springs. No external tank for "comfort" mode but it is "don't care" for me. I recommend you use very heavy duty and wide clamps on the connection to the hose to the external tank.
I recommend rotating the rear tires side to side regularly. The right rear spins first under acceleration until the traction control applies the brake on that corner so the inside of that tire wears first. It looks a lot like incorrect toe-in but it's the tire spinning. So...swap side to side regularly. And watch the inside of the front tires for signs of incorrect toe or suspension issues. If the rubber tread blocks start looking "peeled" or "chunked" you need to find and resolve the issue.
If you are looking for a Xentry system, contact BenzNinja via PM here on the forum. He's located in France so at least you'll be in the same time zone and not 6 or 7 hours apart like I am.
On your coolant expansion tank, try grabbing and rolling the edges of the tank using a thumb and forefinger. If the plastic crumbles, it is time for a new tank. I recently did this on both my '99 and '05 E55s. Not very expensive. I paid $40 US for the coolant reservoir and another $22 US for the labels.
--AMG label A000-584-26-11
--High pressure label A210-584-07-21
--AMG label A000-584-26-11
--High pressure label A210-584-07-21
If you ever have to replace the water pump, that is the time to pull the alternator (much easier with the water pump out!) and have it rebuilt or at least to replace the voltage regulator.
Now...it is time for a cold beer here! Cheers!

Edit: your photos brought back some good memories of a time on leave in the Netherlands. I was stationed in Germany and spoke German pretty well. Knowing Dutch and German were very similar I was speaking German to a fellow there and he was speaking Dutch to me. All is good and then I turned to my then-wife and was speaking to her in English. The fellow blurts out, "You speak English!". To which I blurted out, "You speak English!". We both then proceeded to have a laugh about it...  Good times indeed.
Good times indeed.
 In the Netherlands, we get RON98 (aka E5) tops. But the everyday driver use RON95 with 10% ethanol added)
Thread Starter
MBWorld Fanatic!
Joined: May 2022
Posts: 1,917
Likes: 499
From: The Netherlands
2005 CLS55 AMG W219 C219
Might have to put this color on my wishlist...Noticed the color on the YT channel of FisherFAST
Do you think that will look good on a silver CLS?

Do you think that will look good on a silver CLS?
Thread Starter
MBWorld Fanatic!
Joined: May 2022
Posts: 1,917
Likes: 499
From: The Netherlands
2005 CLS55 AMG W219 C219
Thanks @karlward !
I also had issues with broken cables in the latch mechanism. As I went on investigation, I noticed that the previous owners already made some repairs in that department. In my case, a couple things werent functioning:

I also had issues with broken cables in the latch mechanism. As I went on investigation, I noticed that the previous owners already made some repairs in that department. In my case, a couple things werent functioning:
- Boot handle
- Auto Close button
- Lock button
- Boot light (intermittent)
Thread Starter
MBWorld Fanatic!
Joined: May 2022
Posts: 1,917
Likes: 499
From: The Netherlands
2005 CLS55 AMG W219 C219
Invested in well known Bosch 010 pump. When I replaced it, the CLS already had a 010 pump fitted.But I have no idea how long its already there, so I swapped it anyways.
Partnr: 0392022010


Partnr: 0392022010
Last edited by nd-photo.nl; Jul 5, 2022 at 07:55 AM.
Senior Member

Joined: Feb 2021
Posts: 433
Likes: 234
From: Germany RLP
W211 E220, W211 E55, W203 C55
Lovely build thread, and kudos on keeping the car in top shape!
Can agree with the previous commenters, to disconnect the main battery, when doing motor mounts. I changed my headers and and one gasket fell on the starter and caused some sparks.
Might be worth it to get the firmer CLK63 Black Series engine mounts instead of the stock engine mounts, since those wear out quickly.
Also make sure, your fuel system is working properly. Neglected maintianance has caused quite some M113k to break. The E63 brake discs aren't worth it in my opinion, unless you really want the reduced unsprung mass.
MB World Stories
The Best of Mercedes & AMG

7 Craziest Things AMG Gas Ever Built
Verdad Gallardo
New Electric Mercedes-AMG GT 4-Door Coupe Unveiled: 10 Things You Need to Know
Verdad Gallardo
6 Mercedes Models That Did NOT Age Well (But Are Somehow Still Cool)
Verdad Gallardo
Manual Mercedes? 6 Times Sindelfingen Let Drivers Have All The Fun
Verdad Gallardo
Mercedes SLR McLaren 722 S Is Extremely Rare Example Modified by McLaren
Verdad Gallardo
8 Classic Boxy Mercedes Designs That Have Aged Like Fine Wine
Verdad Gallardo
Flawlessly Restored Mercedes 190E Evo II Heads to Auction
Verdad Gallardo
Electric Mercedes C-Class Unveiled: 11 Things You Need to Know
Verdad Gallardo
Mercedes EQS Gets A Major Update: Everything You Need to Know
Verdad Gallardo
Thread Starter
MBWorld Fanatic!
Joined: May 2022
Posts: 1,917
Likes: 499
From: The Netherlands
2005 CLS55 AMG W219 C219
Thx!
I already bough the engine mounts, so when these go, then I will consider the Black series mounts.
The E63 brakes is purely for reducing unsprung mass. The standard brakes suffice for my driving style. Was looking into upgraded pads, but couldnt find all that much in Europe to be honest...Any tips?
Regarding the fuel system, I am highly aware of it now. Makes it all the more important to restore it to tip top shape, before adding power.
Thread Starter
MBWorld Fanatic!
Joined: May 2022
Posts: 1,917
Likes: 499
From: The Netherlands
2005 CLS55 AMG W219 C219
Small repair, which makes all the difference. New bonnet struts! I dont get it when people skimp out on these...

Last edited by nd-photo.nl; Aug 6, 2023 at 07:01 AM.
Thread Starter
MBWorld Fanatic!
Joined: May 2022
Posts: 1,917
Likes: 499
From: The Netherlands
2005 CLS55 AMG W219 C219
Thread Starter
MBWorld Fanatic!
Joined: May 2022
Posts: 1,917
Likes: 499
From: The Netherlands
2005 CLS55 AMG W219 C219
Replaced the Airmatic compressor with a new one. The air hose ruptured as soon as I touched it...Also replaced the Airmatic air filter with a new one (Mann filter). Still have to replace the rubbers, didnt know they were in bad shape.


Looked better than expected. But paper gets hard over time, so not a bad idea to swap it out

Swapped it out with an aftermarket part, which had a somewhat different layout. Unfortunately the air nipple was in a different place, so I decided to extend the existing airline. But I found out the hard way, that normal silicone vacuum hose cannot withstand 14 BAR :P

Hose said bang bang

Used reinforced vacuum hose, problem solved!

Looked better than expected. But paper gets hard over time, so not a bad idea to swap it out
Swapped it out with an aftermarket part, which had a somewhat different layout. Unfortunately the air nipple was in a different place, so I decided to extend the existing airline. But I found out the hard way, that normal silicone vacuum hose cannot withstand 14 BAR :P
Hose said bang bang
Used reinforced vacuum hose, problem solved!
MBWorld Fanatic!


Joined: Jan 2014
Posts: 3,969
Likes: 1,318
From: Republic of Texas
'99 and '05 E55 AMG
Small repair, which makes all the difference. New bonnet struts! I dont get it when people skimp out on these...
https://shorturl.at/ahAIU
https://shorturl.at/ahAIU
Something I forgot to mention about the motor mounts. The one on the driver side is much easier if you drop the steering rack from the subframe and lift the engine a couple of inches. You can then insert the driver's side motor mount on the passenger side and slide it across the front of the subframe to the driver side. You don't need to remove the steering rack, you just need to undo the bolts and let it drop down a couple of inches.
It's very nice to see what you are doing to your car! Please keep up the great work and continue to keep us updated!
Thread Starter
MBWorld Fanatic!
Joined: May 2022
Posts: 1,917
Likes: 499
From: The Netherlands
2005 CLS55 AMG W219 C219
Whilst inspecting, I noticed the hardy disc to have massive tears in them. I decided to replace both the front and rear disc at the same time. That does not look good, and I didnt want a flying propshaft. I thought it would be a job for 2 nights, but instead it almost took me all week. Doing this with jack stands, trying to put power on your ratchet in weird angles didnt work out so well for me. I took my time, let my body rest in between but finished the job in the end.
Glad to have it done, another "peace of mind" job done on the list!

Definitely needed replaceing!

Fresh new bolts always look good (work in progress shot)

Glad to have it done, another "peace of mind" job done on the list!
Definitely needed replaceing!
Fresh new bolts always look good
(work in progress shot)
Thread Starter
MBWorld Fanatic!
Joined: May 2022
Posts: 1,917
Likes: 499
From: The Netherlands
2005 CLS55 AMG W219 C219
First part of replacing the engine mounts, replaced the standard transmission mount with a Meyle HD mount, which should be a little bit more ruggedized compared to OEM


Last edited by nd-photo.nl; Jul 6, 2022 at 01:49 PM.


Thread Starter
MBWorld Fanatic!
Joined: May 2022
Posts: 1,917
Likes: 499
From: The Netherlands
2005 CLS55 AMG W219 C219
Changed all 16 spark plugs with Beru UPT14P spark plugs, they were gapped at 0.75mm and I adjusted them to 0.8mm as per factory spec. So far they are doing good 

Something doesnt look right...The threads are way too dirty. Looks like a gasket leak (and it was!).


Something doesnt look right...The threads are way too dirty. Looks like a gasket leak (and it was!).
Last edited by nd-photo.nl; Jul 7, 2022 at 09:22 AM.
Thread Starter
MBWorld Fanatic!
Joined: May 2022
Posts: 1,917
Likes: 499
From: The Netherlands
2005 CLS55 AMG W219 C219
One of the previous owners scraped something, which damaged the V-bands on the catback (center resonator delete). It resulted in a small leak on both V-bands, so I fixed that with 2 new V-band clamps


Thread Starter
MBWorld Fanatic!
Joined: May 2022
Posts: 1,917
Likes: 499
From: The Netherlands
2005 CLS55 AMG W219 C219
Went to work on replacing the rocker cover gaskets, which was as tedious as everyone says it is. Dont want to do this chore more than I need to, so I bought the Mercedes sealant. Also, this was very hard to extract! I was able to MacGuyver something, which made it way more easy. Leaking solved!
1x 18mm Deep socket
1x Small ratchet extension
1x Kit gun (see pic below)
The deep socket and small extension allow you to use a proper kitgun, which was a godsend With this method, you dont need the provided black tube. You can see it on the last picture (in the back of the frame)
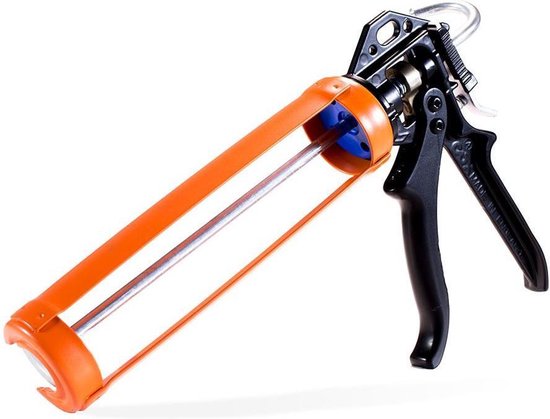
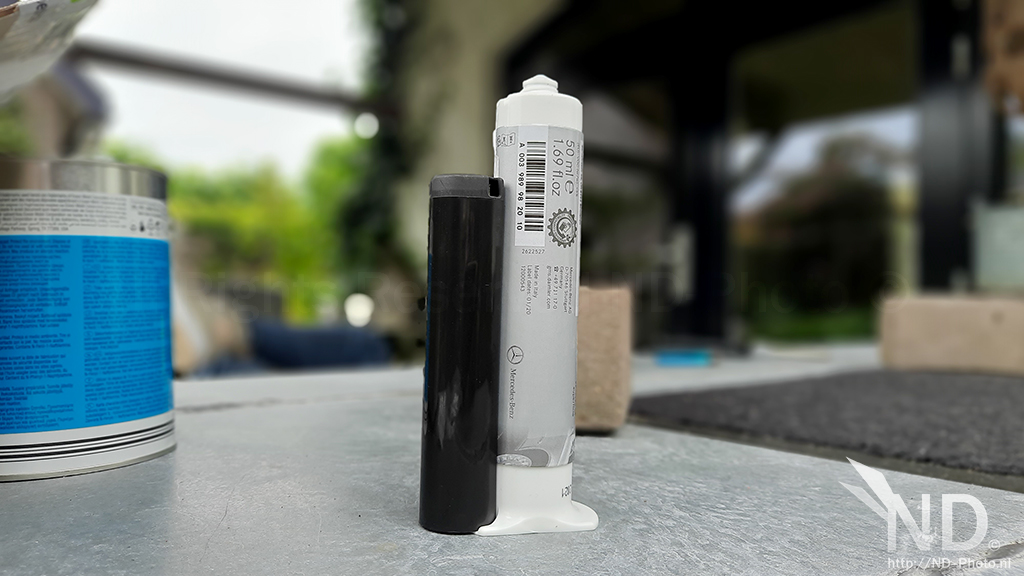

1x 18mm Deep socket
1x Small ratchet extension
1x Kit gun (see pic below)
The deep socket and small extension allow you to use a proper kitgun, which was a godsend
With this method, you dont need the provided black tube. You can see it on the last picture (in the back of the frame)
Last edited by nd-photo.nl; Jul 8, 2022 at 02:48 PM.


