


 Thanks a lot, and yes it is "kind of HUGE" hahaha

TemjinX2's d2 coil over review
Thread Starter
MBWorld Fanatic!
Joined: Dec 2007
Posts: 5,034
Likes: 6
From: Corona, CA
03 g35 coupe...........02 c32 Sold
TemjinX2's d2 coil over review
I bought these for $970 shipped. They offer full 36way damper adjustment and custom springs if wanted. I got them in three days shipped via fedex from taiwan. \
Here are the basic specs
seperate height and preload adjustments allowing for optimal adjustment and allowing full strut travel at all times
6061 high quality aluminum - powder coated for more protection
Threads are teflon coated to prevent rust
Includes 2 keys to adjust ride height
Rebuildable and serviceable in the USA
1 Year Warranty
Specs:
Solid Aluminum Top Mounts: No
Adjustable Top Camber Plate: No
Spring Rate Fronts: 5.2
Spring Rate Rears: 8.5
Part #: D2-B05
i think converted its 291lbs/in in the front and and 476lbs/in in the rear.
I found the spring rates on the Tein SS as comparison
front 336 ft and 448 ft rear.
So there setup for more over steer then the tein's. I decided just to go with the stock spring rates that it came with since i didn't know the c32 spring rates.
Just for future reference, i found this out the hard way, you need to drill out the front sway bar holes to 12mm since they come in 10mm for the other w203's. (thanks splinter for the tip)
So far i'm still fine tunning the damper for daily driving. I have set to 4 notches stiffer from the softest setting to get rid of the bouncyness.
The car rides pretty much like stock...except there's a lot less understeer. If you have 19'' rims it does eat up all the gap. I have the front's at the highest setting and its only a 1 finger gap in the fronts. The rears still have a lot of room for adjustment but i decided to go wit ha 1.5 finger rear.
You do need to reuse your oem bearings, under splinters's advice i decided just to buy new ones since mine looked wore. It also saves a lot of time on the install as well.
If it doesn't rain out this weekend, i'll probably have more at the limit impressions.
Thread Starter
MBWorld Fanatic!
Joined: Dec 2007
Posts: 5,034
Likes: 6
From: Corona, CA
03 g35 coupe...........02 c32 Sold
unfortunately i didn't take pics of the coil overs before i installed them. But they were packaged well, i was pretty impressed. I wish my depo tail lights were packaged as well.
this is basically what they look like minus the top mounts.

this is basically what they look like minus the top mounts.
Thread Starter
MBWorld Fanatic!
Joined: Dec 2007
Posts: 5,034
Likes: 6
From: Corona, CA
03 g35 coupe...........02 c32 Sold
Trending Topics

Senior Member
Joined: Sep 2005
Posts: 446
Likes: 1
From: Home is Stockholm, Sweden. But my work takes me around the world, right now I work/live in Laos, South East Asia.
C32 T 2003. Mods? MANY!! :)
MB World Stories
The Best of Mercedes & AMG

Manual Mercedes? 6 Times Sindelfingen Let Drivers Have All The Fun
Verdad Gallardo
Mercedes SLR McLaren 722 S Is Extremely Rare Example Modified by McLaren
Verdad Gallardo
8 Classic Boxy Mercedes Designs That Have Aged Like Fine Wine
Verdad Gallardo
Flawlessly Restored Mercedes 190E Evo II Heads to Auction
Verdad Gallardo
Electric Mercedes C-Class Unveiled: 11 Things You Need to Know
Verdad Gallardo
Mercedes EQS Gets A Major Update: Everything You Need to Know
Verdad Gallardo
5 Underrated Mercedes-Benz Models That Don't Get the Love They Deserve
Verdad Gallardo
Mercedes 300D Has Pushed Well Past 1 Million Miles and It Ain't Stopping
Verdad Gallardo
10 Most Reliable Mercedes-Benz Models You Can Buy Used
Verdad Gallardo
Member
Joined: Apr 2008
Posts: 226
Likes: 0
From: San Francisco, CA
W203 C32 AMG, W124 E300D
H&R makes sway bars with 12mm holes i believe? So are you using the stock AMG sway bars with this setup?
Thread Starter
MBWorld Fanatic!
Joined: Dec 2007
Posts: 5,034
Likes: 6
From: Corona, CA
03 g35 coupe...........02 c32 Sold
yeah, i'm using the stock amg sways. I'll probably upgrade later after my pulley maching project. But yeah if it wasn't installed already drilling it out to 12mm wouldn't have taken so much time.

Thread Starter
MBWorld Fanatic!
Joined: Dec 2007
Posts: 5,034
Likes: 6
From: Corona, CA
03 g35 coupe...........02 c32 Sold


Thread Starter
MBWorld Fanatic!
Joined: Dec 2007
Posts: 5,034
Likes: 6
From: Corona, CA
03 g35 coupe...........02 c32 Sold


Super Member
Joined: Jul 2006
Posts: 691
Likes: 0
From: FT POLK LOUISIANA
1992 Toyota Corolla, 1994 Chevy C1500, 2002 C32, 2012 Prius, 2013 Toyota Sienna
Any new updates? Thoughts?
Specs:
Solid Aluminum Top Mounts: No................<did you buy this?
Adjustable Top Camber Plate: No..............<did you buy this?
Spring Rate Fronts: 5.2
Spring Rate Rears: 8.5
Part #: D2-B05
Specs:
Solid Aluminum Top Mounts: No................<did you buy this?
Adjustable Top Camber Plate: No..............<did you buy this?
Spring Rate Fronts: 5.2
Spring Rate Rears: 8.5
Part #: D2-B05
Last edited by mdncn2762; Mar 14, 2009 at 04:51 AM.
Thread Starter
MBWorld Fanatic!
Joined: Dec 2007
Posts: 5,034
Likes: 6
From: Corona, CA
03 g35 coupe...........02 c32 Sold
after going on some spirited canyon drives..i'm very happy with the performance. Most of the car' stock understeer is gone. I would say at the limit the car tends to oversteer a bit before the traction control comes in. But i prefer oversteer at the limit. You can adjust the damper settings if you want little more oversteer or understeer at the limit.
The only issue had was the driver side coil over where i had to raise all the way to the top just to get that one finger. i didnt have to do it for the passneger side. I believe this is a error on my part on the installation. I think i didnt correctly line up bearing. I plan readjusting it but i've just been lazy. So far it didnt really effect performance at the limit but i does make a clank sound on the driver side but not the passenager side when i drive over deep bumps.
Again my fault on the installation rather then coil over.
I am happy with the quality and packaging it came in coilovers that it came in. At $950 shipped it pretty much gives you tein SS performance with the damper adjustment at a tein basic price.
Thread Starter
MBWorld Fanatic!
Joined: Dec 2007
Posts: 5,034
Likes: 6
From: Corona, CA
03 g35 coupe...........02 c32 Sold
i would recommend to anyone installing these coil overs to buy the oem bearings separately. Its saves a lot of time from trying to get it off your old stock suspension. My stock bearings were pretty wore anyways, so i'm glad i opted for the new set.
Thread Starter
MBWorld Fanatic!
Joined: Dec 2007
Posts: 5,034
Likes: 6
From: Corona, CA
03 g35 coupe...........02 c32 Sold
i lowered the front a little more about maybe 1/2 to 1/4 of a finger to get rid of the front gap. the springs are stiff enough so the plastic fender doesn't rub when i go over bumps.

Super Member
Joined: Jul 2006
Posts: 691
Likes: 0
From: FT POLK LOUISIANA
1992 Toyota Corolla, 1994 Chevy C1500, 2002 C32, 2012 Prius, 2013 Toyota Sienna
Cool, thanks for the update...
Did you buy these or?????
Solid Aluminum Top Mounts: No................<did you buy this?
Adjustable Top Camber Plate: No..............<did you buy this?
Did you buy these or?????
Solid Aluminum Top Mounts: No................<did you buy this?
Adjustable Top Camber Plate: No..............<did you buy this?
Thread Starter
MBWorld Fanatic!
Joined: Dec 2007
Posts: 5,034
Likes: 6
From: Corona, CA
03 g35 coupe...........02 c32 Sold
The w203 uses a bearing integrated into the top mount, which looks like a propriety design. Basically you either need to buy a separte set or use your old stock ones and put them over the coil over and it attached to the grooves of the chassis.
i didnt buy the camber plates since i don't really need camber adjustment for the fronts. You dont need them to install the coil over.
i'll try to did up a pic from splinter diy thread.
Last edited by TemjinX2; Mar 14, 2009 at 05:27 AM.
Thread Starter
MBWorld Fanatic!
Joined: Dec 2007
Posts: 5,034
Likes: 6
From: Corona, CA
03 g35 coupe...........02 c32 Sold
here's splinters thread
https://mbworld.org/forums/c-class-w...placement.html
https://mbworld.org/forums/c-class-w...placement.html
Because my W203 has accumulated more than a few miles and its steering felt as if it had lost some of its precision and tracking confidence, it was readily apparent that something was amiss. Since the torque and thrust arm bushing replacements had already been completed, the search was on for the next culprit...sure enough, the source of its numb front end feel, particularly over single-wheel irregularities, was the (#115) strut bearings.
To replace them is an easy and inexpensive task.

Get with your preferred parts purveyor to obtain:
(2) 203 320 02 73 Suspension strut bearing
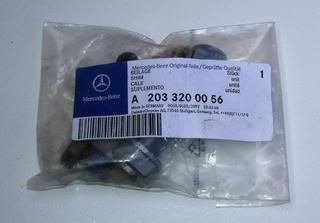
(2) 203 320 00 56 Strut mounting kit
(2) 203 320 08 44 Rubber buffer
(1) 203 589 00 07 00 Strut retainer tool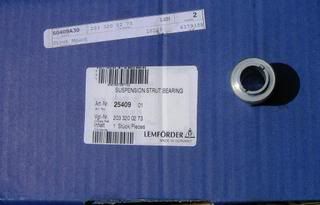
The strut R&R procedure has been shared before, so I’ll forego the perfunctory details –
https://mbworld.org/forums/c-class-w203/196922-diy-coilovers-tein.html
The hardware kit is required by MB for any strut installation. It consists of the requisite consumable washers, encapsulated nuts, and bolts with thread adhesive (Loctite) already applied. Is it absolutely necessary? Probably not. Keep in mind that these lowly fasteners are the only pieces holding the strut in place. They are inexpensive insurance against potential separation and the ensuing catastrophic circumstances...
Replacing the rubber buffer (bump stop) and debris shield is optional for OE applications. They are an inexpensive wear item, so their concurrent replacement would be appropriate. Please be aware that the typically stocked 203 320 09 44 is for the increased ride height US (code 486, non-sport) chassis. While they may work well for those encountering tire interference, it will limit otherwise reasonable jounce travel and contribute to understeer. Those of you running coilovers should disregard the MB part number(s) for this phase of the job..
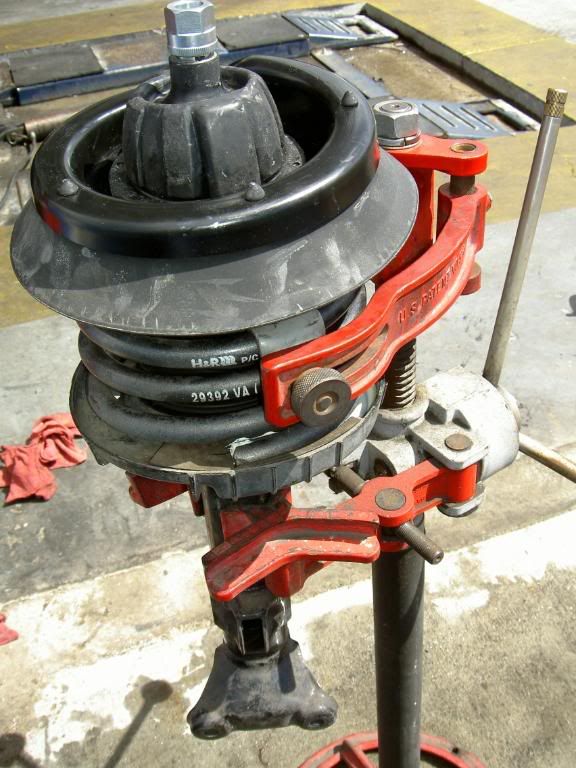
The only challenge to facilitating the bearing replacement is safely compressing the spring. The appropriate tool can be rented or borrowed. My good friend is a Michelin dealer, so I'd arranged in advance to furnish lunch and beverages for his technicians. They had the bearings swapped out pronto! I implore you to always be mindful that compressed springs store a tremendous amount of potentially lethal energy. They will take your head off if it goes awry!
The car felt much more precise going down the road after the installation. It was an investment well spent in that its improvement was immediately apparent. Slowing the aging process and running with the young bucks...LOL!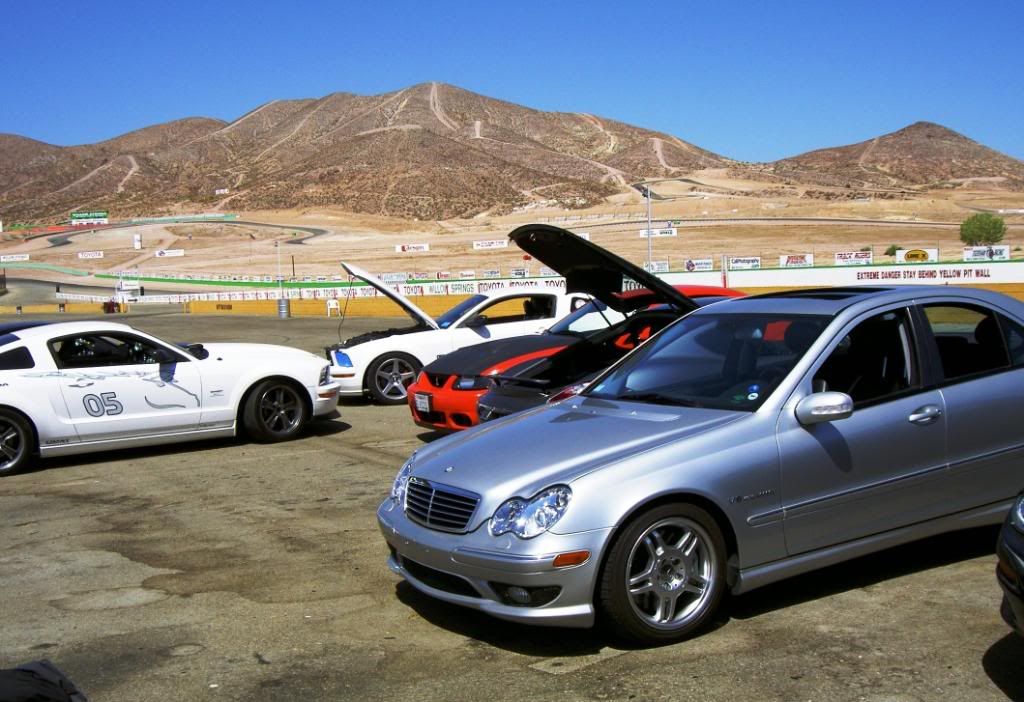
To replace them is an easy and inexpensive task.
Get with your preferred parts purveyor to obtain:
(2) 203 320 02 73 Suspension strut bearing
(2) 203 320 00 56 Strut mounting kit
(2) 203 320 08 44 Rubber buffer
(1) 203 589 00 07 00 Strut retainer tool
The strut R&R procedure has been shared before, so I’ll forego the perfunctory details –
https://mbworld.org/forums/c-class-w203/196922-diy-coilovers-tein.html
The hardware kit is required by MB for any strut installation. It consists of the requisite consumable washers, encapsulated nuts, and bolts with thread adhesive (Loctite) already applied. Is it absolutely necessary? Probably not. Keep in mind that these lowly fasteners are the only pieces holding the strut in place. They are inexpensive insurance against potential separation and the ensuing catastrophic circumstances...
Replacing the rubber buffer (bump stop) and debris shield is optional for OE applications. They are an inexpensive wear item, so their concurrent replacement would be appropriate. Please be aware that the typically stocked 203 320 09 44 is for the increased ride height US (code 486, non-sport) chassis. While they may work well for those encountering tire interference, it will limit otherwise reasonable jounce travel and contribute to understeer. Those of you running coilovers should disregard the MB part number(s) for this phase of the job..
The only challenge to facilitating the bearing replacement is safely compressing the spring. The appropriate tool can be rented or borrowed. My good friend is a Michelin dealer, so I'd arranged in advance to furnish lunch and beverages for his technicians. They had the bearings swapped out pronto! I implore you to always be mindful that compressed springs store a tremendous amount of potentially lethal energy. They will take your head off if it goes awry!
The car felt much more precise going down the road after the installation. It was an investment well spent in that its improvement was immediately apparent. Slowing the aging process and running with the young bucks...LOL!


