PLM head exchanger, johnson CM30 and needswings isolation install
 12-01-2011, 04:23 AM
#1
MBWorld Fanatic!
Thread Starter
PLM head exchanger, johnson CM30 and needswings isolation install
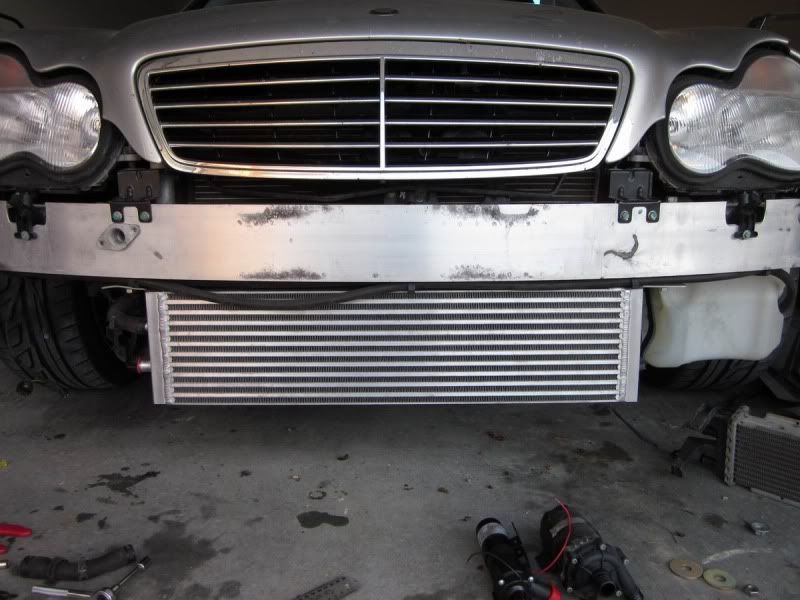
I am halfway through my heat exchanger install. I purchased the PLM heat exchanger on ebay $325 with the Johnson CM30 pump $100 and I already ordered a needswings intercooler isolation kit a few weeks ago. For front bumper removal see this video which helped enormously. http://www.youtube.com/watch?v=wHHRmQc-r6k
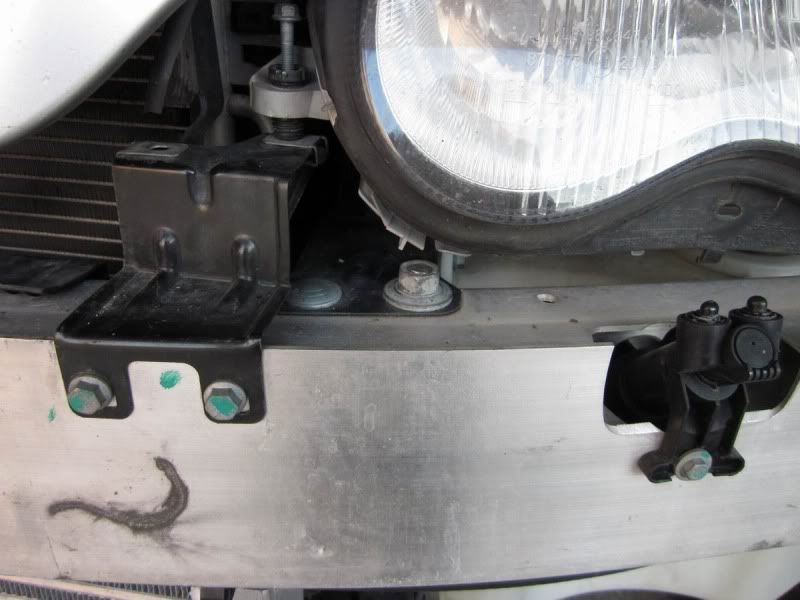
The only difficult thing I found was getting the clips off that hold the bumper and fender together. It is actually easy if you remove the whole plastic wheel arch liner and jack the car up a few inches so you have access with the wheel still on. Taking the wheel off will make it even easier but I could not be bothered.
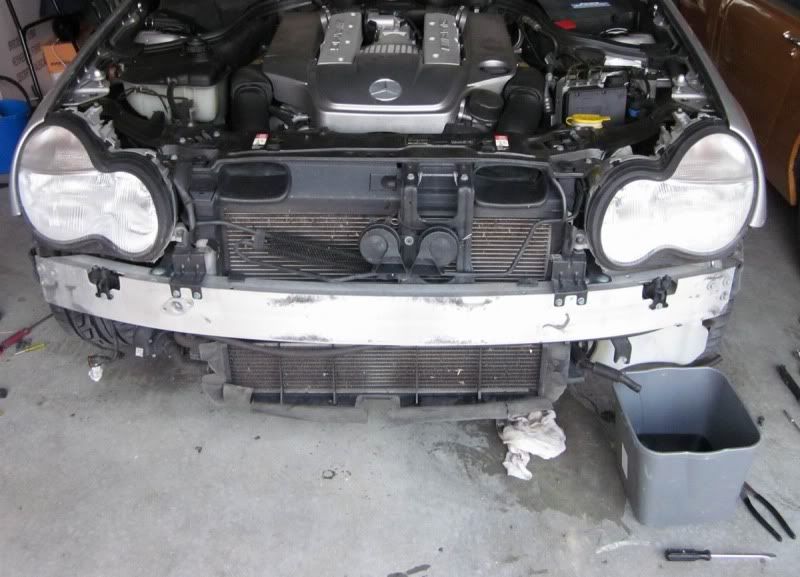
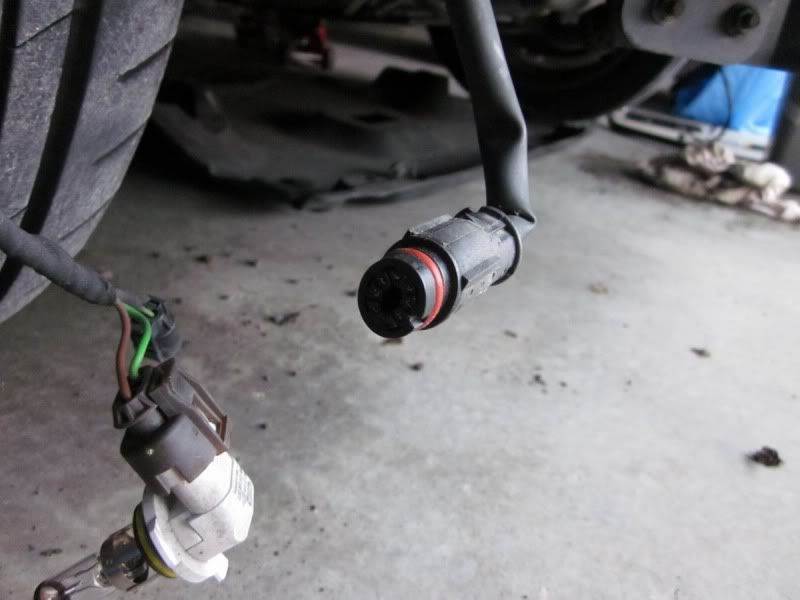
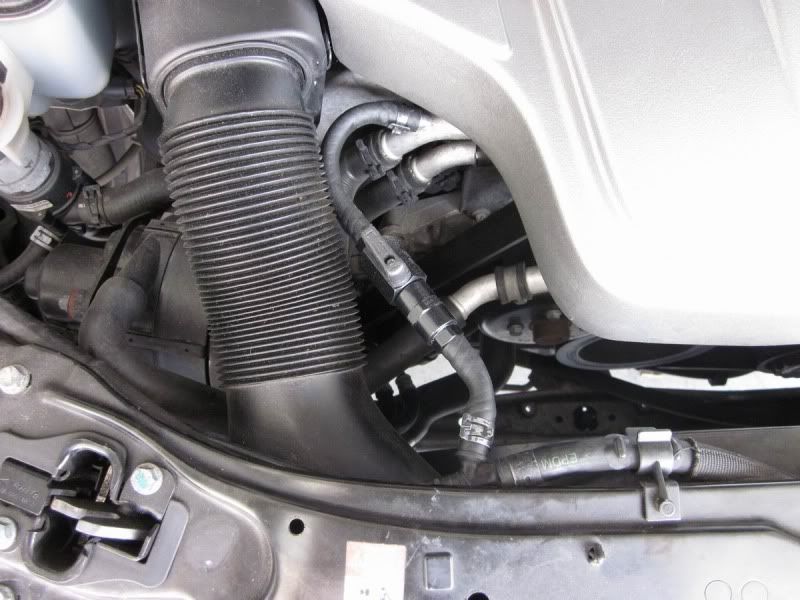
Untwist the light bulbs out, don't bother trying to remove the electrical connection, it is much harder to do. I was unsure about removing the electrical connector underneath, I think it is for the parktronic but I couldn't see any other options.
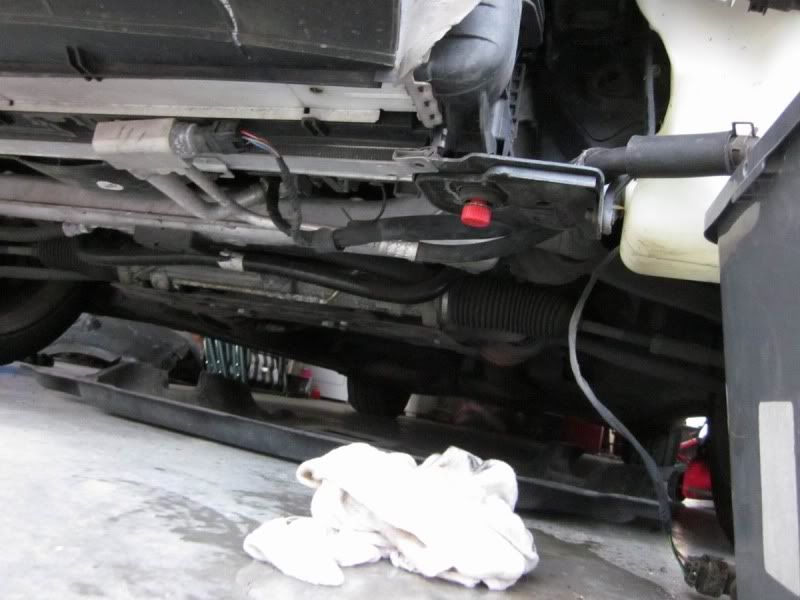
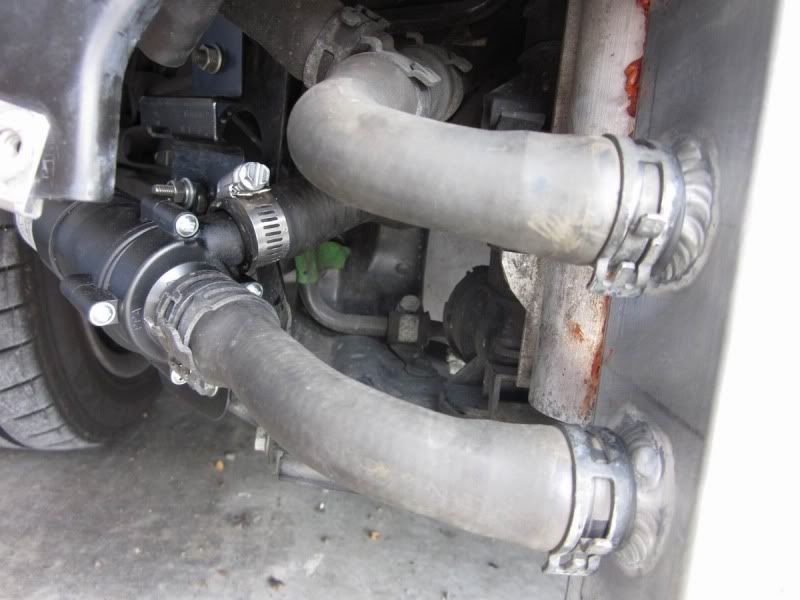
The coolant drain plug is the bright red one underneath. As the intercooler and engine coolant systems are joined you need to drain the engine coolant.
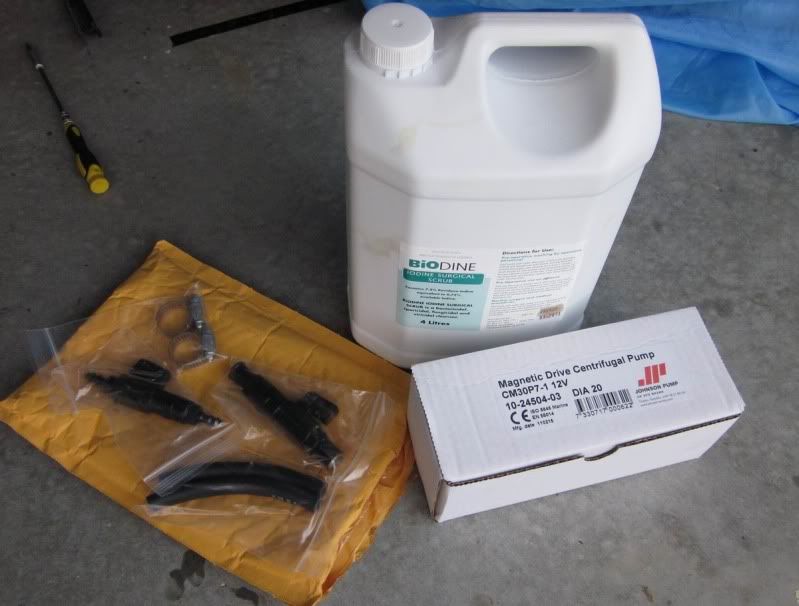
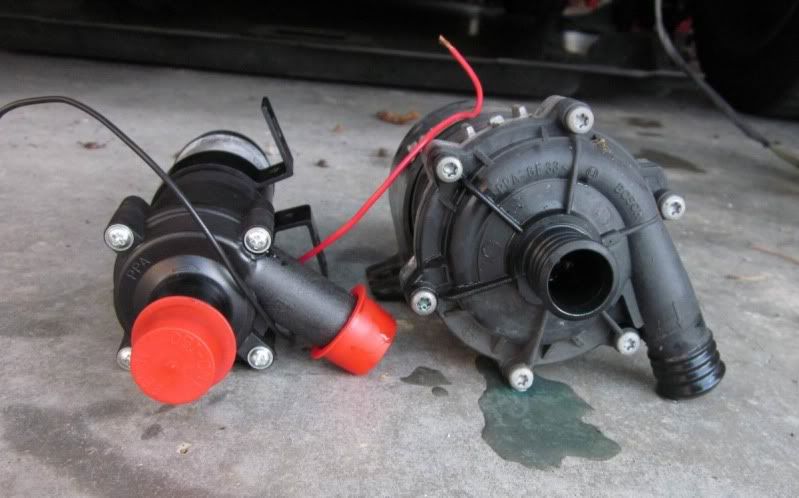
Needswings coolant isolation kit closes the hoses that allow the intercooler and engine coolant to mix thereby only using the intercooler for lowering the IAT's. The CM30 pump is there as is an empty iodine surgical scrub container mercedes were nice enough to fill with new engine coolant for me.
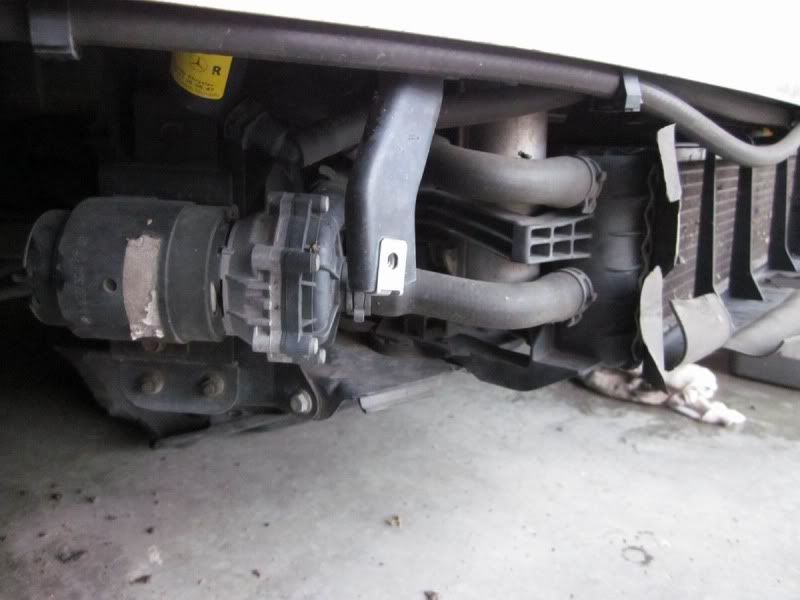
Stock pump, looks like the original and very likely doesn't work. I can see how those coolant hose clips suck. They are simple with the bumper off but working on the pump only from the wheel arch.... not fun.
And now for some funny stuff
I'm going to eat you
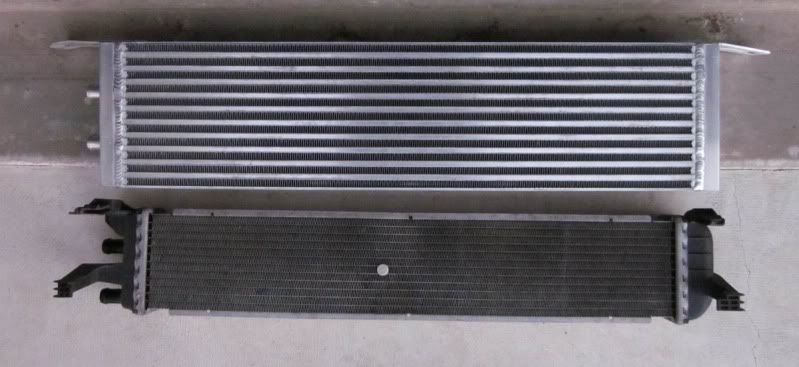
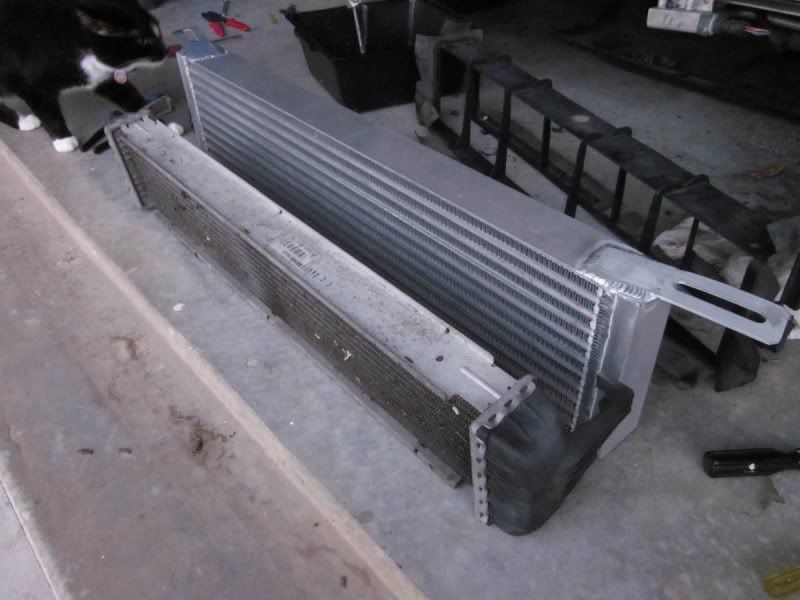
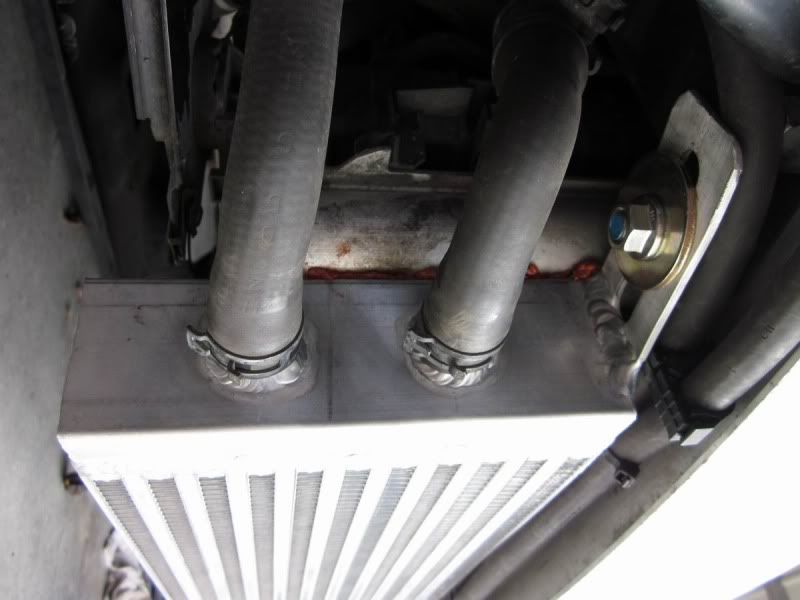
The PLM HE holds 2.2liters of liquid, I have no idea what the stock one holds but I seem to remember reading 600-800mL's, less than 1 liter anyway.
Measuring the cores only, the stock heat exchanger is 650x118x40mm in size (approx 25.5 x 4.6 x 1.6")
The PLM is 700x180x57 (approx 27.5 x 7.1 x 2.25") which is a 134% increase in volume.
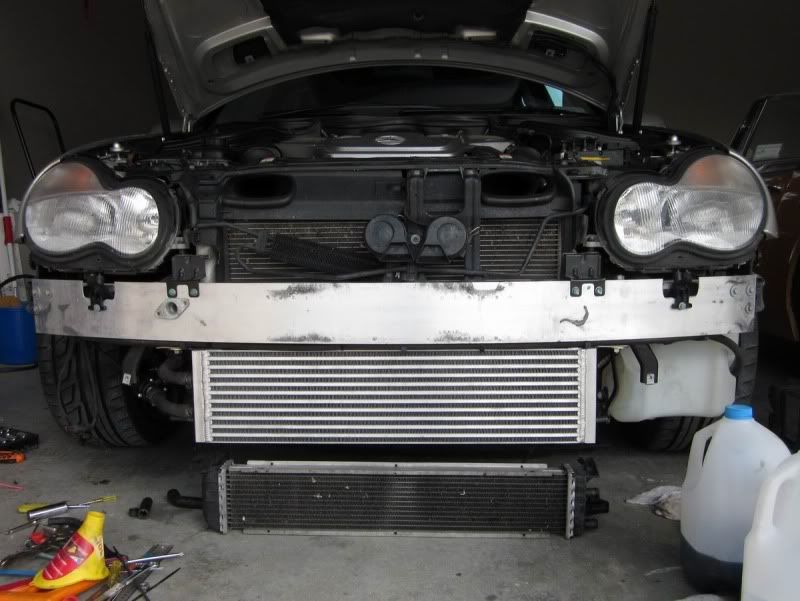
I have not installed the HE yet but it appears to bolt to the solid bumper using the two nuts on either side. I am told by someone who has installed it that it is 100% bolt in. I can confirm the hoses match up perfectly. I will finish this off once I do.
The only difficult thing I found was getting the clips off that hold the bumper and fender together. It is actually easy if you remove the whole plastic wheel arch liner and jack the car up a few inches so you have access with the wheel still on. Taking the wheel off will make it even easier but I could not be bothered.
Untwist the light bulbs out, don't bother trying to remove the electrical connection, it is much harder to do. I was unsure about removing the electrical connector underneath, I think it is for the parktronic but I couldn't see any other options.
The coolant drain plug is the bright red one underneath. As the intercooler and engine coolant systems are joined you need to drain the engine coolant.
Needswings coolant isolation kit closes the hoses that allow the intercooler and engine coolant to mix thereby only using the intercooler for lowering the IAT's. The CM30 pump is there as is an empty iodine surgical scrub container mercedes were nice enough to fill with new engine coolant for me.
Stock pump, looks like the original and very likely doesn't work. I can see how those coolant hose clips suck. They are simple with the bumper off but working on the pump only from the wheel arch.... not fun.
And now for some funny stuff
I'm going to eat you
The PLM HE holds 2.2liters of liquid, I have no idea what the stock one holds but I seem to remember reading 600-800mL's, less than 1 liter anyway.
Measuring the cores only, the stock heat exchanger is 650x118x40mm in size (approx 25.5 x 4.6 x 1.6")
The PLM is 700x180x57 (approx 27.5 x 7.1 x 2.25") which is a 134% increase in volume.
I have not installed the HE yet but it appears to bolt to the solid bumper using the two nuts on either side. I am told by someone who has installed it that it is 100% bolt in. I can confirm the hoses match up perfectly. I will finish this off once I do.
 12-01-2011, 06:43 AM
#2
Super Member

Join Date: Jun 2011
Location: I liva at da land down under
Posts: 601
Likes: 0
Received 4 Likes
on
4 Posts
Porsche 2004 911
I have one; it is 100% fit. Mechanic installed it so I cant elaborate on further install details. I can advise it looks mean through the front fender but.
Summer is here in AU so will see how it goes. Did you get the "water wetter" (gylcol) thrown in on the PLM deal? Again its not available here; only from the US.
Summer is here in AU so will see how it goes. Did you get the "water wetter" (gylcol) thrown in on the PLM deal? Again its not available here; only from the US.

 12-01-2011, 01:47 PM
#4
MBWorld Fanatic!
Thread Starter
I have one; it is 100% fit. Mechanic installed it so I cant elaborate on further install details. I can advise it looks mean through the front fender but.
Summer is here in AU so will see how it goes. Did you get the "water wetter" (gylcol) thrown in on the PLM deal? Again its not available here; only from the US.
Summer is here in AU so will see how it goes. Did you get the "water wetter" (gylcol) thrown in on the PLM deal? Again its not available here; only from the US.
Can someone please tell me, do I need to dilute the MB coolant down before using? I presume it is a concentrate and I need to make it 50:50 with some distilled water?
12-01-2011, 07:59 PM
#5
Super Member
Join Date: Jun 2011
Location: I liva at da land down under
Posts: 601
Likes: 0
Received 4 Likes
on
4 Posts
Porsche 2004 911
And Splinters install of LET H/E; "Refill the entire cooling system with a 50/50 mix of MB antifreeze and distilled water". http://www.mymbonline.com/forum/viewtopic.php?t=6430
12-02-2011, 02:28 AM
#6
MBWorld Fanatic!
Thread Starter
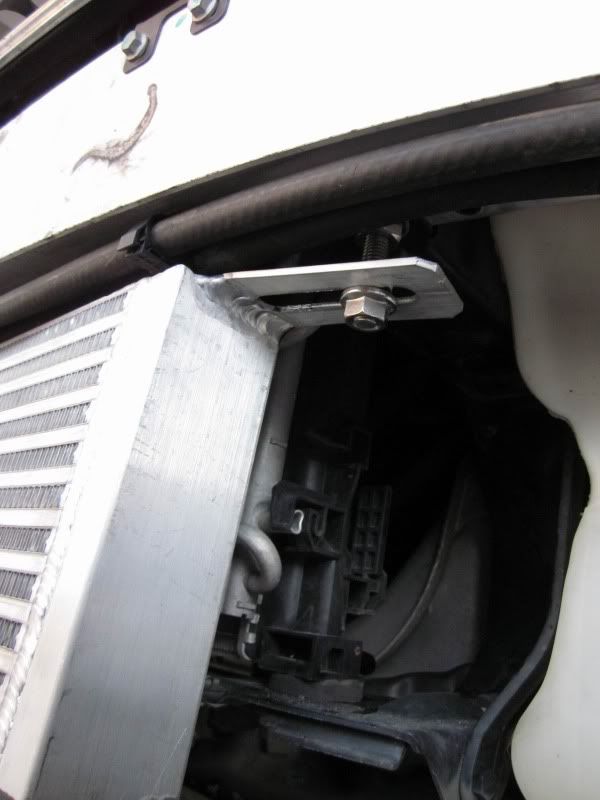
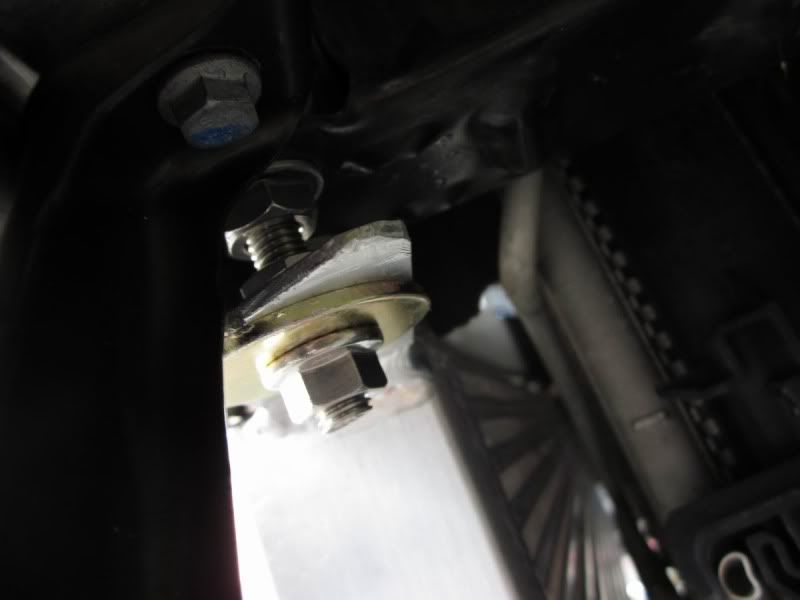
I can confirm that this heat exchanger is NOT bolt on for MY car. This might simply be that my car is RHD but macbryanie didn't have any trouble on his RHD so not sure. Anyway the problem is that the heat exchanger does not fit against what I think is the air conditioning radiator.

Also the tabs are at the slightly wrong angle and cannot fit over the bolts.
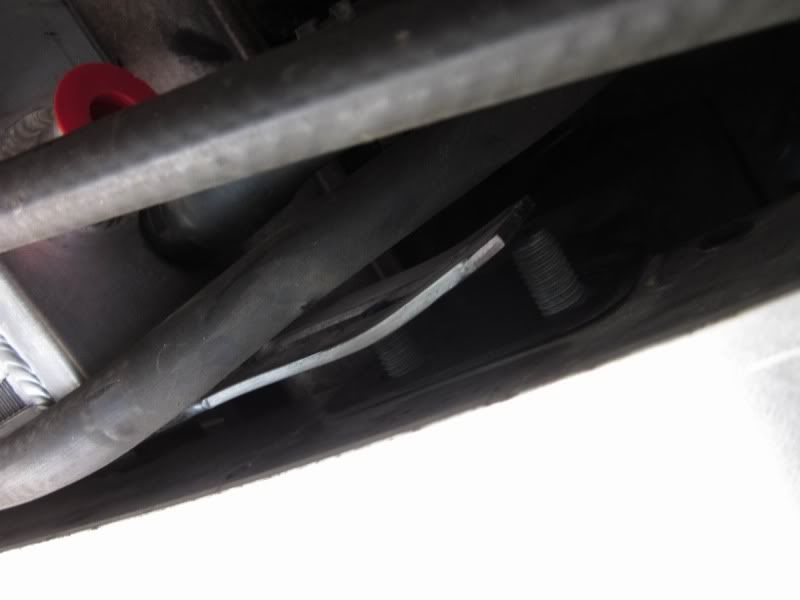
Anyway my possible solution was to remove one bolt from both sides and put an M10 high tensile stainless steel threaded rod through the hole to mount the heat exchanger slightly lower and to the left of the car to avoid the radiator.
You can see the stud here
Underneath
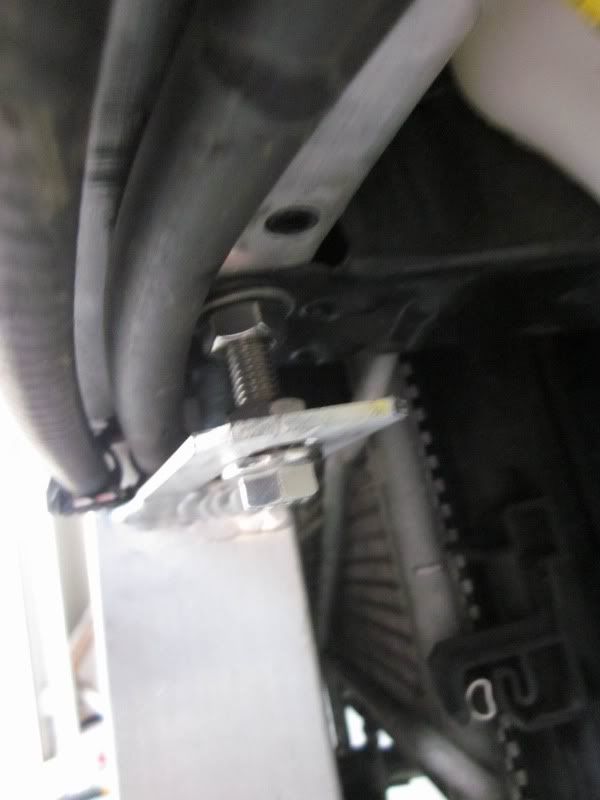
Other side
It sits almost centered. I have yet to adjust the height and I will need to cable tie those hoses in better.
Wow the CM30 is tiny! is this the right pump?
Also the tabs are at the slightly wrong angle and cannot fit over the bolts.
Anyway my possible solution was to remove one bolt from both sides and put an M10 high tensile stainless steel threaded rod through the hole to mount the heat exchanger slightly lower and to the left of the car to avoid the radiator.
You can see the stud here
Underneath
Other side
It sits almost centered. I have yet to adjust the height and I will need to cable tie those hoses in better.
Wow the CM30 is tiny! is this the right pump?
12-03-2011, 12:07 AM
#7
MBWorld Fanatic!
Thread Starter
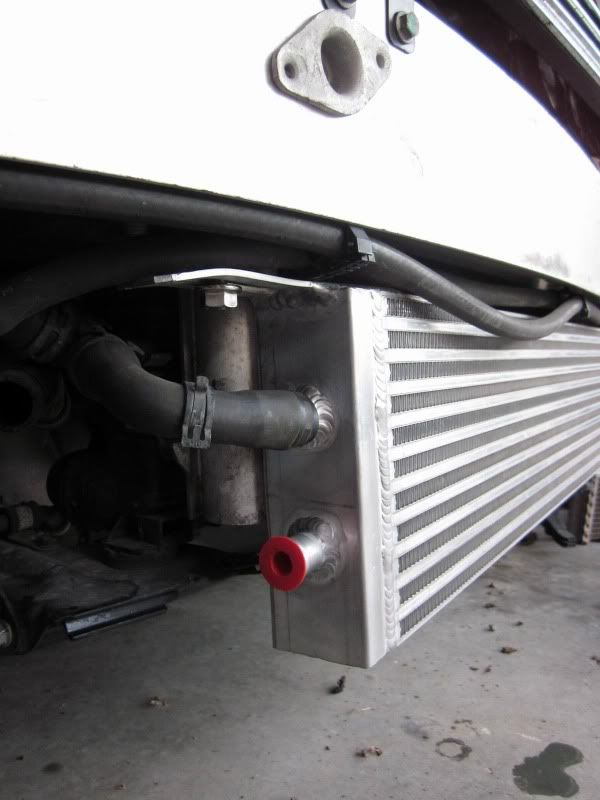
The heat exchanger is mounted, old one below.
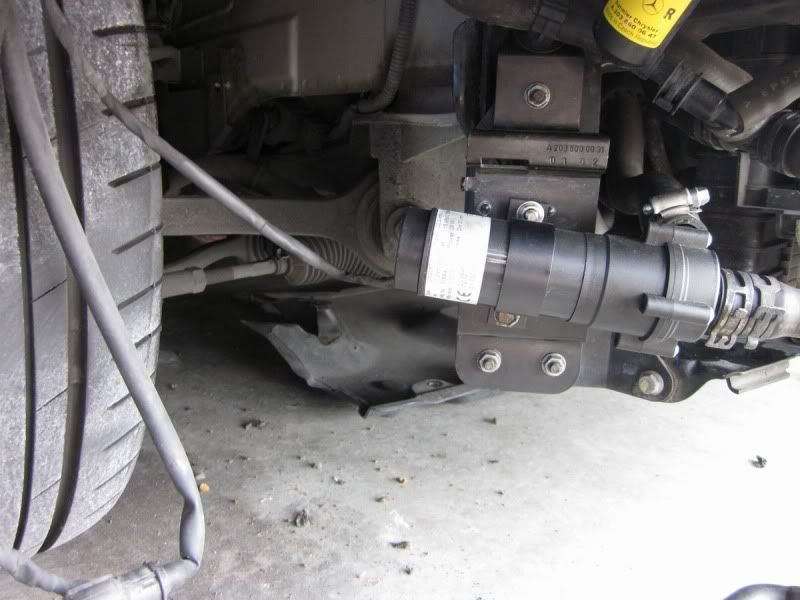
To install the CM30 I used the bracket that came with the new pump. I used the existing bolt hole below and drilled my own hole for the top using a M6x1 bolt, spring washer and nut. I cut, twisted and heat shrinked the wires, red to red, black to brown.
Hoses installed. I would have liked to use more user friendly clamps but I didn't have any spares and could not be bothered going out to get some. Although these suck to use, they are a very reliable style of clamp. Maybe mercedes could have copied toyota and have upright metal tabs instead of the bend over metal which is impossible to grip with regular pliers.
I am still not sure why my kit did not bolt on as I expected. Could be the headlight washer hoses as well but I removed them to test fit. Oh well, this works well, it saved re-routing the water lines, maybe I just got a HE with the tabs welded wrong.
My final mounting solution. It should be pretty reliable, the heat exchanger is solid, it does not have any movement in it at all. The brown **** is gasket maker, I did not want the two radiators vibrating against one another so I kind of glued them together.
Needswings isolation kit. These are not crappy cheap plastic valves, they are full metal with plastic levers only, very nice stuff. This one is simple to install, just make sure to cut the length of the valve out of the hose obviously or it will be a few inches longer.
This is basic if you can get the mercedes clips off the original hose. The hose that comes with the kit is very tight on the fittings, both the valve and the stock fittings at either end. I had to lube them up with dishwashing liquid and immerse the hose ends in boiling water to soften them enough to get them on. No hose clamps required, these will never fall off or leak (I put the stock ones back on anyway because I can't help myself). You can see I cut the front hose shorter to fit.
I test fitted the bumper before filling back up with coolant, it seems to clear everywhere. I might put it back on tomorrow. I filled up with 50/50 MB coolant and distilled water. No leaks. I am not sure why there is a bleeding procedure, it appears to get 99% of the air out just filling and I would guess a few heat cycles would get the rest out. I am going away for 2 weeks but I will share my performance thoughts when I get back.
Last edited by tw2; 12-03-2011 at 12:12 AM.
Trending Topics
12-03-2011, 06:01 AM
#8
MBWorld Fanatic!
Join Date: Mar 2007
Location: Houston, TX
Posts: 1,948
Likes: 0
Received 3 Likes
on
2 Posts
C32/C55 AMG
Good job on the install, looks like your car should run a bit cooler now. I installed the same ISO kit and a modified thermostat and my coolant temps barely approach 80 degrees.
12-03-2011, 06:17 AM
#9
MBWorld Fanatic!
Thread Starter
Thanks, I am hoping that the original pump was broken so the new one will make it seem like like a huge increase in power... and maybe economy? I am not sure about mercedes but most cars are programmed to add a lot more fuel and retard timing when intake air temps go up.
12-21-2011, 03:43 AM
#10
MBWorld Fanatic!
Thread Starter
I have just finished putting the car back together. The bumper went back on ok, not perfect but ok. The plastic of the bumper clears the bottom of the heat exchanger with about 8mm to spare. However the black plastic support does not clear the heat exchanger properly and the bumper sticks out an extra 1-2cm max in the middle. You cannot tell by looking. I know everyone removes this but I wanted to keep it.
The plastic underbody tray bolts back on ok except at the front. The heat exchanger forces it to sit about 1/2" lower than usual. To remedy this I got some M8 studs to allow it to be firmly attached while sitting lower.
Over the next few days I will run it through some heat cycles and see how it performs.
 12-27-2012, 05:38 AM
#12
MBWorld Fanatic!
Thread Starter
12-27-2012, 01:27 PM
#13
Member

when i installed my FTP h/e i noticed a big difference in sustained performance. i take my car up CA highway 2 every weekend and i began to notice power delivery would suffer considerably when i started pushing the car. with the new h/e i have 100% power all the time no matter how hard i drive.


