


I searched the forums but only found completed projects. I know this is an old topic so maybe one of u guys know of a link that was helpful.
This project might also be too simple for a diy guide? Im a noob...
to clarify im doing a c32 to sl55 intake upgrade
This project might also be too simple for a diy guide? Im a noob...
to clarify im doing a c32 to sl55 intake upgrade

Quote:
This project might also be too simple for a diy guide? Im a noob...
to clarify im doing a c32 to sl55 intake upgrade
It's fairly simple, the sl55 intake is installed like the c32 intake. The hardest part will be fitting the y-pipe splitter, it's going to take some wiggling but isn't too difficult. The air boxes will have to be fastened down because they are larger than the factory air boxes and won't fit in the grooves. You might need some hose clamps to clamp the hoses in between the y splitter and the air boxes.Originally Posted by endri266
I searched the forums but only found completed projects. I know this is an old topic so maybe one of u guys know of a link that was helpful. This project might also be too simple for a diy guide? Im a noob...
to clarify im doing a c32 to sl55 intake upgrade
Member
I would recommend taking the metal clips/tabs off the bottom of the bottom of the airboxes. It will allow the boxes to sit more like the C32 boxes di. I was test fitting mine and the boxes were up too high and causing the y pipe to have more issues with fitment than necessary.
Andrew
Andrew
Thanks guys. What the best way to fasten the air boxes?
And parts.com is a trust worthy site for these parts?
And parts.com is a trust worthy site for these parts?

jvakos
MBWorld Fanatic!
close


May 9, 2026
- Join DateMay 2010
- LocationChicago
- Posts:1,227
-
iTrader Positive Feedback0
-
iTrader Feedback Score(0)
- Vehicle(s) I driveE63 SL55 996TT C5Z06
-
Likes:584
-
Liked:185 Times in 131 Posts
Quote:
And parts.com is a trust worthy site for these parts?
you can get the SL55 one. but I just installed the Needswings Dual Cold Air Intake (DCAI) system and am extremely pleased. its a bit pricey at $800 but flows much more than the SL55 boxes and you feel it with the mid-top end power gains that is big time noticeable especially added to my 178mm crank pulley upgrade and tune. the NW kit installs easily in about 1 hour and top quality parts and fits in clean. Originally Posted by endri266
Thanks guys. What the best way to fasten the air boxes? And parts.com is a trust worthy site for these parts?
getting their y-splitter to fit in takes some finesse but 5 mins of playing with it and you'll get it it.
the cannisters that hold the filters are rubber coated actually so that protects the coil packs that they minimally touch.
just my .02 but in case you were considering the NW kit wanted to share very recent feedback. BTW - the owner Rob from NW is fantastic with support. i must have asked him 20 questions before finally pulling the trigger and he happily answered all of them

Junior Member
thank you
Quote:
This project might also be too simple for a diy guide? Im a noob...
to clarify im doing a c32 to sl55 intake upgrade
This is an easy upgrade for the V6AMG.Originally Posted by endri266
I searched the forums but only found completed projects. I know this is an old topic so maybe one of u guys know of a link that was helpful. This project might also be too simple for a diy guide? Im a noob...
to clarify im doing a c32 to sl55 intake upgrade
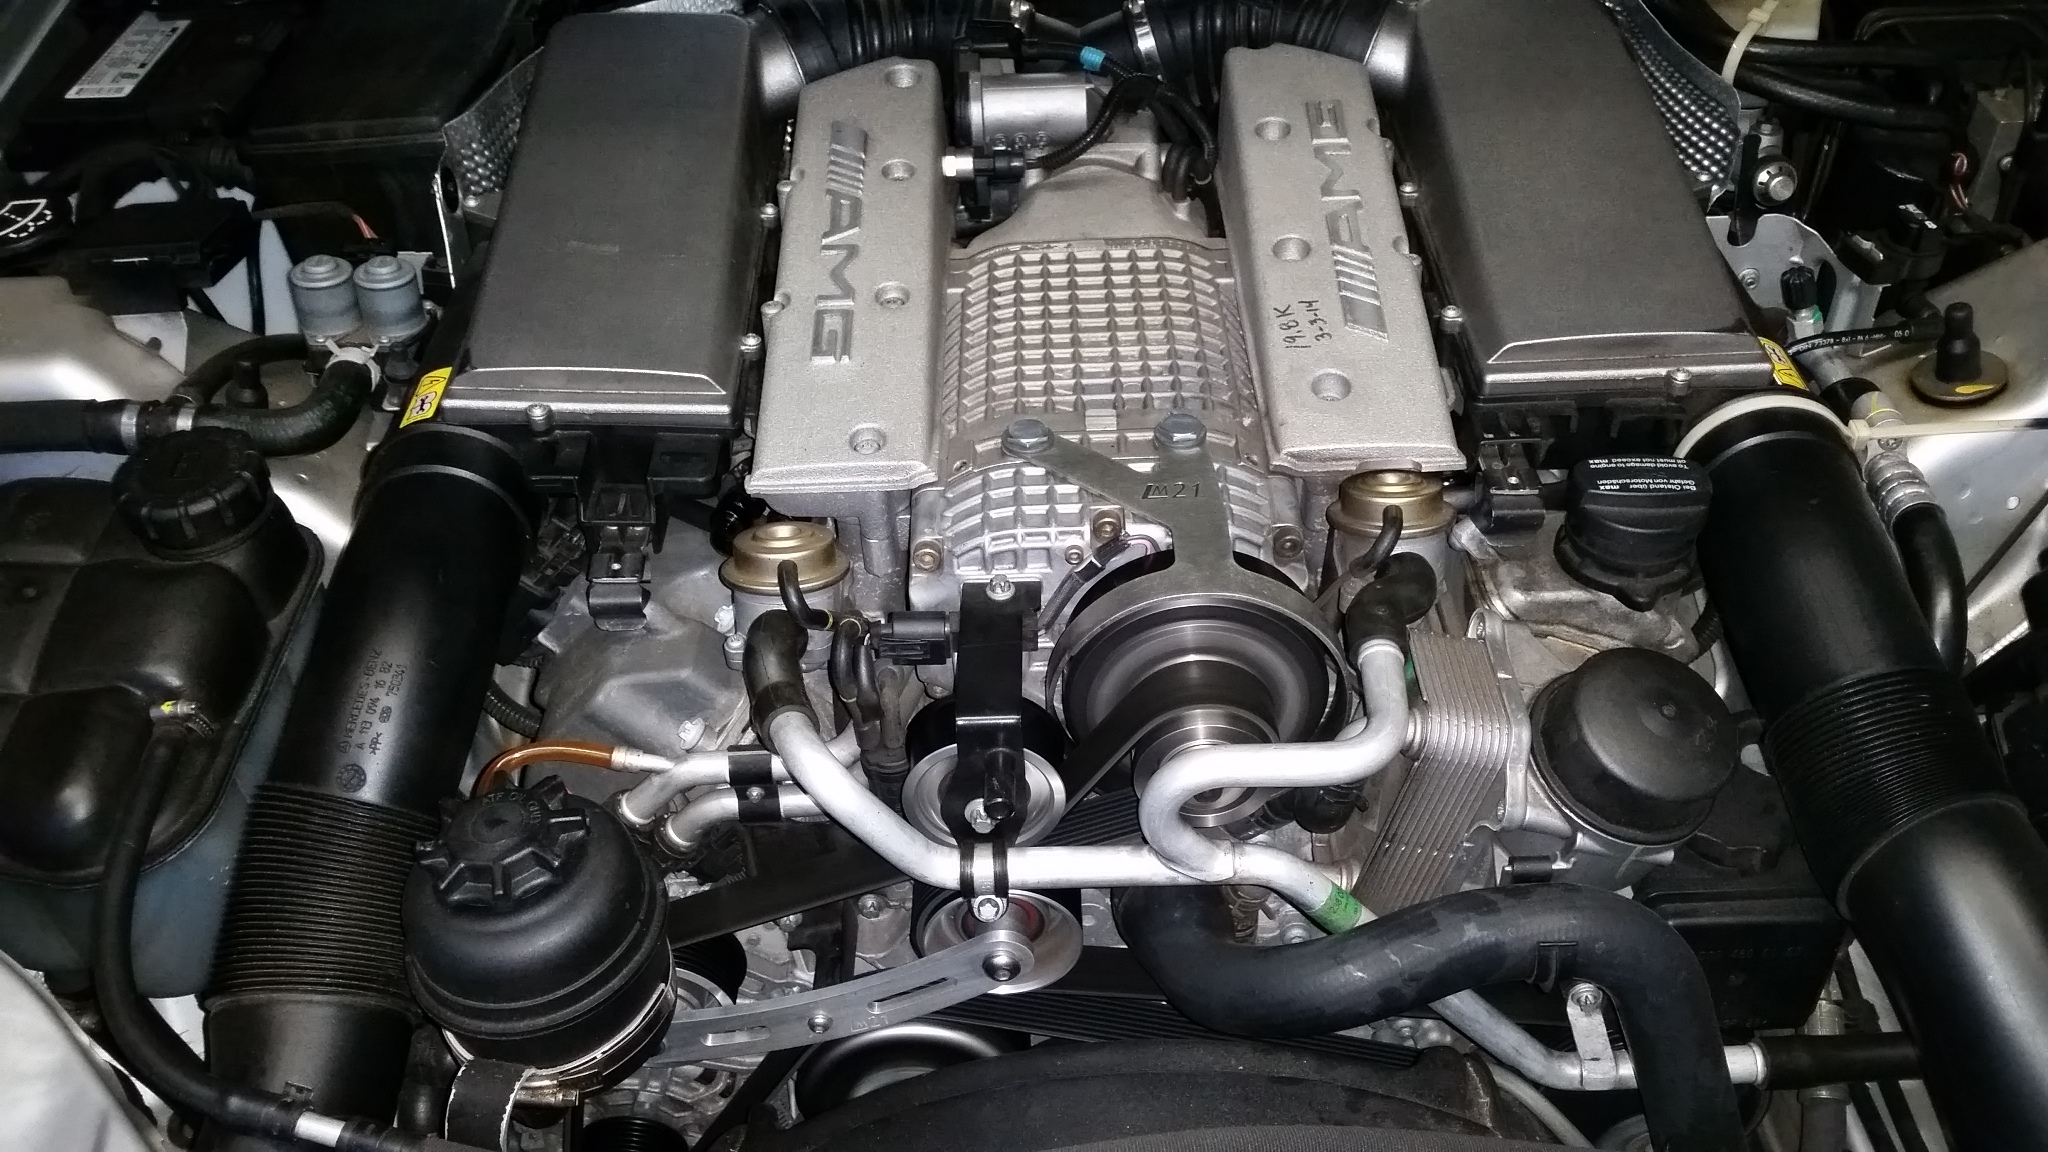
There are 5 parts needed. Y-pipe (with hoses), 2 filter boxes (they come with new filters) and 2 tubes (that go from the filter boxes up to the grill area).
Last time I did it I bought the parts new (from oediscountparts.com) and I paid about $325. I have seen them used for as little as $100 (but more often $200).
The "y"-pipe comes with the hoses attached (with clic-r style clamps). You don't need hose clamps on the other side (where they attach to the filter box) ... just slip it together. (mine have clamps in the pics because I experimented with silicon hoses on the "y" but ended up liking the factory hoses better).
On the SLK32, the y-pipe has NO clearance issues (C32 may be different, don't know).
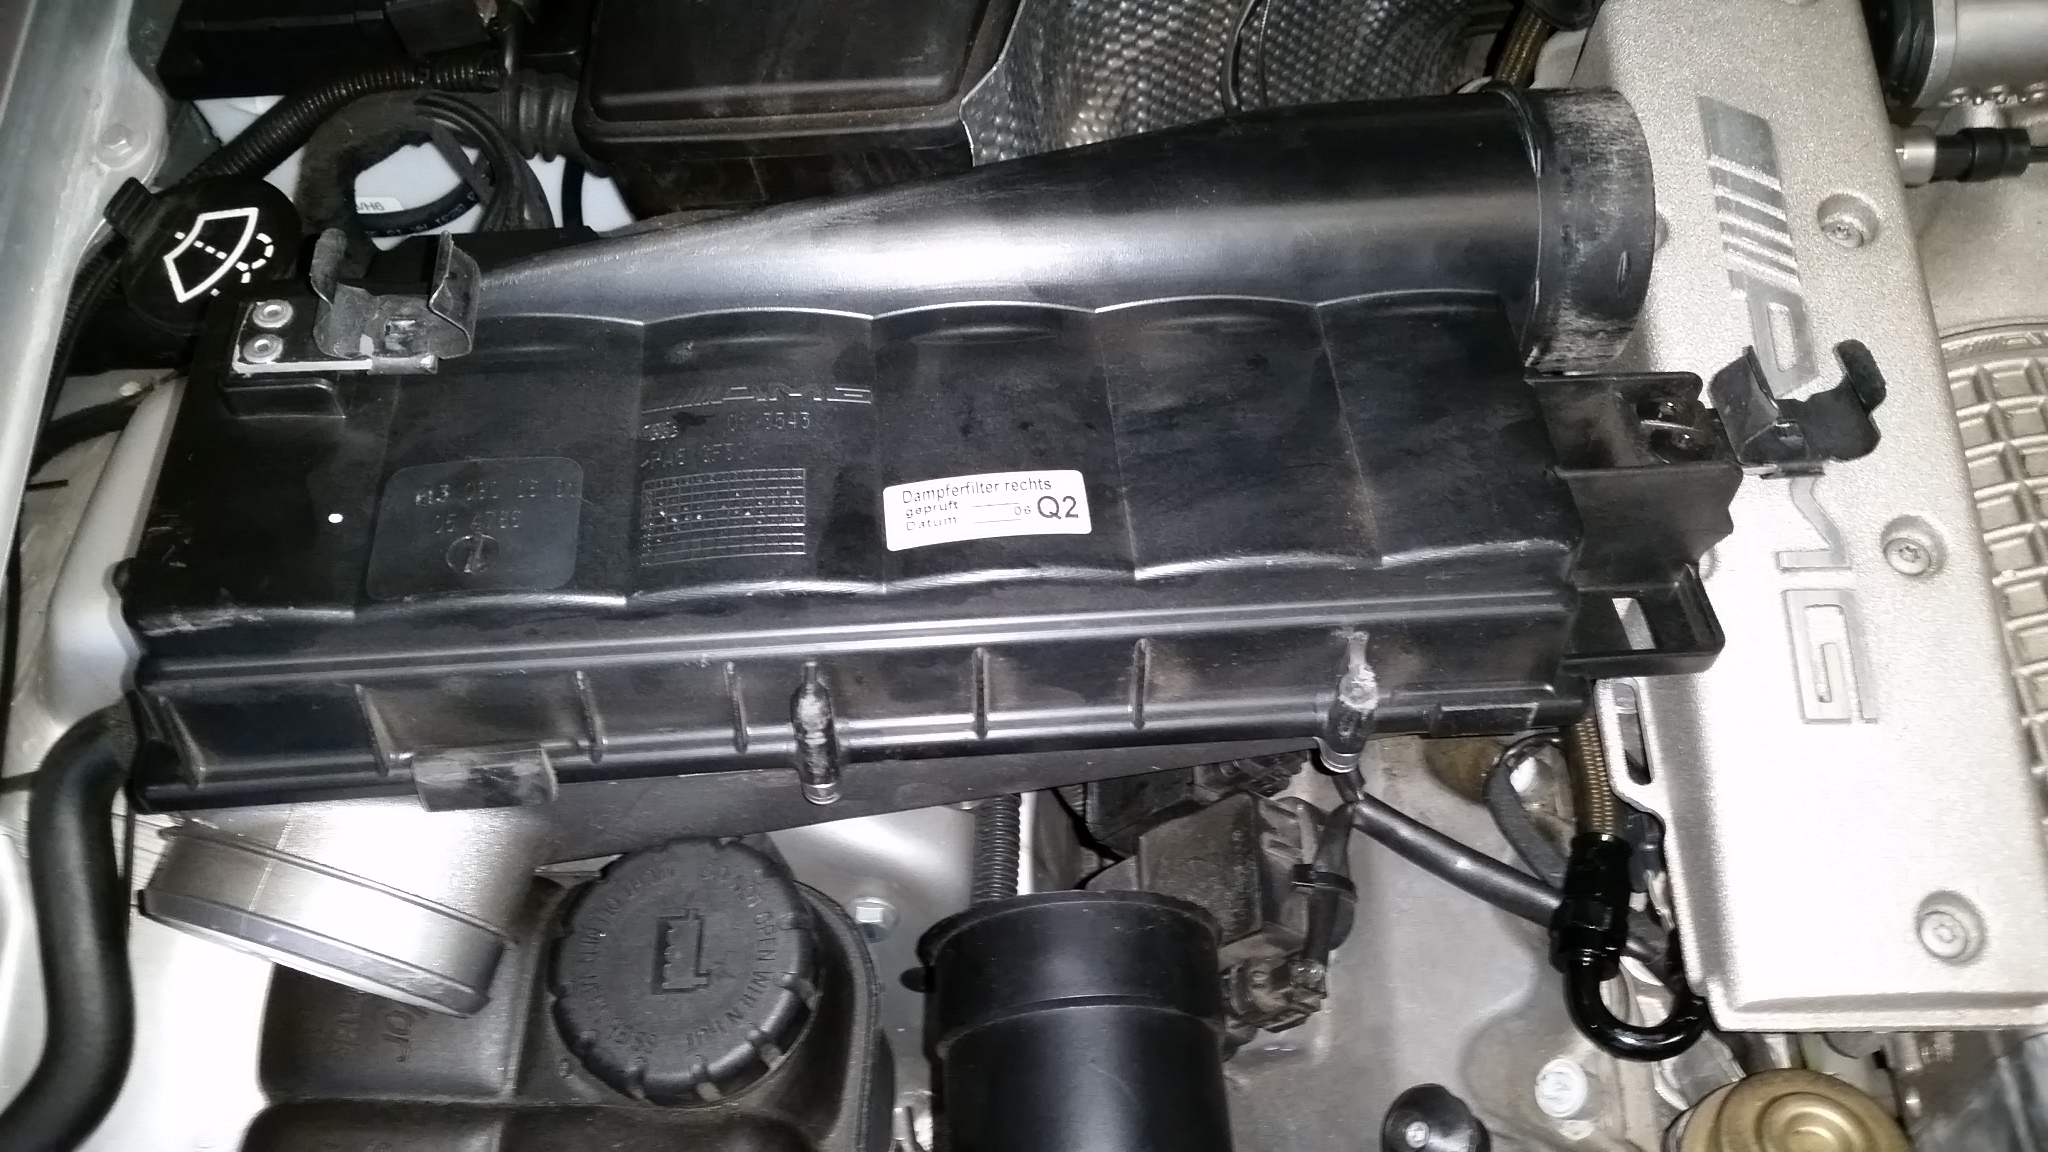
The larger SL55 filter boxes don't fit the same, but with light modification they can be made to snap in like factory pieces.
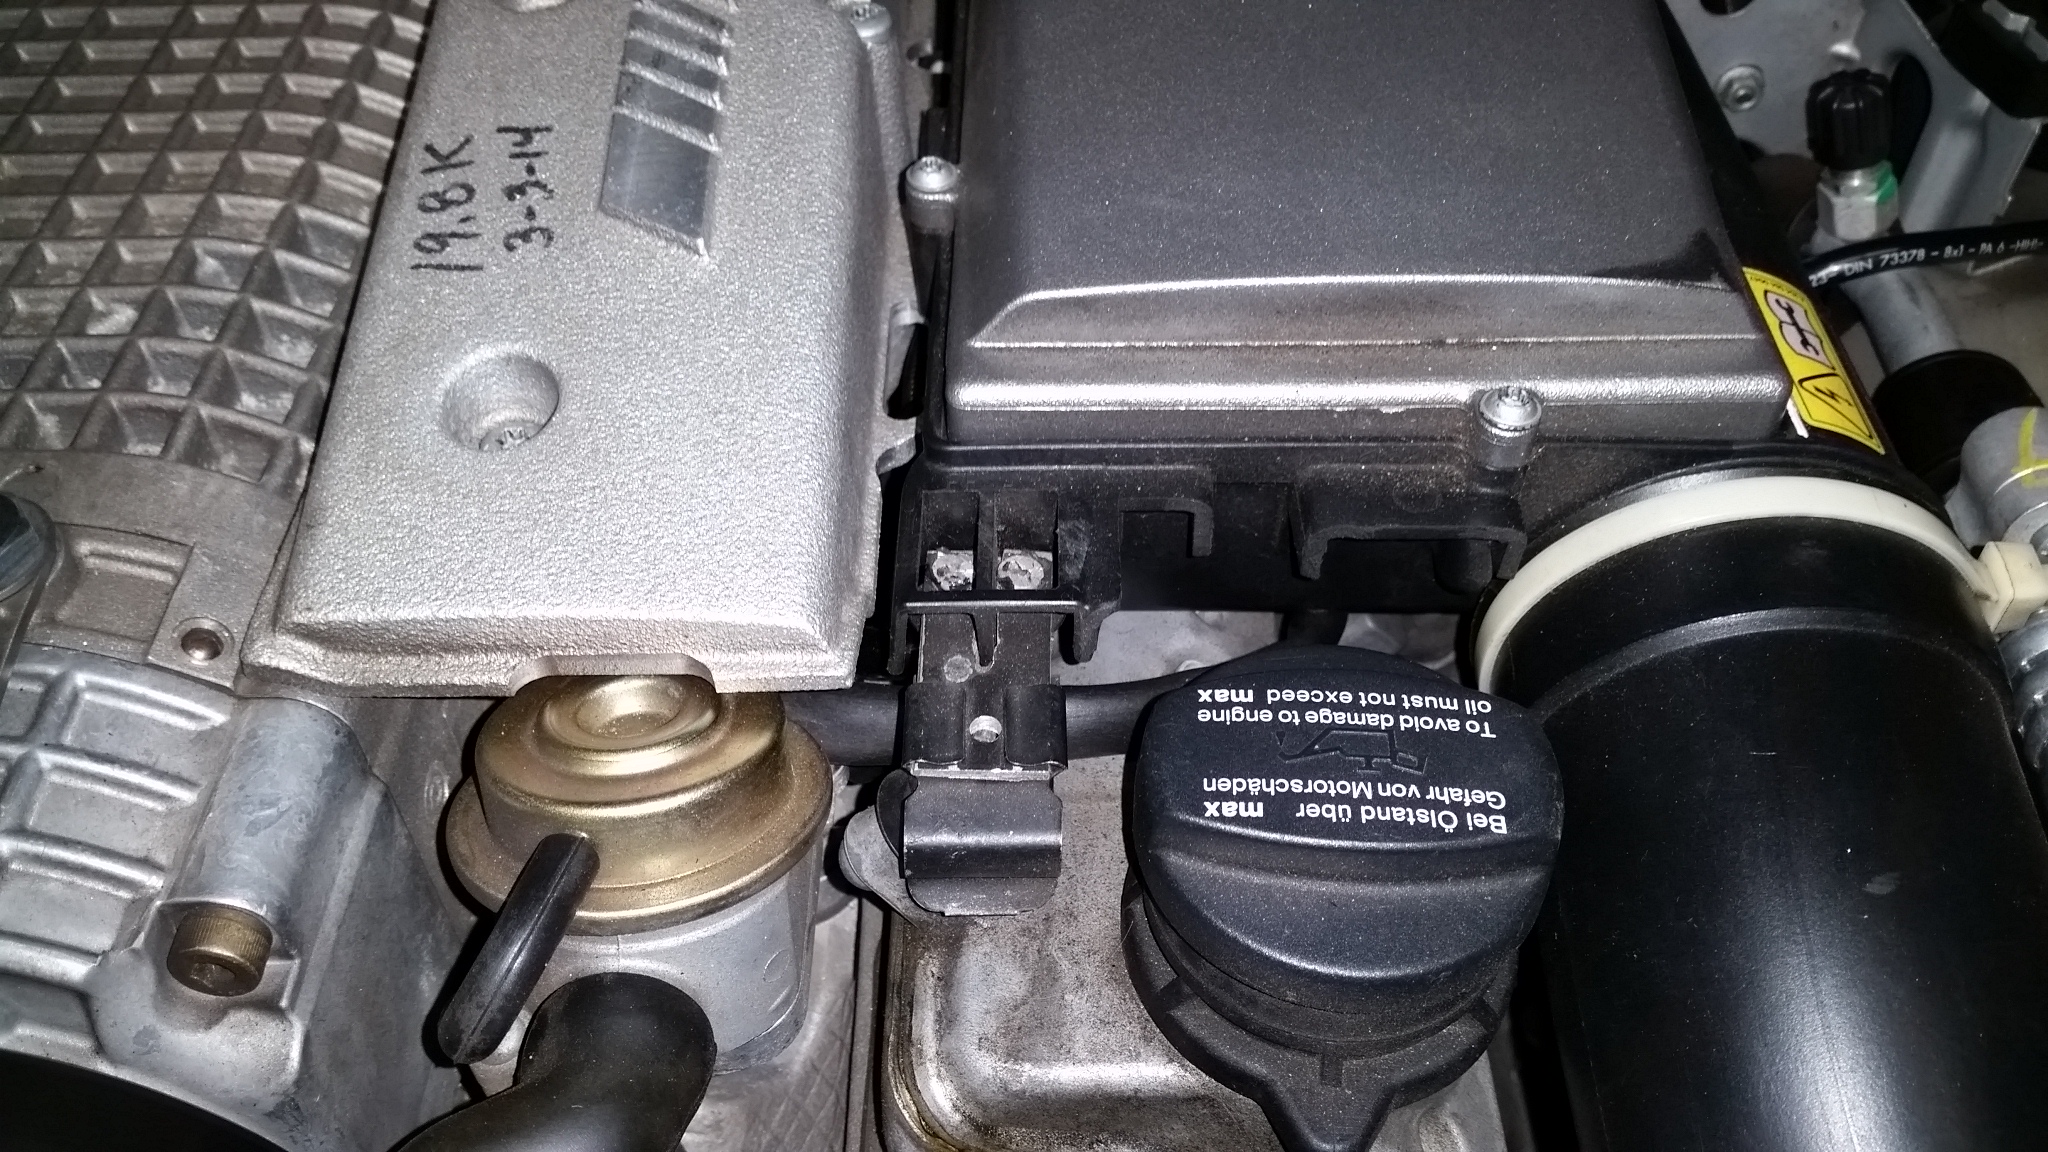
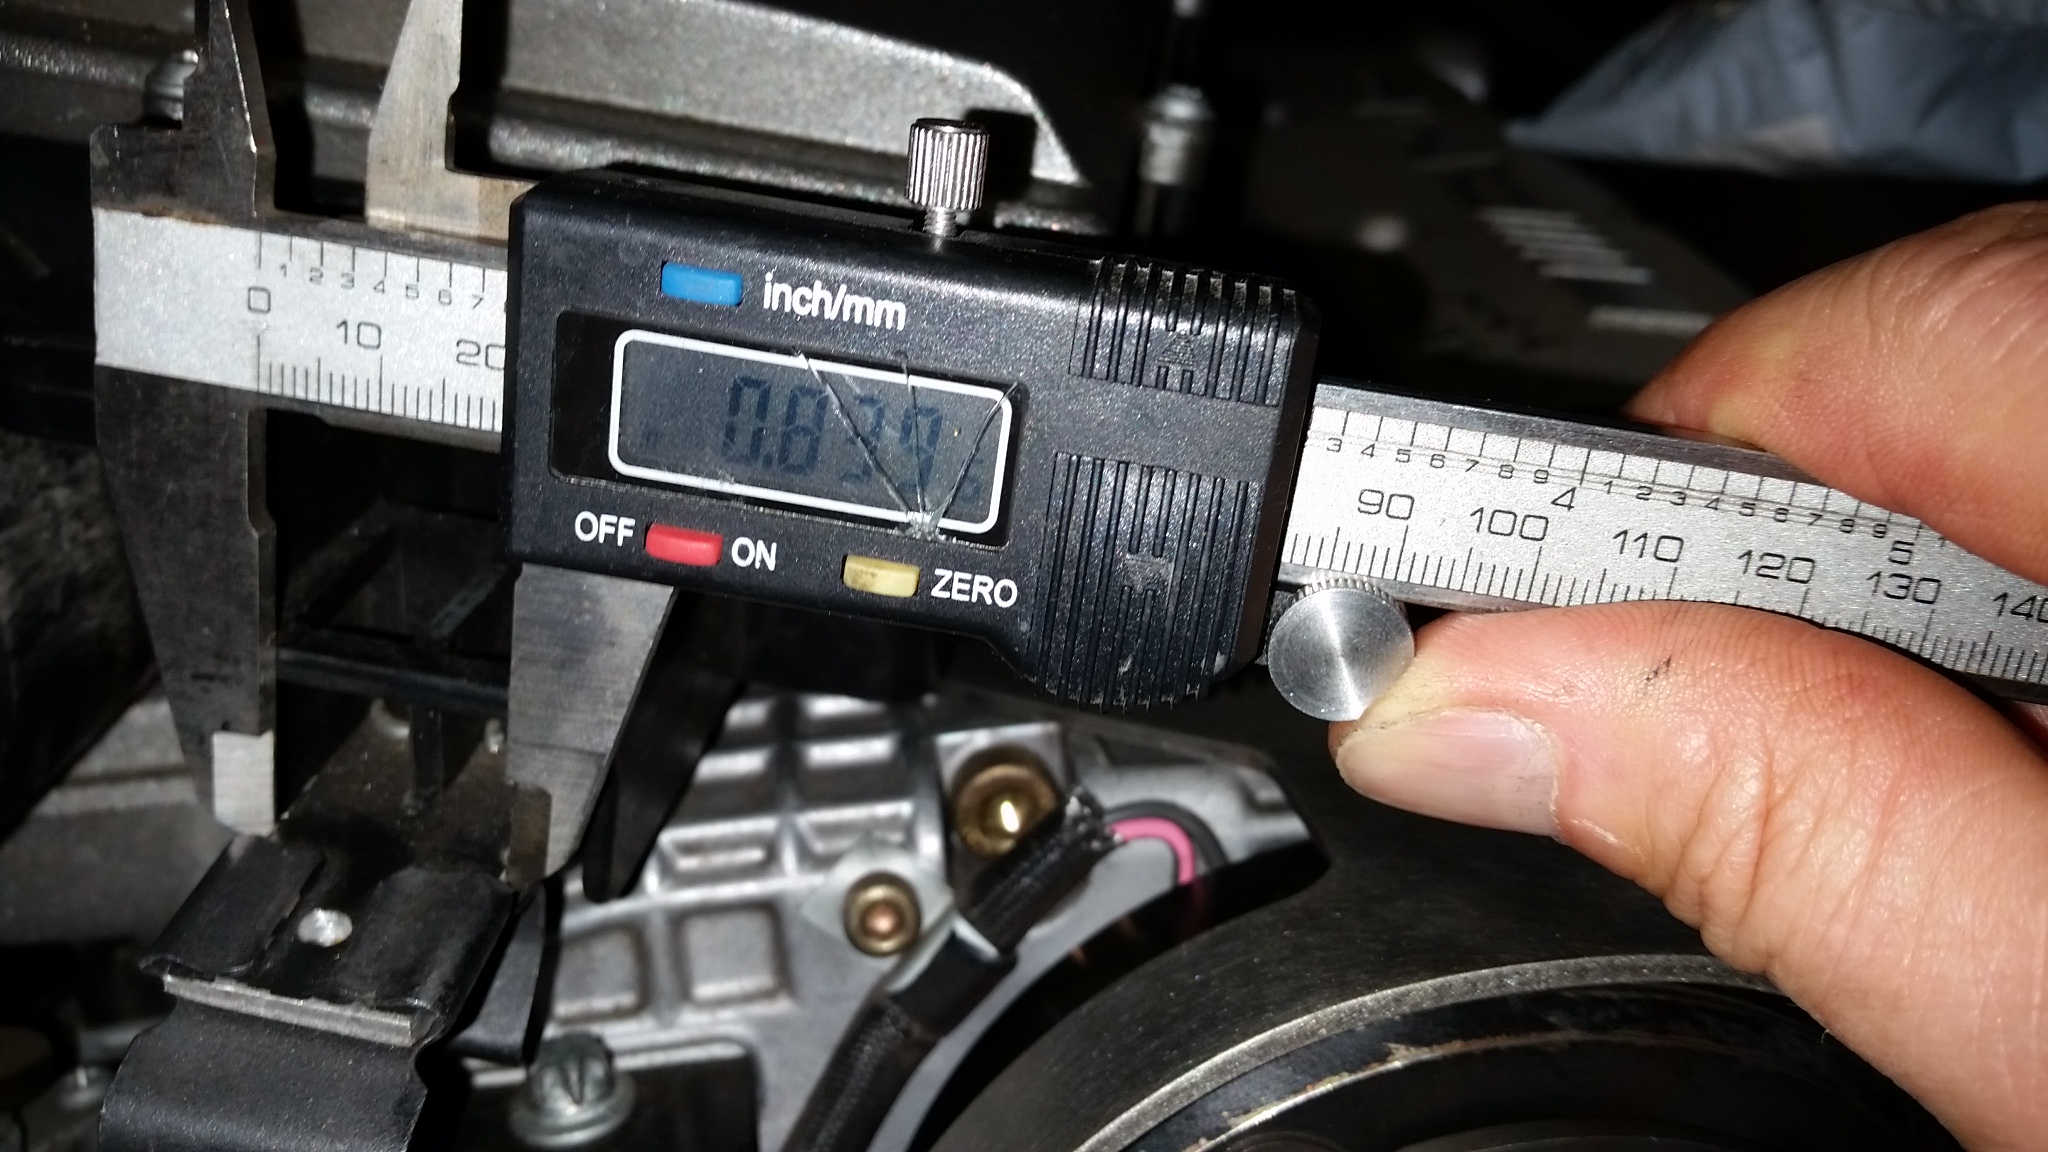
In order to do this, you need to make 4 relocation-plates for the factory clips (somewhat detailed in pics below). These plates are easy to make out of .125" thick (x 1" wide) aluminum strap material. Make 4 pieces that are .125" thick x 2" long x .850" wide. These plates will each get 3 holes drilled in them (2 for pop-rivets and 1 to locate the detent in the clip (the clip which you are relocating). Additionally, the 2 plates used in the forward positions need clearance slot added (see pics).
A small amount of material needs to be ground from the underside/engineside of each airbox for clearance (see pic of passenger side box and modify driver side box as well -as needed).
Finally, the driver side box needs some material at the front removed for clearance around the oil-filler (for fitting the front engine cover). I actually did make the front engine cover fit the first time I did this, but now I don't run one as I like to be able to inspect the Supercharger pulley (as failure is becoming more common ... hence the scattershield).
I really like this intake upgrade as it flows much better than stock but retains a stock-appearance. Hope this helps.
Cheers,
Chris

MB World Stories
The Best of Mercedes & AMG
Explore

Manual Mercedes? 6 Times Sindelfingen Let Drivers Have All The Fun
Verdad Gallardo
Mercedes SLR McLaren 722 S Is Extremely Rare Example Modified by McLaren
Verdad Gallardo
8 Classic Boxy Mercedes Designs That Have Aged Like Fine Wine
Verdad Gallardo
Flawlessly Restored Mercedes 190E Evo II Heads to Auction
Verdad Gallardo
Electric Mercedes C-Class Unveiled: 11 Things You Need to Know
Verdad Gallardo
Mercedes EQS Gets A Major Update: Everything You Need to Know
Verdad Gallardo
5 Underrated Mercedes-Benz Models That Don't Get the Love They Deserve
Verdad Gallardo
Mercedes 300D Has Pushed Well Past 1 Million Miles and It Ain't Stopping
Verdad Gallardo
10 Most Reliable Mercedes-Benz Models You Can Buy Used
Verdad Gallardo

Quote:
There are 5 parts needed. Y-pipe (with hoses), 2 filter boxes (they come with new filters) and 2 tubes (that go from the filter boxes up to the grill area).
Last time I did it I bought the parts new (from oediscountparts.com) and I paid about $325. I have seen them used for as little as $100 (but more often $200).
The "y"-pipe comes with the hoses attached (with clic-r style clamps). You don't need hose clamps on the other side (where they attach to the filter box) ... just slip it together. (mine have clamps in the pics because I experimented with silicon hoses on the "y" but ended up liking the factory hoses better).
On the SLK32, the y-pipe has NO clearance issues (C32 may be different, don't know).
The larger SL55 filter boxes don't fit the same, but with light modification they can be made to snap in like factory pieces.
In order to do this, you need to make 4 relocation-plates for the factory clips (somewhat detailed in pics below). These plates are easy to make out of .125" thick (x 1" wide) aluminum strap material. Make 4 pieces that are .125" thick x 2" long x .850" wide. These plates will each get 3 holes drilled in them (2 for pop-rivets and 1 to locate the detent in the clip (the clip which you are relocating). Additionally, the 2 plates used in the forward positions need clearance slot added (see pics).
A small amount of material needs to be ground from the underside/engineside of each airbox for clearance (see pic of passenger side box and modify driver side box as well -as needed).
Finally, the driver side box needs some material at the front removed for clearance around the oil-filler (for fitting the front engine cover). I actually did make the front engine cover fit the first time I did this, but now I don't run one as I like to be able to inspect the Supercharger pulley (as failure is becoming more common ... hence the scattershield).
I really like this intake upgrade as it flows much better than stock but retains a stock-appearance. Hope this helps.
Cheers,
Chris
first of all: thanks man.Originally Posted by latemodel21
This is an easy upgrade for the V6AMG.There are 5 parts needed. Y-pipe (with hoses), 2 filter boxes (they come with new filters) and 2 tubes (that go from the filter boxes up to the grill area).
Last time I did it I bought the parts new (from oediscountparts.com) and I paid about $325. I have seen them used for as little as $100 (but more often $200).
The "y"-pipe comes with the hoses attached (with clic-r style clamps). You don't need hose clamps on the other side (where they attach to the filter box) ... just slip it together. (mine have clamps in the pics because I experimented with silicon hoses on the "y" but ended up liking the factory hoses better).
On the SLK32, the y-pipe has NO clearance issues (C32 may be different, don't know).
The larger SL55 filter boxes don't fit the same, but with light modification they can be made to snap in like factory pieces.
In order to do this, you need to make 4 relocation-plates for the factory clips (somewhat detailed in pics below). These plates are easy to make out of .125" thick (x 1" wide) aluminum strap material. Make 4 pieces that are .125" thick x 2" long x .850" wide. These plates will each get 3 holes drilled in them (2 for pop-rivets and 1 to locate the detent in the clip (the clip which you are relocating). Additionally, the 2 plates used in the forward positions need clearance slot added (see pics).
A small amount of material needs to be ground from the underside/engineside of each airbox for clearance (see pic of passenger side box and modify driver side box as well -as needed).
Finally, the driver side box needs some material at the front removed for clearance around the oil-filler (for fitting the front engine cover). I actually did make the front engine cover fit the first time I did this, but now I don't run one as I like to be able to inspect the Supercharger pulley (as failure is becoming more common ... hence the scattershield).
I really like this intake upgrade as it flows much better than stock but retains a stock-appearance. Hope this helps.
Cheers,
Chris
you obviously checked out bald man motors' youtube video on this and made some significant improvements.
when i first started cutting the aluminum flat (1/8 x 1 x 36" from home depot), i thought you were absolutely full of ****. but i stayed the course because you put in significant detail.
in theory the whole thing is "not much work" but in reality, it is a lot of work. i miss my die grinder (planning to get another soon. thought the dcg420b was an upgrade from the dcg426b, and it wasn't.) and using a rotary, this takes forever.
the use of a drill hole for the locators on the clips was a great idea. i recommend people go a little less than 0.850" as the corners of the flat can interfere. i think you had it right in your pictures and the added width isn't helpful.
i also think it doesn't hurt to use the "slit" (or what you call the "clearance slot") for all 4 flats because they'll slide into each of the existing airbox mount slots, and then you can rivet them through the plastic and the metal.
tomorrow i have to line up the air boxes and rivet them in. a **** ton of work let me tell you. i had no other choice though, having a 32 engine in a W211. i was already using the 55 hoses and airboxes, just the 32 y pipe. now i got the 55 y pipe (finally) so it was time.
Quote:
you obviously checked out bald man motors' youtube video on this and made some significant improvements.
when i first started cutting the aluminum flat (1/8 x 1 x 36" from home depot), i thought you were absolutely full of ****. but i stayed the course because you put in significant detail.
in theory the whole thing is "not much work" but in reality, it is a lot of work. i miss my die grinder (planning to get another soon. thought the dcg420b was an upgrade from the dcg426b, and it wasn't.) and using a rotary, this takes forever.
the use of a drill hole for the locators on the clips was a great idea. i recommend people go a little less than 0.850" as the corners of the flat can interfere. i think you had it right in your pictures and the added width isn't helpful.
i also think it doesn't hurt to use the "slit" (or what you call the "clearance slot") for all 4 flats because they'll slide into each of the existing airbox mount slots, and then you can rivet them through the plastic and the metal.
tomorrow i have to line up the air boxes and rivet them in. a **** ton of work let me tell you. i had no other choice though, having a 32 engine in a W211. i was already using the 55 hoses and airboxes, just the 32 y pipe. now i got the 55 y pipe (finally) so it was time.
don't recall ever seeing anyone's video on this. When I did it for the first time in 2009, I had seen pictures of a couple of guys who had done this before me. And like you, I took what I saw and added to it to make it better. So I don't know anything about bald man's video but I'm sure he has added to the process as well. That's what makes these Forum so great, everybody adds a little bit and makes all of these upgrades better.Originally Posted by Broly
first of all: thanks man.you obviously checked out bald man motors' youtube video on this and made some significant improvements.
when i first started cutting the aluminum flat (1/8 x 1 x 36" from home depot), i thought you were absolutely full of ****. but i stayed the course because you put in significant detail.
in theory the whole thing is "not much work" but in reality, it is a lot of work. i miss my die grinder (planning to get another soon. thought the dcg420b was an upgrade from the dcg426b, and it wasn't.) and using a rotary, this takes forever.
the use of a drill hole for the locators on the clips was a great idea. i recommend people go a little less than 0.850" as the corners of the flat can interfere. i think you had it right in your pictures and the added width isn't helpful.
i also think it doesn't hurt to use the "slit" (or what you call the "clearance slot") for all 4 flats because they'll slide into each of the existing airbox mount slots, and then you can rivet them through the plastic and the metal.
tomorrow i have to line up the air boxes and rivet them in. a **** ton of work let me tell you. i had no other choice though, having a 32 engine in a W211. i was already using the 55 hoses and airboxes, just the 32 y pipe. now i got the 55 y pipe (finally) so it was time.
Quote:
hahaha i thought baldman was like the pioneer:
Originally Posted by latemodel21
don't recall ever seeing anyone's video on this. When I did it for the first time in 2009, I had seen pictures of a couple of guys who had done this before me. And like you, I took what I saw and added to it to make it better. So I don't know anything about bald man's video but I'm sure he has added to the process as well. That's what makes these Forum so great, everybody adds a little bit and makes all of these upgrades better.
he was a bit lazy with how he did the flats though. that's why i like what you did so much.
but i just realised i necroposted so it's actually baldman who lazily copied you.
i can't wait to get this over with. lining up the holes for the aluminum and airboxes is gonna be key.
then i have to fix the magnetic clutch not engaging (hoping its a diode!) and i'll be sittin pretty. it's already hauled *** all winter. would love the added power.
subie kids were following me for a little bit, but as we're all aware they always go back to their natural habitat: the shop, so they can never follow me for longer than a day or two lol
i finished it today. took me about 6-7 hours total if i'm being honest. i could have done this in way less time if i had a DCG426B but what's done is done. had to deal with using a rotary tool
fit is good, but i found for the W211 i needed to have my flats way shorter at the back. i understand now why you decided to put the flats under the slot in the back, and inside the slot at the front: height
so i copied you closer. in the end my flats in the back were much shorter though. likely about 1 1/2 inches maximum since both of the rear rubber mounts literally began where the slot ended.
a
fronts look very similar to yours. hopefully they hold up lol. i'll eventually post pictures. there's a video floating around of this elusive vehicle if you look for it, but i'm still evaluating AIWYL consumption etc. got almost 5000km on it, need to drive it more.
will be happy if i get no AIWYL warning like for 10 qts (i believe 9 is the amount for a 4matic) and about 5000km. may push it past 5000km to see how much more i can get. if i can get 5000 miles i'd be even happier but i'm not holding my breath and i should really change my AIWYL and filter soon.
gonna let this amazing liqui moly engine sludge cleaner keep going. there wasn't any sludge in my engine now, but just want the crank bearings to get a nice wash.


