Bumper bracket replacement
 04-30-2011, 11:18 AM
#1
MBWorld Fanatic!
Thread Starter
Bumper bracket replacement
I got home from work yesterday, it was so nice out and I had nothing to do so I decided to try and tackle the bumper bracket project by myself. the whole thing took me 2 hours and would of taken me less time if I knew what I was doing.
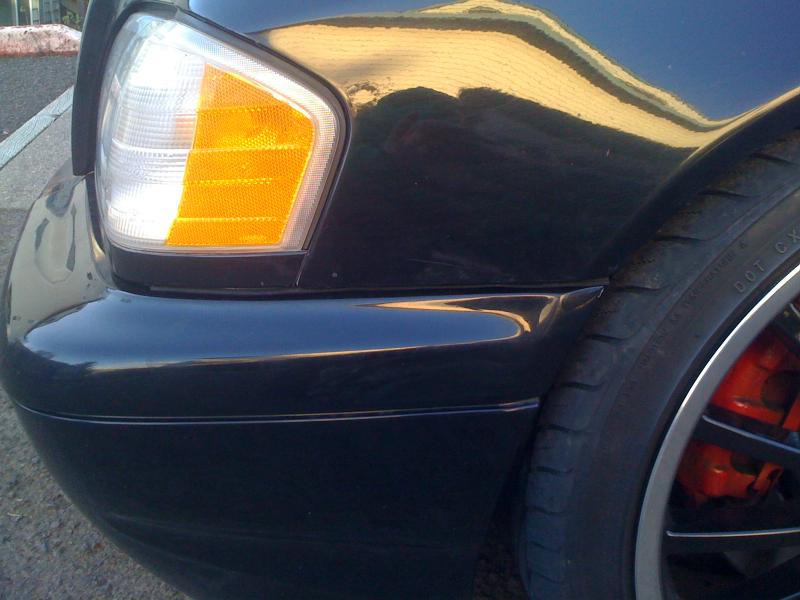
Unfortunately I forgot to get a before picture but I can tell you on the drivers side I had a 1" gap between the bumper and the corner panel and a 3/4" gap on the passenger side, it was embarrassing (I am still looking for the neighbor to thank for the love tap that killed my bumper bracket and prompted this whole project.)
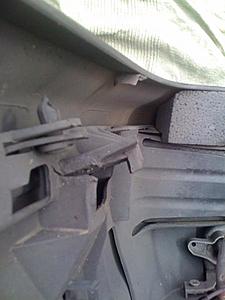
This is the drivers side guide bracket that was cracked causing my bumper to hang down and flare out to the side.
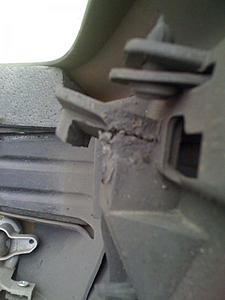
This is the passengers side guide bracket that was cracked causing my bumper to hang down and flare out to the side.
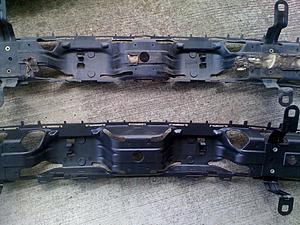
Here is the stock bracket and the new bracket compared to each other. I did this to determine what needed to be modified.
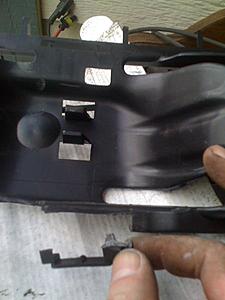
You need to cut this piece off to the bracket to get the fog lights to fit.

Here is the piece cut off
Here is the finished product

Really this isn't as detailed as I wanted but I was in a hurry, I apologize.
Here is a thread that I used to figure out how to do this:
https://mbworld.org/forums/c-class-w...fogs-w202.html
I hope this helps, it was way easier than I thought (frustrating at times but easy). The finished product looks GREAT!!!
I replaced all of the weather stripping (except the one around the turn signal) on the front end of the car and installed my new fog light wiring harnesses. It is so nice, I never had the connector that plugs into the fog light on the end of the fog light wiring harness, just the pin connectors.
My to do list for my C43 is getting smaller and smaller
Unfortunately I forgot to get a before picture but I can tell you on the drivers side I had a 1" gap between the bumper and the corner panel and a 3/4" gap on the passenger side, it was embarrassing (I am still looking for the neighbor to thank for the love tap that killed my bumper bracket and prompted this whole project.)
This is the drivers side guide bracket that was cracked causing my bumper to hang down and flare out to the side.
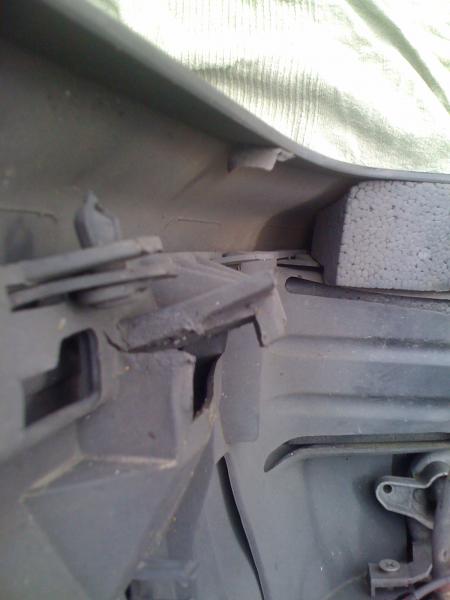
This is the passengers side guide bracket that was cracked causing my bumper to hang down and flare out to the side.

Here is the stock bracket and the new bracket compared to each other. I did this to determine what needed to be modified.

You need to cut this piece off to the bracket to get the fog lights to fit.

Here is the piece cut off

Here is the finished product
Really this isn't as detailed as I wanted but I was in a hurry, I apologize.
Here is a thread that I used to figure out how to do this:
https://mbworld.org/forums/c-class-w...fogs-w202.html
I hope this helps, it was way easier than I thought (frustrating at times but easy). The finished product looks GREAT!!!
I replaced all of the weather stripping (except the one around the turn signal) on the front end of the car and installed my new fog light wiring harnesses. It is so nice, I never had the connector that plugs into the fog light on the end of the fog light wiring harness, just the pin connectors.
My to do list for my C43 is getting smaller and smaller
Last edited by 503C43 ////AMG; 04-30-2011 at 11:47 AM.
 04-30-2011, 01:39 PM
#2

Hey Doogie H.
The man with the weiss labcoat. YU deserve a diploma for this.
YUr car does it look better now with this fix?
Does your rear bumper look funky wavy as seen on other C43's?
If I fly you over here to Europe can you fix my small glitches?
Way to go Jason, keep on fixing it, then you'll know your entire car from top to bottom!
04-30-2011, 04:14 PM
#4
MBWorld Fanatic!
Thread Starter
Hey Doogie H.
The man with the weiss labcoat. YU deserve a diploma for this.
YUr car does it look better now with this fix?
Does your rear bumper look funky wavy as seen on other C43's?
If I fly you over here to Europe can you fix my small glitches?
Way to go Jason, keep on fixing it, then you'll know your entire car from top to bottom!
The man with the weiss labcoat. YU deserve a diploma for this.
YUr car does it look better now with this fix?
Does your rear bumper look funky wavy as seen on other C43's?
If I fly you over here to Europe can you fix my small glitches?
Way to go Jason, keep on fixing it, then you'll know your entire car from top to bottom!

My rear bumper has a tiny touch of the wavyness to it but it is not noticeable unless you know what to look for, I never noticed it until you said something about it in another thread.
Honestly my C43 looks way better now then when I bought it and I am not talking about the lowering or the rims, just the over all fit and finish of the vehicle. When I bought it the front bumper and rear bumper needed to be re-aligned BADLY and obviously the front bumper needed a new bumper bracket to align it.
One thing I am looking into is the removal of the dash, I have something rattling around and it is bugging the hell out of me (a normal person won't notice it but I am CRAZY about rattles.) I plan on removing the dash and the rear baffle board this summer to dynomat everything and re-dye the baffle board as it is currently purple
 . I will definitely post write ups on both of those projects
02-16-2012, 01:40 AM
. I will definitely post write ups on both of those projects
02-16-2012, 01:40 AM
#5
Newbie

Join Date: Jan 2010
Location: Brisbane, QLD
Posts: 7
Likes: 0
Received 0 Likes
on
0 Posts
W202 C200
Hey what did you do about those cracked brackets on the bumper? I believe mine fell off a few weeks ago! I noticed a piece of plastic on my garage floor and it looks like the bit that's cracked...and coming off.
Can you purchase a replacement part that just bolts in? What's that giant 'bumper bracket' piece you have? Is that what the bumper secures into?
Can you purchase a replacement part that just bolts in? What's that giant 'bumper bracket' piece you have? Is that what the bumper secures into?
02-16-2012, 11:11 AM
#6
MBWorld Fanatic!
Thread Starter
Hey what did you do about those cracked brackets on the bumper? I believe mine fell off a few weeks ago! I noticed a piece of plastic on my garage floor and it looks like the bit that's cracked...and coming off.
Can you purchase a replacement part that just bolts in? What's that giant 'bumper bracket' piece you have? Is that what the bumper secures into?
Can you purchase a replacement part that just bolts in? What's that giant 'bumper bracket' piece you have? Is that what the bumper secures into?

Trending Topics
02-16-2012, 04:11 PM
#8
dose brackets do they often break by them self?
are they made of cheap 'n' weak plastic parts?
I bet it's moe difficult to swap these brackets if cars are fitted with parktronic sensors???
Like mine")
are they made of cheap 'n' weak plastic parts?
I bet it's moe difficult to swap these brackets if cars are fitted with parktronic sensors???
Like mine
01-18-2014, 01:13 AM
#9
Senior Member

Join Date: Mar 2011
Location: San Francisco
Posts: 261
Likes: 0
Received 1 Like
on
1 Post
1998 C43 Amg
Hey you guys my driver side front bumper is sagging. And I'm pretty sure it's the bumper bracket. When I went to the dealership they told me that you can't order the bumper bracket separately you have to buy the whole bumper? Does anyone have the part number for the bracket? Just to be sure here's a picture of the bracket that broke on my bumper.
Last edited by vlad957; 01-18-2014 at 01:16 AM.
01-18-2014, 01:47 AM
#10
Senior Member
Join Date: Mar 2011
Location: San Francisco
Posts: 261
Likes: 0
Received 1 Like
on
1 Post
1998 C43 Amg
Hey 503 you also mentioned you replaced all the weathering strips on the bumper. Did you get them from the dealer? And do they have a part number lol? Or if I do go do I just ask them I want the weather strip pieces?
01-18-2014, 01:56 AM
#11
Senior Member
Join Date: Mar 2011
Location: San Francisco
Posts: 261
Likes: 0
Received 1 Like
on
1 Post
1998 C43 Amg
I found the part number # 202-880-01-52-67
And here's the link to buy it. http://www.pelicanparts.com/cgi-bin/...-308&I1.y=-137
And here's the link to buy it. http://www.pelicanparts.com/cgi-bin/...-308&I1.y=-137
01-20-2014, 06:06 PM
#12
Senior Member

I just tackled this same project a couple of months ago. My bumper bracket on the passenger-side was also cracked like everyone else's and the bumper-to-fender gap was nearly an inch! I drilled a sheet metal screw into the broken side of the tab to "close the gap" of the cracked part. I tried pvc cement at first, but couldn't get a strong enough bond.
The screw was a PITA to insert, because I didn't want to take everything apart and there are a lot of little bits and mounting-pieces in the way of the drill-driver. The only alternative I could think of would be to buy another front bumper insert like Vlad found. Thanks, Vlad!
The screw was a PITA to insert, because I didn't want to take everything apart and there are a lot of little bits and mounting-pieces in the way of the drill-driver. The only alternative I could think of would be to buy another front bumper insert like Vlad found. Thanks, Vlad!


