


Painted rotor hats
Thread Starter
MBWorld Fanatic!

Joined: Apr 2010
Posts: 4,437
Likes: 43
From: PDX
1999 C43, 2008 P30 E63, 2014 SQ5, 2024 Model Y Performance
Painted rotor hats
I have decided to paint my rotor hats before I install them. I am going to paint them gloss black to match my rims and I will be painting my calipers black as well. I am thinking about painting the AMG logo on the rotor hats (I bought the OEM rotors and they have the AMG logo just like the stock rotors) either white or silver. I was thinking white but my wife suggested silver and I thought that it didn't sound too bad.
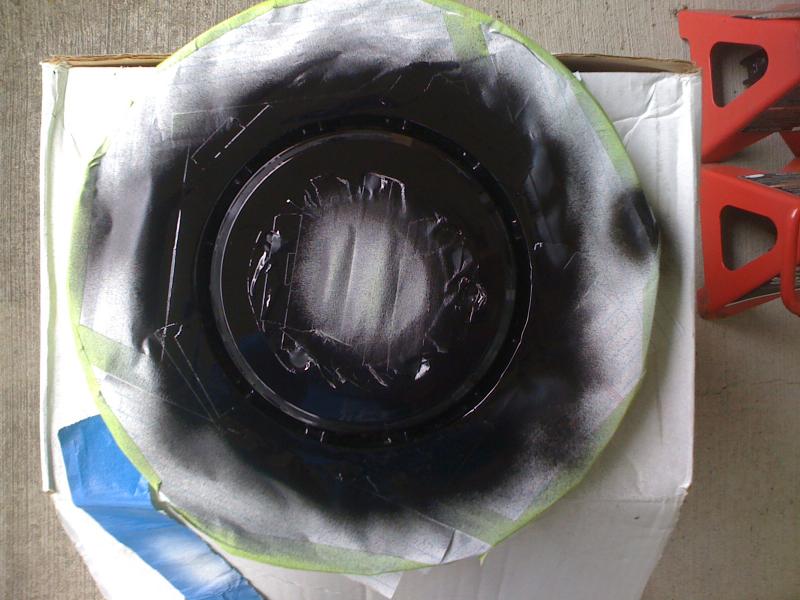
Here are some pics (so far just primered):
I started by cleaning the rotor hat to allow the primer to stick to the rotor hat. I used brake cleaner and a tack cloth.
The primer and paint I am using is made by VHT and it a SUPER high temp primer and paint (it will withstand temps up to 1900� F, my rotors will NEVER see temps this high)
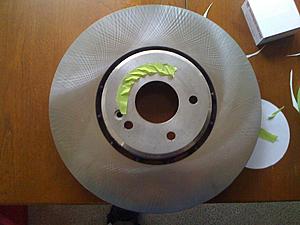
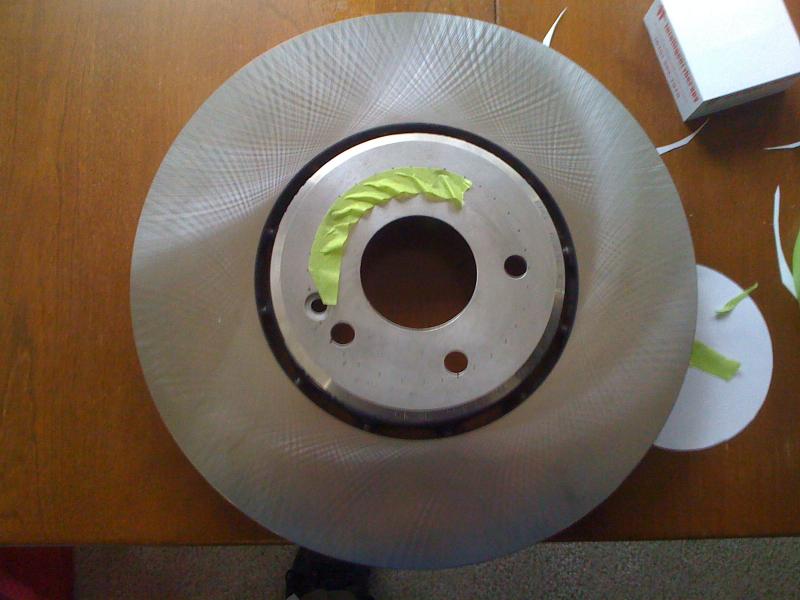
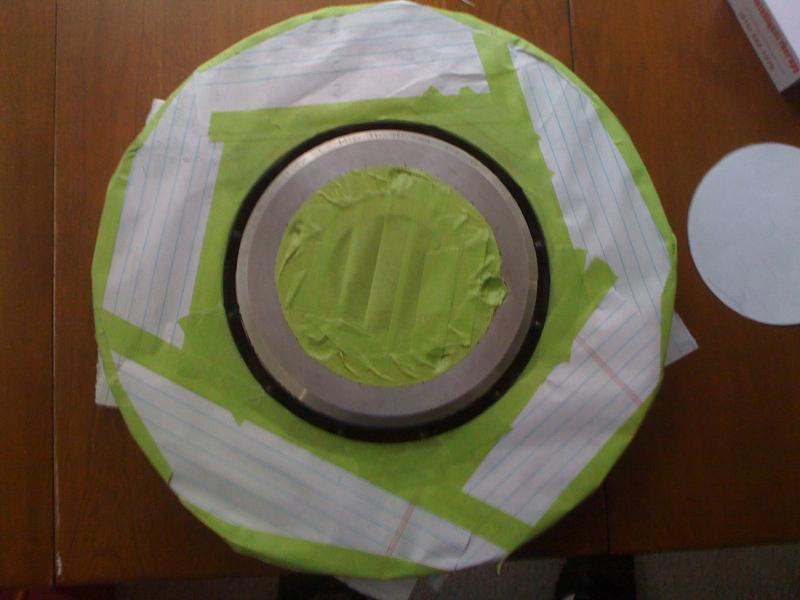
I started by making a template to mark the tape line on the rotor hat as I do not want to paint where the wheel comes in contact with the rotor. I am afraid the paint may make it difficult to remove the wheel in the future as well as possibly make an uneven surface for the wheel to mount to.
Here is a closer pic you can see the marks I made for the tape line
Here is the outline of the tape line
Here is where I covered the area the wheel will come in contact with the rotor

Here the surface of the rotor has been taped off to avoid over spray on the surface

Here is the rotor primed and ready to paint
I will post pics of the finished product as soon as I am done.
Here are some pics (so far just primered):
I started by cleaning the rotor hat to allow the primer to stick to the rotor hat. I used brake cleaner and a tack cloth.
The primer and paint I am using is made by VHT and it a SUPER high temp primer and paint (it will withstand temps up to 1900� F, my rotors will NEVER see temps this high)
I started by making a template to mark the tape line on the rotor hat as I do not want to paint where the wheel comes in contact with the rotor. I am afraid the paint may make it difficult to remove the wheel in the future as well as possibly make an uneven surface for the wheel to mount to.

Here is a closer pic you can see the marks I made for the tape line

Here is the outline of the tape line

Here is where I covered the area the wheel will come in contact with the rotor
Here the surface of the rotor has been taped off to avoid over spray on the surface

Here is the rotor primed and ready to paint
I will post pics of the finished product as soon as I am done.
Thread Starter
MBWorld Fanatic!
Joined: Apr 2010
Posts: 4,437
Likes: 43
From: PDX
1999 C43, 2008 P30 E63, 2014 SQ5, 2024 Model Y Performance
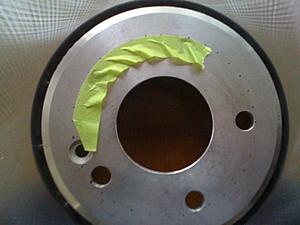
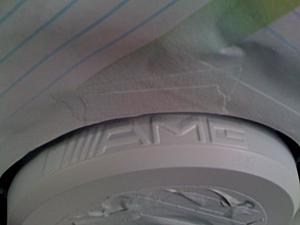
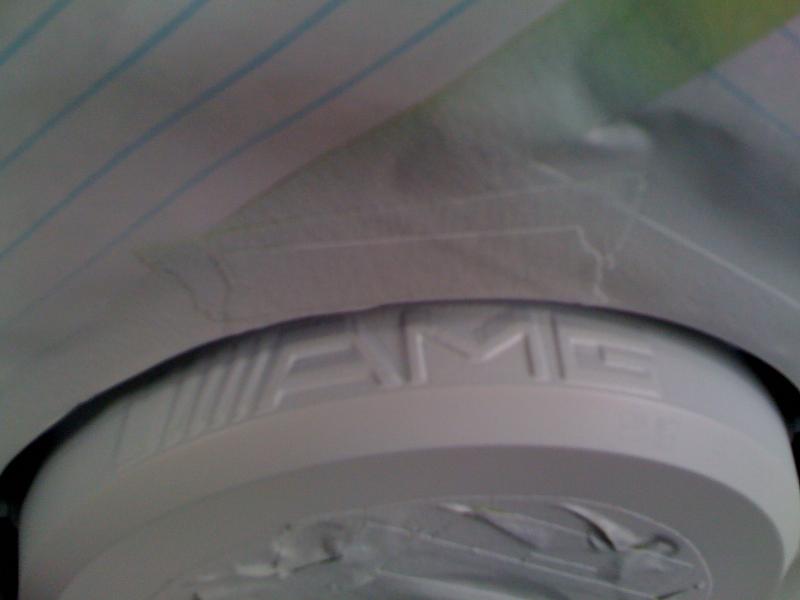
Here is a pic of the AMG logo I am talking about on the rotor hat, I am planning on painting this logo either white or silver.
I will be painting my calipers to match the rotor hats.
I will be painting my calipers to match the rotor hats.
Thread Starter
MBWorld Fanatic!
Joined: Apr 2010
Posts: 4,437
Likes: 43
From: PDX
1999 C43, 2008 P30 E63, 2014 SQ5, 2024 Model Y Performance
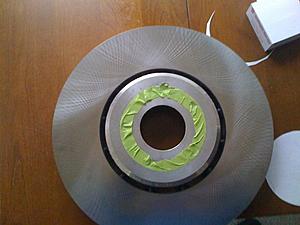
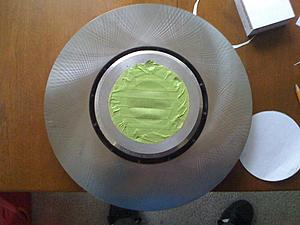
Here is a pic after the 3rd coat of paint has been applied to the rotor hat (not much to see yet)
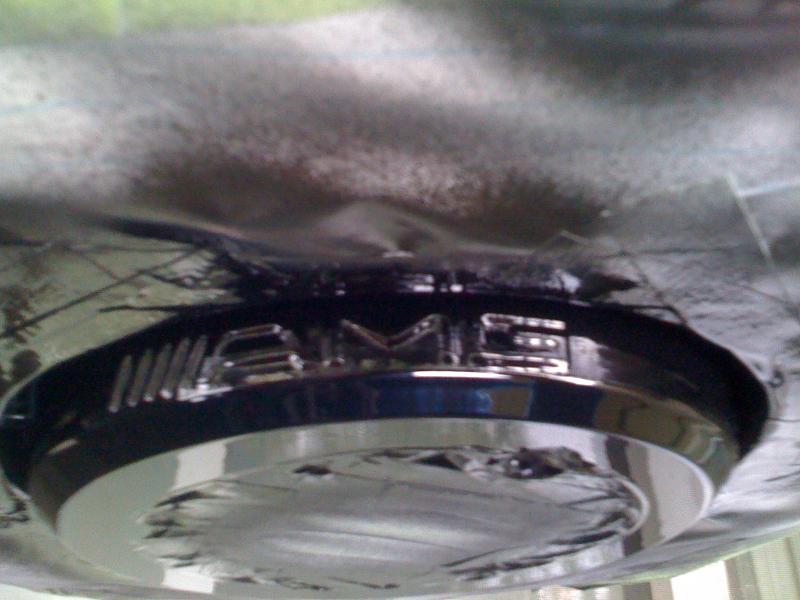
Here is a close up of the AMG logo, you can't really see it but after I paint it its definitely going to stand out

I'll post more pics after it dries and I remove the tape.
Thread Starter
MBWorld Fanatic!
Joined: Apr 2010
Posts: 4,437
Likes: 43
From: PDX
1999 C43, 2008 P30 E63, 2014 SQ5, 2024 Model Y Performance
SOUL CRUSHING UPDATE:
UGGGGGGGGGGHHHHHHHHH
Unfortunately I am way over zealous and as usual shot my self in the foot. Apparently I underestimated the cure time and completely destroyed my beautiful paint job while removing the tape


I will have some progress reports next week
P.S. I would post pictures of the carnage but I do not want any visual reminders
UGGGGGGGGGGHHHHHHHHH
Unfortunately I am way over zealous and as usual shot my self in the foot. Apparently I underestimated the cure time and completely destroyed my beautiful paint job while removing the tape
I will have some progress reports next week
P.S. I would post pictures of the carnage but I do not want any visual reminders
Thread Starter
MBWorld Fanatic!
Joined: Apr 2010
Posts: 4,437
Likes: 43
From: PDX
1999 C43, 2008 P30 E63, 2014 SQ5, 2024 Model Y Performance
I re-tried my painted rotor hat project and had AMAZING results UNTIL I took the rotor inside...
UUUUUUUUUUUUGGGGGGGGGGGGGGGGGGHHHHHHHHHHHHHHHHHHHH HHHHHHH!!!!!!!!!!!!!!!!!!!!!!!
I have determined the cause of the carnage:
I painted my rotors outside and waited for the paint to dry (followed the manufacturers instructions to the "T") and then brought them in to snap some photos. I walked away for a couple seconds and when I returned the paint job looked like the first rotor, the paint appeared to be "pulling" away (kind of like a fish eye but more of a stretched look than a bubbled look).
I can only assume that this is due to the rotor heating up causing the paint to contract?
Either way this is exactly what the first paint job looked like after I had brought in the rotor and so I thought I had ruined the paint job by removing the tape but really it was due to the temperature. I feel like such an idiot (I thought this may have been the issue the first time but totally disregarded it and painted the second one in the exact same fashion) I wasted several hours and a bunch of primer, paint, and brake cleaner.
I am determined to get these rotor hats painted! I will post pics of the FINISHED results once completed
Trending Topics
Thread Starter
MBWorld Fanatic!
Joined: Apr 2010
Posts: 4,437
Likes: 43
From: PDX
1999 C43, 2008 P30 E63, 2014 SQ5, 2024 Model Y Performance
UPDATE:
Just finished painting one rotor and I am about to throw it in the oven to cure the paint. So far so good as the paint has not "pulled" back like the 2 prior attempts.
I determined that it must have been due to the rotor being pretty much ice cold when painting and then heating up when I brought it inside. This time I waited for a warmer day and then kept the rotor at room temperature using a hair dryer (I will say this caused some MEAN orange peel effect due to the paint drying before it could smooth out but I can always wet sand and/or buff/polish the orange peel out if it bothers me but I really don't think it will be a big deal.) After the paint cures in the oven I am going to paint the ///// AMG logo silver, I will post pics once I get it out of the oven and after I paint the ///// AMG logo
Just finished painting one rotor and I am about to throw it in the oven to cure the paint. So far so good as the paint has not "pulled" back like the 2 prior attempts.
I determined that it must have been due to the rotor being pretty much ice cold when painting and then heating up when I brought it inside
. This time I waited for a warmer day and then kept the rotor at room temperature using a hair dryer (I will say this caused some MEAN orange peel effect due to the paint drying before it could smooth out but I can always wet sand and/or buff/polish the orange peel out if it bothers me but I really don't think it will be a big deal.) After the paint cures in the oven I am going to paint the ///// AMG logo silver, I will post pics once I get it out of the oven and after I paint the ///// AMG logo
MB World Stories
The Best of Mercedes & AMG

Manual Mercedes? 6 Times Sindelfingen Let Drivers Have All The Fun
Verdad Gallardo
Mercedes SLR McLaren 722 S Is Extremely Rare Example Modified by McLaren
Verdad Gallardo
8 Classic Boxy Mercedes Designs That Have Aged Like Fine Wine
Verdad Gallardo
Flawlessly Restored Mercedes 190E Evo II Heads to Auction
Verdad Gallardo
Electric Mercedes C-Class Unveiled: 11 Things You Need to Know
Verdad Gallardo
Mercedes EQS Gets A Major Update: Everything You Need to Know
Verdad Gallardo
5 Underrated Mercedes-Benz Models That Don't Get the Love They Deserve
Verdad Gallardo
Mercedes 300D Has Pushed Well Past 1 Million Miles and It Ain't Stopping
Verdad Gallardo
10 Most Reliable Mercedes-Benz Models You Can Buy Used
Verdad GallardoJunior Member
Joined: Jun 2003
Posts: 42
Likes: 2
From: Surfers Paradise
Many Mercedes, Mini Coopers, Mokes
All this work for nothing - use engine enamel, spray the lot, whack them on, drive off and hit the brakes. Voila - clean discs. You can do them as often as you like, even when they are on the car. Done this for years and the brakes work just fine.

Banned
Joined: Feb 2006
Posts: 0
Likes: 36
UPDATE:
Just finished painting one rotor and I am about to throw it in the oven to cure the paint. So far so good as the paint has not "pulled" back like the 2 prior attempts.
I determined that it must have been due to the rotor being pretty much ice cold when painting and then heating up when I brought it inside. This time I waited for a warmer day and then kept the rotor at room temperature using a hair dryer (I will say this caused some MEAN orange peel effect due to the paint drying before it could smooth out but I can always wet sand and/or buff/polish the orange peel out if it bothers me but I really don't think it will be a big deal.) After the paint cures in the oven I am going to paint the ///// AMG logo silver, I will post pics once I get it out of the oven and after I paint the ///// AMG logo
Just finished painting one rotor and I am about to throw it in the oven to cure the paint. So far so good as the paint has not "pulled" back like the 2 prior attempts.
I determined that it must have been due to the rotor being pretty much ice cold when painting and then heating up when I brought it inside
. This time I waited for a warmer day and then kept the rotor at room temperature using a hair dryer (I will say this caused some MEAN orange peel effect due to the paint drying before it could smooth out but I can always wet sand and/or buff/polish the orange peel out if it bothers me but I really don't think it will be a big deal.) After the paint cures in the oven I am going to paint the ///// AMG logo silver, I will post pics once I get it out of the oven and after I paint the ///// AMG logoJason my buddy

Never paint anything with spray cans if it's cold weather outside!
There has to be sun and warmer temperatures outside!
If you do this paintjob inside your heated garage, then you've got no problems.
Leave the rotors in place after you've painted them, let em' sit and dry until tomorrow to avoid fingerprints and ruined paintjob.
Good luck next time
Senior Member
Joined: Dec 2005
Posts: 370
Likes: 0
From: Lebanon
1995 C 36 AMG; 1992 W124 300E (M103 Ex Mosselman TT KIT) was 320hp @10psi now stock :(
i say since just a small diff of few deg made the job worthless, then even if u spray them at hot weather temp or even if heated in anything short of an oven the paint will still be ruined
Thread Starter
MBWorld Fanatic!
Joined: Apr 2010
Posts: 4,437
Likes: 43
From: PDX
1999 C43, 2008 P30 E63, 2014 SQ5, 2024 Model Y Performance
UPDATE:
I spayed the rotors and cured them in the oven and they came out GREAT!! I decided I was going to paint the AMG logo and attempted the job with a high temp paint pen, the job proved more difficult than anticipated as the AMG logo isn't exactly easily accessed.
After trying a few methods I have determined the best way to paint the logo. I am going to spray the logo with high temp silver paint and cure it. After the paint has cured I am going to mask off the logo (VERY TEDIOUS) and then spray the rest of the rotor hat black. This should get me the result I am after (I did a test run and it was pretty successful).
I will post pics when finished
Thread Starter
MBWorld Fanatic!
Joined: Apr 2010
Posts: 4,437
Likes: 43
From: PDX
1999 C43, 2008 P30 E63, 2014 SQ5, 2024 Model Y Performance
Yeah I think I will pass on this method, I have read of others doing this but it just doesn't seem right to me...
Thread Starter
MBWorld Fanatic!
Joined: Apr 2010
Posts: 4,437
Likes: 43
From: PDX
1999 C43, 2008 P30 E63, 2014 SQ5, 2024 Model Y Performance
So I passed on painting the AMG logo as I tried several times and never got the result I wanted  I figured out a way to do it but by the time I figured it out I had already lost patience as I have painted these rotor hats 5 times now
Anyway here is a sneak peak of the finished product. I am planning on installing them tomorrow as well as the Akebono brake pads and Stoptech SS brake lines.
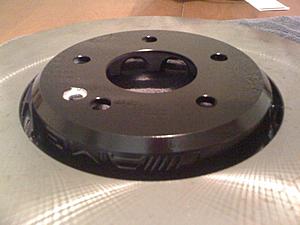
I figured out a way to do it but by the time I figured it out I had already lost patience as I have painted these rotor hats 5 times now Anyway here is a sneak peak of the finished product. I am planning on installing them tomorrow as well as the Akebono brake pads and Stoptech SS brake lines.

Senior Member
Joined: Jun 2011
Posts: 418
Likes: 0
From: San Diego
C63, C300, 911TT x 3, 911 C2 x 2, 911SC, SL65, SL500, 280SL Plus some trucks
Since you want the logos to be silver, just use a sanding block and fine sandpaper to remove the black and reveal the iron below. Spray with clear coat a couple of times to seal and prevent rusting..
You can practice on an old rotor.
Jim
You can practice on an old rotor.
Jim
Thread Starter
MBWorld Fanatic!
Joined: Apr 2010
Posts: 4,437
Likes: 43
From: PDX
1999 C43, 2008 P30 E63, 2014 SQ5, 2024 Model Y Performance
Tried that but the lines were not clean enough
Senior Member

Joined: Jun 2010
Posts: 370
Likes: 0
From: Los Angeles, CA
2000 C230 Kompressor Sport
I've seen in eBay where they sell heat-proof logo stickers (like AMG or Brembo, for example) for the brake calipers. Just wondering, do these stickers really work? 
Check this link: http://cgi.ebay.com/ebaymotors/5-Pie...Q5fAccessories
Check this link: http://cgi.ebay.com/ebaymotors/5-Pie...Q5fAccessories
Last edited by Jovsky; Jul 5, 2011 at 07:46 PM.
Thread Starter
MBWorld Fanatic!
Joined: Apr 2010
Posts: 4,437
Likes: 43
From: PDX
1999 C43, 2008 P30 E63, 2014 SQ5, 2024 Model Y Performance
I've seen in eBay where they sell heat-proof logo stickers (like AMG or Brembo, for example) for the brake calipers. Just wondering, do these stickers really work?
Check this link: http://cgi.ebay.com/ebaymotors/5-Pie...Q5fAccessories
Check this link: http://cgi.ebay.com/ebaymotors/5-Pie...Q5fAccessories


