

 Where did you get this kit btw? I didn't seem to find a link..
 .
.


 Jun 9, 2015, 04:44 PM
Last edit by: IB Advertising
See related guides and technical advice from our community experts:
Browse all: Interior Guides
- Mercedes-Benz C-Class: How to Remove Door Trim Panel
Step by step instructions for do-it-yourself repairs
Browse all: Interior Guides

DIY: interior trim replacement (long)

Thread Starter
Member
Joined: Jul 2009
Posts: 155
Likes: 1
From: NoVA
'09 C63 AMG
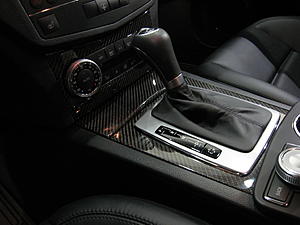
DIY: interior trim replacement (long)
Here's another DIY I put together for installing a 9-piece carbon fiber interior trim kit to replace the stock aluminum trim. Few points: 1) No, I do not have a life 2) Yes, this MA Carbon kit is sinfully priced (they used Lamborghini price points  ), but is beautiful -- just be sure all pieces have the same number of tabs/posts as the stock ones 3) For the door pieces, I plagarized vic_viper's DIY and sage advice on retrofitting speakers, but brain-farted on one part that he skipped, so after getting 75% of the way there I aborted and ended up taking it to Funktion Auto in Sterling, VA, whereby the badass tech made mincemeat of my little project -- still took pics, my lo$$ is your gain! 4) It dawned on me as I was taking my C63 apart that it really is just like a model car -- except w/o the glue...
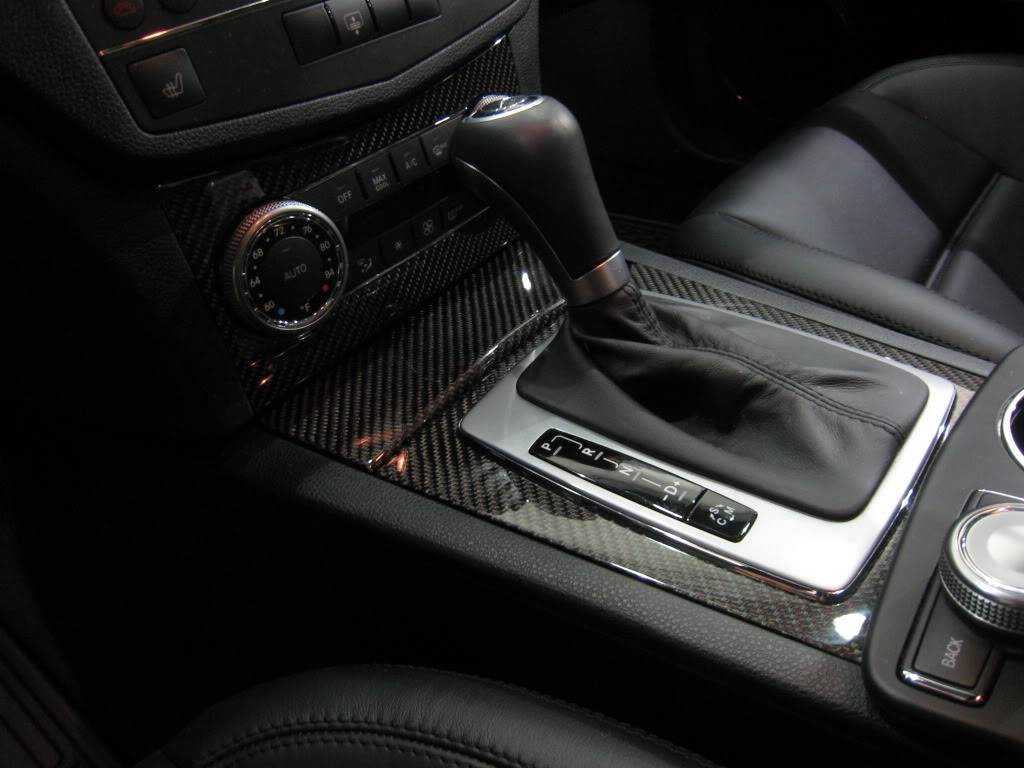
Center trim install (diffiiculty level = beginner)
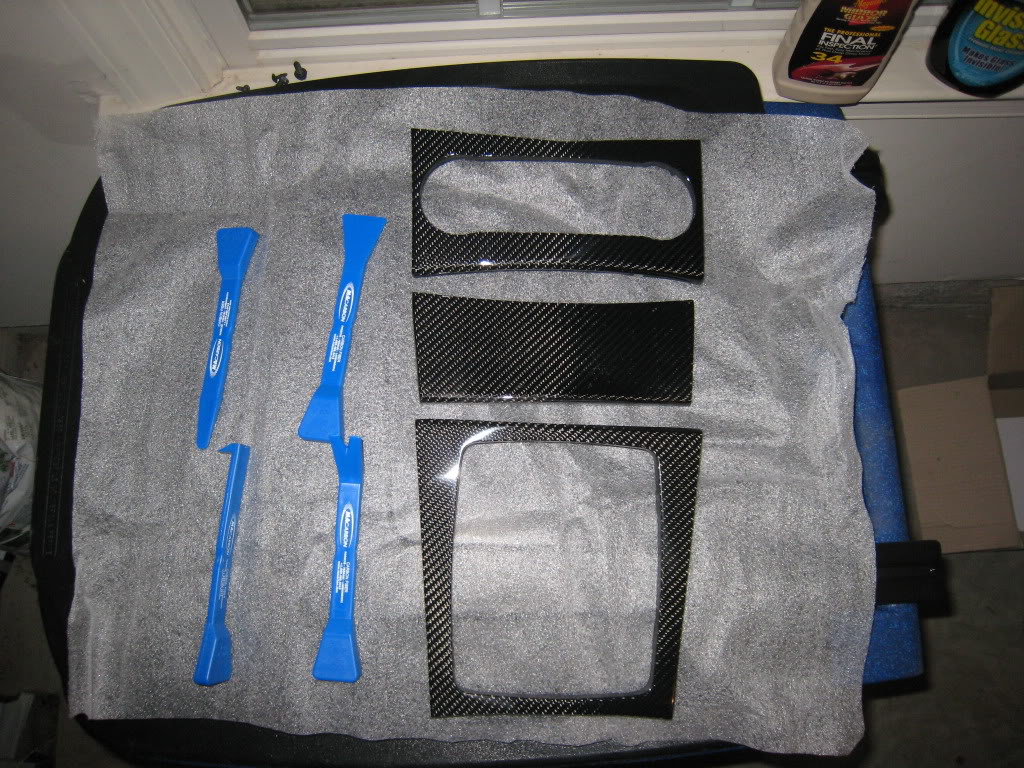
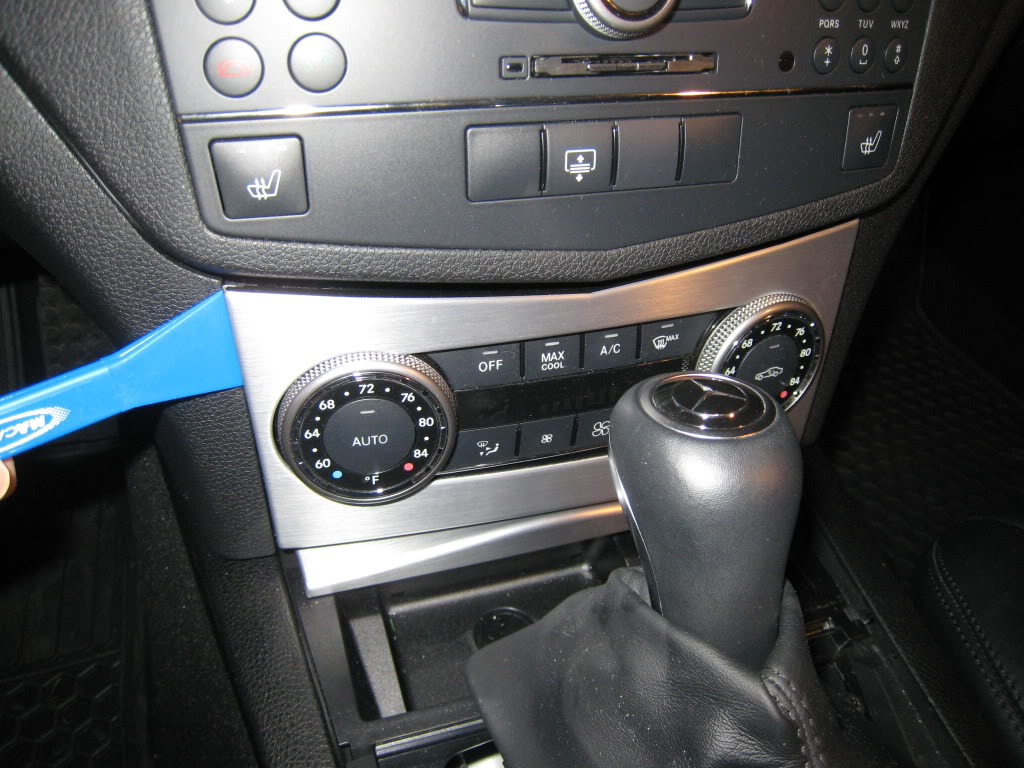
Here are the pieces, w/c came w/ these blue hard plastic wedge removal tools.
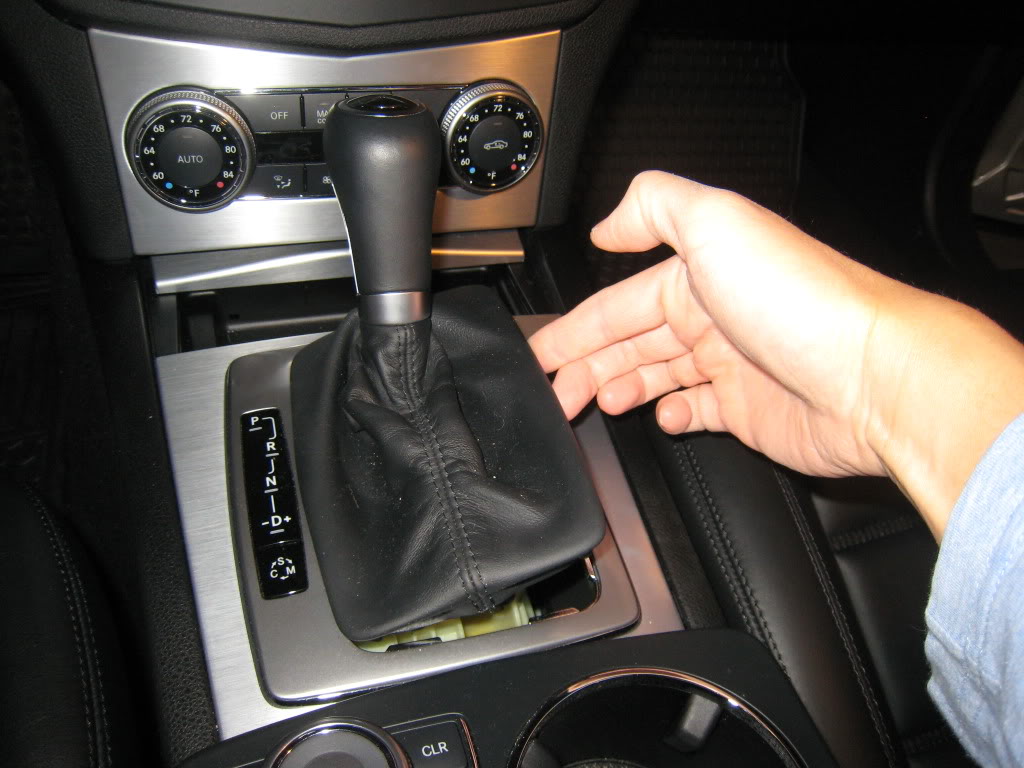
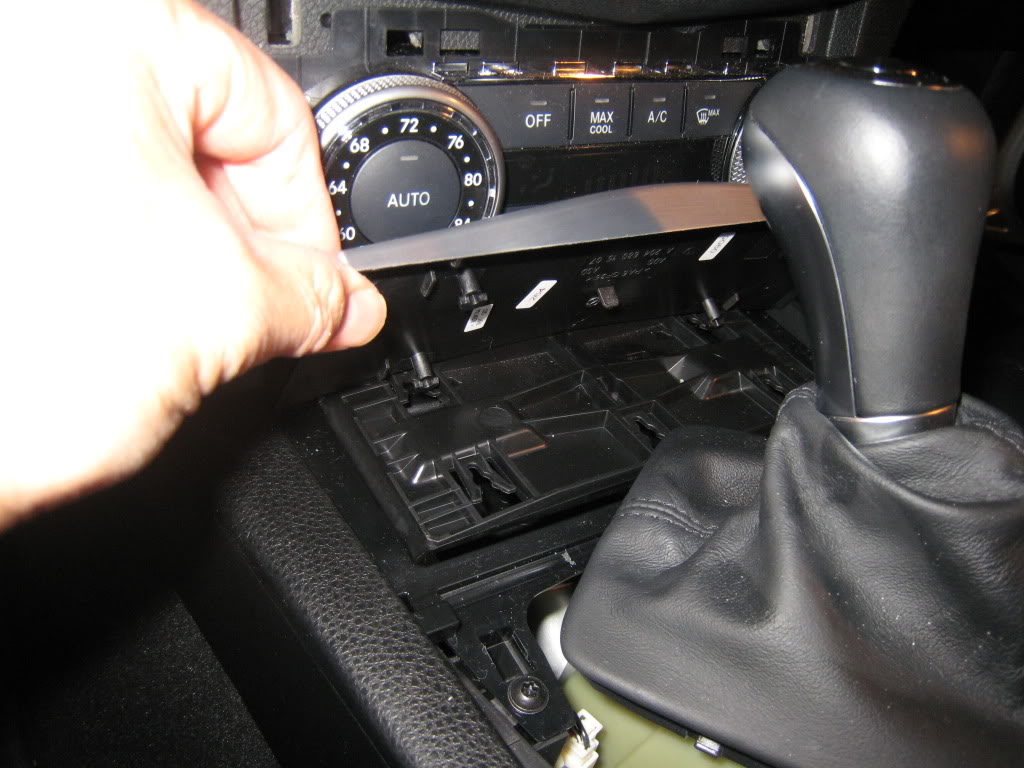
I had the feeling that the shifter's base plate (P-R-N-D) would hinder removal of the center console piece so I removed it: push the right part of the shifter's boot (at the base) to the left and then pull the boot up and over the shifter.

Now holding it's inside edge, firmly lift the shifter base plate up -- it is held in by 4 tabs towards each of it's corners.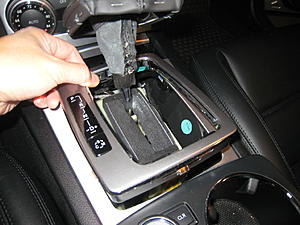
I found it easier to use one of the wedge tools and pry up the console piece at its front end on either side (held in by clips, whereas the rear is held in by tabs). Once the front portion is out, you can slide the rear of the piece up and out. Be firm but controlled -- all pieces will pop out easily.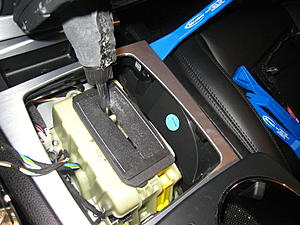
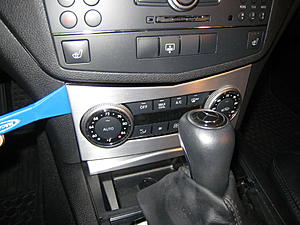
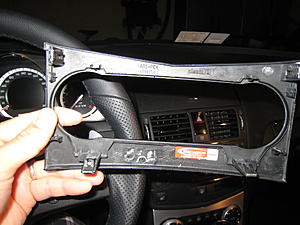
Remove the climate control piece next to give yourself some room for the ashtray cover. Use a wedge tool again to pry the CC piece at it's upper edges on either side, then it's lower edges. Note position of the clips for wedge points.
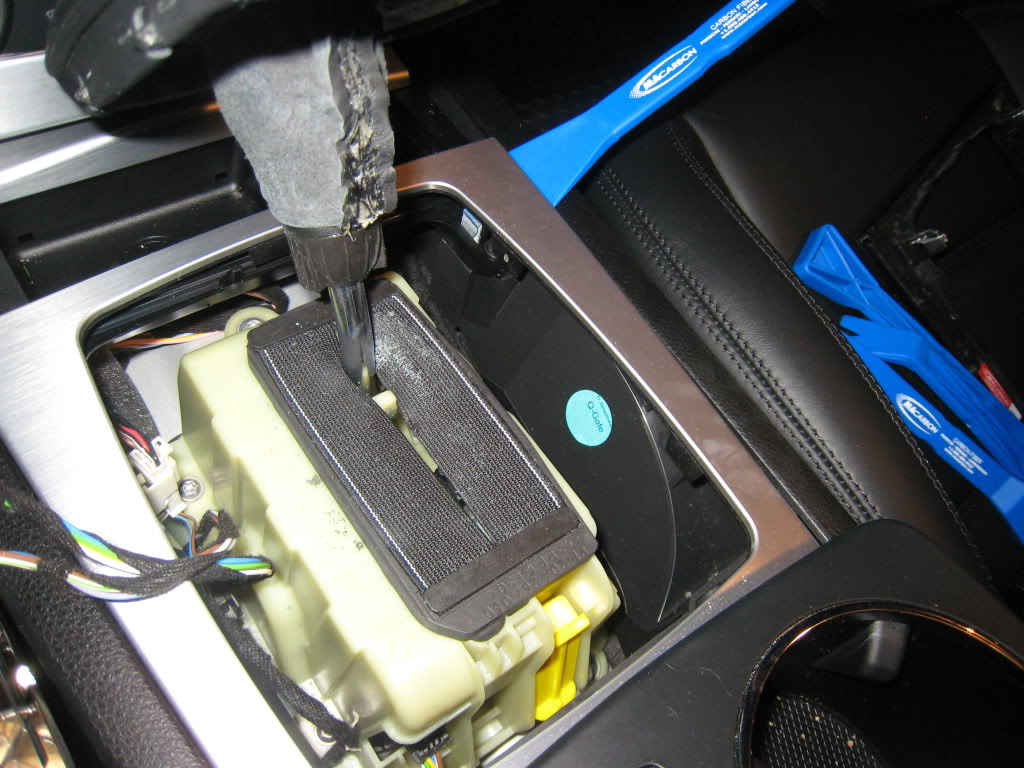
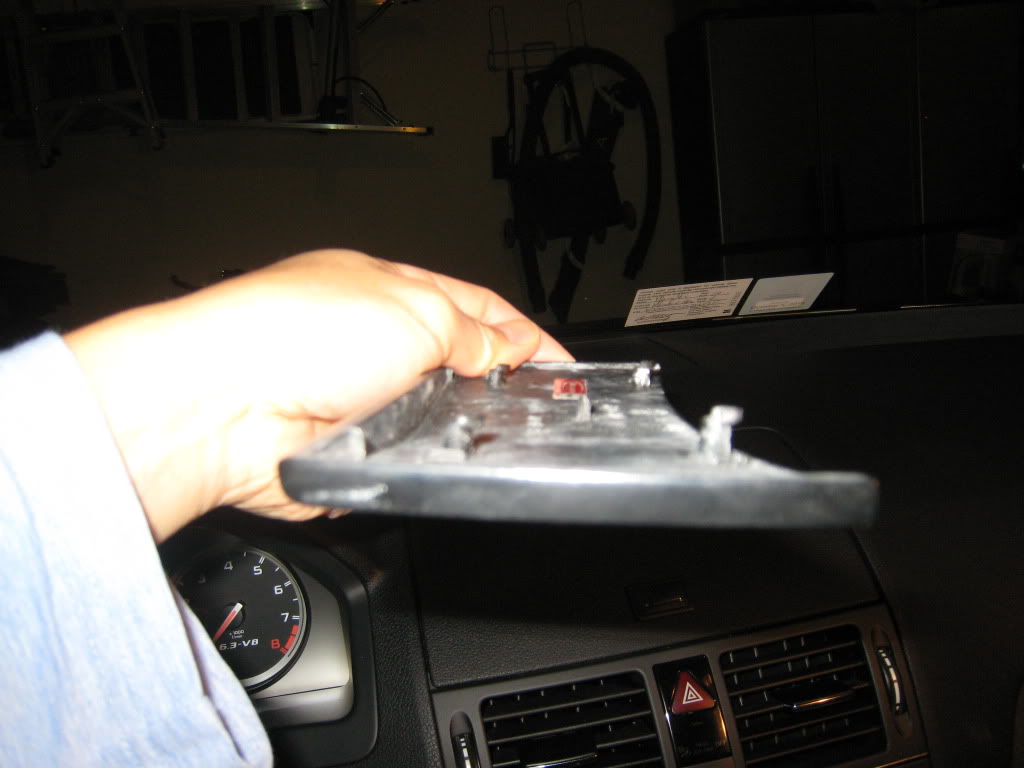
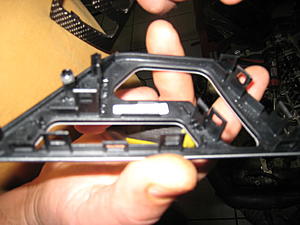
The ashtray cover is a little tricky. The piece itself is thin and rides on an anchoring frame that glides on the tracks. Here is a pic w/ the piece removed. Also see pics of the configuration of the binding posts underneath the piece.
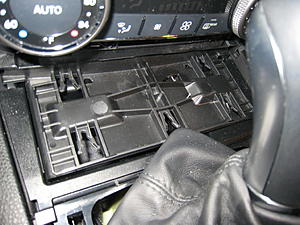
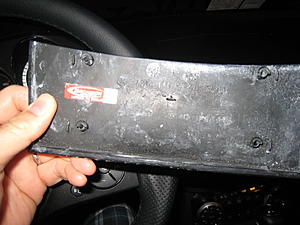
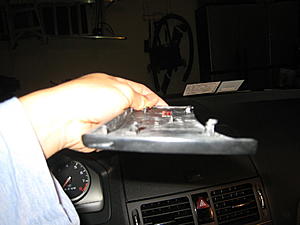
So, with one set of fingers/thumbs push the anchoring frame under the ashtray piece toward the front of the car, and with another set of fingers pull the ashtray piece towards you. You should feel it give as it slides out of its anchored position, then pull up to remove.
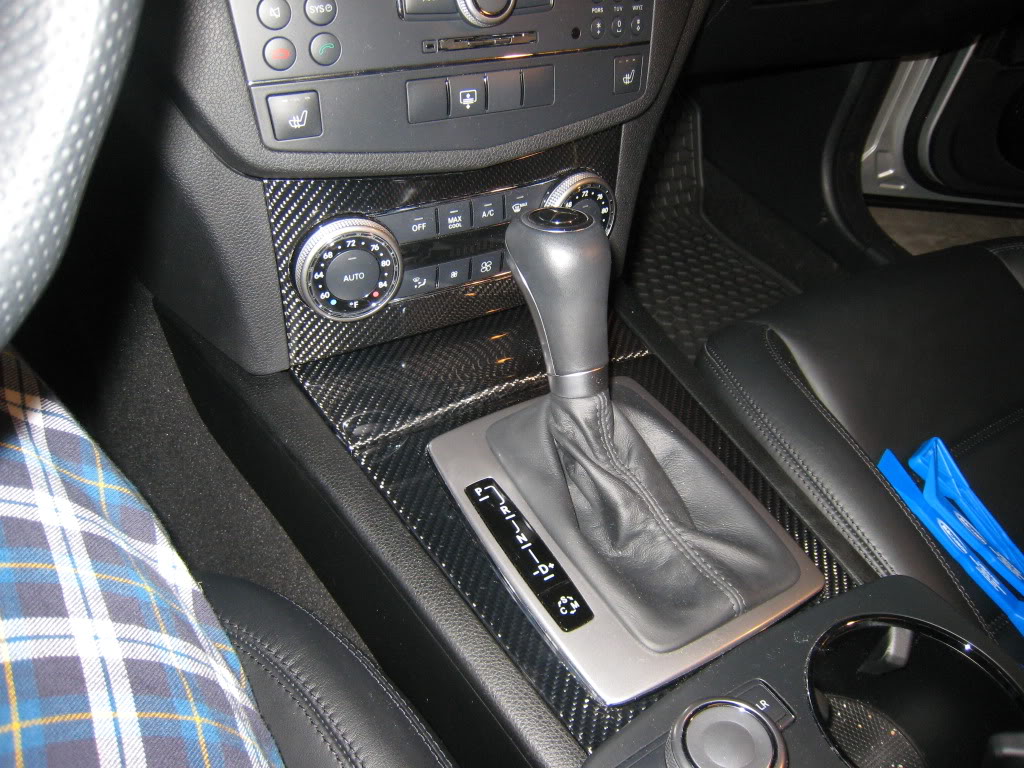
Install the new pieces exactly opposite to the above. They all come with the clips, tabs, and posts exactly as stock.
Time = 15 minutes = GLORY! Note pajama pants, as I was "going to dump the trash."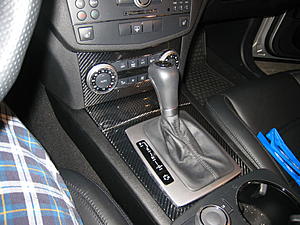
Cooler lighting
), but is beautiful -- just be sure all pieces have the same number of tabs/posts as the stock ones 3) For the door pieces, I plagarized vic_viper's DIY and sage advice on retrofitting speakers, but brain-farted on one part that he skipped, so after getting 75% of the way there I aborted and ended up taking it to Funktion Auto in Sterling, VA, whereby the badass tech made mincemeat of my little project -- still took pics, my lo$$ is your gain! 4) It dawned on me as I was taking my C63 apart that it really is just like a model car -- except w/o the glue...Center trim install (diffiiculty level = beginner)
Here are the pieces, w/c came w/ these blue hard plastic wedge removal tools.
I had the feeling that the shifter's base plate (P-R-N-D) would hinder removal of the center console piece so I removed it: push the right part of the shifter's boot (at the base) to the left and then pull the boot up and over the shifter.
Now holding it's inside edge, firmly lift the shifter base plate up -- it is held in by 4 tabs towards each of it's corners.

I found it easier to use one of the wedge tools and pry up the console piece at its front end on either side (held in by clips, whereas the rear is held in by tabs). Once the front portion is out, you can slide the rear of the piece up and out. Be firm but controlled -- all pieces will pop out easily.
Remove the climate control piece next to give yourself some room for the ashtray cover. Use a wedge tool again to pry the CC piece at it's upper edges on either side, then it's lower edges. Note position of the clips for wedge points.

The ashtray cover is a little tricky. The piece itself is thin and rides on an anchoring frame that glides on the tracks. Here is a pic w/ the piece removed. Also see pics of the configuration of the binding posts underneath the piece.


So, with one set of fingers/thumbs push the anchoring frame under the ashtray piece toward the front of the car, and with another set of fingers pull the ashtray piece towards you. You should feel it give as it slides out of its anchored position, then pull up to remove.
Install the new pieces exactly opposite to the above. They all come with the clips, tabs, and posts exactly as stock.
Time = 15 minutes = GLORY! Note pajama pants, as I was "going to dump the trash."
Cooler lighting
Last edited by dockt; Nov 12, 2009 at 11:15 PM.
Thread Starter
Member
Joined: Jul 2009
Posts: 155
Likes: 1
From: NoVA
'09 C63 AMG
Door trim install (difficulty level = intermediate to advanced), major shout out to FUNKTION AUTO in Sterling, VA for letting me get back in their badass workspace, with their supercool tech, and follow the workflow. Also, to vic_viper whom I'm essentially copying. Sorry, no labels in the pics this time -- too much volume here.
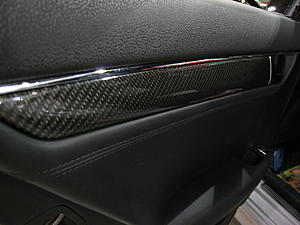
Front door trim
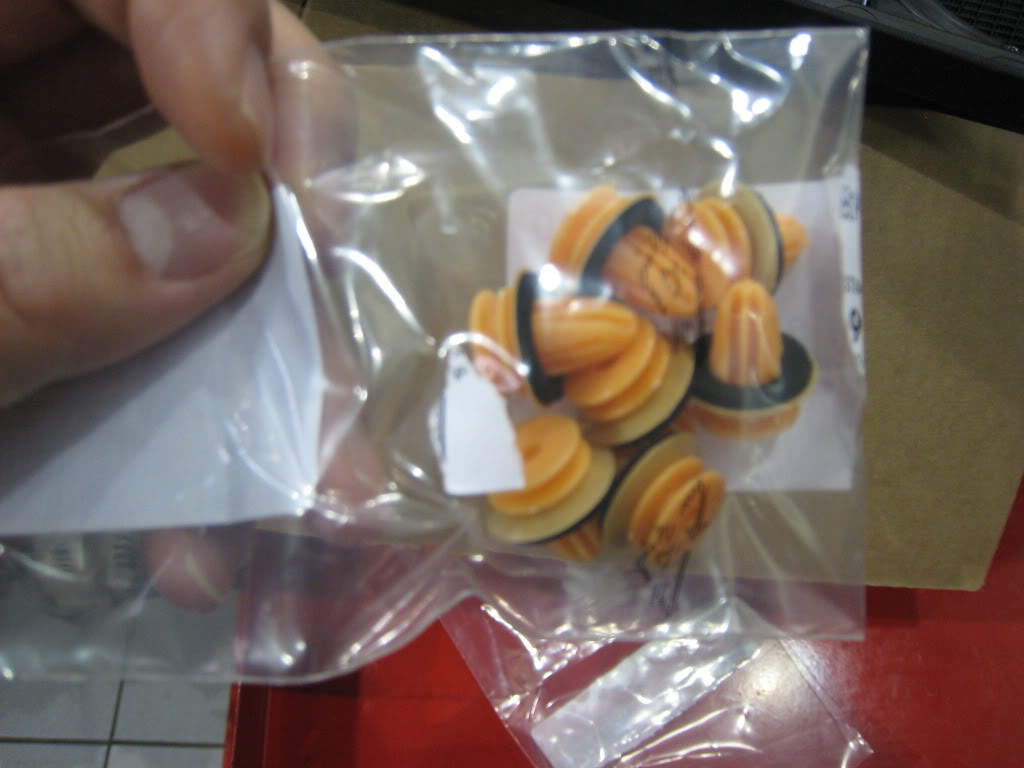
Recommended extra parts on hand: rivets x 2 (PN: A000-991-79-40), orange paneling clips x ~10 (PN: A000-991-86-98)
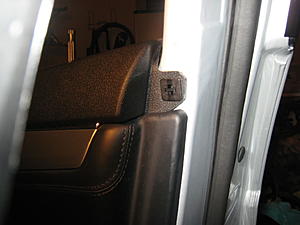
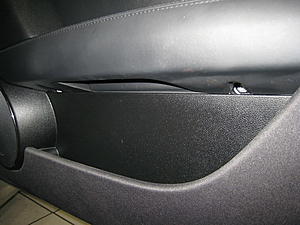
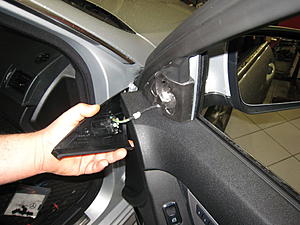
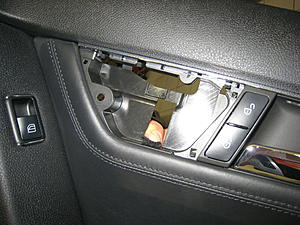
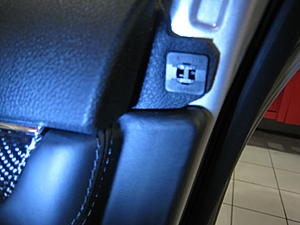
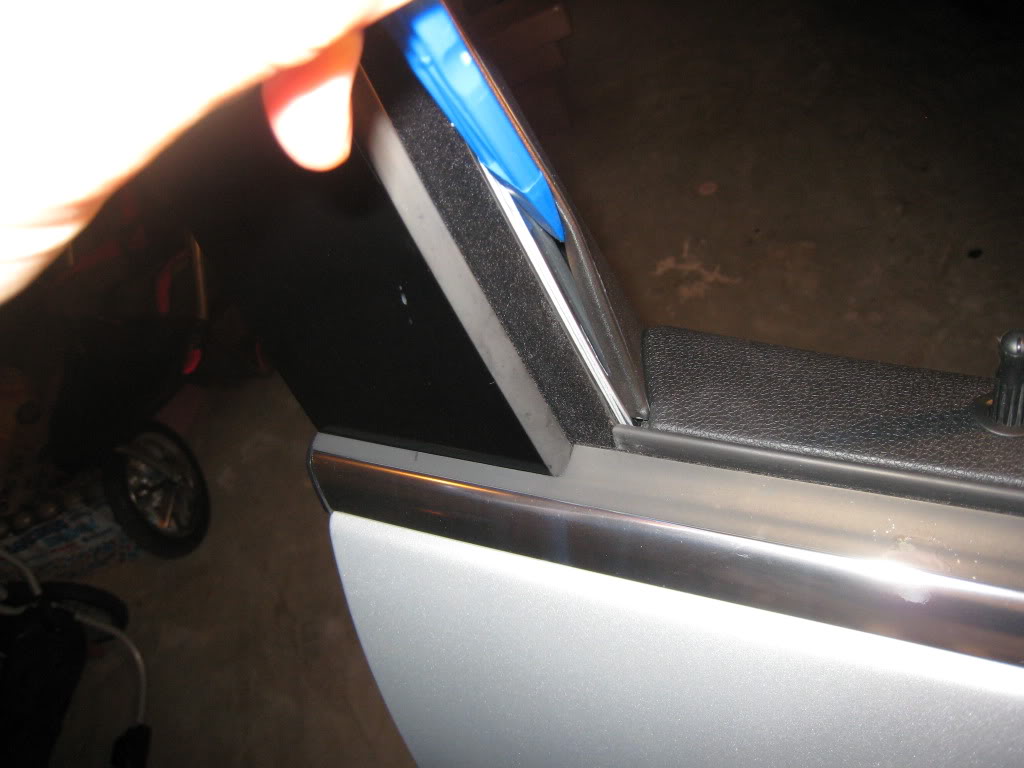
Remove this thin molded plastic trim next to the lower portion of the window by the lock post. It's easiest to use a wedge tool to pry the trim's outside edge free from the door's metal edge (on outside of the car). Then pull out it's thicker base on the inside of the door.
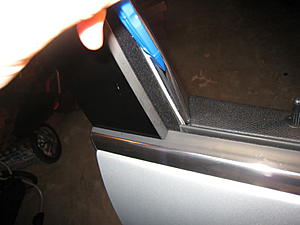
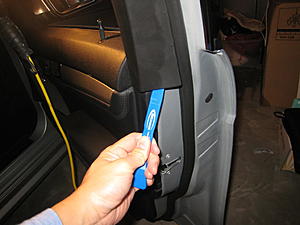
This will reveal this funky rivet (PN: A0009917940). It is square, with an inner pin and an outside lock. Pry out the inner pin turn it 90 degrees and reinsert it into the outer lock part (there's a center stripe across the front of both parts that guides you somewhat. This unlocks the outer part and you can then remove the whole rivet. NOTE: I did not find that one is able to reuse this rivet once it's removed ie I wasn't able to pull out the inner pin out after doing the above procedure.
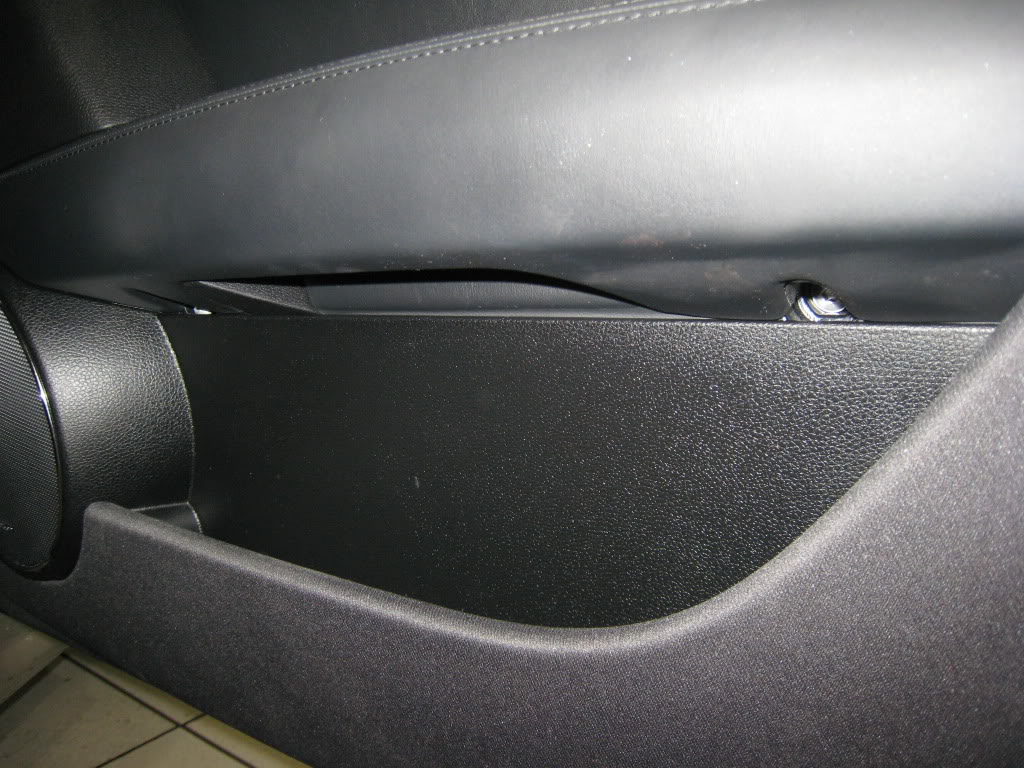
Now remove the two screws under the arm rest w/ a T30 torx driver. This is the simple little part that I didn't figure out on my own causing me to fail.
Also remove pull out the plastic tweeter cover and foam piece underneath.
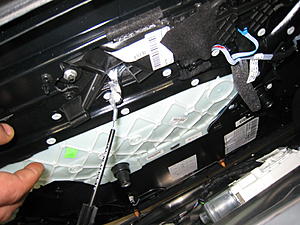
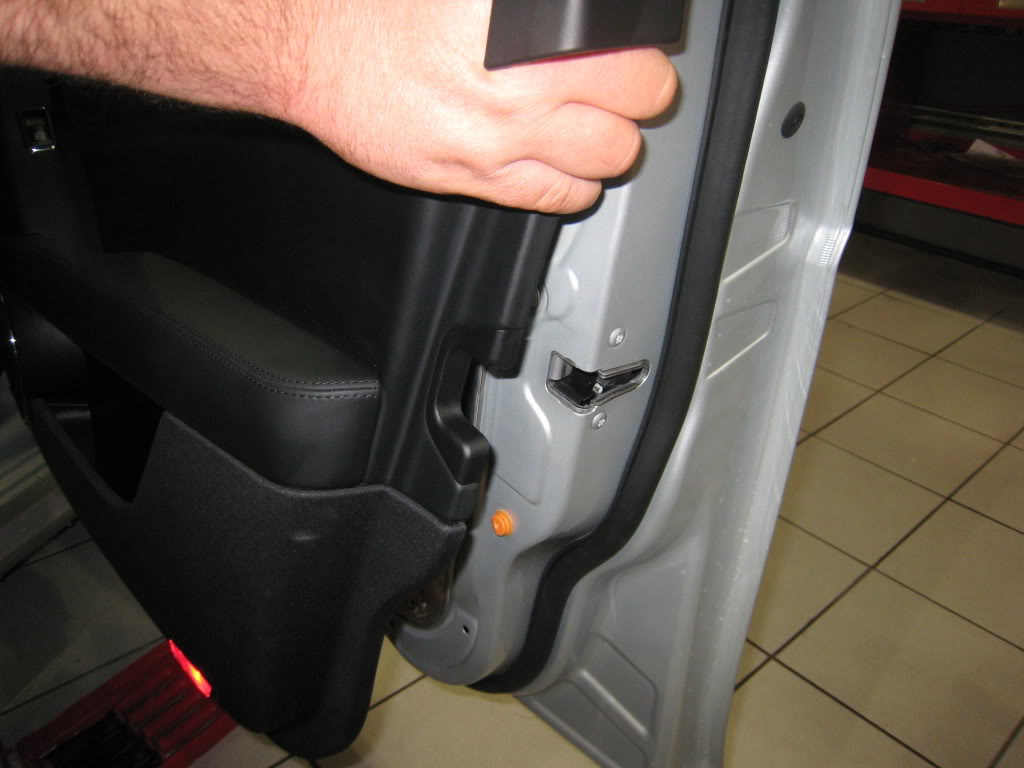
You can now pull out the door panel starting from the bottom -- find it's edge where it meets the painted metal of the door. You have to use considerable force, but controlled -- if not, you will damage more of the orange paneling clips (PN: A000-991-86-98) than you want. As noted by vic_viper, you want to preserve and keep intact all of these orange clips including their thin foam washer as best as you can as they provide a seal from the elements and maintain pressure for the airbag sensors. Use the pic below to figure out the locations to pull out the panel ie near each orange clip. You can use a wedge tool but get in close to the clip locations to avoid damage to the clips and panel itself.


The top of the door panel is rubbery and is kind of hinged onto the metal part of the door; you just pry it up and out. As you remove the entire door panel, the lock post comes out from under it's hole.
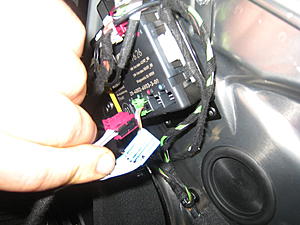
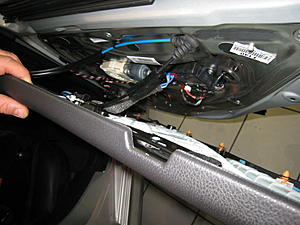
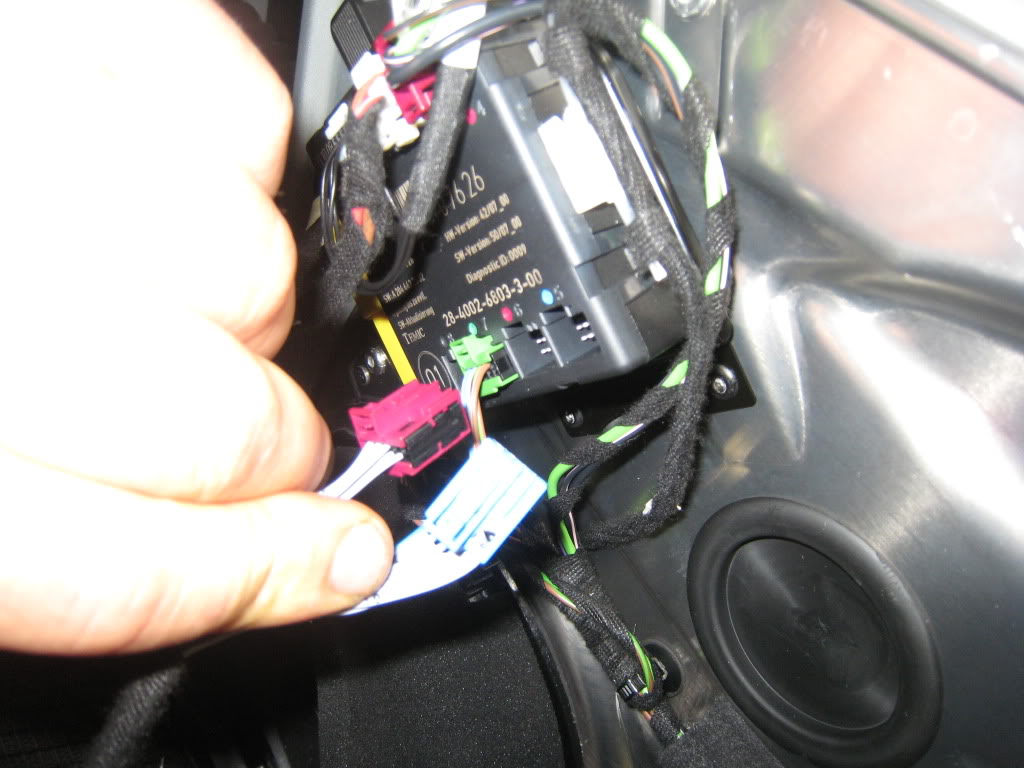
Undo the purple and blue harnesses shown below. Also unlatch the anchor for the locking mechansm by pulling it up; then slide out it's cable more proximally from it's guide.
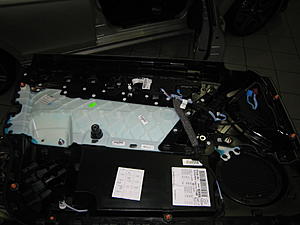
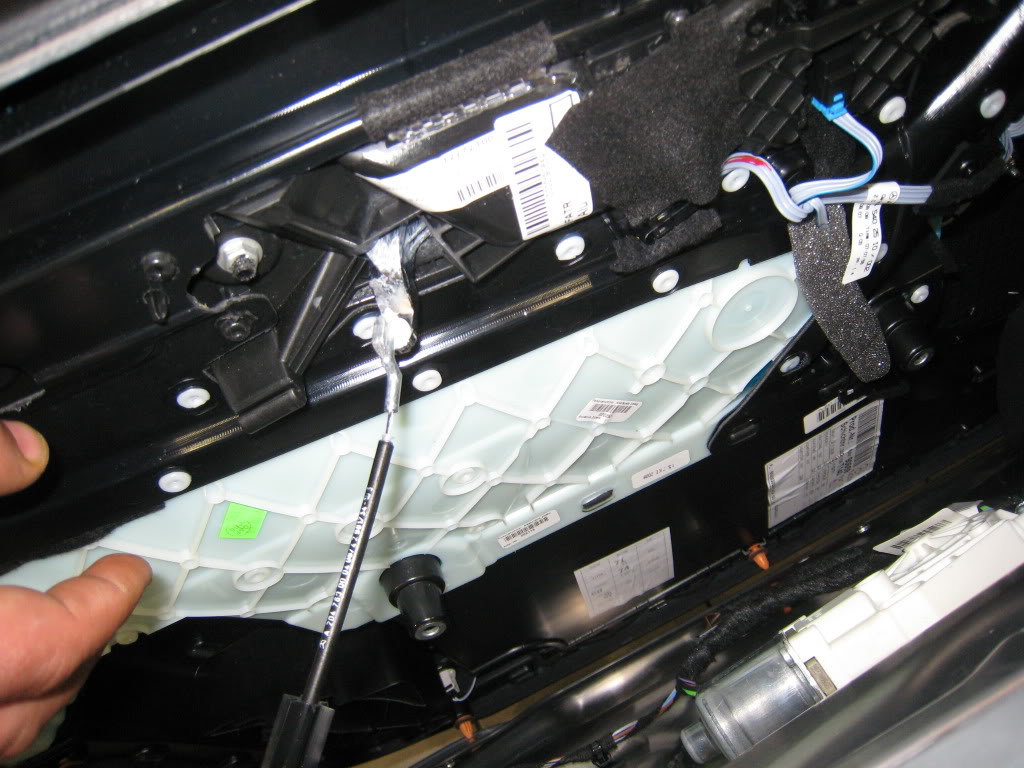
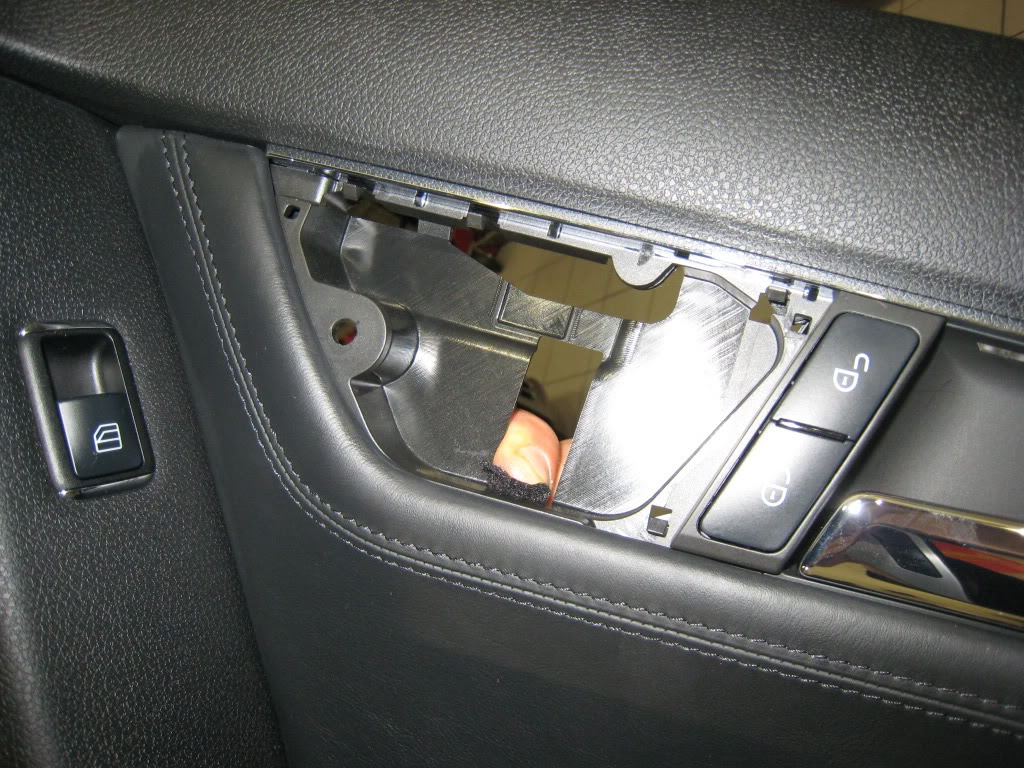
The door panel is now free; lay it upside down on a soft surface. Unscrew the 10mm hex bolts shown below for the long trim piece and seat control piece. The former will just come off after unscrewing.
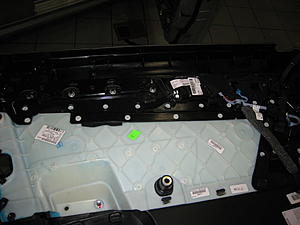
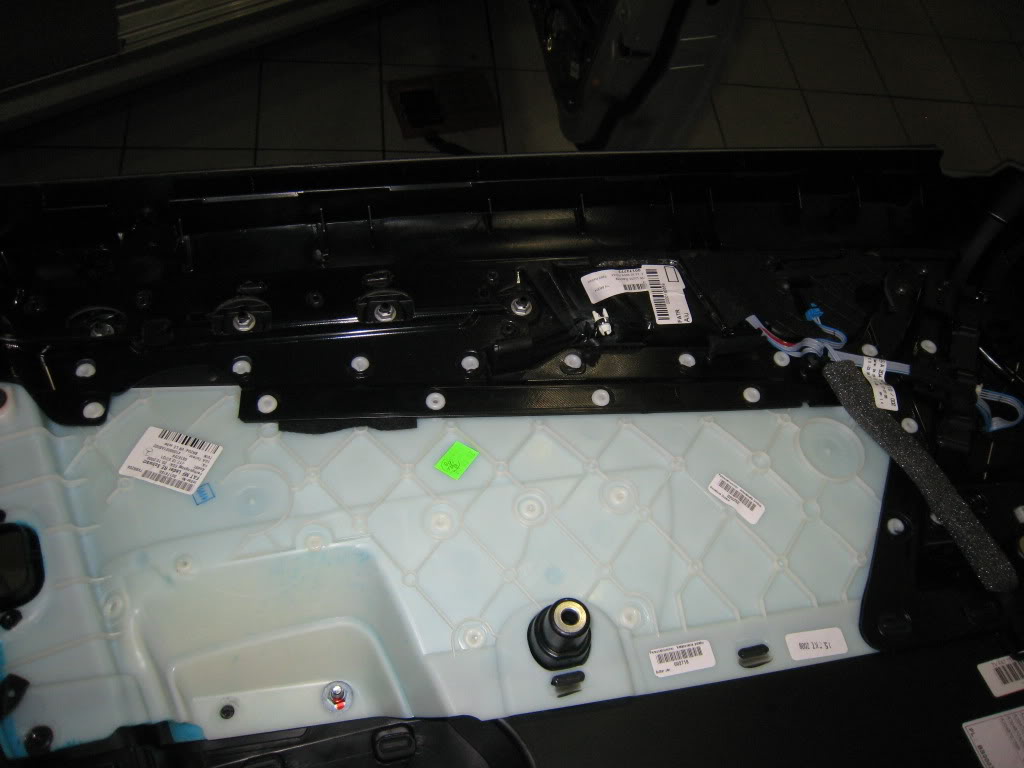
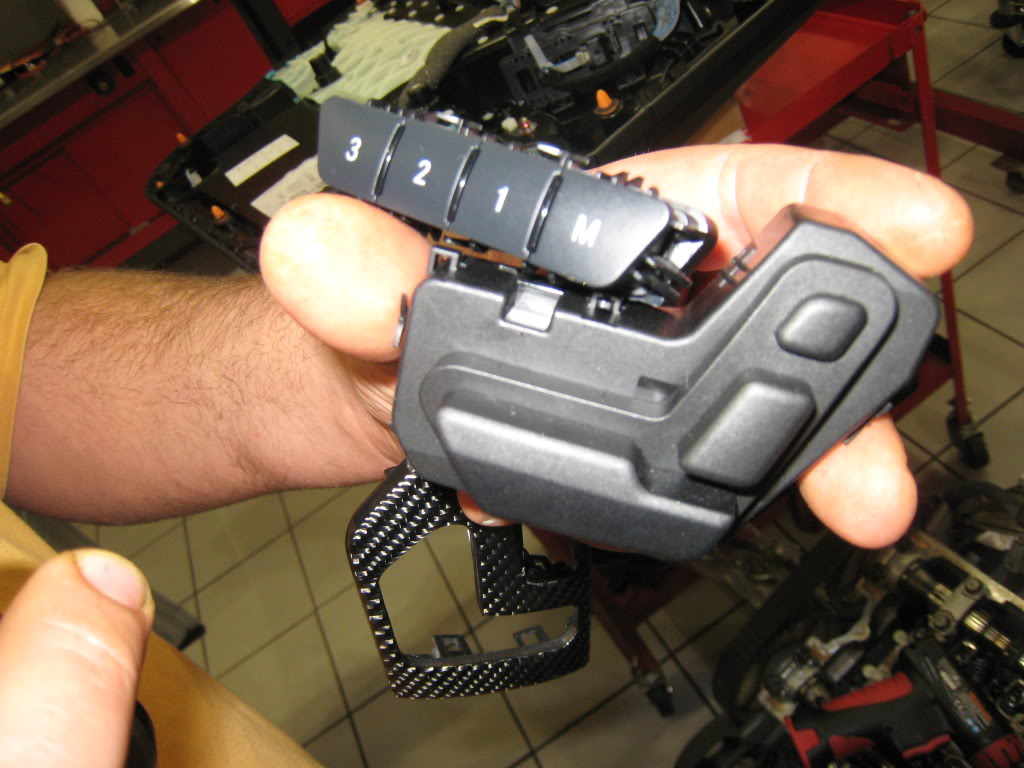
For the seat control trim piece, remove the rubber sticker overlying it's white harness and undo both the white and blue harness. The trim piece along w/ the seat control mechanism (w/c is the back and butt control connected by some silver wire) can now be freed up from the door panel by undoing the trimpiece's tabs from the back of the panel -- a plastic frame will be left behind on the panel as shown below.
The seat control trimpiece has a bunch of little tabs around it that need to be released with a small, thin screwdriver head. Use your new trimpiece or the pic below as a guide. Do not break any of these tabs (my CF piece was missing a tab) as it allows the seat control to sit flush against the trimpiece -- just take your time, it's a little tedious.

Install your new long piece and seat control piece in opposite order from the above, replug the two seat control harnesses and recover the white one w/ the rubbery sticker.
Ensure that all orange panel clips with their foam washers are intact and anchored to the door panel's retaining posts (not into the metal door on the opposite end) -- replace with new clips if some are mangled. Reattach the purple and blue harnesses, the locking mechanism cable anchor and guide. Sort of hang the door panel onto the top of the metal door, putting the lock post through its hole. Line up the orange clips to their holes and bang close the panel with your hand. Work your way around the entire panel, bottom to top, banging at the location of the clips. You will know when each region fits "just right."
Use a new rivet (PN: A000-991-79-40) and replace it as noted above. Again note the marking "stripe" on top of the rivet to tell you it's locked position. Replace the plastic window trim.
If you made it this far, you are a better man than me actually -- but you're probably bleeding somewhere. Time 60-90 minutes for both doors, taking your time = GLORY!!
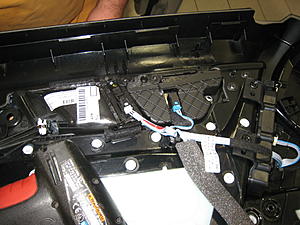
Rear door trim
Essentially same as front door but a) you do not have to remove any window trim b) there is no locking rivet in the panel to remove/replace. Make sure you unscrew the torx screws below the armrest again; then pry open the panel as above. Don't forget to deal w/ the lock mechanism, purple/blue harnesses, and lock post as above. The blue wire you see below is the locking mechanism from the driver's door.

Time = 30 min for both rear doors = GLORY!!
Front door trim
Recommended extra parts on hand: rivets x 2 (PN: A000-991-79-40), orange paneling clips x ~10 (PN: A000-991-86-98)
Remove this thin molded plastic trim next to the lower portion of the window by the lock post. It's easiest to use a wedge tool to pry the trim's outside edge free from the door's metal edge (on outside of the car). Then pull out it's thicker base on the inside of the door.

This will reveal this funky rivet (PN: A0009917940). It is square, with an inner pin and an outside lock. Pry out the inner pin turn it 90 degrees and reinsert it into the outer lock part (there's a center stripe across the front of both parts that guides you somewhat. This unlocks the outer part and you can then remove the whole rivet. NOTE: I did not find that one is able to reuse this rivet once it's removed ie I wasn't able to pull out the inner pin out after doing the above procedure.

Now remove the two screws under the arm rest w/ a T30 torx driver. This is the simple little part that I didn't figure out on my own causing me to fail.
Also remove pull out the plastic tweeter cover and foam piece underneath.

You can now pull out the door panel starting from the bottom -- find it's edge where it meets the painted metal of the door. You have to use considerable force, but controlled -- if not, you will damage more of the orange paneling clips (PN: A000-991-86-98) than you want. As noted by vic_viper, you want to preserve and keep intact all of these orange clips including their thin foam washer as best as you can as they provide a seal from the elements and maintain pressure for the airbag sensors. Use the pic below to figure out the locations to pull out the panel ie near each orange clip. You can use a wedge tool but get in close to the clip locations to avoid damage to the clips and panel itself.

The top of the door panel is rubbery and is kind of hinged onto the metal part of the door; you just pry it up and out. As you remove the entire door panel, the lock post comes out from under it's hole.
Undo the purple and blue harnesses shown below. Also unlatch the anchor for the locking mechansm by pulling it up; then slide out it's cable more proximally from it's guide.
The door panel is now free; lay it upside down on a soft surface. Unscrew the 10mm hex bolts shown below for the long trim piece and seat control piece. The former will just come off after unscrewing.
For the seat control trim piece, remove the rubber sticker overlying it's white harness and undo both the white and blue harness. The trim piece along w/ the seat control mechanism (w/c is the back and butt control connected by some silver wire) can now be freed up from the door panel by undoing the trimpiece's tabs from the back of the panel -- a plastic frame will be left behind on the panel as shown below.

The seat control trimpiece has a bunch of little tabs around it that need to be released with a small, thin screwdriver head. Use your new trimpiece or the pic below as a guide. Do not break any of these tabs (my CF piece was missing a tab) as it allows the seat control to sit flush against the trimpiece -- just take your time, it's a little tedious.

Install your new long piece and seat control piece in opposite order from the above, replug the two seat control harnesses and recover the white one w/ the rubbery sticker.
Ensure that all orange panel clips with their foam washers are intact and anchored to the door panel's retaining posts (not into the metal door on the opposite end) -- replace with new clips if some are mangled. Reattach the purple and blue harnesses, the locking mechanism cable anchor and guide. Sort of hang the door panel onto the top of the metal door, putting the lock post through its hole. Line up the orange clips to their holes and bang close the panel with your hand. Work your way around the entire panel, bottom to top, banging at the location of the clips. You will know when each region fits "just right."
Use a new rivet (PN: A000-991-79-40) and replace it as noted above. Again note the marking "stripe" on top of the rivet to tell you it's locked position. Replace the plastic window trim.

If you made it this far, you are a better man than me actually -- but you're probably bleeding somewhere. Time 60-90 minutes for both doors, taking your time = GLORY!!
Rear door trim
Essentially same as front door but a) you do not have to remove any window trim b) there is no locking rivet in the panel to remove/replace. Make sure you unscrew the torx screws below the armrest again; then pry open the panel as above. Don't forget to deal w/ the lock mechanism, purple/blue harnesses, and lock post as above. The blue wire you see below is the locking mechanism from the driver's door.


Time = 30 min for both rear doors = GLORY!!

Last edited by dockt; Nov 12, 2009 at 11:29 PM.
Thread Starter
Member
Joined: Jul 2009
Posts: 155
Likes: 1
From: NoVA
'09 C63 AMG
Trending Topics

MBWorld Fanatic!
Joined: Dec 2007
Posts: 2,052
Likes: 1
From: Vancouver, BC
2008 Mercedes C300 4Matic
I'm debating whether to buy from there or to get it from the dealer..
MB World Stories
The Best of Mercedes & AMG

New Electric Mercedes-AMG GT 4-Door Coupe Unveiled: 10 Things You Need to Know
Verdad Gallardo
6 Mercedes Models That Did NOT Age Well (But Are Somehow Still Cool)
Verdad Gallardo
Manual Mercedes? 6 Times Sindelfingen Let Drivers Have All The Fun
Verdad Gallardo
Mercedes SLR McLaren 722 S Is Extremely Rare Example Modified by McLaren
Verdad Gallardo
8 Classic Boxy Mercedes Designs That Have Aged Like Fine Wine
Verdad Gallardo
Flawlessly Restored Mercedes 190E Evo II Heads to Auction
Verdad Gallardo
Electric Mercedes C-Class Unveiled: 11 Things You Need to Know
Verdad Gallardo
Mercedes EQS Gets A Major Update: Everything You Need to Know
Verdad Gallardo
5 Underrated Mercedes-Benz Models That Don't Get the Love They Deserve
Verdad Gallardo

Newbie
Joined: Jan 2009
Posts: 11
Likes: 0
From: Orange County
C63AMG
your pics have helped me understand getting into the ashtray so I can get behind the cigarette lighter to hardwire my Valentine one. I will post pics of my job when I’m done under the DIY. also the CF looks very nice.

Junior Member
Joined: Feb 2010
Posts: 74
Likes: 0
2014 E550 Cab
Wow well done! I would have not had the b@lls to rip apart an expensive car like that.
For 2200 plus shipping and all that work I say it is just easier to get the CF from the start.
Actually 2900 if you decide to keep the parts replaced or damage it while taking it off.
For 2200 plus shipping and all that work I say it is just easier to get the CF from the start.
Actually 2900 if you decide to keep the parts replaced or damage it while taking it off.
Last edited by AMG_G; Apr 21, 2010 at 01:09 PM.


Newbie
Joined: May 2009
Posts: 11
Likes: 0
From: Belmont, CA
W211 E55, Porsche 996 Targa
Spendy?
Thanks Dockt for posting the install photos. The car looks great.
The MAcarbon W204 interior package is not cheap. But we try to price our products at the best price we can with the quality level we provide. Our main line of business is CF interiors for Porsche, Ferrari and Lamborghini. Just because its for a W204 does not make it any less expensive to make. We manufacture our parts in Belgium in our own workshop. This leads to higher labor, material and currency costs and therefore a higher retail price than the stuff made in Asia that is found on eBay (or other outlets). Like anything else, carbon parts have different quality levels. The factors to consider are: weave distortion (or lack of), clarity of finish, smoothness of finish, and durability. To get all of those to a high level is not easy. But doing that well is what we pride ourselves on.
On the other side, if you compare our kit to the factory parts or say Brabus, we are a lot less expensive. I believe the OEM parts are over $4000.
Finally, with the W204, there are 9 pieces in the package. So on a per unit basis, the price is not that expensive.
For a C300, it probably does not make sense to invest that in the car. For a C63, with its sporting nature and much higher price, the package is very interesting.
You can see more information on the 9 piece kit or any of our other W204 parts on this page on our site:
http://www.macarbon.com/store/c-class-w204-144/
Thanks.
John Borchelt
MAcarbon
MBWorld Fanatic!
Joined: Aug 2009
Posts: 2,899
Likes: 93
C63 AMG
I just received the CF instrument cluster surround from MAcarbon...it looks topnotch and will nicely complement my factory CF.
http://www.macarbon.com/store/w204-i...uster-440.html
http://www.macarbon.com/store/w204-i...uster-440.html


