When you click on links to various merchants on this site and make a purchase, this can result in this site earning a commission. Affiliate programs and affiliations include, but are not limited to, the eBay Partner Network.
has anyone else broken off their plastic vacuum line fitting that sits RIGHT next to the pcv opening on the intake manifold (see pic)? apparently I hit it while shimmying the weistec fitting into the pcv hole. I am in the process of repairing this thing, but just wondering if I need to be super careful about the hoses moving around and that weistec fitting rotating in the hole and breaking off that black plastic piece again, or if that's not really possible with the hoses and can in their mounted positions. thanks, guys.
During install I zip tied the two hoses together in numerous places from the adapter fittings so they are held together and have not moved so far. Also used one to hold the hoses to the shock tower to support them as they run parallel to the engine on their way to the can. I checked after driving for a few days and nothing has moved. I realize the one adapter will rotate that is why I fastened these two lines together. Once secured they have not moved at all, going on a few weeks now, all okay and solid. Was curious to see if any oil is in the can, but will wait for a few more weeks then open up.
Good Luck with the fix on the plastic line, how did you remove it from the manifold? was thinking maybe a tap to thread into the plastic, but you stated that it rotates so the kind of threw out that idea. Does this line have an O ring inside the manifold to maintain vacuum?
To be honest, it was so damn cramped that I didn't even notice that piece. Is it the other end of the vacuum line that normally snakes over the top of the PCV valve? Unlike critter, I wasn't able to get stuff nearly as neat as my '14 engine bay was even more cramped than I think earlier models are. There is an additional fixed metal line that runs outside of the PCV line that (I think) runs to the crankcase, then there also is the engine oil dipstick housing. Altogether, I could barely get the Weistec fittings to sit in the cramped engine bay, with the PCV valve + billet adapted crammed up against the firewall as I described previously. I've now got the 2 lines running loose, one on either side of the dipstick, forward into the engine bay towards the catch can. I haven't checked them since install, so will tomorrow and see if anything looks irritated, especially that fragile vacuum line. But at least the PCV billet piece can only rotate, and shouldn't rotate much depending on how you fix the line to the catch can. I assume that vacuum line will be safe. Good luck
No jcfay, it is cramped on the E, also there is the ECU power cable for the engine on mine that runs along and behind the dip stick and also that metal bracket, it sure was easier to look at the install on just the engine, without the car attached .
critter: i'll probably use the zip ties once the vac line is fixed and i put the catch can back in. im having my indie shop pull the manifold and repair the plastic piece. seems like it will push through without tapping it, but i'll have to see what they do. and yes, there is at least one O ring at the base of the plastic fitting to seal the hole.
jcfay: yes, this is the line that snakes over the pcv valve. goes from the Y pipe to the intake manifold.
What I was suggesting is to thread a metal threading tap, a small one into the hole left by the plastic tube to pull the whole assembly/fitting out of the manifold. If it is a press fit with O ring into the aluminum manifold, once threaded in you may have enough leverage to pull out the plastic fitting.
kgmuse that changing out the PCV would be a bee atch for sure, unless you have hands of a young girl on the E you see it comes from the bowels of somewhere, through a metal support of some kind then into the manifold. Probably 120 bucks for sure and many new words not found in a dictionary.
Good Luck guys
Yea, I did a bit more research and the far end of the PCV (assume it's crankcase) is a BEAR to remove. That's one of the reasons I was so hesitant to put a lot of twist into the PCV/billet piece to make the lines run better together towards the catch can - I didn't want to put too much stress on that. Took a look this AM and all looks good - no oil in catch can yet (about 400 miles on too...), but a little heat rash on one of the lines that runs up against the dipstick housing. I'm assuming the lines provided by Weistec are engineered to handle that sort of heat, though?
That sux they gotta pull the manifold... I guess they can manually wipe out any oil while they're in there, though, eh?
I bought the Weistec can and now you guys all have me scared to install it. Is it really that hard? But I do appreciate these posts, I will be very careful when I do the install. Of course, I live in the Phoenix area and it's way too hot in my garage to do the install now, won't be doing it until October.
I bought the Weistec can and now you guys all have me scared to install it. Is it really that hard? But I do appreciate these posts, I will be very careful when I do the install. Of course, I live in the Phoenix area and it's way too hot in my garage to do the install now, won't be doing it until October.
It depends. Some folks had no trouble at all. For others it was a real pain. But personally, I enjoy doing this stuff myself, pain and all so I say go for it so long as you are a little handy and have the tools.
I bought the Weistec can and now you guys all have me scared to install it. Is it really that hard? But I do appreciate these posts, I will be very careful when I do the install. Of course, I live in the Phoenix area and it's way too hot in my garage to do the install now, won't be doing it until October.
not hard, I'm just an idiot. one piece of advice that I wish weistec gave me in the instructions: be careful not to break off the vac line fitting when installing the weistec fitting that goes into the intake. you'll see it (there's a vac hose attached to it).
not hard, I'm just an idiot. one piece of advice that I wish weistec gave me in the instructions: be careful not to break off the vac line fitting when installing the weistec fitting that goes into the intake. you'll see it (there's a vac hose attached to it).
Great point. And be careful not to break anything else too! I've attached Weistec's instructions in case you couldn't find them (assuming they won't mind). They make it look easy with the engine out. And my M156 was slightly different (I gather the E63's is slightly too, based on Critter's input).
You guys are the best, thank you so much for the advice. And yes, I'm kind of handy and have a full set of tools. I've been wrenching on my own cars since 1969 including complete engine rebuilds of a Corvair flat 6 and a Porsche flat 6. I also have done cam installs on several GM V8's.
But even though this install is not hard, it looks like you need small hands to get back there. I'll do my best and try not to break anything. Again, thanks for the warnings, they are greatly appreciated.
You'll be set, then. Some tricks: 1) there is an electrical harness that runs along the top of the firewall, unclip it from the driver's side which will give you some more room to reach behind the engine 2) removing the engine cover and airboxes is pretty easy, just don't lose the metal clips that are fastened on the underside of the silver engine cover (they have a tendency to detach themselves from the plastic) 3) removing the plastic y-intake, held in place on either side by sprung plastic tabs: the driver's side is pretty easy to release once you reach it, just stuff your arm deep down behind engine, release driver's side first, lift y-intake gently a bit and then attack the other side, which unfortunately abuts the PCV valve and so can't really be pried loose. just wiggle the intake back and forth gently, and tweak the passenger side tab, and the y-intake will eventually come loose 4) cover the now open manifold intake with tape/shop rags! 5) some folks had success wrenching the billet aluminum pieces together and attaching to tubing prior to attaching billet pieces to engine, just check how you want them oriented first 6) PCV valve with billet adapter and all else will be pretty tightly jammed in there, so just be careful and as gentle as possible, and lay it out however you think will be best (I'm probably going to need to tweak my layout a bit) 7) although billet pieces might not appear that they're tightly wrenched to manifold and PCV valve, they should be vacuum-tight when fully wrenched even though they show a gap prior to wrenching. HTH!
You'll be set, then. Some tricks: 1) there is an electrical harness that runs along the top of the firewall, unclip it from the driver's side which will give you some more room to reach behind the engine 2) removing the engine cover and airboxes is pretty easy, just don't lose the metal clips that are fastened on the underside of the silver engine cover (they have a tendency to detach themselves from the plastic) 3) removing the plastic y-intake, held in place on either side by sprung plastic tabs: the driver's side is pretty easy to release once you reach it, just stuff your arm deep down behind engine, release driver's side first, lift y-intake gently a bit and then attack the other side, which unfortunately abuts the PCV valve and so can't really be pried loose. just wiggle the intake back and forth gently, and tweak the passenger side tab, and the y-intake will eventually come loose 4) cover the now open manifold intake with tape/shop rags! 5) some folks had success wrenching the billet aluminum pieces together and attaching to tubing prior to attaching billet pieces to engine, just check how you want them oriented first 6) PCV valve with billet adapter and all else will be pretty tightly jammed in there, so just be careful and as gentle as possible, and lay it out however you think will be best (I'm probably going to need to tweak my layout a bit) 7) although billet pieces might not appear that they're tightly wrenched to manifold and PCV valve, they should be vacuum-tight when fully wrenched even though they show a gap prior to wrenching. HTH!
jcfay, great write-up, you are now my hero! One question. Is it obvious how to release the plastic sprung tabs on the Y-intake? Also, putting it back on, do you just press it back on?
jcfay, great write-up, you are now my hero! One question. Is it obvious how to release the plastic sprung tabs on the Y-intake? Also, putting it back on, do you just press it back on?
Hi, yes it's pretty straight-forward, they are just plastic tabs with a ridge that locks down over the mating metal lip of the manifold intake. You just gently pull outward on the tab end (so away from the intake), and you can feel the plastic tab bend, and then that side of the y-intake will release. Once you've released the other side (which ain't all that easy), you then will have to rotate the entire y-intake forward and outward until it slides out from behind the firewall. Reinstallation is about the same, except you'll have the Weistec gear installed, and you'll need to make sure that none of the vacuum lines or anything is caught while you reverse the y-intake back into place. But other than that, it pretty much slides into the appropriate place automatically, but you might need to apply some modest force to get it to seat correctly as there is a rubber gasket that seals the y-intake to the manifold (the gasket lives in the end of the y-intake). After reinstallation, I always feel back on either side of the y-intake to make sure the tabs are back where they should be, and that's how I knew the y-intake was fully reseated. HTH!
Hi, yes it's pretty straight-forward, they are just plastic tabs with a ridge that locks down over the mating metal lip of the manifold intake. You just gently pull outward on the tab end (so away from the intake), and you can feel the plastic tab bend, and then that side of the y-intake will release. Once you've released the other side (which ain't all that easy), you then will have to rotate the entire y-intake forward and outward until it slides out from behind the firewall. Reinstallation is about the same, except you'll have the Weistec gear installed, and you'll need to make sure that none of the vacuum lines or anything is caught while you reverse the y-intake back into place. But other than that, it pretty much slides into the appropriate place automatically, but you might need to apply some modest force to get it to seat correctly as there is a rubber gasket that seals the y-intake to the manifold (the gasket lives in the end of the y-intake). After reinstallation, I always feel back on either side of the y-intake to make sure the tabs are back where they should be, and that's how I knew the y-intake was fully reseated. HTH!
i think im gonna actually JB weld the manifold fitting to the little bracket to keep it as one solid, non-rotating piece. but first, i gotta get back in there and see what the clearances and propensity to rotate really are. sounds like from you guys that it's not really a problem except for me (again, where is this kind of luck when i go purchase lottery tickets? lol).
Maximus, is it not possible to remove the adaptor from the engine manifold to give you some room and then use a pair of pliers with a screw driver behind between the manifold and the pliers for leverage and this could help to pop out the fitting. Surely this is just held in with an O ring sitting in a groove inside the opening in the manifold , this is why it has the ability to rotate within the manifold. Hope this helps, at least with the fitting out you may be able to attach the two ends with a small piece of rubber hose like used for windshield washers and the epoxy the two together. It is a bee atch of a place to work and patience will be a virtue, good luck.
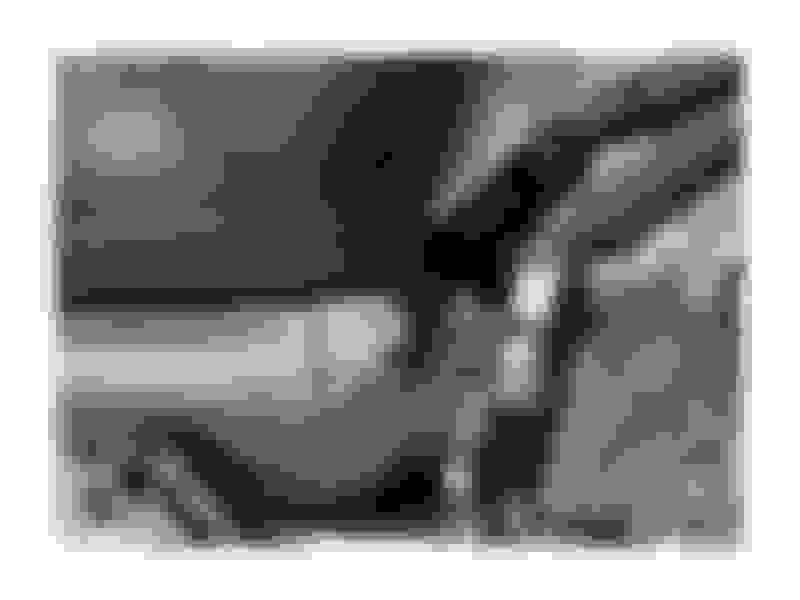
OK, I was looking at instructions and there is actually a pretty good photo of the clip you have to push outward to get the Y intake off.
Do you have to use a screw driver or can you just use your fingers?
fingers. and work on the other side first, as it isn't pinched between the pcv valve (or like in the picture, where the weistec billet piece fits into the pcv vavle manifold hole). I had to reach way, way down on the driver's side to get to that plastic tab, but fingers was the only way to go, I could never get a screwdriver down there. Just know that your arms are going to be bruised to hell after you're done from cramming them behind the engine
release the driver's side tab, then lift that side of the y-intake, and then try flicking the tab on the other side shown in the picture above while you move the y-intake left and right. eventually the tab shown in the image will release itself, and then you can remove the entire y-intake
fingers. and work on the other side first, as it isn't pinched between the pcv valve (or like in the picture, where the weistec billet piece fits into the pcv vavle manifold hole). I had to reach way, way down on the driver's side to get to that plastic tab, but fingers was the only way to go, I could never get a screwdriver down there. Just know that your arms are going to be bruised to hell after you're done from cramming them behind the engine
I was able to use a long flat head screwdriver. I placed the flat head between the intake and the y pipe clip area and rotated the screw driver to get the clip to release.
Maximus, is it not possible to remove the adaptor from the engine manifold to give you some room and then use a pair of pliers with a screw driver behind between the manifold and the pliers for leverage and this could help to pop out the fitting. Surely this is just held in with an O ring sitting in a groove inside the opening in the manifold , this is why it has the ability to rotate within the manifold. Hope this helps, at least with the fitting out you may be able to attach the two ends with a small piece of rubber hose like used for windshield washers and the epoxy the two together. It is a bee atch of a place to work and patience will be a virtue, good luck.
critter, the piece can't be backed out without depressing some barbs on the inside of the mani. my indie shop was gonna epoxy it back together but ended up getting lucky ... they found another vac line nipple and replaced it. so all back to stock now. I'm just gonna wait a little bit to make sure no codes or cel and then I'll put the aos back in.
Congrats on getting this repaired, it is such a pain in the ### when these small issues are so difficult to repair and in such close quarters.
I think my can is defective, nothing in it yet.
Mercedes SLR McLaren 722 S Is Extremely Rare Example Modified by McLaren
Slideshow: A one-of-one U.S.-spec Mercedes-Benz SLR McLaren Roadster became even rarer after a factory-backed transformation at McLaren's headquarters.


 .
.


 so I say go for it so long as you are a little handy and have the tools.