

DIY Backup cam install on '08 & '09 C63

 09-28-2014, 07:04 PM
#1
Junior Member
Thread Starter

Join Date: Dec 2012
Posts: 22
Likes: 0
Received 0 Likes
on
0 Posts
2010 Glk350
DIY Backup cam install on '08 & '09 C63
Ok so I already know that backup cam write-ups have already been done, but I haven't seen any that I know of for the 2008 & 2009 C63's that doesn't include backup cams so I decided to document my progress to share for others.
I've done it before on my GLK350 so everything was relatively easy and straightforward. And the method I used is SUPER easy with NO cutting or running wires around!
So let's jump right into it:
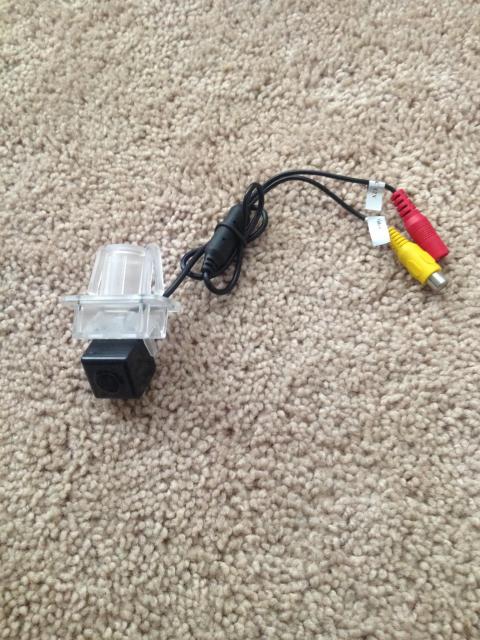
1. You will need a rear backup cam (make sure it's CMOS) I used a cheap chinese e-bay cam but any will do. Just make sure the clips are able to fit on the W204

2. Next, you will need and Fakra to RCA right angle adapter (VERY IMPORTANT). You will see why later on in the tutorial. Other write-ups would have you using a fakra connector and a rca cable, and cutting the ends on both, splicing them together to make this cable. You don't need to do that! You can just get the cable the way it is.

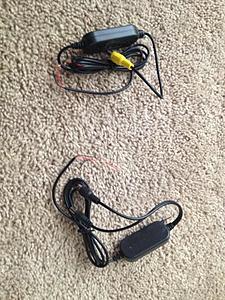
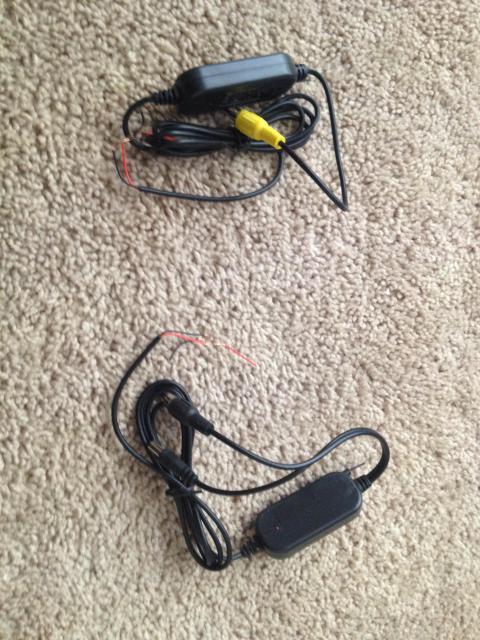
3. You will need a 2.4G Wireless RCA Video Transmitter & Receiver for Car Rearview Camera Monitor. This particular transmitter will eliminate the need to rip up your carpets and go through the hassle of running the wires from the trunk all the way to your headunit. (you'll thank me later!)
From here, you can start either from the truck or from the headunit, it doesn't matter. I started from the trunk.
FROM THE TRUNK
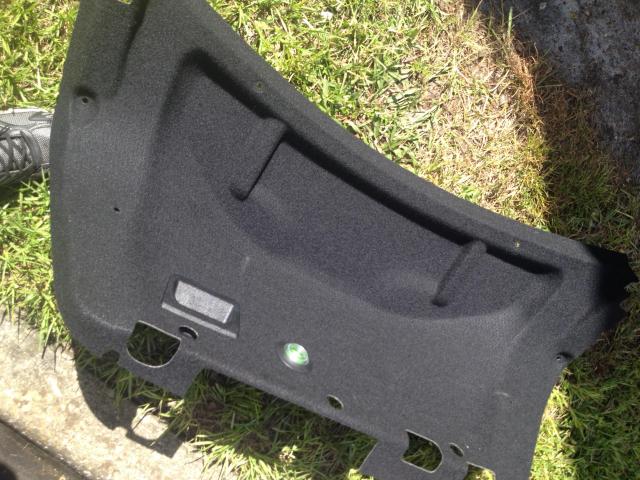
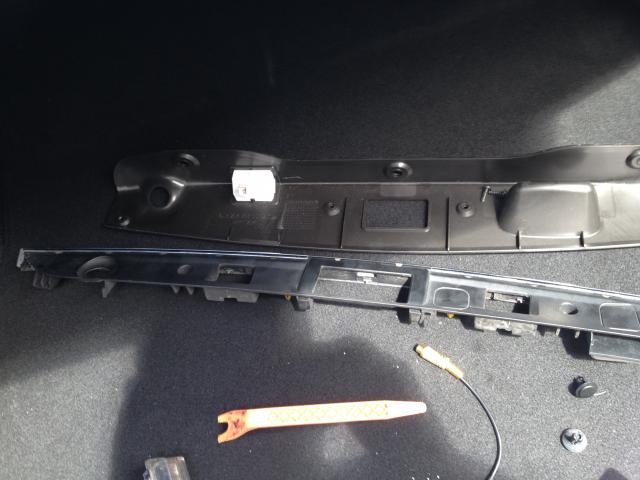
1a. Remove these torx screws located here:
1b. Then remove all the plastic pop-up plug thingys from around the trunk liner. They look like these:
1c. Once those are off, you can disconnect the trunk release wire and set the trunk liner aside


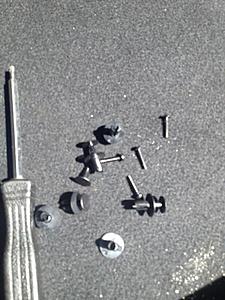
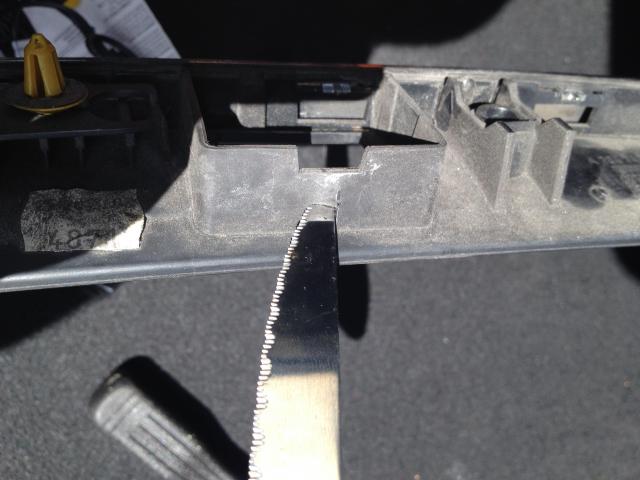
1d. Theres two more torx screws you have to remove thats underneath. Space is tight so it'll be a little tricky. Sorry, I couldn't get a clear shot!
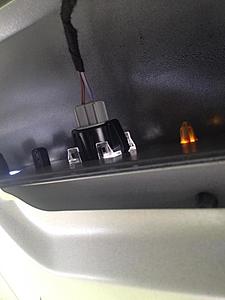
The end result:
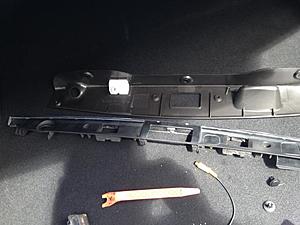
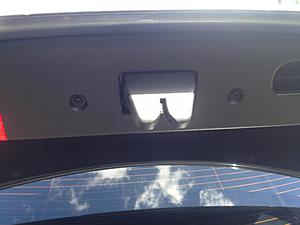
2. The cam will be installed where the right license plate light is. Pop that light off but DO NOT cut or remove it. If you do you'll get an error message on your dash screen. I tuck my light behind the trunk liner as I was putting back on

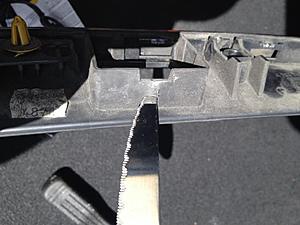
3. Install the cam in that spot and it will snap in place. The cam I bought had a small tab that would clear the opening so I had to cut a small slit so the tab can fit
The cam installed

...and a view from the back
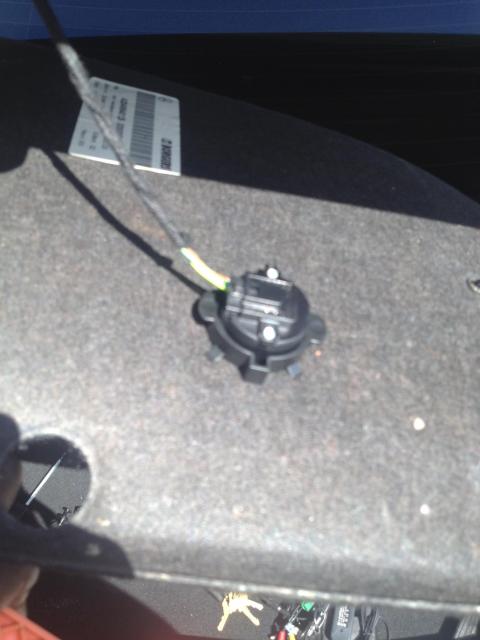
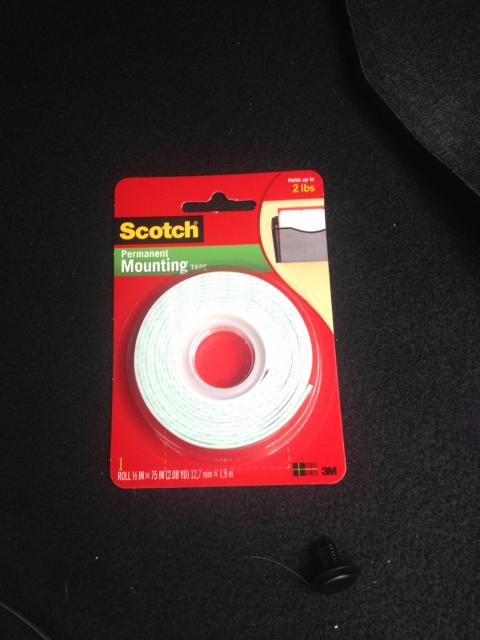
4a. To install the transmitter, use dome double-sided mounting tape and mount the transmitter onto the metal portion of your trunk. Try to make it close to the right trunk arm


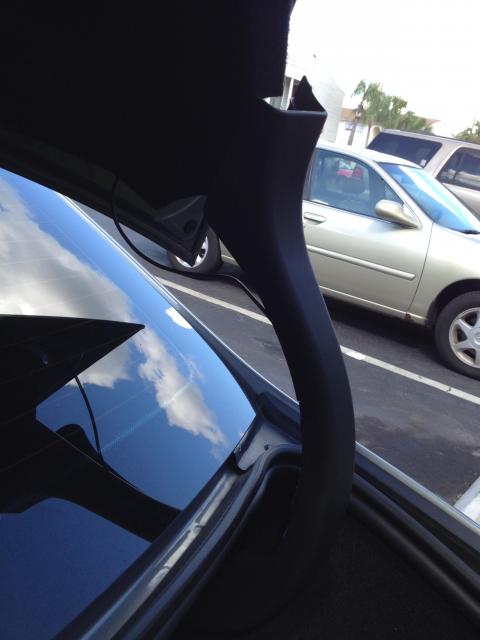
4b. Run the wiring alongside the trunk arm. Make sure you have plenty of slack for the trunk movement

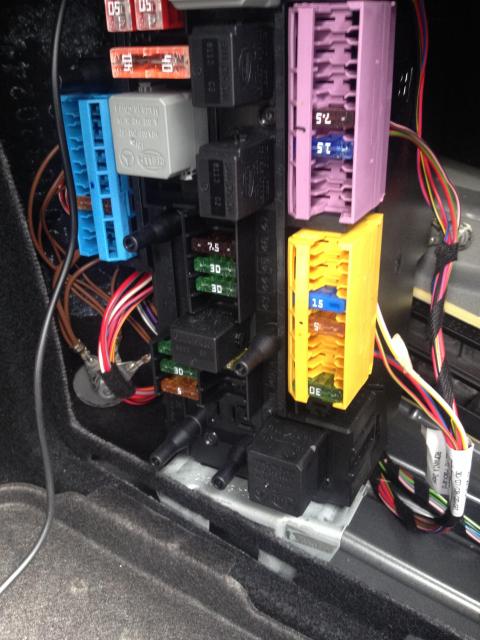
Now onto the wiring. I'll be using the fuse panel in the trunk.
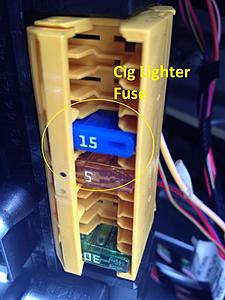
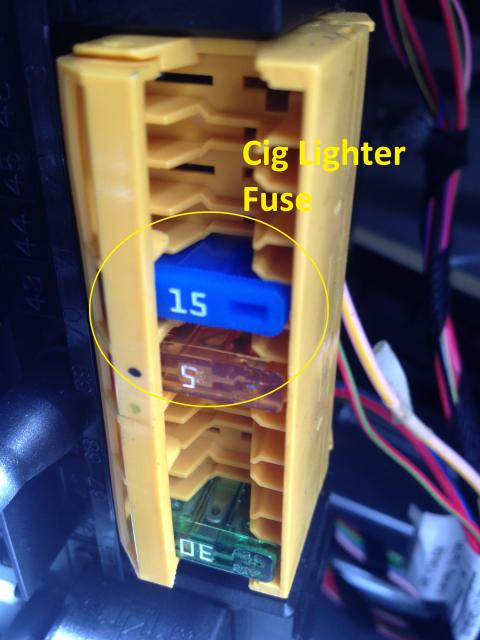
5a. Locate the cigarette lighter fuse (#70 I believe, blue 15A fuse. Strip the open ends of the transmitter to expose the wires. Remove the fuse and wrap the red wire around the fuse, then put the fuse back in.
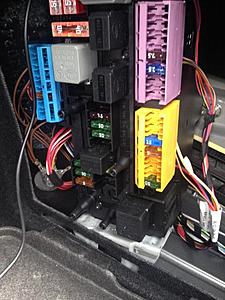
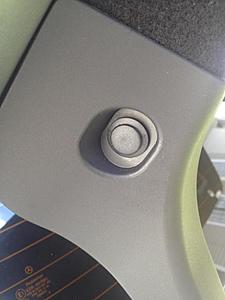
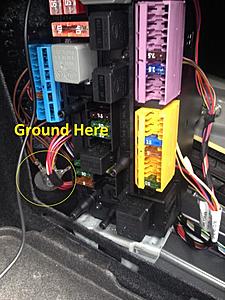
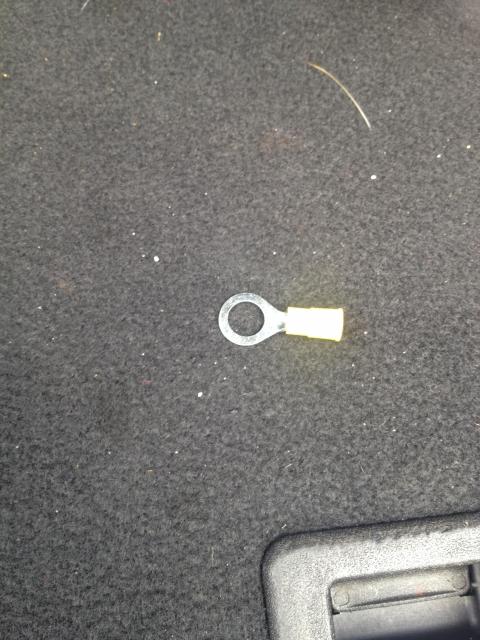
5b. Attach the black wire to the ground as shown:
Crimp this to the end of the black wire:

...and install here:
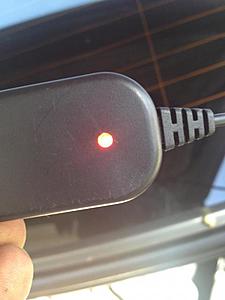
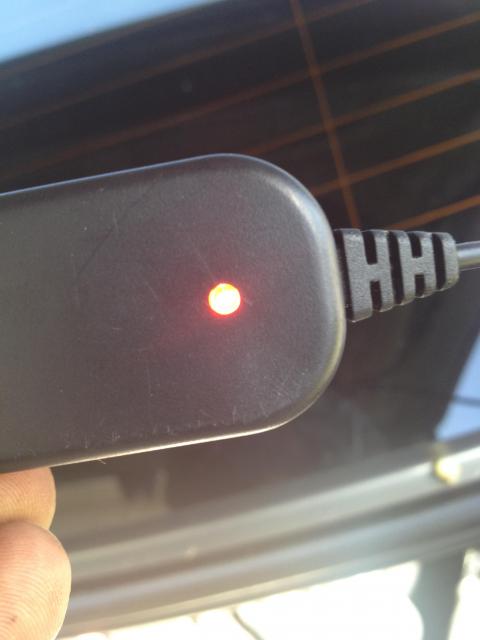
And you're done! The reason why I chose the cig lighter fuse is because that fuse only receives power when the car is started. That way it won't be on continuously when the car is parked. To test if it work, just out the key in ACC mode and look for the red light on the transmitter.
So now, just go in reverse to put everything back together!
I've done it before on my GLK350 so everything was relatively easy and straightforward. And the method I used is SUPER easy with NO cutting or running wires around!
So let's jump right into it:
1. You will need a rear backup cam (make sure it's CMOS) I used a cheap chinese e-bay cam but any will do. Just make sure the clips are able to fit on the W204
2. Next, you will need and Fakra to RCA right angle adapter (VERY IMPORTANT). You will see why later on in the tutorial. Other write-ups would have you using a fakra connector and a rca cable, and cutting the ends on both, splicing them together to make this cable. You don't need to do that! You can just get the cable the way it is.

3. You will need a 2.4G Wireless RCA Video Transmitter & Receiver for Car Rearview Camera Monitor. This particular transmitter will eliminate the need to rip up your carpets and go through the hassle of running the wires from the trunk all the way to your headunit. (you'll thank me later!)
From here, you can start either from the truck or from the headunit, it doesn't matter. I started from the trunk.
FROM THE TRUNK
1a. Remove these torx screws located here:

1b. Then remove all the plastic pop-up plug thingys from around the trunk liner. They look like these:
1c. Once those are off, you can disconnect the trunk release wire and set the trunk liner aside

1d. Theres two more torx screws you have to remove thats underneath. Space is tight so it'll be a little tricky. Sorry, I couldn't get a clear shot!
The end result:
2. The cam will be installed where the right license plate light is. Pop that light off but DO NOT cut or remove it. If you do you'll get an error message on your dash screen. I tuck my light behind the trunk liner as I was putting back on
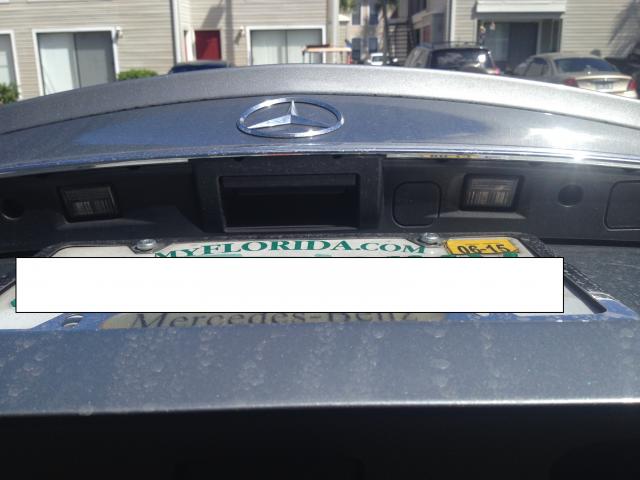
3. Install the cam in that spot and it will snap in place. The cam I bought had a small tab that would clear the opening so I had to cut a small slit so the tab can fit
The cam installed
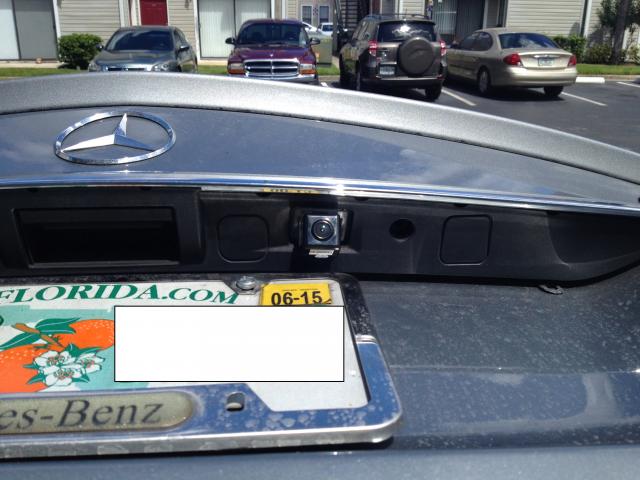
...and a view from the back

4a. To install the transmitter, use dome double-sided mounting tape and mount the transmitter onto the metal portion of your trunk. Try to make it close to the right trunk arm

4b. Run the wiring alongside the trunk arm. Make sure you have plenty of slack for the trunk movement
Now onto the wiring. I'll be using the fuse panel in the trunk.
5a. Locate the cigarette lighter fuse (#70 I believe, blue 15A fuse. Strip the open ends of the transmitter to expose the wires. Remove the fuse and wrap the red wire around the fuse, then put the fuse back in.
5b. Attach the black wire to the ground as shown:
Crimp this to the end of the black wire:
...and install here:

And you're done! The reason why I chose the cig lighter fuse is because that fuse only receives power when the car is started. That way it won't be on continuously when the car is parked. To test if it work, just out the key in ACC mode and look for the red light on the transmitter.
So now, just go in reverse to put everything back together!
 09-28-2014, 07:05 PM
#2
Junior Member
Thread Starter
Join Date: Dec 2012
Posts: 22
Likes: 0
Received 0 Likes
on
0 Posts
2010 Glk350
FROM THE HEADUNIT
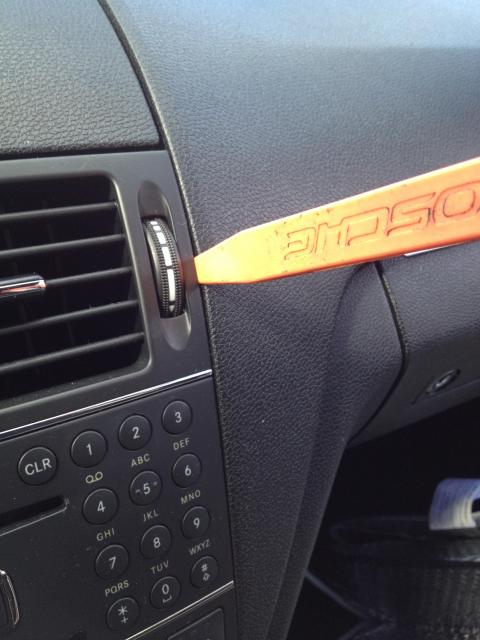
1. Use a plastic wedge and CAREFULLY pry along the edges to remove the AC vents and headunit. Also remove the wires connecting to the AC vents.


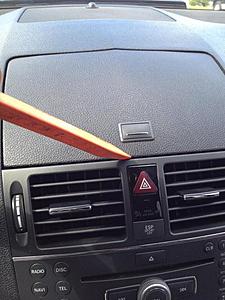
Removing the wires connecting to the AC vents

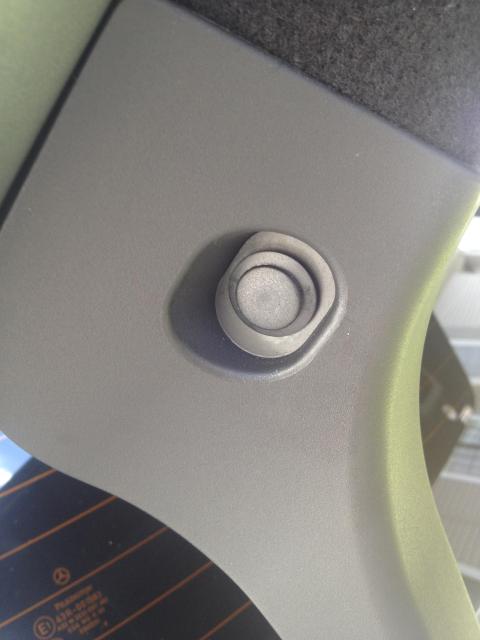
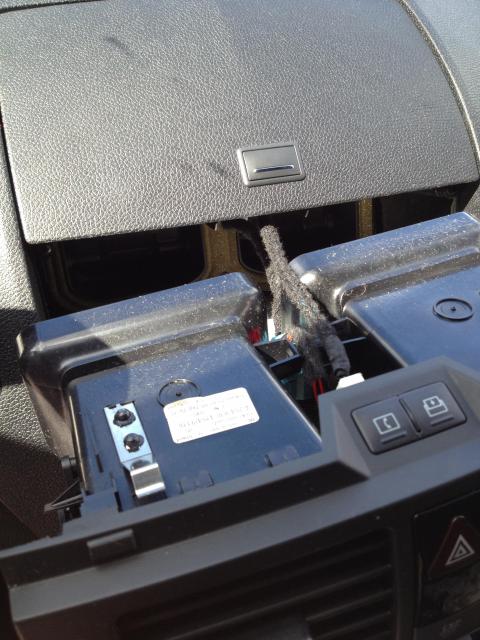
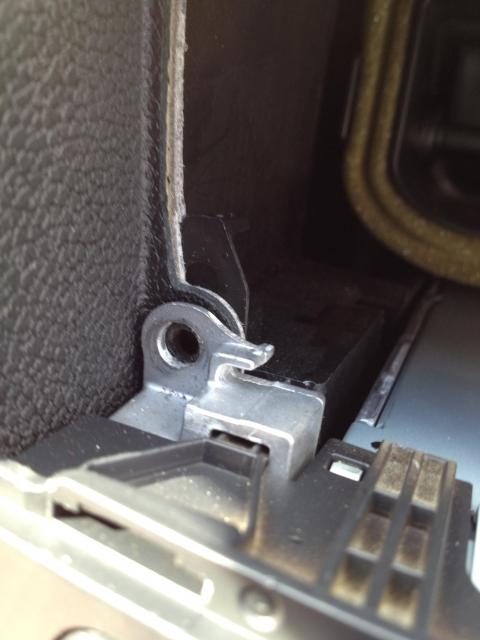
2. Remove the 2 torx screws connecting to the headunit. Then lift up the 2 plastic tabs.
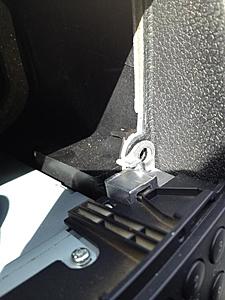
Plastic tab
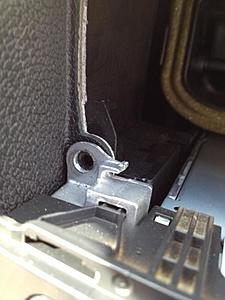
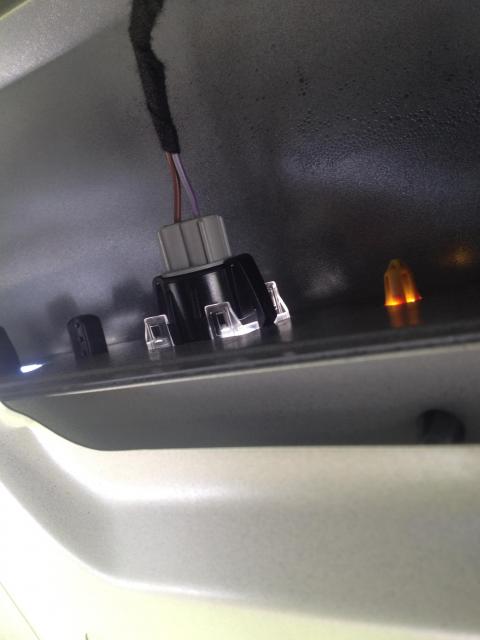
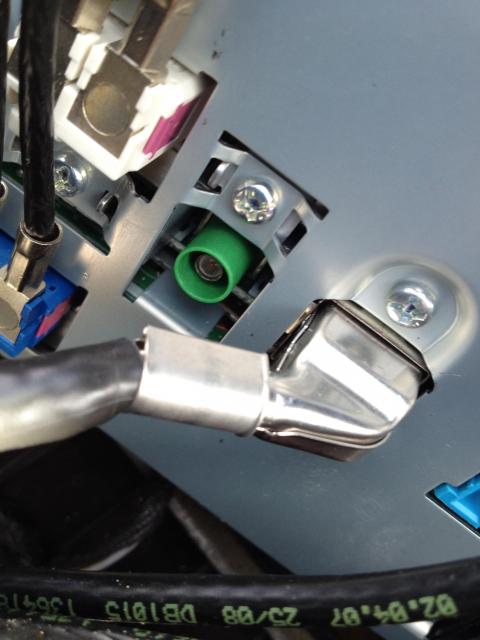
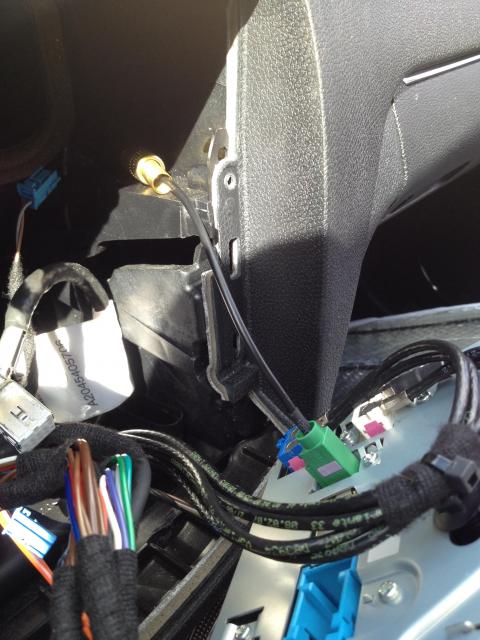
3a. Remove the headunit and locate the green port on the back. Thanks where you will plug in your fakra cable. You'll notice the antennae cable is directly above it. This is why it's important to have the right angle adapter; a straight one would not clear.
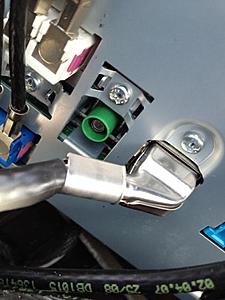

3b. Connect the transmitter to the end of the fakra adapter
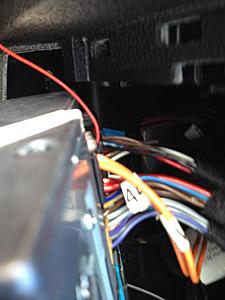
4b. On the back on the headunit where all the cables meet in that haeness there's a fuse. Thats where I draw my power. Remove the fuse, wrap the red wire of the transmitter around that fuse lead and reinsert the fuse.
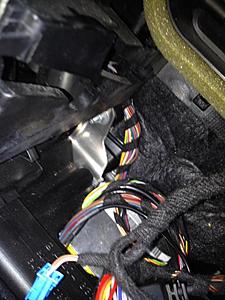
4b. For the ground, I used one of the screws on the headunit. I just loosen up the screw, wrap the ground wire around it and retighten (sorry, don't have a pic of this)
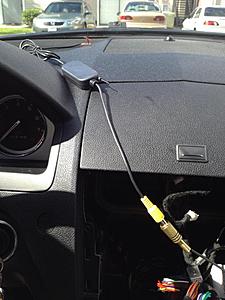
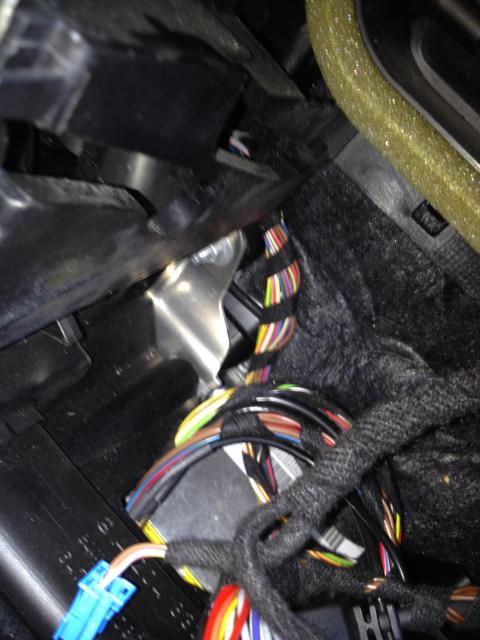
5. Tuck the transmitter and excess wires in the space behind where the headunit rests. Once that's all done, you can put everything back together. Make sure ir works buy looking for the red light on the transmitter
Put everything back together and you're all done. The rest is done in engineering mode
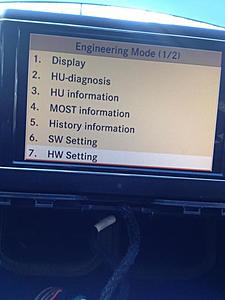
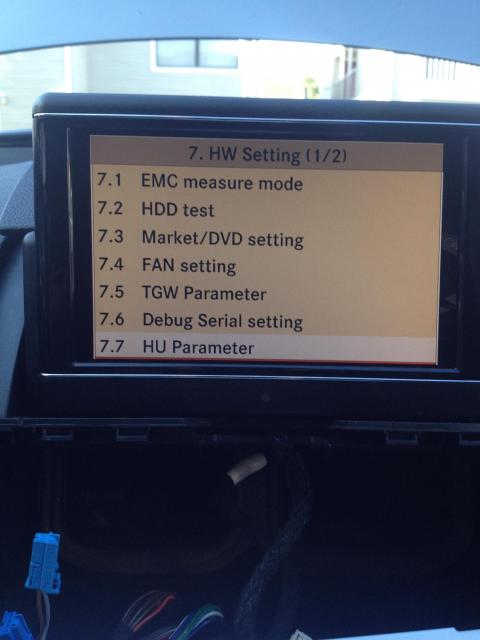
Enter engineering mode by pressing and holding HANG UP, 1, and # at the same time for 5 seconds.
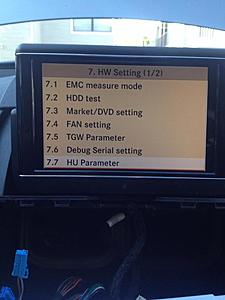
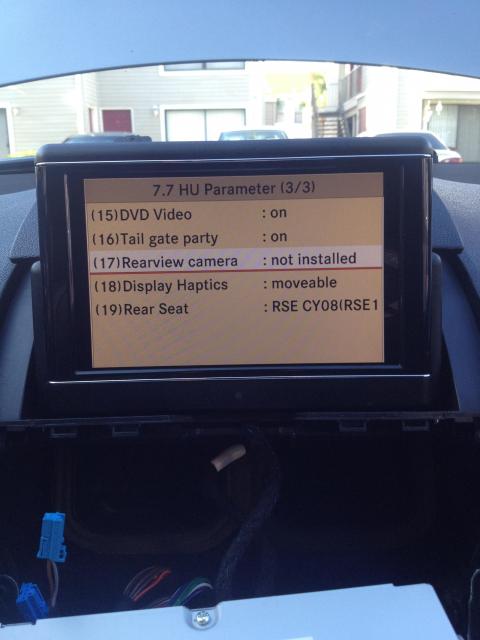
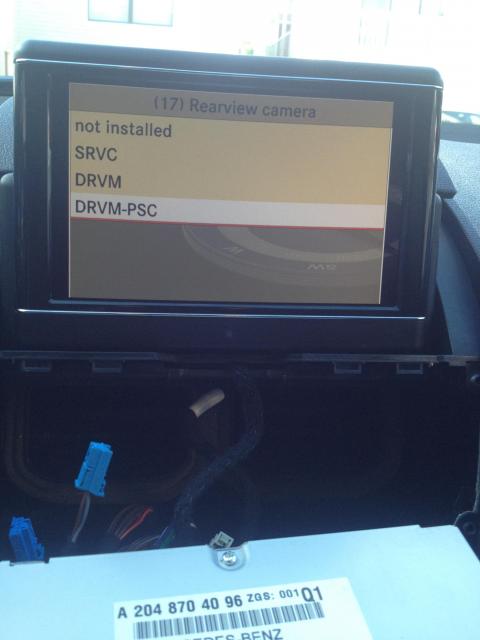
Then goto HW Setting > HU Parameter then scroll to page 3 and select Rearview Camera. Choose SRVC and exit engineering mode. Shut off the car and then restart it; put it in reverse and you should be good to go!


Backup cam
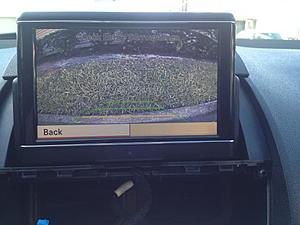
Notice that you did not to cut any existing wires or run any wiring at all throught your car. The rear transmitter sends the video signal to the front transmitter and displays it on your headunit.
1. Use a plastic wedge and CAREFULLY pry along the edges to remove the AC vents and headunit. Also remove the wires connecting to the AC vents.


Removing the wires connecting to the AC vents
2. Remove the 2 torx screws connecting to the headunit. Then lift up the 2 plastic tabs.

Plastic tab
3a. Remove the headunit and locate the green port on the back. Thanks where you will plug in your fakra cable. You'll notice the antennae cable is directly above it. This is why it's important to have the right angle adapter; a straight one would not clear.
3b. Connect the transmitter to the end of the fakra adapter

4b. On the back on the headunit where all the cables meet in that haeness there's a fuse. Thats where I draw my power. Remove the fuse, wrap the red wire of the transmitter around that fuse lead and reinsert the fuse.

4b. For the ground, I used one of the screws on the headunit. I just loosen up the screw, wrap the ground wire around it and retighten (sorry, don't have a pic of this)
5. Tuck the transmitter and excess wires in the space behind where the headunit rests. Once that's all done, you can put everything back together. Make sure ir works buy looking for the red light on the transmitter
Put everything back together and you're all done. The rest is done in engineering mode
Enter engineering mode by pressing and holding HANG UP, 1, and # at the same time for 5 seconds.
Then goto HW Setting > HU Parameter then scroll to page 3 and select Rearview Camera. Choose SRVC and exit engineering mode. Shut off the car and then restart it; put it in reverse and you should be good to go!

Backup cam

Notice that you did not to cut any existing wires or run any wiring at all throught your car. The rear transmitter sends the video signal to the front transmitter and displays it on your headunit.
Last edited by rgray80; 09-28-2014 at 07:08 PM.

 09-28-2014, 07:49 PM
#4
Out Of Control!!
Join Date: Jun 2004
Posts: 11,986
Received 2,144 Likes
on
1,502 Posts
2014 E63S; AMS 100 octane ecu tune; edok tcu tune; BB intakes; dyno tuned
Dude... Very impressive!!!!
09-28-2014, 08:12 PM
#6
Member

Join Date: Oct 2009
Location: Greensboro, NC
Posts: 90
Likes: 0
Received 1 Like
on
1 Post
2014 C63 AMG 507 sedan
Thank you for this excellent DIY, great idea wit the transmitter system. I'm still looking for a complete DIY for FL 2012+ models.
Again, thanks for sharing.
Again, thanks for sharing.
11-04-2014, 06:51 PM
#7
Thank you for this. I did this to my C63 this week. I had a hard time finding a right angle Fakra adapter with a female RCA end so I ended up buying one with a male RCA end. Then I used a female to female RCA coupler to connect to the wireless transmitter.
My only issue is that the fuse on the back of the head unit I am using as a power source for the wireless transmitter (the one shown here in the writeup) seems to be powered with the key not in the ignition. The light was still on the transmitter the whole time I was putting everything back in the dash and the key wasn't in the ignition. I might find a different source so it doesn't slowly drain the battery if that's the case.
My only issue is that the fuse on the back of the head unit I am using as a power source for the wireless transmitter (the one shown here in the writeup) seems to be powered with the key not in the ignition. The light was still on the transmitter the whole time I was putting everything back in the dash and the key wasn't in the ignition. I might find a different source so it doesn't slowly drain the battery if that's the case.
Trending Topics
11-05-2014, 07:22 PM
#9
Super Member

hi RGRAY80
great write up thanks i got quoted $1500.00 by a radio shop to fit rev. camera.
with your set up do you get grid lines & a clear pic. thanks.
great write up thanks i got quoted $1500.00 by a radio shop to fit rev. camera.
with your set up do you get grid lines & a clear pic. thanks.
11-06-2014, 10:55 PM
#10
Senior Member

This is great. I was just thinking how nice it would be to have a backup camera on my car. Will have to to this. Any links to where you got all the parts? Also, any delay in screen activation after you put car into reverse?
11-07-2014, 07:59 AM
#11
I got all the parts off ebay. The camera was around $20, the transmitters were $15 and the Fakra cable was $7. It takes less than a second once the car is in reverse for the screen to come up.
11-07-2014, 08:12 AM
#12
Super Member
i am in australia could please send me the links to the parts you purc. thanks.
regards
george
11-07-2014, 08:17 AM
#13
Super Member
if you are happy with the result let us know how the install went thanks
11-07-2014, 09:12 AM
#14
Camera: http://www.ebay.com/itm/271314780918?_trksid=p2060778.m2749.l2649&ssPageName=STRK%3AMEBIDX%3AIT
Transmitter: http://www.ebay.com/itm/390858171757?_trksid=p2060778.m2749.l2649&ssPageName=STRK%3AMEBIDX%3AIT
Cable: http://www.ebay.com/itm/380745054003?_trksid=p2060778.m2749.l2649&ssPageName=STRK%3AMEBIDX%3AIT
Female to female coupler used to connect the cable to the transmitter on the back of the head unit: http://www.ebay.com/itm/111473009563?_trksid=p2060778.m2749.l2649&ssPageName=STRK%3AMEBIDX%3AIT
 . Will tackle this sometime before December.
 11-13-2014, 06:10 AM
#20
Well, I was getting a lot of interference with the wireless setup, so I ran the wire that came with the camera through the car to the head unit. If anyone wants the wireless transmitters I will give them to you if you pay the shipping.
11-13-2014, 01:18 PM
#21
Junior Member

Good night.
Thank you for sharing your work.
Briefly we have to buy a camera and a cable Reverse Antenna Adapter. Assemble everything and connect the RCA cable to cable Reverse Antenna Adapter, where the reverse cable will connect the green plug from the Command APS and radio in order to activate the camera. right?
11-18-2014, 04:53 PM
#24
Just an update. Since I ditched the wireless receivers and ran the wire that came from the camera from the trunk to the Command head unit, the camera has been perfect. No more distorted picture. The resolution is surprisingly good, even at night, for a $20 camera. There are numerous writeups on how to run the cable through the interior on the forums, but if anyone wants tips, I can help.
11-18-2014, 06:35 PM
#25
Senior Member
I got almost everything for this already and just waiting for one more. My weekends are busy till December, so won't be able to get to it till then. Think I will go with the wire just to be safe as well.


