

Best way to handle this road-rash scratch?
 05-30-2017, 07:38 PM
#26
Super Member
Thread Starter

Go to MB if you don't have the correct touch up paint and grab a paint correction set for your specific paint, you can scout around online if you want a cheaper option. Sometimes they'll even do the touch ups for you if you buy the paint from the MB dealership. If you're doing it yourself, shotgun a couple beers, watch a couple videos and then apply the paint, let it dry for a day, wax and buff the car following and call it.
Jim G
 05-30-2017, 07:46 PM
#27
Junior Member

Join Date: Nov 2016
Location: NY/NJ
Posts: 37
Received 0 Likes
on
0 Posts
C63 AMG EDITION 1, CLA45 AMG STAGE 3
I got a couple knicks and a scratch on my 2016 CLA45 and when I brought it in for some routine service (all included for free under warranty) I purchased paint and asked if they could do the touchups for me, they did them decently and then cleaned the car all for free. I haven't tried it on my C63 though.
05-30-2017, 07:51 PM
#28
Super Member
Thread Starter
I got a couple knicks and a scratch on my 2016 CLA45 and when I brought it in for some routine service (all included for free under warranty) I purchased paint and asked if they could do the touchups for me, they did them decently and then cleaned the car all for free. I haven't tried it on my C63 though.
Jim G
05-30-2017, 10:43 PM
#29
MBWorld Fanatic!
05-30-2017, 11:15 PM
#30
MBWorld Fanatic!
Originally Posted by JimGnitecki
Thanks, Maximus. I like the minimalist approach you describe, which would avoid the undesirable "enlargement" of the scratch that results from trying to "cover" it versus "filling" it. Do I hold the toothpick mostly vertically or do I hold it somewhat at a reduced vertical angle from horizontal so that I can better prevent a "blob"?
The Google instructions I found, after I filtered out the ridiculous "sand it first" instructions (and thus enlarge it which seems counterproductive) mention the toothpick method, but don't realyl describe the actual technique. I realize the goal is to clean the scratch of wax and other contaminants, and then FILL the scratch, but the key appears to be controlling how fast and how much paint you let flow into the scratch.
Jim G
05-31-2017, 12:19 AM
#31
Member
Thanks, Maximus. I like the minimalist approach you describe, which would avoid the undesirable "enlargement" of the scratch that results from trying to "cover" it versus "filling" it. Do I hold the toothpick mostly vertically or do I hold it somewhat at a reduced vertical angle from horizontal so that I can better prevent a "blob"?
The Google instructions I found, after I filtered out the ridiculous "sand it first" instructions (and thus enlarge it which seems counterproductive) mention the toothpick method, but don't realyl describe the actual technique. I realize the goal is to clean the scratch of wax and other contaminants, and then FILL the scratch, but the key appears to be controlling how fast and how much paint you let flow into the scratch.
Jim G
The Google instructions I found, after I filtered out the ridiculous "sand it first" instructions (and thus enlarge it which seems counterproductive) mention the toothpick method, but don't realyl describe the actual technique. I realize the goal is to clean the scratch of wax and other contaminants, and then FILL the scratch, but the key appears to be controlling how fast and how much paint you let flow into the scratch.
Jim G
05-31-2017, 01:13 AM
#32
Super Member
Thread Starter
Only put a little paint on the toothpick, not a glob. The capillary action will pull the paint from the toothpick into the scratch and fill it. You need patience, though, as it takes multiple coats. It is like when you fill in wood floor scratches with a sharpie marker, with a dab dab motion versus strokes. Also, you can always wipe the paint off with some alcohol before it dries if you mess up. Hope that helps.
Jim G
05-31-2017, 01:14 AM
#33
Super Member
Thread Starter
Buy the kit from Dr Colorchip. I found that their product is better than the paint from the dealer and this comes in a kit that allows you to actually use more paint then you need to fill it and then they provide a solution to wipe off the excess. You can Google their videos and it tells you how to use their kits.
Jim G
05-31-2017, 01:38 AM
#34
MBWorld Fanatic!
Join Date: Jul 2003
Location: Western Canada
Posts: 1,683
Likes: 0
Received 26 Likes
on
18 Posts
2013 C63 AMG P31, 2014 GMC Sierra (6.2)
Buy the kit from Dr Colorchip. I found that their product is better than the paint from the dealer and this comes in a kit that allows you to actually use more paint then you need to fill it and then they provide a solution to wipe off the excess. You can Google their videos and it tells you how to use their kits.
05-31-2017, 02:35 AM
#35
MBWorld Fanatic!
Originally Posted by wawy
+1 for Dr Colorchip. Have used it on a few occasions with several different vehicles...
06-14-2017, 11:31 PM
#39
Super Member
Thread Starter
I mentioned the scratch to a salesperson at the local MB dealership, and he brought over a gal that had until recently worked at their detail shop. she told me it was too deep for a non-pro to handle (must have been a BIG stone that got kicked up), but said that she thought their detail shop could handle it for little or no cost, as it takes mainly experience versus time.
The service writer made an appointment for me with the detail shop, and the shop worked on it for a couple of hours, and then brought the car back to me, and told me that they had managed to fill and dry the scratch with multiple layers of paint, that it still looked unacceptable but that i needed to simply wait a week and then bring it back for the final touches.
i did so today, and they took it for another 1-1/2 hours, and then returned it to me, telling me they had done the best that could be done without refinishing the entire door which would be ridiculous.
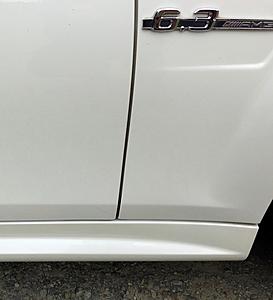
Here is how it looks now:
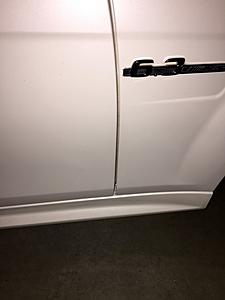
Barely discernible unless you REaLLY "look for it".
When i found a suitable outdoor location where the combination of sunlight and viewing angle was just right (worst), it shows, but only when you know to look that low and have just the right lighting and angle:
i am satisfied!
I asked how much for the repair, and was told that the dealership appreciates my business and simply looks forward to helping me keep my car looking good and running well. i told them i appreciate the skill and effort they expended on the repair, and really expected to pay for it, but the service writer insisted on it being no charge.
I certainly appreciate my dealership even more now.
Jim G
The service writer made an appointment for me with the detail shop, and the shop worked on it for a couple of hours, and then brought the car back to me, and told me that they had managed to fill and dry the scratch with multiple layers of paint, that it still looked unacceptable but that i needed to simply wait a week and then bring it back for the final touches.
i did so today, and they took it for another 1-1/2 hours, and then returned it to me, telling me they had done the best that could be done without refinishing the entire door which would be ridiculous.
Here is how it looks now:

Barely discernible unless you REaLLY "look for it".
When i found a suitable outdoor location where the combination of sunlight and viewing angle was just right (worst), it shows, but only when you know to look that low and have just the right lighting and angle:

i am satisfied!
I asked how much for the repair, and was told that the dealership appreciates my business and simply looks forward to helping me keep my car looking good and running well. i told them i appreciate the skill and effort they expended on the repair, and really expected to pay for it, but the service writer insisted on it being no charge.
I certainly appreciate my dealership even more now.
Jim G
Last edited by JimGnitecki; 06-15-2017 at 09:52 AM.
06-14-2017, 11:47 PM
#40
Super Member

Wow, this is amazing. I looked for it and still couldn't find it. They did a good job. And it was free? From the dealership?? Lucky day, Jim!
06-15-2017, 11:57 PM
#42
MBWorld Fanatic!

Daub the paint gently into the scratch to fill it. You will never see it unless you want to be really **** about it and complain that when within 6 inches of it you can see it.
A fine brush does not work as well as making a paper dauber. If you are unsure and in Nanaimo go see Ralph Lemmon at Mid-Island Collision and tell him I sent you to learn how he does it. I learned from him.
As a side note my CLA45 AMG was white and I had no touch up paint but some white enamel house trim paint was almost a dead match.
06-15-2017, 11:59 PM
#43
MBWorld Fanatic!
Lots of patience if you're doing it yourself. That's #1. However, that being said, if it was my car I would either A) ignore it or B) take it to a pro and spend money to have it done the right way. (Like actually spraying it but just a super small section right there)
A 10 minute fiddle will do it if done right without over complicating it.
06-16-2017, 12:08 AM
#44
Super Member
Thread Starter
Get a piece of paper towel and roll it into a tight pointed shape to form a cone with a tip. You want to get it really tight. Clean the area around the scratch, dab some paint from the tub on the tip using the brush in the tube.
Daub the paint gently into the scratch to fill it. You will never see it unless you want to be really **** about it and complain that when within 6 inches of it you can see it.
A fine brush does not work as well as making a paper dauber. If you are unsure and in Nanaimo go see Ralph Lemmon at Mid-Island Collision and tell him I sent you to learn how he does it. I learned from him.
As a side note my CLA45 AMG was white and I had no touch up paint but some white enamel house trim paint was almost a dead match.
Jim G
06-16-2017, 12:42 AM
#45
MBWorld Fanatic!
My paint is the "pearl" white which they told me complicates an amateur doing a decent repair. From what I recall about pearl paints from model car building, they contain reflective pieces whose orientation becomes "wrong" when multiple coats are applied with insufficient skill.
Jim G
Jim G
06-16-2017, 09:16 AM
#46
MBWorld Fanatic!
My paint is the "pearl" white which they told me complicates an amateur doing a decent repair. From what I recall about pearl paints from model car building, they contain reflective pieces whose orientation becomes "wrong" when multiple coats are applied with insufficient skill.
Jim G
Jim G
06-16-2017, 10:24 AM
#47
Super Member
Thread Starter
06-16-2017, 10:41 AM
#48
MBWorld Fanatic!
Join Date: Jun 2008
Location: Los Angeles
Posts: 8,061
Received 2,842 Likes
on
1,677 Posts
2012 P31 C63 Coupe Trackrat, 2019 GLE63S Coupe Beast
Holy ****ing ****. All this dumb****ery for a 1" superficial scratch under the car where nobody will ever see it. 


