


CL-Class (W215) Door soft close mechanism repair

Thread Starter
Member
Joined: Apr 2011
Posts: 130
Likes: 53
From: NC
'15 GLK350, '05 CL65 AMG, '04 C320 4matic
CL-Class (W215) Door soft close mechanism repair
This thread will document the process for removal and repair of the door soft close mechanism. The car used in this example is a 2005 CL65 AMG with keyless go. The procedure should be the same for all W215 models with perhaps minor differences. This photos in this example are of the driver's (left side) door. The process will be the same but mirror image for the opposite door.
There may be other reasons for needing to disassemble the inner door. But let's assume that your soft close feature is not working. You hear a hissing air sound when the door is partially closed and the closer feature should have pulled it the rest of the way closed, but it doesn't move. There is a good chance that the closer mechanism has a broken diaphragm housing. It is plastic and held together with weak small tabs that break off.
Disclaimer:
This is a very difficult and time consuming project in the sense that there is a great deal of disassembly of the inner door required to gain access to the soft closer mechanism. This job is not for the faint of heart or those not confident in their skills. You can damage or break expensive parts! If in doubt after reviewing this thread, best take it to a professional who will be responsible for anything that goes wrong.
Thread Starter
Member
Joined: Apr 2011
Posts: 130
Likes: 53
From: NC
'15 GLK350, '05 CL65 AMG, '04 C320 4matic
Removing the inner door panel
The first and very important step, before removing the inner door panel, is to pre-position the window. Because the window must be removed, it must be at a particular open position so that access to the bolts is possible later in the process. It will not be possible to move the window after the switch assembly has been disconnected.
Step 1) Lower the window until the top edge is approximately 9" from the top of the door.
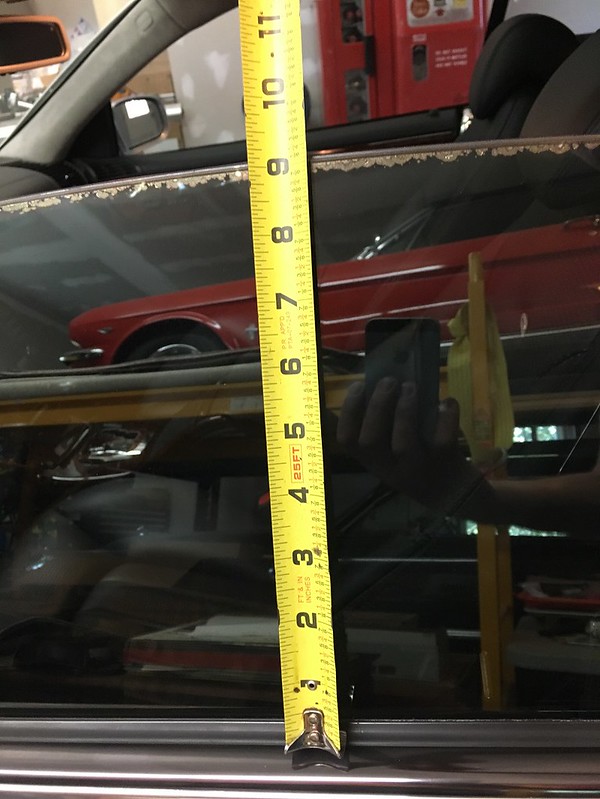
Step 1) Lower the window until the top edge is approximately 9" from the top of the door.
Thread Starter
Member
Joined: Apr 2011
Posts: 130
Likes: 53
From: NC
'15 GLK350, '05 CL65 AMG, '04 C320 4matic
Removing the inner door panel
Step 2) Remove the vent piece at the top front of the door. There is a single philips head screw located inside the vent. Completely remove the screw, then swing the far end of the vent out of the panel. Next slide it forward to release the hook at its rear.
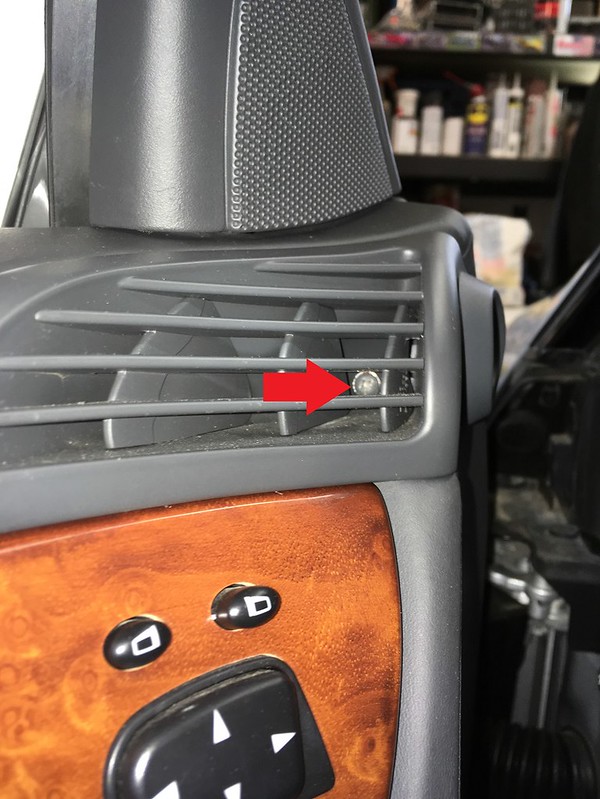
Step 3) There is a sliding latch at the top of the seat switch assembly. Slide the latch rearward to release the top of the switch assembly.
Step 4) Swing the switch assembly down away from the door a bit, then lift upwards to release the hooks at the bottom.
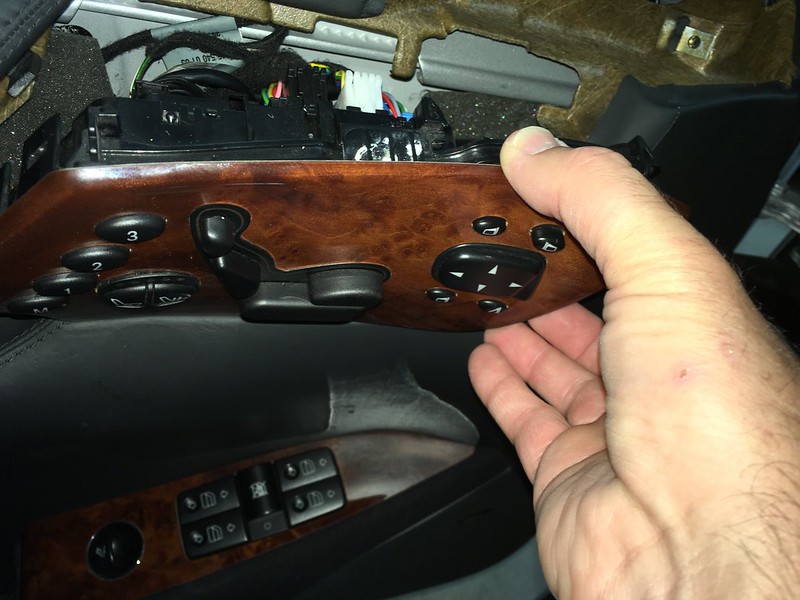
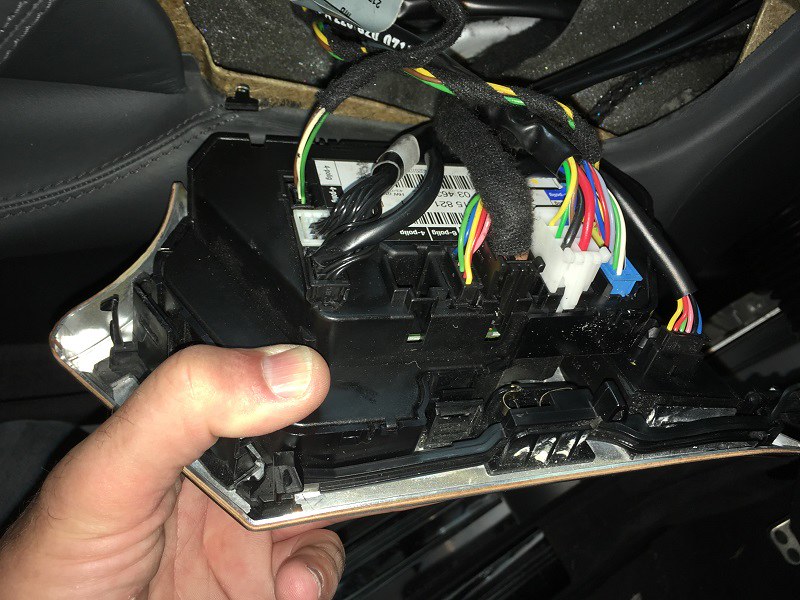
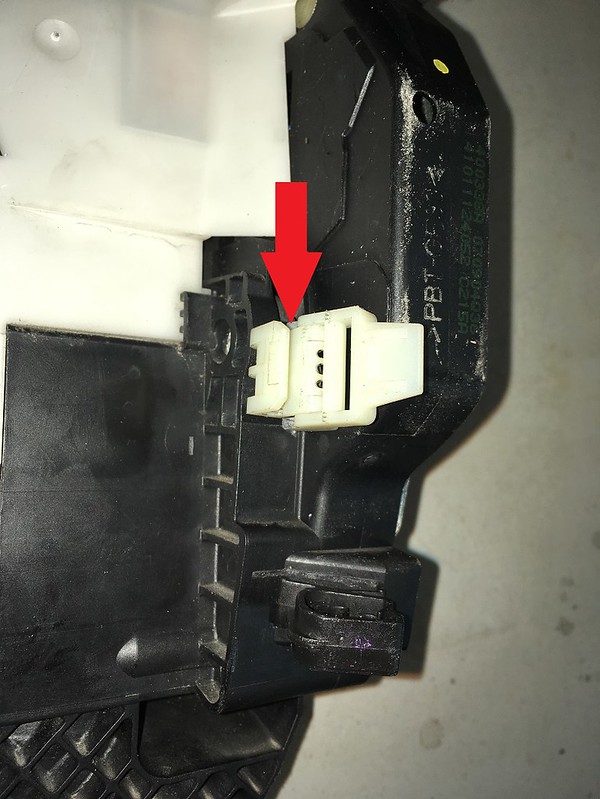
Step 5) Disconnect all wire harnesses from the switch assembly and set it aside somewhere safe from damage.
Step 3) There is a sliding latch at the top of the seat switch assembly. Slide the latch rearward to release the top of the switch assembly.
Step 4) Swing the switch assembly down away from the door a bit, then lift upwards to release the hooks at the bottom.
Step 5) Disconnect all wire harnesses from the switch assembly and set it aside somewhere safe from damage.
Thread Starter
Member
Joined: Apr 2011
Posts: 130
Likes: 53
From: NC
'15 GLK350, '05 CL65 AMG, '04 C320 4matic
Removing the inner door panel
Step 6) Remove the small speaker near the mirror. You should be able to pull this off by hand by pulling it away near the top, then lifting upward to release the hooks at the bottom. If it doesn't pull away by hand, it may be necessary to lever it gently with a soft prying tool. Only pry near the top so that you don't break the tabs near the lower end.
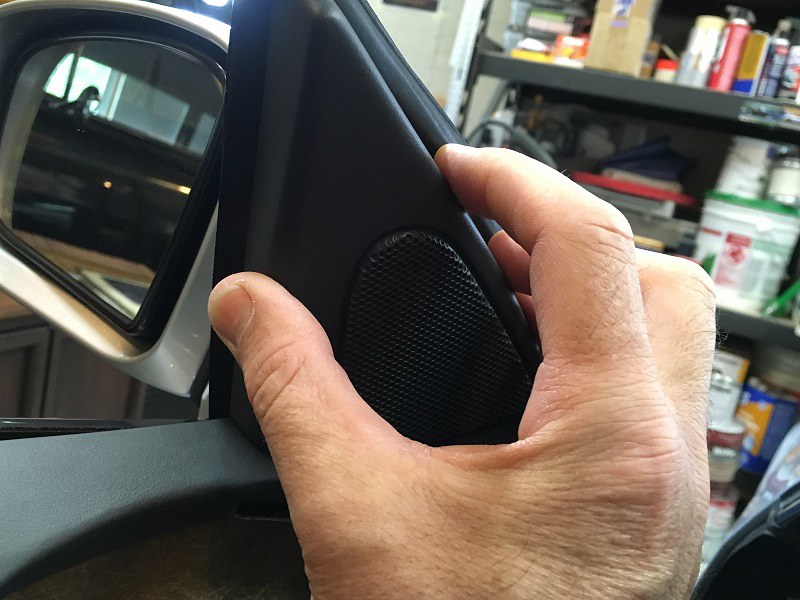
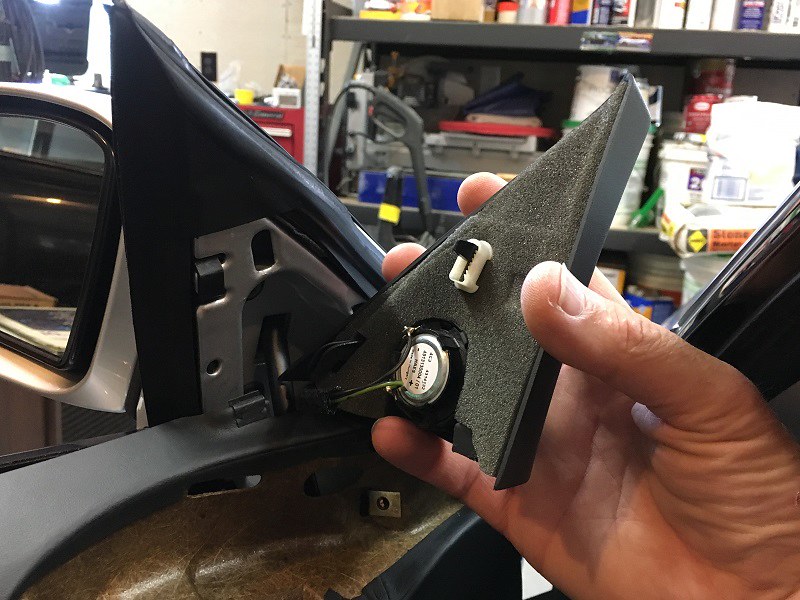
The speaker will remain hanging by its wires. There is enough slack to set it aside, taking care not to pull too hard on the wires.
The speaker will remain hanging by its wires. There is enough slack to set it aside, taking care not to pull too hard on the wires.
Last edited by Geraldius; Jul 19, 2017 at 04:46 PM.
Thread Starter
Member
Joined: Apr 2011
Posts: 130
Likes: 53
From: NC
'15 GLK350, '05 CL65 AMG, '04 C320 4matic
Removing the inner door panel
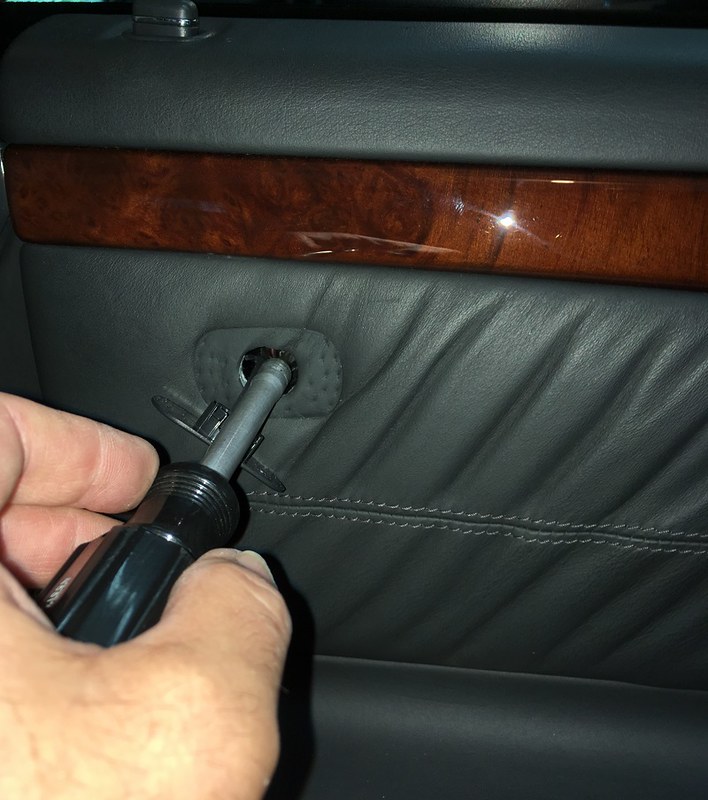
Step 7) Remove the SRS Airbag emblem at the top-rear of the door by pulling outward gently from any edge. It will pop out partially, but is retained by a short tether of plastic. It is not necessary to completely remove it.
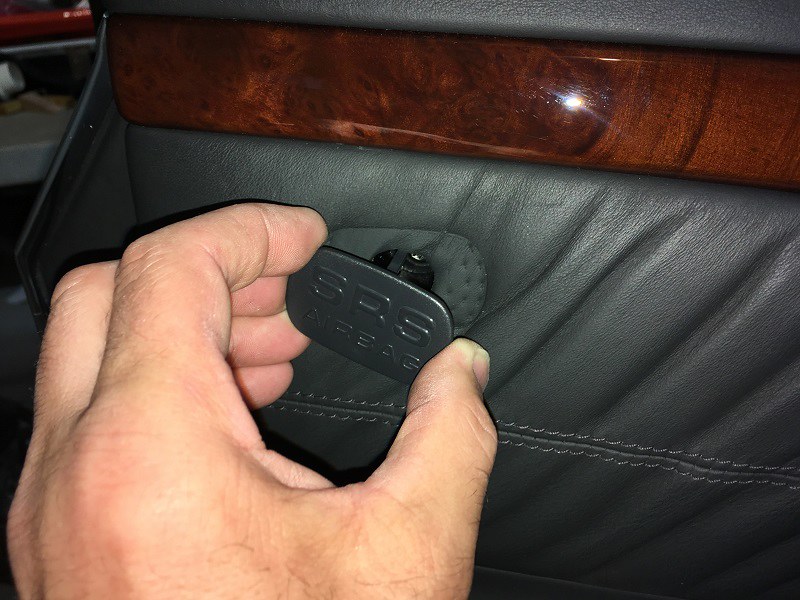
Step 8) Remove the torx screw revealed behind the SRS emblem.
Step 8) Remove the torx screw revealed behind the SRS emblem.
Thread Starter
Member
Joined: Apr 2011
Posts: 130
Likes: 53
From: NC
'15 GLK350, '05 CL65 AMG, '04 C320 4matic
Removing the inner door panel
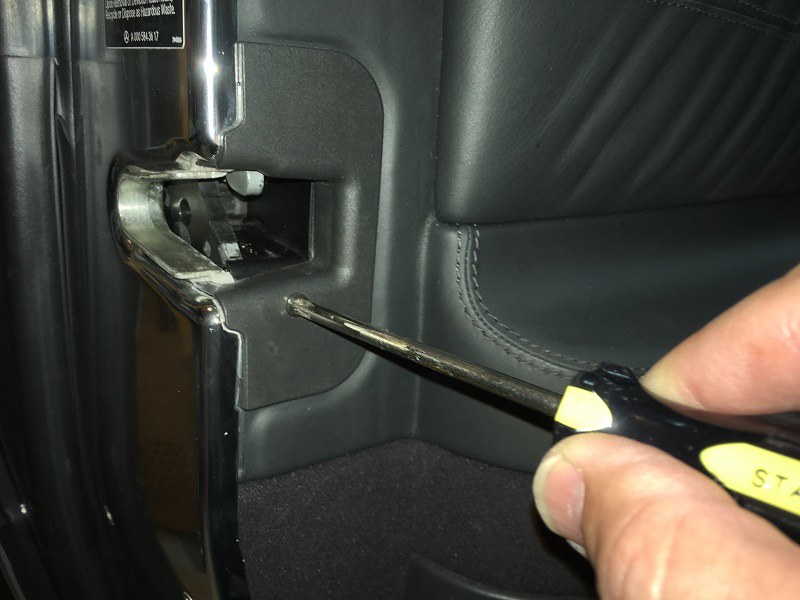
Step 9) Remove the single philips head screw from the plastic trim at the door latch.
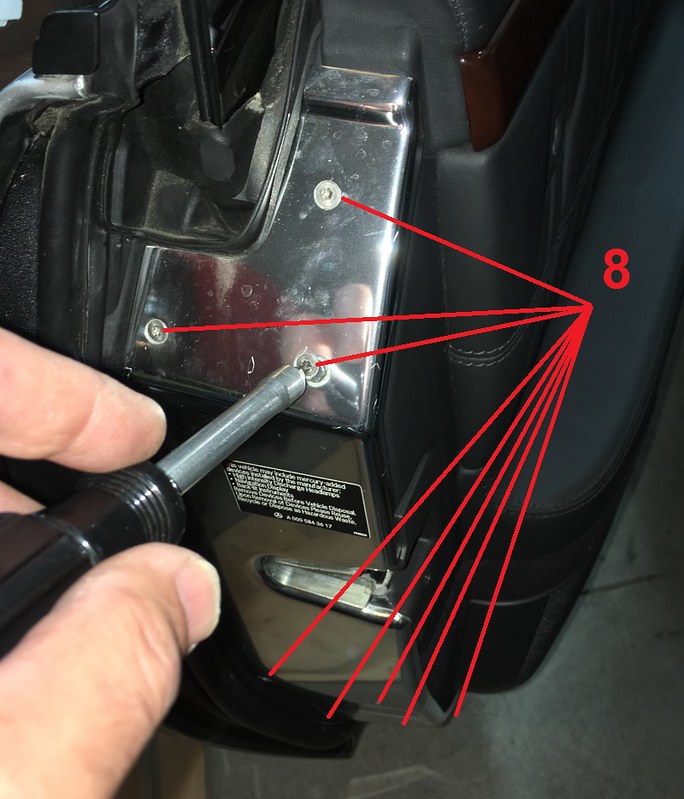
Step 10) Remove the aluminum cover trim at the rear of the door by removing 8 torx screws. The plastic trim piece remains attached to it by clips. Set this aside
Step 10) Remove the aluminum cover trim at the rear of the door by removing 8 torx screws. The plastic trim piece remains attached to it by clips. Set this aside
Thread Starter
Member
Joined: Apr 2011
Posts: 130
Likes: 53
From: NC
'15 GLK350, '05 CL65 AMG, '04 C320 4matic
Removing the inner door panel
Step 11) Now it is time to remove the actual inner door panel. First, the bottom must be pulled away from the door frame. It is held to the door frame by snaps that plug into the door. These are fairly snug and require some force, but they can usually be pulled free by hand. If not, it may require gentle levering with a non-marring prying tool. There are about 6 of them, or so, around the lower edge and lower front edge.
The door panel will not pull away completely until the following steps.
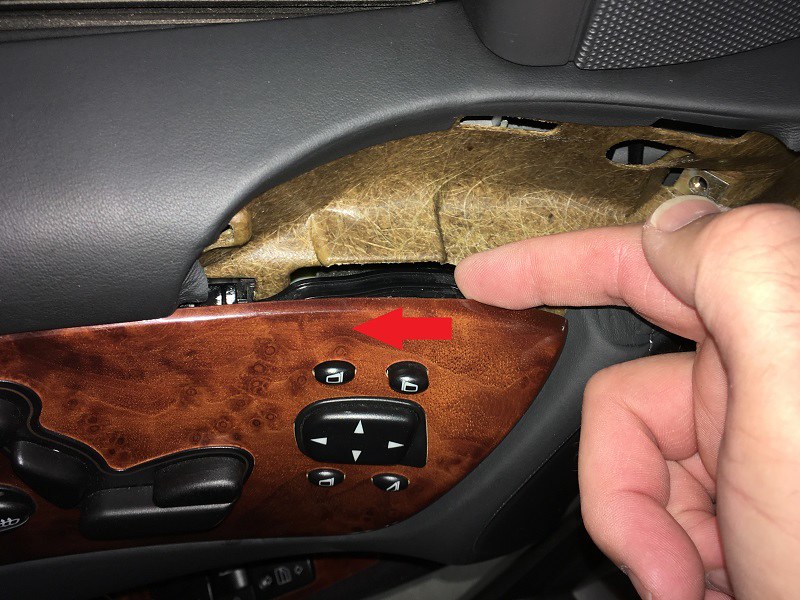
Step 12) There is a hidden, spring-loaded latch inside the door panel near the pull handle. This needs to be released. Reach inside the opening from the removed seat switch assembly, and firmly press the release button as shown in the pictures.
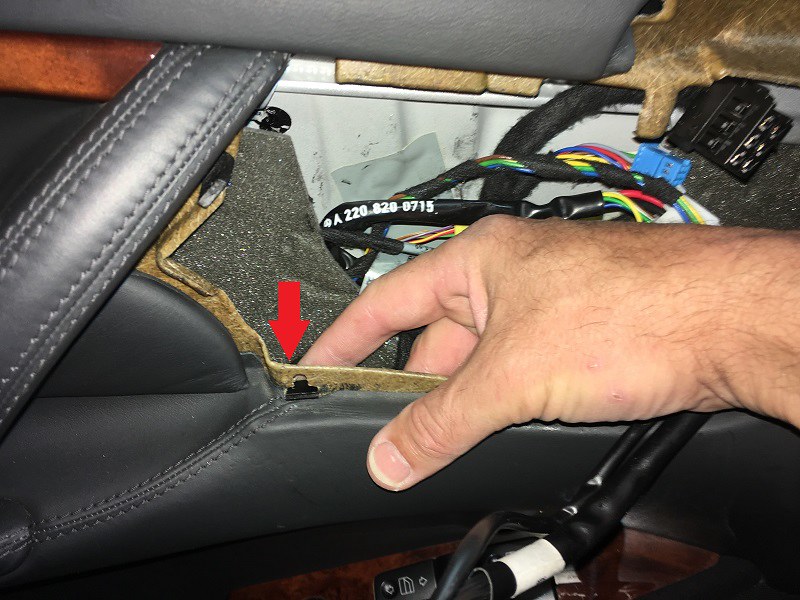
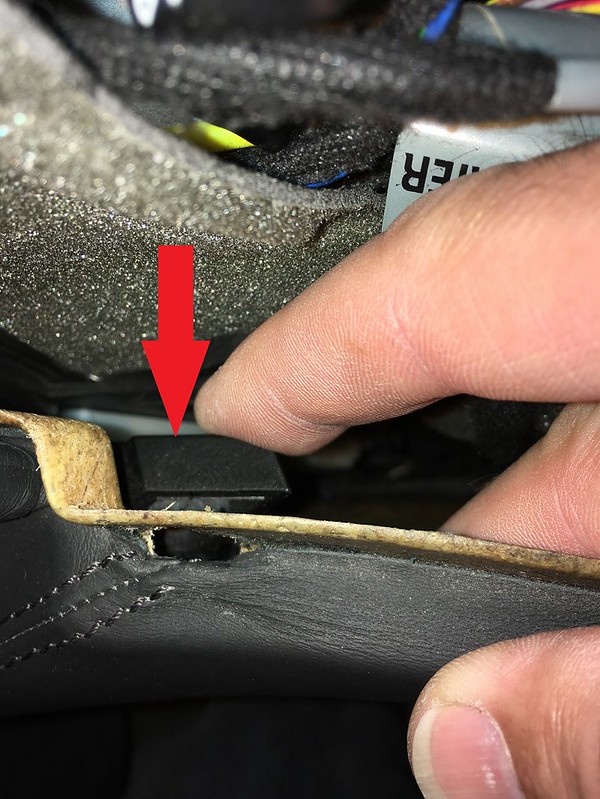
Continue pressing the release button firmly with one hand while pulling the panel away from the door frame at the bottom with the other hand. You will feel it release and the panel will move further away from the door. It will be removed completely in the next steps.
Step 13) The upper portion of the door panel is secured to the door by a vertical flange that fits into a groove in the rubber window trim along its full length. To release the panel, wiggle it fore and aft while lifting upward with steady, firm force. It is fairly tight but should give way a little at a time until it is entirely free.
When the panel lifts clear of the top edge of the door it will be held back by a couple of items that need to be disconnected: the door latch release cable and a wire harness connection.
Step 14) Disconnect the door latch cable by pulling the cable outer sheath rearward, away from its fixture in the door panel. This will take some force to overcome the spring tension in the door latch.
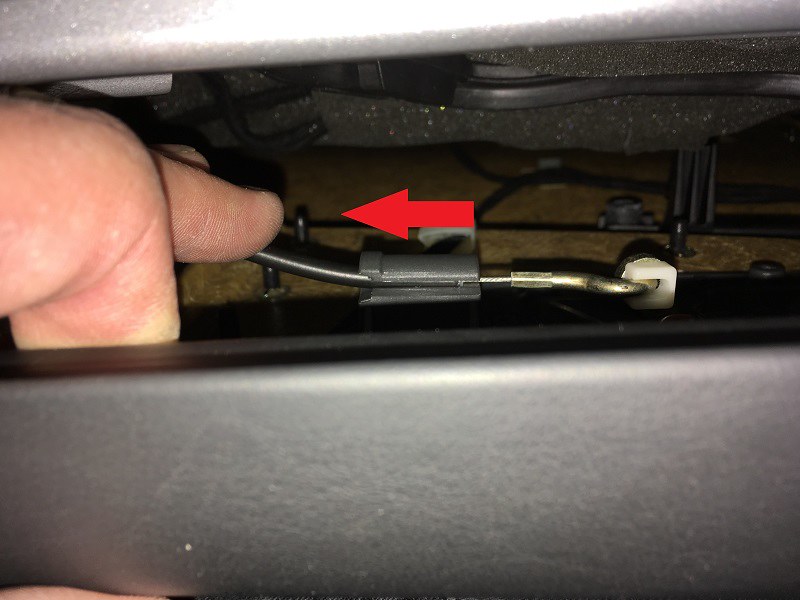
When it is back far enough to clear the fixture, lift it up and out through the slot in the top of the fixture.

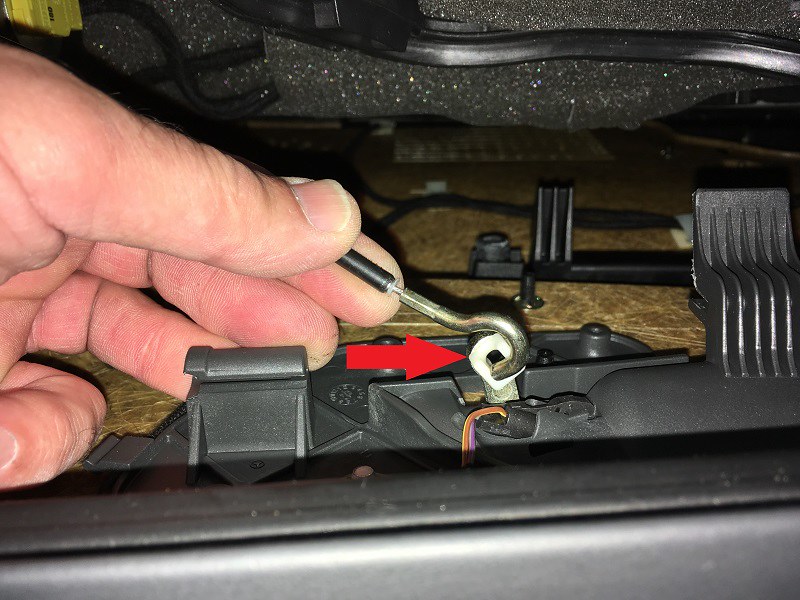
Finally, remove the cable hook from its connection to the door latch hand lever by lifting it up and out.
Step 15) Pulling the door panel away from the door will reveal one last wire harness that needs to be disconnected. Then the panel can be completely removed and set aside.
The door panel will not pull away completely until the following steps.
Step 12) There is a hidden, spring-loaded latch inside the door panel near the pull handle. This needs to be released. Reach inside the opening from the removed seat switch assembly, and firmly press the release button as shown in the pictures.
Continue pressing the release button firmly with one hand while pulling the panel away from the door frame at the bottom with the other hand. You will feel it release and the panel will move further away from the door. It will be removed completely in the next steps.
Step 13) The upper portion of the door panel is secured to the door by a vertical flange that fits into a groove in the rubber window trim along its full length. To release the panel, wiggle it fore and aft while lifting upward with steady, firm force. It is fairly tight but should give way a little at a time until it is entirely free.
When the panel lifts clear of the top edge of the door it will be held back by a couple of items that need to be disconnected: the door latch release cable and a wire harness connection.
Step 14) Disconnect the door latch cable by pulling the cable outer sheath rearward, away from its fixture in the door panel. This will take some force to overcome the spring tension in the door latch.
When it is back far enough to clear the fixture, lift it up and out through the slot in the top of the fixture.
Finally, remove the cable hook from its connection to the door latch hand lever by lifting it up and out.
Step 15) Pulling the door panel away from the door will reveal one last wire harness that needs to be disconnected. Then the panel can be completely removed and set aside.
Trending Topics
Thread Starter
Member
Joined: Apr 2011
Posts: 130
Likes: 53
From: NC
'15 GLK350, '05 CL65 AMG, '04 C320 4matic
Removing inner door components
With the door panel removed it is time to begin removing inner components. Take care not to disturb the airbag. If you are worried, you may want to disconnect the battery if you haven't already.
Step 16) At this time remove the door antenna loop assembly. There are two torx screws at the front, and two snap in plugs at the rear top and bottom.
Remove the door latch cable from its clip at the top of the airbag to get it out of the way.
Disconnect the harness, and set the loop assembly aside.
Last edited by Geraldius; Jul 19, 2017 at 08:19 PM.
MB World Stories
The Best of Mercedes & AMG

New Electric Mercedes-AMG GT 4-Door Coupe Unveiled: 10 Things You Need to Know
Verdad Gallardo
6 Mercedes Models That Did NOT Age Well (But Are Somehow Still Cool)
Verdad Gallardo
Manual Mercedes? 6 Times Sindelfingen Let Drivers Have All The Fun
Verdad Gallardo
Mercedes SLR McLaren 722 S Is Extremely Rare Example Modified by McLaren
Verdad Gallardo
8 Classic Boxy Mercedes Designs That Have Aged Like Fine Wine
Verdad Gallardo
Flawlessly Restored Mercedes 190E Evo II Heads to Auction
Verdad Gallardo
Electric Mercedes C-Class Unveiled: 11 Things You Need to Know
Verdad Gallardo
Mercedes EQS Gets A Major Update: Everything You Need to Know
Verdad Gallardo
5 Underrated Mercedes-Benz Models That Don't Get the Love They Deserve
Verdad Gallardo
Thread Starter
Member
Joined: Apr 2011
Posts: 130
Likes: 53
From: NC
'15 GLK350, '05 CL65 AMG, '04 C320 4matic
Removing inner door components
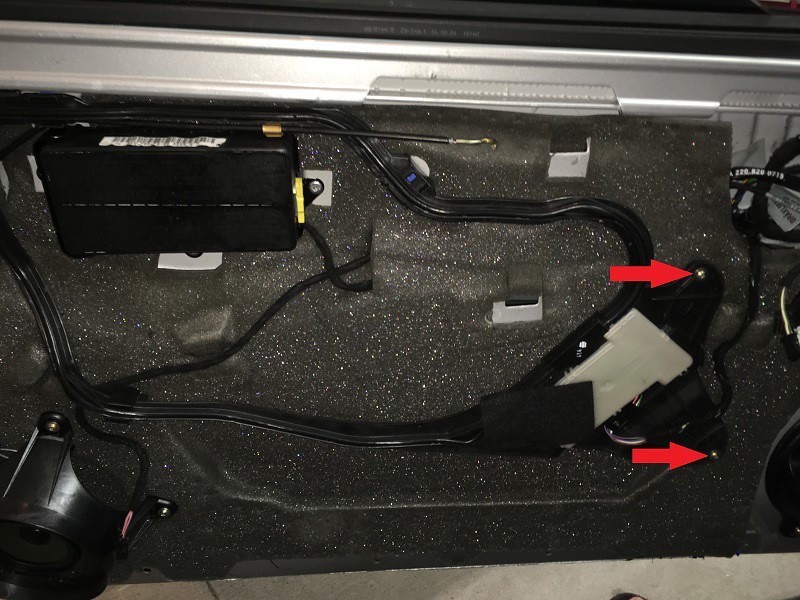
Step 17) Un-plug the rear speaker wires.
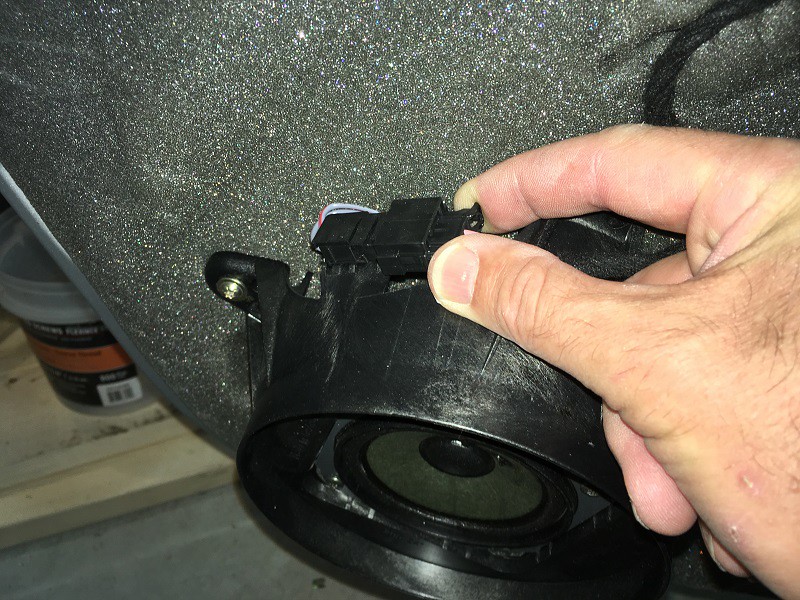
Step 18) Remove 4 torx screws to remove the rear speaker. Set the speaker aside where it will not be damaged.
Step 19) Take note of the height of the manual door lock cap before unscrewing it to completely remove it. It is threaded on quite far, so it will take many turns to unscrew it all the way.
Step 20) Begin carefully peeling the edges of the foam door liner away from the door frame. It is adhered with an extremely sticky rubber compound, but will let go with a steady pull. Take care not to smear the sticky rubber compound everywhere. If you do get it on something where you don't want it, it can be easily cleaned with white mineral spirits. Take care not to tear the foam material.
Step 21) When you get the liner out of the way of the rear door latch area, you can finish removing the latch release cable.
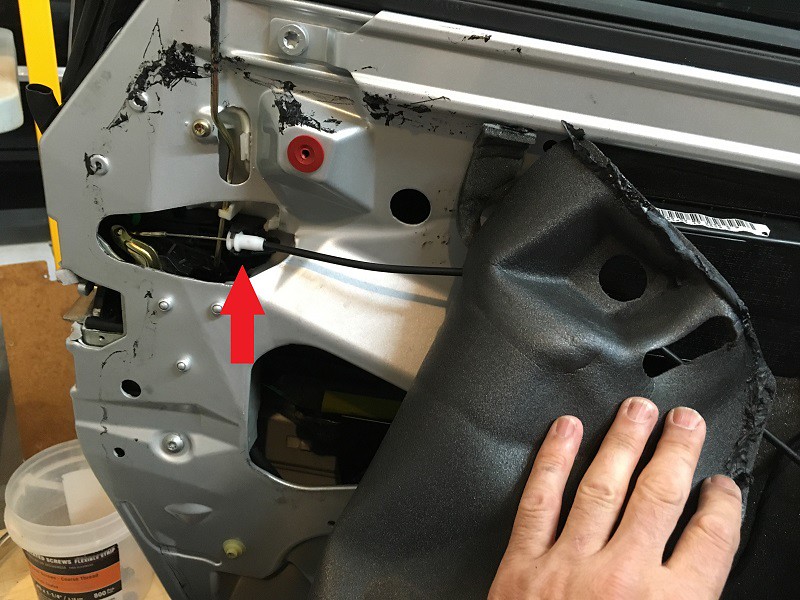
Snap the white cable stop out of the fixture by pulling it away from the door.
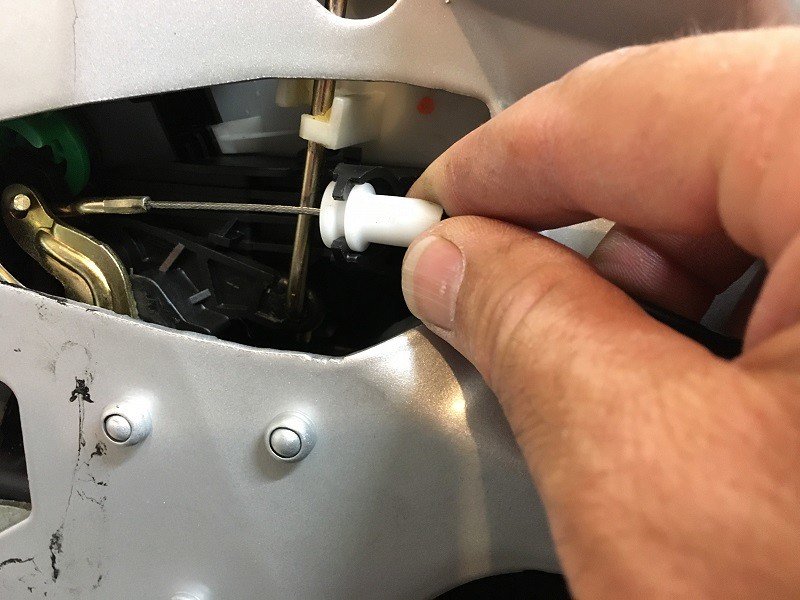
Unhook the end of the cable from the door latch and set it aside.

Step 18) Remove 4 torx screws to remove the rear speaker. Set the speaker aside where it will not be damaged.
Step 19) Take note of the height of the manual door lock cap before unscrewing it to completely remove it. It is threaded on quite far, so it will take many turns to unscrew it all the way.
Step 20) Begin carefully peeling the edges of the foam door liner away from the door frame. It is adhered with an extremely sticky rubber compound, but will let go with a steady pull. Take care not to smear the sticky rubber compound everywhere. If you do get it on something where you don't want it, it can be easily cleaned with white mineral spirits. Take care not to tear the foam material.
Step 21) When you get the liner out of the way of the rear door latch area, you can finish removing the latch release cable.
Snap the white cable stop out of the fixture by pulling it away from the door.
Unhook the end of the cable from the door latch and set it aside.
Last edited by Geraldius; Jul 19, 2017 at 08:41 PM.
Thread Starter
Member
Joined: Apr 2011
Posts: 130
Likes: 53
From: NC
'15 GLK350, '05 CL65 AMG, '04 C320 4matic
Removing door lock
Step 22) Gently pull the rubber door weather seal away from the door and separate it at the junction with the top sealing moulding. It is a slip fit within the moulding and has a rubber nub that plugs into a hole in the door.
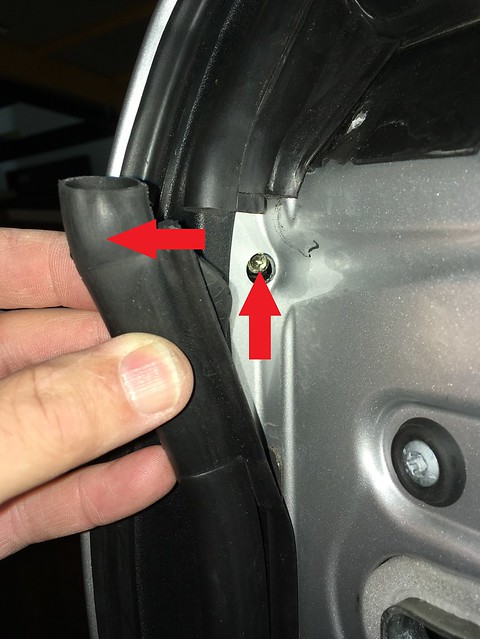
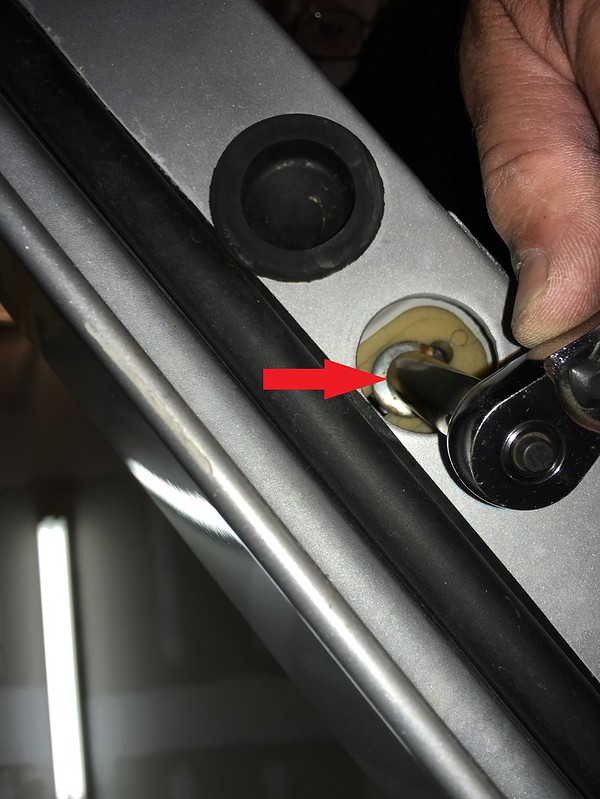
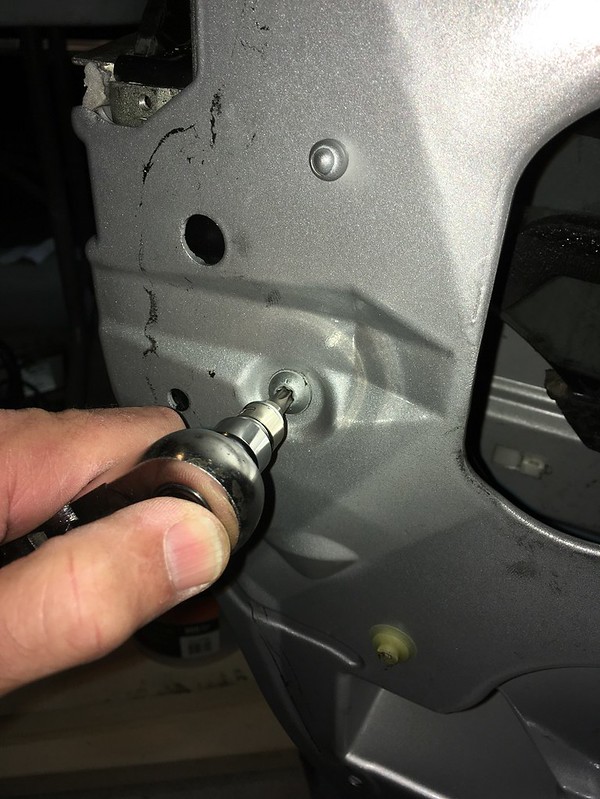
Step 23) This reveals a torx screw inside the hole. Remove the screw to release the outside door keylock assembly.
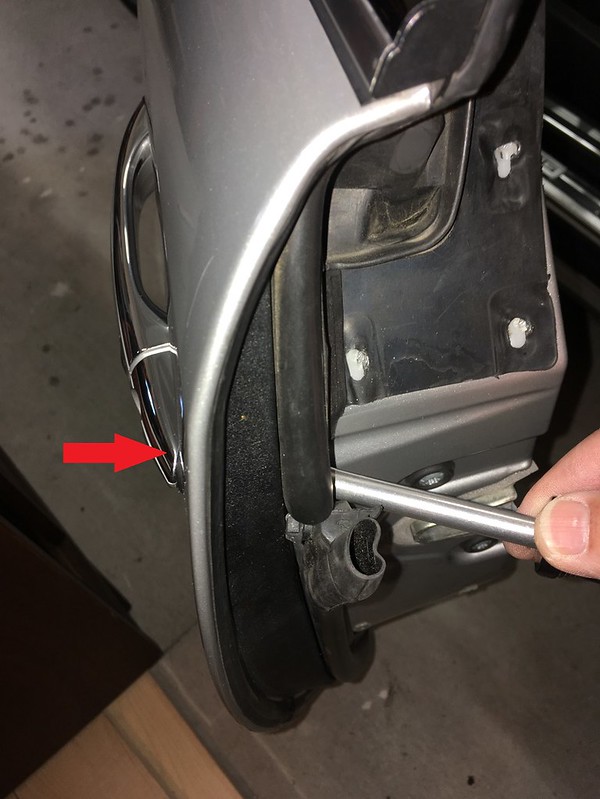
Step 24) Wiggle the lock assembly free and pull it outward.
When the lock is all the way out disconnect the cable and set the lock aside.

Step 23) This reveals a torx screw inside the hole. Remove the screw to release the outside door keylock assembly.
Step 24) Wiggle the lock assembly free and pull it outward.
When the lock is all the way out disconnect the cable and set the lock aside.
Last edited by Geraldius; Jul 19, 2017 at 08:53 PM.
Thread Starter
Member
Joined: Apr 2011
Posts: 130
Likes: 53
From: NC
'15 GLK350, '05 CL65 AMG, '04 C320 4matic
Removing door glass
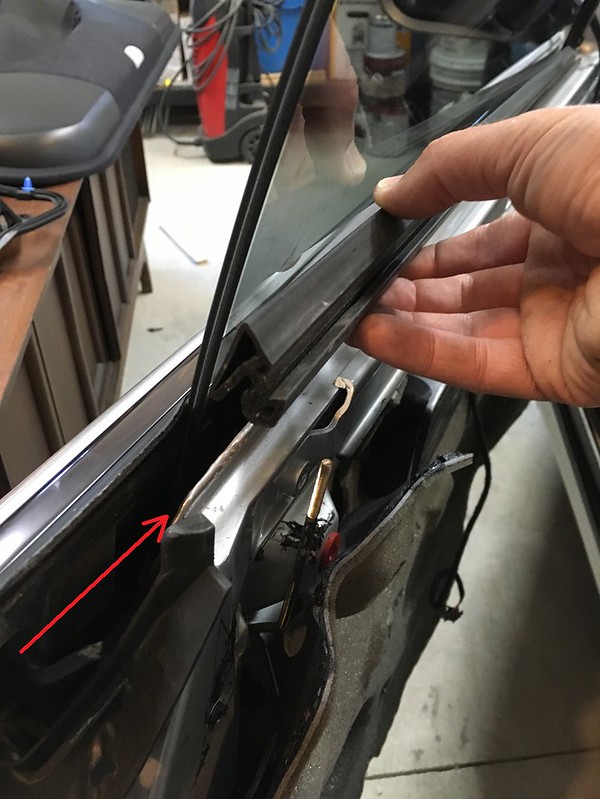
Step 25) Remove the inner rubber window moulding by levering it up all along its length. This grips the top of the door frame very tightly by friction, so it will take some effort. Work it fore and aft a little at a time so that it lifts off evenly without bending its internal metal reinforcement.
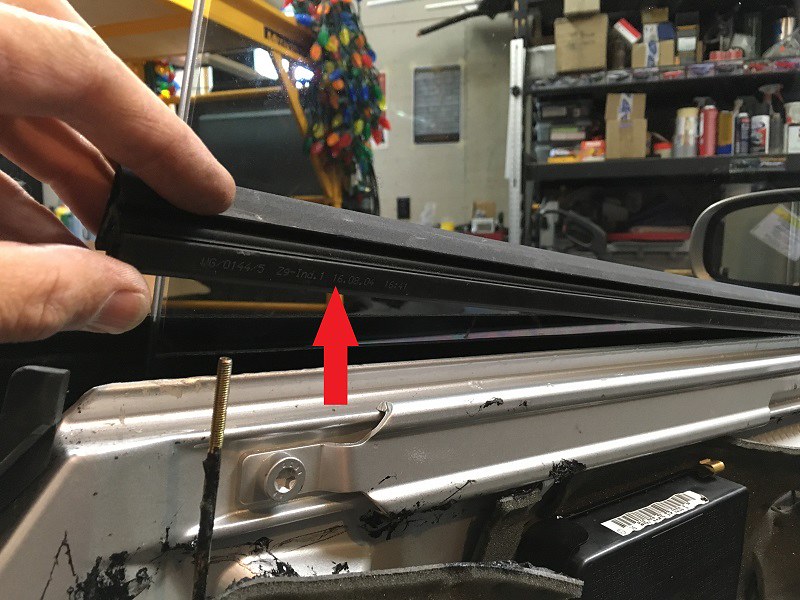
Step 26) From the openings in the inner door frame, remove 1 large front and 1 large rear window mounting screw. To get your tool onto these screws it will have been necessary to have pre-positioned the window as instructed in Step 1).
Step 27) The window, together with its bottom rail, can now be carefully removed out of the opening in the top of the door. Take care not to scratch the glass or the window tinting film if present.
Set the window aside somewhere safe away from the work area.
Thread Starter
Member
Joined: Apr 2011
Posts: 130
Likes: 53
From: NC
'15 GLK350, '05 CL65 AMG, '04 C320 4matic
Remove rear window lift assembly
Step 28) Remove the 10mm flanged nut at the bottom of the rear window lift mechanism. This is accessed through a rubber plug in the bottom rear of the door.

There are two rubber plugs in this area. Only the forward one of the pair needs to be removed.
Step 29) Remove the 10mm flanged nut at the top of the window lift mechanism. (It is sufficient to just loosen it and slide the top of the mechanism out of the slotted hole.) You can access this nut through the rear of the window opening with a socket on an extension after the window has been removed in the direction of the arrow.
When reassembling, do not mix this nut up with the other, larger flanged nut from the bottom, as the larger flange will interfere with the window closing. (Don't ask me how I know this...).
Step 30) Work the window raiser assembly out through the opening in the door frame and let it rest loose. There is no need to disconnect the cabling or anything else. This will provide enough clearance to remove the door closer mechanism in the later steps.
Thread Starter
Member
Joined: Apr 2011
Posts: 130
Likes: 53
From: NC
'15 GLK350, '05 CL65 AMG, '04 C320 4matic
Removing the door latch/soft closer mechanism
Now you can finally begin to remove the door latch/soft closer mechanism. You have not yet even begun to fix the problem. You had to learn how to do 30 other tasks just do get to this point. I'll wager that every CL will need repairs to this unit in its lifetime. I think you can see by now that this is not a cheap repair for labor costs.
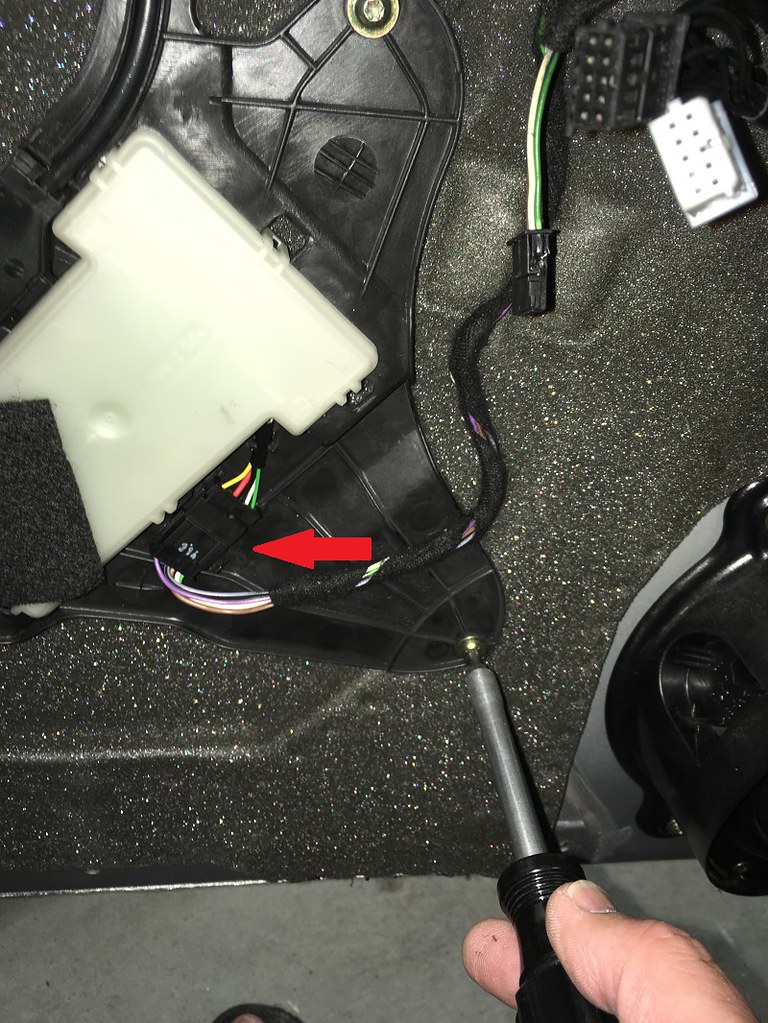
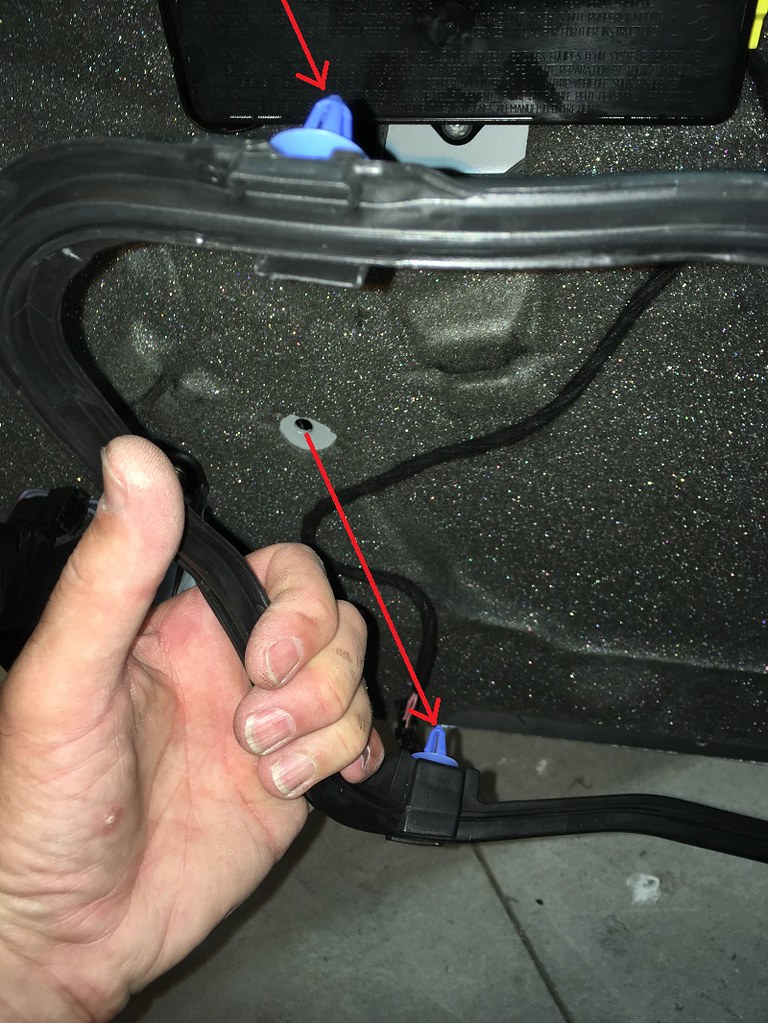
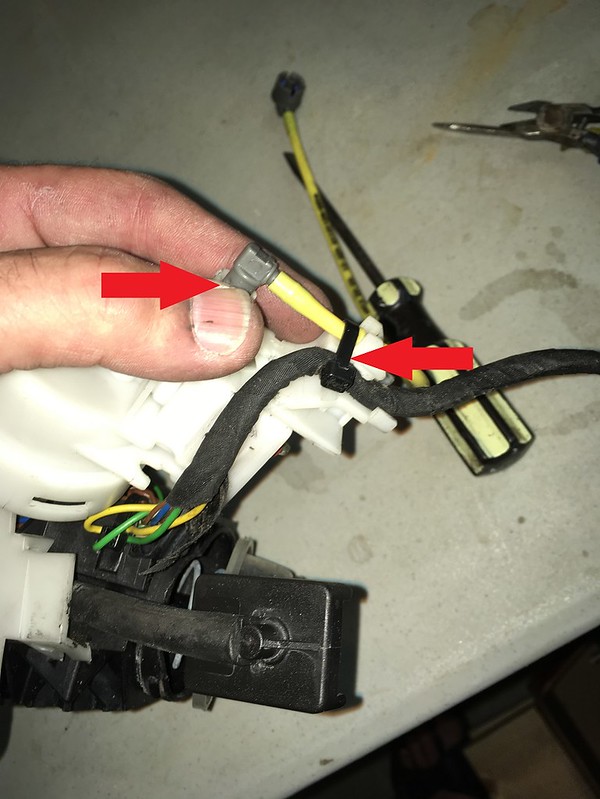
Step 31) Cut the wire ties that secure the vacuum tubing and wiring to the door frame. There are several of these fastening points behind the foam door liner. Take care not to nick the wiring or the vacuum tubing. Take note of the routing for future reassembly reference.
Step 32) Disconnect 2 wiring harness connectors and 1 vacuum line connecter along the open side of the door frame. The vacuum connectors are tricky to separate without a special tool. I don't have the special tool, so I had to fuss with them for a while to release the locking tabs using a small tipped screwdriver.
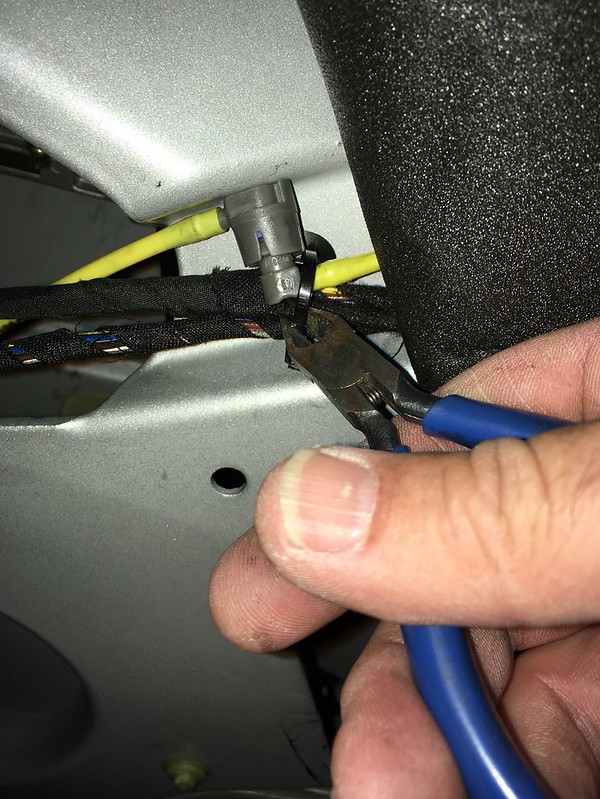
There will also be a few wire ties up inside the door cavity that you will have to cut. This will have to be done by feel since you can't see in there.
Step 32) Un-clip the door latch rod that connects to the exterior door handle. This is a snap-locking device that clamps around the threaded end of the rod to grip it. It is release by pressing firmly on a release tab until it snaps open. This will need to be done by feel because you cannot see it. The photos should help your fingers to recognize the part and how it works. (Note that when you reassemble it you don't need to be too concerned about adjustment, because the rod will naturally drop into the place where it is happy.)

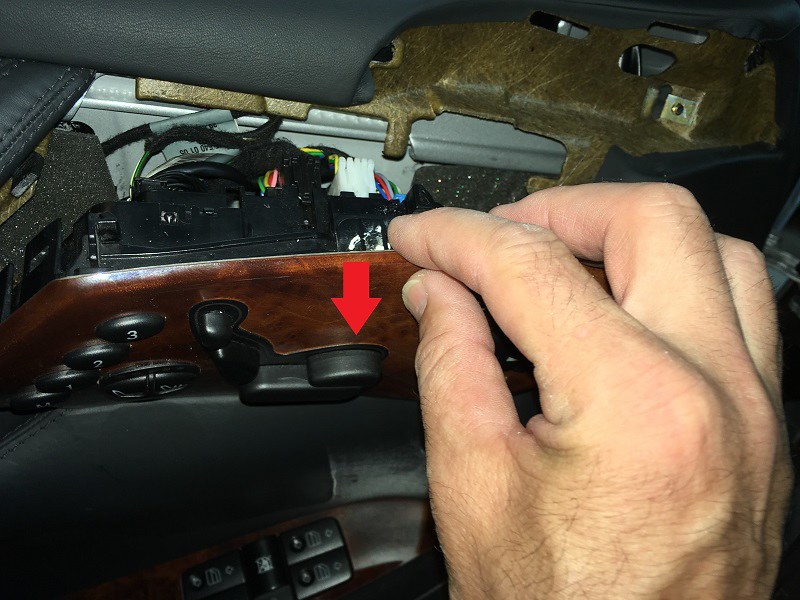
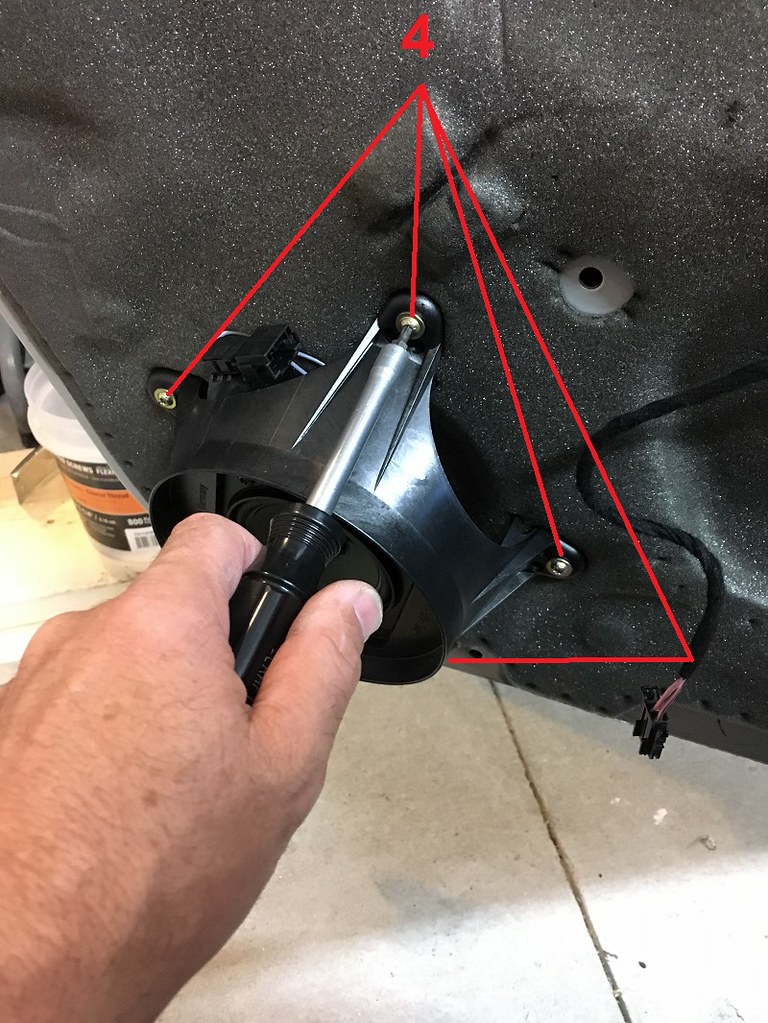
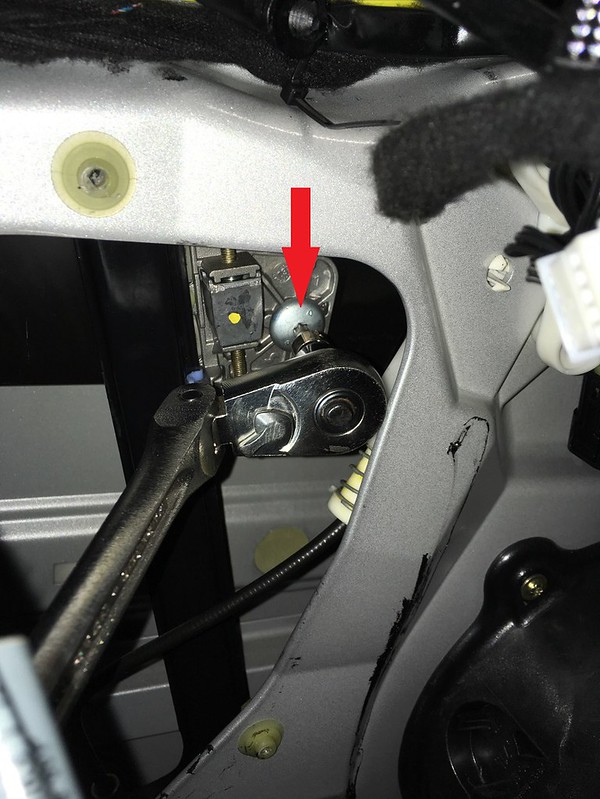
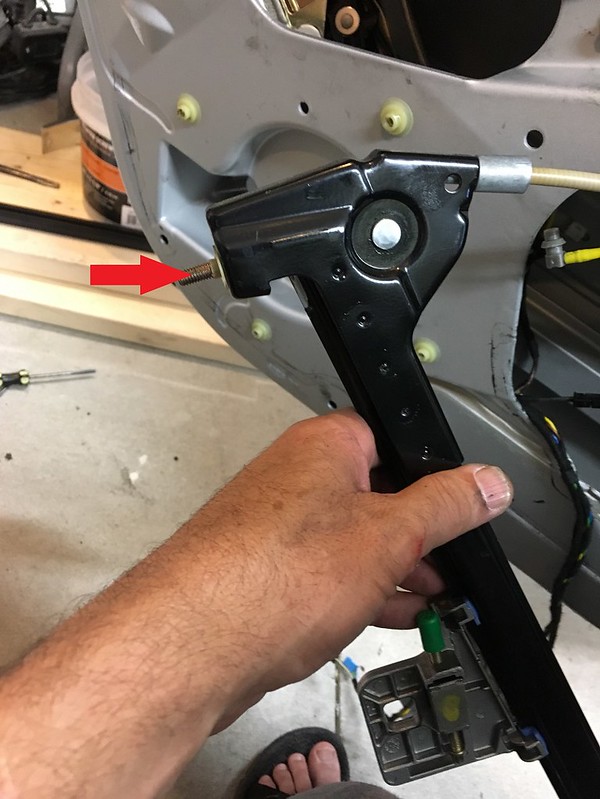
Step 33) Remove the 4 torx screws that attach the door latch/soft closer mechanism to the door frame.

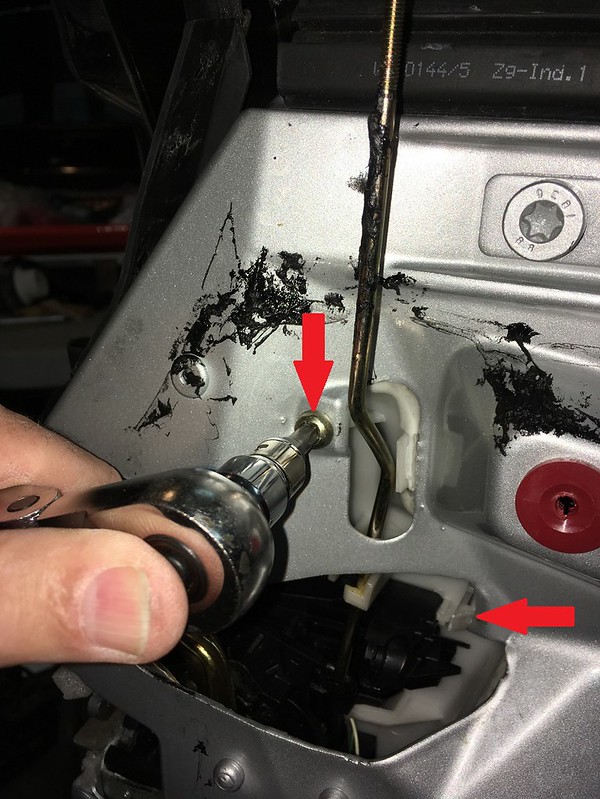
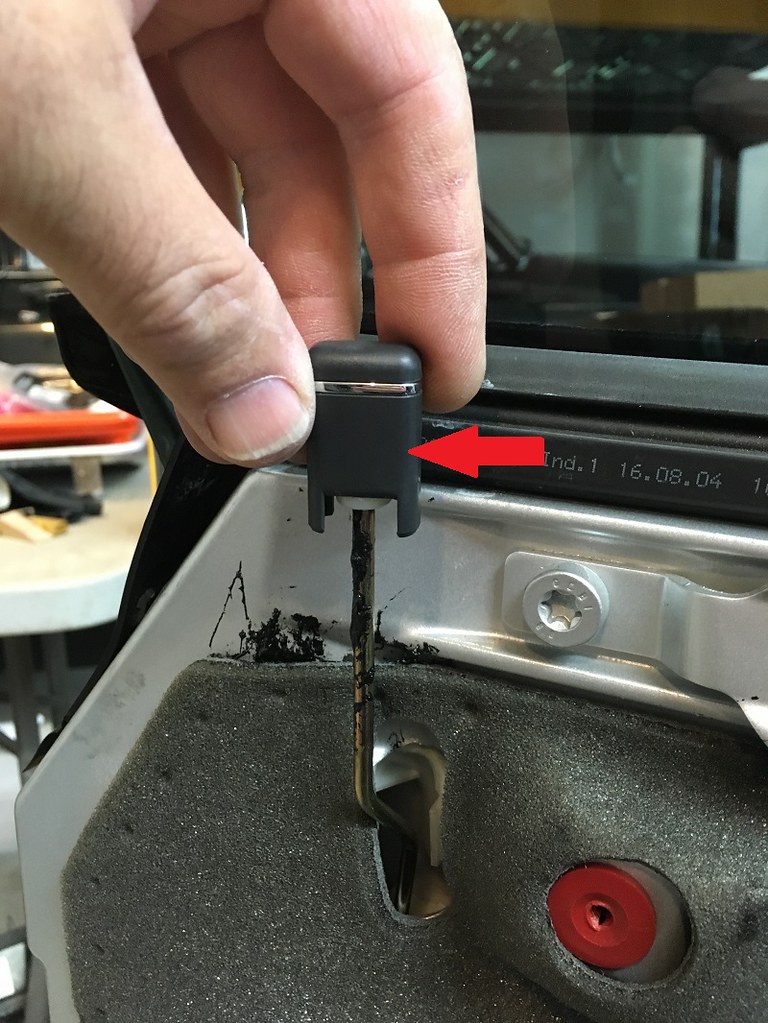
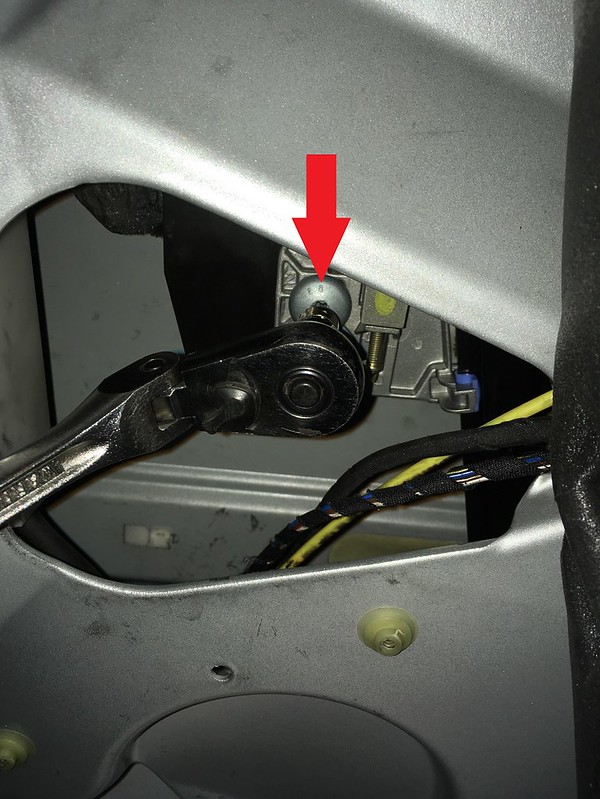
Step 34) The door latch/soft closer mechanism is now ready to be extracted from the door cavity. Release the small plastic clip at the top (red arrow) and the assembly will let loose. (Note, this clip aids in holding the unit in place for reassembly). Lower the assembly taking care to guide the door lock rod down through its opening.
Step 35) Rotate and lower the latch assembly as necessary and proceed to route it out through the large door frame opening as shown by the arrow. Gather up and guide the vacuum line and wiring as needed to completely remove the unit. You can now transfer this to the workbench for repairs.

Step 31) Cut the wire ties that secure the vacuum tubing and wiring to the door frame. There are several of these fastening points behind the foam door liner. Take care not to nick the wiring or the vacuum tubing. Take note of the routing for future reassembly reference.
Step 32) Disconnect 2 wiring harness connectors and 1 vacuum line connecter along the open side of the door frame. The vacuum connectors are tricky to separate without a special tool. I don't have the special tool, so I had to fuss with them for a while to release the locking tabs using a small tipped screwdriver.
There will also be a few wire ties up inside the door cavity that you will have to cut. This will have to be done by feel since you can't see in there.
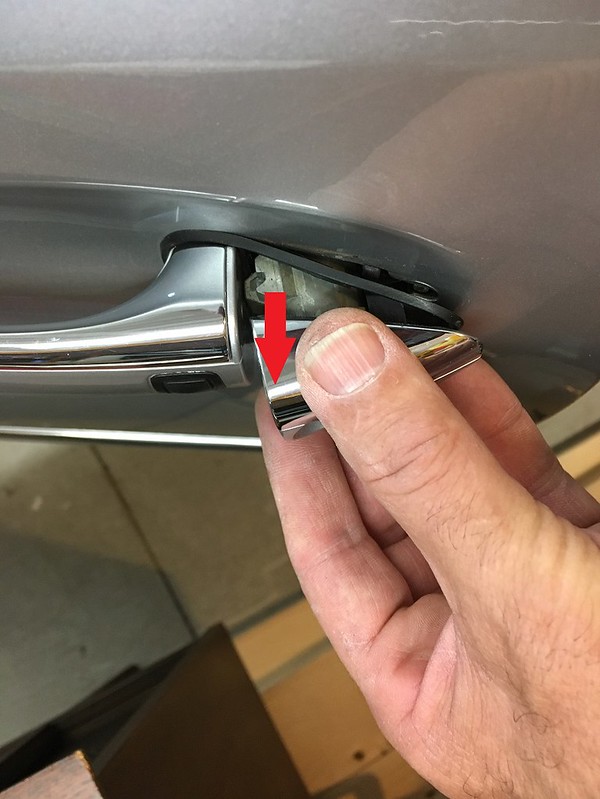
Step 32) Un-clip the door latch rod that connects to the exterior door handle. This is a snap-locking device that clamps around the threaded end of the rod to grip it. It is release by pressing firmly on a release tab until it snaps open. This will need to be done by feel because you cannot see it. The photos should help your fingers to recognize the part and how it works. (Note that when you reassemble it you don't need to be too concerned about adjustment, because the rod will naturally drop into the place where it is happy.)
Step 33) Remove the 4 torx screws that attach the door latch/soft closer mechanism to the door frame.
Step 34) The door latch/soft closer mechanism is now ready to be extracted from the door cavity. Release the small plastic clip at the top (red arrow) and the assembly will let loose. (Note, this clip aids in holding the unit in place for reassembly). Lower the assembly taking care to guide the door lock rod down through its opening.
Step 35) Rotate and lower the latch assembly as necessary and proceed to route it out through the large door frame opening as shown by the arrow. Gather up and guide the vacuum line and wiring as needed to completely remove the unit. You can now transfer this to the workbench for repairs.
Last edited by Geraldius; Jul 20, 2017 at 01:40 PM.
Thread Starter
Member
Joined: Apr 2011
Posts: 130
Likes: 53
From: NC
'15 GLK350, '05 CL65 AMG, '04 C320 4matic
Now that you have the latch assembly out on the bench you can evaluate it for repairability. At this point you may decide that it is better to just replace the whole unit, as few repair parts are available and what is available is expensive.
You can order it from mercedes as part: "Lock - Mercedes-Benz (215-720-13-35)" for the left side or "(215-720-16-35)" for the right side.
This vendor lists them for about $450.
https://www.mbpartsfactory.com/
The part that typically breaks is the soft close actuator diaphragm housing (that is a made up descriptive name). It has plastic tabs that break off when they get brittle with age. (red arrow)
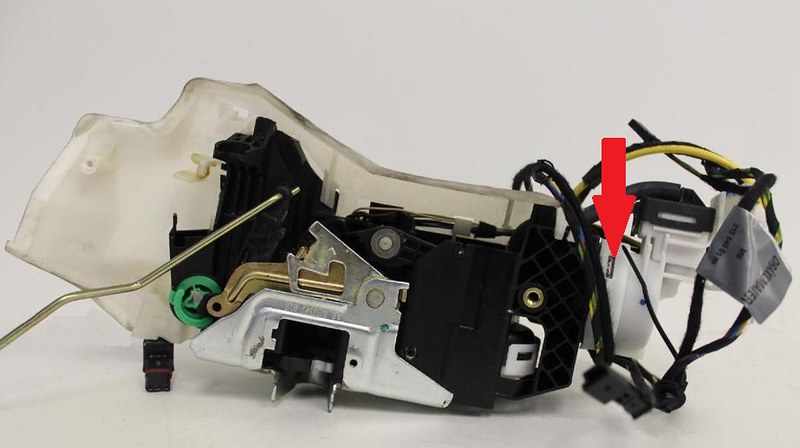
You can find a replacement part for this from a number of vendors on ebay and amazon at around $80.
I elected to go the repair route, but if I did it over again I'd probably just buy the whole unit to save time and better reliability.
You can order it from mercedes as part: "Lock - Mercedes-Benz (215-720-13-35)" for the left side or "(215-720-16-35)" for the right side.
This vendor lists them for about $450.
https://www.mbpartsfactory.com/
The part that typically breaks is the soft close actuator diaphragm housing (that is a made up descriptive name). It has plastic tabs that break off when they get brittle with age. (red arrow)
You can find a replacement part for this from a number of vendors on ebay and amazon at around $80.
I elected to go the repair route, but if I did it over again I'd probably just buy the whole unit to save time and better reliability.
Last edited by Geraldius; Jul 21, 2017 at 10:42 AM.
Thread Starter
Member
Joined: Apr 2011
Posts: 130
Likes: 53
From: NC
'15 GLK350, '05 CL65 AMG, '04 C320 4matic
Repairing the door closer
This portion covers repairing a broken door closer diaphragm housing.
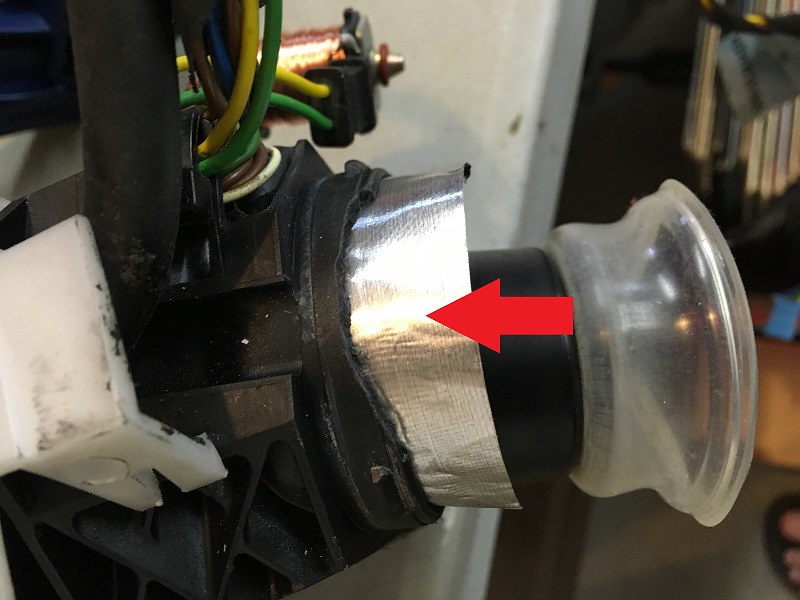
Step 36) Begin disassembly of the door closer by removing the rectangular cover shown. This encloses an air control solenoid valve. To release it, gently pry the slotted sides away from the retainer tabs. Try not to break this part as you may need to reuse it. There is typically a new one in the repair kits, but the one I got was poorly made and would not seal properly. So I reused the original one that was still in good condition.
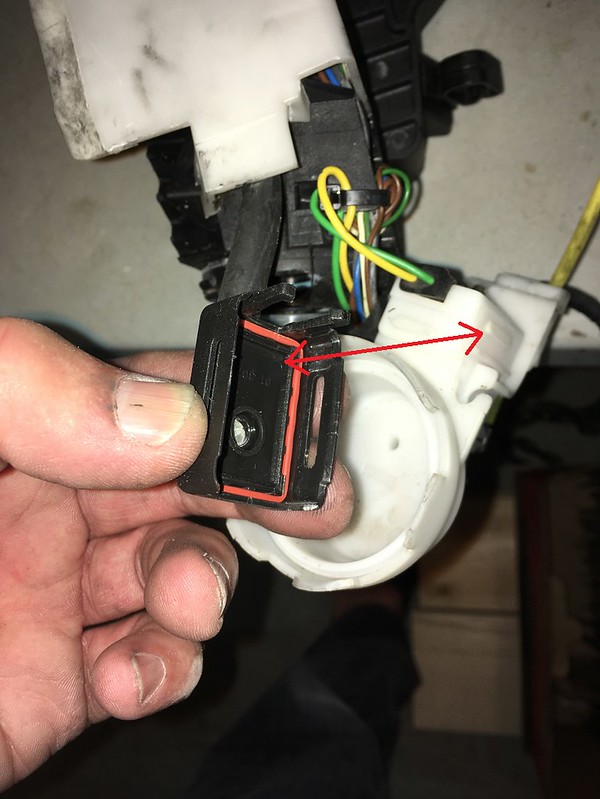
Step 37) Carefully lift the solenoid valve out of its housing, taking care not to lose any of the 3 rubber O-rings. (When you reinstall this later, use a little dielectric grease on the O-rings.)
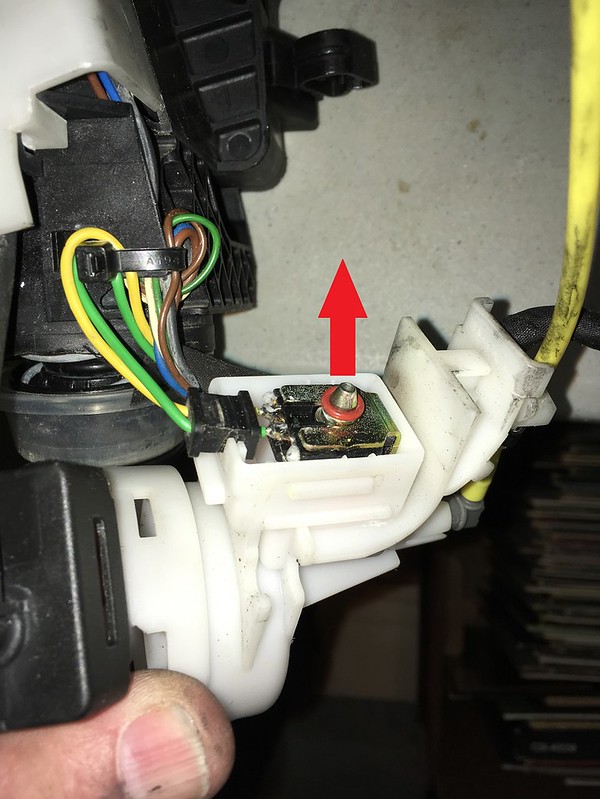
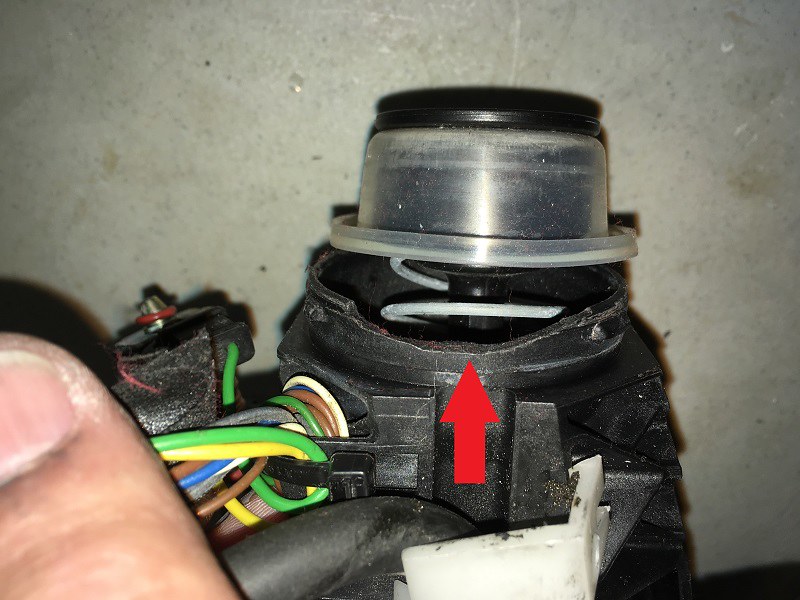
Step 38) Clip the wire tie indicated by the red arrow. Then release the vacuum line fitting from the diaphragm housing by prying the tabs outward (or use the special tool if you have one).
At this point the housing part is probably free of the closer assembly if enough of the retainer tabs were broken. If not, then carefully release the part by gently lifting the remaining tabs. You don't want to cause further damage to the main closer molding.
Step 39) You need to recover the O-ring from the old diaphragm housing for reuse -- the replacement part does not typically come with one. Gently pry out the red plastic retainer ring, then lift out the rubber O-ring below it. (When you reassemble this into the new part, apply a tiny bit of dielectric grease.)
Step 36) Begin disassembly of the door closer by removing the rectangular cover shown. This encloses an air control solenoid valve. To release it, gently pry the slotted sides away from the retainer tabs. Try not to break this part as you may need to reuse it. There is typically a new one in the repair kits, but the one I got was poorly made and would not seal properly. So I reused the original one that was still in good condition.
Step 37) Carefully lift the solenoid valve out of its housing, taking care not to lose any of the 3 rubber O-rings. (When you reinstall this later, use a little dielectric grease on the O-rings.)
Step 38) Clip the wire tie indicated by the red arrow. Then release the vacuum line fitting from the diaphragm housing by prying the tabs outward (or use the special tool if you have one).
At this point the housing part is probably free of the closer assembly if enough of the retainer tabs were broken. If not, then carefully release the part by gently lifting the remaining tabs. You don't want to cause further damage to the main closer molding.
Step 39) You need to recover the O-ring from the old diaphragm housing for reuse -- the replacement part does not typically come with one. Gently pry out the red plastic retainer ring, then lift out the rubber O-ring below it. (When you reassemble this into the new part, apply a tiny bit of dielectric grease.)
Last edited by Geraldius; Jul 21, 2017 at 11:13 AM.
Thread Starter
Member
Joined: Apr 2011
Posts: 130
Likes: 53
From: NC
'15 GLK350, '05 CL65 AMG, '04 C320 4matic
This is where it gets more complicated...
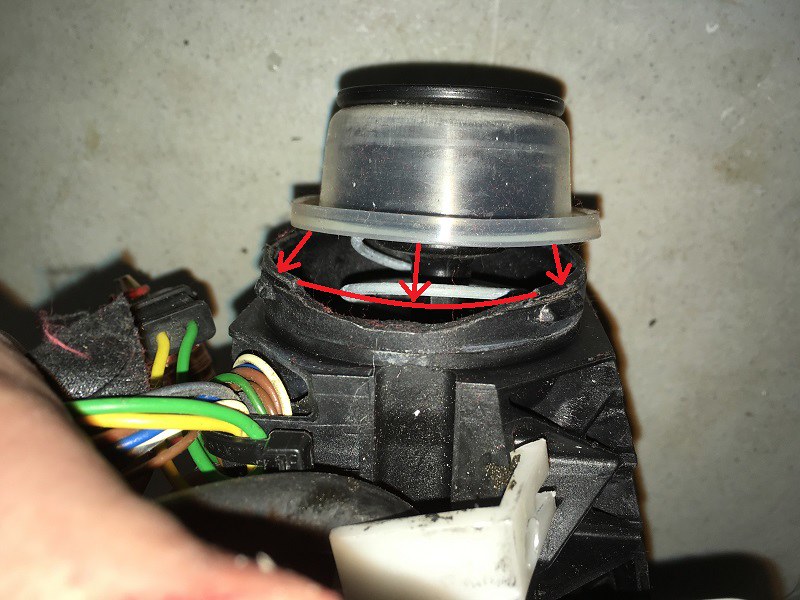
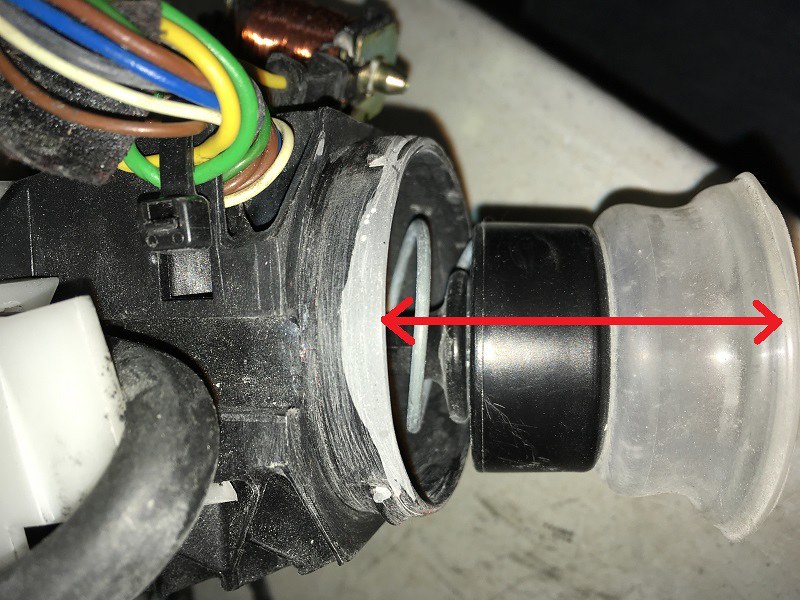
The main molded plastic part of my door closer was broken where the diaphragm housing would snap onto it. When the housing tabs broke, it took a chunk of the main molding with it.
The replacement diaphragm housing will not seal with this chunk missing.
At this point a sane person would throw in the towel and just buy a complete new door lock assembly. However I had already bought the new repair kit for $90 before discovering this, and did not want to waste that money. So I decided to try repairing the main molding. Nothing to lose by trying but my time, right?
The missing area to be repaired is shown below. This would require duplication of the original profile to be able to re-create the sealing surface for the silicone rubber diaphragm.

MBWorld Fanatic!
Joined: Oct 2009
Posts: 1,924
Likes: 38
cl600
when this happened to me i got some jb weld and completely covered the plastic piece that holds the diaphragm in place. i went overboard and covered the top and all around the sides and then used tie raps to secure it while it dried. it seemed to do the job very well. i never personally used the mechanism myself because the part was then covered under my warranty. i did give the reconditioned part to a friend and as far as i know he didn't have any problems with it and it worked fine. good luck and great write up. my right door has stopped working and one day i may use your write up to fix that. thank you. i understand this is about a 3-4 hour job. how long did it take you?
the best and good luck!
the best and good luck!
Thread Starter
Member
Joined: Apr 2011
Posts: 130
Likes: 53
From: NC
'15 GLK350, '05 CL65 AMG, '04 C320 4matic
Thanks. I would guess that it should take about 3 hours if one has already had experience with the job, nothing goes wrong, and one is replacing the entire lock assembly with a new one.
I did use JB Weld for the repairs as you will see...
I did use JB Weld for the repairs as you will see...
Thread Starter
Member
Joined: Apr 2011
Posts: 130
Likes: 53
From: NC
'15 GLK350, '05 CL65 AMG, '04 C320 4matic
You may or may not want to try to duplicate this part of the repair. It's fairly skill intensive, and only you can decide for yourself whether you are able.
JB Weld is used to reconstruct the plastic molding as shown.
I will let the photos speak for themselves.
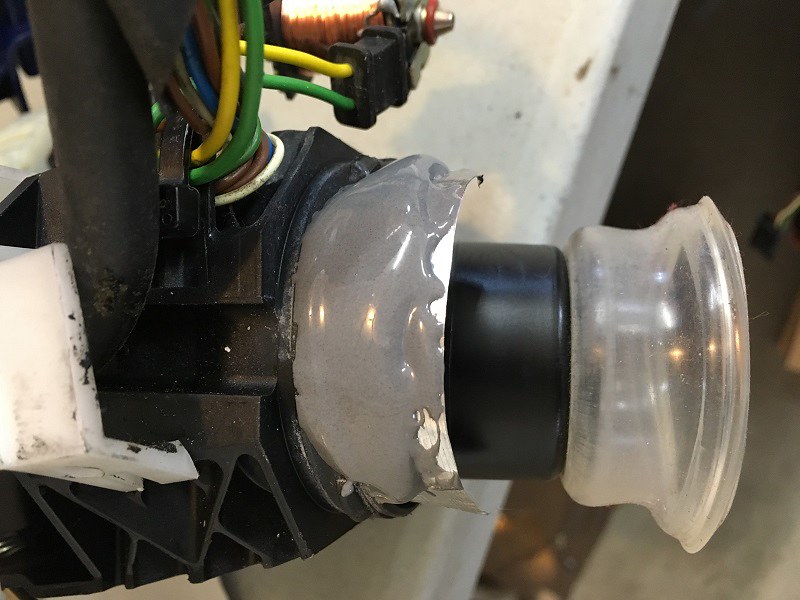
Here the profile and the sealing surface has been restored and is ready for reassembly. Diaphragm is turned inside out to get it out of the way. (Note: the rubber diaphragm with its spring and pushrod can easily be removed for easier access, as I discovered later.)
This JB Weld repair provides an entirely adequate surface to seal the diaphragm, however it cannot be as strong as the original part. Also 1 locking tab is missing with the chunk that broke off. Consequently, I used thin superglue to secure the new diaphragm housing after reassembly as a security measure. This part will not be coming apart again.
JB Weld is used to reconstruct the plastic molding as shown.
I will let the photos speak for themselves.
Here the profile and the sealing surface has been restored and is ready for reassembly. Diaphragm is turned inside out to get it out of the way. (Note: the rubber diaphragm with its spring and pushrod can easily be removed for easier access, as I discovered later.)
This JB Weld repair provides an entirely adequate surface to seal the diaphragm, however it cannot be as strong as the original part. Also 1 locking tab is missing with the chunk that broke off. Consequently, I used thin superglue to secure the new diaphragm housing after reassembly as a security measure. This part will not be coming apart again.
Thread Starter
Member
Joined: Apr 2011
Posts: 130
Likes: 53
From: NC
'15 GLK350, '05 CL65 AMG, '04 C320 4matic
Reassembly tip
I'm not going to cover reassembly, since that is as they say, "the reverse of the disassembly process." However here is one simple tip that may save you a few minutes of frustration.
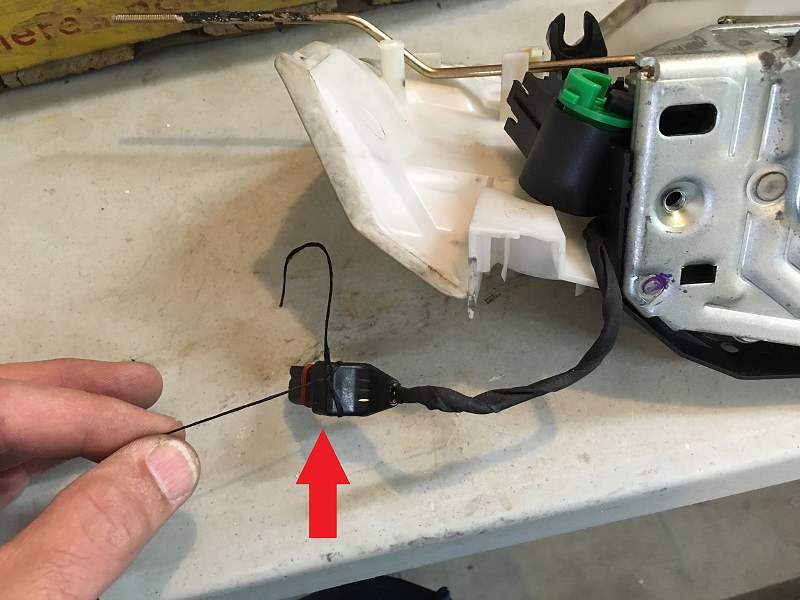
When preparing to reinstall the door latch closer assembly, there is a wiring cable with connector that must route through the hole in the outer door skin to connect to the door key lock. There is very little room to get your hands in there to work. I find that this little trick helps: Tie a strong string to the connector while it is still on the bench. Then snake the string through the lock hole first. Then as you raise the latch assembly into place with one hand you can pull on the string with the other hand to fish the connector and cable through the hole.
When preparing to reinstall the door latch closer assembly, there is a wiring cable with connector that must route through the hole in the outer door skin to connect to the door key lock. There is very little room to get your hands in there to work. I find that this little trick helps: Tie a strong string to the connector while it is still on the bench. Then snake the string through the lock hole first. Then as you raise the latch assembly into place with one hand you can pull on the string with the other hand to fish the connector and cable through the hole.
MBWorld Fanatic!
Joined: May 2015
Posts: 4,037
Likes: 1,012
From: Miami, FL
2003 CL 600
Excellent write up.
Where did you source the repair kit? My CL needs this, and the hissing as it tests the circuit while the door is already closed from time to time makes me insane. I don't want to spend $500 on a new latch if I can help it.
Where did you source the repair kit? My CL needs this, and the hissing as it tests the circuit while the door is already closed from time to time makes me insane. I don't want to spend $500 on a new latch if I can help it.

Excellent
for those who would like to repair infrared reciever too:
http://fotifixes.com/2017/03/15/ir-d...-w203-c-class/
This has been tested (same thing on W220 and W215) I repaired both sides last year
for those who would like to repair infrared reciever too:
http://fotifixes.com/2017/03/15/ir-d...-w203-c-class/
This has been tested (same thing on W220 and W215) I repaired both sides last year
Last edited by pmercury; Jul 22, 2017 at 05:47 AM.
Thread Starter
Member
Joined: Apr 2011
Posts: 130
Likes: 53
From: NC
'15 GLK350, '05 CL65 AMG, '04 C320 4matic
http://www.ebay.com/itm/Mercedes-W21...t/391744492304
You can find them for a bit less with only the soft closer parts.
MBWorld Fanatic!


Joined: Nov 2001
Posts: 6,340
Likes: 22
From: Southern California, USA
2003 CL55 AMG
Excellent write up. I had to do this repair several years ago and you are 100% right when you said it takes a LOT of time and a LOT of disassembly.
About 6 months ago the diaphragm body broke again and to be honest I probably won't fix it because of the time it takes. I just make sure to shut the door with enough force now to get a good close.
It will be a reoccurring issue. Mercedes should have engineered this part better. There has never even been a revision update on the part # to address this issue.
Last edited by awiner; Jul 22, 2017 at 10:33 PM.


