


DIY: ABC pump rebuild (Pictures + steps)
Thread Starter
Junior Member
Joined: Jul 2013
Posts: 25
Likes: 8
CL55 AMG
DIY: ABC pump rebuild (Pictures + steps)
My first DIY so this is really a rough draft. If you have any questions or suggestions, I will try to answer them to the best of my ability. My dad fixed the pump, I just outlined all the steps for everyone to follow along.
I didn't really know where this belonged, and I hadn't seen anyone try to rebuild this troublesome pump. The procedure actually didn't seem too bad it just takes a long time to take out, fix, install, and then pour back fluid. I know how frustrating it can be to have to shell out $1400 for a new pump + labor to fix this annoying ABC problem.
So my dad and I just did probably one of the most annoying rebuild jobs on this pump, but it actually was not very bad. I spent hours looking for a rebuild kit, and I managed to find only one place selling for $69. It's a hefty price, but worth it if you don't want to pay $1300-$2000 for a new pump. In this installation, you can and should replace the ABC micron filter and the power steering filter. I no longer receive the ABC warning light on the dash.
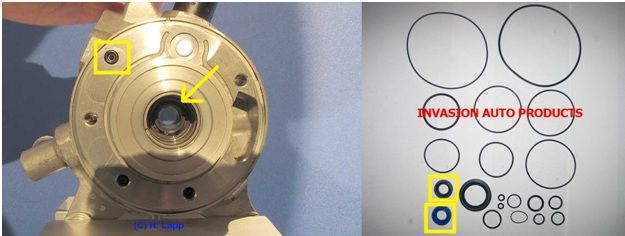
Mercedes Benz ABC Pump Seal Kit MBZABCSEALKIT:
http://www.invasionautoproducts.com/mebeabcpusek.html
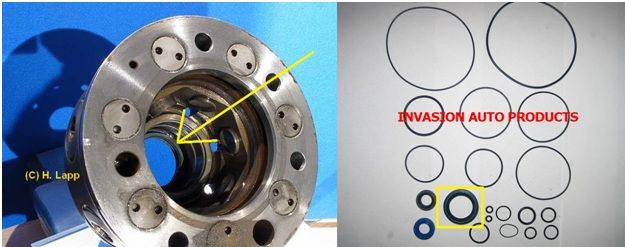
The seal kit contains every single o-ring you'll need to completely replace all the o-rings inside the pump.
I should've took pictures to completely document how we did the entire procedure but I will try to give exact steps from pictures sourced from a German automotive site (I used google chrome to translate).
German automotive site where pictures were sourced: http://hehlhans.de/sl55amg-tandem.htm#b4
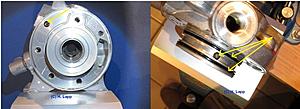
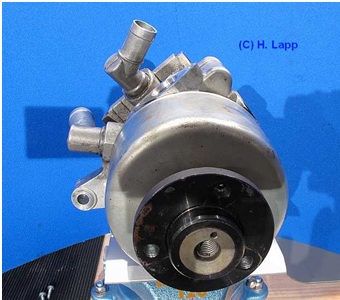
Step 1- Remove ABC pump pulley, I used pulley puller to remove the pulley.
This part is probably the hardest part to rebuilding the pump. Taking about one hour to remove the pulley, I heard at least 3 loud clicks as it was moving out.

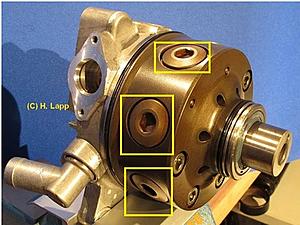
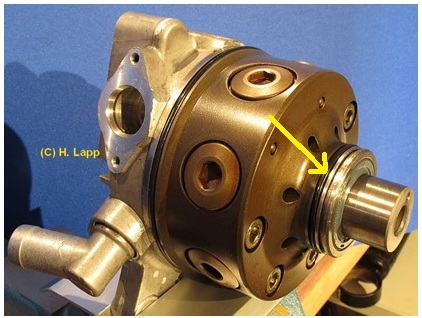
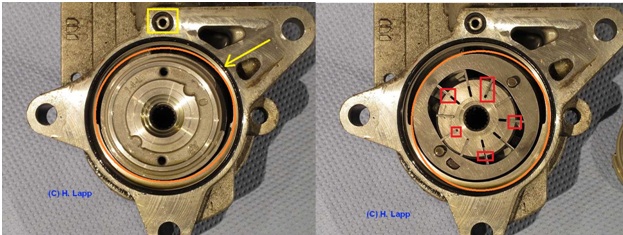
Step 2- Remove the cover and it should now look like this. The yellow arrow points to a snap clip you must remove after you take off the ABC pulley. I used a snap clip plier to make it easier.

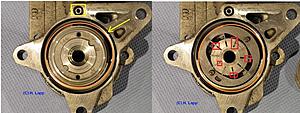
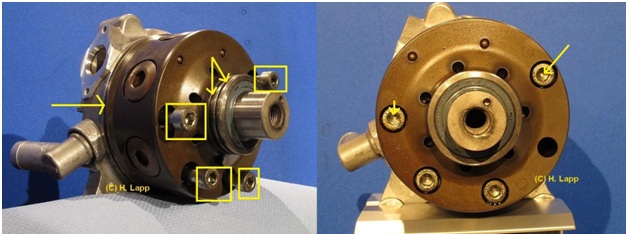
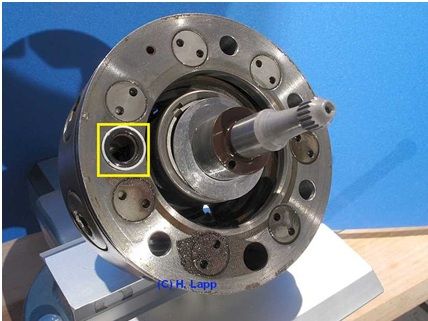
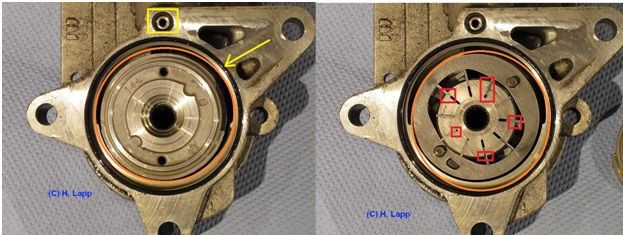
Step 4- Note the O rings I have marked with yellow arrows
Special tool needed: Hollow torx bit (Torx 40 I think)
Remove the 4 hollow hexagon screw

Step 5- Remove all the other screws all around
Special tool not needed
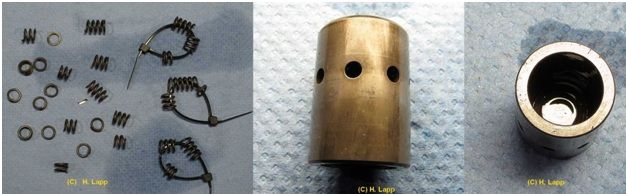
After you remove all these hexagonal screws all around, take out the springs followed by the pressure pistons.
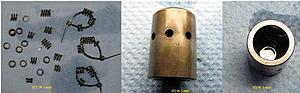
Notice how some of the springs are also broken. Mine were not broken so they did not have to be replaced, but the spring dimensions: length 31 mm, outer diameter 9.2 mm, wire thickness 1.25 mm.
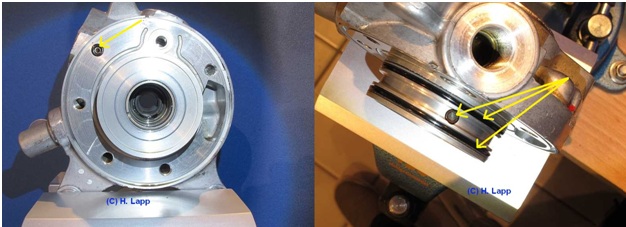
Step 6- Another o ring�
Step 7- Notice the o ring on the inner side. I used a screwdriver and a wooden hammer to lightly tap it out and replaced it right away. Note which side faces out and which side faces in.
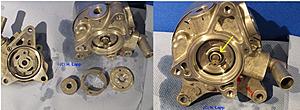
Step 8- MORE O RINGS�
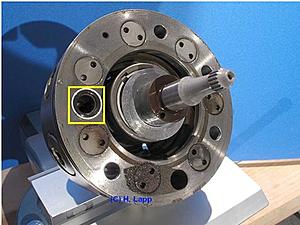
Step 9- Unscrew and remove the opposite side now
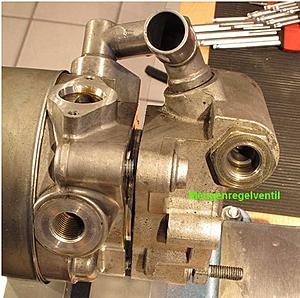
Step 10- O ring first
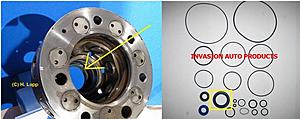
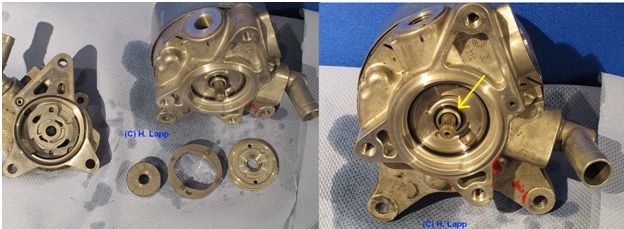
The center o ring is comprised of the two rings in the picture on the left. If you look closely the gray and blue fit into each other like a puzzle, but there is also an o ring in between them as well. To remove the older gray and blue o ring, use a screw driver and lightly hammer it out, I used the wooden side of a hammer and tapped lightly. Place the new one in and you�re good to go.

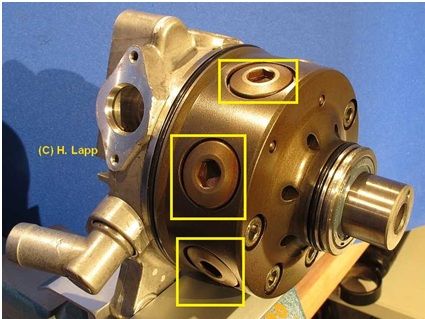
Step 11- The circular object in the orange should slide out with much ease. In the 2nd picture it slides out again but in the red boxes, take note of how it fit in to the slits. Some parts are slightly curved or just plain sharp. You will see what I mean when you take it out. Put it back in the way it was exactly before.
Step 12- Eventually if you keep taking out the middle pieces, it�ll look like the picture n the left. In the left is the final o ring.
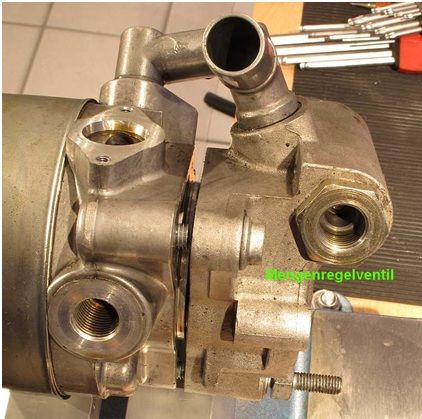
Step 13- To be obvious, you should have used up every single o ring in the seal kit if you did it correctly. Final notes: put back the pump in the reverse order. The hardest part, now, is putting back on the ABC pulley. In order to put the ABC pulley, you must heat it on the stove (remember to already have the snap clip on the pump prior to this step). After the pulley is hot enough, using pliers, place it back on the ABC pump. If it was hot enough, the metal expanded and it should slip right on with ease back onto the pump. To cool the pulley, I poured water on it.
Final thoughts: I only rebuilt the pump because it was spewing tons of oil so I knew there were damaged o rings inside the unit. I placed back on the pump onto the engine and no longer have the ABC warning on the dash. After installation, I filled up the ABC and power steering reservoir with Pentosin CHF11S Hydraulic oil to levels that were appropriate. I then turned on the car, and cycled the hydraulic up and down to lift and lower the car at least 15 times. Also, I turned the steering wheel left and right for the power steering fluid.
I didn't really know where this belonged, and I hadn't seen anyone try to rebuild this troublesome pump. The procedure actually didn't seem too bad it just takes a long time to take out, fix, install, and then pour back fluid. I know how frustrating it can be to have to shell out $1400 for a new pump + labor to fix this annoying ABC problem.
So my dad and I just did probably one of the most annoying rebuild jobs on this pump, but it actually was not very bad. I spent hours looking for a rebuild kit, and I managed to find only one place selling for $69. It's a hefty price, but worth it if you don't want to pay $1300-$2000 for a new pump. In this installation, you can and should replace the ABC micron filter and the power steering filter. I no longer receive the ABC warning light on the dash.
Mercedes Benz ABC Pump Seal Kit MBZABCSEALKIT:
http://www.invasionautoproducts.com/mebeabcpusek.html
The seal kit contains every single o-ring you'll need to completely replace all the o-rings inside the pump.
I should've took pictures to completely document how we did the entire procedure but I will try to give exact steps from pictures sourced from a German automotive site (I used google chrome to translate).
German automotive site where pictures were sourced: http://hehlhans.de/sl55amg-tandem.htm#b4
Step 1- Remove ABC pump pulley, I used pulley puller to remove the pulley.
This part is probably the hardest part to rebuilding the pump. Taking about one hour to remove the pulley, I heard at least 3 loud clicks as it was moving out.
Step 2- Remove the cover and it should now look like this. The yellow arrow points to a snap clip you must remove after you take off the ABC pulley. I used a snap clip plier to make it easier.
Step 4- Note the O rings I have marked with yellow arrows
Special tool needed: Hollow torx bit (Torx 40 I think)
Remove the 4 hollow hexagon screw
Step 5- Remove all the other screws all around
Special tool not needed

After you remove all these hexagonal screws all around, take out the springs followed by the pressure pistons.

Notice how some of the springs are also broken. Mine were not broken so they did not have to be replaced, but the spring dimensions: length 31 mm, outer diameter 9.2 mm, wire thickness 1.25 mm.
Step 6- Another o ring�

Step 7- Notice the o ring on the inner side. I used a screwdriver and a wooden hammer to lightly tap it out and replaced it right away. Note which side faces out and which side faces in.

Step 8- MORE O RINGS�
Step 9- Unscrew and remove the opposite side now

Step 10- O ring first
The center o ring is comprised of the two rings in the picture on the left. If you look closely the gray and blue fit into each other like a puzzle, but there is also an o ring in between them as well. To remove the older gray and blue o ring, use a screw driver and lightly hammer it out, I used the wooden side of a hammer and tapped lightly. Place the new one in and you�re good to go.

Step 11- The circular object in the orange should slide out with much ease. In the 2nd picture it slides out again but in the red boxes, take note of how it fit in to the slits. Some parts are slightly curved or just plain sharp. You will see what I mean when you take it out. Put it back in the way it was exactly before.
Step 12- Eventually if you keep taking out the middle pieces, it�ll look like the picture n the left. In the left is the final o ring.

Step 13- To be obvious, you should have used up every single o ring in the seal kit if you did it correctly. Final notes: put back the pump in the reverse order. The hardest part, now, is putting back on the ABC pulley. In order to put the ABC pulley, you must heat it on the stove (remember to already have the snap clip on the pump prior to this step). After the pulley is hot enough, using pliers, place it back on the ABC pump. If it was hot enough, the metal expanded and it should slip right on with ease back onto the pump. To cool the pulley, I poured water on it.
Final thoughts: I only rebuilt the pump because it was spewing tons of oil so I knew there were damaged o rings inside the unit. I placed back on the pump onto the engine and no longer have the ABC warning on the dash. After installation, I filled up the ABC and power steering reservoir with Pentosin CHF11S Hydraulic oil to levels that were appropriate. I then turned on the car, and cycled the hydraulic up and down to lift and lower the car at least 15 times. Also, I turned the steering wheel left and right for the power steering fluid.

MBWorld Fanatic!
Joined: Jan 2005
Posts: 1,114
Likes: 49
From: Palm Harbor, FL
couple of Benzos
Wow I cannot believe this thread comes alive now, my P/S took a crap on me yesterday on the highway but unlike yours where it was leaking mine is making noise (a knocking noise) so im pretty sure im going to have to change the pump  Great write up for future im sure a lot of ppl will need/should do this to prevent complete pump failure
Great write up for future im sure a lot of ppl will need/should do this to prevent complete pump failure

MBWorld Fanatic!


Joined: Dec 2004
Posts: 4,268
Likes: 253
This rebuild has not been done (publicly) let alone documented up to this point as far as I know. Excellent post and thank you for your contribution.
We now know how rebuild valve blocks and tandem pump. Between those two and the Arnott life time warranty shocks - the hoses remain the only sore spot.
Again- excellent post and thank you for the work.
We now know how rebuild valve blocks and tandem pump. Between those two and the Arnott life time warranty shocks - the hoses remain the only sore spot.
Again- excellent post and thank you for the work.
Last edited by alx; Aug 12, 2013 at 11:44 AM.

MBWorld Fanatic!

Joined: Nov 2010
Posts: 2,605
Likes: 343
From: Welwyn, Herts, UK
2006 S600
Excellent contribution from the OP!
Here's a way to cope with leaky hoses:
https://mbworld.org/forums/5745224-post171.html
Nick
https://mbworld.org/forums/5745224-post171.html
Nick
Trending Topics
Thread Starter
Junior Member
Joined: Jul 2013
Posts: 25
Likes: 8
CL55 AMG
You're welcome guys, and good luck with the rebuilds  The car definitely feels even smoother than when it was first bought from the previous owner too. One other thing I was probably going to do was purchase a magnetic inline filter to place before the ABC reservoir. I think the filter would also help catch all the metal shavings and at least extend the life of both the ABC pump and micron filter for some time, but you should regularly replace the ABC filter when needed. I couldn't find the magnetic filter online because it was made and sold on german forums but it looks like this:
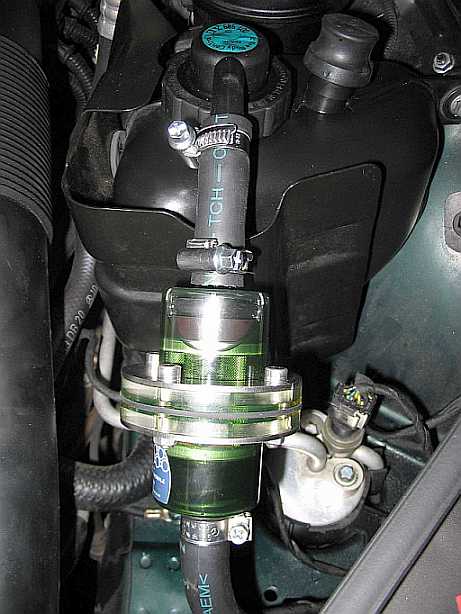
I was going to use a magnefine inline transmission filter that is also used for power steering pump lines in Acura RDX.

What do you guys think? It's an easy installation under $25. Also, what size hose is the hose connecting to the ABC micron filter?
The car definitely feels even smoother than when it was first bought from the previous owner too. One other thing I was probably going to do was purchase a magnetic inline filter to place before the ABC reservoir. I think the filter would also help catch all the metal shavings and at least extend the life of both the ABC pump and micron filter for some time, but you should regularly replace the ABC filter when needed. I couldn't find the magnetic filter online because it was made and sold on german forums but it looks like this:I was going to use a magnefine inline transmission filter that is also used for power steering pump lines in Acura RDX.
What do you guys think? It's an easy installation under $25. Also, what size hose is the hose connecting to the ABC micron filter?
MB World Stories
The Best of Mercedes & AMG

Manual Mercedes? 6 Times Sindelfingen Let Drivers Have All The Fun
Verdad Gallardo
Mercedes SLR McLaren 722 S Is Extremely Rare Example Modified by McLaren
Verdad Gallardo
8 Classic Boxy Mercedes Designs That Have Aged Like Fine Wine
Verdad Gallardo
Flawlessly Restored Mercedes 190E Evo II Heads to Auction
Verdad Gallardo
Electric Mercedes C-Class Unveiled: 11 Things You Need to Know
Verdad Gallardo
Mercedes EQS Gets A Major Update: Everything You Need to Know
Verdad Gallardo
5 Underrated Mercedes-Benz Models That Don't Get the Love They Deserve
Verdad Gallardo
Mercedes 300D Has Pushed Well Past 1 Million Miles and It Ain't Stopping
Verdad Gallardo
10 Most Reliable Mercedes-Benz Models You Can Buy Used
Verdad GallardoSuper Member
Joined: Jan 2007
Posts: 566
Likes: 0
From: OC, CA
1999 CLK430 (sold) 03 CL55
This is a superb and easy to follow write-up. This is a huge benefit to those who are unfamiliar with a ABC pump and are afraid to tackle it.
To further add to your thread, here is a great link I came across to when I was searching for valve block repairs and also has info on that ABC oil magnetic filter. http://translate.google.de/translate...-abc1.htm%23b6

To further add to your thread, here is a great link I came across to when I was searching for valve block repairs and also has info on that ABC oil magnetic filter. http://translate.google.de/translate...-abc1.htm%23b6
Super Member
Joined: Nov 2012
Posts: 698
Likes: 16
From: Germany
C215 CL55 AMG, W124 500E, W210 E430, W124 300E
The magnetic filter is sold by http://www.exclusiv-automobile.de/ww.../Produkte.html
(Magnet Filter 99€)
I have it in my car too and according to the previous owner since at least 7 years. Guess what i still have the very first pump in my car... Dated to 2003 at its type-sign.
Excellent writeup btw.
Keep changing the oil every two years to live trouble-free ;-)
(Magnet Filter 99€)
I have it in my car too and according to the previous owner since at least 7 years. Guess what i still have the very first pump in my car... Dated to 2003 at its type-sign.
Excellent writeup btw.
Keep changing the oil every two years to live trouble-free ;-)
Last edited by Crissus; Aug 17, 2013 at 12:55 PM.
Thread Starter
Junior Member
Joined: Jul 2013
Posts: 25
Likes: 8
CL55 AMG
You're right about the aluminum not being attracted to magnets, I guess an inline magnetic filter is useless then. However, if the metal shavings are big enough they should be trapped by the German one posted from their auto forum, and the Magnefine being useless in this case.
Senior Member
Joined: Jul 2011
Posts: 386
Likes: 12
Cl65 AMG
ABC HOSES
I live in Lake Forest Ca. and theres a shop called Mesa Hose in Costa Mesa which can rebuild the ABC hoses at a substantial savings. I had a line on my garage lift bad out of the box when I installed my lift 2 years ago. Mesa made me up one better than new for next to nothing. FYI
FYI
I live in Lake Forest Ca. and theres a shop called Mesa Hose in Costa Mesa which can rebuild the ABC hoses at a substantial savings. I had a line on my garage lift bad out of the box when I installed my lift 2 years ago. Mesa made me up one better than new for next to nothing.
FYI
Super Member
Joined: Nov 2012
Posts: 698
Likes: 16
From: Germany
C215 CL55 AMG, W124 500E, W210 E430, W124 300E
ABC HOSES
I live in Lake Forest Ca. and theres a shop called Mesa Hose in Costa Mesa which can rebuild the ABC hoses at a substantial savings. I had a line on my garage lift bad out of the box when I installed my lift 2 years ago. Mesa made me up one better than new for next to nothing. FYI
I live in Lake Forest Ca. and theres a shop called Mesa Hose in Costa Mesa which can rebuild the ABC hoses at a substantial savings. I had a line on my garage lift bad out of the box when I installed my lift 2 years ago. Mesa made me up one better than new for next to nothing.
FYIWe also have one just around the corner (less than 10 miles away), that helped me in the past with blown linies from Automatic gearboxes, Self-leveling-Suspensions and whatnot.
ABC Hoses are not a "special" thing for a good hydraulic specialist.

Newbie
Joined: Aug 2013
Posts: 2
Likes: 0
BMW X5, Jaguar XJ8, Shopping for the next one...
Awesome write up. It's always nice when someone takes the time to not only take the photos while they are working, but then follows up with the write up when they would rather be driving! Good job!

Member
Joined: Jun 2010
Posts: 124
Likes: 18
CL 600 '04, Porsche GT3 RS '08, CLS 500 '05, SL 500 '92
http://www.exclusiv-automobile.de/ww..._Fahrwerk.html

Newbie
Joined: Sep 2013
Posts: 2
Likes: 0
CL55
My first DIY so this is really a rough draft. If you have any questions or suggestions, I will try to answer them to the best of my ability. My dad fixed the pump, I just outlined all the steps for everyone to follow along.
I didn't really know where this belonged, and I hadn't seen anyone try to rebuild this troublesome pump. The procedure actually didn't seem too bad it just takes a long time to take out, fix, install, and then pour back fluid. I know how frustrating it can be to have to shell out $1400 for a new pump + labor to fix this annoying ABC problem.
So my dad and I just did probably one of the most annoying rebuild jobs on this pump, but it actually was not very bad. I spent hours looking for a rebuild kit, and I managed to find only one place selling for $69. It's a hefty price, but worth it if you don't want to pay $1300-$2000 for a new pump. In this installation, you can and should replace the ABC micron filter and the power steering filter. I no longer receive the ABC warning light on the dash.
Mercedes Benz ABC Pump Seal Kit MBZABCSEALKIT:
http://www.invasionautoproducts.com/mebeabcpusek.html
The seal kit contains every single o-ring you'll need to completely replace all the o-rings inside the pump.
I should've took pictures to completely document how we did the entire procedure but I will try to give exact steps from pictures sourced from a German automotive site (I used google chrome to translate).
German automotive site where pictures were sourced: http://hehlhans.de/sl55amg-tandem.htm#b4
Step 1- Remove ABC pump pulley, I used pulley puller to remove the pulley.
This part is probably the hardest part to rebuilding the pump. Taking about one hour to remove the pulley, I heard at least 3 loud clicks as it was moving out.
Step 2- Remove the cover and it should now look like this. The yellow arrow points to a snap clip you must remove after you take off the ABC pulley. I used a snap clip plier to make it easier.

Step 4- Note the O rings I have marked with yellow arrows
Special tool needed: Hollow torx bit (Torx 40 I think)
Remove the 4 hollow hexagon screw

Step 5- Remove all the other screws all around
Special tool not needed
After you remove all these hexagonal screws all around, take out the springs followed by the pressure pistons.
Notice how some of the springs are also broken. Mine were not broken so they did not have to be replaced, but the spring dimensions: length 31 mm, outer diameter 9.2 mm, wire thickness 1.25 mm.
Step 6- Another o ring�
Step 7- Notice the o ring on the inner side. I used a screwdriver and a wooden hammer to lightly tap it out and replaced it right away. Note which side faces out and which side faces in.
Step 8- MORE O RINGS�

Step 9- Unscrew and remove the opposite side now
Step 10- O ring first
The center o ring is comprised of the two rings in the picture on the left. If you look closely the gray and blue fit into each other like a puzzle, but there is also an o ring in between them as well. To remove the older gray and blue o ring, use a screw driver and lightly hammer it out, I used the wooden side of a hammer and tapped lightly. Place the new one in and you�re good to go.
Step 11- The circular object in the orange should slide out with much ease. In the 2nd picture it slides out again but in the red boxes, take note of how it fit in to the slits. Some parts are slightly curved or just plain sharp. You will see what I mean when you take it out. Put it back in the way it was exactly before.
Step 12- Eventually if you keep taking out the middle pieces, it�ll look like the picture n the left. In the left is the final o ring.
Step 13- To be obvious, you should have used up every single o ring in the seal kit if you did it correctly. Final notes: put back the pump in the reverse order. The hardest part, now, is putting back on the ABC pulley. In order to put the ABC pulley, you must heat it on the stove (remember to already have the snap clip on the pump prior to this step). After the pulley is hot enough, using pliers, place it back on the ABC pump. If it was hot enough, the metal expanded and it should slip right on with ease back onto the pump. To cool the pulley, I poured water on it.
Final thoughts: I only rebuilt the pump because it was spewing tons of oil so I knew there were damaged o rings inside the unit. I placed back on the pump onto the engine and no longer have the ABC warning on the dash. After installation, I filled up the ABC and power steering reservoir with Pentosin CHF11S Hydraulic oil to levels that were appropriate. I then turned on the car, and cycled the hydraulic up and down to lift and lower the car at least 15 times. Also, I turned the steering wheel left and right for the power steering fluid.
I didn't really know where this belonged, and I hadn't seen anyone try to rebuild this troublesome pump. The procedure actually didn't seem too bad it just takes a long time to take out, fix, install, and then pour back fluid. I know how frustrating it can be to have to shell out $1400 for a new pump + labor to fix this annoying ABC problem.
So my dad and I just did probably one of the most annoying rebuild jobs on this pump, but it actually was not very bad. I spent hours looking for a rebuild kit, and I managed to find only one place selling for $69. It's a hefty price, but worth it if you don't want to pay $1300-$2000 for a new pump. In this installation, you can and should replace the ABC micron filter and the power steering filter. I no longer receive the ABC warning light on the dash.
Mercedes Benz ABC Pump Seal Kit MBZABCSEALKIT:
http://www.invasionautoproducts.com/mebeabcpusek.html
The seal kit contains every single o-ring you'll need to completely replace all the o-rings inside the pump.
I should've took pictures to completely document how we did the entire procedure but I will try to give exact steps from pictures sourced from a German automotive site (I used google chrome to translate).
German automotive site where pictures were sourced: http://hehlhans.de/sl55amg-tandem.htm#b4
Step 1- Remove ABC pump pulley, I used pulley puller to remove the pulley.
This part is probably the hardest part to rebuilding the pump. Taking about one hour to remove the pulley, I heard at least 3 loud clicks as it was moving out.

Step 2- Remove the cover and it should now look like this. The yellow arrow points to a snap clip you must remove after you take off the ABC pulley. I used a snap clip plier to make it easier.

Step 4- Note the O rings I have marked with yellow arrows
Special tool needed: Hollow torx bit (Torx 40 I think)
Remove the 4 hollow hexagon screw

Step 5- Remove all the other screws all around
Special tool not needed

After you remove all these hexagonal screws all around, take out the springs followed by the pressure pistons.

Notice how some of the springs are also broken. Mine were not broken so they did not have to be replaced, but the spring dimensions: length 31 mm, outer diameter 9.2 mm, wire thickness 1.25 mm.
Step 6- Another o ring�

Step 7- Notice the o ring on the inner side. I used a screwdriver and a wooden hammer to lightly tap it out and replaced it right away. Note which side faces out and which side faces in.

Step 8- MORE O RINGS�

Step 9- Unscrew and remove the opposite side now

Step 10- O ring first
The center o ring is comprised of the two rings in the picture on the left. If you look closely the gray and blue fit into each other like a puzzle, but there is also an o ring in between them as well. To remove the older gray and blue o ring, use a screw driver and lightly hammer it out, I used the wooden side of a hammer and tapped lightly. Place the new one in and you�re good to go.

Step 11- The circular object in the orange should slide out with much ease. In the 2nd picture it slides out again but in the red boxes, take note of how it fit in to the slits. Some parts are slightly curved or just plain sharp. You will see what I mean when you take it out. Put it back in the way it was exactly before.

Step 12- Eventually if you keep taking out the middle pieces, it�ll look like the picture n the left. In the left is the final o ring.

Step 13- To be obvious, you should have used up every single o ring in the seal kit if you did it correctly. Final notes: put back the pump in the reverse order. The hardest part, now, is putting back on the ABC pulley. In order to put the ABC pulley, you must heat it on the stove (remember to already have the snap clip on the pump prior to this step). After the pulley is hot enough, using pliers, place it back on the ABC pump. If it was hot enough, the metal expanded and it should slip right on with ease back onto the pump. To cool the pulley, I poured water on it.
Final thoughts: I only rebuilt the pump because it was spewing tons of oil so I knew there were damaged o rings inside the unit. I placed back on the pump onto the engine and no longer have the ABC warning on the dash. After installation, I filled up the ABC and power steering reservoir with Pentosin CHF11S Hydraulic oil to levels that were appropriate. I then turned on the car, and cycled the hydraulic up and down to lift and lower the car at least 15 times. Also, I turned the steering wheel left and right for the power steering fluid.
I HAVE CL55 AND I ALREADY OPEND MY ABC PUMP.IF I BUY THIS ABC KIT, DO YOU THINK IT WILL FIT MY CL55 2001 MODEL?
IS YOUR CAR IS SAME AS MINE?
PLEASE REPLY ME BECAUSE I WANT TO BUY IT FROM THE WEBSITE.
REGARDS,
Thread Starter
Junior Member
Joined: Jul 2013
Posts: 25
Likes: 8
CL55 AMG
FYI: I am not responsible for any damages or problems that you cause to your own vehicle or pump, this is merely a guide for a DIY.
Junior Member
Joined: Dec 2012
Posts: 41
Likes: 3
From: Lebanon pa
s600 amg renntech/ brabus
Is this to fix the pressure drop too. Mine is not leaking just get red display and says 5 bar but car works fine no sag and when first start it works good raises and lowers but has white display from the start but all works. And only code is about pressure but if I open bleeder when engine off to lower struts then start it shows red but yet it raises it up. Mer benz is lost. Cause pump kicks out rodeo but is showing 197 bar when display is white but second goes red it says 5 bar. But shut off and boom right to white and 197 bar. Give it a second and red back down. And restart back to normal. See pattern they are lost and only code was for low pressure but before this was right front strut plunger and put new strut now this but it works other then light. So annyoing
Junior Member
Joined: Dec 2012
Posts: 41
Likes: 3
From: Lebanon pa
s600 amg renntech/ brabus
Anyone. Need to know if this will fix a pressure drop. I might do it to do it. But if anyone knows more it would help only code is cause it drops pressure fluid looks great filter clean. I just don't know and same with Mercedes Benz but of course they want to throw parts at it. So yeah buy whole new system and guess what it will work..... duh. But any help guys.
Junior Member
Joined: Dec 2012
Posts: 41
Likes: 3
From: Lebanon pa
s600 amg renntech/ brabus
I do have a drop. When started it is at 197bar then display goes to white abc visit work shop because it drops randomly. Then after fluid warm it goes red and down to 5 bar. But if you restart car like min of tow later it stays white for like five min. Then drops pressure again and boom red. And not one leak and no sagging. But funny thing I showed deal is when is says 5bar you can open bleeder and strut falls but close bleeder and it lifts car. And like dealer says if at five bar it can't lift the front. Plus it stayes level but gets spungy only when light is red other wise it's normal. Will let u guys know since no leaks or bleeding down maybe those springs mentioned in this maybe they broke is there anything in here I need to change or causes the pump to loose pressure. What builds the pressure. O and guys I will be making a filter to fit between tank and pump. Idk y they filter the return. Will let u know whet I come up with and a way to change with out draining tank.
MBWorld Fanatic!


Joined: Nov 2001
Posts: 6,340
Likes: 22
From: Southern California, USA
2003 CL55 AMG
Possible pressure sensor going bad?
I do have a drop. When started it is at 197bar then display goes to white abc visit work shop because it drops randomly. Then after fluid warm it goes red and down to 5 bar. But if you restart car like min of tow later it stays white for like five min. Then drops pressure again and boom red. And not one leak and no sagging. But funny thing I showed deal is when is says 5bar you can open bleeder and strut falls but close bleeder and it lifts car. And like dealer says if at five bar it can't lift the front. Plus it stayes level but gets spungy only when light is red other wise it's normal. Will let u guys know since no leaks or bleeding down maybe those springs mentioned in this maybe they broke is there anything in here I need to change or causes the pump to loose pressure. What builds the pressure. O and guys I will be making a filter to fit between tank and pump. Idk y they filter the return. Will let u know whet I come up with and a way to change with out draining tank.

Newbie
Joined: Jan 2014
Posts: 3
Likes: 0
05 Renntech S600
ABC White Warning When Started Drives 5 Minutes Red Light Car Drops To Blocks
I do have a drop. When started it is at 197bar then display goes to white abc visit work shop because it drops randomly. Then after fluid warm it goes red and down to 5 bar. But if you restart car like min of tow later it stays white for like five min. Then drops pressure again and boom red. And not one leak and no sagging. But funny thing I showed deal is when is says 5bar you can open bleeder and strut falls but close bleeder and it lifts car. And like dealer says if at five bar it can't lift the front. Plus it stayes level but gets spungy only when light is red other wise it's normal. Will let u guys know since no leaks or bleeding down maybe those springs mentioned in this maybe they broke is there anything in here I need to change or causes the pump to loose pressure. What builds the pressure. O and guys I will be making a filter to fit between tank and pump. Idk y they filter the return. Will let u know whet I come up with and a way to change with out draining tank.


