


CLK AMG Black Series paddle shifter retro-fit
Thread Starter
MBWorld Fanatic!
Joined: Jul 2010
Posts: 4,748
Likes: 0
From: A Canadian in Dubai, United Arab Emirates
'05 C200K SS, '05 Kleemann CLK500K, '08 Hummer H3 & '92 Z34 5sp (track car in Canada)
CLK AMG Black Series paddle shifter retro-fit
RETRO-FITTING CLK AMG BLACK SERIES PADDLE SHIFTERS TO A 209 CLK500 WITH DUAL PHASE (up/down on both sides) SHIFT BUTTONS
Out of all the mods that non-AMG 209 guys seem to want to do, this appears to be the most popular behind quad exhaust, but reading several other threads on this forum and others it has always seemed like it was a very time consuming and complicated project.
Not anymore�
I�ll go through how I got everything installed and working, you�ll find that it�s actually incredibly simple, even I was surprised.
First thing is to make sure you have all the tools needed all available, here is what you will need (in order of when you need it);
8mm socket
�� ratchet wrench
�� ratchet wrench short extension
#30 Torx bit
Small flat blade terminating screwdriver
10mm hex bit (or #55 Torx bit)
�� ratchet wrench
�� ratchet wrench long extension
Dremel with thin cutoff wheels
Needle nose pliers
Drill
2mm drill bit
4mm drill bit
Screws (x2)
Phillips screwdriver
JD and ice for the celebration AFTER the test drive!
First thing, get into the car, crack the windows down half an inch, move your seat back all the way, then extend the steering wheel all the way towards you, make sure the wheels and steering wheel are straight. Next, remove the negative battery cable from the strut tower post using the 8mm socket and leave the car for at least 20 minutes � this is to disable the SRS system. Leave the hood up, if you close it the cable could make contact with the hood and complete a circuit.
After at least 20 minutes, use the #30 torx bit with the short �� extension and socket wrench and loosen off the two screws holding the airbag/center section onto the steering wheel. The screws will stay in the steering wheel housing.
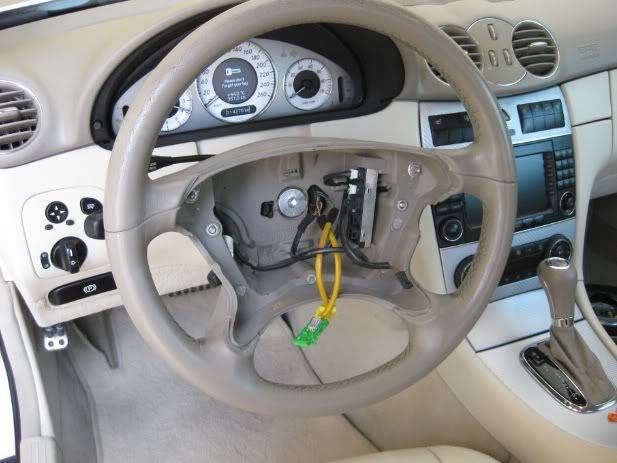
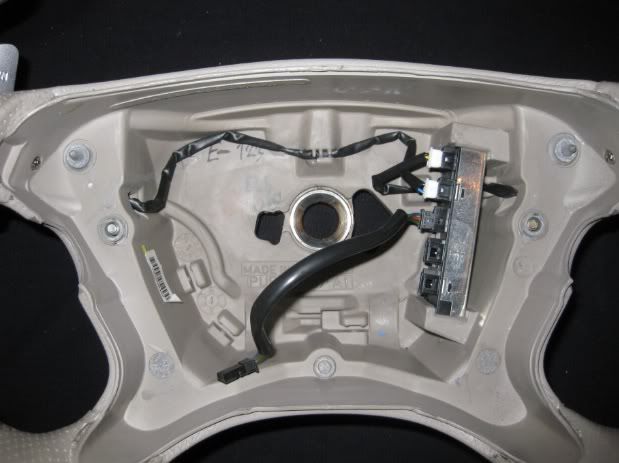
With the airbag/center section free, remove the short wire/data connection for the steering wheel controls, then use the terminating screw driver to remove the two orange retainers from the airbag wire harness clips, pull the two airbag clips straight off. The center section is now free. Place this in a plastic bag to keep it clean, lay it down with the Mercedes star facing up. You will now see the single retaining bolt holding the steering wheel in place, use the 10mm hex bit, �� ratchet wrench and long extension to remove it being very careful not to strip it. It is torqued down and has Loctite on it, be a man about it, not a job for a M3 driver�
Now, BEFORE you remove the wheel, notice that the wheel and column spine have identifying marks on them, take note of the position and replace the wheel the same way otherwise driving straight will not have the wheel centered at 12 o�clock.

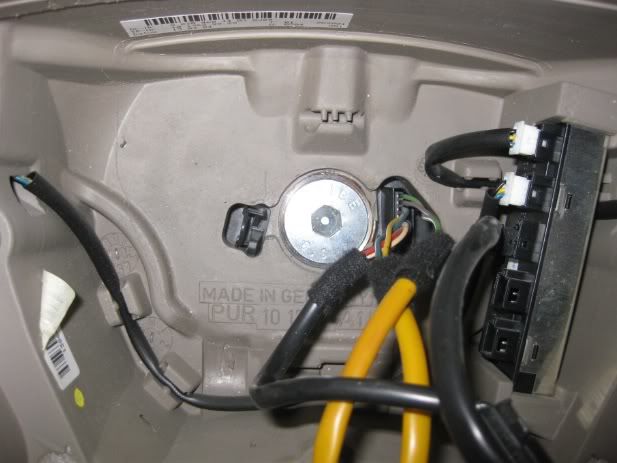
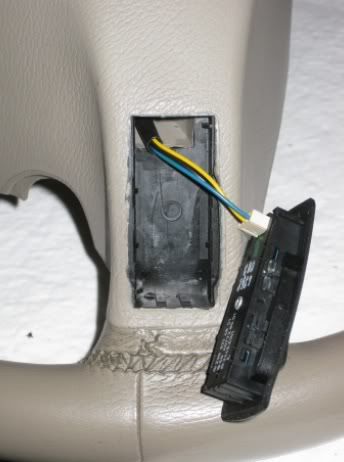
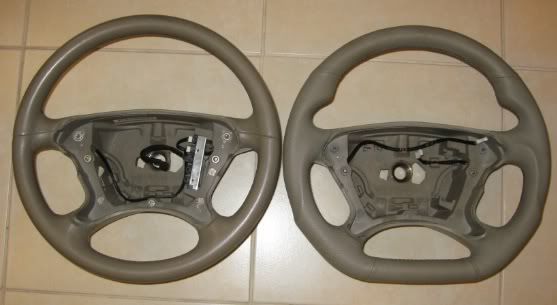
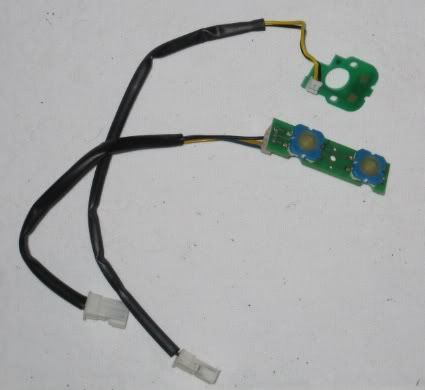
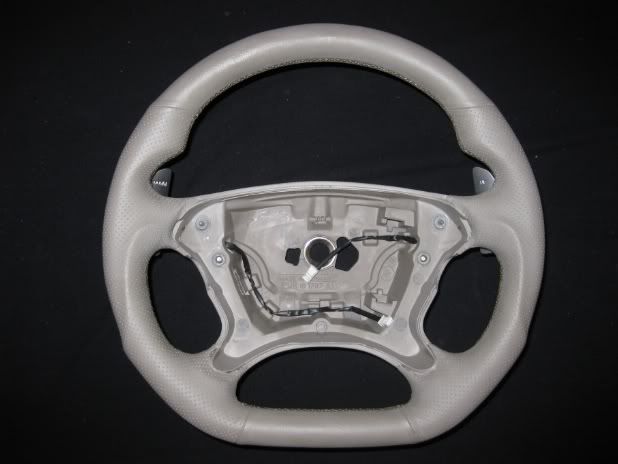
With the wheel now off, remove the internal terminating block noting the position of the master connection, mark it for future reference. Flip the wheel over and remove the OEM shift buttons by sliding a butter knife between them and the wheel, give it a slight twist and they pop right out, they are just press-fit in place. Your wheel will now be bare.
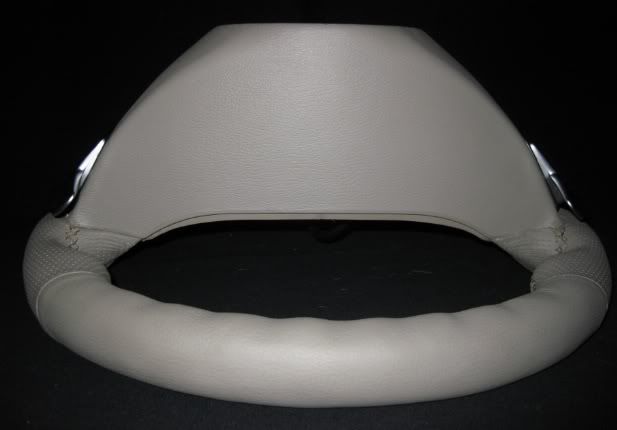
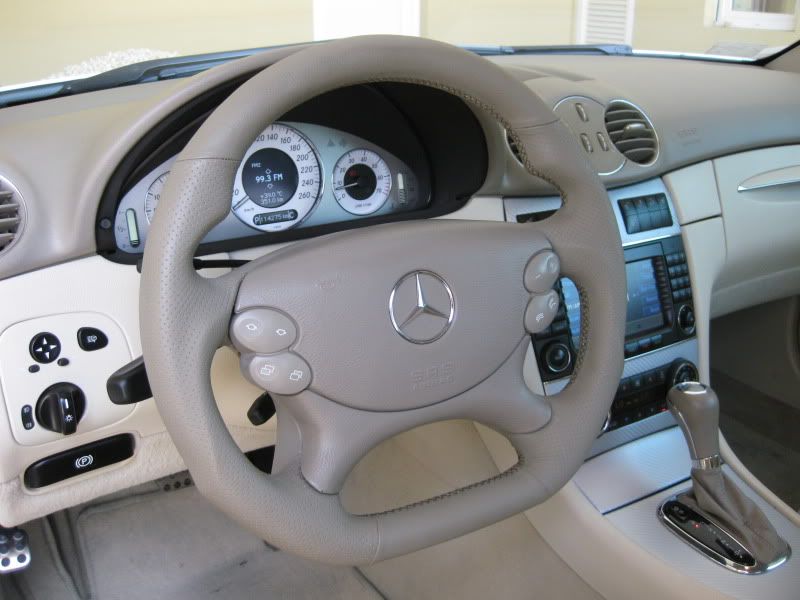
I am taking this opportunity to install my customized Black Series steering wheel at the same time.
This is a good time to explain why this is such a simple retrofit, I�ll explain then get back to the install.
I�m sure that everyone interested in the mod has read the several threads already written whereas guys have fitted these onto other MB�s with the single phase (up/down on separate sides of the wheel) shift buttons � all of them have had to remove the circuit board from the OEM button, mill it down and fit it into the AMG paddle housing. They have done this because the resistance between the OEM buttons and new AMG paddles is different � I had always presumed that both had resistive circuit boards with different ohm ratings. I even read a few articles where guys have measured the two sets and posted the ohm readouts, always different numbers, never any consistency. Anyways, when I had the OEM button and paddle side by side, I took them apart and took a look at the internals.
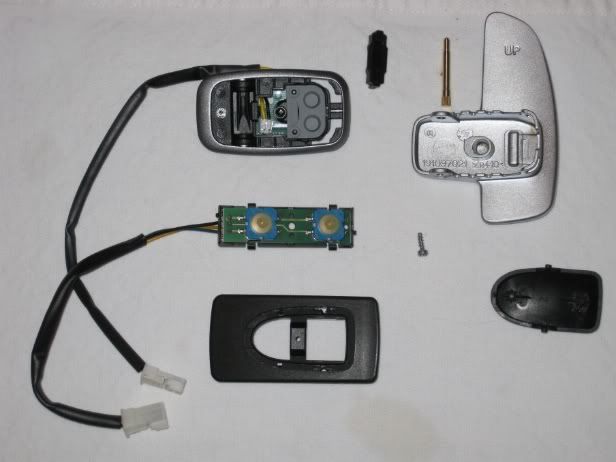
Simple rocker switches, no visible resistors. I metered them both with my Fluke and found that there was no resistance on either. This suddenly became obvious that it was in fact �plug and play� electronically, I was positive there would be no need to swap electronics from the OEM buttons to the paddles so I moved forward with the job to test my theory.
Back to the install steps.
To properly get the paddle fit in the wheel and line it up for the hole that will need to be drilled later it makes life a whole lot easier to take one paddle apart and end up with just the base in your hand. It�s very simple to do, push the brass pin out of the paddle assembly and everything comes apart nicely. I took an OEM button apart and dremeled it out for the sole reason to show that the new paddle base is quite a bit smaller than the OEM button.
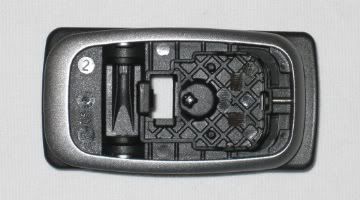
You will find that the paddle base will not fit width wise into the steering wheel because the OEM buttons are thinner, queue the dremel.
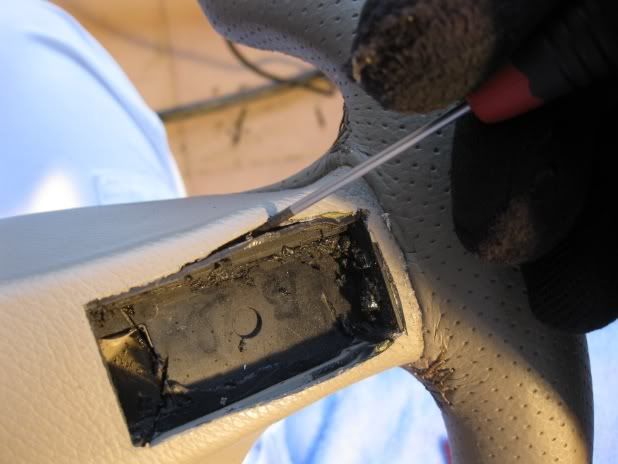
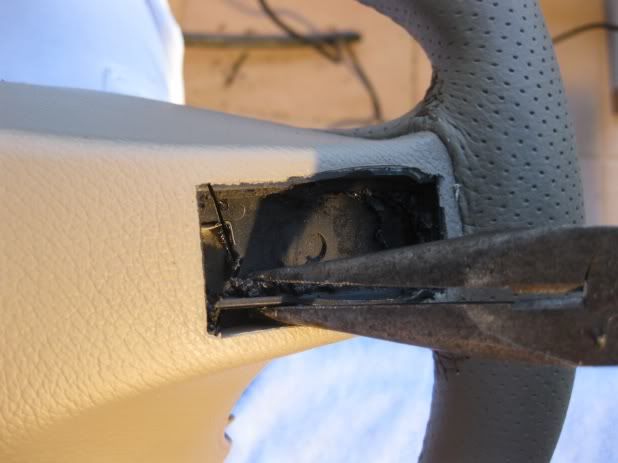
This next part of the retrofit is very simple but can go very wrong if you aren�t careful! You need to dremel out the plastic sides on the OEM button housings on the steering wheel � it is hard plastic. Once you get through it the steering wheel is a very, very soft rubber foam � if you go too far you will cut right through the wheel so a slow steady hand is paramount. I�ve got quite a few years of doing stuff like this behind me so my advice is that if you haven�t used a dremel before, you should seriously consider having someone else do this. Most custom car audio installation shops that turn out big builds have guy that work with dremels all day long, you should be able to find a guy that can do this for you. However, if you�re the man and are ready, read on�
You are going to need thin cutoff disks and in different diameters. A new full size disk is used to cut along the base of the housing into the side supports. A smaller size disk is needed to cut into the corners without cutting into the wheel itself. I just took a new disk and slowly wore it down to the proper size by �cutting� into a rock. Crude but it works perfectly, been doing it this way for years.
After you�ve got your cuts done, take your small flat blade terminating screw driver and move the foam rubber away from the housing so you can get your needle nose pliers in there. Grip one corner at a time right next to the vertical cut and slowly angle in toward the housing while giving it a little twist, it�ll break free easily. Do this on the other end, the piece of plastic will come out, repeat on the other side.
Now that you have the four OEM side supports cut out, you will see that the paddle base easily fits into the wheel. I centered the base so the front caught the lip of the OEM support housing giving it a little extra strength as now the sides are just foam rubber. With it centered, mark a small dot on either side of the screw housing, then sit the steering wheel so the housing is level and drill a pilot hole, I use a 2mm bit. Follow this with a 4mm bit. You�ll end up with a perfectly lined up hole.


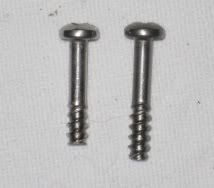
For projects like this I like using a coarse thread screw, they grab quickly and hold very well. I had a few sitting around from previous projects but they were slightly long so I used the dremel and cut them down to the proper required length.
Now, reassemble your paddle and secure them onto the steering wheel with the screws, tighten to a firm snug fit, don�t over tighten. You�ll now have your first look at the paddles on the wheel. You�ll immediately notice the feel of the paddle and the �click� of the switch is a drastic improvement over the dual phase buttons you just replaced.
Re-install the termination block into the wheel plugging in the new paddles and route the wires as shown.
Fit the steering wheel back into the car making sure to align it with the marks noted when first removed. Everything else goes in reverse of the steps to remove the wheel, very simple stuff. When you have everything all back together, reconnect the battery, set your clock and the windows � you�re done.
The total time it took me to do this project (minus the 20 minutes spent taking apart the OEM buttons and metering � you don�t need to do this) was just under an hour. The look is great but most importantly to me, the control is far superior to the clumsy buttons � a major benefit for me while road course racing.
I have a feeling I�m going to be seeing a whole lot of these conversions now�
*EDIT* Just noticed that the pic of the wheel in the car is when I test fit it before the paddles were installed.
Out of all the mods that non-AMG 209 guys seem to want to do, this appears to be the most popular behind quad exhaust, but reading several other threads on this forum and others it has always seemed like it was a very time consuming and complicated project.
Not anymore�
I�ll go through how I got everything installed and working, you�ll find that it�s actually incredibly simple, even I was surprised.
First thing is to make sure you have all the tools needed all available, here is what you will need (in order of when you need it);
8mm socket
�� ratchet wrench
�� ratchet wrench short extension
#30 Torx bit
Small flat blade terminating screwdriver
10mm hex bit (or #55 Torx bit)
�� ratchet wrench
�� ratchet wrench long extension
Dremel with thin cutoff wheels
Needle nose pliers
Drill
2mm drill bit
4mm drill bit
Screws (x2)
Phillips screwdriver
JD and ice for the celebration AFTER the test drive!
First thing, get into the car, crack the windows down half an inch, move your seat back all the way, then extend the steering wheel all the way towards you, make sure the wheels and steering wheel are straight. Next, remove the negative battery cable from the strut tower post using the 8mm socket and leave the car for at least 20 minutes � this is to disable the SRS system. Leave the hood up, if you close it the cable could make contact with the hood and complete a circuit.
After at least 20 minutes, use the #30 torx bit with the short �� extension and socket wrench and loosen off the two screws holding the airbag/center section onto the steering wheel. The screws will stay in the steering wheel housing.
With the airbag/center section free, remove the short wire/data connection for the steering wheel controls, then use the terminating screw driver to remove the two orange retainers from the airbag wire harness clips, pull the two airbag clips straight off. The center section is now free. Place this in a plastic bag to keep it clean, lay it down with the Mercedes star facing up. You will now see the single retaining bolt holding the steering wheel in place, use the 10mm hex bit, �� ratchet wrench and long extension to remove it being very careful not to strip it. It is torqued down and has Loctite on it, be a man about it, not a job for a M3 driver�
Now, BEFORE you remove the wheel, notice that the wheel and column spine have identifying marks on them, take note of the position and replace the wheel the same way otherwise driving straight will not have the wheel centered at 12 o�clock.
With the wheel now off, remove the internal terminating block noting the position of the master connection, mark it for future reference. Flip the wheel over and remove the OEM shift buttons by sliding a butter knife between them and the wheel, give it a slight twist and they pop right out, they are just press-fit in place. Your wheel will now be bare.
I am taking this opportunity to install my customized Black Series steering wheel at the same time.
This is a good time to explain why this is such a simple retrofit, I�ll explain then get back to the install.
I�m sure that everyone interested in the mod has read the several threads already written whereas guys have fitted these onto other MB�s with the single phase (up/down on separate sides of the wheel) shift buttons � all of them have had to remove the circuit board from the OEM button, mill it down and fit it into the AMG paddle housing. They have done this because the resistance between the OEM buttons and new AMG paddles is different � I had always presumed that both had resistive circuit boards with different ohm ratings. I even read a few articles where guys have measured the two sets and posted the ohm readouts, always different numbers, never any consistency. Anyways, when I had the OEM button and paddle side by side, I took them apart and took a look at the internals.
Simple rocker switches, no visible resistors. I metered them both with my Fluke and found that there was no resistance on either. This suddenly became obvious that it was in fact �plug and play� electronically, I was positive there would be no need to swap electronics from the OEM buttons to the paddles so I moved forward with the job to test my theory.
Back to the install steps.
To properly get the paddle fit in the wheel and line it up for the hole that will need to be drilled later it makes life a whole lot easier to take one paddle apart and end up with just the base in your hand. It�s very simple to do, push the brass pin out of the paddle assembly and everything comes apart nicely. I took an OEM button apart and dremeled it out for the sole reason to show that the new paddle base is quite a bit smaller than the OEM button.
You will find that the paddle base will not fit width wise into the steering wheel because the OEM buttons are thinner, queue the dremel.
This next part of the retrofit is very simple but can go very wrong if you aren�t careful! You need to dremel out the plastic sides on the OEM button housings on the steering wheel � it is hard plastic. Once you get through it the steering wheel is a very, very soft rubber foam � if you go too far you will cut right through the wheel so a slow steady hand is paramount. I�ve got quite a few years of doing stuff like this behind me so my advice is that if you haven�t used a dremel before, you should seriously consider having someone else do this. Most custom car audio installation shops that turn out big builds have guy that work with dremels all day long, you should be able to find a guy that can do this for you. However, if you�re the man and are ready, read on�
You are going to need thin cutoff disks and in different diameters. A new full size disk is used to cut along the base of the housing into the side supports. A smaller size disk is needed to cut into the corners without cutting into the wheel itself. I just took a new disk and slowly wore it down to the proper size by �cutting� into a rock. Crude but it works perfectly, been doing it this way for years.
After you�ve got your cuts done, take your small flat blade terminating screw driver and move the foam rubber away from the housing so you can get your needle nose pliers in there. Grip one corner at a time right next to the vertical cut and slowly angle in toward the housing while giving it a little twist, it�ll break free easily. Do this on the other end, the piece of plastic will come out, repeat on the other side.
Now that you have the four OEM side supports cut out, you will see that the paddle base easily fits into the wheel. I centered the base so the front caught the lip of the OEM support housing giving it a little extra strength as now the sides are just foam rubber. With it centered, mark a small dot on either side of the screw housing, then sit the steering wheel so the housing is level and drill a pilot hole, I use a 2mm bit. Follow this with a 4mm bit. You�ll end up with a perfectly lined up hole.
For projects like this I like using a coarse thread screw, they grab quickly and hold very well. I had a few sitting around from previous projects but they were slightly long so I used the dremel and cut them down to the proper required length.
Now, reassemble your paddle and secure them onto the steering wheel with the screws, tighten to a firm snug fit, don�t over tighten. You�ll now have your first look at the paddles on the wheel. You�ll immediately notice the feel of the paddle and the �click� of the switch is a drastic improvement over the dual phase buttons you just replaced.
Re-install the termination block into the wheel plugging in the new paddles and route the wires as shown.
Fit the steering wheel back into the car making sure to align it with the marks noted when first removed. Everything else goes in reverse of the steps to remove the wheel, very simple stuff. When you have everything all back together, reconnect the battery, set your clock and the windows � you�re done.
The total time it took me to do this project (minus the 20 minutes spent taking apart the OEM buttons and metering � you don�t need to do this) was just under an hour. The look is great but most importantly to me, the control is far superior to the clumsy buttons � a major benefit for me while road course racing.
I have a feeling I�m going to be seeing a whole lot of these conversions now�
*EDIT* Just noticed that the pic of the wheel in the car is when I test fit it before the paddles were installed.
Last edited by Kevwood; Jun 28, 2011 at 08:24 AM.

Junior Member
Joined: Mar 2011
Posts: 38
Likes: 0
clk55 AMG 04
Well done, thanks for posting up. Where did you get the BS wheel from?
Do you know if the following wheel will work,
http://cgi.ebay.co.uk/Mercedes-SL-R2...#ht_3179wt_989
looks like it, except the wiring from my CLK55 w209 will need to be reused?
Do you know if the following wheel will work,
http://cgi.ebay.co.uk/Mercedes-SL-R2...#ht_3179wt_989
looks like it, except the wiring from my CLK55 w209 will need to be reused?
Thread Starter
MBWorld Fanatic!
Joined: Jul 2010
Posts: 4,748
Likes: 0
From: A Canadian in Dubai, United Arab Emirates
'05 C200K SS, '05 Kleemann CLK500K, '08 Hummer H3 & '92 Z34 5sp (track car in Canada)
Thanks, I got it from Steeringwheel Land, you should be able to find them on eBay. Because of the style I chose and the interior color it ended up being a long delivery time (5 months IIRC) but worth every minute of the wait - no one else wanted to make one in my color.
The wheel you linked will fit, it's a 209 part number.
The wheel you linked will fit, it's a 209 part number.
Last edited by Kevwood; Jun 28, 2011 at 10:53 AM.
MBWorld Fanatic!


Joined: May 2008
Posts: 1,250
Likes: 21
From: Los Angeles, CA
Supercharged CLK500,ML500,S580
Fantastic write-up Kev!
I bet there is going to be a bunch of conversions in the next coming months!
Unfortunately, the holy grail of conversions is adding paddle shifters to W209s without shift buttons (OEM buttons like your non-modded wheel) like my 2004
I bet there is going to be a bunch of conversions in the next coming months!
Unfortunately, the holy grail of conversions is adding paddle shifters to W209s without shift buttons (OEM buttons like your non-modded wheel) like my 2004
MBWorld Fanatic!
Joined: Jul 2010
Posts: 1,595
Likes: 1
From: Sweden
Mercedes CLK 320 W209
Great DIY Kev. As we discussed on the plane to London you had a idea how to make it work for W209 without shift buttons. Might be something I could try if you explained it to me again
Thread Starter
MBWorld Fanatic!
Joined: Jul 2010
Posts: 4,748
Likes: 0
From: A Canadian in Dubai, United Arab Emirates
'05 C200K SS, '05 Kleemann CLK500K, '08 Hummer H3 & '92 Z34 5sp (track car in Canada)
Trending Topics

MBWorld Fanatic!
Joined: Jun 2005
Posts: 1,280
Likes: 0
CLK550
Awesome write up. Did you have OEM shift paddles before? My mechanic at the shop said since i have the buttons on my steering wheel already, it should be a easy step to just swap them out(i'm not sure if i have to take out the airbag or not?).
MB World Stories
The Best of Mercedes & AMG

Manual Mercedes? 6 Times Sindelfingen Let Drivers Have All The Fun
Verdad Gallardo
Mercedes SLR McLaren 722 S Is Extremely Rare Example Modified by McLaren
Verdad Gallardo
8 Classic Boxy Mercedes Designs That Have Aged Like Fine Wine
Verdad Gallardo
Flawlessly Restored Mercedes 190E Evo II Heads to Auction
Verdad Gallardo
Electric Mercedes C-Class Unveiled: 11 Things You Need to Know
Verdad Gallardo
Mercedes EQS Gets A Major Update: Everything You Need to Know
Verdad Gallardo
5 Underrated Mercedes-Benz Models That Don't Get the Love They Deserve
Verdad Gallardo
Mercedes 300D Has Pushed Well Past 1 Million Miles and It Ain't Stopping
Verdad Gallardo
10 Most Reliable Mercedes-Benz Models You Can Buy Used
Verdad GallardoMBWorld Fanatic!
Joined: Mar 2008
Posts: 3,632
Likes: 150
C63s Cabriolet, BMW M4, Civic
Your mechanic is right. It pretty much plug-n-play if you already have the OEM shifter button on the back of the steering wheel like Kev's car. As for remove the airbag to do the mod, where's is your common senses?


Thread Starter
MBWorld Fanatic!
Joined: Jul 2010
Posts: 4,748
Likes: 0
From: A Canadian in Dubai, United Arab Emirates
'05 C200K SS, '05 Kleemann CLK500K, '08 Hummer H3 & '92 Z34 5sp (track car in Canada)
When it comes to electronics, things are never as easy as we hope in most cases. So, what OEM shift buttons do you have?
Thread Starter
MBWorld Fanatic!
Joined: Jul 2010
Posts: 4,748
Likes: 0
From: A Canadian in Dubai, United Arab Emirates
'05 C200K SS, '05 Kleemann CLK500K, '08 Hummer H3 & '92 Z34 5sp (track car in Canada)
Super Member
Joined: Jun 2011
Posts: 672
Likes: 0
From: San Diego North County
2015 E400 CAB, 2010 Jeep Compass, 2009 E350 Sedan
10 Min. install on mine, Pulled off the airbag on the wheel did not disconnect it bedside the neg. on the battery then removed the one screw on each paddle all plug in the play from there.
Thanks Kev for the documentation
Louie
Thanks Kev for the documentation
Louie
Junior Member
Joined: Mar 2011
Posts: 38
Likes: 0
clk55 AMG 04
Hey Louie,
So you basically bought the paddles and that's it, plug and play!?
So you basically bought the paddles and that's it, plug and play!?
Super Member
Joined: Jun 2011
Posts: 672
Likes: 0
From: San Diego North County
2015 E400 CAB, 2010 Jeep Compass, 2009 E350 Sedan

Junior Member
Joined: Apr 2010
Posts: 31
Likes: 0
From: Colorado
G500, CLK500
So did you have to dremel like Kevwood to get the new paddles to fit in the existing holes?
I just ordered them... and used the C63 part number floating around, though while I was on Parts.com I looked up a 2008 CLK "shift paddle" and they are $72? The price difference is negligible, but if they fit without dremeling that would be ideal.
Has everyone that has done it ordered the $100 (C63) ones?
Thread Starter
MBWorld Fanatic!
Joined: Jul 2010
Posts: 4,748
Likes: 0
From: A Canadian in Dubai, United Arab Emirates
'05 C200K SS, '05 Kleemann CLK500K, '08 Hummer H3 & '92 Z34 5sp (track car in Canada)
What are you doing with the OEM's you took off the wheel? I'm thinking about doing a retro-fit project on my C class to see if I can get them working on a car that didn't come with anything. I have a theory that just might work.
Out Of Control!!
Joined: Apr 2008
Posts: 10,275
Likes: 10
From: Jerzy
04 CLK 320 > CLK32K
Yeah, when you have the '07+ CLK it's a very simple swap since the wheel already has a set in it but for the guys with the buttons like I have, it's a little more work.
What are you doing with the OEM's you took off the wheel? I'm thinking about doing a retro-fit project on my C class to see if I can get them working on a car that didn't come with anything. I have a theory that just might work.
What are you doing with the OEM's you took off the wheel? I'm thinking about doing a retro-fit project on my C class to see if I can get them working on a car that didn't come with anything. I have a theory that just might work.
That would be EPIC!


