


P0015 - can magnets be replaced one at a time?

Thread Starter
Newbie
Joined: May 2018
Posts: 5
Likes: 1
CLK 550
P0015 - can magnets be replaced one at a time?
I have two new magnets but want to replace only one right now because of time and convenience. Will replacing only one of two (or even four) magnets cause problems?
I want to start on the left side (bank 1 per P0015 description) with the easy one first. On the M273 engine the second one is behind the oil cooler which with my big hands and arms might require me to remove radiator cross-member support and radiator top hose to get access to the bolts for the oil cooler. Then, I will need to order a gasket for the oil cooler and might as well get a new top coolant hose which looks like a tricky clamp connection at the radiator. So, while the first magnet will be easy to replace, the second one will take much longer.
2007 CLK 550
Thread Starter
Newbie
Joined: May 2018
Posts: 5
Likes: 1
CLK 550
Thanks, Rodney.
FYI to anyone else in the future:
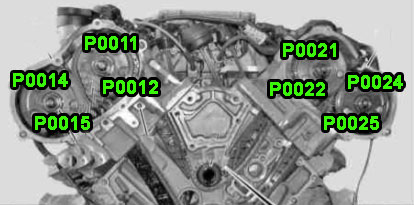
- Right side is bank 1
- Left side is bank 2
- P0011 and P0012 indicate RIGHT side intake
- P0014 and P0015 indicate RIGHT side exhaust
- P0021 and P0022 indicate LEFT side intake
- P0024 and P0025 indicate LEFT side exhaust
0059 Continuous camshaft adjustment ( RIGHT ): Incorrect position of the exhaust camshaft (P0014)
0060 Continuous camshaft adjustment ( RIGHT ): Incorrect position of the exhaust camshaft (P0015)
0063 Continuous camshaft adjustment ( LEFT ): Incorrect position of the exhaust camshaft (P0024)
0064 Continuous camshaft adjustment ( LEFT ): Incorrect position of the exhaust camshaft (P0025)
0271 Continuous camshaft adjustment ( RIGHT ): Incorrect position of the intake camshaft (P0011)
0272 Continuous camshaft adjustment ( RIGHT ): Incorrect position of the intake camshaft (P0012)
0275 Continuous camshaft adjustment ( LEFT ): Incorrect position of the intake camshaft (P0021)
0276 Continuous camshaft adjustment ( LEFT ): Incorrect position of the intake camshaft (P0022)
FYI to anyone else in the future:
- Right side is bank 1
- Left side is bank 2
- P0011 and P0012 indicate RIGHT side intake
- P0014 and P0015 indicate RIGHT side exhaust
- P0021 and P0022 indicate LEFT side intake
- P0024 and P0025 indicate LEFT side exhaust
0059 Continuous camshaft adjustment ( RIGHT ): Incorrect position of the exhaust camshaft (P0014)
0060 Continuous camshaft adjustment ( RIGHT ): Incorrect position of the exhaust camshaft (P0015)
0063 Continuous camshaft adjustment ( LEFT ): Incorrect position of the exhaust camshaft (P0024)
0064 Continuous camshaft adjustment ( LEFT ): Incorrect position of the exhaust camshaft (P0025)
0271 Continuous camshaft adjustment ( RIGHT ): Incorrect position of the intake camshaft (P0011)
0272 Continuous camshaft adjustment ( RIGHT ): Incorrect position of the intake camshaft (P0012)
0275 Continuous camshaft adjustment ( LEFT ): Incorrect position of the intake camshaft (P0021)
0276 Continuous camshaft adjustment ( LEFT ): Incorrect position of the intake camshaft (P0022)

MBWorld Fanatic!


Joined: Jun 2008
Posts: 1,227
Likes: 61
From: Atlanta Metro
2008 clk550 - Navigator - Frontier
The magnet and sensor behind the oil cooler and radiator elbow are for the intake of bank 2. I just changed magnets and sensors for bank 1 and the exhaust magnet and sensor for bank 2. Did not change the intake magnet and sensor because the 2 vertical screws for the elbow were damaged (Indy). I have the screws now and the gasket for the elbow and the oil cooler, but since they were changed at 50K miles I may not change them right now. They are working ok. The exhaust magnet and sensor for bank 2 can be changed w/o removing anything else.
Is it your intake for Bank 2 that is showing an error?
Is it your intake for Bank 2 that is showing an error?
Thread Starter
Newbie
Joined: May 2018
Posts: 5
Likes: 1
CLK 550
Thanks, Fatz. I'm new to M-B and I mistakenly assumed "bank 1" part of the generic P0015 description meant the left side. Then I learned bank 1 is where cylinder 1 is located and for M-B this is the right side. Then, I found a post from Rudeney some years back where he mapped each of the eight codes to their location. So, I lucked out with P0015 because it is the easiest to reach of the four magnets. Job all done now.

MBworld Guru
Joined: Dec 2009
Posts: 10,782
Likes: 1,011
NO LONGER ACTIVE
Note that when talking about "right" and "left" in a car, it is always relative to sitting in the cockpit looking out the front windshield. So, then standing in front of the engine with the hood up, the "right bank" will be on your left.
Here's the diagram you mentioned, from the perspective of standing in front of the engine (so left is right and right is left!):
Here's the diagram you mentioned, from the perspective of standing in front of the engine (so left is right and right is left!):

Senior Member
Joined: Sep 2002
Posts: 352
Likes: 12
From: Worcester, MA
15' CLS400
I have two new magnets but want to replace only one right now because of time and convenience. Will replacing only one of two (or even four) magnets cause problems?
I want to start on the left side (bank 1 per P0015 description) with the easy one first. On the M273 engine the second one is behind the oil cooler which with my big hands and arms might require me to remove radiator cross-member support and radiator top hose to get access to the bolts for the oil cooler. Then, I will need to order a gasket for the oil cooler and might as well get a new top coolant hose which looks like a tricky clamp connection at the radiator. So, while the first magnet will be easy to replace, the second one will take much longer.
2007 CLK 550
I want to start on the left side (bank 1 per P0015 description) with the easy one first. On the M273 engine the second one is behind the oil cooler which with my big hands and arms might require me to remove radiator cross-member support and radiator top hose to get access to the bolts for the oil cooler. Then, I will need to order a gasket for the oil cooler and might as well get a new top coolant hose which looks like a tricky clamp connection at the radiator. So, while the first magnet will be easy to replace, the second one will take much longer.
2007 CLK 550
 There is a video on youtube somewhere showing how to do it with a wrench.
Trending Topics
MBWorld Fanatic!
Joined: Jun 2008
Posts: 1,227
Likes: 61
From: Atlanta Metro
2008 clk550 - Navigator - Frontier
The WIS I saw also did not indicate that the oil cooler or coolant elbow needed to be removed to replace the magnets or sensors. It did reference an H-8 tool however. I believe this is similar to a crows foot attachment used to get into tight places. I didn't have one, and the torx screw sockets were too deep to use to remove the fasteners for the coil and sensor related to P0021 and P0022 in the drawing from Rodney. I will try one day during the winter, using a small ratcheting wrench.
I think for now, because that magnet and sensor are ok for me and the OP, we're good. I'll try to remember to follow up on if the wrench or shallow 1/4 inch socket woks on the 273. Thanks
I think for now, because that magnet and sensor are ok for me and the OP, we're good. I'll try to remember to follow up on if the wrench or shallow 1/4 inch socket woks on the 273. Thanks
MB World Stories
The Best of Mercedes & AMG

Manual Mercedes? 6 Times Sindelfingen Let Drivers Have All The Fun
Verdad Gallardo
Mercedes SLR McLaren 722 S Is Extremely Rare Example Modified by McLaren
Verdad Gallardo
8 Classic Boxy Mercedes Designs That Have Aged Like Fine Wine
Verdad Gallardo
Flawlessly Restored Mercedes 190E Evo II Heads to Auction
Verdad Gallardo
Electric Mercedes C-Class Unveiled: 11 Things You Need to Know
Verdad Gallardo
Mercedes EQS Gets A Major Update: Everything You Need to Know
Verdad Gallardo
5 Underrated Mercedes-Benz Models That Don't Get the Love They Deserve
Verdad Gallardo
Mercedes 300D Has Pushed Well Past 1 Million Miles and It Ain't Stopping
Verdad Gallardo
10 Most Reliable Mercedes-Benz Models You Can Buy Used
Verdad GallardoSenior Member
Joined: Jan 2018
Posts: 295
Likes: 24
From: Edmonton Area
2007 CLK550 Coupe, 2003 CL600, 2012
I replaced all 4 on my 07 clk550 without removing anything else, just unplug all the sensors in the area. The one behind the oil cooler was real tricky, but it just slid out with half a mm of clearence.

Junior Member
Joined: Nov 2007
Posts: 27
Likes: 1
From: Florida
CLK 350
I'm a year late to this party buy I also have P0015 and P0025 codes. Sounds like I need to replace these "magnets." If anyone can help with part numbers and/or recommend an on-line store to order from, I'd appreciate it...
Thanks!!!
Thanks!!!
Senior Member
Joined: Jan 2018
Posts: 295
Likes: 24
From: Edmonton Area
2007 CLK550 Coupe, 2003 CL600, 2012
Junior Member
Joined: Nov 2007
Posts: 27
Likes: 1
From: Florida
CLK 350
Senior Member
Joined: Jan 2018
Posts: 295
Likes: 24
From: Edmonton Area
2007 CLK550 Coupe, 2003 CL600, 2012
Junior Member
Joined: Nov 2007
Posts: 27
Likes: 1
From: Florida
CLK 350
Got Bank 1 done...Easy-Peasy! On to Bank 2 (left side). Besides the oil cooler contraption, there's another reservoir of some sort. Black with a cap on it. At first, I thought to just loosen the 3 torx bolts and it would come off. Well...
The f**kin' thing just won't come off! Kept looking for another bolt (all 3 completely loosened) and couldn't find anything. Shoved a mirror underneath and didn't see anything. Gently twisted and pulled but still no result. The most frustrating...the ONE magnet screw is RIGHT THERE but I can't get to it!!!
Any help would be appreciated!!!

Senior Member


Joined: Feb 2019
Posts: 337
Likes: 53
From: CA
2010 E550 Coupe
Interesting- maybe this is a job I can do myself then. Can you elaborate on unplugging sensors?
Junior Member
Joined: Nov 2007
Posts: 27
Likes: 1
From: Florida
CLK 350
BTW...still looking for some help with getting the reservoir out of the way on the left side. Any suggestions would be appreciated!
Junior Member
Joined: Nov 2007
Posts: 27
Likes: 1
From: Florida
CLK 350
**UPDATE** For those following, here's some further information on the magnet replacement project:
1. Started with check engine codes P0015 and P0025...Cam solenoid (magnet) failure;
2. Took Kelvin's advice and order a kit from FCU EURO. $125 with tax and shipping. Four magnets plus oil cooler filter and gasket. Prompt delivery. VERY helpful in providing installation instructions and communications via e-mail;
3. Bank 1 (Passenger side) replacement easy peasy! 1/4" socket was all that was needed on torx shaped bolts. Old solenoid out; new solenoid right back in;
4. Bank 2 was challenging. Bottom bolt on both magnets tucked behind oil cooler and power steering reservoir respectively;
5. Tried to remove both components so I could access the bolts. What a pain in the ***! Just couldn't do it without spilling lots of fluids, especially power steering reservoir;
6. Checked out YouTube and found a video in which a guy used a !/4" box wrench to slip behind both the oil cooler and the reservoir and was able to grasp and loosen both of the bolts;
7. It was very helpful to detach the solenoids as well as take off the power steering reservoir cap to make for a little easier access;
8. Old magnets out; new magnets in. Just a little challenging to hand screw the bottom bolts but, once in, was able to use the 1/4" box wrench to tighten.
Thanks again to everyone for your input and help!
Last edited by JayDV; Dec 22, 2019 at 08:36 AM.


