DIY Amplifier and Subwoofer Install (4 hours total)
 11-22-2010, 06:24 AM
#1
Member
Thread Starter

Join Date: May 2010
Posts: 77
Likes: 0
Received 0 Likes
on
0 Posts
Lexus GS400
DIY Amplifier and Subwoofer Install (4 hours total)
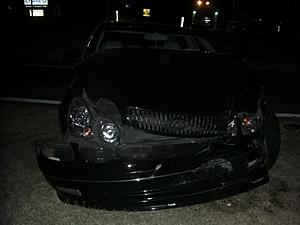
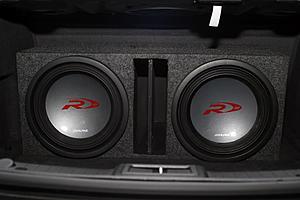
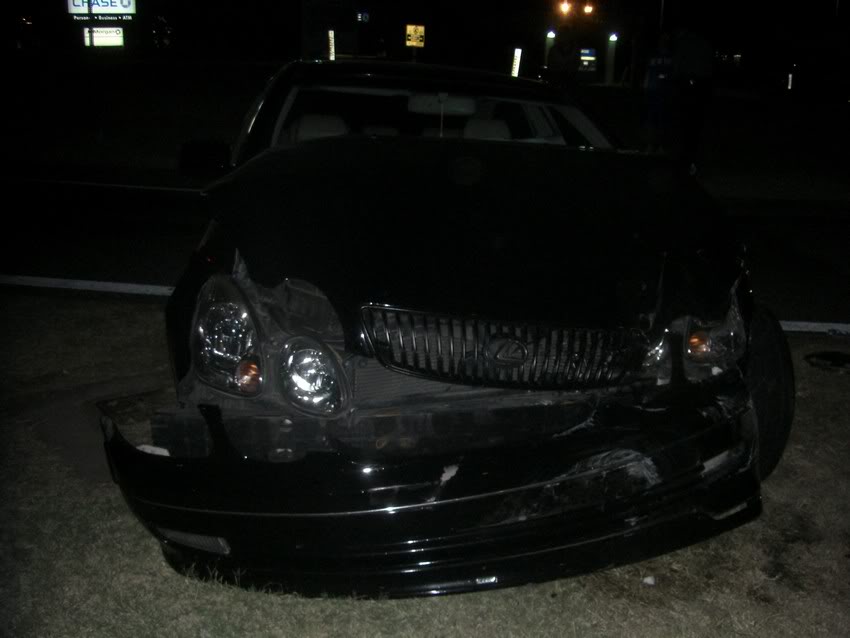
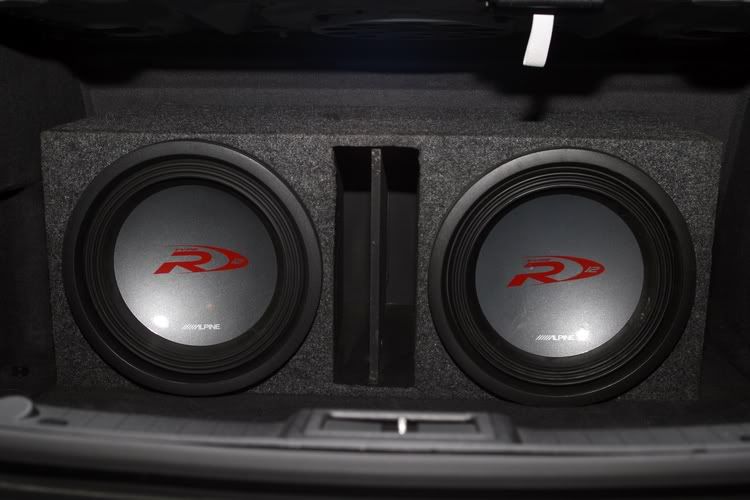
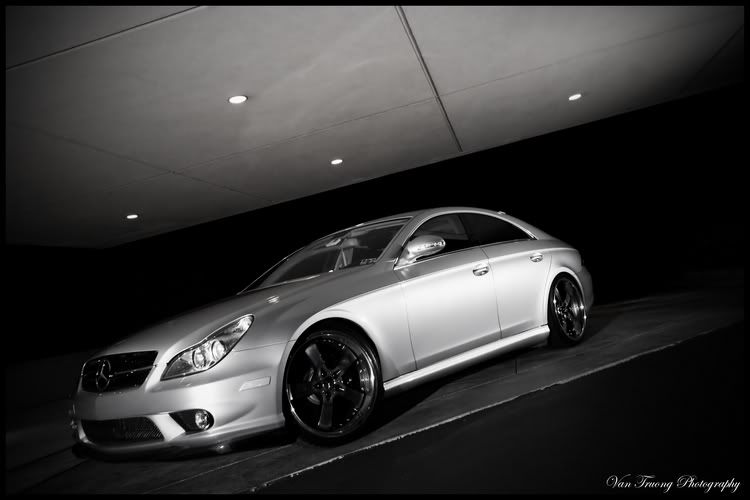
Hello all! I recently got this car (completely stock) in August 2010. I had an audio system from my previous car just collecting dust in my garage. The system cost me less than $400 (wiring included) used. It was from my Lexus GS400 (pictured below), after it was totaled by getting hit on the front wheel by a hit-and-run driver.

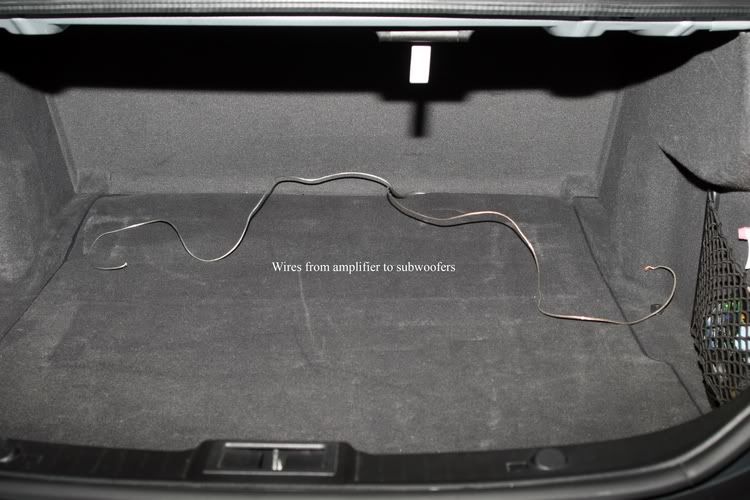
My cousin and I started on the install at 11pm and ended at 2:50am. It was the easiest and most leisurely installs in my entire life. It's because all the wires that must be accessed are all located in the trunk! Nothing is needed to be run through the firewall or from the engine compartment to the trunk.
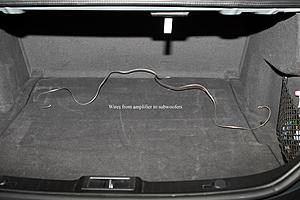
I was able to locate the audio signal wires going to the stock subwoofer, without removing the decklid. The wires are visible if you are lying on your back looking up at the decklid (through the hole) towards the driver's side. I then routed the wires and hooked up an RCA plug to those wires (without a line output converter). It works great.
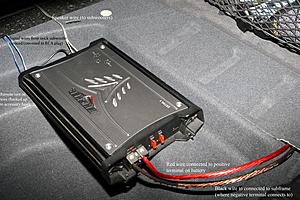
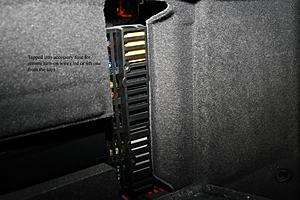
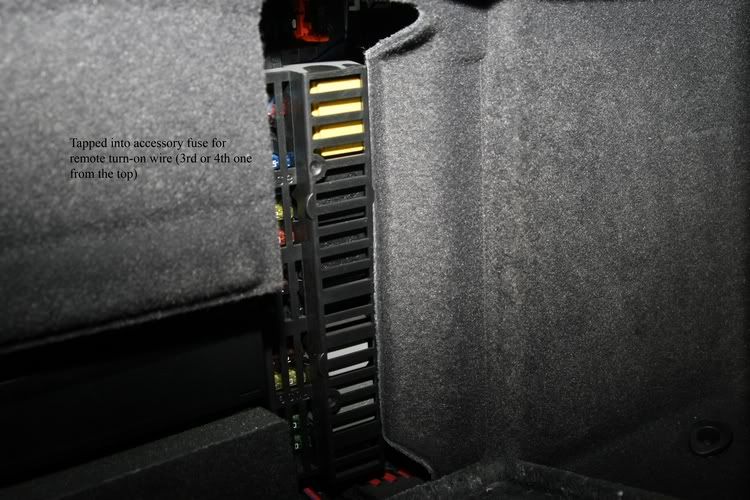
The remote turn-on wire was connected to one of the accessory fuses in the fuse box next to the stock DVD navigation unit (on the driver's-side).
The positive amplifier wire was connected directly to the positive terminal of the battery. The negative amplifier wire was connected to the bolt that secures the wire of the negative battery terminal (to the sub-frame of the car).
I did not take any pictures during the wiring process. One thing to note: make sure you have a voltmeter during the install. Lastly, the system sounds great with the stock Comand headunit/processor. Enjoy the pictures!

Crappy picture of exterior of car:
IMG_6586copy_filteredcopy.jpg?t=1290423084

My cousin and I started on the install at 11pm and ended at 2:50am. It was the easiest and most leisurely installs in my entire life. It's because all the wires that must be accessed are all located in the trunk! Nothing is needed to be run through the firewall or from the engine compartment to the trunk.
I was able to locate the audio signal wires going to the stock subwoofer, without removing the decklid. The wires are visible if you are lying on your back looking up at the decklid (through the hole) towards the driver's side. I then routed the wires and hooked up an RCA plug to those wires (without a line output converter). It works great.
The remote turn-on wire was connected to one of the accessory fuses in the fuse box next to the stock DVD navigation unit (on the driver's-side).
The positive amplifier wire was connected directly to the positive terminal of the battery. The negative amplifier wire was connected to the bolt that secures the wire of the negative battery terminal (to the sub-frame of the car).
I did not take any pictures during the wiring process. One thing to note: make sure you have a voltmeter during the install. Lastly, the system sounds great with the stock Comand headunit/processor. Enjoy the pictures!


Crappy picture of exterior of car:
IMG_6586copy_filteredcopy.jpg?t=1290423084

 11-22-2010, 10:13 AM
#3
Senior Member

Join Date: Feb 2005
Location: orlando, florida. Dr.Phillips, UCF
Posts: 303
Likes: 0
Received 0 Likes
on
0 Posts
04 CLK 500, 07 GSX-R 750, S 550, 09 Jeep GC
yea how does that sound?
I have 2, 10's in a sealed Box, didn't go ported, becuase i wanted to lessen the chances of exterior vibration caused by increased movement of air with a ported box.
how many watts are you running?
looks like 8 guage power cable?
I have 2, 10's in a sealed Box, didn't go ported, becuase i wanted to lessen the chances of exterior vibration caused by increased movement of air with a ported box.
how many watts are you running?
looks like 8 guage power cable?
11-22-2010, 11:41 AM
#4

Looks great man...gotta hear that bass for sure (it will be on Tuesday night at 11  ) . I think im gona add like a single 12" to my benz too but that wont happen until i get back from houston. Lets do some lunch on tuesday...just txt me.
Edit: He is the one did the photoshoot my car ...thanks again dude.
Andy
) . I think im gona add like a single 12" to my benz too but that wont happen until i get back from houston. Lets do some lunch on tuesday...just txt me.Edit: He is the one did the photoshoot my car ...thanks again dude.
Andy
11-22-2010, 03:46 PM
#5
Member
Thread Starter
Join Date: May 2010
Posts: 77
Likes: 0
Received 0 Likes
on
0 Posts
Lexus GS400
Edit: it's cheap 6 gauge wire.
11-29-2010, 10:13 PM
#7
Junior Member

Join Date: Nov 2010
Posts: 24
Likes: 0
Received 0 Likes
on
0 Posts
CLS 550
How's the sound compared to your Lexus? I am looking at adding a sub, but heard that the factory amp is crossed over at a high pass frequency, so the sub, although will work doesn't sound as deep?
Trending Topics
12-01-2010, 01:56 PM
#8
Member
Thread Starter
Join Date: May 2010
Posts: 77
Likes: 0
Received 0 Likes
on
0 Posts
Lexus GS400
It sounds much sharper in the Mercedes than in the Lexus. I think it's due to better stock processing in the Mercedes. I hooked the system up the same way in both cars.
12-01-2010, 02:04 PM
#9

Whatever panel or section of the car that might vibrate.. is going to vibrate no matter the style of the box..
I have had both types of boxes (sealed and ported) in the same car... and the exact things rattled, in both setups.
12-30-2010, 07:20 PM
#10
Newbie

Join Date: Dec 2010
Posts: 1
Likes: 0
Received 0 Likes
on
0 Posts
I had a technician tried to hook up a amp and a sub woofer to my CLS 500 - 2006 mod. but in the process, toasted up my amp - nothing works anymore. When you power the radio system, the MB logo flashes and after a while goes off and blank all over.
 06-12-2012, 06:27 PM
#12
Junior Member

Join Date: Apr 2012
Posts: 69
Likes: 0
Received 0 Likes
on
0 Posts
CLS 550
I know this is an old thread but when disconnecting the batter to install the amp kit, do you need a special code to get the command unit to start working again. I know some cars have this anti theft mechanism that does this just wondering before I disconnect the cables.
R,
R,
Hello all! I recently got this car (completely stock) in August 2010. I had an audio system from my previous car just collecting dust in my garage. The system cost me less than $400 (wiring included) used. It was from my Lexus GS400 (pictured below), after it was totaled by getting hit on the front wheel by a hit-and-run driver.


My cousin and I started on the install at 11pm and ended at 2:50am. It was the easiest and most leisurely installs in my entire life. It's because all the wires that must be accessed are all located in the trunk! Nothing is needed to be run through the firewall or from the engine compartment to the trunk.
I was able to locate the audio signal wires going to the stock subwoofer, without removing the decklid. The wires are visible if you are lying on your back looking up at the decklid (through the hole) towards the driver's side. I then routed the wires and hooked up an RCA plug to those wires (without a line output converter). It works great.
The remote turn-on wire was connected to one of the accessory fuses in the fuse box next to the stock DVD navigation unit (on the driver's-side).
The positive amplifier wire was connected directly to the positive terminal of the battery. The negative amplifier wire was connected to the bolt that secures the wire of the negative battery terminal (to the sub-frame of the car).
I did not take any pictures during the wiring process. One thing to note: make sure you have a voltmeter during the install. Lastly, the system sounds great with the stock Comand headunit/processor. Enjoy the pictures!


Crappy picture of exterior of car:
My cousin and I started on the install at 11pm and ended at 2:50am. It was the easiest and most leisurely installs in my entire life. It's because all the wires that must be accessed are all located in the trunk! Nothing is needed to be run through the firewall or from the engine compartment to the trunk.
I was able to locate the audio signal wires going to the stock subwoofer, without removing the decklid. The wires are visible if you are lying on your back looking up at the decklid (through the hole) towards the driver's side. I then routed the wires and hooked up an RCA plug to those wires (without a line output converter). It works great.
The remote turn-on wire was connected to one of the accessory fuses in the fuse box next to the stock DVD navigation unit (on the driver's-side).
The positive amplifier wire was connected directly to the positive terminal of the battery. The negative amplifier wire was connected to the bolt that secures the wire of the negative battery terminal (to the sub-frame of the car).
I did not take any pictures during the wiring process. One thing to note: make sure you have a voltmeter during the install. Lastly, the system sounds great with the stock Comand headunit/processor. Enjoy the pictures!
Crappy picture of exterior of car:

 Thanks for taking the time to put this together.
06-17-2012, 12:02 AM
Thanks for taking the time to put this together.
06-17-2012, 12:02 AM
#15
Super Member
how do I know if my car is fiber optic? I want to replace the radio.
03-28-2015, 11:26 AM
#16
Newbie

Join Date: Mar 2015
Posts: 1
Likes: 0
Received 0 Likes
on
0 Posts
mercedes cls320
cant find Sub Signal wire
Hi There,
Great Post.
However was just wondering if you have any info on how to get to the stock subwoofer, to gain access to the signal cables
Many Thanks,
Nick
Great Post.
However was just wondering if you have any info on how to get to the stock subwoofer, to gain access to the signal cables
Many Thanks,
Nick
10-24-2015, 08:00 PM
#17

I know this is an old post but I am in a very similar situatiton as the OP I just purchased an 06 cls and the thing is in basically new condition even have both of the original keys with it. I am an audiophile at heart and need my sound however. I have a 1200 hifonics brutus and 2 12's that I would be pulling out a 98 e320 that was in an accident (insurance covered). And I want to keep it as stock as possible. This seems doable for me my main concern is splicing the wires from the fuse box do I just follow them leading from the accessory fuse and cut the wire then join them with wire nuts or something? Or do you guys recommend wire tap ins? Also how much of an amp can the stock alternator and battery of these cars take I know this brutus hifonics required an extra battery in my 98 e but things may have changed...
04-05-2016, 09:16 PM
#18
Newbie

Join Date: Apr 2016
Posts: 1
Likes: 0
Received 0 Likes
on
0 Posts
2011 MB CLS550
I'm going to try putting in a sub in my ride as well. Like everyone here, there seems to be a trend of subs and amps living in basements and garages lol... Same here.
Sounds like it's pretty simple! Looking forward to hearing my 12" Kappa Perfect with a mono amp.
I just have a simple question (it's probably a stupid one but I don't want to blow anything up in the car). Did you guys leave the stock sub and added the extra sub or did you remove the stock sub when installing the aftermarket?
Just curious if I can keep both. Thanks!
04-05-2016, 09:19 PM
#19
I'm going to try putting in a sub in my ride as well. Like everyone here, there seems to be a trend of subs and amps living in basements and garages lol... Same here.
Sounds like it's pretty simple! Looking forward to hearing my 12" Kappa Perfect with a mono amp.
I just have a simple question (it's probably a stupid one but I don't want to blow anything up in the car). Did you guys leave the stock sub and added the extra sub or did you remove the stock sub when installing the aftermarket?
Just curious if I can keep both. Thanks!
Sounds like it's pretty simple! Looking forward to hearing my 12" Kappa Perfect with a mono amp.
I just have a simple question (it's probably a stupid one but I don't want to blow anything up in the car). Did you guys leave the stock sub and added the extra sub or did you remove the stock sub when installing the aftermarket?
Just curious if I can keep both. Thanks!


