


Ask a Professional Detailer….

Thread Starter
Banned
Joined: Sep 2006
Posts: 1,164
Likes: 2
From: NY
Sam - Glad the write ups are helpful. I'm happy to hear you've found our information helpful and you're ready to really take care of your vehicle. I find it personally very rewarding to take care of my vehicle and give it a great deep shine. Since your paint is black it should look exceptional after the detail is complete. The first thing I would recommend is to read our How To page. This will help you understand each step in the process better and help you determine which steps you want to do. I'll send you a PM with a package that I recommend and we can modify it together if needed. Thanks for the post and if anyone else would like a custom built package please let me know, I'd be happy to create one for anyone.
Greg @ Detailed Image
Greg @ Detailed Image

Member
Joined: May 2006
Posts: 94
Likes: 0
From: Lake Worth, FL
2006 C280
Greg,
My black C280 doesn't look quite as bad as your "before" picture but I would like to get it back to the mirror finish it had when it was new. Using one of the "kits" you recommended, how many hours would it take an amateur to complete the process?
Also, if I didn't want to do it myself, how would I go about finding an auto detailer capable of doing this kind of work (as opposed to someone who is a glorified car waxer) and what would be a reasonable amount to pay for the service?
Thread Starter
Banned
Joined: Sep 2006
Posts: 1,164
Likes: 2
From: NY
If its just a thin little sticker here is what I recommend. Use a warm blow dryer to heat up the sticker, this will help loosen the adhesives on the back of the sticker. After a little while you can usually peel it off with just your fingers. If there is any residue left behind you can remove it with Goo Gone or a 50/50 mix of Isopropyl Alcohol. If that areas was exposed to a lot of sun there may be an outline of the sticker from sun fade. This can be permanently fixed with a light polish, while waxes will temporarily cover it.
If its a thick sticker or an emblem I would use the same process but after I use the blow dryer I gently work fishing line behind the emblem/sticker. As long as the glue behind the emblem/sticker is warm or loose the fishing line can usually pop them off no problem. Then just follow the recommendations listed above all the way through.
If you have any other questions please let me know.
Greg @ Detailed Image
Thread Starter
Banned
Joined: Sep 2006
Posts: 1,164
Likes: 2
From: NY
I know I am a little biased but I would highly recommend doing it yourself. Its a great skill to learn how to maintain your own vehicle plus you know you'll do it right. Its really hard to find good detailers and if you do they will charge you probably atleast $200+. The C280 isn't a huge car and it has relatively straight panels so its not too bad to detail yourself.
Restoring it yourself can have a variety of meanings. The step thats going to give you the most noticeable difference is using a two step polishing combination. Applying the Menzerna Intensive Polish and Menzerna Final Polish II with the Porter Cable 7424 will help reduce the apperance of swirls, remove oxidation and other imperfections in the clear coat. It won't remove every imperfection but significantly reduce them. I'll outline a basic restoration and then a full one with estimated times if done by yourself.
Basic Restoration
Wash/Dry 45 minutes
PC 7424 and Menzerna Intensive Polish 1.5 - 2 hours
PC 7424 and Menzerna Final Polish II 1.5 hours
PC 7424 Wax or sealant 45 minutes
Estimated Total 4.5 - 5 hours
Full Restoration
Wash/Dry 45 minutes
Clay Bar 1.5 hours
PC 7424 and Menzerna Intensive Polish 1.5 - 2 hours
PC 7424 and Menzerna Final Polish II 1.5 hours
PC 7424 and Menzerna Finishing Touch Glaze 45 minutes
PC 7424 and Menzerna Full Molecular Jacket 45 minutes
Poorboy's World Natty's Blue Paste Wax (applied and removed by hand) 45 minutes
Estimated Total 7.5 - 8 hours
To help understand this process better I highly recommend reading our How To pages that outline this exact process. These are two good options and I can certainly custom tailor a package to your needs. These are just some sample packages of what you can do. Let me know what you think of this process and if you'd like more information about how to best complete this detail. Thanks for posting and I look forward to hearing from you.
Greg @ Detailed Image
Greg,
My black C280 doesn't look quite as bad as your "before" picture but I would like to get it back to the mirror finish it had when it was new. Using one of the "kits" you recommended, how many hours would it take an amateur to complete the process?
Also, if I didn't want to do it myself, how would I go about finding an auto detailer capable of doing this kind of work (as opposed to someone who is a glorified car waxer) and what would be a reasonable amount to pay for the service?
My black C280 doesn't look quite as bad as your "before" picture but I would like to get it back to the mirror finish it had when it was new. Using one of the "kits" you recommended, how many hours would it take an amateur to complete the process?
Also, if I didn't want to do it myself, how would I go about finding an auto detailer capable of doing this kind of work (as opposed to someone who is a glorified car waxer) and what would be a reasonable amount to pay for the service?
Member
Joined: May 2006
Posts: 94
Likes: 0
From: Lake Worth, FL
2006 C280
Greg,
Thanks for your detailed response. One more question: is there a limit to the number of times you can you do this over the life of the car without damaging the paint?
As for regular maintenance, are your recommendations for products and frequency also in the "how-to" section?
Thanks for your detailed response. One more question: is there a limit to the number of times you can you do this over the life of the car without damaging the paint?
As for regular maintenance, are your recommendations for products and frequency also in the "how-to" section?
Thread Starter
Banned
Joined: Sep 2006
Posts: 1,164
Likes: 2
From: NY
You can do this process virtually an unlimited amount of times. If you were to use a rotary buffer regularly you might have to be more cautious. The polishes listed here with an orbital buffer have limited cutting power.
A detailing schedule can vary depending on how much time you can commit to the job and your goals. Here is a sample schedule of what you can do to have a well protected vehicle as well as a deep shine.
Step 1 - Wash/Dry
Step 2 - Clay Bar
Step 3 - PC 7424 and Menzerna Intensive Polish
Step 4 - PC 7424 and Menzerna Final Polish II
Step 5 - PC 7424 and Menzerna Finishing Touch Glaze
Step 6 - PC 7424 and Menzerna Full Molecular Jacket
Step 7 - Poorboy's World Natty's Blue Paste Wax
11/06 – Full Detail All 7 Steps
12/06 – Steps 1, 6 and/or 7
01/07– Steps 1, 6 and/or 7
02/07– Steps 1, 6 and/or 7
03/07– Steps 1, 6 and/or 7
04/07– Steps 1, 6 and/or 7
05/07– Full Detail All 7 Steps
06/07– Steps 1, 6 and/or 7
07/07– Steps 1, 6 and/or 7
08/07– Steps 1, 6 and/or 7
09/07– Steps 1, 6 and/or 7
10/07– Steps 1, 6 and/or 7
11/07– Full Detail All 7 Steps
If you'd like a detailing schedule for another detailing package please let me know. I just did it for the full process but would be happy to adjust it if needed. Let me know if you have any questions.
Greg @ Detailed Image
Member
Joined: May 2006
Posts: 94
Likes: 0
From: Lake Worth, FL
2006 C280
Greg,
Could you please email me prices on the following:
Step 1 - Wash/Dry - What do you recommend?
Step 2 - Clay Bar & Lubricant - What do you recommend?
Step 3 - Menzerna Intensive Polish
Step 4 - Menzerna Final Polish II
Step 5 - Menzerna Finishing Touch Glaze
Step 6 - Menzerna Full Molecular Jacket
Step 7 - Poorboy's World Natty's Blue Paste Wax
Include the Porter Cable 7424 with the Velcro backer and the recommended Lake Country pads.
Thanks!
Barry
MB World Stories
The Best of Mercedes & AMG

Manual Mercedes? 6 Times Sindelfingen Let Drivers Have All The Fun
Verdad Gallardo
Mercedes SLR McLaren 722 S Is Extremely Rare Example Modified by McLaren
Verdad Gallardo
8 Classic Boxy Mercedes Designs That Have Aged Like Fine Wine
Verdad Gallardo
Flawlessly Restored Mercedes 190E Evo II Heads to Auction
Verdad Gallardo
Electric Mercedes C-Class Unveiled: 11 Things You Need to Know
Verdad Gallardo
Mercedes EQS Gets A Major Update: Everything You Need to Know
Verdad Gallardo
5 Underrated Mercedes-Benz Models That Don't Get the Love They Deserve
Verdad Gallardo
Mercedes 300D Has Pushed Well Past 1 Million Miles and It Ain't Stopping
Verdad Gallardo
10 Most Reliable Mercedes-Benz Models You Can Buy Used
Verdad Gallardo
Thread Starter
Banned
Joined: Sep 2006
Posts: 1,164
Likes: 2
From: NY
Thank you for the inquiry Barry, I sent you an e-mail and look forward to hearing from you. Let me know if you have any questions.
If anyone else would like a custom package built for them please let me know.
Greg @ Detailed Image
If anyone else would like a custom package built for them please let me know.
Greg @ Detailed Image
Member
Joined: May 2006
Posts: 94
Likes: 0
From: Lake Worth, FL
2006 C280
Greg,
Thanks for your advice and quick responses to my emails. I just placed my order for the package you recommended. The process was really easy. You've obviously spent a lot of time refining your website and it shows.
It will be a couple of weeks before I can get the time to devote to this project. Once I've got it done, I'll let you know it went.
Barry
Thread Starter
Banned
Joined: Sep 2006
Posts: 1,164
Likes: 2
From: NY
Barry,
Thank you very much for your purchase and support of Detailed Image. Please let me know if you have any questions with the products or during any part of the detailing process. I look forward to hearing about your results with the products.
Greg @ Detailed Image
Thank you very much for your purchase and support of Detailed Image. Please let me know if you have any questions with the products or during any part of the detailing process. I look forward to hearing about your results with the products.
Greg @ Detailed Image
Senior Member

Joined: Oct 2006
Posts: 350
Likes: 1
2001 VW Jetta GLX VR6
As a new sponsor of MB World we would like to open up a thread where you can ask us about anything relating to detailing. There is a lot of good and bad information out there about how to detail properly, so we want to provide you a place to get clarification on your detailing questions. While we don’t know everything, we do have a lot of experience with a wide variety of products that can provide you with meaningful insight. We specialize in helping people clean, shine and protect their vehicle’s interior, exterior and engine bay. We have hand-selected each product on our site that will help give you top quality detailing results.
Below we have posted some before and after pictures of work Detailed Image has done with the service side of our business. These results can be achieved by anyone who is willing to learn about detailing properly with the right combination of products. We can help you pick out a detailing package that best fits your vehicle’s particular needs.
Don't be afraid to post up any questions that you have no matter how simple or complex it is. We’ll do our best to provide you a detailed and timely response.
Before - Notice the house in the background through the haze?
After:
Side by Side Comparison:

Thank you and we look forward to starting up some great dialogue!
George and Greg
Owners - Detailed Image
Below we have posted some before and after pictures of work Detailed Image has done with the service side of our business. These results can be achieved by anyone who is willing to learn about detailing properly with the right combination of products. We can help you pick out a detailing package that best fits your vehicle’s particular needs.
Don't be afraid to post up any questions that you have no matter how simple or complex it is. We’ll do our best to provide you a detailed and timely response.
Before - Notice the house in the background through the haze?
After:
Side by Side Comparison:
Thank you and we look forward to starting up some great dialogue!
George and Greg
Owners - Detailed Image
WOW, the before and after picutre of that black MB is incredible, I was just wondering how long the outside of that car took to do and what steps you took, one by one?
Senior Member
Joined: Oct 2006
Posts: 350
Likes: 1
2001 VW Jetta GLX VR6
I forgot to ask....what do you use to wash the car, dry the car and apply polishes/waxes (when not using a wheel). I mean the type of pad/cloth, microfiber vs. 100% cotton, that sorta stuff
Thread Starter
Banned
Joined: Sep 2006
Posts: 1,164
Likes: 2
From: NY
Here is the process I believe we used for that vehicle with the Porter Cable on steps 3-6.
Step 1 - Wash/Dry
Step 2 - Clear Kote Clay Bar with Clear Kote Quick Shine Clay Lube
Step 3 - Menzerna Intensive Polish (orange cutting pad)
Step 4 - Menzerna Final Polish II (white polishing pad)
Step 5 - Menzerna Finishing Touch Glaze (white polishing pad)
Step 6 - Menzerna Full Molecular Jacket (black finishing pad)
Step 7 - Poorboy's World Natty's Blue Paste Wax (must be hand applied)
The Porter Cable 7424 (recommend advanced kit) is essential in my opinion to generate enough heat to properly break down the product and buff it into the surface. However PC 7424 is very safe and easy to use for even novices.
I worked on that Mercedes personally with someone else and I would estimate it took us 6 hours not including breaks. You can do less steps and still get very good results. I would say the most essential steps would be (1,3,4,6).
As for towels I use only our microfiber towels. We have two towels that use during details which range from plush to ultra plush. We carry some of the highest quality microfiber towels on the market that are very safe for the clear coat so you don't add any fine scratches.
To read more about the entire process I listed above please visit our site's (www.detailedimage.com) How To section. There is lots of good information there and you can always post here or PM me if you have any other questions. Let me know if there is anything else I can do to help you get the most out of your detail.
Greg @ Detailed Image
Senior Member
Joined: Oct 2006
Posts: 350
Likes: 1
2001 VW Jetta GLX VR6
Here is the process I believe we used for that vehicle with the Porter Cable on steps 3-6.
Step 1 - Wash/Dry
Step 2 - Clear Kote Clay Bar with Clear Kote Quick Shine Clay Lube
Step 3 - Menzerna Intensive Polish (orange cutting pad)
Step 4 - Menzerna Final Polish II (white polishing pad)
Step 5 - Menzerna Finishing Touch Glaze (white polishing pad)
Step 6 - Menzerna Full Molecular Jacket (black finishing pad)
Step 7 - Poorboy's World Natty's Blue Paste Wax (must be hand applied)
The Porter Cable 7424 (recommend advanced kit) is essential in my opinion to generate enough heat to properly break down the product and buff it into the surface. However PC 7424 is very safe and easy to use for even novices.
I worked on that Mercedes personally with someone else and I would estimate it took us 6 hours not including breaks. You can do less steps and still get very good results. I would say the most essential steps would be (1,3,4,6).
As for towels I use only our microfiber towels. We have two towels that use during details which range from plush to ultra plush. We carry some of the highest quality microfiber towels on the market that are very safe for the clear coat so you don't add any fine scratches.
To read more about the entire process I listed above please visit our site's (www.detailedimage.com) How To section. There is lots of good information there and you can always post here or PM me if you have any other questions. Let me know if there is anything else I can do to help you get the most out of your detail.
Greg @ Detailed Image
Step 1 - Wash/Dry
Step 2 - Clear Kote Clay Bar with Clear Kote Quick Shine Clay Lube
Step 3 - Menzerna Intensive Polish (orange cutting pad)
Step 4 - Menzerna Final Polish II (white polishing pad)
Step 5 - Menzerna Finishing Touch Glaze (white polishing pad)
Step 6 - Menzerna Full Molecular Jacket (black finishing pad)
Step 7 - Poorboy's World Natty's Blue Paste Wax (must be hand applied)
The Porter Cable 7424 (recommend advanced kit) is essential in my opinion to generate enough heat to properly break down the product and buff it into the surface. However PC 7424 is very safe and easy to use for even novices.
I worked on that Mercedes personally with someone else and I would estimate it took us 6 hours not including breaks. You can do less steps and still get very good results. I would say the most essential steps would be (1,3,4,6).
As for towels I use only our microfiber towels. We have two towels that use during details which range from plush to ultra plush. We carry some of the highest quality microfiber towels on the market that are very safe for the clear coat so you don't add any fine scratches.
To read more about the entire process I listed above please visit our site's (www.detailedimage.com) How To section. There is lots of good information there and you can always post here or PM me if you have any other questions. Let me know if there is anything else I can do to help you get the most out of your detail.
Greg @ Detailed Image
Thread Starter
Banned
Joined: Sep 2006
Posts: 1,164
Likes: 2
From: NY
Glad to hear we have othe detailer on the forum. I believe the Menzerna line of products is excellent head to toe. They really only want products that are very well balanced, nothing half way. If you have a buffer I think the Menzerna polishes are very good and really do great work. Let me know if you'd like more information on any Menzerna products or just detailing in general.
Greg @ Detailed Image
Greg @ Detailed Image
Senior Member
Joined: Oct 2006
Posts: 350
Likes: 1
2001 VW Jetta GLX VR6
For my personal use, my car does not require extense buffer needs. This is why I have decided to try the route of Zaino. Sorry, I know you promote other lines of product but it seems a good fit for what I need with my personal car. This is only because I have buffed my car, and done all the grunt work on it for awhile now. To be quite frank I am sick of the Meguair Mirror glazes (with their myriad of numbered products) and the 3M products I just feel like they don't give me 100% results. This is why I am going to check out your site and order some product for my work (I am incharge of ordering), I work at a Land Rover dealership, detailing. I am interested in changing their products lines, we use a hybridization between WellWorth and Meguairs. If I have any questions I will let you know.
Thread Starter
Banned
Joined: Sep 2006
Posts: 1,164
Likes: 2
From: NY
Thanks for that info and while we don't promote other brands we respect people's decisions to use whatever products best fit their needs. We encourage others to try different combinations and use proper techniques for best results. I try to be open to new products and ideas. As for any future orders, we look forward to hearing from you and helping you select products that work best for you. Also it'd be nice to hear some comparisons between other products you have used.
Greg @ Detailed Image
Greg @ Detailed Image

Member
Joined: Sep 2003
Posts: 216
Likes: 0
From: Sarasota, FL
E55
I havent tried the products that you sell.. But im a was fanatic so im sure i will get some.. I have tried lots of different brands and So far my favorite it Adams Polishes. (also 10% off use code mbworld). I did like Zaino but it was time consuming. And I get near same results with the adams. Anyone else have experience with their products?? They have a great things calling "In and Out spray" It works magic on all black trim and the engine. Especailly right under teh windshield in the hard to reach places.
Thread Starter
Banned
Joined: Sep 2006
Posts: 1,164
Likes: 2
From: NY
Thanks for the post, you brougt up some good points. Finding the best products takes some trial and error. I think finding the right products depends on each person's specefic situation which includes their budget, detailing goals, time available, regularity of detailing, weather conditions, buffer vs. hand applications, vehicle storage, etc. The condition of your vehicle will also affect what products work best too. Factors such as condition of clear coat, surface contamination, severity of imperfections, paint color, manufactuerer and more. Ultimately the perception of the owner is a big factor because different people will have different opions about what works/looks best. Therefore in my opinion finding the right combination will vary a lot depending on the person and their vehicle.
As for the products you mentioned both brands are good. I agree that Zaino can be a lot of steps and there may be better options with less time. It sounds like the product you are reffering to is similar to the 303 Aerospace Protectant. This product can be used on rubber, vinyl, plastic and leather surfaces. Itypically use it under the hood, tires, trim, dash board, doors, condole, rubber moldings, seats and more. It adds a nice low gloss finish without the greasy and oily feeling. It also protects those surfaces from UV rays with SPF 40, one of my personal favorites. As for the rest of our products I hope you'll try some and let us know what you think. Let me know if you're looking for any recommendations and I'd be happy to supply them. We also offer 10% off to all MB World forum members when you use the code "10offMBW" when checking out. Thanks again for the post and I look forward to hearing from you.
Greg @ Detailed Image
Member
Joined: May 2006
Posts: 94
Likes: 0
From: Lake Worth, FL
2006 C280
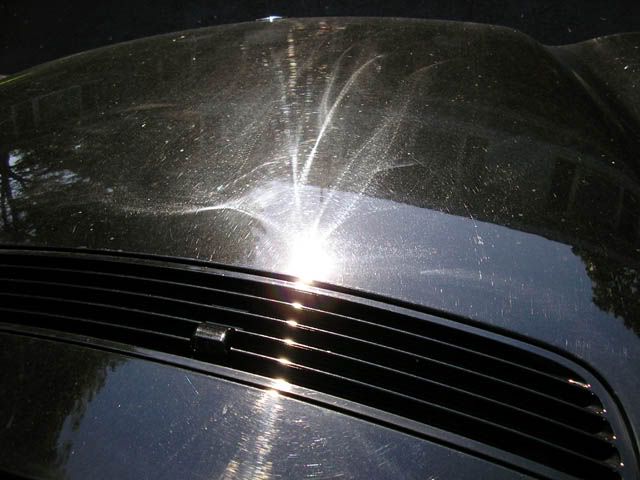
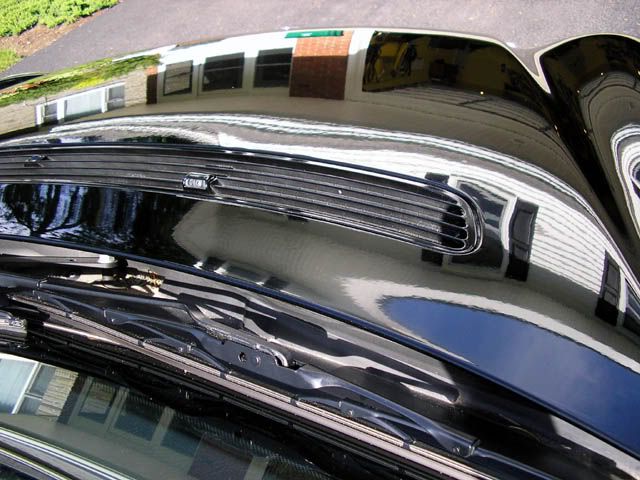
I didn't remove every scratch and imperfection but I never expected to. I did get most of them, especially the ones I was most concerned about. I've posted some before and after pics. Look at the gloss and the depth of the shine in the after pics. It's amazing and worth every penny and hour I spent.
Anyone else considering doing this, make sure to allow plenty of time and patience. Technique is a big part of this and by the end of the job, you will be better than when you started. Get your supplies from Greg at Detailed Image.com, follow his instructions and you'll get results like mine. Thanks Greg!


Driver's side C-Panel BEFORE

Driver's Side C-Panel AFTER

Hood AFTER

See my reflection? I was standing about 7 feet away.


Thread Starter
Banned
Joined: Sep 2006
Posts: 1,164
Likes: 2
From: NY
WOW! That detail job is awesome. Congratulations on doing some pretty impressive work, that black looks very deep and glossy. Thank you again for supporting Detailed Image and let me know if there is anything else I can do to help you.
Greg @ Detailed Image
Greg @ Detailed Image
Senior Member
Joined: Oct 2006
Posts: 350
Likes: 1
2001 VW Jetta GLX VR6
Greg,
I was wondering what you use when you are cleaning plastic lenses? Such as the one that covers the speedometer/dash? I notice some people have like a million scratches on these and I was wondering what to use that would not cause any more. I have no idea how people get so many scratches there.
Thanks
Thread Starter
Banned
Joined: Sep 2006
Posts: 1,164
Likes: 2
From: NY
Let me know if you have any questions about this process or the products.
Greg @ Detailed Image


