



project help

Thread Starter
MBWorld Fanatic!
Joined: Feb 2003
Posts: 5,622
Likes: 1
From: Los Angeles, Ca
Sean's Sister--
project help
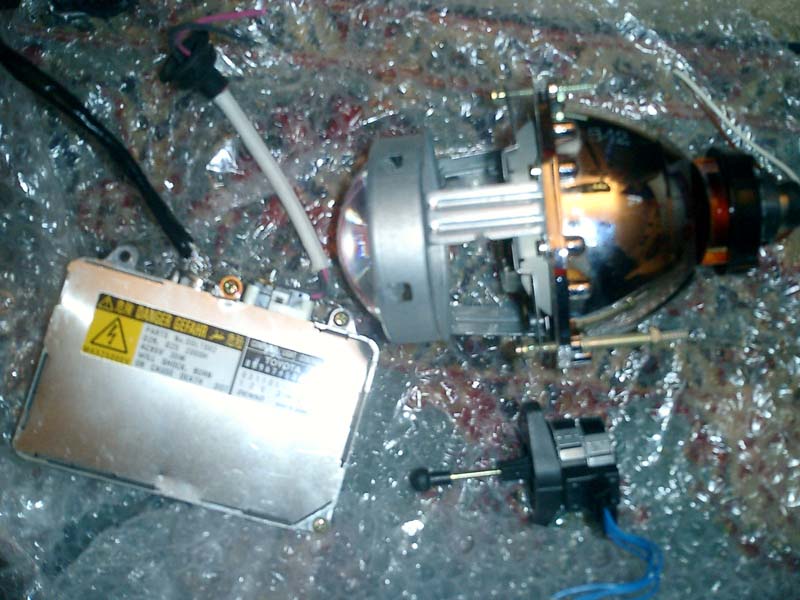
ok so basically on my own here trying to do a litle DIY and i found the light i think at the end of the tunnel......after selling the audi rs6 projectors i got myself some acura tsx projectors that are the same size......i took the projector apart, much easier then the rs6 ones but i need to drill 2 holes to get it to mount in...the orignal projecto had 7 screws to where i can put 4 but nothing more for the back and also i need to glue on the shrouds to the projecter..luckily i kept the 00+ ones because those fit in nicly without doing anything to them....
now i need to know how to wire it up and what this part is and any advice.....
also does anyone know if i would still be able to adjust the beam once everythings put back together?
now i need to know how to wire it up and what this part is and any advice.....
also does anyone know if i would still be able to adjust the beam once everythings put back together?

Member
Joined: Aug 2002
Posts: 193
Likes: 0
From: Kansas City
97 E420 90 300E
The two wires, positive and negative, going into the ballast (purple and black in your case) get hooked to the positive and negative wires that went to the h7 bulb in the original projector. Just cut the H7 connector off and connect the black to black, and purple to whatever the color of the positive wire in the headlight assembly is.
Thread Starter
MBWorld Fanatic!
Joined: Feb 2003
Posts: 5,622
Likes: 1
From: Los Angeles, Ca
Sean's Sister--
so what is the unit in the first pic?? also is there any way to extend the ballast?? i got about a foot or so of play so i was thinking of mounting it to the back of the headlight housing.....
i got rid of the audi ones cause they were a little big bigger the the stock ones of the housing.......i had the depo ones before but but the balck ones and they are made by eagle eye i guess and the size is smaller and the tsx ones are a perfect fit........i actually opened up the other light and now have both projectors mounted but just need to glue on the headlight shrouds to the projectors and then i can get the headlights re-sealed........should i put them back in the oven for a little bit to soften the old glue to be able to close them up???
i got rid of the audi ones cause they were a little big bigger the the stock ones of the housing.......i had the depo ones before but but the balck ones and they are made by eagle eye i guess and the size is smaller and the tsx ones are a perfect fit........i actually opened up the other light and now have both projectors mounted but just need to glue on the headlight shrouds to the projectors and then i can get the headlights re-sealed........should i put them back in the oven for a little bit to soften the old glue to be able to close them up???
Trending Topics
Member
Joined: Aug 2002
Posts: 193
Likes: 0
From: Kansas City
97 E420 90 300E
Originally Posted by Alexbenz
so what is the unit in the first pic?? also is there any way to extend the ballast??
Last edited by cragigotgame; Mar 29, 2006 at 11:26 PM.
MB World Stories
The Best of Mercedes & AMG

6 Mercedes Models That Did NOT Age Well (But Are Somehow Still Cool)
Verdad Gallardo
Manual Mercedes? 6 Times Sindelfingen Let Drivers Have All The Fun
Verdad Gallardo
Mercedes SLR McLaren 722 S Is Extremely Rare Example Modified by McLaren
Verdad Gallardo
8 Classic Boxy Mercedes Designs That Have Aged Like Fine Wine
Verdad Gallardo
Flawlessly Restored Mercedes 190E Evo II Heads to Auction
Verdad Gallardo
Electric Mercedes C-Class Unveiled: 11 Things You Need to Know
Verdad Gallardo
Mercedes EQS Gets A Major Update: Everything You Need to Know
Verdad Gallardo
5 Underrated Mercedes-Benz Models That Don't Get the Love They Deserve
Verdad Gallardo
Mercedes 300D Has Pushed Well Past 1 Million Miles and It Ain't Stopping
Verdad Gallardo
Thread Starter
MBWorld Fanatic!
Joined: Feb 2003
Posts: 5,622
Likes: 1
From: Los Angeles, Ca
Sean's Sister--
yea i think it's the ignitor....but it's a bmw one and has 4 wires.....i've installed hid kit plenty on times but oem parts i'm not sure about.........the ballasts is a lexus one that others have sugguested that doesn't trip the computer......
i;m gonna take some pics and post them over on hidplanet.......
thanks
i;m gonna take some pics and post them over on hidplanet.......
thanks
MBWorld Fanatic!
Joined: Apr 2003
Posts: 1,464
Likes: 9
From: SoCal OC
S, GL, Escalade ESV, my shoes
Hello Alex
Sorry that I've been so busy lately (lot of work, baby on the way...), just when I'm in town, you're busy, and vice versa.
Couple things, since I think you're on the right path:
1. The unit in the first picture is the auto-leveler unit. You don't need that. It would be impossible to wire that unit anyway. Just have the projector aim correctly, you'll be fine. Lot of new car w/ HID don't have auto-leveler (like Acura TSX), the key is to aim the light right, so it won't get into other driver eyes
2. On the picture where you mount the projector, you mount it wrong. You're supposed to mount it in a way so that the shield (the metal piece) is in the bottom, not the top . When the light to throught the projector lens, it would be flipped to give light to the bottom. So again, you need to remount the projector.
3. The ballast you use is the Denso, very good ballast. Just that they're very polarity sensitive. For the two wire on the ballast, connect them to the wire that light up the original H7 in the headlight. Red from the ballast to yellow in the headlight (I think, since Eagle should go w/ that standard wiring code), and black from the ballast to black wire in the headlight. Make sure the connection are all tight and good. Do not make mistake on this, since the ballast would be fried instantly if the wire are connected incorrectly. Also, this ballast has a built-in ignitor. You can extend the red&black wire if you have too, just make sure you use good grading wire & good connection. You CAN NOT extend the wire from the ballast to the bulb, since this is a special wire that designed to carry high voltage & power from the ballast to the bulb when start up. That wire must stay the way it is, no cut nor extend whatsoever.
Last, try to mount the projector so that the top of the shield stay horizontal. That way, once you're done and need to adjust, the two knob on top of the headlight would be sufficient to adjust left/right and up/down. If you don't have the shield & cut-off line straight, so they're tilt, it is much harder to adjust. So again, make sure mount the projector so that the shield is in the bottom, and the top of the shield line is horizontal & straight.
Give me a ring next week if you need help, since I'm in town. You can stop by my company around lunch time if I could be any quick help.
Sorry that I've been so busy lately (lot of work, baby on the way...), just when I'm in town, you're busy, and vice versa.
Couple things, since I think you're on the right path:
1. The unit in the first picture is the auto-leveler unit. You don't need that. It would be impossible to wire that unit anyway. Just have the projector aim correctly, you'll be fine. Lot of new car w/ HID don't have auto-leveler (like Acura TSX), the key is to aim the light right, so it won't get into other driver eyes
2. On the picture where you mount the projector, you mount it wrong. You're supposed to mount it in a way so that the shield (the metal piece) is in the bottom, not the top . When the light to throught the projector lens, it would be flipped to give light to the bottom. So again, you need to remount the projector.
3. The ballast you use is the Denso, very good ballast. Just that they're very polarity sensitive. For the two wire on the ballast, connect them to the wire that light up the original H7 in the headlight. Red from the ballast to yellow in the headlight (I think, since Eagle should go w/ that standard wiring code), and black from the ballast to black wire in the headlight. Make sure the connection are all tight and good. Do not make mistake on this, since the ballast would be fried instantly if the wire are connected incorrectly. Also, this ballast has a built-in ignitor. You can extend the red&black wire if you have too, just make sure you use good grading wire & good connection. You CAN NOT extend the wire from the ballast to the bulb, since this is a special wire that designed to carry high voltage & power from the ballast to the bulb when start up. That wire must stay the way it is, no cut nor extend whatsoever.
Last, try to mount the projector so that the top of the shield stay horizontal. That way, once you're done and need to adjust, the two knob on top of the headlight would be sufficient to adjust left/right and up/down. If you don't have the shield & cut-off line straight, so they're tilt, it is much harder to adjust. So again, make sure mount the projector so that the shield is in the bottom, and the top of the shield line is horizontal & straight.
Give me a ring next week if you need help, since I'm in town. You can stop by my company around lunch time if I could be any quick help.
Last edited by zam2000; Mar 30, 2006 at 02:30 AM.
Thread Starter
MBWorld Fanatic!
Joined: Feb 2003
Posts: 5,622
Likes: 1
From: Los Angeles, Ca
Sean's Sister--
so there upside down?? i just need to flip them?? thats why i wanted to stop by before i sealed them up because it'll be a pain in the butt to re-open them......
also can i test them before i put them in the car??
huy monday sound good for you?
also can i test them before i put them in the car??
huy monday sound good for you?
Thread Starter
MBWorld Fanatic!
Joined: Feb 2003
Posts: 5,622
Likes: 1
From: Los Angeles, Ca
Sean's Sister--
huy i got a problem now, by trying to mount it the other way i only get 2 holes to mount on the bottom......we need to meet up for sure now.......
thanks
thanks

MBWorld Fanatic!

Joined: Nov 2001
Posts: 3,860
Likes: 3
From: Jacksonville Florida
209/W210 Estate /W211 modded by MBENZNL
Originally Posted by zam2000
Hello Alex
Sorry that I've been so busy lately (lot of work, baby on the way...), just when I'm in town, you're busy, and vice versa.
Give me a ring next week if you need help, since I'm in town. You can stop by my company around lunch time if I could be any quick help.
Sorry that I've been so busy lately (lot of work, baby on the way...), just when I'm in town, you're busy, and vice versa.
Give me a ring next week if you need help, since I'm in town. You can stop by my company around lunch time if I could be any quick help.
Zam check your PM/Mail
Thread Starter
MBWorld Fanatic!
Joined: Feb 2003
Posts: 5,622
Likes: 1
From: Los Angeles, Ca
Sean's Sister--
huy/raymond/mario or anyone else that has worked with headlights before....
if i cut these portions off the housing of the headlight, will it affect it in any way?
if i cut these portions off the housing of the headlight, will it affect it in any way?
MBWorld Fanatic!
Joined: Apr 2003
Posts: 1,464
Likes: 9
From: SoCal OC
S, GL, Escalade ESV, my shoes
Originally Posted by Alexbenz
huy/raymond/mario or anyone else that has worked with headlights before....
if i cut these portions off the housing of the headlight, will it affect it in any way?
if i cut these portions off the housing of the headlight, will it affect it in any way?
Not at all. I have to cut them all the time when I mount the X5 or E55 projector (to give the bi-xenon solenoid room). As long as there's nothing in front of the projector lens, light will not be effect at all. That's the rule for mounting projector. However, if you have to cut the light, it is IMPORTANT to cut it in a way so that the projector have good mounting point & stay secure. Since there's a lot of vibration in the headlight when the car move.
Again, if you are about to use glue on them (in that case, use "JB Weld" from Home Depo, since they're the only thing that heat resistant very well), make sure the top line of the shield stay absolutely horizontal (verify that you mount the projector in a way that the shield stays in the bottom). Since you can only adjust the light up/down and left/right, but if you twist the cut-off a bit, it's not that easy to fix.
Last edited by zam2000; Apr 3, 2006 at 01:23 AM.
Thread Starter
MBWorld Fanatic!
Joined: Feb 2003
Posts: 5,622
Likes: 1
From: Los Angeles, Ca
Sean's Sister--
huy i bought longer screws at home depot and some metal pieces to pull this off but i;m having some trouble.......
even if i cut those tabs off and take the screws and tighten it through the back i should be fine, no??
even if i cut those tabs off and take the screws and tighten it through the back i should be fine, no??
Thread Starter
MBWorld Fanatic!
Joined: Feb 2003
Posts: 5,622
Likes: 1
From: Los Angeles, Ca
Sean's Sister--
ok i shaved off more then half of the tabs and drilled some new holes.....2 or 3 of the holes were drilled real close to the holes that were in the tabs so it made a larger hole but once i feed the screw in and tightin up the bolt in the rear it seems pretty firm but don't know with the shaking and what not if the nut will get lose????
also since the projector sits in futher i'm having trouble with mouting the shroud...so i shaved off a little bit of the face plate but i wanted to know if i should add washers to push out the projector more to the front???
also since the projector sits in futher i'm having trouble with mouting the shroud...so i shaved off a little bit of the face plate but i wanted to know if i should add washers to push out the projector more to the front???
Thread Starter
MBWorld Fanatic!
Joined: Feb 2003
Posts: 5,622
Likes: 1
From: Los Angeles, Ca
Sean's Sister--
so it seems the shrouds from the 00+ depo ones fit the tsx a little better, not 100% fit but i'm guessing with some glue it'll stay....will it affect the light if the shroud doesn't sit right?
MBWorld Fanatic!
Joined: Apr 2003
Posts: 1,464
Likes: 9
From: SoCal OC
S, GL, Escalade ESV, my shoes
Originally Posted by Alexbenz
so it seems the shrouds from the 00+ depo ones fit the tsx a little better, not 100% fit but i'm guessing with some glue it'll stay....will it affect the light if the shroud doesn't sit right?
The shroud from the Depo headlight should look nice with the TSX projector. When you mount the shroud, as long as it doesn't cover the lens (and it shouldn't, since that shroud is larger than the TSX projector), you should be all fine.
I'll dig out pix on how to align the beam and post it for you.

MBWorld Fanatic!


Joined: Jan 2004
Posts: 5,939
Likes: 178
From: Seattle WA
99 E320
I've not worked on tsx before so I'm unsure how the shroud is attached to
the projector. But I have come across slightly loose shrouds and I wanted to
ensure that they dont come loose during vibration or railroad tracks etc...you
get the idea. So i used tube of high temp silicone gasket goop from Permatex.
It holds the pieces together, resistent to higher temperatures but if needed,
you can remove the pieces and scrape off the silicone for adjustment,
correction, or even replacement of the projector later if desired.
Looks like from your pics, you're progressing along methodically, and nicely.
We're rooting for you. The only thing I don't like about 4 point anchor as you
have is that you *really* need to be sure that your rotational alignment is
spot on. The cutoff better be near perfect and parallel to the ground. That
is....unless your housing has some way of adjusting this. Most do not. Usually,
they only come with V and H adjustments.
the projector. But I have come across slightly loose shrouds and I wanted to
ensure that they dont come loose during vibration or railroad tracks etc...you
get the idea. So i used tube of high temp silicone gasket goop from Permatex.
It holds the pieces together, resistent to higher temperatures but if needed,
you can remove the pieces and scrape off the silicone for adjustment,
correction, or even replacement of the projector later if desired.
Looks like from your pics, you're progressing along methodically, and nicely.
We're rooting for you. The only thing I don't like about 4 point anchor as you
have is that you *really* need to be sure that your rotational alignment is
spot on. The cutoff better be near perfect and parallel to the ground. That
is....unless your housing has some way of adjusting this. Most do not. Usually,
they only come with V and H adjustments.
Thread Starter
MBWorld Fanatic!
Joined: Feb 2003
Posts: 5,622
Likes: 1
From: Los Angeles, Ca
Sean's Sister--
Originally Posted by cragigotgame
Also if you are worried about the nuts coming loose, you can alway put some thread lock or some glue on there to keep them from backing off.
how do you align the projector at this point?? i don't have the car and also how can i check to see if everythings working without putting it together?
Thread Starter
MBWorld Fanatic!
Joined: Feb 2003
Posts: 5,622
Likes: 1
From: Los Angeles, Ca
Sean's Sister--
ok i bought some lock nuts today and got the silcone epoxy and glued on the chrome shroud and awating till the morning to let it dry and then shove it back into the oven to close it up.......i am going to use the same epoxy on the outside but what did you guys use?? someone told me to get some of the black high temp silcone
MBWorld Fanatic!
Joined: Jan 2004
Posts: 5,939
Likes: 178
From: Seattle WA
99 E320
I would suggest that you consider a sealant vs an adhesive. Assuming, of
course, that the factory stickum is resuseable, it would soften once you pop
it back into the oven. You then press the outer, clear lens back into position
so that it firmly seats well into the stickum. There should be no real gap be-
tween the clear, outer lens and the lens housing. Provided that the stickum
was soft enough after reheating, be clear that you only have a limited amount
of time (less than a minute or so) to reseat the outer lens. After that, the
goop hardens and becomes less compliant.
Okay, now that the lens is back on as best you can, you still need to to be
certain that water wont enter via this seam.
Permatex windshield sealant is clear and has the consistency of snot.....
runny, yet thick.
Permatex RTV clear silicone is more like cold honey. I dont know if they
make this in black color.
Consider using the windshield goop first as it seeps into the smaller cracks
better and seals. Wait to dry. This kind of acts as a primer and a foundation .......
Now follow up with the thicker RTV silicon and draw a much thicker bead.
No real need to make this pretty. The MB figure-8 rubber gasket will cover
this up since it's about .75" wide, right? So it matters not that it is black
or clear silicone anyhoo. Let that dry overnight+
Oh yes, since this is your first mod, you'll never know what you missed in
terms of assembly and fit etc. If you seal the outer lens with epoxy or
serious adhesive, you increase the chance of swearing or frustration if you
have to open the headlight up again for some unanticipated reason. This is
why I recommended RTV silicone. It's peel-off-able....not in one simple tug,
but with easy scraping with say, a plastic tool or some such.
no real need for hi-temp, hi-adhesive as the part/fit is low stress and not
subjected to heat
course, that the factory stickum is resuseable, it would soften once you pop
it back into the oven. You then press the outer, clear lens back into position
so that it firmly seats well into the stickum. There should be no real gap be-
tween the clear, outer lens and the lens housing. Provided that the stickum
was soft enough after reheating, be clear that you only have a limited amount
of time (less than a minute or so) to reseat the outer lens. After that, the
goop hardens and becomes less compliant.
Okay, now that the lens is back on as best you can, you still need to to be
certain that water wont enter via this seam.
Permatex windshield sealant is clear and has the consistency of snot.....
runny, yet thick.
Permatex RTV clear silicone is more like cold honey. I dont know if they
make this in black color.
Consider using the windshield goop first as it seeps into the smaller cracks
better and seals. Wait to dry. This kind of acts as a primer and a foundation .......
Now follow up with the thicker RTV silicon and draw a much thicker bead.
No real need to make this pretty. The MB figure-8 rubber gasket will cover
this up since it's about .75" wide, right? So it matters not that it is black
or clear silicone anyhoo. Let that dry overnight+
Oh yes, since this is your first mod, you'll never know what you missed in
terms of assembly and fit etc. If you seal the outer lens with epoxy or
serious adhesive, you increase the chance of swearing or frustration if you
have to open the headlight up again for some unanticipated reason. This is
why I recommended RTV silicone. It's peel-off-able....not in one simple tug,
but with easy scraping with say, a plastic tool or some such.
no real need for hi-temp, hi-adhesive as the part/fit is low stress and not
subjected to heat


