


DIY: Installing a new Changeover/Heater Control Valve

Newbie
Joined: Jul 2012
Posts: 4
Likes: 0
From: richmond, va
gl450 e320
Just used the instructions to chg the heater control valve on a e320 2003
Used the instructions they were very helpful the bolts on the wipers are 15mm
One other item take off the wiper motor assembly it is three bolts and disconnect the electrical connection to the wiper motor makes the job much easier.
One other item take off the wiper motor assembly it is three bolts and disconnect the electrical connection to the wiper motor makes the job much easier.

Member
Joined: Sep 2009
Posts: 197
Likes: 3
From: St. Louis, MO
2005 E55 Sedan (Peuter)
Holy geez, this thread was helpful! I did this repair last night and it worked like a charm! Many thanks for this very detailed write-up. This should be an example of the detail needed on other DIY instructions. As good as it is, I have a few tips for others who want to do this:
PART:
Cheapest source for part I found was MBOnlineParts.com ($31.50 + $9 = $40.50)
http://www.mbonlineparts.com/parts/2005/MERCEDES-BENZ/E55%20AMG/index.cfm?searchText=211+832+05+84&siteid=215843&y ear=2005&make=MERCEDES-BENZ&model=E55+AMG&submodel=&vehicleid=1431058
If you can�t find the part, search on the part number without the �A� (i.e. �211 832 05 84�)
REPAIR:
Wiper Arm: found it a little difficult to remove the driver�s side wiper arm. Trick is to pull the wiper arm off of the glass a little (as if you�re about to clean the windshield). This will relieve tension in the mounting bracket and you can remove it at that point.
Plastic Rivets: I didn�t find it hard to remove and replace the plastic rivets w/o breaking them. Technique I used was to unscrew with one hand and slide something sharp under the screw part with the other hand. I used a small flathead screwdriver for that. Through unscrewing and prying up, I was able to get it to the point where I could use a needle nose pliers and pull the whole thing out.
Plastic Plugs on Cover at Base of Windshield: these only come loose with a lot of force. I pulled a little from the top while pushing on the back with the tip of a pry bar. Worked well. Didn�t break any. Just make sure you aren�t using the pry bar as a lever by pressing against anything else in there cus it�s all fragile stuff.
Wiper Motor: I followed the advice of another forum member who wrote to take off the windshield wiper motor. I very much agree that it�s worth the minute or two. Also don�t forget to connect the wiring harness to the motor when reassembling!! Not saying I did, tho! :-P Won�t admit to anything!
Disconnecting Stepper Motor (a.k.a. changeover valve): before disconnecting this, you may want to take the cap off of the coolant expansion take. I don�t know if this will minimize the amount of coolant flowing out of the stepper motor, but it might. Easy to do, so it�s worth a try. Also, the first part you should disconnect is the part pointing to the front of the car (to the front of the firewall). There�s less electronic equipment there, so it minimizes chances of coolant flowing out causing damage. Lastly, when you disconnect the hose that points to the right of the car (the one connected by a clamp), have plenty of paper towels stuffed in beneath it. This will keep coolant from going everywhere.
Other info: http://www.buellwinkle.com/HVAC-W203.pdf
THAT�S ALL! THANKS AGAIN, W211 Ryda!

Senior Member
Joined: Aug 2008
Posts: 360
Likes: 0
From: Riverwoods, Il
2005 E55 AMG
This was the shipped price.
Awesome write up. Definitely saved me lots of time and $. A few things I would like to add for other folks going to attempt this repair themselves.
I found the part for only $30 at getmercedesparts.com which is MB of Annapolis, MD.
The 3 screws to remove that electrical box are t20 not t25.
A standard hook and pick set like pictured here >> http://www.craftsman.com/shc/s/p_101...4&blockType=L4 is all that's needed to remove all the clips. This is an item that should be in everyones toolbox.
After you install the new valve and before you re install the shroud be sure to rinse underneath the valve to wash out the coolant that leaked on to the paint.
Finally clean the bottom of the windshield underneath the shroud. My glass had some dirt buildup. Also be sure to clean underneath the rubber seal/ lip that sits on the glass. Their tends to be buildup that gets in between the glass and the seal. This will ensure a nice tight seal and help keep dirt out.
Here is inside my defective unit:

Member
Joined: Sep 2009
Posts: 197
Likes: 3
From: St. Louis, MO
2005 E55 Sedan (Peuter)

Junior Member
Joined: Nov 2012
Posts: 17
Likes: 0
2004 E500 Wagon
Great repair notes. Is there a Wiki?
Re: 2004 E500
First of all, THANK YOU for this thread. There is no WAY I could have done this without the great writeup and pics.
Has the Forum ever considered a Wiki to organize these pieces? I frequent another forum, the SL Group, for Pagodas (W113) and the Wiki is a really useful tool.
Couple of notes for this repair:
My problem was not too much heat. It was no heat. Same root cause, which was corrosion from leakage inside the motor housing causing the control unit to freeze and burn out motor.
I did not need to remove the whole firewall shroud. I left the driver side wiper arm in place, and just pulled the shroud about 3/4 of the way free. OK, so it was because I could not get the wiper arm off and did not have the right puller, but it was fine and did not impede the R&R.
As a couple of posts said, 1.) you do not need to install with the clips open, you can pop the valve body on with the clips closed and 2.) that spring clip/ hose clamp is a pain and it is, imo, better off replaced with a screw-type clamp which I did.
The valve body can be oriented 1,000 ways to R&R, but only one way works! (at least for the E500). You will need to cycle the wiper linkage to get maximum clearance, then get the body clear by bringing it out with the electrical connector body first and facing rearwards.
The plastic connectors pinning the shroud to the firewall are fragile, plan on replacing vs. reusing at least 2 of the four. I only salvaged 1.
You will need a heavy duty coat hanger. The clips are in very tight.
Thanks again for this great repair note, what a great forum.
Greg from Atlanta
MB World Stories
The Best of Mercedes & AMG

6 Mercedes Models That Did NOT Age Well (But Are Somehow Still Cool)
Verdad Gallardo
Manual Mercedes? 6 Times Sindelfingen Let Drivers Have All The Fun
Verdad Gallardo
Mercedes SLR McLaren 722 S Is Extremely Rare Example Modified by McLaren
Verdad Gallardo
8 Classic Boxy Mercedes Designs That Have Aged Like Fine Wine
Verdad Gallardo
Flawlessly Restored Mercedes 190E Evo II Heads to Auction
Verdad Gallardo
Electric Mercedes C-Class Unveiled: 11 Things You Need to Know
Verdad Gallardo
Mercedes EQS Gets A Major Update: Everything You Need to Know
Verdad Gallardo
5 Underrated Mercedes-Benz Models That Don't Get the Love They Deserve
Verdad Gallardo
Mercedes 300D Has Pushed Well Past 1 Million Miles and It Ain't Stopping
Verdad Gallardo
Member
Joined: Oct 2008
Posts: 179
Likes: 2
From: Chicago, Naperville area
2005 Mercedes S600, 2004 Mercedes E500 4-Matic, 2002 Mercedes C32 AMG, 2001 Trans-Am WS-6
THANK YOU!!!
Performed this surgery on my wife's 2004 E500 4-matic last night.
Her symptom was no heat.
Took about an hour and a half (15-20 minutes spent trying to retrieve one of the wiper linkage nuts that fell under the driver side fuse box and then onto the belly pan).
Observations:
-Purchased the valve from Mercedes of Westmont for $41 (suprised me too).
They needed a VIN because apparently there are TWO versions of the valve - one with a bypass of some sort. This one did not need it.
-The coathook idea is brilliant and was used to get the bottom connection to the heater core off.
-Definitely worth the extra couple minutes to remove the wiper motor assembly.
-Very little coolant came out of the lines (but coolant level was good). It was a cold car (not driven for 48 hours) so I'm not sure if that had something to do with it.
-Biggest pain in the rear was trying to gently pry the palstic shield off the windshield without breaking the pastic rivets, and then re-applying it so it sealed.
Excellent write up, thanks for the details.

Newbie
Joined: Dec 2012
Posts: 2
Likes: 0
E Class 211 Estate CDI Avantgarde
Hi all, New to this and from the UK. Noticed from Peter the Hat post 29 that uk version is mounted under servo unit (RHD car). Any easy way to get this unit out without stripping servo / master cylinder out.
E Class estate cdi avantgarde (w211) 2008 model.
Thanks
Peter
E Class estate cdi avantgarde (w211) 2008 model.
Thanks
Peter
Newbie
Joined: Dec 2012
Posts: 2
Likes: 0
E Class 211 Estate CDI Avantgarde
E Class 220 CDI poor heat
Hi all, New to this and from the UK. Noticed from Peter the Hat post 29 that uk version is mounted under servo unit (RHD car). Any easy way to get this unit out without stripping servo / master cylinder out.
E Class estate cdi avantgarde (w211) 2008 model.
Thanks
Peter
E Class estate cdi avantgarde (w211) 2008 model.
Thanks
Peter

Super Member

Joined: Jun 2012
Posts: 959
Likes: 36
From: Maryland
W212 E63 AMG S Model
Anyone in the DMV area that can lend a hand with this? Really not trying to pay the dealership $600... I already attempted this and it doesn't seem that bad, I just can't get the hose off that's facing the motor.

Member
Joined: Jan 2012
Posts: 244
Likes: 4
From: PA, USA
2004 E320 4matic Sedan
To remove the front hose....
I agree the front hose can be hard to move. Did you manage to remove the clip for the front hose? If so, then the use of a large pair of channel-lock pliers to rotate the hose adaptor fitting just a degree or two relative to the valve body, may do it. You need to break the years-old affinity the two plastic parts have developed for each other. The hose adaptor/plug/elbow is tougher than you think so I doubt you'll break it. It is clearly visible in the pics if you aren't sure what I'm talking about.
Super Member
Joined: Jun 2012
Posts: 959
Likes: 36
From: Maryland
W212 E63 AMG S Model
Sorry, I can't quite make it down your way....
I agree the front hose can be hard to move. Did you manage to remove the clip for the front hose? If so, then the use of a large pair of channel-lock pliers to rotate the hose adaptor fitting just a degree or two relative to the valve body, may do it. You need to break the years-old affinity the two plastic parts have developed for each other. The hose adaptor/plug/elbow is tougher than you think so I doubt you'll break it. It is clearly visible in the pics if you aren't sure what I'm talking about.
I agree the front hose can be hard to move. Did you manage to remove the clip for the front hose? If so, then the use of a large pair of channel-lock pliers to rotate the hose adaptor fitting just a degree or two relative to the valve body, may do it. You need to break the years-old affinity the two plastic parts have developed for each other. The hose adaptor/plug/elbow is tougher than you think so I doubt you'll break it. It is clearly visible in the pics if you aren't sure what I'm talking about.

Junior Member
Joined: Jul 2012
Posts: 15
Likes: 0
2003 E 500 and 2006 ML 500
i had the same problem, bought the exchange valve ($40 dollars) and attempted the repair. However, at the end of the whole process it was impossible to attach the valve to the back hose, it seemed like the two did not match, or were slightly different. I could not afford not having a vehicle, so I ended up spending the $600 plus dollars to get it fixed at my mechanic and he did have to replace the back hose as well. From what i have experienced, sometime the parts for certain years are a bit different and the repair attempt can be hell. Good luck!!
Super Member
Joined: Jun 2012
Posts: 959
Likes: 36
From: Maryland
W212 E63 AMG S Model
i had the same problem, bought the exchange valve ($40 dollars) and attempted the repair. However, at the end of the whole process it was impossible to attach the valve to the back hose, it seemed like the two did not match, or were slightly different. I could not afford not having a vehicle, so I ended up spending the $600 plus dollars to get it fixed at my mechanic and he did have to replace the back hose as well. From what i have experienced, sometime the parts for certain years are a bit different and the repair attempt can be hell. Good luck!!
The thing that really got me bad was after my friend disconnected the hose that I couldn't disconnect, a lot of coolant spilled out. We ended up refilling the coolant reservoir with distilled water to get the coolant level back up. Once we started the car and turned the heat on... it was still blowing out cold air. We had to drive the car around for a bit in order for the air to start blowing hot.
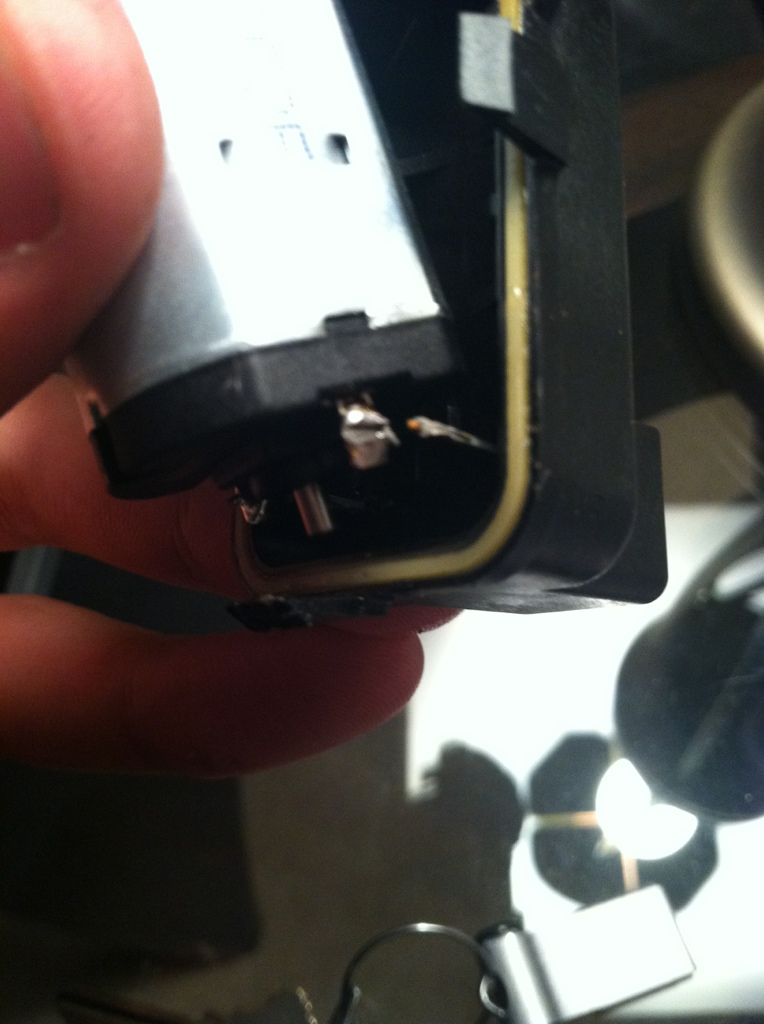
For the record, I opened my old one as well, and noticed one of the solder joints was disconnected... seems like a simple thing to repair with a soldering iron, but I had already purchased and installed the other one:
Super Member


Joined: Dec 2004
Posts: 921
Likes: 36
From: CA
MB
Did it my self, I save $200 from dealer ... http://www.ebay.com/itm/Mercedes-Ben...item2c68331a13

Junior Member
Joined: Dec 2012
Posts: 20
Likes: 2
2006 C230 Sedan
Just did this today. Thanks for the great write up. Took all of 40 minutes. It is not that hard. Take off wipers, plastic cover, unhook old valve, take it out, hook up new valve and put everything back together. It really does not take that long and is really easy to do.
Thanks again for the great write up!
Thanks again for the great write up!
Junior Member
Joined: Dec 2012
Posts: 20
Likes: 2
2006 C230 Sedan
FYI. I think the coolant that flows out after disconnecting the old valve can cause problems to the Crankshaft Position Sensor because it gets drenched by the spilling coolant. I don't know if the coolant did do my sensor damage, but I got a check engine light yesterday, a day or two after doing this proc. I replaced the sensor today and noticed that the old one was really wet and realized that it was probably (not sure) the spilling coolant since that opening is right over the sensor. I probably could have just dried it off and reused but realized all this after replacing the sensor. It cost around $160 bucks, wholesale, at the dealer so if this was the case, than that was an expensive spill. So be careful if you take this on. Take care!


Newbie
Joined: Nov 2012
Posts: 9
Likes: 0
2004 E500
Thank you for a great set of instructions! I was going to take some photos in case I saw something you had missed but there was no need! It took me about 1-1/2 hours which works out to $160 per hour in my favor after spending $60 for the part! What a great savings and now I get cold air in the rear, leaving the console cool. 
Newbie
Joined: Jul 2013
Posts: 5
Likes: 0
w211 / 2005 ,E 36 325i tunned /1995
clima leftside, not so cold!?!
Hello All! Great post and i think is awesome! I have my own problem and i wonder if your solution is work for my MB w211 /2005 /220cdi?! On the left side (driver seat ) the air is not so cold like in the right side (passenger seat ), i think it makes cold by simpaty ,anyway its a teperature diference about 5degree Celsius more or less ! Can You Tell Me please what is wrong?!? I just refill the instalation with freon (on the right side seems like in Alaska) front and back , the fun is working verry well No noise,No smel inside cockpit,a friend of mine check the hole car with a laptop and No problem with AC(clima),the car itself have 90.000miles(141.000km) Please Some HELP & THANKS !!!
) the air is not so cold like in the right side (passenger seat ), i think it makes cold by simpaty ,anyway its a teperature diference about 5degree Celsius more or less ! Can You Tell Me please what is wrong?!? I just refill the instalation with freon (on the right side seems like in Alaska) front and back , the fun is working verry well No noise,No smel inside cockpit,a friend of mine check the hole car with a laptop and No problem with AC(clima),the car itself have 90.000miles(141.000km) Please Some HELP & THANKS !!!

Newbie
Joined: Feb 2010
Posts: 4
Likes: 0
2002 mercedes e240, w211
this is a great post, i've had problems with my e240 blowing very hot air at the rear and i think i've now found the problem! The dealers in Kenya have been unable to figure out what the problem is


