


Replaced The Drivers Door Mirror Housing (Pics)
Thread Starter
Member
Joined: Feb 2014
Posts: 126
Likes: 4
From: Las Vegas, NV
2011 E350 Sedan
Replaced The Drivers Door Mirror Housing (Pics)
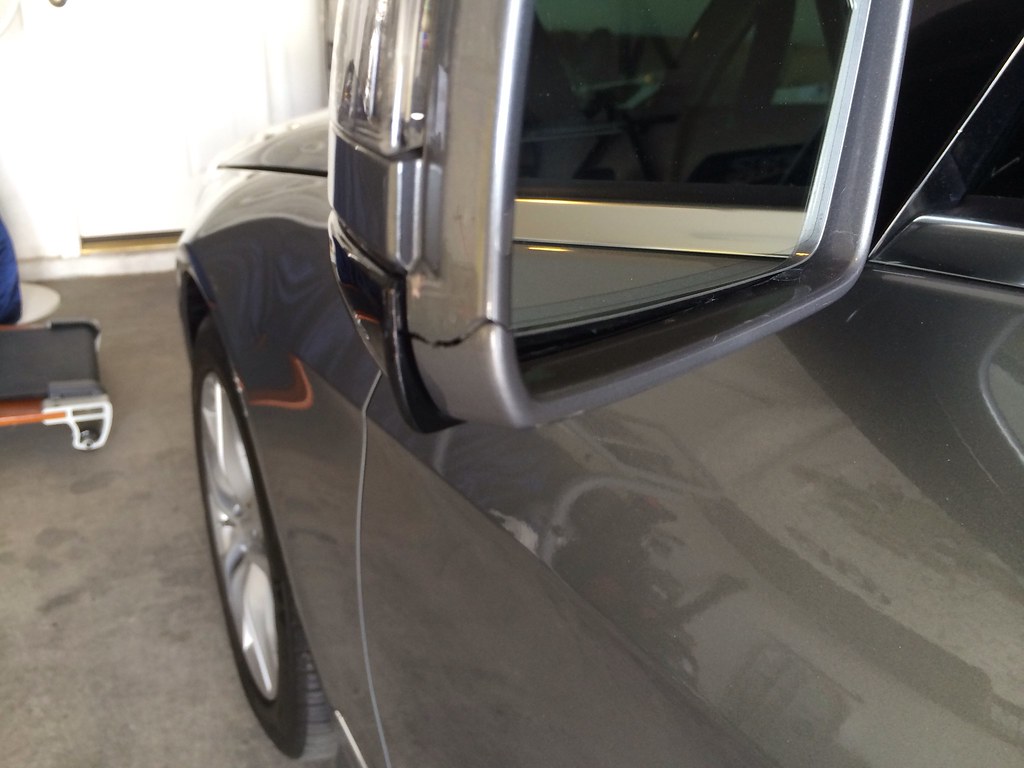
When I bought my car a few weeks ago the only damage to the body was a cracked mirror housing:
So I ordered a color matched replacement from parts.com at a cost of $103:

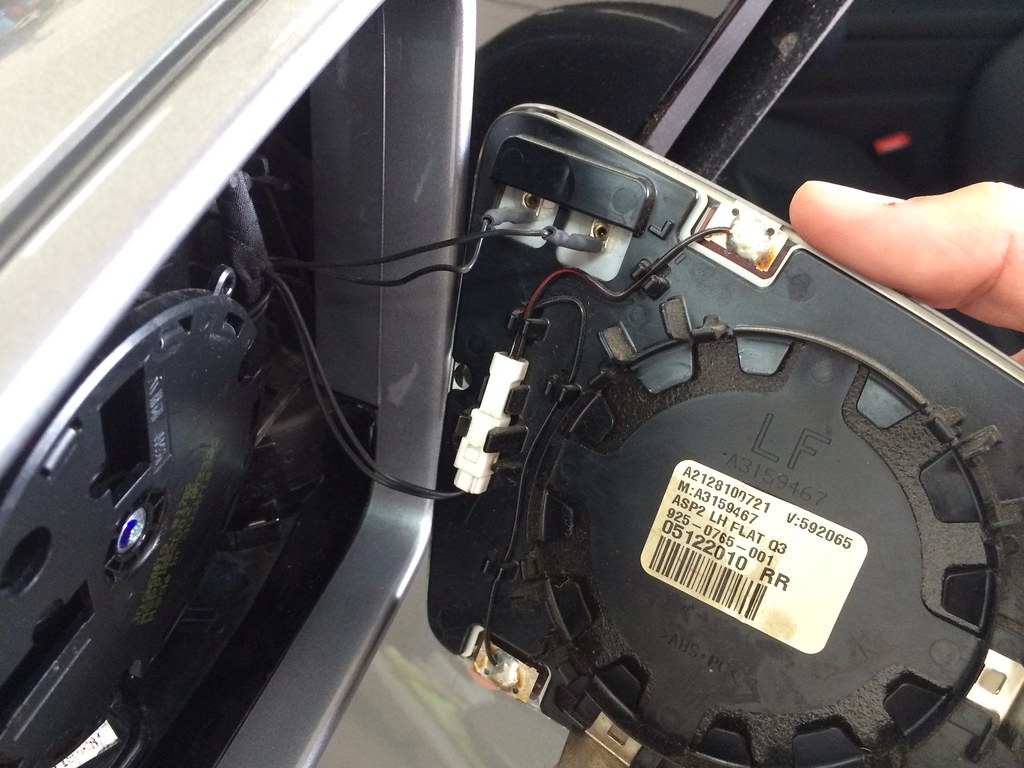
Installation is pretty straight forward. You move the mirror all the way to its lowest position as if you were trying to see the ground in the mirror. Once moved you stick your fingers behind the mirror and gently pull. It snaps out pretty easy. There is a white plug and two wires to disconnect:
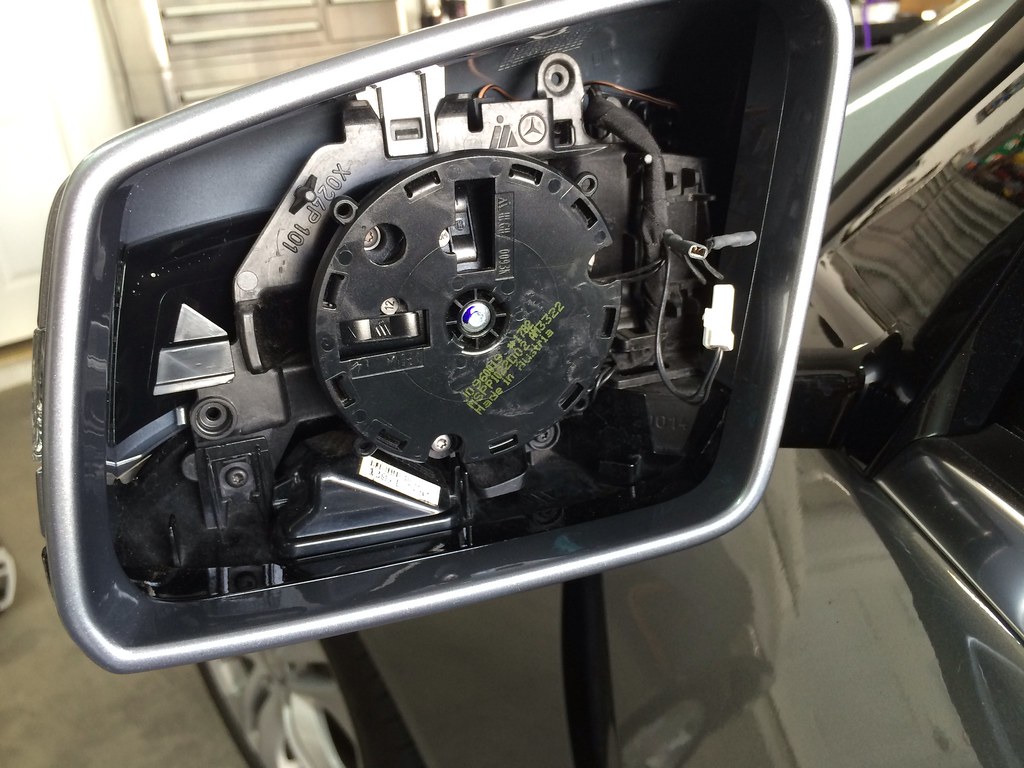
After you gently place this very expensive piece of glass somewhere safe, remove the torx screw in the lower left corner. There are two clips that hold the housing in place so you lift up in it to remove it:
The new part slides back down and you just have to make sure the plug for the signal light lines up:

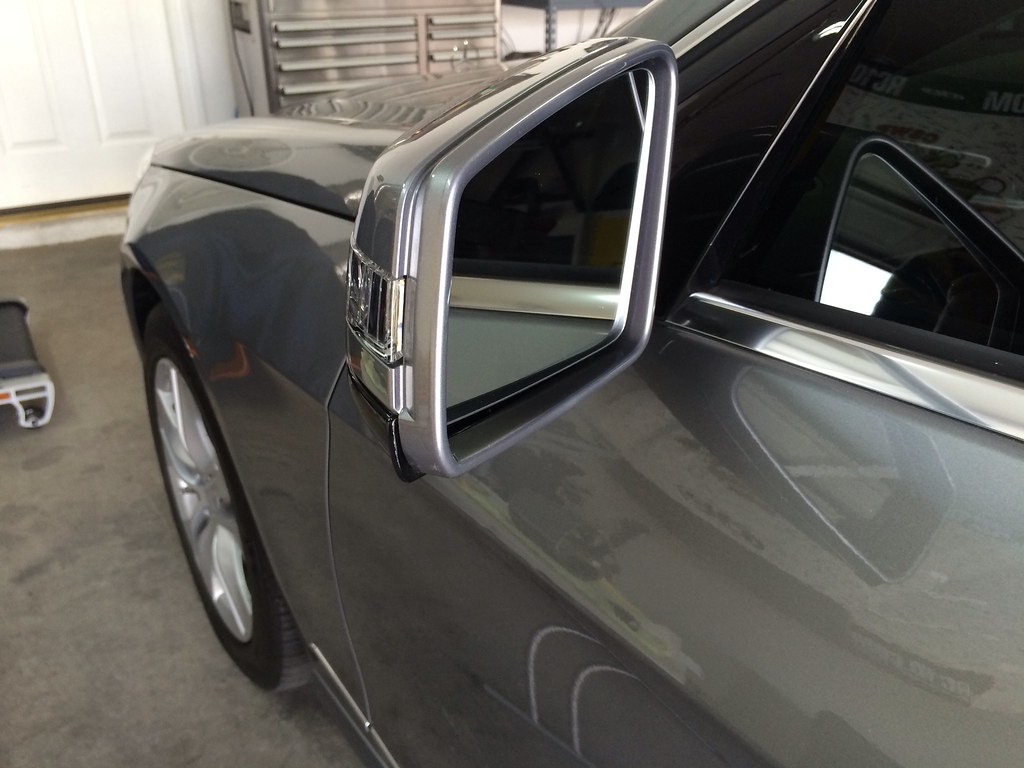
Reassembly is the reverse order. When go to snap the mirror back in to place make sure the two small wires will not get caught. When you are all done it should look like new:
It took me about 10 minutes to complete. Just be very careful with the mirror glass.
So I ordered a color matched replacement from parts.com at a cost of $103:
Installation is pretty straight forward. You move the mirror all the way to its lowest position as if you were trying to see the ground in the mirror. Once moved you stick your fingers behind the mirror and gently pull. It snaps out pretty easy. There is a white plug and two wires to disconnect:
After you gently place this very expensive piece of glass somewhere safe, remove the torx screw in the lower left corner. There are two clips that hold the housing in place so you lift up in it to remove it:
The new part slides back down and you just have to make sure the plug for the signal light lines up:
Reassembly is the reverse order. When go to snap the mirror back in to place make sure the two small wires will not get caught. When you are all done it should look like new:
It took me about 10 minutes to complete. Just be very careful with the mirror glass.
Thread Starter
Member
Joined: Feb 2014
Posts: 126
Likes: 4
From: Las Vegas, NV
2011 E350 Sedan
Trending Topics
Senior Member

Joined: Oct 2007
Posts: 387
Likes: 4
From: Boston, MA
2010 E550 Coupe
Mike - Thanks for the write up and decent pictures too - I'm sure this post will become useful for many.
Admins: Can we make it into a DIY / Sticky? At least prefix the subject line with DIY so that we can search for all DIY's.
thanks,
Richard
Admins: Can we make it into a DIY / Sticky? At least prefix the subject line with DIY so that we can search for all DIY's.
thanks,
Richard
MB World Stories
The Best of Mercedes & AMG

Manual Mercedes? 6 Times Sindelfingen Let Drivers Have All The Fun
Verdad Gallardo
Mercedes SLR McLaren 722 S Is Extremely Rare Example Modified by McLaren
Verdad Gallardo
8 Classic Boxy Mercedes Designs That Have Aged Like Fine Wine
Verdad Gallardo
Flawlessly Restored Mercedes 190E Evo II Heads to Auction
Verdad Gallardo
Electric Mercedes C-Class Unveiled: 11 Things You Need to Know
Verdad Gallardo
Mercedes EQS Gets A Major Update: Everything You Need to Know
Verdad Gallardo
5 Underrated Mercedes-Benz Models That Don't Get the Love They Deserve
Verdad Gallardo
Mercedes 300D Has Pushed Well Past 1 Million Miles and It Ain't Stopping
Verdad Gallardo
10 Most Reliable Mercedes-Benz Models You Can Buy Used
Verdad Gallardo
Senior Member
Joined: Aug 2008
Posts: 436
Likes: 2
From: British Columbia
2011 E350 4 Matic
I am going to install an aftermarket blind spot system and have most things figured out (I think).
Two things I need some help with, I need power and I see this thing that appears to be a relay (red square) and it has a plus and minus on it, anybody know if it is safe to unplug and can it be used for power or is there better source ( if so what color wire).
Also I will need to feed a cable from the mirror into the door and I have removed the three screws that hold the mirror housing in place but it isn't coming off yet, it's loose but can't see to get it off?
Senior Member
Joined: Aug 2008
Posts: 436
Likes: 2
From: British Columbia
2011 E350 4 Matic
I am also changing the mirrors to European version and will be connecting the blind spot led in the mirror to the after market system.
The led has three wires attached, I tried to use a 9v battery to determine which wires are needed to light up but could not get the led to light up. Any idea what that could be?
The wire colors are black with red wire, blue wire and grey wire.
The led has three wires attached, I tried to use a 9v battery to determine which wires are needed to light up but could not get the led to light up. Any idea what that could be?
The wire colors are black with red wire, blue wire and grey wire.
Super Member


Joined: Sep 2013
Posts: 971
Likes: 182
From: DFW, TX
2014 E350 Wagon, 2025 GLC 350e, 2026 E53 Wagon
I am also changing the mirrors to European version and will be connecting the blind spot led in the mirror to the after market system.
The led has three wires attached, I tried to use a 9v battery to determine which wires are needed to light up but could not get the led to light up. Any idea what that could be?
The wire colors are black with red wire, blue wire and grey wire.
The led has three wires attached, I tried to use a 9v battery to determine which wires are needed to light up but could not get the led to light up. Any idea what that could be?
The wire colors are black with red wire, blue wire and grey wire.
Pin 1 - yellow LED +
Pin 2 - red LED +
Pin 3 - ground
Good luck! BTW what is the aftermarket system you're installing?
Super Member
Joined: Sep 2013
Posts: 971
Likes: 182
From: DFW, TX
2014 E350 Wagon, 2025 GLC 350e, 2026 E53 Wagon
Senior Member
Joined: Aug 2008
Posts: 436
Likes: 2
From: British Columbia
2011 E350 4 Matic
It's called bliss blind spot, any idea about that. Red relay whether it can be used to tap power?

Super Member


Joined: Jan 2012
Posts: 599
Likes: 6
From: Maryland
2022 E450 Prior:2021 S580 2012 E350BT, 2013 GL350BT, 2009 ML320BT, 2006 E320CDI, 1987 260E
Nice work! We had to replace the cover on an 2009 ML we had. One dealer quoted $700, the other $250, so I just went with the $250, unfortunately our ML had the odd rectangular mirrors only around 1-2yrs so was hard to find the part online. $103 is a steal....
Senior Member
Joined: Aug 2008
Posts: 436
Likes: 2
From: British Columbia
2011 E350 4 Matic
Thx Greg, Grey is negative, blue is yellow led, brown black is red led.

Newbie
Joined: Dec 2014
Posts: 1
Likes: 0
ML 350
Works for 2010 ML 350 as well
This instruction works for 2010 ML 350 mirror as well. I was searching for removal instruction for a long time and finally tumble onto this and want to let others know in case they are looking for ML 350 mirror removal instruction as well.


