When you click on links to various merchants on this site and make a purchase, this can result in this site earning a commission. Affiliate programs and affiliations include, but are not limited to, the eBay Partner Network.
Old thread but I have a 15 E63 with the HK sound system and my center speaker on the dash seams to have crapped out, it�s horribly garbled and I have to adjust the balance to left or right to direct to sound away from the center to hear anything.
did you have that issue and just upgraded to a better speaker??
I have a year of CPO warranty remaining and it states the stereo / radio is covered so will see what the dealer says.
Greetings from the future. Your PDF instructions were the only help I could find anywhere. My center channel was buzzing (2012 E63 HK Logic 7), and the dealer refused to give me a price to replace it without taking the car in. A local shop quoted me $405 for OEM replacement. WIth your instructions, I was able to just pop the speaker out. (There are no screws holding the speaker in place.)
Guess what, the system still sounds great, so I'm just running without that center channel.
I've been looking at this old thread too, its the only one. Is the procedure the same for W218 CLS? I've seen some replacements that look like easy swap in upgrades for MUCH less than the dealer quoted you.
I am trying to change my rear speakers on the deck (below the rear windshield). One of the speakers starting cracking and popping. I disconnected the clip for the load speaker/sub woofer that is in the middle.
If you have any instructions on how to take it apart or any possible ideas why the speaker is popping/cracking it is much appreciated!
Here is the link to my video of the speaker cracking.
I am trying to change my rear speakers on the deck (below the rear windshield). One of the speakers starting cracking and popping. I disconnected the clip for the load speaker/sub woofer that is in the middle.
If you have any instructions on how to take it apart or any possible ideas why the speaker is popping/cracking it is much appreciated!
What I am hearing in your video are DC pulses frying your speaker voice coil.
PULL YOUR AMP FUSE or harness plug ASAP to save you $$$$
I have seen up close how the main Amplifier module is built with amazin' capacitors rated at 16Volts max...
Once all the caps start leaking DC voltage through, the days of your speaker set are numbered.
To save your speakers... fix the amp!
I have not yet seen the woofer amp module... soon, on my way to dealing with my roll-up blind unit.
How many of you are interested in fixing their OEM amp (caps and heatsinks) under $10?
Last edited by CaliBenzDriver; 09-20-2021 at 05:01 PM.
Reason: interest in preventive fix
What I am hearing in your video are DC pulses frying your speaker voice coil.
PULL YOUR AMP FUSE or harness plug ASAP to save you $$$$
I have seen up close how the main Amplifier module is built with amazin' capacitors rated at 16Volts max...
Once all the caps start leaking DC voltage through, the days of your speaker set are numbered.
To save your speakers... fix the amp!
I have not yet seen the woofer amp module... soon, on my way to dealing with my roll-up blind unit.
How many of you are interested in fixing their OEM amp (caps and heatsinks) under $10?
Thanks for the feedback. I disconnected the clip (in the top of the trunk) that goes to the loud/sub speaker but it is still cracking - popping. Do you know where the fuse is that i can pull it out till i get it checked out? BTW, i thought there is only one amp in the car? I thought i disconnected the one to the speaker? Do you know if it is the head-unit? Is there an amp there i need to worry about as well?
Thanks for the feedback. I disconnected the clip (in the top of the trunk) that goes to the loud/sub speaker but it is still cracking - popping.
Do you know where the fuse is that i can pull it out till i get it checked out? BTW, i thought there is only one amp in the car? I thought i disconnected the one to the speaker? Do you know if it is the head-unit? Is there an amp there i need to worry about as well?
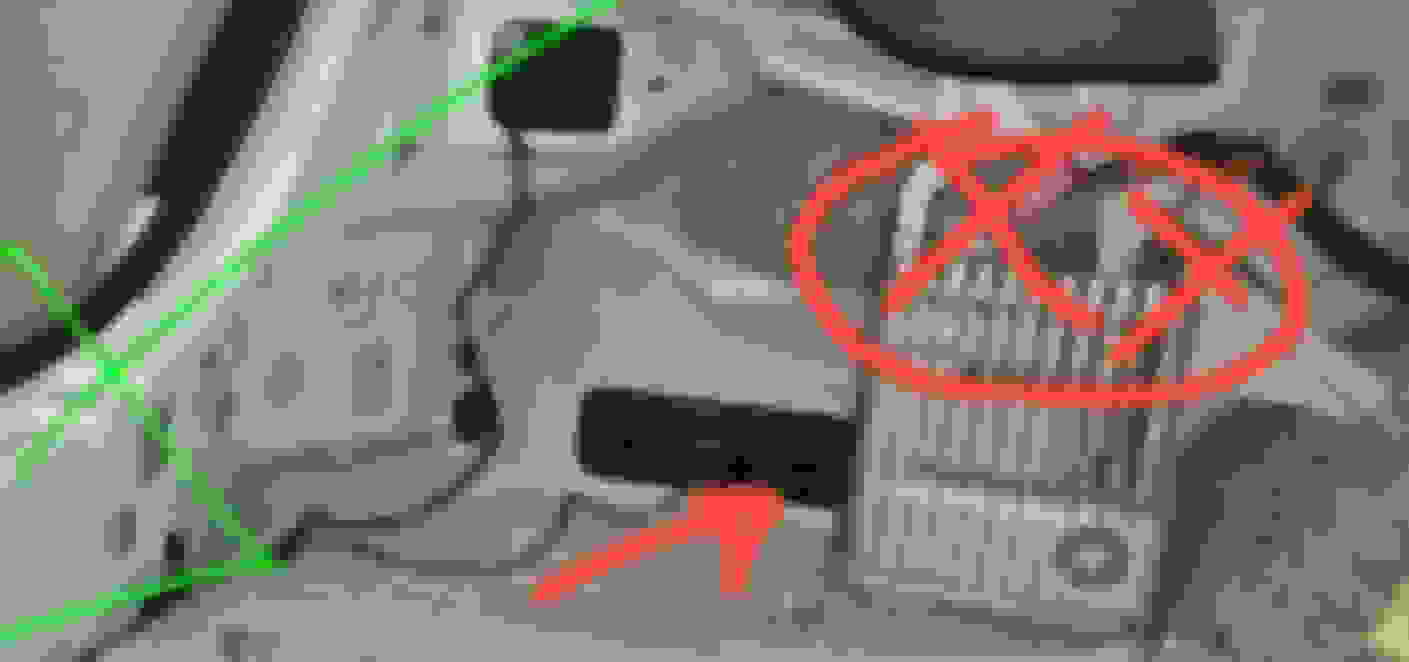
You have pulled the plug from the SUB Amp but it's still crackling... then go for MAIN Amp in trunk left side as pictured below.
Pulling multiple shared fuses will power down additional systems you may still use. Simply pulling plug is a better choice to stop frying your set of speakers.
To answer your question, I do not think the head unit has any power Amps built in. There are nearly coutless different types of COMAND units for the E cars so yours may be a different gem than mine.
pull these 2 plugs OUT, carefully.
Last edited by CaliBenzDriver; 09-21-2021 at 06:00 PM.
You have pulled the plug from the SUB Amp but it's still crackling... then go for MAIN Amp in trunk left side as pictured below.
Pulling multiple shared fuses will power down additional systems you may still use. Simply pulling plug is a better choice to stop frying your set of speakers.
To answer your question, I do not think the head unit has any power Amps built in. There are nearly coutless different types of COMAND units for the E cars so yours may be a different gem than mine.
pull these 2 plugs OUT, carefully.
Thanks for the detail, brotha. Do you have a part number by any chance? Or if this amp can be swapped out by a aftermarket one? I have a 2014 e550.
You can pullout the main Amp really easily to look at its numberings. This module is seriously complicated with digital processing away from being an simple amplifier. I once counted over 35 chips in it....
Replacing a hand full of caps is the quickest and cheapest way to save your OEM unit with limited output power.
I think piggybacking an aftermarket Amp is the best long term fix to gain serious RMS power. I don't think you can bypass the DSP but I could be wrong.
In either direction, the first step is to start by fixing existing unit ...
Can you share the instructions and item numbers for replacing the Caps and any other recommended mods for the OEM amplifier. Mine fried my center speaker yesterday, so I pulled the fuse that supplies it to avoid other speakers following its path.
Thanks!
this would be a very difficult amp to repair, as its input is a optical digital stream unique to the HK stereo system, and there are no repair documentation such as schematics. as others said before its not at all a simple amplifier, it has integrated crossover equaliization on each channel, and it has 14 channels of outputs
front left door woofer
front left door midrange
front left mirror triangle tweeter
front right door woofer
front right door midrange
front right mirror triangle tweeter
front center channel
rear left door woofer
rear left door tweeter
rear right door woofer
rear right door tweeter
rear left pillar surround/tweeter
rear right pillar surround/tweeter
rear trunk area subwoofer
the B&O premium system has the same setup as the HK Logic7 system, but different speaker and amplifier part numbers
Can you share the instructions and item numbers for replacing the Caps and any other recommended mods for the OEM amplifier. Mine fried my center speaker yesterday, so I pulled the fuse that supplies it to avoid other speakers following its path.
Thanks!
Are you handy with a soldering iron around electronics? If so your time may be well spent.
The main Amp is located in the trunk left side. Once you get it open, a collection of 16V caps will be your target for replacement with higher voltage and about similar capacitance. They are used to filter out the output DC voltage from reaching the speaker coils. The limiting factor here is the available room for cap size! I did run a part search a while ago... will add edits about findings.
@Left Coast Geek shows us the way the Amp outputs are individually served with pre-filters. This is a luxurious solution.
Traditional "LC-filters" are only great on paper, in practice they waste a lot of power. Here our frequency cut-off filtering is nicely done ahead of amplification. This way the two front doors use no less than 6 amplification channels, great !
"Recycling" free channels:
I recall the amp chips showing proprietary markings (unknown replacement) - If you have a bad chip for your center spk use one of your rear door channel!!!
Rear doors use 4 channels... you rewire the tweeter to a serial 2uF cap, hooked up in parallel to woofer - This single cap is the highly efficient filtering used in my Bose speakers.
Having freed two channels (L+R Rear tweeters) you can move the chip to replace your center channel if bad beyond a leaky 16V cap.
Plan B...Simplify!
Okay, you say life is short, let's just loose the front center channel.
This is the easiest way >😊
In this case you renew all your 16Volt caps and if the center chip is bad, you let it be. At least frying other speaker coil will be prevented.
Oz of prevention:
> You want to upgrade the liquidy OEM thermal paste that's running down the vertical heatsink... ouch! Use good silver CPU paste for a superior grade.
> Furthermore you put on your eye glasses and realize the heatsink mating surfaces are rough unmachined AL casting... polish them a bit with your Dremel tool.
Now your main Amp will perform reliably well.
+++ Edits+++++
double check this Capacitor Ref# UPW1E472MHD
4700uF 25V 105�C 18x35x8 radial
$1.49Ea. at Jameco, Digikey or Mouser
✌️
Last edited by CaliBenzDriver; 05-18-2022 at 05:14 PM.
re ditching the center speaker... AFAIK, thats used for telephone calls and such as the only speaker. per the wiring diagrams, its actually a double speaker, I suspect one half for the voice stuff, other half for dolby digital 5.1.
So I would leave the center channel speaker physically in place, and just disconnect he "S" jack (grey, brown/grey) and not the "LCT" plug (brown/green and green)
on my old W124 wagon, the right speaker had dual voice coils, one for the cellular phone, the other for the stereo.
Are you handy with a soldering iron around electronics? If so your time may be well spent.
The main Amp is located in the trunk left side. Once you get it open, a collection of 16V caps will be your target for replacement with higher voltage and about similar capacitance. They are used to filter out the output DC voltage from reaching the speaker coils. The limiting factor here is the available room for cap size! I did run a part search a while ago... will add edits about findings.
@Left Coast Geek shows us the way the Amp outputs are individually served with pre-filters. This is a luxurious solution.
Traditional "LC-filters" are only great on paper, in practice they waste a lot of power. Here our frequency cut-off filtering is nicely done ahead of amplification. This way the two front doors use no less than 6 amplification channels, great !
"Recycling" free channels:
I recall the amp chips showing proprietary markings (unknown replacement) - If you have a bad chip for your center spk use one of your rear door channel!!!
Rear doors use 4 channels... you rewire the tweeter to a serial 2uF cap, hooked up in parallel to woofer - This single cap is the highly efficient filtering used in my Bose speakers.
Having freed two channels (L+R Rear tweeters) you can move the chip to replace your center channel if bad beyond a leaky 16V cap.
Plan B...Simplify!
Okay, you say life is short, let's just loose the front center channel.
This is the easiest way >😊
In this case you renew all your 16Volt caps and if the center chip is bad, you let it be. At least frying other speaker coil will be prevented.
Oz of prevention:
> You want to upgrade the liquidy OEM thermal paste that's running down the vertical heatsink... ouch! Use good silver CPU paste for a superior grade.
> Furthermore you put on your eye glasses and realize the heatsink mating surfaces are rough unmachined AL casting... polish them a bit with your Dremel tool.
Now your main Amp will perform reliably well.
+++ Edits+++++
double check this Capacitor Ref# UPW1E472MHD
4700uF 25V 105�C 18x35x8 radial
$1.49Ea. at Jameco, Digikey or Mouser
✌️
I�m about to remove and replace the 3 capacitors with the P/N you listed above, but I noticed the stock 16V capacitors are 3300 uF and the new 25V capacitors are 4700 uF. Is the difference in uF going to be a problem or did you do that on purpose for a good reason? Thanks
 04-11-2018, 11:13 AM


 polish them a bit with your Dremel tool.


