When you click on links to various merchants on this site and make a purchase, this can result in this site earning a commission. Affiliate programs and affiliations include, but are not limited to, the eBay Partner Network.
I got to autopsy the filter unit. Mine new P/N A2184700994 https://www.fcpeuro.com/products/mer...mer-2184700994
This MB P/N is inclusive of Fuel Pressure Sensor too.
It is not the same as E350 version of before 2012/2013, I believe so.
This fuel filter is made by VDO, at least the old one in the tank. The new one from FCP Euro I never bother to check
The old one P/N is A2184700194
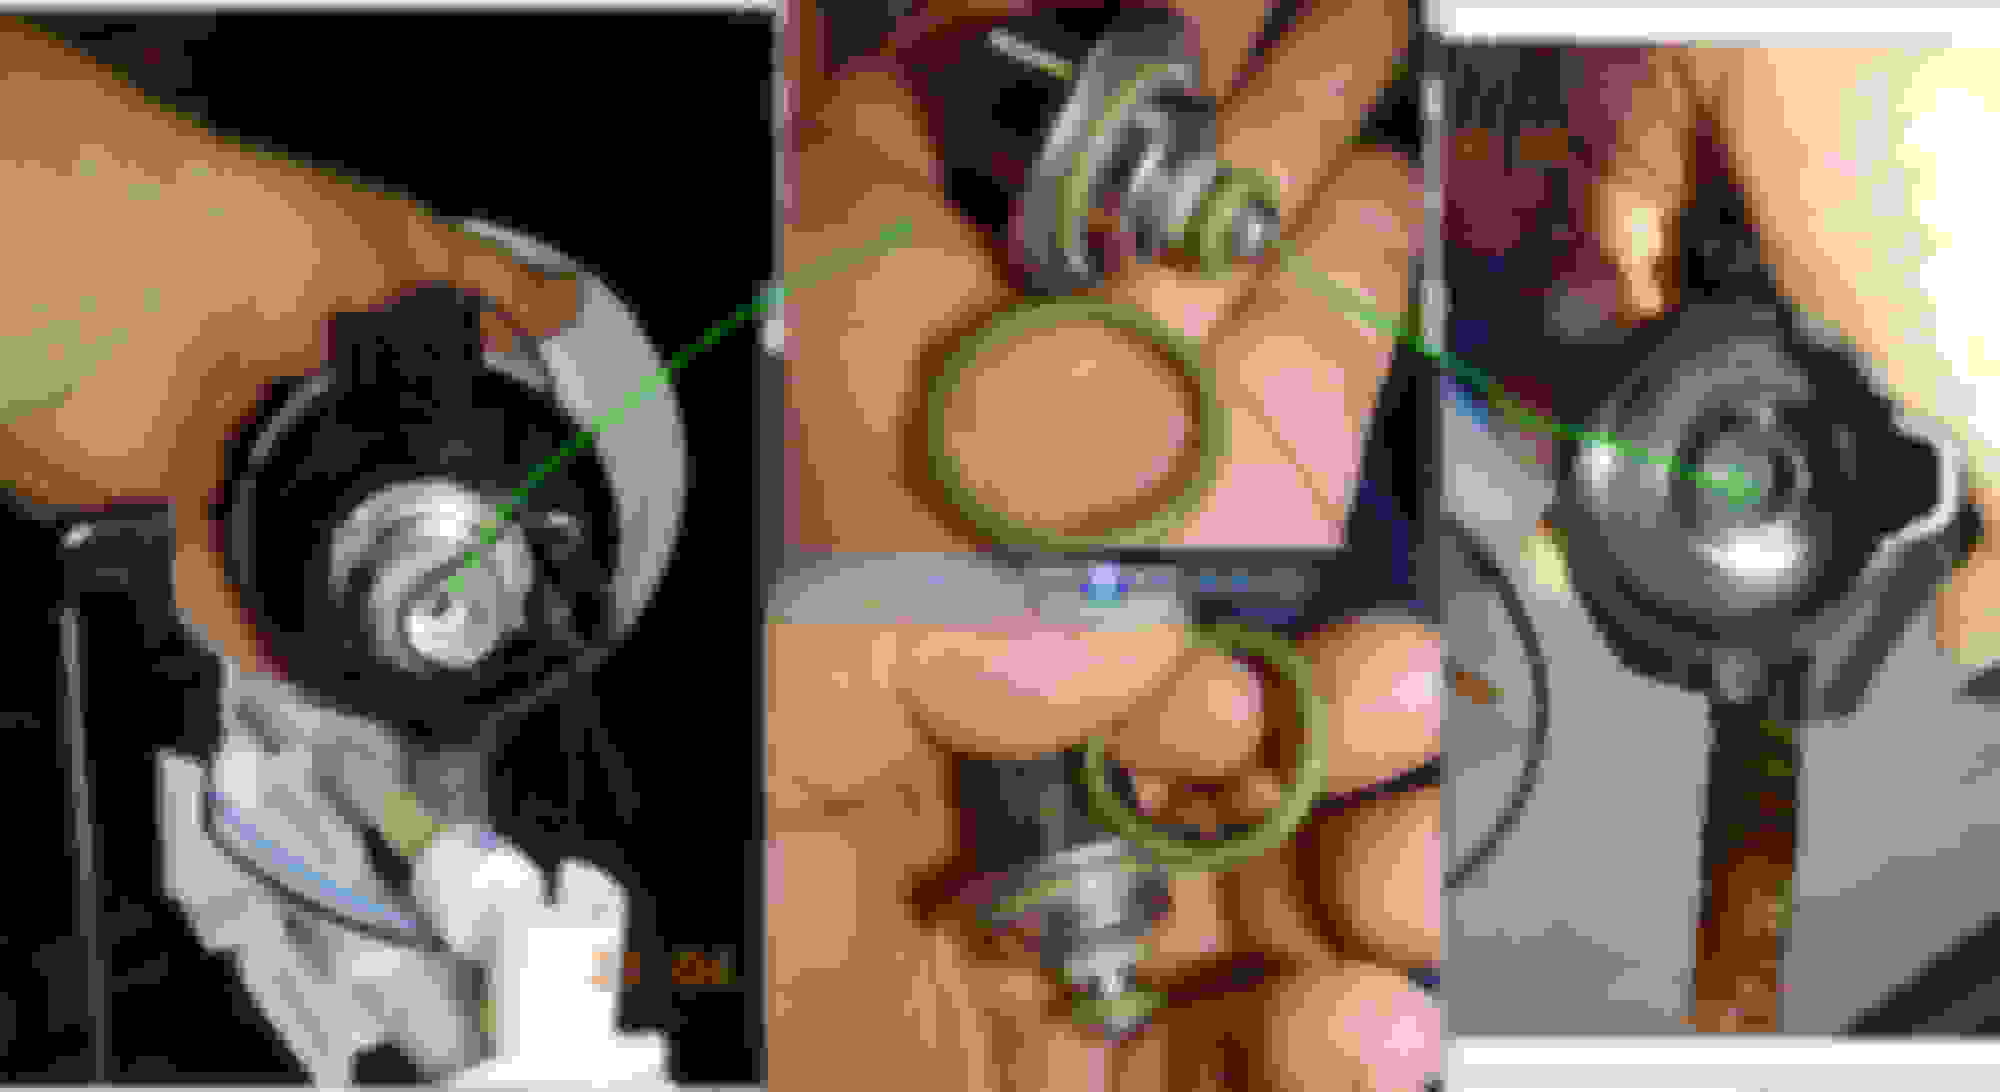
Let's discuss the filter design. I don't like it.
I don't like the quality of the sealing material separating dirty/raw fuel and the filtered/clean fuel chamber/zone.
The OUTPUT I marked green at above and below photos, is heading to the filter output fitting and also to the pressure sensor.
This brown filter top/bpttom hat is actually also a seal, like an o-ring duty.
The problem is, this brown material is quite hard/stiff now and with fuel contact since 2014 the car was built, this plastic-kinda-flexible-thingy it is not sealing too well anymore.
The o-ring of the over-pressure (return to tank valve) is a nice good quality o-ring, this one is still flexible till now.
Why would I say the sealing of the browny top and bottom hat is bad ?
Some dirt has managed to by-pass the sealing and is at the output side, this means the proper sealing have failed.
When filter removed and drained out from its OUTPUT, the fuel look like shi-et. The input has a check-valve, so you can only drain the CLEAN side of the filter....yeah right , clean my azz
Will continue................
Last edited by S-Prihadi; May 20, 2022 at 03:14 PM.
Reason: typo
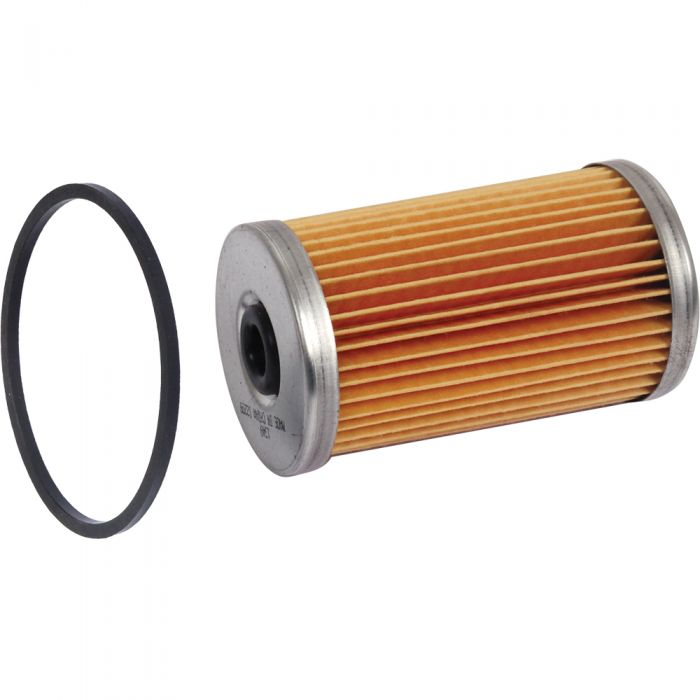
Why did not VDO simply use proven seal type o-ring for such inline filter, example a Ford 6 cylinder one below :
I do fear filter element staying too long immersed in petrol.
They use adhesive to bond the brown top/bottom hat seal to the filter element paper. Sometime too long in petrol, the adhesive can break down and failed. I seen such cases.
Pressure seek easiest path. If my paper filter element has high HEAD/RESISTANCE and that brown seal (top/bottom hat ) is already like mine, sort of dry and not sealing so well, fluid will enter via the sealing surface, instead of having to fight pressure
given by a dirty paper element. This is why I can get dirty fuel from a supposedly clean zone of the filter assy when I drained it.
36,000KM at 8 years is how old the filter element is.
I think next filter change I will keep it down to 4 years or 20,000KM max. It will cost me only 2.3 USD cents per KM if based on 20,000KM and this is including 2 of the o-rings. You need 2 o-rings, 1 for pump housing and 1 for filter housing.
The precision machining of the High Pressure Pump piston/plunger can not tolerate even slight dirt. See my original post to find link on how our HP pump internally is like or find Taso's youtube channel : https://www.youtube.com/c/TasosMosch...%20fuel%20pump
These o-rings
Now, the paper element weight is only 36 grams.
The paper element has thousans amount of pores. Those pores will get clogged with the dirt in the fuel.
My logic is, no way this filter paper element can hold dirt to a 100% of its weight.....and we expect our fuel flow to engine is still capable in capacity with ease to deliver in liters per minute for WOT red line.
I would use 75% as maximum,so 27 grams.
I done some calculation :
Damn at 0.001% contamination , from 5,000 liters burn, I will get 36 grams alreadyand that is a a 10 PPM class of contamination, the crazy superfine.
No way Indonesia's average fuel cleanliness is to 10 PPM at petrol station....no way.
Will continue later,.............. on tips for replacing the fuel filter and what tools you will need.
I forgot, while still in the fuel filter assy discussion.
This is the check-valve.
The orifice size is so small, this design has high HEAD loss for sure...dork !!! For a 2ish liter per minute or claimed 130L per hour this set up is...... hhmmm .... dork design indeed
Will continue...................
Last edited by S-Prihadi; May 20, 2022 at 02:41 PM.
Reason: add info
Thanks for taking your time.
Unfortunately with more and more gadgets installed on today's cars ,- space is getting higher and higher value and my guess this is why MB put filters inside the tank on some models.
Even my diesel has filter on top of the engine, it is several hr job to get there.
Quality of materials is getting better in last years.
I drive MB starting with 1985 models and plastics & rubbers cracking on W210 model was probably the biggest issue at the time.
Than some designs go well over the head. My sprinter has integrated Diesel Emission Fluid reservoir.
When $2 heating element burns, you have to replace whole reservoir, when the part is about $4000
1st and foremost. Get a bloody good fire extinguisher of 3Kg or bigger and remove battery negative cable when wanting to replace fuel filter.
Get a fan too and blow fresh air into the car interior and have all windows/doors open and pano/sunroof roof too.
My garage ventilation is decent, full width opening at rear of car and front of car is semi open area, so airflow mode okey.
Yep, that blue taped foam so that my door wont whack the wall ....
02. Depending on your fuel pump and fuel filter assy locking mechanism, mine is the I-hate-it type of ring. Very solid ring-lock style but its tough to work with.
Get from AliExpress China, cheap and well made. The teeth are accurate. https://www.aliexpress.com/item/1005...5b555244q3cDSL
This locking ring friction caused by the 7 devil notches is insane. I dare not use too long a breaker bar, because the claws which mate to this locking ring is embedded into the plastic fuel tank.
I fear tearing out the claws.
03. Fuel Level, WIS said less than 1/2 tank, but be warned that the balance of fuel between left and right saddle tank is NOT equal. The side where the fuel pump is, always have more fuel.
I opened up the fuel pump section at 21L of fuel left and it is nearly full....yikes !!!! 21 liters from a 50 liters tank is 42% full.
So I pumped out down to 12L and only then the fuel pump side is like 2 fingers down on the fuel level towards the opening. And the fuel filter side of the saddle tank is nearly empty !!!!!
Even using the special tank opening tool, you have to hammer lightly on the tool to clear the 7 devil notches, while exerting force on the breaker bar.
You can try exceeding 150Nm on the breaker bar, it won't move...yep. I even applied silicone lubricant to the claw and notches, did not help much because there was no corossion,
it is simple friction based on locking shape of half-moon notch to another half moon claw. Its so crude having to hammer. I think if I have impact hammer gun, it can help. I should buy one.
04. De-pressurize the fuel hose from filter assy to engine, that thing is 5 BAR / 75 psi at the filter output. De-pressurize at engine bay fuel connector, Schrader valve
Remember, by altitude your tank is lower than engine bay, so not only the 5 BAR left over pressure to deal with, but your fuel hose from engine bay to filter assy has like 100cc of fuel at least and that will gravity to fuel filter assy hose
and will wet you when you disconnect the fuel filter hose clip.
1st I use MityVac hand pump which can do suction or pressure, I use the pressure function and blow left over fuel in hose clip at fuel filter towards engine bay at low pressure rise....I mean a hand pump, whatdaya expect its pressure rise would be.
2nd I use compressed air to blow out more of the fuel inside the hose and hoping the dirt ( if any ) will also be removed. Remember, I found trace of dirt at the fuel filter output connector.
05. Open or work on fuel pump section first and un-clip 2 hoses for the fuel filter assy and tie them with a string so that the string later will be used to send the new filter assy hose set over to the pump.
Mark it if possible, albeit it is hard to go wrong. The lock ring mark it too.
The fuel pump or fuel filter assy, does not sit on the tank with special pad on tank's bottom to prevent it from moving around. Fuel pump uses spring pressure from its cover, see the 2 springs.
06. Be safe by plastic bagging all connectors as per few photos above. So no fuel spill will damage it. Cover your seat with towel, because the old fuel filter long hoses are stiff and it may splash fuel to your interior when you get the fuel filter assy out of the tank.
Lots of small towel to grab wet fuel filter assy and use a proper sized container to hold fuel filter assy + its stupid STIFF hose ( stiff after 8 years of submersion in petrol ) while still in car interior, cleaner and safer this way.
Will continue.......................
Last edited by S-Prihadi; May 20, 2022 at 03:01 PM.
Reason: typo
So I have covered the fuel filter assy removal yada yada.
The re-installation of the fuel pump is no fun, there will be lack of feeling of how your new o-ring is seating.
I use new o-ring and it is still fat. The opening of the fuel tank where the pump assy sit is not zero flat. It is at a slight angle where the one towards the rear of the car is lower than the front side.
This is why the spring and its guide for the fuel pump top part is slanted.
As explanied earlier : "The fuel pump or fuel filter assy, does not sit on the tank with special pad on tank's bottom to prevent it from moving around. Fuel pump uses spring pressure from its cover, see the 2 springs."
Please becareful when sitting down ( also locking in place ) the fuel pump top part and its spring. Not only the springs are quite hard ( few KG worth of pressure ) and the hole is not flat, rather slanted,
the worry part for me is the proper sitting of the o-ring which can slide out of its retainer lip with ease at any slight disturbance to it. I can't feel the o-ring because I am fighting the 2 springs and freaking slanted insertion is also
making my sense rather dull. I did not grease the o-ring to help it stick better to its retainer lip, I think suitable grease will help. The retaining ring is so not tall enough for fat new o-ring to sit pretty, I had trouble making sure
this o-ring sits well. This o-ring proper sitting part I worry mostb ecause leak can happen. The o-ring is sooooo easy to shift out its place/retainer groove-lip...DAMN !!!!
The fuel filter assy also uses spring, a single spring to lock itself to tank bottom, but its spring is at the bottom and not as strong as fuel pump ones.
Think of pogo stick
Pogo stick
Will continue later , on how the new filter pressure is different than the old one. No test drive yet, but stationary revving. Today rain, me don't want to waste time washing my car IF after a test drive
After I blew compressed air to the fuel delivery pipe from fuel filter assy to engine , I also blew air with my own mouth/lung and there is of course resistance but nothing significant, based on AIR.
Upon completion of new filter assy installion, I run the LP fuel pump via Xentry to clear air bubbles and filled up the delivery pipe from tank to engine full of fuel.
I purge a few times the fuel and pump up again, to make sure no bubbles trapped in fuel delivery pipe and the filter assy itself.
Satisfied with the air bleeding and fuel priming, I then remove excess pressure from fuel delivery pipe to read what is the left over static head from the different elevation of tank to engine and also
static head from existing fuel inside the pipe.
I notice a remarkable difference. With the old fuel filter, 1 push of the button of the fuel pressure test gauge kit bleeder valve, will drop the pressure at the gauge to zero.
With the new fuel filter, I need to do the same short push like 3 times to read zero pressure at the gauge. This is a good sign, that means there is more fuel volume,albeit pressure is near the same for peak
pressure of actuation of the fuel pump by Xentry.
The new Wika Gauge, 100 psi version.
Head lost in car's delivery pipe is the static pressure at 1.1 BAR , see below Xentry capture
I am still not pleased with the head loss of 1.1 BAR in car's delivery pipe. My calculation was 0.53 BAR is the probable value. 1 BAR loss is equal to 10 meters / 33 feet of pushing water vertically up, aka HEAD.
I want to investigate the under carriage, see if the blue hose get twisted or pipe got squeezed.
I have seen diesel fuel hose swollen on the inner wall, in yachts, as such the internal diameter of the hose shrank and cause reduced fuel flow.
I don't have personal experience with petrol hose inner wall collapsing/swollen, I have seen hardened hose ...yes.
The blue hose from fuel filter assy to later joining a pipe under the car, that is plastic and not typical rubber type fuel hose.
Hopefully tomorrow no rain and I can test drive the new fuel filter. I also need to make sure the 2 o-rings seal properly or else at full fuel, I can have a bad leak.
The WIS is crap, because it is not safety concious enough.
01. Not a single instruction that it will be best ( compulsory if for me ) to disconnect battery, for total electrical short circuit protection. See attached WIS related to fuel pump & filter removal.
Even with battery disconnect, I still took the trouble to plastic bag all connectors at fuel pump and filter, for added safety.
Imagine when one only read FUEL FILTER WIS, he will assume all good and never disconnect the fuel pump power connector !!!!
See the WIS Fuel Filter Install/Removal instructions, 1 to 20, no mention of fuel pump power connector to be disconnected !!, for extra safety.
Yes, N118 fuel pump controller has a secondary activation from ECM at its pin #11 connector 1 in order for it to ACTIVATE, but it get direct power from fuse 42 of Rear SAM at N118 pin 1 connector 2.
We don't want Uncle Murphy Law to come and whoop our azz......., 120 seconds to disconnect the battery negative wire, why not do it ?
Why would I need fire extinguisher standing by if I am confident ? Well, I fear fire hazard big time. On boats with inboard Mercruiser petrol engine ( time bomb equivalent ), I have lost a crew in the marina community.
I have 2 friends who got blasted into the air while sun tanning on the engine room cover ( which is used as sun tanning bed )... Kaboom !!! , they survived because they were thrown into the water ... LOL.
I have caused fire too ...ha ha ha, on someone's else fuel pump back in late 80s. It was a Peugeot 604, a french car.
That I-almost-burn-down-someone's-Peugeot is the day I seen Halon power over foam or powder and made me a true believer.
Halon is a fire extinguisher clean agent, so VERY good it is. What I use now for my work is its replacement, more ozone friendly one called AF11E . By today's standard AF11E is not ozone friendly enough.
02. No mention in WIS of removing 5 BAR / 75 psi of excess pressure from filter output ( filter quick clip connector , blue hose ) safely at engine bay, fuel inlet to engine.
So WIS expects we to have wet and wild party with at least 100cc of fuel...awesome !!!
The one who wrote the WIS, never really work on the actual job of replacing the fuel filter.,. LOL.
Fuel filter hose end quick disconnect.... IS.... located at the FUEL PUMP ouput, that means fuel level in tank must follow FUEL PUMP WIS, not Fuel Filter WIS because like it or not, we must also open up FUEL PUMP top cover,
albeit no need to remove it entirely the fuel pump. Fuel flooding the rear seat with fuel can happen if we do not empty enough the fuel pump's region of fuel..
Our car uses twin saddle fuel tank, so there are 2 zones, as explained in earlier part of this thread, fuel level quantity are different between Fuel Pump and Fuel Filter saddle regions.
03. There is a Xentry feature to drain fuel tank bi-directionally, to safe working level. It can not be used to drain to empty the tank for tank removal, pump will burn for sure and can not remove 100% fuel too.
Why there is NO MENTION in WIS of draining fuel tank to safe working level for fuel filter/pump work using Xentry ?? Hello WIS ????
The WIS for Emptying Fuel Tank is a mechanical one, capable of sucking all fuel in tank probably. See the attachment.
I feel sad.... for this low quality information from WIS.
=====================================
Now, to those who wants to remove the fuel level sensor at the fuel filter for some reason, WIS did not show where the lock tabs are, I will show you.
The new fuel filter assy gets you Level Sensor & Presure Sensor. MB does not want to sell separately now, at least that is what EPC is showing for my car.
Ebay image, below
=================================
How to NOT ruin your rear azz seat hook clip.
Rear Seat, for our azz part : The front locking tabs are pure friction base, so pull upwards is correct. Beware if you have DVD player on rear seat like mine, I will explain the tips to remove the front face panel of DVD safely later.
Easy one
The tricky one. Use your hand/finger to feel this hook to hook clip mechanism with seat azz forward part lifted up a tiny bit.
Use your finger to push out the hook clip from hook. DONT play rough and think this is a friction fit and Rambo it out... No No No be gentle.
==============================
Now, if you got DVD on seat azz like mine. This is the worst for me, because when it comes to car interior locking tricks for plastic, I am crappy stupid and ROUGH.
If it weren't for my endoscope camera, I would have broken the side (big) hook shape locking tab for sure.
You must remove the shiny DVD front face panel first before able to completely remove the seat azz. Becareful of this steel rod below, red arrow. I did not know it existed .... LOL.
This is no fun to work with, you can only lift the seat azz a few cm up and because WIS never shown side view of the DVD metal frame, where and how shiny DVD front face panel locks, we don't know for sure.
WIS low quality image is also not helping.
Don't over pry that side hook , it can break. The plastic is not super flexible type.
Don't damage your seat fabric/leather while doing this.
That's all the Tips n Trick which WIS did not point out or not clear enough.
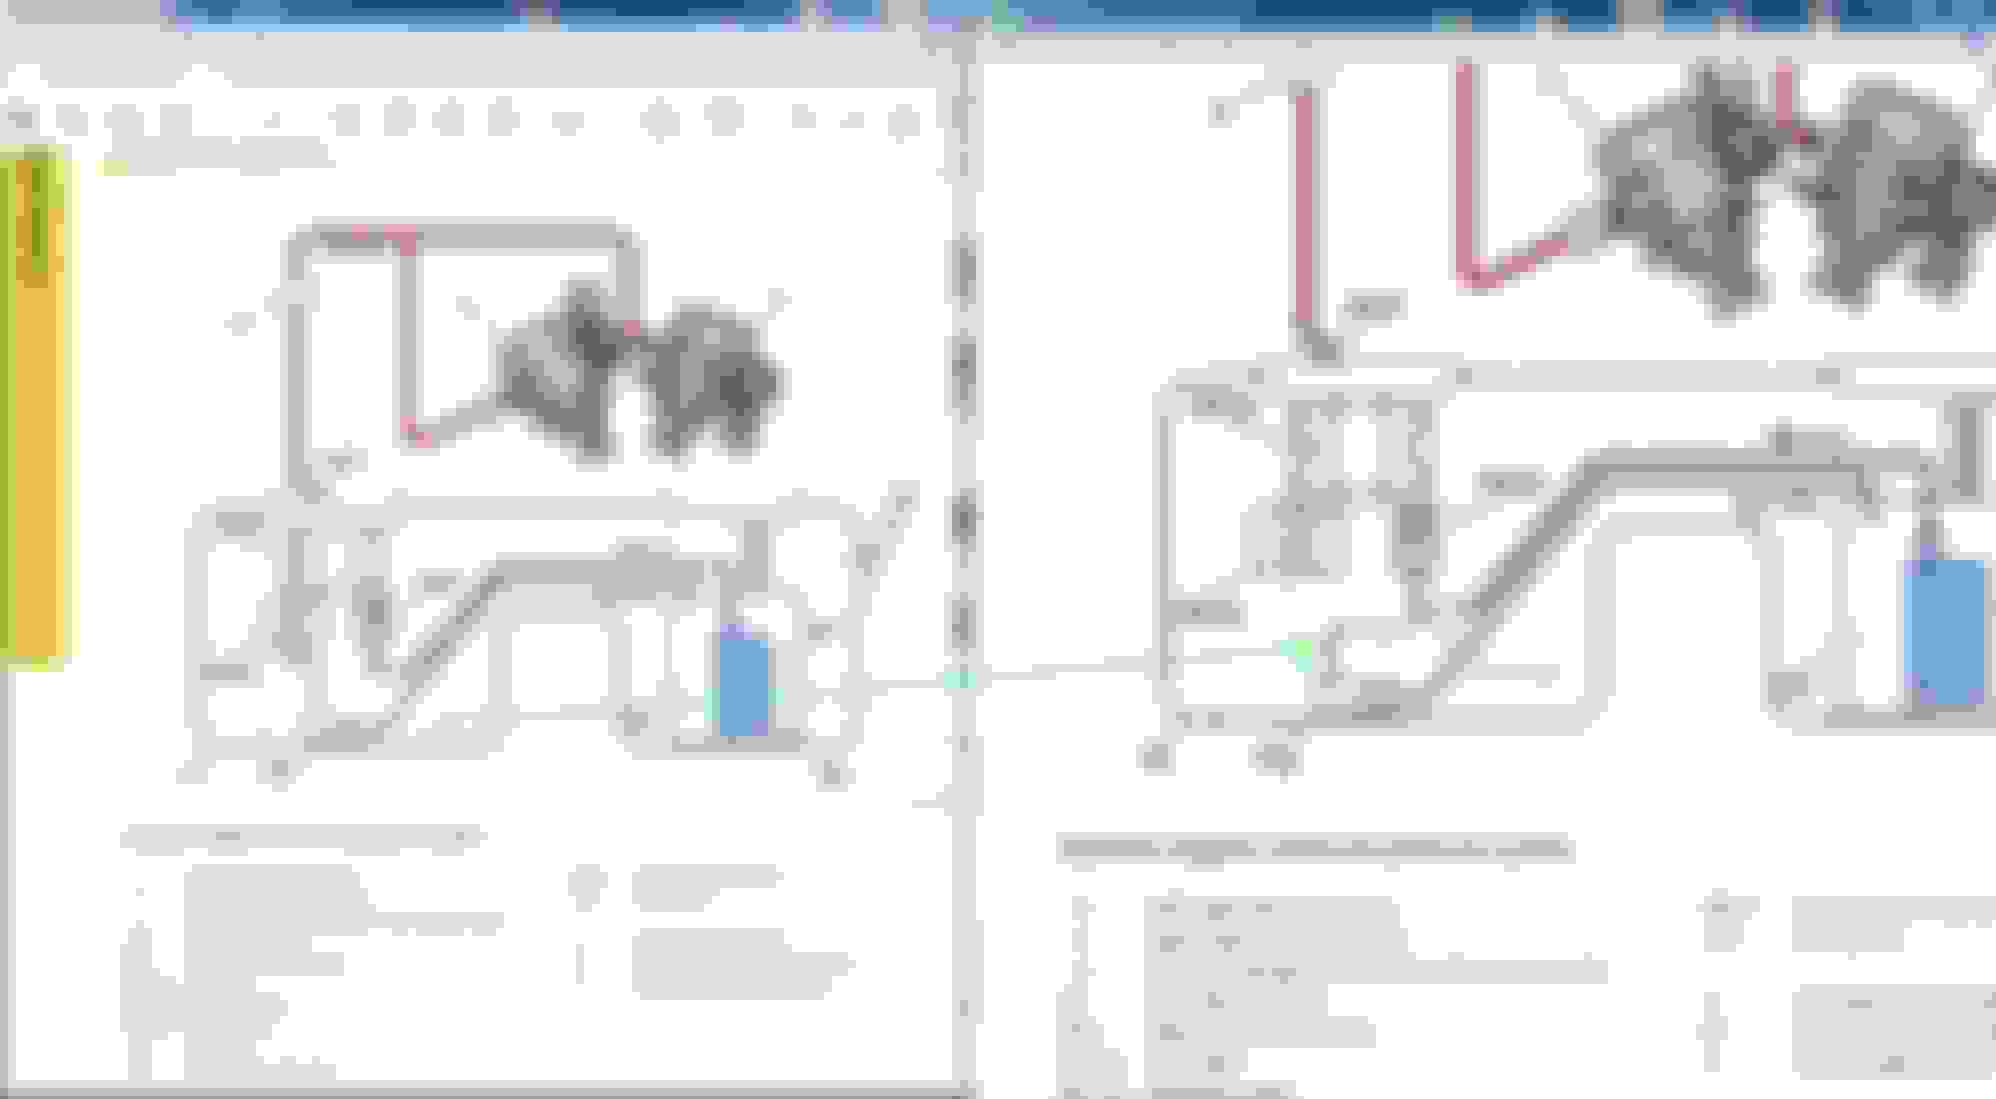
I was thinking about the jet pump effect. The venturi effect actually, on how the LEFT saddle-tank where fuel filter is...can have its fuel send to the RIGHT saddle-tank to the fuel pump.
Since there is only 1 fuel pump and 2 zones aka SADDLE, the jet pump/venturi effect is the mean to transfer fuel from LEFT to RIGHT.
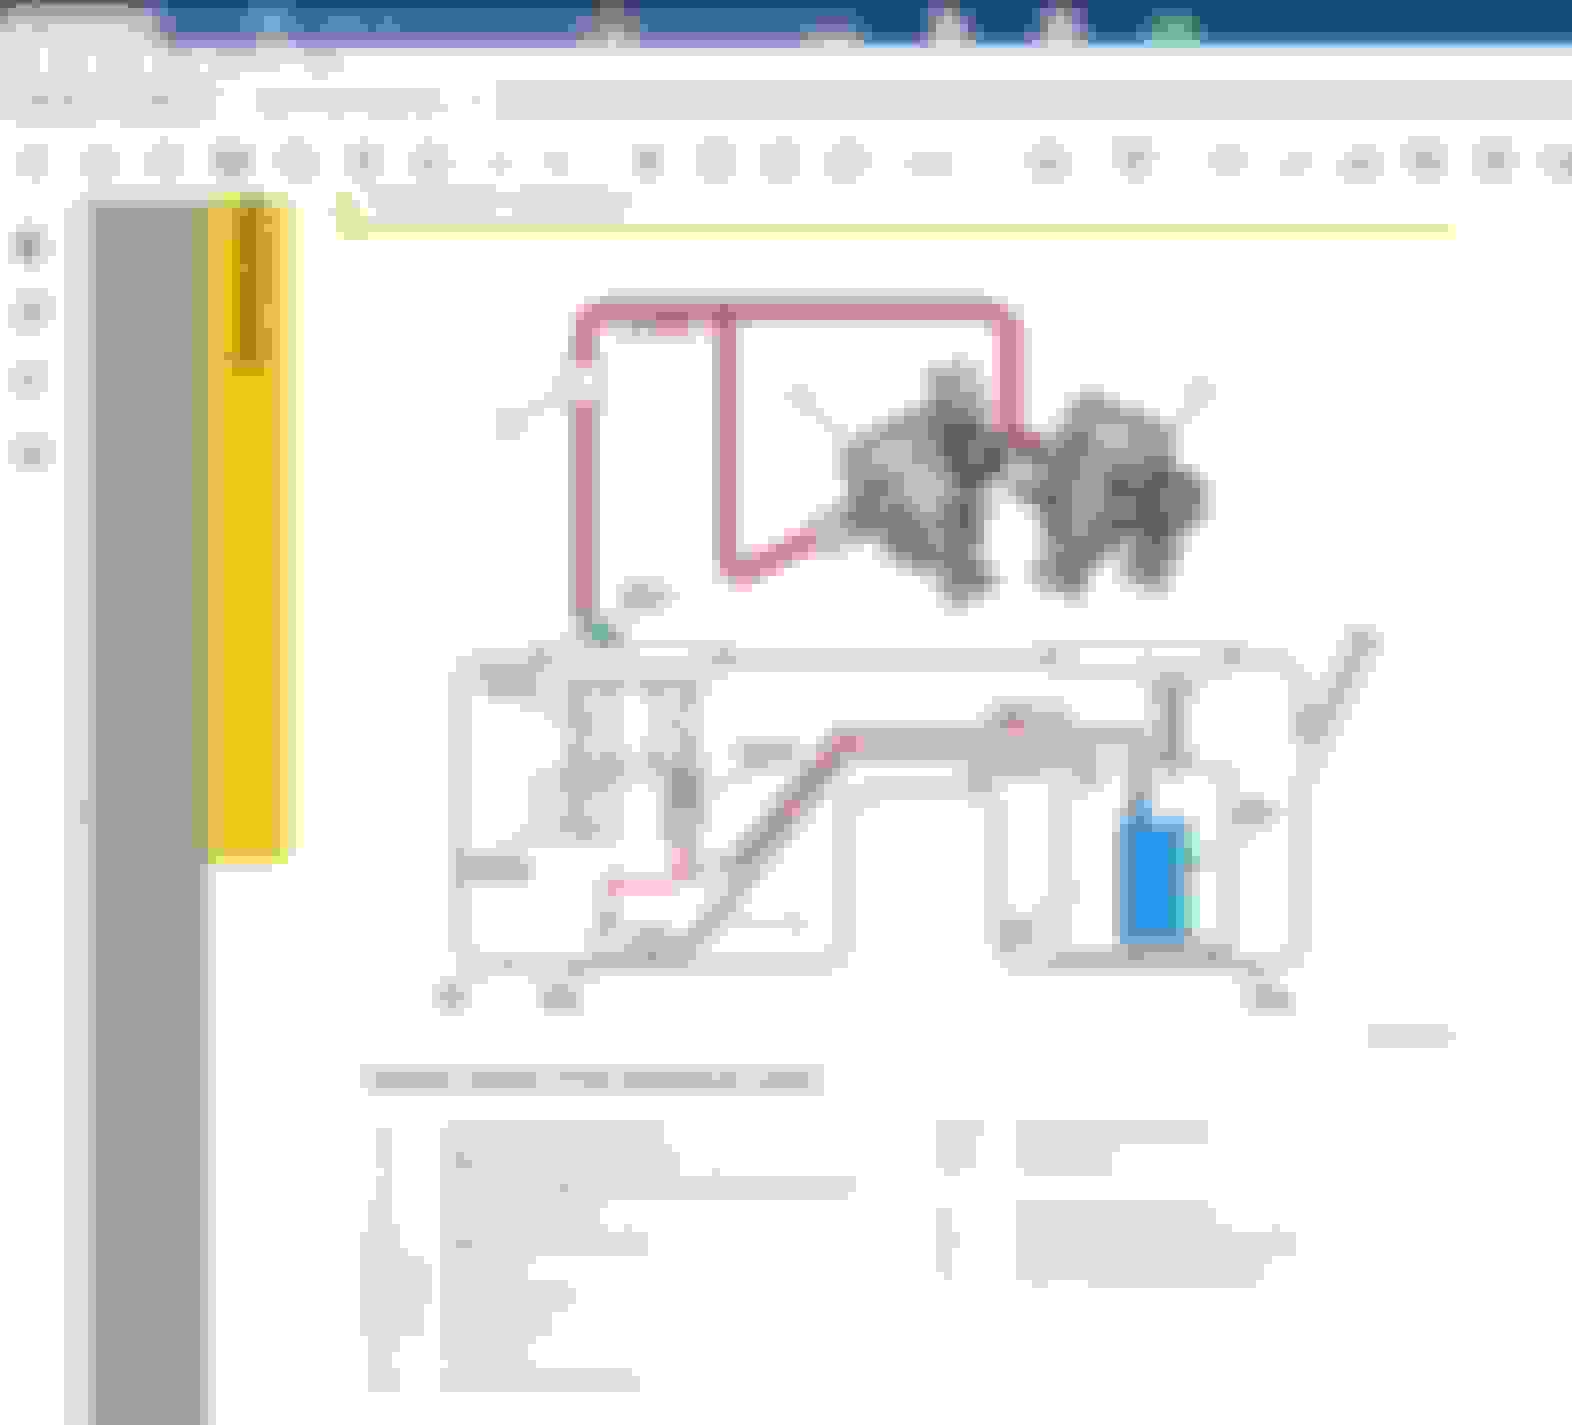
Funny, WIS does not have below diagram. Its from M276 3.5L / M278 Introduction Manual/document and also available on my M276 3.0 Turbo Introduction document.
I have corrected the diagram.
Now, with me corecting the diagram to represent actual hose routing, it got me thinking. Wait a minute, the pressure and volume into the fuel filter for the engine is being diverted/shared to/by ALSO the jet pump/venturi duty !!!
So there must be a mechanism to prevent fuel supply shortage to the filter/engine. If engine needsXPSI and Y Volume of fuel, the jet pump/venturi surely must have higher pressure requirement or
higher pressure opening of a regulator of some sort... so that fuel filter get served first and not too much lost to jet-pump/venturi.
So I did a tear down to see what pressure mechanism device the 75a jet suction/venturi has..... to make sure how it does not go greedy and eat up the fuel filter share of pressure and flow.
The way I see it, the increased resistance or HEAD of the 75a jet-suction/venturi compared to fuel filtser section , lies with 2 components.
01. Smaller hose from Y pipe on purpose for 75a compared to a bit bigger hose for fuel filter + its check valve 55/2a & 55/2c.
02. The item #1 yellow super small nozzle hole at jet-pump system. This one is super restrictive for sure and also make good effect in a venturi system where velocity of the liquid is
I think more important than the volume.
It would be great if these 2 pressure set points can be measured.
We know that from M276 Introduction document :
By logic, I think the 75a jet-suction/venturi would need at least 7.5 to 8 BAR to start working.
And this means also, the fuel pump itself if rated at 130 liters per minute is based on NET for engine burn alone and would be actually more powerful than 130 LPM if the 75a system to be included.
On marine diesel engine ( non common rail ) with return type fuel system, the FEED fuel pump will deliver 300% of max WOT fuel burn.
100% for engine and the 200% will be for lubrication of the high pressure fuel injection pump and return to tank and get cooled down by sea-water heat exchanger while on its way to the fuel tank.
This is why in marine diesel, our primary fuel filter ( boat builder provided ) and the secondary one ( engine brand provided ) is to be minimum 300% of engine fuel burn at WOT because the returned fuel also goes thru those filters.
The diagram from M276 Introduction document if i do not correct it as-is, is actually representing like a marine diesel engine, the return fuel is FILTERED first.
I guess VDO and MB cheap out and decided why waste fuel filter paper element life ? , why not just divert to 7a jet-suction/venturi raw fuel instead.
In a country with DIRTY fuel, I won't be suprised this current configuration jet-suction/venturi system (75a) can get clogged and fuel from LEFT side saddle tank will not transfer enough fuel to the fuel pump at the RIGHT side saddle tank.
So if fuel level is low, the engine can get choked from fuel starvation at WOT while fuel gauge/tank is not yet empty
Look at the fine wire mesh strainer at 75a and the super small yellow orifice hole, that is so easy to clog.
The fuel hose & line has no kinks whatsoever.
Maybe tomorrow open up the blue fuel hose and poke it with plastic rod hahahah.
EDIT : MY BAD. Below is not brake line, the fat Hycot, it is Fuel Vapor line .... dang, I am a total DORK !!!! My apology
Tomorrow I shall test with magnet, curios to know if the fuel pipe/line is aluminum or steel.
Suprise to see my brake pipe is aluminum by HYDRO, model is Hycot. LP 100 100 150. Hydra Aluminium. https://www.hydro.com/en-US/aluminum...s/brake-lines/.
I thought usually it will be steel, hence I read members here having corossion with it in USA. Maybe before facelift models ?
I think this damage must be from a railway crossing. There was only once I heard scrubbing/HIT, but I thought it would be from/at the front spoiler lip.
After rainy season, the railway crossing rocks will be gone and the rail way steel track becomes "tall". Damn, I never knew it damaged my sound shield.
I have inspected Nov/Dec last year after Bali trip and all good. So must be the railway after Bali trip and in Jakarta.
But funny about the damage, its like I hit an object while going REVERSE and not moving forward kind of damage. The crumpling is from rear to front and not vice versa.
Last edited by S-Prihadi; May 22, 2022 at 06:28 AM.
Reason: add info
My my...even on Sunday I can't even do proper 1st and 2nd gear WOT pull to red line with ease, let alone 3rd gear...
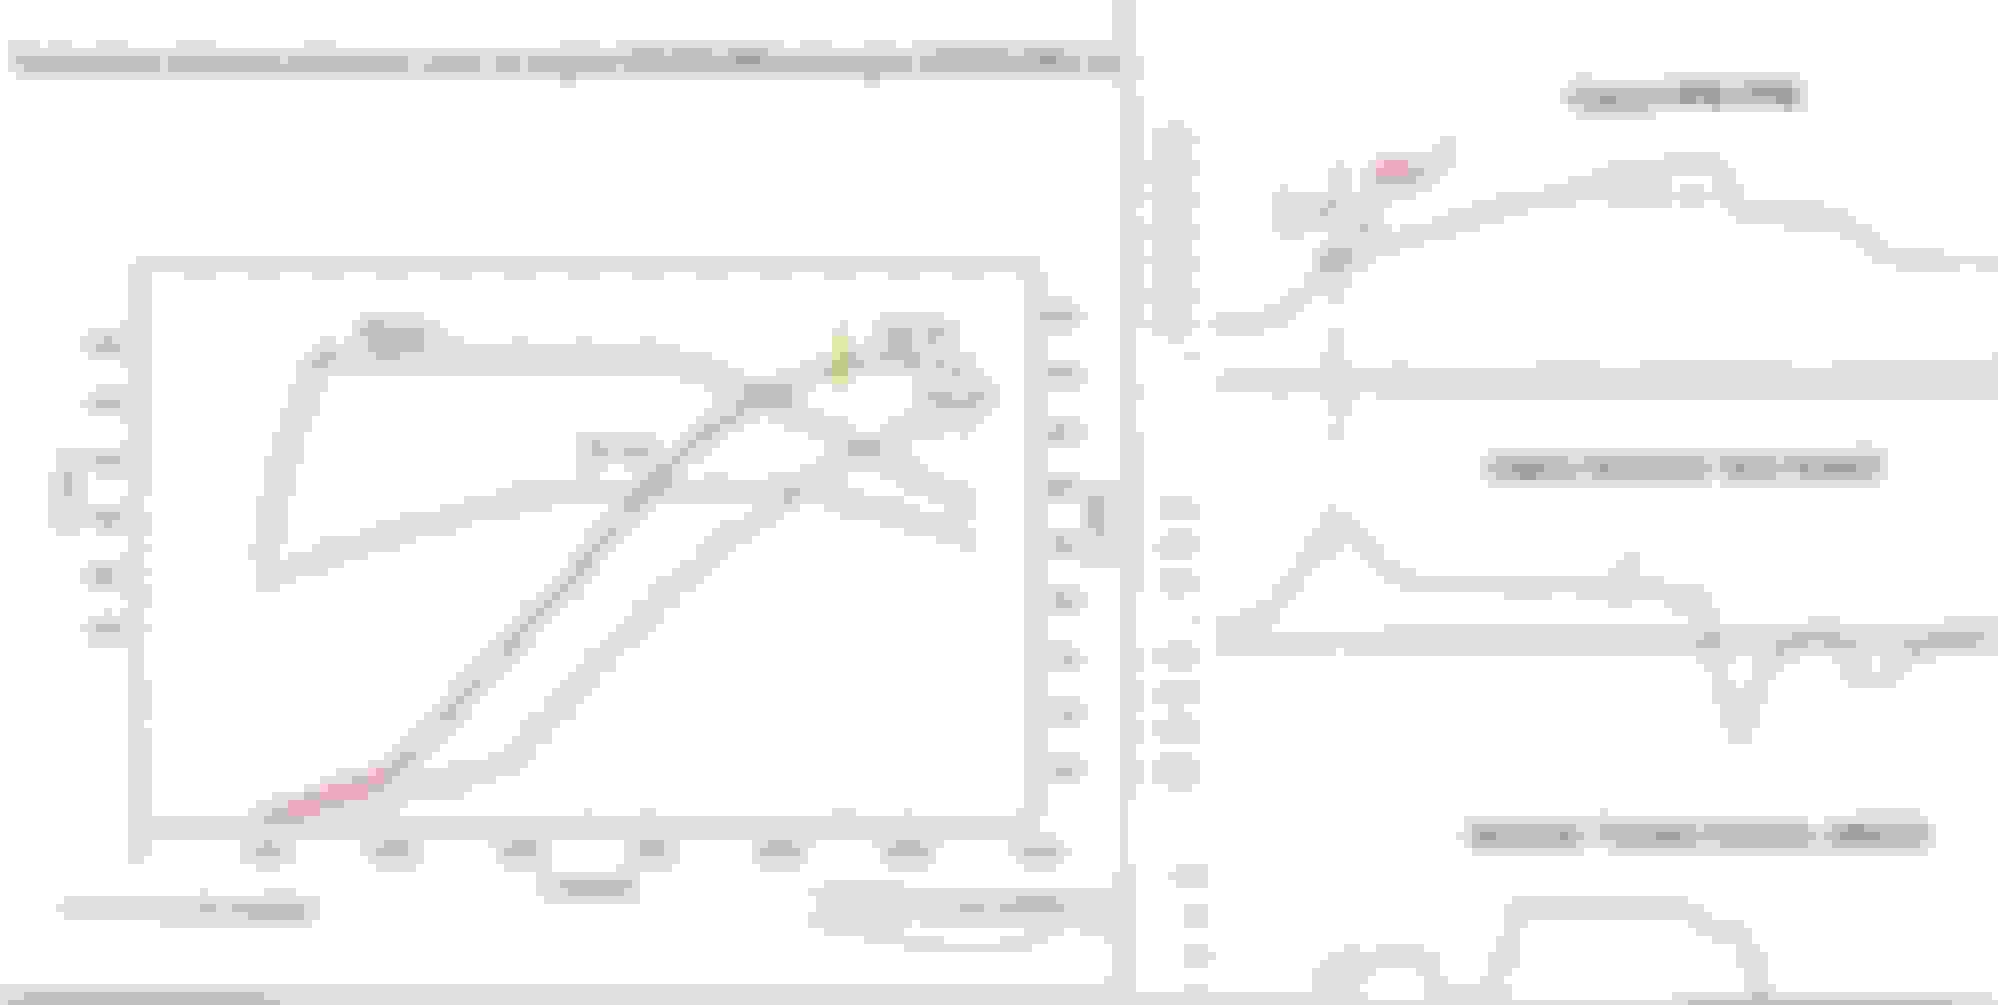
Here is the fuel pressure data , test drive version. LEFT side is new filter and right side is the old filter
Please note that XENTRY data is lagging and not purely in sync with the car RPM. However, still useful nevertheless. Even my dashcam GPS is slow, lagging hahaha
So I guess I can rely on data table below for my future reference.
All I got to do is 1st and 2nd gear proper WOT pull to redline and use 5.2 BAR at fuel filter as minimum at 5,500 RPM. This way me still get 4.1 BAR net at HP fuel pump inlet.
Too bad I can not hook up my Banks OBD logger while Xentry is using the OBD connector. I have an OBD splitter, but either Xentry or Banks gauge can crash from collision if both are connected at the same time.
I think because both are "talker", and not pure listener. To request data from the car, OBD2 gauge must talk/request.
Banks gauge has this unique data, RPM rise per second or ENGINE RESPONSE RATE RPM/s
It seems the fastest fuel burn is up to 5,500 RPM, above this it slows down as engine nearing WOT.
So to predict mild fuel starvation by looking at fuel filter pressure, it would be best done on 1st and 2nd gear proper pull ( empty enough road ).
In fact I see 1st gear as best (but too short a duration ), because we can start all the way from 1,500 RPM. 2nd gear we start at 4,500 ish when it 1st goes to 2nd.
1st gear also can produce fastest RPM rise due to its gear ratio.
I guess the upto 5,500 RPM as fastest RPM rise, it is inline with my engine power curve. 5,500 up its curving down already.
Wow.... this JET-PUMP venturi effect is LOUD !!!!!
My tank is now close to empty at 16 liters ( full tank is actually 59L, sorry not 50L ) and that means the LEFT saddle where the fuel filter and its JET-PUMP/Venturi is at is VERY EMPTY.
Find the noise of air rushing into the jet-pump orifice.
W212 at 80 KM/H is usually very quiet.
No rear seat for azz means less noise insulation. I also did not tighten down the man-holes of both fuel pump and fuel filter on purpose to detect fuel smell, just in case there is any leak.
What you guys will hear, that is the noise of the jet pump. If at idle, the noise is much reduced, for sure tire noise is less but the jet-pump slows down too.
The audio comes from my Samsung cellphone, as I can get it closer to rear seat and it has the best audio quality compared to the Viofo dashcam and the GoPro Session for RPM.
Laptop Xentry screen recording audio is crap hahaha.
We took some detailed measurements of all this: During idle at 650 RPM, the fuel pump operated at a 28 percent duty cycle and current was 18 to 19 amps, turning the
pump at about 6,200 RPM. At an engine speed of 1,500 RPM, duty cycle was 43 percent, current draw 21 amps and the pump turned about 7,500 RPM.
Finally, at an engine speed of 3,000 RPM we measured a 47 percent duty cycle, 23 amps and 8,350 pump RPM.
I have not seen close to 7 amps ( based on Xentry ) even, during this fuel filter adventure and anything pass 5,000 RPM.
N118 fuel control module which supply the power to the fuel pump, only uses 25amps fuse. That means no way fuel pump can exceed even 15 amps, or 12.5 amps perhaps.
MB habit of fuse sizing is 200% than device peak current, easy.
My LED 641 ILS is 40 watts max, less than 6 amps for sure, 15amps fuse is what the fuse data shows and I don't know why, MB Indonesia placed 20 amps ones...hahaha.
Last edited by S-Prihadi; May 23, 2022 at 12:22 AM.
Okey, finally I filled up 100% full tank today.
Tested running with both manhole open. No leak, nice.
Can't do too willd a test drive, the 3kg fire extinguisher keep rolling on the foot carpet of the front passenger seat when cornering and hard braking.
I learnt that the manhole itself, if they are removed, the noise level in the cabin is soooooo loud .
So I use my stand-by HVAC thermal foam as noise control.
3mm thick
Extra 13grams
Sound test. Not bad, no more those "gong" sound effect.
Above the Fuel Filter and Fuel Pump itself, I placed a thicker version of the thermal HVAC foam. I think it is 15mm or so.
Towards the front of the car, the fuel tank to car seat/body , the gap is about as thick as this thermal foam, so I pushed into those gaps.
FUEL PUMP MAN HOLE
====================
FUEL FILTER MANHOLE
I have not tested the car with these insulations.
I think I may want stick those sticky-bitumen type sound shield layer on the white painted seat metal, hoping it will kill noise even more.
I have not decided what to use but was thingking 3M . https://www.3m.com/3M/en_US/p/d/b40068137/Material: Bitumen, mineral filler, elastomer
Okey, finally I filled up 100% full tank today.
Tested running with both manhole open. No leak, nice.
Can't do too willd a test drive, the 3kg fire extinguisher keep rolling on the foot carpet of the front passenger seat when cornering and hard braking.
I learnt that the manhole itself, if they are removed, the noise level in the cabin is soooooo loud .
So I use my stand-by HVAC thermal foam as noise control.
Above the Fuel Filter and Fuel Pump itself, I placed a thicker version of the thermal HVAC foam. I think it is 15mm or so.
Towards the front of the car, the fuel tank to car seat/body , the gap is about as thick as this thermal foam, so I pushed into those gaps.
FUEL PUMP MAN HOLE
====================
FUEL FILTER MANHOLE
I have not tested the car with these insulations.
I think I may want stick those sticky-bitumen type sound shield layer on the white painted seat metal, hoping it will kill noise even more.
I have not decided what to use but was thingking 3M . https://www.3m.com/3M/en_US/p/d/b40068137/Material: Bitumen, mineral filler, elastomer
Will update if I do stick them 3M .....
Stuff looks similar to some closed cell foam that i have used before. Works pretty good, not as good as the tar like sound deadening stuff but still pretty good. The tar like aluminum foil stuff really takes care of the vibrations (speakers) but the foam helps with noise more so in my experience.
I think I�m going to replace mine after seeing your post. However local mercedes part store only has vdo version. The store owner does not recommend to replace it unless I have a problem lol. Its 14 year old car and at 70k kms on the odo I think its time to replace.
I�m going to drive a bit around and wait until the fuel close to empty. Is VDO good enough? its a bit expensive for fuel filter but better safe than sorry. Maybe I need to also get the fuel tank cleaned, I hope is not too difficult
Best to remove your rear seat azz-cushion and see the actual P/N on the fuel filter.
Mine is VDO too, but there are many variant. So best to make sure.
You can always buy from FCP Euro, USA, like I did. Cheaper than MB Indonesia and faster arrival too.
Ebay seller, some can calculate import duty to destination country and they can charge you ALL IN, you sit pretty and receive the goods no hassle, just like Amazon USA to Indonesia.
Below, US$80 of it is shipping and import duty.
This C200 fuel filter, MB Indonesia charged approx Rp9.5 - 10 million and 30 days minimum delivery. Ebay landed & taxed Rp5 million and 14 days arrival
Many slow moving items, MB Indonesia will whack Indonesian customers 300% of USA retail price, usually 175% to 200% for most components decently fast moving..
Last edited by S-Prihadi; Aug 31, 2024 at 06:17 AM.
Best to remove your rear seat azz-cushion and see the actual P/N on the fuel filter.
Mine is VDO too, but there are many variant. So best to make sure.
You can always buy from FCP Euro, USA, like I did. Cheaper than MB Indonesia and faster arrival too.
This C200 fuel filter, MB Indonesia charged approx Rp9.5 - 10 million and 30 days minimum delivery. Ebay landed & taxed Rp5 million and 14 days arrival
Many slow moving items, MB Indonesia will whack Indonesian customers 300% of USA retail price, usually 175% to 200% for most components decently fast moving..
I�m not ordering from MB indonesia, there�s local indie mercedes specialist has VDO one in stock, alredy checked and matched with my VIN, and asking me for IDR 3,9 million (and 250k idr installation fee!!) so I guess its pretty good deal huh?
If it is genuine VDO and is the correct P/N for your car, that is a good deal.
But better if both o-rings of fuel pump and fuel filter get replaced too, as they are already 14 years old.
I do not have your car VIN, but if your model is W212.054 below is the P/N
Do a logging before you replace the fuel filter.
You need someone to screen record using camera, the fuel pressure while you do 1st and 2nd gear pull all the way to redline. Our baby launch Creader can't do screen record.
If the graph function can do at least 15-30 seconds record, you can use it instead of a video camera and take photo of it.
If the graph function can do double graph, one for RPM, that is even better, as we need RPM information too.
Sorry, albeit I own the baby launch, I only log using my Benz-Ninja Xentry ( very fast ) using stand alone HDMI video screen recorder, so I am not familiar with baby launch graphing capability or if its logging speed is faster than 1 HZ.
Do the same logging again when using new fuel filter. There you will see the pressure difference as the amount of blockage from fuel dirt.
Your engine I am sure is M272 3.0 and is not Direct Injection, it has only one fuel pressure data, the low pressure only.
This CLEAN filter pressure value 1st and 2nd gear pull all the way to redline is then a baseline for future reference.
Also pour the fuel from the old filter output side ( supposedly cleaned-filtered fuel ) to a container and see how much dirt has by-passed the fuel filter element poor seal design VDO uses.
Thanks to all who posted here. Good information.
My 2010 E 350 is due for fuel filter replacement and coolant flush. After reading all of above, have decided probably need to take it to an M-B dealership. Way too complicated for DIY and too many places where something might break or need replacement. Not to mention spilling gas inside car.
Thought about using one of two independents that have done "A" services on car, but not real confident their technicians have the knowledge to handle this process at every step. Especially if some small part breaks or something. They would have to order it from somewhere most likely or else try to jerry rig something that would be out of my sight.
One indy is highly rated foreign car and other is highest rated auto service in county.
Taking it to M-B dealership involves one hour drive each way. Wife would have to drive her vehicle and pick me up as it would take them hours, if not days, to get it done. Then take me back to pick it up. Would get coolant flush and "B" service at same time.
Or, I could trade it in and let the next guy worry about it. And I would if SUV prices were not so high right now and I really, really like my E 350. Nothing M-B sells now appeals to me at all.
Contacted the highly rated independent that I have used for M-B and other vehicles for oil changes and so forth. Counter guy talked to shop guy who used to work for the highly rated foreign independent. He said he could do it. Not real encouraged as don't know if he ever has.
So I contacted the highly rated foreign car indy who has worked on my M-B before. Stated emphatically that my car (they used VIN) requires that fuel pump and filter be replaced at same time as they are made together. Cost would be around $700 depending upon which fuel pump/filter I purchased (M-B or someone else).
Haven't called the M-B dealer, but that is my next step just to find out what they say.
My manual only mentions replacing the filter and not the pump as well.
its a good idea to do service jobs together.
You have a chance to save on duplicate labor if they don't add up individual book times. (2x labor... gravy )
DC pump likes to burn its wiring with high current so sooner is better than later. AC pump i think is fine with split feeds.
Mr Prihadi your attention to detail is amazing. Thanks for laying out the repair for us poor souls that are facing this issue for the first time. Did you notice any change in the sound level with your added insulation?
My hearing is starting to fail and I miss many low level sounds today but I have never heard my Fuel pumps run as long as the rear seat is in place.


 , clean my azz


 .
.


 be gentle.


 And I would if SUV prices were not so high right now and I really, really like my E 350. Nothing M-B sells now appeals to me at all.


