When you click on links to various merchants on this site and make a purchase, this can result in this site earning a commission. Affiliate programs and affiliations include, but are not limited to, the eBay Partner Network.
Just finished hardwiring a VIOFO A119 Dash Cam in my Brilliant Blue MY17 GLC300 4Matic. Was a bit of a headache finding the correct ACC-wire that wasn't always-on (would drain battery dead.)
After searching far and wide for instructions, didn't see any so I went ahead and experimented and finally I finished, took some pictures and a video to show you ladies and gentlemen (unfortunately, I have no idea why I can't embed my photos, the uploader in the forum doesn't work for me, but I have attached them as attachments so please have a look)
I originally bought one from eBay that arrived DOA.
-Fuse Tap, if you didn't order the one that I linked, these are called Add-A-Circuit in some countries and you will want the Standard size (ATO).
-Ratchet with 1/2 inch socket, I probably had the proper one for MM in my kit but this one fit so I didn't bother.
-Fuse puller or small pliers
-Electrical Tape (optional.)
Premise:
I tried all the fuses in the passenger footwell as it's much easier to access but they were all "hot." This means they will still draw power when connected to the camera/radar detector and your battery will eventually die. What you are looking for is an "Accessory" outlet that only powers on when the ignition is started.
So we will need to use the driver side interior dashboard fuse box.
Be advised, use caution when opening this one as you can easily damage the panel as it's quite tight and unlike some older Benz models I have seen online.
To remove the panel: Start from underneath and use steady force pulling in the direction of the driver door, it will start to give and you need to use your other hand and keep the gap open and keep sliding your hands up until the panel pops off.
See this manual Interestingly enough, this Dashboard Fuse Box section was omitted from my manual and it said to access this specific fuse box, please go to a Mercedes-Benz service centre (NO!)
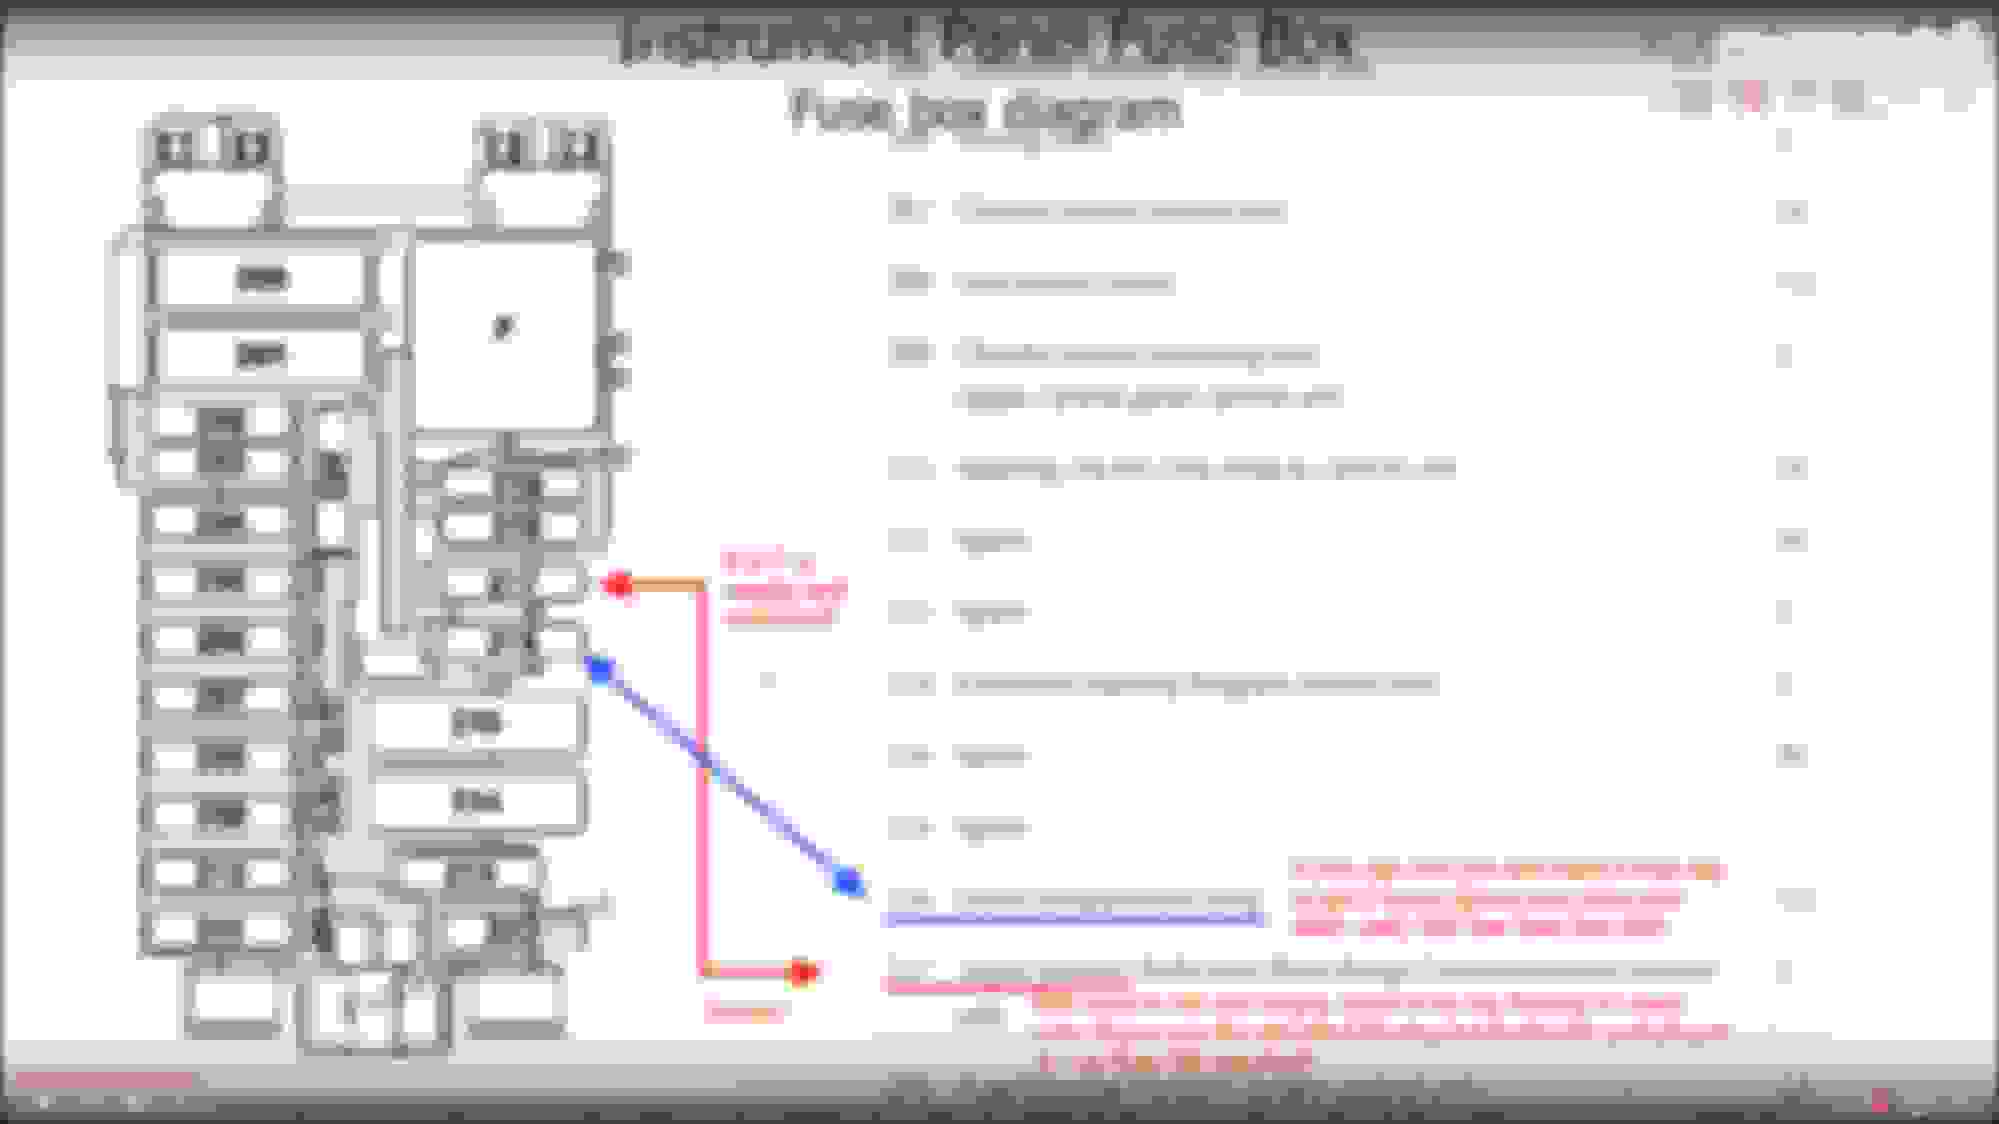
Next, I've done the testing for you all with my voltmeter. You'll want to tap into Fuse #216 (The brown slot.) On my car, it should be #216. According to this fuse map
Whatever you do, do NOT tap the top two 5A and 7.5A fuses and they are for your airbag systems and any malfunction of those could be fatal. On my Canadian-spec car, it has a 7.5A fuse in Slot 216. So I added a 3A fuse in the tap and away we went. When you remove the fuses, there is a little tab that you push in before pulling with the fuse pullers/pliers. Please make sure to do that or you risk breaking these fuse holders.
Loosen the ground bolt and either solder an O-ring end to the negative terminal if you want to be super safe but racheting down the ground on bare-leads or the two-prong terminal I had was enough. After, triple check your connections to make sure they are not reversed or loose at all. Test the camera to make sure it powers on/off with the car before running the cable (otherwise it sucks to have to remove it if there is something wrong.)
Next, mount the dashcam, either by sticky tape, or some prefer suction cup. Run the cable across where you want to place the dash cam and roughy stick the cable in the roofliner to minimize exposed wiring at the termination point of the camera.
Next, pull back the weatherstripping and start bunching up the extra cable to stick it inside the area underneath the fuse box. Tie up the loose bits with zip ties and stick it inside.
Run the USB up to the A-pillar. Pull on the A pillar enough to fit the cable through. Where the A-Pillar meets the roofliner will be difficult to push in but I used a butter knife with a blunt edge to run it in the crevice. Keep running it across and around the mirror. Tidy it up after. Connect camera. Profit.
Go for a test drive.
After everything is good to go, re-assemble the panel in the same order. Make sure the trim panel lines up with the other parts, start from the top and work your way down, after you click in the top clip, you can just start giving the panel a few smacks and it should be good as new (and hopefully without and damage!)
If you used a fuse-tap, you should probably use heatshrink and/or electrical tape to secure your connections, otherwise, thanks for reading and enjoy your new hardwired dash cam!
This is my 4th dash cam install. My 08 Civic Coupe was far easier. Acura RDX and Audi A4 were straightforward as well. It is just getting the panel off on this car that was a pain, as there weren't any other guides, and taking the time to find a "switched" fuse that wasn't an airbag or safety-related.
Have fun!
I have the camera set to 1440p30 and my microSDHC card is a Silicon Power 32GB. Most cards are fine as they are really cheap but don't get unknown brands, nor SanDisk. Stick to Lexar, Transcend, Kingston. More info on cards here
Cool! I have a GLC on order and have been thinking about doing the same exact thing. I even planned it out in my head the same way.
A problem I did notice is when you are running the wire through the gaps in the headliner, one of the gaps goes over the top of the A pillar where there is an airbag. Won't having a wire running over that interfere at all with the airbag deploying?
I also bought an A119 for my GLC, but I have not installed it yet. I just had my front window tinted and they said to wait about 2 weeks for it to fully cure before I mount the camera.
I'm still debating whether to try to run the wires like this myself, or have a shop do it. Identifying the switched fuse really helps, but I really don't want to mess up the trim on my new car. I also worry about making sure the wire doesn't interfere with the A-pillar air bag.
Did you try to hide the wire behind the rain sensor cover? I don't want to see any wires at all. A black wire around my beige interior would really bug me.
A problem I did notice is when you are running the wire through the gaps in the headliner, one of the gaps goes over the top of the A pillar where there is an airbag. Won't having a wire running over that interfere at all with the airbag deploying?
Run it along the weatherstripping gap and then underneath the curtain airbag when you need to get to the roofliner section.
Thanks for doing the research and finding a switched accessory circuit!!
From my findings, the entire column where I tapped is switched.
I have read that some people who mounted radar detectors in various other W204 C-classes used the 218 and 219 fuses but those say airbag so that's a no-no in my book.
I also bought an A119 for my GLC, but I have not installed it yet. I just had my front window tinted and they said to wait about 2 weeks for it to fully cure before I mount the camera.
I'm still debating whether to try to run the wires like this myself, or have a shop do it. Identifying the switched fuse really helps, but I really don't want to mess up the trim on my new car. I also worry about making sure the wire doesn't interfere with the A-pillar air bag.
Did you try to hide the wire behind the rain sensor cover? I don't want to see any wires at all. A black wire around my beige interior would really bug me.
Thanks for posting this!
Realistically a shop would route it the same. They may take the A-pillar off to tie it behind the airbag but that's purely cosmetic and from what I've read on the W204 C-Class, the clips in the A-pillar cover break easily if you aren't careful. I was nervous about messing up the trim but if you aren't very confident in your skills, I recommend a professional, they are insured against damages as well so if they break a panel, they replace it!
I will want to route it under the rain sensor eventually but I don't see any sevice manual for accessing that panel.
I tried comparing with other Benz models that use a pry tool but it doesn't seem to budge. Wil see if I can make it work. I can also agree if I had a beige interior I would be pissed at this black wire eyesore.
They have excellent resolution, powered from a supercapacitor, have wifi, a useable app, a parking mode that won't drain your battery, and excellent customer support.
Regarding the hardwire setup:
1. The rain sensor and plastic cover (and distronic gear if you have it) is easily popped off with a trim removal tool. My dash cam came with one. Pry it loose and tuck in the wire. To reduce frustration, make sure the wire is plugged into your cam before you place the plastic cover back into place.
2. Routing thru the A pillar is easy. Just follow the headliner until you reach the A pillar. Cross to the bottom side of the A pillar and run along the rubber seal on the bottom edge. This location will not interfere with airbag deployment.
3. Fuse tap:
For constant on with parking mode, I tapped the fuse for the analog clock. It's constant on and rated art 5A which is more than enough for a dash cam.
3. Fuse tap:
For constant on with parking mode, I tapped the fuse for the analog clock. It's constant on and rated art 5A which is more than enough for a dash cam.
What fuse did you tap on your GLC, since we have no analog clock?
What fuse did you tap on your GLC, since we have no analog clock?
The GLCs have an empty fuse slot for the analog clock in the exact same position as the W205 C class.
I used the same fuse slot for both my C450 and my GLC43. It's #206 on the fuse map, located in the front drivers side fuse box (might be passenger side for RHD vehicles). This will provide constant-on power for the cam.
I grounded to the same location as the OP. Those bolts are attached to bus with multiple grounds. As always, make sure to disconnect the neg battery terminal before tapping or grounding anything.
There are some great cams that are panel integrated
Ive seen some great cams online that are integrated into the rain sensor housing for mb glc. I was goung to get one but i did not receive a rrsponse, it went to my spam. However, i did get two SG remote cam sgzc12rc cams which are very small. They are even more discrete than the viofo a119 or a118 or sg9665 like i have in my other vehicles.
they are great so far. I also hardwired mine to fused switched power.
found the link to the integrated one. https://mbworld.org/forums/glc-class-x253/666880-aerowerkz-integrated-dash-camera-x253-glc-class.html
Last edited by aarghj; Aug 15, 2017 at 02:15 PM.
Reason: Add link to alternate cam.
Ive seen some great cams online that are integrated into the rain sensor housing for mb glc. I was goung to get one but i did not receive a rrsponse, it went to my spam. However, i did get two SG remote cam sgzc12rc cams which are very small. They are even more discrete than the viofo a119 or a118 or sg9665 like i have in my other vehicles.
they are great so far. I also hardwired mine to fused switched power.
I originally went to Aerowerkz for the integrated camera (perfect for what I wanted), but the manufacturer does not make one for the rain sensor cover I have. I have the really large one that has the dual cameras.
I also looked at the sgzc's, but decided on the A119.
Did you use the same fuse (216) or a different one?
I used a different one in the far rear fusebox for both cams on same circuit. Wish i had knoen about the analog clock fuse location... would have been much easier runs. However, i have much experience in auto electrical so was not too tough.
hardest part was running data cable for rear cam through the factory looms onto the rear door and dropping it through to the window. Im not in that car today so when i get home i can take some pics and share.
Front cam visibility from drivers seat. Close up view of rear view mirror with rear cam visible. It is invisible from the outside. Looking up at rain sensor cover and front cam.
Last edited by aarghj; Aug 26, 2017 at 04:45 PM.
Reason: Add pictures
I finally got my A119 installed. I mounted the camera exactly where I wanted it. Both the camera and the USB wire are invisible from the drivers seat in my normal driving position.
I ended up having a shop do the hard wiring. I used the same power conversion cable as shown in the original post and they used it for the installation.
The shop ended up routing the 5V wire down the right hand A-Pillar and stowed and fastened the voltage converter box in the passenger fuse compartment.
They tied the ground to an bolt next to the converter, then ran the positive 12V line under the glove box and tied it to the internal wiring for the console power plug (which is definitely a switched power supply).
Sorry I don't have any pictures of them doing the work. All I can show is the finished work; all wiring is hidden away.
My wife picked the color scheme; she didn't want black. Black interiors get too hot in the summer for her. With the added tint on the windows, it really keeps the interior cool.
I like the beige interior and brilliant blue exterior combination a lot. The interior feels very open and light and the leather is nice.
I haven't got much practice producing Youtube videos, this video was made with a Gopro without a screen.
This short video shows how I installed a Thinkeare F800 2 channel system with a Cellink B under the cargo floor.
This process took around two hours and over an hour working to fish the rear camera wire through the weather boot between the body and the tailgate.
I ordered the kit from Canada and everything shipped overnight to my door was about $649 (Photo below shows what came in the kit) factoring in the exchange rate this included a 64 GB Thinkware micro SD card too. BlackBoxMyCar also sent all the wiring ready for the Thinkware camera and the Cellink. All I had to do was install in my vehicle.
Everything works well and I am pleased with the performance even at night.
This is the Cellink B v2. I did come with wiring setup for the Thinkware F800 I bought. I believe the vendor took care of this small task prior to shipment. Saved me some time and was helpful.
The instructions that came with the Cellink B are not the best, might be helpful if they made a plain english set. Not a big deal. Notice it says not to store in a high temperature environment such as inside a car in hot weather. Hmm. A device designed to be hard wired into a vehicle. I checked and it is supposed to be good up to 149 degrees. High temps do not get along well with LiPo batteries. The Cellink has a Samsung battery pack
This was the PITA part of the install. You have to losen the plastic keeper (?) that helps hold the rubber boot in place. If you don't there is not enough room to pass the USB rear camera cable through it, it was very tight regardless.
This is the rear camera, I have it oriented the wrong direction, I was able to correct this in the settings in the camera.
This is the trim removal tool set I got on Amazon, very sturdy tools that will last a long time. Affordable too.
This tool was included with my kit, it does work but is a bit flimsy at times, some of the panels are very tight.
This is the F800 kit I ordered, I didn't use the stickers.
This is the view of the camera installed from the driver's side. I can't see the bottom at all...unless I lowered the seat.
The camera fits nicely below the Distronic cameras and is out of the way for the driver and passengers. It slides to the right to remove the camera from the mount. The cables fit well between the small gap between the Distronic housing and the glass.
Last edited by edofloat; Sep 11, 2017 at 10:10 PM.
Reason: added photos
Installed a Rexing V1 dash cam in our GLC 300 today using the excellent instructions in this thread!
I found a simplification though, i.e, use fuse slot # 217 instead of # 216.
If you have a GLC 300 and are using the standard Rexing hard-wire kit (with has a fuse connector), you can use fuse slot # 217- it is also ignition switched.
That slot is only used in Japan and empty in the US (suspect the same for Canada).
Using the standard Rexing hard-wire kit with the fuse connector, you just plug it in - no need for a fuse tap that you would need with slot # 216.
GLC 300 dashboard fuse box diagram attached.
Aychillus Hi,
Thanks for your post. I used this set up and fitted a spare Aux Socket. It makes it more versatile, I can use a greater selection of equipment. I've got a 'SNOOPER' a Dash Cam, and I can also plug in a DVD Player etc.
Thank you, very good information.
Would like to add 0.02 to it
not sure how did you drag the wire to the cam here is how I did, it was much easier vs headliner and dash
Really helpful thread. I had done an install on my Valentine V1 G2 but couldn't locate a "Switched" 12VDC source. Fuse 216 and the fuse tap were the perfect solution. Thank you very much for the great info.
Last edited by bspurloc; Mar 27, 2020 at 04:39 PM.
Reason: spelling error


 How do you like the beige interior?


![[DIY] How-To: Hardwire Dash Cam Install GLC X253-ang62s0.jpg](https://mbworld.org/forums/attachments/glc-class-x253/439778d1683240289-diy-how-hardwire-dash-cam-install-glc-x253-ang62s0.jpg)


