When you click on links to various merchants on this site and make a purchase, this can result in this site earning a commission. Affiliate programs and affiliations include, but are not limited to, the eBay Partner Network.
I wanted to do a basic write up on the lift kit install for my GLK350. Caveat, of course, is that this is how I did it. If you follow suit and something breaks or the truck falls on your face....that's on you. I had the entire vehicle up on jackstands. If I have to mention how to do that or to remove the wheels....take it to a shop to do the install.
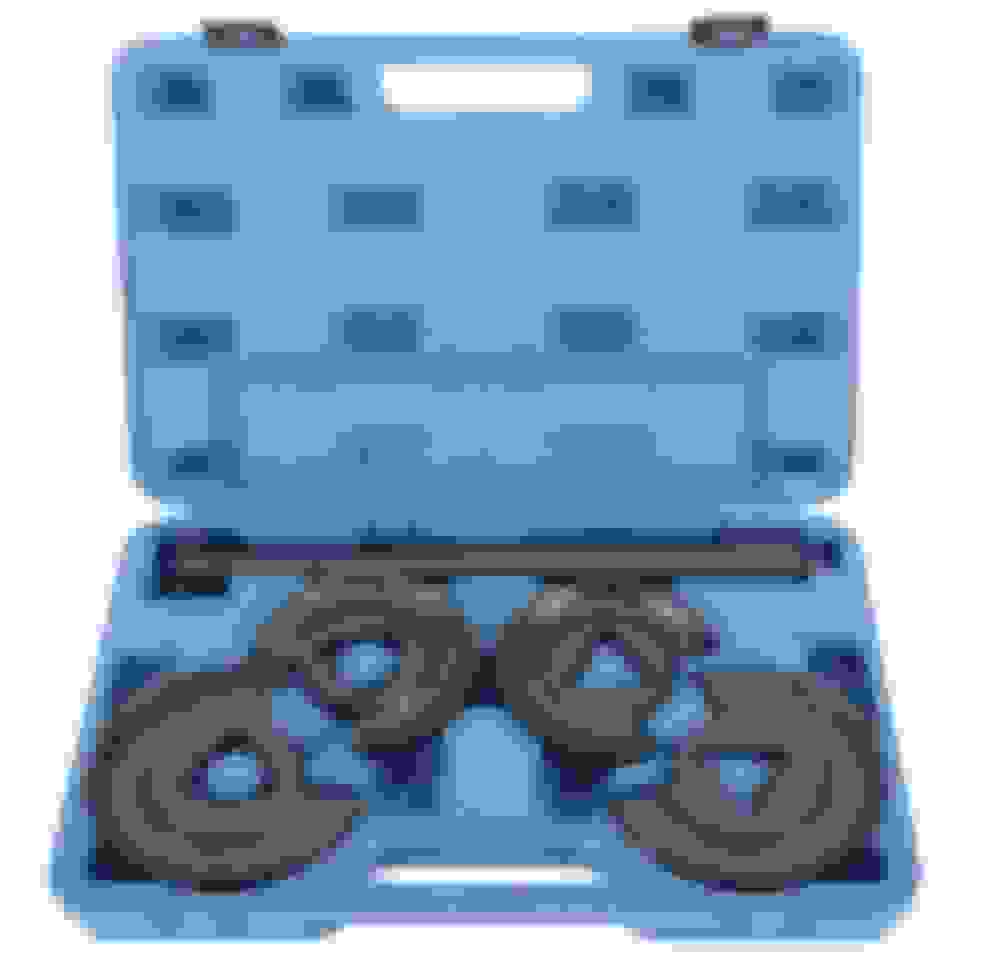
The lift is that simple Tema4x4 or Rising Tuning GLK350 spacer lift. They can be found online at eBay and Amazon. The kit consists of: Front strut spacers and replacement bolts, Rear coil spring spacers/shims, and rear shock spacers and replacement studs.
Also purchased were new complete Arnott front strut assemblies and new rear shocks and shock mounts. You can reuse your old parts. I just figured I'd refresh while I was at it. Aside from your standard tools, make sure you have an internal spring compressor ($60 on Amazon), e-torx sockets (shallow not deep) and a triple square set. You can do it all with hand tools, but an impact is always a good thing to have. Some added items are a good floor jack, breaker bar, and torque wrench.
FRONT:
I found that the 3 replacement top strut mounting bolts that came with the kit were too long. One of the bolts wanted to bottom out on the strut bearing during install. I spend a few bucks and bought 6 slightly shorter bolts from Ace Hardware. I believe they were M8 x 1.25, but I can't remember the exact length I purchased. Just take the ones that came with the kit with you and grab some that are about 10mm shorter. There's a video I found on Youtube by KYB, which shows the basics for removal and re-installation of the front struts. I followed that as a reference....but here's an additional breakdown of how I did the fronts.
Take a pic or two of how all of the lines are routed in reference to the strut, so you can install everything the way it came out.
Unclip the brake lines from the black cable holder.
Remove the cable holder as seen in the video.
Remove the upper sway bar end link bolt. Mine took an 18mm box wrench in the back between the boot and strut mount and an 18mm socket on the nut. Zips right out with an impact.
Remove the 2 bolts holding the caliper assembly from the back of the knuckle. These bolts use an E18 socket. Mine were on there tight as hell....be warned.
Remove the caliper and support or hang it so it doesn't stretch the brake line.
Remove the bottom 2 bolts holding the strut to the knuckle. Again, use your E18 socket and a 20mm on the opposite side.
Pry the knuckle out of the strut seat and let it hang. The internal axle splines may slide out of their seats in the front differential, but the knuckle assembly won't fall, so no need to hang that with anything. When re-installing, just wiggle with a bit of light pressure and the axle splines will slide back in.
Undo the top 3 bolts using an E13 socket and pull the strut out.
Place the spacer on top of the strut top hat. You'll notice that 2 of the holes are a tad offset.....picture a Y instead of the MB star. Just turn the spacer until the holes line up.
I put 2 punches in the 2 rear holes (through the spacer and into the strut top hat). This helps line up the holes as you lift the strut back up into place. It also keeps the spacer from sliding around.
Once you get the strut back up into place, literally just go back in the reverse order.
The knuckle assembly moves pretty freely when lining up the bottom 2 holes. If you feel resistance, your axle shafts slipped out. Wiggle wiggle and they'll pop back in.
Once assembled, you can jack the knuckle up a bit to get the sway bar end link lined up better.
The video shows the torque values...just convert from deca-Newton meters to lb/ft.
REAR:
Rears can be a pain in the *** a bit. As before, I was installing new shocks and mounts, so I prepped those first. Remove the 2 studs from the mounts with a good wack from a hammer. They have splines, like lug bolts on cars, and will pop right out. Insert the longer included studs into the mount. Tap them a bit to seat a little of the splines, then seat them fully using a nut on the threaded part. Tighten the nut all the way down and to fully seat the studs in the shock mount.
To remove the rear shocks, you have to get to the nuts, which MB decided to hide behind the cargo area interior paneling. The pic below is pulled from another thread but shows where the nuts are located. I did NOT pull that much paneling off. I just pulled enough to squeeze my hand in and remove/install the nuts. You'll remove a few of the tie downs and bag hangers. There are 2 torx bolts on the sides behind the removable panels and a few under the left and right trays. You can then use a trim tool to pop a few hidden clips back. It's trial and error, but not as bad as I'd thought.
On to doing the rears. No videos of the x204 that I found, but being familiar with VWs and looking at some other model MB videos...not too hard to figure out. Let's do the shocks first.
Remove the wheel-well liner. Have fun with this, as the liner isn't too flexible and wants to hang up on the little bolt studs. There are a few washer nuts you zip off with an 8mm socket and 5 or 6 push pins. There are 2 push pins you access from the bottom on the front edge and one torx screw you access from the bottom at the rear of the liner. Take a few pics on how everything is lined up. Once all fasteners are removed, wrestle that thing out. The top is tucked behind the lip of the wheel well. You'll get it...it's just a pain as it's not too flexible. Re-installation, surprisingly, isn't too bad.
Remove the lower shock bolt in the control arm.
Remove the upper shock nuts as described above.
Remove shock.
If you're installing new shocks and mounts, and have prepped them already, you're set for install.
If you're reusing your old shocks and mounts, you might have to separate the shocks from themounts to swap the longer lugs in. Just zip off the top bolt with an impact, swap the studs, then re-install the mounts to the shock using an open socket and allen key.
Install spacer onto the shock mount.
Slide upper studs of the mount through holes in wheel well.
Attach nuts from the inside, behind the panelling.
Re-install lower shock bolt. These are a pain like all others....just man up and lift the shock a bit then shove the bolt through.
Now on to the coil springs. Removal is simple and I did not use the spring compressor. The bottom shock bolts and sway bar end link bolts were not removed. The control arm drops plenty with these still attached. Having the *** end high on jackstands helps with all of this. Before anything, you need to remove the plastic “skid plate” under the control arms...held on by 4 push snaps....super easy
Put the pad of your floor jack under the end of the control arm where the single bolt connects the control arm to the frame. No need to put too much pressure on it....just solid contact between the jack and control arm.
Remove the nut from the inside. If the bolt spins, you'll need to hold it using a triple square bit.
Remove the bolt from the back. Use your Impact driver and run it out. Do not tap it out. Let the threads do what they do.
Once the bolt is out, slowly let the jack down. You'll notice that the control arm is at an angle and the pad on the jack is flat. It might want to push the jack sideways. This is more applicable on install. Mine didn't move at all during removal.
Once the control arm is hanging slack, the spring will be loose and you can remove it from the vehicle.
Keep track of the spring orientation and re-install the same way. Easy to tell as the coils on the top end will be cleaner than the ones at the bottom.
Crawl underneath and look where the spring sat in the body. There's a cavity with a rubber shim/isolator in there. This HAS to be removed (don't ask how I know). It's not glued in...just press fit. I used 2 screwdrivers and pliers to work it out. They're a pain, but they will come out.
Once removed, put the lift spacer up into that void...flat side in.
Re-install the lower part of the spring into the recess in the control arm. Make sure the metal isolator is in there and that the tail end of the spring seats against the stop ledge. You'll see what I mean once you're looking in there.
Put the top of the spring into the recessed area of the top spacer you just installed. You may need to spin the shim so the tail end of the spring sits against the ledge machined into the spacer....just like on the bottom.
During install, make sure the spring does not spin. The tail ends need to remain against the stop ledges...to and bottom. Mine did not spin. Go slow and you should be fine.
Now you have the spring installed and you're down to putting one bolt back in...this is the hardest part. One side went in perfect, the other side I had to wrestle a bit.
At this step, you should have your spring and spacers sitting kinda snug where they should be, with the control arm still slack.
Put the jack under the control arm where the bolt will attach....same place you had it upon removal.
Jack the control arm up just a bit until it sits level. You'll have some tension on the spring but not a ton at this point.
Install the top plate of the compressor first. Not too high up. You'll have to remove it from the back side of the spring. These springs sit naturally curved, so the open area of the plate (you'll see when looking at them) needs to be more on the inside. Once the spring is fully set and curved, you want to make sure it doesn't bind and hinder removal.
Install the bottom plate of the compressor. Don't install it too low or removal will be a pain. I can't remember how many coils I had between the plates, but not too many. Just make sure it doesn't contact the control arm or, again, it will bind.
Install the shaft of the compressor up through the hole in the bottom of the control arm. Pass it through the hole in the bottom plate and up through the top plate. Rotate the shaft and let the 3 nubs on the top of the shaft settle into the 3 recesses of the top plate.
Turn the bolt at the bottom of the compressor with a 19mm socket until everything snugs up a bit. Check for binding and check to make sure the nubs are still engaged with the top plate.
Use a ratched, not a power tool, to compress the spring. I had a buddy help. I compressed a bit, he jacked up the control arm a bit...I compressed a bit more, he jacked up a bit more...and repeat.
I did not sandwich the coils completely. The spring was compressed just enough to not have insane tension on the spring. You'll notice there's a sweet spot. Don't compress it enough and the tension will want to push the jack to the side. Compress it too much....well, no downside really. I just hate messing with springs under more tension than needed.
Once the control arm hole is lined up with the hole in the frame....run that bolt through. Don't hammer it. Those threads are ridiculously tough. Hit that thing with the impact and run it through. Again, let those threads do their job.
If the bolts goes halfway in and stops, look at the exit hole. The control arm may be canted a bit. You may need to add or lessen pressure to align the bolt. You'll notice that moving the jack handle a bit left and right will easily manipulate how the control arm sits...pretty easy to make small alignment adjustments.
I used loctite on the nut here...good dab of blue.
Once the nut is attached, double check the spring tail ends and make sure everything is set properly.
Stand back and enjoy your success !!!!
** WARNING** One side of the rears went in without a hiccup. We did have some issues with the compressor binding on the other side. After wrestling with it and finally disassembling everything, I believe it was completely my fault. As I mentioned above, do not install the compressor plates too low or too high. The plates bound up on us and it was frustrating trying to get anything to move. We did a complete disassembly and re-installed everything with the plates adjusted a bit, which solved the problem. Just take your time, watch for binding, make sure the spring and its tail ends are properly seated and you should be fine.
Take the car for a quick drive...lots of left/right swerves....help everything settle. Pull back into the garage and take a peek. If nothing shifted...you're done. As with any suspension work, put a few miles on it, then get an alignment. Also check all of the bolts after a few hundred miles and re-torque if needed.
I did not take measurements, but I'd say the lift is as advertised. I'm running 18x8.5 et35 Neuspeed Tse53 wheels with 235/60/18 Wilderness Wildpeak A/T Trail tires. They fit pre-lift, with a tiny bit of rub at full lock. This little lift gave me the added space I was looking for. Rides like a dream compared to the 20” AMG wheelset that the truck came with.
I should have taken pics along the way, but didn't think about doing a write up. I hope this basic guide makes your install easier than from scratch.
The last few pics were pulled from some random threads I found to highlight a few things.....first few pics are from my install. I'll add some pics of my GLK this afternoon.
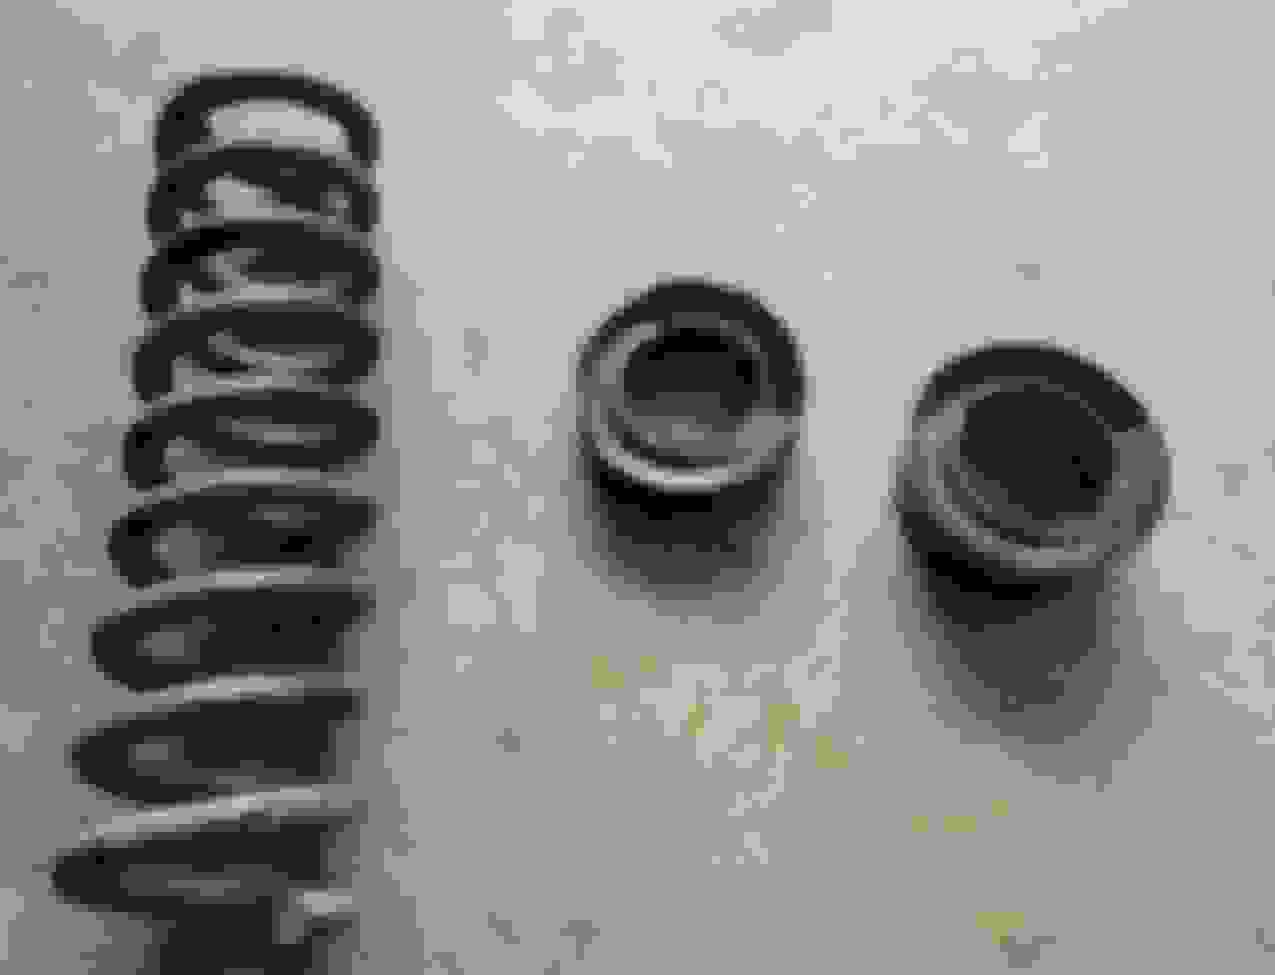
Spring compressor Void where the factory shim sat Spring, old shim and new lift spacer Torx bolt you need to remove from the interior Some parts you'll remove from the interior Where the bag hooks mount Shock mount nut location Bolt you remove to lower the control arm
Awesome writeup. I appreciate you gathering all of this into one thread with detailed instructions, I'll definitely be relying on it when I do my suspension refresh. Currently just below 130k miles on original hardware and you can tell.
Now to look up the Arnott assemblies you mentioned. My plan was to source everything (spring, shock, mount, etc.) and replace each corner as a unit. Your writeup will certainly help.
Good to hear. I grabbed to Arnott assemblies from Rockauto. They were considerably less expensive than other websites and shipped from the manufacturer. Nice to have a complete assembly and not mess with taking strut assemblies apart. They got good reviews. Rear shocks and mounts I bought from Pelican, I believe.
Sorry, I see you posted that a few places now. I haven't seen where you mentioned your offset, though. I read 45 mm is stock, and 35 will push the wheels wider. What you got with those 18's?
I'm trying to find the difference in photo form. The 6th image here on the only site I can find that sells the lift kit, risingtuning.com/lift-kits/product-981
tan/green/yellow looking GLK (looks like a wrap) looks like it has to be 35 mm offset.
Maybe it's a good angle, but they really bulge out from under the fender, and that's the look I'm going for, along with a lot of useless sidewall tread. lol
I assume 35 mm might make up for going 7.5" from 8.5" with the handling a bit, which is mostly what's suggested, but I see you stayed 8.5..
Last edited by GLKwanter; Jul 9, 2023 at 10:01 PM.
Appreciate this thread. I have a Subaru Crosstrek wilderness on order but I think I'm going to go with a glk 250 instead but one sticking point for me is ground clearance - I actually use it.
I'll likely get my shop to do the install but the pics and direction and wheel specs are very useful.
Any suspension issues developing from the lift so far?
Nice! Your info has been very helpful in sorting out mods to my GLK.
I've just installed a 30mm suspension spacer lift and 18x8.5 ET45 w/ 235/60R18 BFGs along with fresh suspension parts.
Next up, dechroming.
Mercedes SLR McLaren 722 S Is Extremely Rare Example Modified by McLaren
Slideshow: A one-of-one U.S.-spec Mercedes-Benz SLR McLaren Roadster became even rarer after a factory-backed transformation at McLaren's headquarters.